
Chapter 12. Personalization
One of the hallmarks of a professional web site is the ability for users to personalize the site to their individual needs. Personalization means that the site remembers the user and the user’s preferences, profile information, and so forth.
In addition to allowing users to personalize your site, you may want to limit their access based on their identity. To accomplish this, you may want your users to “log in.” While you can use Windows security on an intranet, the harder task has always been to create a complete authentication and authorization system for Internet applications where you can’t know in advance who will be logging in. This is called forms-based security , and Visual Basic 2005 makes it a snap, with a ready-to-go set of controls and a complete database for managing both your users login information and their preferences.
Implementing Forms-Based Security
To begin, create a new web application named FormsBasedSecurity. Click on WebSite → ASP.NET Configuration to open the Web Site Administration Tool (WAT
). Click on the Security tab, as shown in Figure 12-1.
Under Users, click on the link “Select authentication” and choose “From the Internet” as opposed to “From a local network.” Then click the Done button. When you return to the Security tab, you’ll find that the Users section has changed considerably, as shown in Figure 12-2.
Click on Create User and create one user for your site, as shown in Figure 12-3.


Warning
By default, passwords must be “strong,” which is defined as having at least six characters and including at least one element of at least three of the four types of characters: English upper case, English lower case, Arabic numerals, and special characters (e.g., !, @, etc.). This is fully documented in the MSDN article “Strong Password Enforcement.”
The CreateUserWizard has a PasswordRegularExpression property that allows you to substitute your own regular expression to determine the characteristics of acceptable passwords.
When you click the Create User button, you will receive confirmation that the user has been created. Click the Back button and you are returned to the WAT, which reports faithfully that one user has been created. Close the WAT for now.
The user has been added to the SqlExpress personalization database, as we’ll explore in depth next. For an alternative approach, using IIS rather than the WAT, see the section "Creating the User Through IIS.”

Creating the User Through IIS
As an alternative to using the WAT, you can work through IIS to create the same effect.
To begin, create an new empty directory called FormsBasedSecurityIIS.
In IIS manager (accessed through the control panel), create a virtual directory named FormsBasedSecurityIIS, as shown in Figure 12-4.

Give the new virtual directory the alias “FormsBasedSecurityIIS” and on the second step of the wizard, browse to the physical FormsBasedSecurityIIS folder you just created. After the virtual directory is created, click Properties.
In the Properties window, click on the ASP.NET tab, and then click Edit Configuration. Within the Configuration settings dialog, click on the Authentication tab. Within that tab, set the Authentication mode to Forms, as shown in Figure 12-5. Confirm that the Membership provider class is set to AspNetSqlMembershipProvider.
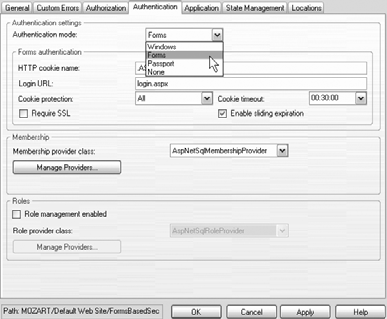
Click OK to close all the dialogs. A Web.config file is created for you in the FormsBasedSecurityIIS directory, as shown in Example 12-1.
ASP.NET 2.0 Forms-built security is built on a set of tables that must be created in your database: typically SQL Server or SQL Server Express. Fortunately, ASP.NET provides a utility named aspnet_regsql.exe, located in the <Drive:>WindowsMicrosoft.NETFramework<versionNumber> folder on your web server, which sets up the tables for you. This utility program will create the required database and all its tables.
The easiest way to use this utility is to run aspnet_regsql.exe from the .NET command box, with no arguments. A wizard will walk you through the process. For more details, see the MSDN article “Installing the SQL Server Provider Database.”
You are now ready to create a new web site in the same location. A dialog box will warn you that you already have a web site in that location; choose Open Existing Site, as shown in Figure 12-6.
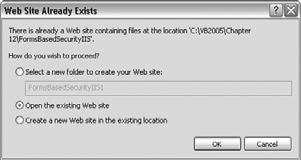
This instructs Visual Studio to use the site you’ve created, complete with the Web.config file already available for that site.
Creating Accounts Programatically
Your initial goal is to have two pages: a default page that displays different information depending on whether users are logged in or not, and a login page that allows the user to log in.
To have users log in, however, you must first create accounts. Create a new page called CreateAccount.aspx. (Right-click on the application and choose Add New Item. Choose web form and set the name to CreateAccount.aspx).
Click on the Design tab for your page, and then click on the Login tab in the Toolbox. Drag an instance of CreateUserWizard
onto your page, as shown in Figure 12-7.

The CreateUserWizard prompts the user for a username, a password (twice), an email address, and a security question and answer. All of this is configurable through the HTML that is created by this control; through the Properties window; or, more commonly, through the smart tag, as shown in Figure 12-8.

Click on the control and scroll through the properties to find the ContinueDestina-tionPageURL. Click the ellipses (...) button and choose the Create Account page itself (CreateAccount.aspx), so that you’ll be brought back to the same page after the new user is confirmed. Click on the Document and scroll down the Properties window to the title of the page to Create User. Finally, set the CreateAccount.aspx page as your Start page, and fire up the application.
Tip
Assuming you created this application, using the WAT as described earlier, you will be prompted to create a Web.config file. Click OK to add the new Web.config file with debugging enabled.
When the page opens, you will be prompted to add a new user, as shown in Figure 12-9.

When you click Create User, the account is created, and you are brought to a confirmation screen. Click Continue, and you are brought back to the Create Account screen to create a second account. Add a couple of accounts, then stop the application and examine your database.
Tip
To see the profile database, click on ServerExplorer and make a connection to <machine>sqlexpress.aspnetdb.dbo.
You should find that a database named aspnetdb with many tables, including the aspnet_Users table. You can display it by right-clicking and choosing Show Table Data, as shown in Figure 12-10.

Creating the Welcome Page
With your user database in place, you are ready to create the page that will welcome the logged-in user.
Create a new page called Welcome.aspx and drag a LoginStatus control from the Login section of the Toolbox.
A link marked Login is placed on the page, whose smart tag indicates that you are looking at the template for when the user is not logged in, as shown in Figure 12-11.

You can set the properties of the LoginStatus
control, for example, to change the text of the link. You can also drop down the view window to see the link and text for Logged In status.
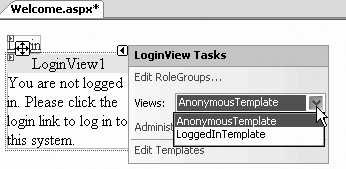
Drag a LoginView control from the Toolbox, and drop it onto the page below the LoginStatus control. Here you may enter text and controls that will be displayed based on whether or not the user is logged in. Notice that this control has two views: Anonymous Template and Logged In Template. The template that will be displayed depends on whether the user has logged in.
Click on the smart tag and confirm that the view is set to Anonymous Template and type some text in the box, as shown in Figure 12-12.
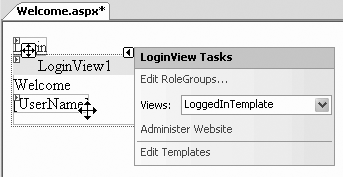
Now set the LoggedInTemplate. Since the user will be logged in when this template is displayed, you can use the LoginName
control to welcome the user by name. Drag the LoginName control onto the LoginView template, as shown in Figure 12-13.
Create a Login Page
You are now ready to create the Login page for users to log in to the system (after having created an account). Add a new page named Login.aspx. Change to Design view, and drag a Login control onto the page. To make your page look more professional, click on the AutoFormat link from the smart tag, as shown in Figure 12-14.

Pick one of the predefined formats for the control, as shown in Figure 12-15.

Make sure that the Welcome page is the Start page and run the application. The Welcome page will display its “Not Logged In” message. Click the link to go to the login page.
Enter a false name and/or incorrect password. The Login control will display an error message explaining your mistake; as shown in Figure 12-16.

Enter the correct name and password and you are brought back to the Welcome page. Your status is noted as logged in, you are greeted by name, and you are offered the opportunity to log out, as shown in Figure 12-17.

Adding a Password Reminder
To add a password reminder, you must first change your existing login control to a template by clicking on the smart tag and choosing “Convert to template,” as shown in Figure 12-18.

The display will change to a template that you can modify. Add a link titled (for example) Recover Password, as shown in Figure 12-19.
Set the NavigateURL to the name of the page that will hold your PasswordRecovery control, then click the smart tag and choose End Editing.
Your next step, of course, is to create the new .aspx page, RecoverPW.aspx. Drag a PasswordRecovery control onto the page, and click the smart tag to choose the view you wish to edit, as shown in Figure 12-20.
Set the SuccessPageUrl property to Login.aspx. You may also want to confirm or change the Success Text as well as the other text fields (QuestionInstructionText, QuestionLabelText, etc.).


Add Roles to ASP.NET Accounts
Authentication is the process of identifying a user; authorization is the process of deciding which parts of your application that user can see and interact with. The forms-based security controls and database that comes with Visual Basic 2005 allows you to set authorization for specific users based on their being assigned to a role (such as guest, member, manager, etc). You do so in three steps: create the roles, assign permissions to each role, and then assign users to the roles. Any given user may be in more than one role (e.g., administrator and manager). The permissions you assign to each role may determine access to a page, or may change the content of a given page displayed to members of that role.
Create a New Application with Roles
To demonstrate how to create roles
and assign users to those roles, you’ll need to create a new application, ASPSecurityRoles. Begin by copying
over the web site you used in the previous exercise (FormBasedSecurity), as shown in Figure 12-21.

Set Welcome as the Start page and run the program to make sure you can still log in. Open the WAT and click on the Security tab. In the second column (Roles), you’ll see that roles are not enabled. Click on Enable Roles, as shown in Figure 12-22.

Open Web.config and you’ll see that the WAT has updated it to add roles management:
    <system.web>
       <roleManager enabled="true" />
       <authentication mode="Forms"/>
       <membership defaultProvider="AspNetSqlMembershipProvider"/>
       <compilation debug="true"/>
    </system.web>
Tip
Depending on how your machine is set up and which database you are using, you may or may not have the defaultProvider entry in your Web.config.
Once roles have been created, use the WAT to create your first Role: Manager (it is helpful to have an initial role and a user in that role so that you can have in your code a test to ensure that only Managers, for example, can create new roles or add users to roles).
Under Add/Remove users, click the Manage link and navigate to one of your users (e.g., jliberty) and click the User Is In Role box to add that user to the role, as shown in Figure 12-23.
Using the LoginView’s smart tag, click on Edit Templates and edit the Logged In Template. Add three hyperlinks to the Logged In Template on the Welcome page, as shown in Figure 12-24. Set the NavigateURL to ChangePW.aspx, CreateAccount.aspx, and ManageRoles.aspx, respectively. Be sure to click on End Template Editing when you are done.
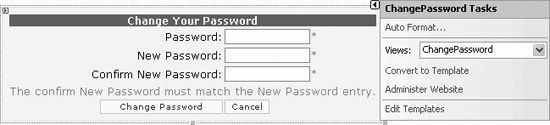
Create the ChangePW.aspx page and drag a ChangePassword control onto the page. Use the smart tag to format the ChangePassword control, as shown in Figure 12-25.
Set the ContinueDestinationPageURL property to Login.aspx, and on Login.aspx make sure the ContinueDestinationPageURL of the Login control is set to Welcome.aspx. You may also want to confirm or change the Success Text as well as the other text fields (ChangePasswordTitleText, ChangePasswordFailureText, etc.)


Create the ManageRoles.aspx page. This new page has a somewhat complex layout since it must display the list of roles and the list of users supported by your site, as well as which users have been assigned which roles. The page is shown in Figure 12-26, and the controls are listed in Table 12-1.

|
Control name |
Control type |
Attributes |
|
|
Hyperlink |
|
|
|
Label | |
|
|
ListBox |
|
|
|
ListBox |
|
|
|
Button |
|
|
|
Button |
|
|
|
Panel |
|
|
|
Label |
|
|
|
TextBox | |
|
|
Button |
|
|
|
GridView |
The UsersInRoleGrid should look like Example 12-2.
<asp:GridView runat="server" CellPadding="4" id="UsersInRoleGrid"
                AutoGenerateColumns="false" Gridlines="None"
                CellSpacing="0"
OnRowCommand="UsersInRoleGrid_RemoveFromRole">
       <HeaderStyle BackColor="navy" ForeColor="white" />
       <Columns>
        <asp:TemplateField HeaderText="User Name">
          <ItemTemplate>
           <%# Container.DataItem.ToString() %>
          </ItemTemplate>
        </asp:TemplateField>
        <asp:ButtonField Text="Remove From Role" ButtonType="Link" />
       </Columns>
</asp:GridView>
All of these controls should be laid out in a table, with the text inserted into columns as well. The finished page is shown in Example 12-3.
<%@ Page Language="VB" AutoEventWireup="false" CodeFile="ManageRoles.aspx.vb"
Inherits="ManageRoles_aspx" %>
<!DOCTYPE html PUBLIC "-//W3C//DTD XHTML 1.1//EN" "http://www.w3.org/TR/xhtml11/DTD/
xhtml11.dtd">
<html xmlns="http://www.w3.org/1999/xhtml" >
<head runat="server">
<title>Manage Roles</title>
</head>
<body>
<form id="form1" runat="server">
<h3>Role Membership
<asp:HyperLink ID="linkHome" Runat="server" NavigateUrl="Welcome.aspx">
Home page
</asp:HyperLink>
</h3>
<asp:Label id="Msg" ForeColor="maroon" runat="server" /><BR>
<table CellPadding="3" border="0">
<tr>
<td valign="top">Roles:</td>
<td valign="top" style="width: 186px">
<asp:ListBox id="RolesListBox"
runat="server" Rows="8" AutoPostBack="True" />
</td>
<td valign="top">Users:</td>
<td valign="top">
<asp:ListBox id="UsersListBox" DataTextField="Username"
Rows="8" SelectionMode="Multiple" runat="server" />
</td>
<td valign="top" visible="false">
<table>
<tr>
<td>
<asp:Button Text="Add User(s) to Role" id="btnAddUsersToRole"
runat="server" OnClick="AddUsers_OnClick" />
</td>
</tr>
<tr>
<td>
<asp:Button Text="Create new Role" id="btnCreateRole"
runat="server" OnClick="CreateRole_OnClick"
Width="170px" Height="24px" />
</td>
</tr>
<tr>
<td>
<asp:Panel ID="pnlCreateRole" Runat="server" Width="259px"
Height="79px" Visible="False" BackColor="#E0E0E0">
<br />
<asp:Label ID="Label2" Runat="server" Text="New Role:"
Width="72px" Height="19px"/>
<asp:TextBox ID="txtNewRole" Runat="server"/> <br />
<br />
<asp:Button ID="btnAddRole" Runat="server"
Text="Add" OnClick="btnAddRole_Click"
Width="64px" Height="24px" /><br />
</asp:Panel>
</td>
</tr>
</table>
</td>
</tr>
<tr>
<td valign="top">Users In Role:</td>
<td valign="top" style="width: 186px">
<asp:GridView runat="server" CellPadding="4" id="UsersInRoleGrid"
AutoGenerateColumns="false" Gridlines="None"
CellSpacing="0"
OnRowCommand="UsersInRoleGrid_RemoveFromRole">
<HeaderStyle BackColor="navy" ForeColor="white" />
<Columns>
<asp:TemplateField HeaderText="User Name">
<ItemTemplate>
<%# Container.DataItem.ToString() %>
</ItemTemplate>
</asp:TemplateField>
<asp:ButtonField Text="Remove From Role" ButtonType="Link" />
</Columns>
</asp:GridView>
</td>
</tr>
</table>
</form>
</body>
</html>Tip
This page is not designed to be pretty, just useful. It is based on a demonstration . aspx page provided by Microsoft.
The code-behind page must implement five event handlers:
Your class will declare three member variables:
A string array named
rolesArrayA string array named
usersInRoleAn instance of
MembershipUserCollectionnamedusers
The MembershipUserCollection is defined by the Framework to hold MembershipUser objects (surprise!). A MembershipUser object, in turn, is defined by the Framework to represent a single user in the membership data store (in this case, the tables created in SqlServerExpress). This class exposes information about the user such as the user’s email address, and methods such as those needed to change or reset the user’s password.
Here’s how the code works. The first step is to override the Page_Load event handler, as shown in Example 12-4.
Protected Sub Page_Load( _
ByVal sender As Object, _
ByVal e As System.EventArgs) Handles Me.Load
   If User.IsInRole("Manager") = False Then
      Response.Redirect("NoPrivs.aspx")
   End If
   Msg.Text = String.Empty
   If Not IsPostBack Then
      rolesArray = Roles.GetAllRoles()
      RolesListBox.DataSource = rolesArray
      RolesListBox.DataBind()
      users = Membership.GetAllUsers()
      UsersListBox.DataSource = users
      UsersListBox.DataBind()
   End If
   If (RolesListBox.SelectedItem IsNot Nothing) Then
      usersInRole = Roles.GetUsersInRole(RolesListBox.SelectedItem.Value)
      UsersInRoleGrid.DataSource = usersInRole
      UsersInRoleGrid.DataBind()
   End If
End Sub
First check that the current user is a manager. If he is, a redirect to an error page:
     If User.IsInRole("Manager") = False Then
        Response.Redirect("NoPrivs.aspx")
     End If
If this is the first time you are displaying the page, get the rolls and bind them to the list box, then get all the users and bind that collection to the Users List Box:
       If Not IsPostBack Then
          rolesArray = Roles.GetAllRoles()
          RolesListBox.DataSource = rolesArray
          RolesListBox.DataBind()
          users = Membership.GetAllUsers()
          UsersListBox.DataSource = users
          UsersListBox.DataBind()
       End If
If there is a selected item in the Roles List Box, get the list of users who are in that role and bind the list to the users in Roll Grid:
       If (RolesListBox.SelectedItem IsNot Nothing) Then
          usersInRole = Roles.GetUsersInRole(RolesListBox.SelectedItem.Value)
          UsersInRoleGrid.DataSource = usersInRole
          UsersInRoleGrid.DataBind()
       End If
Step 2 is to implement the AddUsers_OnClick
event handler, as shown in Example 12-5.
Protected Sub AddUsers_OnClick( _
ByVal sender As Object, _
ByVal e As System.EventArgs) Handles btnAddUsersToRole.Click

    '  A role must be selected
    If RolesListBox.SelectedItem Is Nothing Then
        Msg.Text = "Please select a role."
        Exit Sub
    End If

    ' At least one user must be selected
    If UsersListBox.SelectedItem Is Nothing Then
        Msg.Text = "Please select one or more users."
        Exit Sub
    End If

    ' Create list of users to be added to the selected role
    Dim sizeOfArray As Integer = UsersListBox.GetSelectedIndices.Length
    Dim newUsers(sizeOfArray − 1) As String

    'For i As Integer = 0 To newusers.Length − 1
    '    newusers(i) = _
    '    UsersListBox.Items( _
    '        UsersListBox.GetSelectedIndices()(i)).Value
    'Next

    For i As Integer = 0 To newUsers.Length − 1
        ' get the array of selected indices from the (multiselect) list box
        Dim selectedIndices As Integer() = UsersListBox.GetSelectedIndices()
        ' get the selectedIndex that corresponds to the counter (i)
        Dim selectedIndex As Integer = selectedIndices(i)
        ' get the ListItem in the UserListBox Items collection at that offset
        Dim myListItem As ListItem = UsersListBox.Items(selectedIndex)
        ' get the string that is that ListItem's value property
        Dim newUser As String = myListItem.Value
        ' add that string to the newUsers collection of string
        newUsers(i) = newUser
    Next


    ' Add users to the selected role
    Roles.AddUsersToRole(newUsers, RolesListBox.SelectedItem.Value)
    usersInRole = Roles.GetUsersInRole(RolesListBox.SelectedItem.Value)
    UsersInRoleGrid.DataSource = usersInRole
    UsersInRoleGrid.DataBind()

End Sub
First, check to make sure that a role has been selected:
    If RolesListBox.SelectedItem Is Nothing Then
        Msg.Text = "Please select a role."
        Exit Sub
    End If
At least one user should be selected:
    If UsersListBox.SelectedItem Is Nothing Then
        Msg.Text = "Please select one or more users."
        Exit Sub
    End If
Create an array to hold the users to be added:
    Dim sizeOfArray As Integer = UsersListBox.GetSelectedIndices.Length
    Dim newusers(sizeOfArray − 1) As String
Iterate through the users, retrieving each selected user’s name:
    For i As Integer = 0 To newusers.Length − 1
        newusers(i) = _
        UsersListBox.Items( _
            UsersListBox.GetSelectedIndices()(i)).Value
    Next
This statement is pretty complicated. The best way to understand it is to rewrite it using interim variables, like this:
    For i As Integer = 0 To newUsers.Length − 1
        ' get the array of selected indices from the (multiselect) list box
        Dim selectedIndices As Integer() = UsersListBox.GetSelectedIndices()
        ' get the particular selectedIndex that corresponds to the counter (i)
        Dim selectedIndex As Integer = selectedIndices(i)
        ' get the ListItem in the UserListBox Items collection at that offset
        Dim myListItem As ListItem = UsersListBox.Items(selectedIndex)
        ' get the string that is that ListItem's value property
        Dim newUser As String = myListItem.Value
        ' add that string to the newUsers collection of string
        newUsers(i) = newUser
    Next
The advantage of the interim variables is that you can set break points on them and see what their value is, and you can more easily document the code. The disadvantage is minimal, but many programmers (especially those from the “C” culture!) still prefer the terser version.
Next, call the static AddUsersToRole on the Roles class, passing in the array of usernames, and the role you want these users added to. Rebind the users who are in that role to the UsersInRoleGrid:
    Roles.AddUsersToRole(newUsers, RolesListBox.SelectedItem.Value)
    usersInRole = Roles.GetUsersInRole(RolesListBox.SelectedItem.Value)
    UsersInRoleGrid.DataSource = usersInRole
    UsersInRoleGrid.DataBind()
As noted earlier, step 3 is to implement UsersInRoleGrid_RemoveFromRole
as shown in Example 12-6.
Protected Sub UsersInRoleGrid_RemoveFromRole( _
ByVal sender As Object, _
ByVal e As System.Web.UI.WebControls.GridViewCommandEventArgs) _
Handles UsersInRoleGrid.RowCommand

   ' get the user to remove
   Dim index As Integer = Convert.ToInt32(e.CommandArgument)
   Dim username As String = _
   CType(UsersInRoleGrid.Rows(index).Cells(0).Controls(0), _
       DataBoundLiteralControl).Text

   ' remove the user
   Roles.RemoveUserFromRole(username, RolesListBox.SelectedItem.Value)

   ' Rebind the users in role to Gridview
   usersInRole = Roles.GetUsersInRole(RolesListBox.SelectedItem.Value)
   UsersInRoleGrid.DataSource = usersInRole
   UsersInRoleGrid.DataBind()
End Sub
Step 4 is to add the Create Role_OnClick event handler, which makes the CreateRole panel visible, as shown in Example 12-7.
The purpose of this is to present the panel, which contains a text box for the user to enter a new role and an Add button, as shown in Figure 12-27.

Finally, implement the btnAddRole_Click
event handler, shown in Example 12-8.
Protected Sub btnAddRole_Click( _
ByVal sender As Object, _
ByVal e As System.EventArgs) Handles btnAddRole.Click
    If txtNewRole.Text.Length > 0 Then
        Dim newRole As String = txtNewRole.Text

        ' if the role does not already exist, add it
        ' rebind the roles

 list box
        If Roles.RoleExists(newRole) = False Then
            Roles.CreateRole(newRole)
            rolesArray = Roles.GetAllRoles()
            RolesListBox.DataSource = rolesArray
            RolesListBox.DataBind()
        End If
    End If
    txtNewRole.Text = String.Empty
    pnlCreateRole.Visible = False
End Sub
Check to make sure there is text in the NewRole text box, and then check to make sure the role does not exist. If it does not, create the new role using the Shared CreateRole method of the Roles class, provided by the Framework.
Get all the roles
by calling the Shared method GetAllRoles and store the roles in the member array rolesArray, to which you bind the list box. When the role is added, the text box is cleared and the panel is made invisible.
Run the application and click on Manage Roles to add a couple of roles. Next, click on a role (to highlight it) and highlight one or more users; then click Add User(s) to Role. The results are shown in Figure 12-28.

Add each user to one or more roles.
Restricting Access to Pages Based on Roles
There are two ways to restrict access to a page based on membership in a Role. The first is to test if the logged-in user is in a particular role, using the User.IsInRole() method:
Dim isManager as boolean = User.IsInRole("Manager")You might redirect the user to an error page if the user is not in the required role. As an example, let’s add code that blocks nonmanagers from linking to the Manage Roles page. To do so, add a test in the Page_Load method of ManageRoles.aspx.vb:
    Protected Sub Page_Load( _
    ByVal sender As Object, _
    ByVal e As System.EventArgs) Handles Me.Load
        If User.IsInRole("Manager") = False Then
            Response.Redirect("NoPrivs.aspx
")
        End If
If the user is not in the role of “Manager,” the user is redirected to the page NoPrivs.aspx. That page can display an error message and then allow the user to take other actions. A very simple example is shown in Figure 12-29.

The code for the button (btnHome) on the NoPrivs.aspx.vb page, whose text is “Return to Welcome,” is very simple and shown in Example 12-9.
Restricting Access to a Set of Pages
You can also restrict access to a set of pages by adding an authorization section to a Web.config file. You place this file in a subdirectory to control access to all files in that subdirectory and all of its subdirectories, and you use the location element to control access to specific files:
    <authorization>
      <deny users='?' />
      <allow roles='Manager' />
      <deny users='*' />
    </authorization>
The first line (deny users = '?') prohibits access to anyone who is not logged in. The second line (allow roles='Manager') allows access to anyone in the Manager role, and the final line (deny users='*') disallows everyone, but is overridden by the allow roles.
Create Personalized Web Sites
Now that you have forms-based security working, you know who your user is and can store the user’s preferences and, if appropriate, previous choices (e.g., “You have 3 items in your shopping cart”).
To get started, you’ll want a new project that duplicates the work you accomplished in the previous example. Create a new web site called SitePersonalization and use the CopyWebSite pattern described previously to make a copy of ASPSecurityRoles into the new site (copying over all the files and folders from the old site to the new.) Set Welcome.aspx as the Start page, and run the program to make sure you have a working duplicate.
Recording Personalization Information
The simplest form of personalization is to record information about the user, then make that information available whenever the user logs on. This requires a kind of persistence that goes beyond session state. To create true personalization, you’ll want to store the user’s choices and information in a database that associates the saved information with a particular user, and that persists indefinitely.
ASP.NET 2.0 provides all of the plumbing required. You do not have to design, edit, or manage the database tables; all of that is done for you.
Setting up profile handling
ASP.NET 2.0 has decoupled the Profile API (how you programmatically interact with profile data) from the underlying data provider (how you store the data). This allows you to use the default provider (SqlServerExpress), one of the other providers supplied (SQL server), or even write your own provider (e.g., for an existing Customer Relationship Management system) without changing the way you interact with the profile in the rest of your code.
If you wish to have the SQLExpress database handle the profile information, there are no additional steps; profile tables have already been created for you. To add data to the user’s profile, alert the system about the data you wish to store by making an entry in Web.config. Add a profile section to the <system.web> element, as shown in Example 12-10.
<?xml version="1.0"?>
<configuration>
  <connectionStrings>
    <remove name="LocalSqlServer"/>
    <add name="LocalSqlServer" connectionString="data source=.sqlExpress;Integrated
 Security=SSPI;Initial Catalog=aspnetdb"/>
  </connectionStrings>
  <system.web>
    <authentication mode="Forms"/>
    <membership defaultProvider="AspNetSqlMembershipProvider"/>
    <roleManager enabled="True" defaultProvider="AspNetSqlRoleProvider"/>
    <compilation debug="true"/>
    <profile enabled="True" defaultProvider="AspNetSqlProfileProvider">
      <properties>
        <add name="lastName" />
        <add name="firstName" />
        <add name="phoneNumber" />
        <add name="birthDate" type="System.DateTime"/>
      </properties>
    </profile>
  </system.web>
</configuration>
Tip
Your Web.config file may look somewhat different depending on your machine configuration and the databases you have installed (SQL Server, SQL Express, etc.)
The configuration shown in Example 12-10 causes the Profile API to create storage for four pieces of information: first and last name, phone number, and birth date. The default storage type is String. Notice, however, that you are storing the birth date as a DateTime object.
You can gather this personalization information any way you like. For this example, return to Welcome.aspx and click on the smart tag to choose EditTemplates and then choose the LoggedIn Template. Set the text to Add Profile Info and the NavigateURL property to ProfileInfo.aspx (which you will create shortly). Don’t forget to click EndTemplateEditing when you are done.
Create the new page: ProfileInfo.aspx. Add a table, and within the table, labels and checkboxes, as well as a Save button, as shown in Figure 12-30.
The HTML code for the Profile Table is shown in Example 12-11.

<%@ Page Language="VB" AutoEventWireup="false" CodeFile="ProfileInfo.aspx.vb"
Inherits="ProfileInfo" %>


<!DOCTYPE html PUBLIC "-//W3C//DTD XHTML 1.1//EN" "http://www.w3.org/TR/xhtml11/DTD/
xhtml11.dtd">


<html xmlns="http://www.w3.org/1999/xhtml" >
<head id="Head1" runat="server">
    <title>ProfileInfo</title></head>
<body>
    <form id="form1" runat="server">
    <div>
            <table>
            <tr>
                <td>First Name: </td>
                <td style="width: 193px">
                  <asp:TextBox ID="firstName" Runat="server" />
                </td>
            </tr>
            <tr>
                <td>Last Name: </td>
                <td style="width: 193px">
                 <asp:TextBox ID="lastName" Runat="server" /></td>
            </tr>
            <tr>
                <td>Phone number: </td>
                <td style="width: 193px">
                   <asp:TextBox ID="phone" Runat="server" />
                </td>
            </tr>
            <tr>
                <td>BirthDate</td>
                <td style="width: 193px">
                   <asp:TextBox ID="birthDate" Runat="server" />
                </td>
            </tr>
             <tr>
                <td>
                   <asp:Button ID="save" Text="Save" Runat="server"
                       OnClick="save_Click" />
                 </td>
                <td style="width: 193px"></td>
            </tr>
        </table>

    </div>
    </form>
</body>
</html>
All that remains to be done is to add an event handler for the Save button:
    Protected Sub save_Click( _
    ByVal sender As Object, _
    ByVal e As System.EventArgs) Handles save.Click
        If Profile.IsAnonymous = False Then
            Profile.lastName = Me.lastName.Text
            Profile.firstName = Me.firstName.Text
            Profile.phoneNumber = Me.phone.Text
            Profile.birthDate = CType(Me.birthDate.Text, System.DateTime)
        End If
        Response.Redirect("Welcome.aspx")
End SubThe Profile object has properties that correspond to the properties you added in Web.config. To test that the Profile object has, in fact, stored this date, you’ll add a panel to the bottom of the Welcome page, as shown in Figure 12-31.

The panel has a table with three rows, and each row has a label that is initialized to say that the value is unknown (this is not normally needed, but is included here to ensure that the data you see is retrieved from the Profile object). When the page is loaded, you check to see if you have Profile data for this user and, if so, you assign that data to the appropriate controls.
Example 12-12 shows the source for the panel.
<asp:Panel ID="pnlInfo" Runat="server" Visible="False" Width="422px" Height="63px">
  <br />
  <table width="100%">
    <tr>
      <td>
        <asp:Label ID="lblFullName" Runat="server"
         Text="Full name unknown">
        </asp:Label></td>
      </tr>
    <tr>
      <td>
        <asp:Label ID="lblPhone" Runat="server"
          Text="Phone number unknown">
        </asp:Label>
      </td>
    </tr>
    <tr>
      <td>
        <asp:Label ID="lblBirthDate" Runat="server"
            Text="Birthdate  unknown">
        </asp:Label>
      </td>
    </tr>
  </table>
 </asp:Panel>
You’ll need to add a bit of code to the Welcome.aspx.vb page, so that when the page loads it will check to see if you have a profile, and if so, it will make the panel visible, as shown in Example 12-13.
Protected Sub Page_Load( _
ByVal sender As Object, _
ByVal e As System.EventArgs) Handles Me.Load
If Not IsPostBack And Profile.UserName IsNot Nothing Then
Me.pnlInfo.Visible = True
If Profile.IsAnonymous = False Then
Me.lblFullName.Text = Profile.firstName & " " & Profile.lastName
Me.lblPhone.Text = Profile.phoneNumber
Me.lblBirthDate.Text = Profile.birthDate.ToShortDateString()
End If
Else
Me.pnlInfo.Visible = False
End If
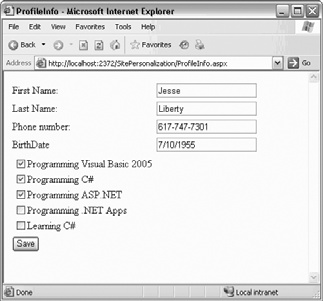
End SubWhen you start the application, you are asked to log in. Once logged in, a new hyperlink appears: Add Profile Info. This was created by the hyperlink you added to the LoggedInTemplate earlier. Clicking on that link brings you to your new profile page, as shown in Figure 12-32.

When you click Save and return to the Welcome page, the Page_Load event fires. The Page_Load begins with an If statement:
     If Profile.UserName IsNot Nothing And _
        Profile.IsAnonymous = False Then
Both parts of the If statement evaluate True: the UserName value in the profile is not Nothing, and the user is logged in, and thus not anonymous.
Your profile information is displayed, as shown in Figure 12-33.

Exploring the Profile Tables
Stop the application and open the Database Explorer window, and look at the Tables in the aspnetdb database. Open two tables, aspnet_Users (which lists all the users your database knows about) and aspnet_Profile (which lists the profile information for those users). To see these next to each other, click and drag the tab for one of the views, as shown in Figure 12-34.

When you let go, a menu will open offering to create a new tab group. Choose New Horizontal Tab Group, as shown in Figure 12-35.

This done, you can see both the Profile tab and the Users tab in a single window. The Users tab shows you that each user has a unique UserID. The Profile tab has a foreign key added into that table (UserID) and lists the PropertyNames and PropertyValues, as shown in Figure 12-36.

PropertyNames matches up with the entries you created in the <profile> section of Web.config:
    <profile>
        <properties>
            <add name="lastName" />
            <add name="firstName" />
            <add name="phoneNumber" />
            <add name="birthDate" type="System.DateTime"/>
        </properties>
    </profile>
Each property is named (e.g., phoneNumber), given a type (S for string), a starting offset (phoneNumber begins at offset 5), and a length (phoneNumber’s value has a length of 12). This offset and value are used to find the value within the PropertyValueString field.
Personalize with Complex Types
To make a useful commercial site, you often have to store complex user-defined types (classes) or collections.
In the next exercise, you’ll edit the Web.config file to add a collection of strings called CHOSENBOOKS. Doing so will allow the user to choose one or more books, and have those choices stored in the user’s profile.
Add a line to Web.config for your new property:
    <profile>
      <properties>
        <add name="lastName" />
        <add name="firstName" />
        <add name="phoneNumber" />
        <add name="birthDate" type="System.DateTime"/>
        <add name="CHOSENBOOKS"
         type="System.Collections.Specialized.StringCollection" />
      </properties>
    </profile>
To see this collection at work, edit the page ProfileInfo.aspx, inserting a row with a CheckBoxList just above the row with the Save button, as shown in Figure 12-37.

Modify the Save button handler to add the selected books to the profile, as shown in Example 12-14.
Profile.CHOSENBOOKS = New System.Collections.Specialized.StringCollection()
For Each item As ListItem In Me.cblChosenBooks.Items
    If item.Selected Then
        Profile.CHOSENBOOKS.Add(item.Value.ToString())
    End If
Next
Each time you save the books, you create an instance of the String collection, and you then iterate through the checked list boxes, looking for the selected items. Each selected item is added to the string collection within the profile (the CHOSENBOOKS property).
You also need to override Page_Load so that this page will open with the user’s profile information updated, as shown in Example 12-15.
Partial Class ProfileInfo
    Inherits System.Web.UI.Page
   Protected Sub save_Click( _
   ByVal sender As Object, _
   ByVal e As System.EventArgs) Handles save.Click
      If Profile.IsAnonymous = False Then
         Profile.lastName = Me.lastName.Text
         Profile.firstName = Me.firstName.Text
         Profile.phoneNumber = Me.phone.Text
         Profile.birthDate = CType(Me.birthDate.Text, System.DateTime)
         Profile.CHOSENBOOKS =
            New System.Collections.Specialized.StringCollection()
         For Each item As ListItem In Me.cblChosenBooks.Items
            If item.Selected Then
               Profile.CHOSENBOOKS.Add(item.Value.ToString())
            End If
         Next
      End If
      Response.Redirect("Welcome.aspx")
   End Sub
   Protected Sub Page_Load(ByVal sender As Object, _
     ByVal e As System.EventArgs) Handles Me.Load
      If Not IsPostBack And Profile.UserName IsNot Nothing Then
         If Profile.IsAnonymous = False Then
            Me.lastName.Text = Profile.lastName
            Me.firstName.Text = Profile.firstName
            Me.phone.Text = Profile.phoneNumber
            Me.birthDate.Text = Profile.birthDate.ToShortDateString()
         End If

         If Profile.CHOSENBOOKS IsNot Nothing Then
            For Each theListItem As ListItem In Me.cblChosenBooks.Items
               For Each theProfileString As String In Profile.CHOSENBOOKS
                  If theListItem.Text = theProfileString Then
                     theListItem.Selected = True
                  End If
               Next
            Next
         End If
      End If
   End Sub
End Class
Each time you navigate to the Profile page, the values are updated from the existing profile (if any) in Page_Load and you are free to change them and save the new values, as shown in Figure 12-38.
To confirm that this data has been stored, add a ListBox (name it lbBooks) to the pnlInfo panel you added to Welcome.aspx page, as shown in Figure 12-39.

Bind the ListBox to the collection in the profile, as shown in Example 12-16.
Protected Sub Page_Load( _
ByVal sender As Object, _
ByVal e As System.EventArgs) Handles Me.Load
If Not IsPostBack And Profile.UserName IsNot Nothing Then
Me.pnlInfo.Visible = True
If Profile.IsAnonymous = False Then
Me.lblFullName.Text = Profile.firstName & " " & Profile.lastName
Me.lblPhone.Text = Profile.phoneNumber
Me.lblBirthDate.Text = Profile.birthDate.ToShortDateString()
End If
If Profile.CHOSENBOOKS IsNot Nothing Then
For Each bookName As String In Profile.CHOSENBOOKS
Me.lbBooks.Items.Add(bookName)
Next
End If
Else
Me.pnlInfo.Visible = False
End If
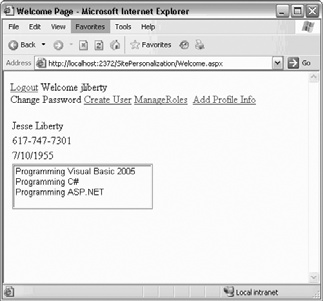
End SubWhen you click Save in the Profile page and return to the Welcome page, your saved profile information is reflected, as shown in Figure 12-40.
Anonymous Personalization
It is common to allow your users to personalize your site before identifying themselves. A classic example of this is Amazon.com , which lets you add books to your shopping cart before you log in (you only need to log in when you are ready to purchase what is in your cart).
ASP.NET 2.0 supports personalization for anonymous users as well as the ability later to link anonymous personalized data with a specific user’s. Once that user logs in, you don’t want to lose what was in the user’s cart.
To enable anonymous personalization, you must update your Web.config file adding:
<anonymousIdentification enabled="true" />Add the attribute-value pair allowAnonymous="true" to the CHOSENBOOKS element of Web.config, as shown in Example 12-17.
<?xml version="1.0"?>
<configuration xmlns="http://schemas.microsoft.com/.NetConfiguration/v2.0">
   <connectionStrings>
      <remove name="LocalSqlServer"/>
      <add name="LocalSqlServer" connectionString="data source=.SqlExpress;Integrated
Security=SSPI;Initial Catalog=aspnetdb"/>
   </connectionStrings>
   <system.web>
      <anonymousIdentification enabled="true" />
      <roleManager enabled="true" />
      <authentication mode="Forms"/>
      <membership defaultProvider="AspNetSqlMembershipProvider"/>
      <compilation debug="true"/>
      <profile enabled="True" defaultProvider="AspNetSqlProfileProvider">
         <properties>
            <add name="lastName" />
            <add name="firstName" />
            <add name="phoneNumber" />
            <add name="birthDate" type="System.DateTime"/>
            <add name="CHOSENBOOKS" allowAnonymous="true"
             type="System.Collections.Specialized.StringCollection" />
         </properties>
      </profile>
   </system.web>
</configuration>
Redesign your Welcome.aspx page in two ways: first move the hyperlink to the profile Information page outside of the Logged In template. Second move the listbox (lbBooks) outside the panel. Thus, you can see both of these features whether or not you are logged in. Also, change the text on the Add Profile Info hyperlink to just Profile Info, since you will be using this link to add and edit the profile info.
When an anonymous user fills in the profile information, the user will automatically be assigned a Globally Unique Identifier (GUID), and an entry will be made in the database for that ID. However, note that only those properties marked with allowAnonymous may be stored, so you must modify your Save_Click event handler in ProfileInfo.aspx.vb. Bracket the entries for all the profile elements except
CHOSENBOOKS in an If statement that tests whether the user is currently Anonymous. The new save_Click event handler for ProfileInfo.aspx.vb is shown in Example 12-18.
Protected Sub save_Click( _
ByVal sender As Object, _
ByVal e As System.EventArgs) Handles save.Click
   If Profile.IsAnonymous = False Then
      Profile.lastName = Me.lastName.Text
      Profile.firstName = Me.firstName.Text
      Profile.phoneNumber = Me.phone.Text
      Profile.birthDate = CType(Me.birthDate.Text, System.DateTime)
   End If
   Profile.CHOSENBOOKS = New System.Collections.Specialized.StringCollection()
   For Each item As ListItem In Me.cblChosenBooks.Items
      If item.Selected Then
         Profile.CHOSENBOOKS.Add(item.Value.ToString())
      End If
   Next
   Response.Redirect("Welcome.aspx")
End Sub
The effect of the new code shown in Example 12-18 is that you check whether the IsAnonymous property is false. If it is, then you are dealing with a logged-in user, and you can get all of the properties; otherwise, you can get only those that are allowed for anonymous users.
Modify the ProfileInfo page so that the non-anonymous data is in a panel that will be invisible for users who are not logged in. The simplest way to do this may be to switch to Source view and bracket the nonanonymous code inside a panel (don’t forget to end the table before ending the panel), as shown in Example 12-19.
<body>
    <form id="form1" runat="server">
    <div>
        <asp:Panel ID="pnlNonAnonymousInfo" runat="server">
            <table>
            <tr>
                <td>First Name: </td>
                <td style="width: 193px">
                  <asp:TextBox ID="FirstName" Runat="server" />
                </td>
            </tr>
            <tr>
                <td>Last Name: </td>
                <td style="width: 193px">
                 <asp:TextBox ID="LastName" Runat="server" /></td>
            </tr>
            <tr>
                <td>Phone number: </td>
                <td style="width: 193px">
                   <asp:TextBox ID="Phone" Runat="server" />
                </td>
            </tr>
            <tr>
                <td>BirthDate</td>
                <td style="width: 193px">
                   <asp:TextBox ID="BirthDate" Runat="server" />
                </td>
            </tr>
        </table>
        </asp:Panel>
Modify the Page_Load for ProfileInfo.aspx to hide the panel if the user is anonymous, as shown in Example 12-20.
Protected Sub Page_Load(ByVal sender As Object, _
ByVal e As System.EventArgs) Handles Me.Load
If Not IsPostBack And Profile.UserName IsNot Nothing Then
If Profile.IsAnonymous = True Then
Me.pnlNonAnonymousInfo.Visible = False
Else
Me.pnlNonAnonymousInfo.Visible = True
If Profile.IsAnonymous = False Then
Me.lastName.Text = Profile.lastName
Me.firstName.Text = Profile.firstName
Me.phone.Text = Profile.phoneNumber
Me.birthDate.Text = Profile.birthDate.ToShortDateString()
End If
If Profile.CHOSENBOOKS IsNot Nothing Then
For Each theListItem As ListItem In Me.cblChosenBooks.Items
For Each theProfileString As String In Profile.CHOSENBOOKS
If theListItem.Text = theProfileString Then
theListItem.Selected = True
End If
Next
Next
End If 'Profile.CHOSENBOOKS IsNot Nothing
End If 'Profile.IsAnonymous = True
End If 'Not IsPostBack And Profile.UserName IsNot Nothing
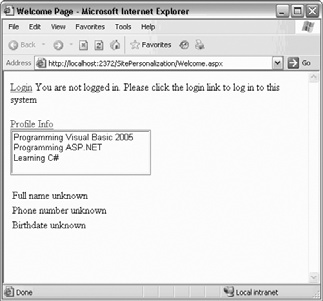
End SubRun the application. Do not log in, but do click the Profile Info link. Select a few books and click Save. When you return to the Welcome page, you are still not logged in, but your selected books are displayed, as shown in Figure 12-41.
Stop the application and reopen the database. You’ll see that an ID has been created for this anonymous user (and the UserName has been set to the GUID generated). In addition, the profile information has been stored in the corresponding record, as shown in Figure 12-42.

Migrating the Anonymous Data to the Actual User’s Record
When the user does log in, you must migrate the Profile data you’ve accumulated for the anonymous user to the authenticated user’s record (so that, for example, shopping cart items are not lost). You do this by writing a global handler in global.asax.
If your project does not yet have a global.asax file, right-click on the project and choose Add New Item. One of your choices will be Global Application Class, and it will default to the name global.asax (click Add). Within that class, add a method to handle the MigrateAnonymous
event that is fired when a user logs in, as shown in Example 12-21.
Sub Profile_MigrateAnonymous( _
ByVal sender As Object, ByVal e As ProfileMigrateEventArgs)
    Dim anonymousProfile As ProfileCommon = _
        Profile.GetProfile(e.AnonymousId)
    If anonymousProfile IsNot Nothing And _
        anonymousProfile.CHOSENBOOKS IsNot Nothing Then
        For Each s As String In anonymousProfile.CHOSENBOOKS
            Profile.CHOSENBOOKS.Remove(s)  ' remove duplicates
            Profile.CHOSENBOOKS.Add(s)
        Next
    End If
End Sub
The first step in this method is to get a reference to the profile that matches the AnonymousID passed in as a property of ProfileMigrateEventArgs:
    Dim anonymousProfile As ProfileCommon = _
        Profile.GetProfile(e.AnonymousId)
If the reference is not Nothing, then you know that there is a matching anonymous profile, and that you may choose whatever data you need from that profile. In this case, you copy over the CHOSENBOOKS collection.
The user’s profile is updated, and the books chosen as an anonymous user are now part of that user’s profile, as shown in Figure 12-43.

Themes and Skins
Many users like to personalize their favorite web sites by setting the look and feel to meet their own aesthetic preferences. ASP.NET 2.0 supports that requirement with “themes .”
A theme is a collection of skins . A skin describes how a control should look. A skin can define style sheet attributes, images, colors, and so forth.
Having multiple themes allows your users to choose how they want your site to look by switching from one set of skins to another at the touch of a button. Combined with personalization, your site can remember the look and feel each user prefers.
There are two types of themes. The first, called stylesheet themes
, define styles that may be overridden by the page or control. These are, essentially, equivalent to CSS style sheets. The second type, called customization themes, cannot be overridden. You set a stylesheet theme by adding the StyleSheetTheme attribute to the page directive, and, similarly, you set a customization theme by setting the Theme attribute in the page directive.
In any given page, the properties for the controls are set in this order:
Properties are applied first from a stylesheet theme.
Properties are then overridden based on properties set in the control.
Properties are then overridden based on a customization theme.
Thus, the customization theme is guaranteed to have the final word in determining the look and feel of the control.
Skins themselves come in two flavors: default skins and explicitly named skins. Thus, you might create a Labels skin file with this declaration:
    <asp:Label runat="server"
    ForeColor="Blue" Font-Size="Large"
    Font-Bold="True" Font-Italic="True" />
This is a default skin for all Label controls. It looks like the definition of an ASP:Label control, but it is housed in a skin file and, thus, is used to define the look and feel of all Label objects within that skin file’s theme.
In addition, however, you might decide that some labels must be red. To accomplish this, create a second skin, but assign this skin a SkinID property:
    <asp:Label runat="server" SkinID="RedLabel"
    ForeColor="Red" Font-Size="Large"
    Font-Bold="True" Font-Italic="True" />
Any label that does not have a SkinID attribute will get the default skin; any label that sets SkinID ="Red" will get your named skin.
The steps to providing a personalized web site are:
Create the test site.
Organize your themes and skins.
Enable themes and skins for your site.
Specify themes declaratively if you wish.
Create the Test Site
To demonstrate the use of themes and skins, you’ll create a new web site (Themes) but you will use Copy Web Site to bring over all the personalization code from the previous example and set the start page to Welcome.aspx. Test the application to make sure it still works as expected.
To begin modifying your application, you’ll need some controls whose look and feel you can set.
Open Welcome.aspx, and drag on some new controls, as shown in Figure 12-44.

There are four labels (each with names beginning with lbl): ListBox, RadioButtonList, Calendar, and TextBox. Use the default properties (other than the names) for all, except remove all text from TextBox1’s Text property.
You’ll also need to click on the smart tag for both lbItems (the ListBox) and RadioButtonList1 (the RadioButtonList). For each of these, choose Edit the List items, as shown in Figure 12-45.

In the ListItem Collection Editor add four items to the list box, and six items to the RadioButtonList, as shown back in Figure 12-44.
You will use themes to change the look and feel of the new controls.
Organize Site Themes and Skins
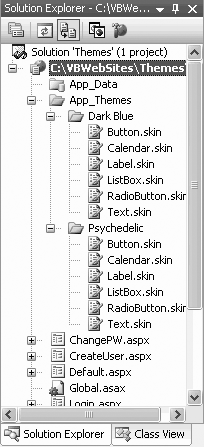
Themes are stored in your project in a folder named App_Themes. To create this folder, go to Solution explorer, right-click on the project folder, and choose Add Folder → Theme Folder. Name the new folder Dark Blue—the folder App_Themes will be created automatically, with a Theme folder named Dark Blue immediately under it. Right-click on App_Themes and create a second theme folder, named Psychedelic.
Right-click on the Dark Blue theme folder and choose Add New Item. From the template lists, choose Skin File and name it Button.skin (to hold all the button skins for your Dark Blue theme), as shown in figure Figure 12-46.

Each skin file is just a text file that contains a definition for the control type, but with no ID. Thus, your Label.skin file for the Dark Blue theme might look like this:
    <asp:Label Runat="server"
    ForeColor="Blue" Font-Size="Large"
    Font-Bold="True" Font-Italic="True" />
Create skin files for each of the following types in both themes:
Button.skin
Calendar.skin
Label.skin
ListBox.skin
RadioButton.skin
Text.skin
At this point, your solution should look more or less like Figure 12-47.
You can experiment with adding attributes to these new skin files and see the effects they produce on your user interface. Start by copying the text from Label.skin, then modifying it so it affects the appropriate control type (asp:Button in Button.skin, asp:Calendar in Calendar.skin, asp:ListBox in ListBox.skin, etc.).
Enable Themes and Skins
To let your users choose the theme they like and have their preference stored in their profile, you need to add a single line to the properties element in the profile element of Web.config:
<add name="Theme" />
Save and rebuild your application.
Specify Themes for Your Page
You can set the themes
on your page either declaratively or programmatically. To set a theme declaratively, add the Theme attribute to the Page directive:
    <%@ Page Language="VB" AutoEventWireup="true"
    CodeFile="Default.aspx.vb" Inherits="Default_aspx" Theme="Dark Blue"%>
You can also set the theme programmatically, either by hard coding it or (even better) by setting it from the user’s profile.
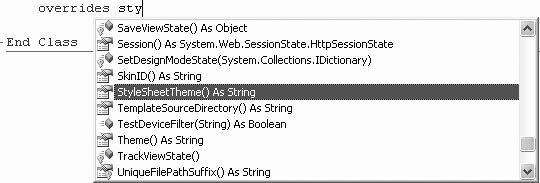
StyleSheet themes are set by overriding the StyleSheetTheme property for the page. IntelliSense will help you with this. Open Welcome.aspx.vb and scroll to the bottom of the class. Type the word overrides and all the overridable members are shown. Start typing sty and IntelliSense will scroll to the property you want: StyleSheetTheme, as shown in Figure 12-48.
Once IntelliSense finds the property you want, press Tab to accept it. Fill in the accessors, as shown in Example 12-22.
Public Overrides Property StyleSheetTheme() As String
    Get
        If Profile.IsAnonymous = False And Profile.Theme IsNot Nothing Then
            Return Profile.Theme
        Else
            Return "Dark Blue"
        End If
    End Get
    Set(ByVal value As String)
        Profile.Theme = value
    End Set
End Property
If you are going to set a customization theme programmatically, however, you must do so from the PreInit event handler for the page,[*] because the theme must be set before the controls are created. A PreInit event handler is shown in Example 12-23.
Protected Sub Page_PreInit( _
ByVal sender As Object, ByVal e As System.EventArgs) _
Handles Me.PreInit
    If Profile.IsAnonymous = False Then
        Page.Theme = Profile.Theme
    End If
End Sub
Setting the theme in PreInit creates a bit of a difficulty when you want to allow the user to change the theme at runtime. If you create a control that posts the page back with a new theme, the PreInit code runs before the event handler for the button that changes the theme, and so by the time the theme is changed, the controls have already been drawn.
To overcome this you must, unfortunately, refresh the page again. An alternative is to set the themes in another page. For example, add two buttons to the ProfileInfo.aspx page (at the bottom of the table at the bottom of the page). Set the properties of the first button to:
ID="ThemeBlue" Text="Dark Blue" OnClick="Set_Theme"
Set the properties of the second button to:
ID="ThemePsychedelic" Text="Psychedelic" OnClick="Set_Theme"
Notice that the two buttons share a single Click event handler, Set_Theme, shown in Example 12-24. An easy way to have Visual Studio 2005 set up that event handler for you is to switch to Design view and click on one of the buttons. Click on the lightning bolt in the Properties window to go to the events, and double-click on the Set_Theme event. You are now ready to implement the event handler. You’ll cast the sender to the button and check its text, setting the theme appropriately.
Protected Sub Set_Theme( _
ByVal sender As Object, _
ByVal e As System.EventArgs) Handles ThemePsych.Click
    Dim btn As Button = CType(sender, Button)
    If btn.Text = "Psychedelic" Then
        Profile.Theme = "Psychedelic"
    Else
        Profile.Theme = "Dark Blue"
    End If
End Sub
When the user is not logged on, the Welcome page’s default theme will be used. Once the user sets a theme in the profile, that theme will be used when you return to the Welcome page. Create skins for your two themes and then run the application to see the effect of applying the themes.
Using Named Skins
You can override the theme for particular controls by using named skins.
Set the lblRadioButtonList label to be red even in the Deep Blue theme, by using a named skin. To accomplish this, create two Label skins in the Label.skin file within the Deep Blue folder.
    <asp:Label Runat="server"
    ForeColor="Blue" Font-Size="Large"
    Font-Bold="True" Font-Italic="True" />

    <asp:Label Runat="server" SkinID="Red"
    ForeColor="Red" Font-Size="Large"
    Font-Bold="True" Font-Italic="True" />
The first skin is the default; the second is a named skin, because it has a SkinID property set to Red. Click on the RadioButtonList control in Design view and set the SkinID property to Red. Or, open the source for Welcome.aspx and find the RadioButtonList and add the attribute SkinID="Red":
    <asp:Label ID="lblRadioButtonList" Runat="server" Text="Radio Button List"
    SkinID="Red"/>
When you log in and set your theme to Dark Blue, you’ll find that the label for the RadioButtonList is Red, as shown in Figure 12-49. (You didn’t get stuck with a black & white book, did you?)

Web Parts
Web Parts allow your users to reconfigure sections of your site to meet their own needs and preferences. Many information providers allow the user to pick which content they want displayed and in which column to display it. Web Parts allow you to provide that functionality with drag-and-drop “parts” of your page.
Create a New Site
To learn about Web Parts
, create a new web site (call it WebParts) and copy the SitePersonalization web site from the beginning of this chapter (not the Themes web site you just completed).
Set the Welcome page as the start page and make sure you can log in with an account you created previously (or, alternatively, set CreateAccount as the start page and create a new account to work with).
Web Parts Architecture
Web Parts are created and managed on top of personalization using the WebPartManager control to manage the interaction of Web Parts, and normal ASP UI Controls to create the user-managed interface.
Creating Zones
A page that uses Web Parts is divided into zones : areas of the page that can contain content and controls that derive from the Part class (Part controls). They can also contain consistent UI elements (header and footer styles, border styles, etc.) known as the chrome of the control.
It is typical (though certainly not required) to organize these zones using tables.
To see a simple example of Web Parts at work, follow these steps:
Create a new page called WebPartsDemo.aspx.
Open the WebParts section of your Toolbox, and drag a
WebPartManageronto your page.The job of the
WebPartManageris to track and coordinate all the Web Part controls on the page. It will not be visible when the page is running.Add a new table, with two rows and three columns. Rearrange the columns so that they are not of even size.
Drag a
WebPartZoneinto each of the six table cells. EachWebPartZonewill have a default name (e.g.,WebPartZone6) and a default heading. You can easily modify either or both of these properties in the Properties window, as shown in Figure 12-50.
Set the HeaderText property on the first Web Part control to News.
Adding Controls to Zones
Drag a Label control into the zone. The normal ASP.Label control is automatically wrapped in a Web Part control, and its title is set to Untitled, as shown in Figure 12-51.


Switch to Source view and set the Title property of the label to Today’s News and the text to <br/>New Translation of In Search Of <em>Lost Time</em> Sets English World On Fire.
Tip
Title is not normally a property of the Label control, and will not show up in the Properties window or IntelliSense. However, when you add it to a WebPartZone it is wrapped, at runtime, in a GenericWebPart control that does recognize this property. Ignore intelliSense and press on.
Switch back to Design view and drag a ListBox control into WebPartZone3. Set the header text for the WebPartZone to Sponsors. Click on the ListBox, and then on its smart tag and then click on Edit Items to open the ListItems Collection Editor. Add a few items to the ListBox. Back in Source view, set the Title property to Our Sponsors. (This control, like the Label control, does not inherently have a Title property, so IntelliSense will complain, but as the note above explains, all will be well.)
Add a link in the LoggedInTemplate in Welcome.aspx, to take the user to your new page and run the program. Login using one of the accounts you set up previously and click on the link to the new Web Parts page.
You should see two Web Parts, as shown in Figure 12-52.

Minimizing and Restoring
Click on the tag next to the title and a menu appears allowing you to minimize or close the Web Part, as shown in Figure 12-53.

If you choose Minimize, the Web Part is minimized to its title, and the minimize tag offers the choices of Restore or Close, as shown in Figure 12-54.

Exit the application. Start it again, sign back in, and navigate back to these pages. Aha! The minimized zone remains minimized. Each individual’s personalized Web Parts are automagically persisted through the personalization database.
Enabling Editing and Layout Changes
Web Parts provide users with the ability to change the layout of the Web Part controls by dragging them from zone to zone. You may also allow your users to modify the appearance of the controls, their layout and their behavior.
The built-in Web Parts control set provides basic editing of any Web Part control on the page. You an also create custom editor controls that allow users to do more extensive editing.
Creating a User Control to Enable Changing Page Layout
To edit the contents of zones or move controls from one zone to another, you need to be able to enter Edit and Design mode. To do so, you will create a new user control called DisplayModeMenu.ascx, that will allow the user to change modes among Browse, Edit, and Design, as shown in Figure 12-55.

Right-click on the web project in the Solution explorer and choose Add New Item. Select Web User Control and name the new user control DisplayModeMenu.
Tip
User controls are described in detail in Chapter 13.
Add the highlighted code listed in in Example 12-25 to the content file of your new user control.
<%@ Control Language="VB" AutoEventWireup="false" CodeFile="DisplayModeMenu.ascx.vb " Inherits="DisplayModeMenu" %> <div> <asp:Panel ID="Panel1" runat="server" Borderwidth="1" Width="230" BackColor="lightgray" Font-Names="Verdana, Arial, Sans Serif" > <asp:Label ID="Label1" runat="server" Text=" Display Mode" Font-Bold="true" Font-Size="8" Width="120" /> <asp:DropDownList ID="ddlDisplayMode" runat="server" AutoPostBack="true" EnableViewState="false" Width="120" OnSelectedIndexChanged="ddlDisplayMode_SelectedIndexChanged" /> </asp:Panel> </div>
This code creates a panel, and within that panel it adds a single drop-down list (ddlDisplayMode). It also sets the event handler for when the Selected item changes in the drop-down list. To support this page, open the code-behind file (DisplayModeMenu.ascx.vb) and add the code shown in Example 12-26.
Imports System.Web.UI
Partial Class DisplayModeMenu
    Inherits System.Web.UI.UserControl

   Dim myWebPartManager As WebPartManager


   Protected Sub Page_Init( _
   ByVal sender As Object, _
   ByVal e As System.EventArgs) Handles Me.Init
      AddHandler Page.InitComplete, AddressOf Page_InitComplete
   End Sub

   Protected Sub Page_InitComplete( _
   ByVal sender As Object, _
   ByVal e As System.EventArgs)

   myWebPartManager = _
     WebPartManager.GetCurrentWebPartManager(Page)

   For Each mode As WebPartDisplayMode In _
      myWebPartManager.SupportedDisplayModes
      Dim modeName As String = mode.Name
      If mode.IsEnabled(myWebPartManager) Then
         Dim myListItem As ListItem = _
            New ListItem(modeName, modeName)
         ddlDisplayMode.Items.Add(myListItem)
      End If
   Next
End Sub


   Protected Sub ddlDisplayMode_SelectedIndexChanged( _
   ByVal sender As Object, _
   ByVal e As System.EventArgs) _
   Handles ddlDisplayMode.SelectedIndexChanged
      Dim selectedMode As String = ddlDisplayMode.SelectedValue
      Dim mode As WebPartDisplayMode = _
      myWebPartManager.SupportedDisplayModes(selectedMode)
      If (mode IsNot Nothing) Then
         myWebPartManager.DisplayMode = mode
      End If
   End Sub


   Protected Sub Page_PreRender( _
   ByVal sender As Object, _
   ByVal e As System.EventArgs) Handles Me.PreRender
      Dim items As ListItemCollection = ddlDisplayMode.Items
      Dim selectedIndex As Integer = _
      items.IndexOf(items.FindByText(myWebPartManager.DisplayMode.Name))
      ddlDisplayMode.SelectedIndex = selectedIndex
   End Sub
End Class
Open the WebPartsDemo page in Design mode and make a space between the WebPartManager and the table of zones. Drag the DisplayModeMenu.ascx file from the Solution explorer into that space. Change to Source view and notice that Visual Studio 2005 has done two things for you: it has registered the new control:
    <%@ Register Src="DisplayModeMenu.ascx" TagName="DisplayModeMenul"
    TagPrefix="uc1" %>
and it has placed the control into the form:
    <div>
        <asp:WebPartManager ID="WebPartManager1" runat="server" />
       <uc1:DisplayModeMenul ID="DisplayModeMenul1" runat="server" />
Before testing this, delete the Web Part Zone in the lower righthand cell in the table and drag an Editor Zone into that cell. Drag an AppearanceEditorPart and a LayoutEditorPart onto the Editor Zone. To make the Editor Zone stand out, click on its smart tab and choose AutoFormat and then Professional. Your design page should look more or less like Figure 12-56.

Moving a Part
Run the application. When you log in and go to the Web Parts page, you are in Browse mode. Use the Display mode drop-down list to switch to Design mode and all the zones (except the Editing Zone) appear. You can now click on any Web Part (e.g., Today’s News) and drag it to any other zone, as shown in Figure 12-57.
Editing a Part
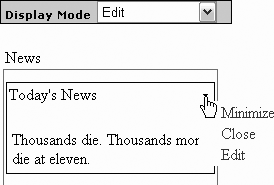
Next, change the drop-down list to Edit mode. Nothing much happens, but click on the drop-down tag on one of the Web Part controls. A menu appears that now includes Edit, as shown in Figure 12-58.
Click Edit and the Edit Zone appears, allowing you to edit the current Web Part, as shown in Figure 12-59.
The Appearance editor lets you change the title and look of the Web Part, while the Layout lets you change, among other things, the zone where the Web Part will appear.

Adding Parts from a Catalog
You may want to provide a catalog of Web Parts
that your users can add to the various zones. To do so, open WebPartsDemo.aspx and find Zone 4. Remove it from the cell so that the cell is empty. Next, drag a CatalogZone control into newly empty cell. Click on the zone and in the Properties window make sure the HeaderText property is set to Catalog Zone. Drag a DeclarativeCatalogPart control into the zone, as shown in Figure 12-60.
Click the smart tag on the DeclarativeCatalogPart and select Edit Templates. From the standard tab of the Toolbox drag on a Calendar and a File Upload control, as shown in Figure 12-61.


Before you run your program, switch to Source view and find the catalog zone you’ve added. Within the <WebPartsTemplate> element, add a Title attribute to both the Calendar and the File Upload controls, as shown in Example 12-27. (Again, IntelliSense will not like this attribute, but be strong and do it anyway.)
<asp:CatalogZone ID="CatalogZone1" runat="server">
   <ZoneTemplate>
      <asp:DeclarativeCatalogPart ID="DeclarativeCatalogPart1" runat="server">
         <WebPartsTemplate>
            <asp:Calendar ID="Calendar1" runat="server"
               title="Calendar" />
            <asp:FileUpload ID="FileUpload1" runat="server" title="Upload Files" />
         </WebPartsTemplate>
      </asp:DeclarativeCatalogPart>
   </ZoneTemplate>
</asp:CatalogZone>
Run the application. Drop down the display mode and notice that the Catalog mode has been added, as shown in Figure 12-62.

When you select Catalog, the Catalog Zone is displayed. You may select one of the controls and decide which zone to place it in, as shown in Figure 12-63.

Once you’ve picked your control and the zone to add it to, click Add and the control instantly appears in the designated zone.