Chapter 3. Cool Controls
In this chapter you’ll explore the tools available for building advanced forms with Visual Basic 2005.
Start by changing the title displayed on the Welcome Form you created in Chapter 2. Click on the form, and set the Text property (in the Properties Windows) to Welcome.
Okay, that was pretty easy. Have a cookie and let’s move on.
Adding a Menu and Toolbar
To navigate to the new pages that you’ll be adding to the application in this chapter, you’ll need to add a menu to the Welcome page. Lengthen the form and drag all the controls down (including the images) to make room for the menu. To do so, click in the form, click Control-A to mark all the images, then grab a move-handle and drag them in unison.
Drag a menu strip control from the Toolbox to the top of the Welcome page. Notice that “MenuStrip1” is added. Rename this to mnuWelcome. Click on the Menu, and add four top-level menus
: Employees, Customers, Orders, and Suppliers. For each, create two sub-menu choices: Show All and Find.
Tip
To move from one top-level menu item to the next, use tab. Within a menu, to move from one sub-item to the next, use Enter.
You can now move all the other controls back up into position below the menu.
Rename All the Menu Choices
Before proceeding, rename the various menu choices by clicking on each and setting its Name property in the Properties window. For example, click on Employees → Show All and set its name to mnuEmployeesShowAll, and set its Find sub-menu to mnuEmployeeFind, as shown in Figure 3-1.
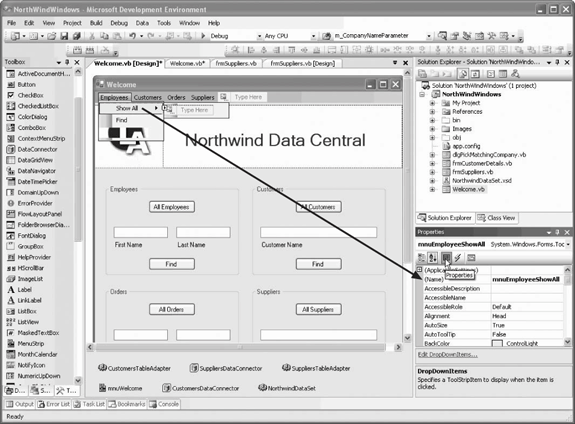
Setting the event handlers for the menu choices is also pretty easy, as you want them to do the same thing their related buttons specify. Thus, click on the All Employees button, and in the Properties window, click the Events button (the lightning bolt) to see the names of the predefined event handlers for this control. Copy the button’s Click event handler (btnAllClick).
Now click on the Employees menu to open it, and select Show All. In the Properties window, click on the Event button (the one with the lightning bolt) to reveal the events for this menu choice, and in the Click event, paste the btnAllClick event handler name, as shown in Figure 3-2.
Tip
As an alternative, you can click in the Click event and choose btnAllClick from the drop-down menu.
Do the same for the Show All for each of the other menu choices. Next, click on the Find button for Customers, and pick up btnFind_Click, which you can add to the Find menu choices for Customers and Suppliers.
Before you choose the Show All menu choice, you’ll need to make some changes to the btnAllClick menu choice, because that event handler, as written, assumes it was clicked by a Button control. The modified event handler for the All buttons on the Welcome page is shown in Example 3-1.
Private Sub btnAllClick( _
ByVal sender As System.Object, _
ByVal e As System.EventArgs) _
Handles btnAllCustomers.Click, _
btnAllSuppliers.Click, _
btnAllEmployees.Click, _
btnAllOrders.Click, _
mnuEmployeeShowAll.Click, _
ShowAllToolStripMenuItem1.Click, _
ShowAllToolStripMenuItem2.Click, _
ShowAllToolStripMenuItem3.Click
    MessageBox.Show(CType(sender, Button).Text + _
    " not yet implemented", "Not Yet Implemented", _
        MessageBoxButtons.OK, MessageBoxIcon.Exclamation)
End Sub
Because a ToolStripMenuItem does not inherit from Control, you’ll need to test the type of the sender and then cast accordingly. Thus, replace the body of Example 3-1 with the code shown in Example 3-2.
Dim txt As String = String.Empty

If TypeOf sender Is Button Then
    txt = CType(sender, Button).Text
ElseIf TypeOf sender Is ToolStripMenuItem Then
    txt = CType(sender, ToolStripMenuItem).Text
End If

MessageBox.Show(txt + _
" not yet implemented", "Not Yet Implemented", _
MessageBoxButtons.OK, MessageBoxIcon.Exclamation)Other Cool Controls
Before we continue with this application, let’s explore some other cool controls that don’t quite fit with our immediate business requirements but are still very handy. To get started, you’ll add a Web Browser menu command and, in fact, you’ll make it the first menu item. No problem, click on the end of the menu bar and choose the smart tab’s Edit Items... link. This opens the Items Collection Editor. You have the opportunity to edit the names of the items and to insert a new item by clicking the Add button, as shown in Figure 3-3.

Add a new menu item and rename it mnuWebBrowser. Set its Text to Web Browser. Click the Up button to raise it to the first position in the menu and click OK. Set the event handler for the Click event of this menu item, as shown in Example 3-3.
Displaying Web Documents
Create a new form and name it frmWeb.
Resize the form to 800,700 and drag a Web Browser from the Toolbox onto the new form. You’ll find that it fills the form. Click on the smart tab and click on the “Undock in parent container” link, as shown in Figure 3-4.
Shrink the web form down just enough to add a text box (which you’ll name txtURL) and four buttons (btnGo, btnHome, btnPrevious, and btnNext), as shown in Figure 3-5.

Setting Web Browser Event Handlers
It would be useful to disable the Previous button when it is not possible to go back any further, and to disable the Next button when there is no next page. The Web Browser
has two properties (CanGoBack and CanGoForward
) that you can test. Rather than testing these every time the form is navigated, it’s more efficient to respond to the events that fire when these properties change—CanGoBackChanged
and CanGoForwardChanged—as shown in Example 3-4.
Private Sub WebBrowser1_CanGoBackChanged( _
ByVal sender As System.Object, _
ByVal e As System.EventArgs) Handles WebBrowser1.CanGoBackChanged
   btnPrevious.Enabled = WebBrowser1.CanGoBack
End Sub

Private Sub WebBrowser1_CanGoForwardChanged( _
ByVal sender As System.Object, _
ByVal e As System.EventArgs) Handles WebBrowser1.CanGoForwardChanged
   btnNext.Enabled = WebBrowser1.CanGoForward
End Sub
In addition, you’ll handle the Navigating event from the browser to set the cursor to a Wait cursor while the page is loading (see Example 3-5).
Private Sub WebBrowser1_Navigating( _
ByVal sender As System.Object, _
ByVal e As System.Windows.Forms.WebBrowserNavigatingEventArgs) _
Handles WebBrowser1.Navigating
    Me.Cursor = Cursors.WaitCursor
End Sub
Finally, you’ll handle the Navigated event, which fires once the new page is loaded, as shown in Example 3-6.
Private Sub WebBrowser1_Navigated( _
ByVal sender As System.Object, _
ByVal e As System.Windows.Forms.WebBrowserNavigatedEventArgs) _
Handles WebBrowser1.Navigated
    Me.txtURL.Text = Me.WebBrowser1.Url.ToString()
    Me.Cursor = Cursors.Default
End Sub
As you can see, once the page is loaded, you load its URL into txtURL and you reset the cursor to the default. You change the URL in the Navigated event in case the user has navigated through hyperlinks (so that the text box is kept up to date).
There are a number of ways to set the initial URL for the browser. You can set the URL property of the browser, or you can set the initial URL programmatically. You’ll choose the latter, because you want to use the same address for the Home button. To make this work, you’ll add a constant member of the frmWeb class that was declared for you by Visual Studio 2005 in the code file for the form:
Const home As String = "http://www.libertyassociates.com"
Next, navigate to that location in the form’s Load event handler, as shown in Example 3-7.
Private Sub frmWeb_Load( _
 ByVal sender As System.Object, _
 ByVal e As System.EventArgs) _
 Handles MyBase.Load
     Me.WebBrowser1.Navigate(home)
     Me.btnNext.Enabled = False
     Me.btnPrev.Enabled = False
 End Sub
The bold code, which calls the Navigate() method on the WebBrowser control, causes the web browser to open to the home page (and to disable the Next and Previous buttons), as shown in Figure 3-6.

Tip
The Navigate method is overloaded with eight variations. We are using the simplest in which you just pass in a string representing the URL you wish to navigate to.
A number of event handlers will all do the same thing: tell the web browser to navigate to whatever URL is in the text box. So factor that logic out to a helper method of the frmWeb class, as shown in Example 3-8.
Private Sub GoToURL()
    If Not Me.txtURL.Text.Equals("") Then
        Me.WebBrowser1.Navigate(Me.txtURL.Text)
    End If
End Sub
Notice that if the URL text is blank, the method does nothing, but if the user navigates to a new page, that new page is shown in the text box.
If the user enters a URL in the text box and then hits tab (to leave the URL text box), you’ll want to invoke the GoToURL method. The same logic will apply if the user presses the Go button, so you’ll want to handle both events in the Leave event handler shown in Example 3-9.
Private Sub TextBox1_Leave( _
ByVal sender As System.Object, _
ByVal e As System.EventArgs) _
Handles txtURL.Leave, btnGo.Click
    GoToURL()
End SubFinally, if the user enters a URL and presses the Enter key, you’ll want to take that as a signal to go to the URL as well. To do so, you’ll examine each key pressed in the TextBox to see if it is the enter key in the KeyUp event handler shown in Example 3-10.
Adding an Auto-Complete Text Box to Navigate URLs
The text box should display all the URLs that match the text you’ve begun to type (this is how Internet Explorer behaves, why not you?) That turns out to be easy, thanks to two properties
of the text box control: AutoCompleteMode and AutoCompleteSource, as shown in Figure 3-7.
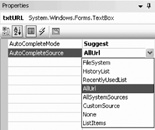
The AutoCompleteMode may be Suggest, Append, or SuggestAppend (or none). Suggest provides a drop down (see Figure 3-8), Append attempts to complete the listing for you. Whatever mode you choose, you must also tell the text box where to get the data to use to try to complete your entry. Your choices are shown in Figure 3-7. For this example, select Suggest for AutoCompleteMode, and AllUrl for AutoCompleteSource. As the user enters text, the auto-complete box provides suggested matches, as shown in Figure 3-8

Clicking on a choice in the text box causes the browser to navigate to the selected page, as shown in Figure 3-9.[*]
As the user follows links, the txtURL text box is updated and the Next and Previous buttons will be enabled or disabled as appropriate. The WebBrowser control keeps track of its own history, so implementing the Next and Previous buttons’ event handlers is fairly trivial, as shown in Example 3-11.

Private Sub btnPrev_Click( _
ByVal sender As System.Object, _
ByVal e As System.EventArgs) _
Handles btnPrev.Click
    Me.WebBrowser1.GoBack()
End Sub

Private Sub btnNext_Click( _
ByVal sender As System.Object, _
ByVal e As System.EventArgs) _
Handles btnNext.Click
    Me.WebBrowser1.GoForward()
End Sub
You can now navigate from page to page, and move back and forth through the pages you’ve seen. Finally, the browser has a method GoHome that takes you to the URL marked as Home in Internet Explorer. Example 3-12 shows the implementation for the Home button Click
event.
One very powerful reason for having a web browser built into your application is to enable users to XML documents. The web browser automatically understands the hierarchical structure of such documents.
Using Drag and Drop
To see an XML document in your browser, you can locate the document in Windows Explorer and then just drag and drop it onto the Web Browser control (as shown in the circled area in Figure 3-10). When you drop the document in the browser, it is displayed and the Navigated event fires. As shown earlier, this causes the URL of the XML document to appear in the text box above the browser, as shown in Figure 3-10.

Masked Text Box
A very handy advanced control provided by Visual Basic 2005 is the MaskedTextBox control. A Masked Text Box
only allows data to be entered if it matches a particular pattern. For example, you might provide a telephone mask, if the user enters 6175551212, the mask will render the input as (617) 555-1212.
The mask can block invalid characters (such as the % sign) and can signal to the user what is expected (e.g., the parentheses indicate that an area code is required).
To see this at work, return to frmSuppliers and delete the txtPhone text box. Drag into its place a MaskedTextBox control, and name it mtbPhone. Click on its smart tag and click the Set Mask link, bringing up the Input Mask dialog that allows you to pick one of the existing masks for your control, as shown in Figure 3-11.
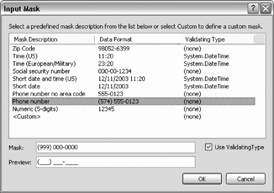
While it is possible to create a custom mask, in this case, the Phone number mask is just what you want. The mask itself is shown at the bottom of the dialog, and you have a chance to “try” the mask before accepting it. Click OK to accept the mask.
Hooking the Masked Control to the Data
What you want, however, is a MaskedTextBox that is bound to your data. There are many ways to accomplish this, but the easiest is to drag one from the Suppliers table.
Delete the MaskedTextBox on your form and its associated label, and open the Data Source View (Data → Show Data Sources). Expand the Suppliers table and click on the drop down next to phone. Click on Customize. This opens the Options Dialog, as shown in Figure 3-12.

In the left window, pick Windows Forms Designer and under that Data UI Customization. The Associated Controls window will show the default list of controls associated with the Data type String. Check MaskedTextBox.
You may click Set Default if you want this control to be available in the list for other controls that manage strings. In either case, click OK. Return to the Phone field and drop down the list of controls and choose Masked Text Box. You can now drag the MaskedTextBox onto your form, align its label, and then click on its smart tag to choose the mask you want.
You will have to change your code slightly to enable and disable the MaskedTextBox and to set up its event handler. In the Load method handler for the form, add a variable to hold the MaskedTextBox immediately following the definition of the txtbox variable in the existing code, like this:
Dim txtbox As TextBox = Nothing
Dim masked As MaskedTextBox = Nothing
In the For Each loop of the same method, add an if statement for MaskedTextBox, just as you have for TextBox, as shown in Example 3-13.
For Each ctrl In Me.Controls
   If TypeOf ctrl Is MaskedTextBox Then
      masked = CType(ctrl, MaskedTextBox)
      masked.Enabled = False
      AddHandler masked.TextChanged, AddressOf TextBoxChanged
   ElseIf TypeOf ctrl Is TextBox Then
      txtbox = CType(ctrl, TextBox)
      txtbox.Enabled = False
      AddHandler txtbox.ModifiedChanged, AddressOf TextBoxChanged
   ElseIf TypeOf ctrl Is DataGridView Then
      dgv = CType(ctrl, DataGridView)
      dgv.Enabled = False
      AddHandler dgv.CellValueChanged, AddressOf DataGridChanged
   End If
Next
Notice that the event you will handle (TextChanged) is different from the event you handle for TextBox (ModifiedChanged), but you will share event handlers nonetheless.
Modify StopEditing
to test for the MaskedTextBox type as well, as shown in Example 3-14.
You’re all set. When you run the program, the phone number is now in the mask. If you enter edit mode, you will not be able to enter illegitimate characters into the phone number and the mask will indicate the area code and the number of digits expected, as shown in Figure 3-13.

Printing a Document
One of the key features of any full-fledged desktop application is the ability to print. Let’s add another choice to the Welcome Form menu, mnuFile with the text File. While creating the menu choice, use the Properties window to create mnuFile_Click and add a single line:
Private Sub mnuFile_Click( _
ByVal sender As System.Object, _
ByVal e As System.EventArgs) Handles mnuFile.Click
   frmText.Show()
End Sub
As you can guess, you’ll now want to add a new form, frmText to the project. Resize the new form to 700,600 and set its text attribute to “Text Form.”
This form will have two controls, a RichTextBox and a menu. The menu name will be “File” (mnuFile) and will have sub-menu items of Open, Save, and Print, as shown in Figure 3-14.

After your menu is set up, drag a RichTextBox control onto the form and set its size to 668,512 and its location to 12,42.
Drag an OpenFileDialog and a SaveFileDialog onto your tool strip, along with a PrintDocument and a PrintDialog control, leaving their default names as they are. Implement the mnuFileOpen_Click event handler first, as shown in Example 3-15.
Private Sub mnuFileOpen_Click( _
ByVal sender As System.Object, _
ByVal e As System.EventArgs) _
Handles mnuFileOpen.Click
    ' set the initial directory in which to look for files
    Me.OpenFileDialog1.InitialDirectory = "C:Temp"

    'set the file filter
    Me.OpenFileDialog1.Filter = "Text files (*.txt) | *.txt"

    ' check to see if the user clicked ok, if so, load the
    ' file into the rich text box, setting the file type to
    ' plain text, and set the font
    Dim result As DialogResult = Me.OpenFileDialog1.ShowDialog()
    If result = Windows.Forms.DialogResult.OK Then
        RichTextBox1.LoadFile( _
            OpenFileDialog1.FileName, _
            RichTextBoxStreamType.PlainText)
        RichTextBox1.SelectionFont = New Font("Verdana", 10)
    End If

End Sub
The File Save dialog box works just like the file save you saw for the Active Document example. When the user clicks save on the menu, the mnuFilesSave_Click event is raised. The event handler displays the SaveFileDialog, as shown in Example 3-16.
Private Sub mnuFilesSave_Click( _
ByVal sender As System.Object, _
ByVal e As System.EventArgs) _
Handles mnuFilesSave.Click
    Me.SaveFileDialog1.FileName = _
       Me.OpenFileDialog1.FileName
    Me.SaveFileDialog1.Filter = _
       Me.OpenFileDialog1.Filter
    Me.SaveFileDialog1.ShowDialog()
End Sub
When the user clicks OK in the dialog, the SaveFileDialog’s FileOK event is raised, and handled in your handler by writing the file to disk, as shown in Example 3-17. Notice that the RichTextBox control knows how to do this.
Private Sub SaveFileDialog1_FileOk( _
ByVal sender As System.Object, _
ByVal e As System.ComponentModel.CancelEventArgs) _
Handles SaveFileDialog1.FileOk

    Me.RichTextBox1.SaveFile( _
        Me.SaveFileDialog1.FileName, _
        RichTextBoxStreamType.RichText)
End Sub
Handling the Print Click Event
The print Click event handler is a bit more complicated. You will break the logic into two methods: the event handler for the menu choice, and the event handler for the PrintDocument object you’ve added to your page. Because you will need to create the Stream object for the document in the Print event handler, and you’ll need to reference that stream in the PrintDocument’s PrintPage
event handler, you’ll create a member variable for the class to hold that stream.
Public Class frmText
    Private streamToPrint As StringReader
To identify the string reader, you’ll add the following to the top of the file:
Imports System.IO
When the user clicks on the Print menu choice, the event handler initializes streamToPrint by creating a new StringReader with the text from the RichTextBox:
streamToPrint = New StringReader(Me.RichTextBox1.Text)
The PrintDialog is shown, allowing the user to pick a printer and set its characteristics:
Me.PrintDialog1.Document = PrintDocument1
Dim dlgResult As DialogResult = Me.PrintDialog1.ShowDialog()
If the user clicks OK, the PrintDocument’s Print method is called, which raises the PrintPage event on that object, as shown in Example 3-18.
When the PrintPage event is raised, the PrintDocument’s event handler is called, as shown in Example 3-19.
' called from mnuFilePrint_Click
Private Sub PrintDocument1_PrintPage( _
ByVal sender As System.Object, _
ByVal e As System.Drawing.Printing.PrintPageEventArgs) _
Handles PrintDocument1.PrintPage

   Dim printFont As Font = New Font("Verdana", 10)

   Dim linesPerPage As Single = 0
   Dim yPosition As Single = 0
   Dim ctr As Integer = 0
   Dim left As Single = e.MarginBounds.Left
   Dim top As Single = e.MarginBounds.Top
   Dim line As String = Nothing

   ' Calculate the number of lines per page.
   linesPerPage = e.MarginBounds.Height / _
       printFont.GetHeight(e.Graphics)

   While ctr < linesPerPage
      line = streamToPrint.ReadLine()
      If line Is Nothing Then
         Exit While
      End If
      yPosition = top + ctr * _
          printFont.GetHeight(e.Graphics)

      e.Graphics.DrawString
( _
      line, _
      printFont, _
      Brushes.Black, _
      left, _
      yPosition, _
      New StringFormat())

      ctr += 1
   End While

   If line IsNot Nothing Then
      e.HasMorePages = True
   Else
      e.HasMorePages = False
   End If

End Sub
The second argument passed in is of type PrintPageEventArgs, which contains vital information about how to print the page.
For simplicity you’ll hardcode a font (Verdana, 10 point) to print with, using the following declaration:
Dim printFont As Font = New Font("Verdana", 10)With that font in hand, you can compute the number of lines per page:
linesPerPage = e.MarginBounds.Height / _
    printFont.GetHeight(e.Graphics)
That done, you can begin reading lines from the stream. As long as you have a valid line, you can compute its position on the page, then call the DrawString method on the Graphics object you get from the PrintPageEventArgs parameter, e.
This method is overloaded. The version you’ll use takes six parameters, as shown in Example 3-20.
In Example 3-20:
-
line Is the string to draw on the page
-
printFont Is the font to use to print the text
-
Brushes.Black Is a standard enumeration for the black color to draw the text
-
left Is the x coordinate at which to begin drawing
-
yPosition Is the y coordinate at which to begin drawing
-
StringFormat Is an object that specifies the formatting attributes, such as line spacing and alignment; here, you are using the default provided by the
StringFormatclass
Copying Files Using Tree Views
Let’s try something a bit fancier. Add a menu choice to the Welcome form’s menu named mnuFilesFileCopier. Set its Text to File Copier. The event handler for that menu choice will open the frmFilesCopier form that you’ll create to copy files
from a group of directories selected by the user to a single target directory or device, such as a floppy or backup hard drive.
Although you won’t implement every possible feature, you can imagine programming this form so that you can mark dozens of files and have them copied to multiple disks.
Begin by creating the frmFilesCopier form, then extending it to a size of 570,740. Next, drag on three labels, a text box, two tree view controls, four buttons, and a checkbox, as shown in Figure 3-15.

Drag a StatusStrip on to the form at the bottom. Click on the status strip’s drop down (on the form) and chose StatusLabel. Set the label’s name to lblStatus and set its Text to Ready.
You want checkboxes next to the directories and files in the source selection window but not in the target (where only one directory will be chosen). Set the CheckBoxes property on tvwSource to true, and on tvwTarget to false.
Once you’ve done this, double-click the Cancel button to create its event handler. The entire implementation for this event handler is to close the form without taking further action, as shown in Example 3-21.
Populating the TreeView Controls
The two TreeView controls
work identically, except that the left control, tvwSource, lists the directories and files, whereas the right control, tvwTarget, lists only directories. Also, although tvwSource will allow multiselect, which is the default for TreeView controls, you will enforce single selection for tvwTarget.
Before you begin, please add these three Imports statements to the top of your code file:
Imports System.Collections.Generic
Imports System.Collections
Imports System.IO
Factor the common code for both TreeView controls into a shared method FillDirectoryTree
, passing in the target tree view and a flag indicating whether to get the files, as shown in Example 3-22.
You’ll call this method from the Form’s Load event handler, once for each of the two controls, as shown in Example 3-23.
Private Sub frmFilesCopier_Load( _
ByVal sender As System.Object, _
ByVal e As System.EventArgs) Handles MyBase.Load

      Me.Cursor = Cursors.WaitCursor
      Me.FillDirectoryTree(Me.tvwSource, True)
      Me.FillDirectoryTree(Me.tvwTarget, False)
      Me.Cursor = Cursors.Default
 End Sub
Tip
Because filling the Directory Trees will take a few seconds, you change the cursor to the WaitCursor mode until the work is complete.
The TreeView control has a property, Nodes, which gets a TreeNodeCollection object. The TreeNodeCollection is a collection of TreeNode objects, each of which represents a node in the tree. The first thing you’ll do in FillDirectoryTree is empty that collection:
tvw.Nodes.Clear()
You are ready to fill the TreeView’s Nodes collection by recursing through the directories
of all the drives. You’ll implement a method called GetSubDirectoryNodes that does exactly that.
Displaying the Directories
Before calling GetSubDirectoryNodes, FillDirectoryTree needs to get all the logical drives on the system. To do so, call a shared method of the Environment object, GetLogicalDrives. The Environment class provides information about and access to the current platform environment. You can use the Environment object to get the

machine name, OS version, system directory, and so forth, from the computer on which you are running your program.
Dim strDrives As String() = Environment.GetLogicalDrives()
GetLogicalDrives returns an array of strings, each of which represents the root directory of one of the logical drives. You will iterate over that collection, adding nodes to the TreeView control as you go.
For Each rootDirectoryName As String In strDrives
You process each drive within the For Each loop.
The very first thing you need to determine is whether the drive is ready. One hack for doing that is to get the list of top-level directories from the drive by calling GetDirectories on a DirectoryInfo object you create for the root directory, like this:
Try
    Dim dir As DirectoryInfo = New DirectoryInfo(rootDirectoryName)
    dir.GetDirectories()
The DirectoryInfo class exposes instance methods for creating, moving, and enumerating through directories, their files, and their subdirectories. The GetDirectories method throws an exception if the drive is not ready (e.g., the A: drive does not have a floppy in it). Your goal here is just to skip over those drives; you don’t actually care about the directories returned.
Wrap the call in a try block and take no action in the catch block. The effect is that if an exception is thrown, the drive is skipped.
Continuing in the try block (if you’re still there, the drive is ready), create a TreeNode to hold the root directory of the drive and add that node to the TreeView control, like this:
Dim ndRoot As TreeNode = New TreeNode(rootDirectoryName)
tvw.Nodes.Add(ndRoot)
To get the plus signs right in the TreeView, you must find at least two levels of directories (so the TreeView knows which directories have subdirectories
and can write the plus sign next to them). You do not want to recurse through all the subdirectories, however, because that would be too slow.
The job of the GetSubDirectoryNodes method is to recurse two levels deep, as shown schematically in Figure 3-16. You pass it:
The root node (
ndRoot)The name of the root directory (
ndRoot.Text)A flag indicating whether you want files (
True) or just directories (False)The current level (you always start at level
1)
Here’s the code for doing these steps:
If (getFiles = True) Then
    GetSubDirectoryNodes(ndRoot, ndRoot.Text, True, 1)
Else
    GetSubDirectoryNodes(ndRoot, ndRoot.Text, False, 1)
End If
You will see why you need to pass in ndRoot.Text when you recurse back into GetSubDirectoryNodes.
Recursing through the subdirectories
GetSubDirectoryNodes begins by once again calling GetDirectories, this time stashing away the resulting array of DirectoryInfo objects:
Private Sub GetSubDirectoryNodes( _
ByVal parentNode As TreeNode, _
ByVal fullName As String, _
ByVal getFileNames As Boolean, _
ByVal level As Int32)

    Dim dir As DirectoryInfo = New DirectoryInfo(fullName)
Notice that the node passed in is named parentNode. The current level of nodes will be considered children to the node passed in. This is how you map the directory structure to the hierarchy of the tree view.
Iterate over each subdirectory within a try block (forbidden files and directories will throw an exception that you can safely ignore). Here’s some code for doing that:
Try
    Dim dirSubs As DirectoryInfo() = dir.GetDirectories()
    For Each dirsub As DirectoryInfo In dirSubs
    ''...
Catch ex As Exception
    ' ignore exceptions
End Try
Create a TreeNode with the directory name and add it to the Nodes collection of the node passed in to the method (parentNode), like this:
Dim subNode As TreeNode = New TreeNode(dirsub.Name)
parentNode.Nodes.Add(subNode)
Now you check the current level (passed in by the calling method) against a constant defined for the class:
Private Const MaxLevel As Integer = 2
so as to recurse only two levels deep:
If level < MaxLevel Then
    'recursion
    GetSubDirectoryNodes( _
        subNode, _
        dirsub.FullName, _
        getFileNames, _
        level + 1)
End If
You pass in the node you just created as the new parent, the full path as the full name of the parent, and the flag you received (getFileNames), along with one greater than the current level (thus, if you started at level 1, this next call will set the level to 2).
Tip
Notice that the call to the TreeNode constructor uses the Name property of the DirectoryInfo object, while the call to GetSubDirectoryNodes uses the FullName property. If your directory is C:WinNTMediaSounds, the FullName property will return the full path, while the Name property will return just Sounds. Pass in only the name to the node, because that is what you want displayed in the tree view. Pass in the full name with path to the GetSubDirectoryNodes method so that the method can locate all the subdirectories on the disk. This is why you need to pass in the root node’s name the first time you call this method: what is passed in is not the name of the node, it is the full path to the directory represented by the node!
Getting the files in the directory
Once you’ve recursed through the subdirectories, it’s time to get the files for the directory if the getFileNames flag is true. To do so, call the GetFiles method on the DirectoryInfo object. An array of FileInfo objects is returned:
If getFileNames = True Then
    Dim files As FileInfo() = dir.GetFiles()
The FileInfo class provides instance methods for manipulating files. You can now iterate over this collection, accessing the Name property of the FileInfo object and passing that name to the constructor of a TreeNode, which you then add to the parent node’s Nodes collection (thus creating a child node). There is no recursion this time because files do not have subdirectories:
For Each file As FileInfo In files
    Dim fileNode As TreeNode = New TreeNode(file.Name)
    parentNode.Nodes.Add(fileNode)
Next
That’s all it takes to fill the two tree views. Run the program and see how it works so far.
Handling TreeView Events
You must handle a number of events
for this page to work properly. For example, the user might click Cancel, Copy, Clear, or Delete. She might click one of the checkboxes in the left TreeView, one of the nodes in the right TreeView, or one of the plus signs in either view.
Let’s consider the clicks on the TreeViews first, as they are the most interesting, and potentially the most challenging.
Clicking the source TreeView
There are two TreeView objects
, each with its own event handlers. Consider the source TreeView object first. The user checks the files and directories he wants to copy from. Each time the user clicks the checkbox indicating a file or directory, a number of events are raised. The event you must handle is AfterCheck
.
Your implementation of AfterCheck will delegate the work to a recursive method named SetCheck that you’ll also write. The SetCheck method will recursively set the check mark for all the contained folders.
To add the AfterCheck event, select the tvwSource control, click the Events icon in the Properties window, then double-click AfterCheck. This will add the event, wire it, and place you in the code editor where you can add the body of the method, shown in Example 3-24.
The event handler passes in the sender object and an object of type TreeViewEventArgs. It turns out that you can get the node from this TreeViewEventArgs object (e). Call SetCheck, passing in the node and its checked state.
Each node has a Nodes property, which gets a TreeNodeCollection containing all the subnodes. Your SetCheck method recurses through the current node’s Nodes collection, setting each subnode’s check mark to match that of the node that was checked. In other words, when you check a directory, all its files and subdirectories are checked, recursively, all the way down.
For each TreeNode in the Nodes collection, set the checked property to the Boolean value passed in. A node is a leaf if its own Nodes collection has a count of zero; if the current node is not a leaf, recurse. Code for the SetCheck method is shown in Example 3-25.
This propagates the check mark (or clears the check mark) down through the entire structure. In this way, the user can indicate that he wants to select all the files in all the subdirectories by clicking a single directory.
Expanding a directory
Each time you click on a plus sign next to a directory in the source (or in the target) you want to expand that directory. To do so, you’ll need an event handler for the BeforeExpand
event. Since the event handlers will be identical for both the source and the target tree views, you’ll create a shared event handler (assigning the same event handler to both), as shown in Example 3-26.
Private Sub tvwExpand( _
ByVal sender As System.Object, _
ByVal e As System.Windows.Forms.TreeViewCancelEventArgs) _
Handles tvwSource.BeforeExpand, tvwTarget.BeforeExpand
    Dim tvw As TreeView = CType(sender, TreeView)
    Dim getFiles As Boolean = (tvw.Name = "tvwSource")
    Dim currentNode As TreeNode = e.Node
    Dim fullName As String = currentNode.FullPath
    currentNode.Nodes.Clear()
    GetSubDirectoryNodes(currentNode, fullName, getFiles, 1)
End Sub
Tip
There are two schools of thought on how terse to make your code. For example, many programmers would argue that the declaration of getFiles should be written as:
Dim getFiles As Boolean = False
If tvw.Name = "tvwSource" Then
   getFiles = True
End If
The significant advantage to the longer style is that you can examine the interim values in the debugger if your results are not what you expect.
The first line of tvwExpand casts sender from System.Object to TreeView, which is safe since you know that only a TreeView can trigger this event.
You must determine whether you want to get the files in the directory you are opening. You want to get the files only if the name of the TreeView that triggered the event is tvwSource.
You determine which node’s plus mark was checked by getting the Node property from the TreeViewCancelEventArgs that is passed in as the second argument.
Dim currentNode As TreeNode = e.Node
Once you have the current node, you get its full path name (which you will need as a parameter to GetSubDirectoryNodes). You then clear its collection of subnodes; you are going to refill that collection by calling GetSubDirectoryNodes.
currentNode.Nodes.Clear()
Why do you clear the subnodes and then refill them? Because this time you will go another level deep so that the subnodes know if they, in turn, have subnodes, and thus will know if they should draw a plus mark next to their subdirectories.
Clicking the target TreeView
The second event handler
for the target TreeView (in addition to BeforeExpand) is somewhat trickier. The event itself is AfterSelect. (Remember that the target TreeView does not have checkboxes.) This time, you want to take the one directory chosen and put its full path into the text box at the upper-left corner of the form.
To do so, you must work your way up through the nodes, finding the name of each parent directory and building the full path. An event handler for AfterSelect
that does all this is shown in Example 3-27.
(You’ll see GetParentString in just a moment.)
Once you have the full path, you must lop off the backslash (if any) on the end, and then you can fill the text box, like this:
If theFullPath.EndsWith("") Then
    theFullPath = theFullPath.Substring(0, theFullPath.Length − 1)
End If
Me.txtTarget.Text = theFullPath
The GetParentString method takes a node and returns a string with the full path. To do so, it recurses upward through the path, adding the backslash after any node that is not a leaf, as shown in Example 3-28.
The recursion stops when there is no parent; that is, when you hit the root directory.
Handling the Clear button event
Given the SetCheck method developed earlier, handling the Clear button’s Click event is trivial, as shown in Example 3-29.
Just call the SetCheck method on the root nodes and tell them to recursively uncheck all their contained nodes.
Implementing the Copy Button Event
Now that you can check the files
and pick the target directory, you’re ready to handle the Copy button’s Click event. The very first thing you need to do is to get a list of which files were selected. This will be represented as a collection of FileInfo objects. Delegate responsibility for filling the list to a method called GetFileList as the first step executed by the event handler:
Private Sub btnCopy_Click( _
ByVal sender As System.Object, _
ByVal e As System.EventArgs) _
Handles btnCopy.Click
    Dim fileList As List(Of FileInfo) = GetFileList()
Let’s examine the GetFileList method before returning to the event handler.
Getting the selected files
Start by instantiating a new List(Of string) object to hold the strings representing the names of all the files selected:
Private Function GetFileList() As List(Of FileInfo)
    Dim fileNames As List(Of String) = New List(Of String)
To get the selected filenames, you can walk through the source TreeView control:
For Each theNode As TreeNode In tvwSource.Nodes
    GetCheckedFiles
(theNode, fileNames)
Next
To see how this works, look at the GetCheckedFiles method, shown in Example 3-30. This method is pretty simple: it examines the node it was handed. If that node has no children, it is a leaf. If that leaf is checked, get the full path (by calling GetParentString on the node) and add it to the List(Of String) passed in as a parameter.
Notice that if the node is not a leaf, you recurse down the tree, finding the child nodes.
This will return the List filled with all the filenames. Back in GetFileList, create a second List, this time to hold the actual FileInfo objects:
Dim fileList As List(Of FileInfo) = New List(Of FileInfo)
Notice the use of type-safe List objects to ensure that the compiler will flag any objects added to the collection that are not of type FileInfo.
You can now iterate through the filenames in fileNames, picking out each name and instantiating a FileInfo object with it. You can detect if it is a file or a directory by calling the Exists property, which will return False if the File object you created is actually a directory. If it is a File, you can add it to the new List(Of FileInfo), as shown in the following snippet:
For Each fileName As String In fileNames
    Dim file As FileInfo = New FileInfo(fileName)
    If file.Exists Then
        fileList.Add(file)
    End If
Next
That done, you can return fileList to the calling method:
Return fileList
The calling method was btnCopy_Click. Remember, you went off to GetFileList in the first line of the event handler! At this point, you’ve returned with a list of FileInfo objects, each representing a file selected in the source TreeView. You can now iterate through the list, copying the files and updating the UI, as shown in the completed Click event handler in Example 3-31.
Private Sub btnCopy_Click( _
ByVal sender As System.Object, _
ByVal e As System.EventArgs) Handles btnCopy.Click

    Dim fileList As List(Of FileInfo) = GetFileList()

    For Each file As FileInfo In fileList
        Try
            lblStatus.Text = "Copying " + txtTarget.Text + "" + file.Name + "..."
            Application.DoEvents()
            file.CopyTo(txtTarget.Text + "" + file.Name, cbOverwrite.Checked)
        Catch ex As Exception
            MessageBox.Show(ex.Message)
        End Try
    Next
    lblStatus.Text = "Done"
    Application.DoEvents()
End Sub
As you go, write the progress to the lblStatus label and call Application.DoEvents to give the UI an opportunity to redraw. Then call CopyTo on the file, passing in the target directory obtained from the text field, and a Boolean flag indicating whether the file should be overwritten if it already exists.
You’ll notice that the flag you pass in is the value of the cbOverwrite checkbox. The Checked property evaluates to True if the checkbox is checked and False if not.
The copy is wrapped in a Try block because you can anticipate any number of things going wrong when copying files. For now, handle all exceptions by popping up a dialog box with the error; you might want to take corrective action in a commercial application.
That’s it; you’ve implemented file copying!
Handling the Delete Button Event
The code to handle the delete event is even simpler. The very first thing you do is make sure the user really wants to delete the files. You can use the MessageBox static Show method, passing in the message you want to display, the title "Delete Files" as a string, and flags:
-
MessageBox.YesNo Asks for two buttons:
YesandNo-
MessageBox.IconExclamation Indicates that you want to display an exclamation mark icon
-
MessageBox.DefaultButton.Button2 Sets the second button (
No)as the default choice
When the user chooses Yes or No, the result is passed back as a System.Windows.Forms.DialogResult enumerated value. You can test this value to see if the user selected Yes, as shown in the following code snippet:
Private Sub btnDelete_Click( _
   ByVal sender As System.Object, _
   ByVal e As System.EventArgs) Handles btnDelete.Click
    Dim result As DialogResult = _
        MessageBox.Show( _
            "Are you quite sure?", _
            "Delete Files", _
            MessageBoxButtons.YesNo, _
            MessageBoxIcon.Exclamation, _
            MessageBoxDefaultButton.Button2)
    If result = Windows.Forms.DialogResult.Yes Then
        Dim fileNames As List(Of FileInfo) = GetFileList()
        For Each file As FileInfo In fileNames
            Try
                lblStatus.Text = "Deleting " + txtTarget.Text + "" +
                file.Name + "..."
                Application.DoEvents()
                file.Delete()
            Catch ex As Exception
                MessageBox.Show(ex.Message)
            End Try
        Next
        lblStatus.Text = "Done."
        Application.DoEvents()
    End If
End Sub
Assuming the value you get back from the DialogResult is Yes, you get the list of fileNames and iterate through it, deleting each as you go:
The final working version of FilesCopier window is shown in Figure 3-17.

[*] This article is licensed under the GNU Free Documentation License (http://www.gnu.org/copyleft/fdl.html).