5. Drupal Content Explained
The most important thing on your website is the content.
Drupal itself is called a Content Management System, and the most important way that Drupal helps you manage content is with content types.
In this chapter, we explore the content types available on a new Drupal site.
We’re also going to show you how to create and edit your own content types.
At the end of this chapter, you should be able to
![]() Add content.
Add content.
![]() Find content.
Find content.
![]() Create an Article.
Create an Article.
![]() Create a Basic page.
Create a Basic page.
![]() Enable more content types.
Enable more content types.
![]() Create more content types.
Create more content types.
![]() Edit content types.
Edit content types.
![]() Describe the purpose of a content type.
Describe the purpose of a content type.
Content Types
There is one important thing to think about before using Drupal content: Different types of content have different features.
Your site might contain many different content types, from news, blogs, and events to opinion polls, e-commerce products, staff member profiles, and more. Each of those is a different content type and will likely need different features.
When you first install Drupal, it gives you an Article and a Basic page content type.
Drupal also provides four other content types ready for you to enable and use: Blog, Book, Forum, and Poll. Each content type has unique features and serves a unique purpose on the site.
In addition to the content types that Drupal provides, you can also create your own. For instance, imagine you want to sell products on your site. You can create a Product content type. This unique content type can feature photos of the product, its price, and shipping information. You probably don’t want to add a price and shipping information to staff member profiles, so you can create a separate Staff Members content type for them! Perhaps your site is going to help your team run events. You can create an Events content type and include a date and a location. The possibilities are endless.
Default Content Types Explained
The best way to learn about content types is to start using them. Let’s start with the two default content types: Article and Basic page.
Creating an Article
Articles are where you can put all your news and topical information. In our Drupalville site, we will use articles to publish news and information about Drupal.
We’re going to start simply and walk through the process of creating an Article. After you are familiar with the style of the content form, you can speed up the process and explore more options:
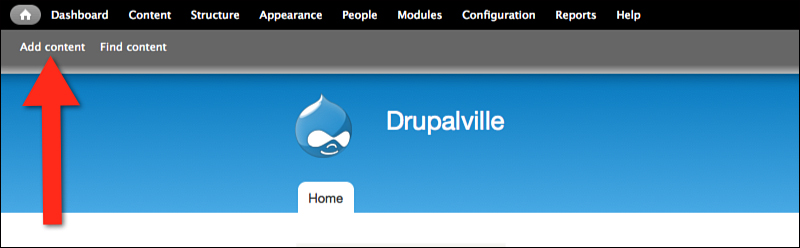
1. Log into your site and see the black menu bar across the top.
2. Under that menu is a gray menu bar, which contains just two links: Add Content and Find Content.
3. Click Add Content, which you can see highlighted in Figure 5.1.
4. You’ll see a screen like Figure 5.2.
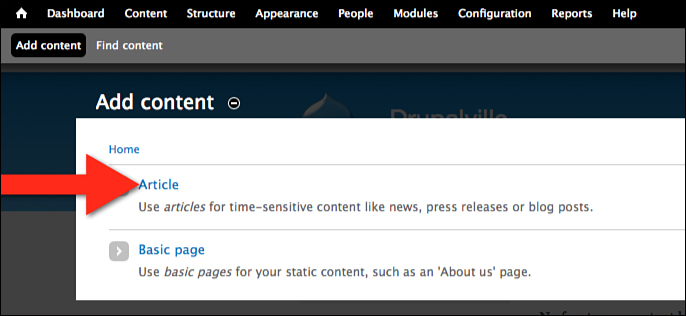
You’ll see two options: Article and Basic Page. You can see that Drupal explains an Article in this way: “Use articles for time-sensitive content like news, press releases or blog posts.”
5. Click Article, and you see a screen like Figure 5.3. This is the main screen for creating content in Drupal. You’ll be coming back here time and time again throughout the book.

6. There are only two fields that are essential to enter: Title and Body. You can also enter Tags, which are keywords you can use to categorize the content. You can enter as many as you want. Simply add a comma and a space after each one. Here are the details of what to enter. You can see the results in Figure 5.4:
![]() Title: Welcome to Drupalville
Title: Welcome to Drupalville
![]() Tags: Drupalville, Introduction
Tags: Drupalville, Introduction
![]() Body: Welcome to Drupalville. This is a great place to spend time!
Body: Welcome to Drupalville. This is a great place to spend time!

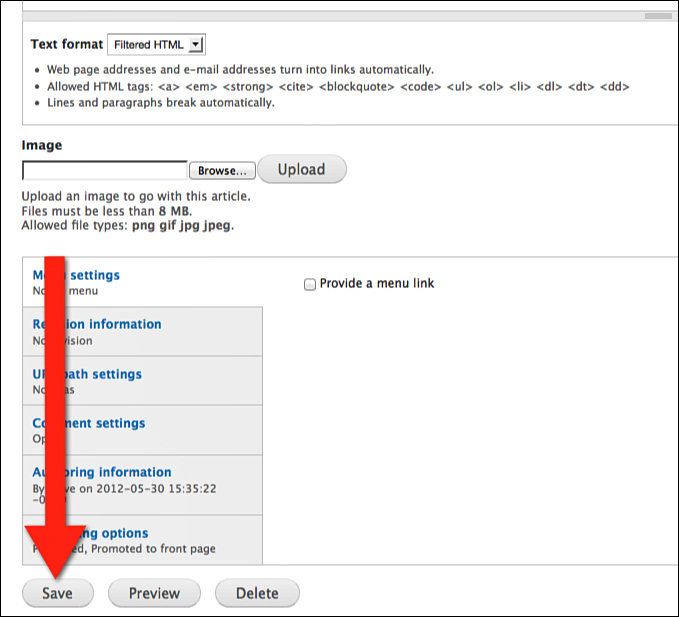
7. Scroll to the bottom of the page, and click Save, as shown in Figure 5.5.
You can now see your first Drupal article live on your site, as shown in Figure 5.6.

8. You can leave comments on your article. Now give the comments a test. You must enter a comment but don’t have to enter a subject. If you leave the subject blank, then Drupal will fill it in for you. As you enter the comment, your screen will look like Figure 5.7:
![]() Subject: I agree
Subject: I agree
![]() Comment: I’m excited to see how this site turns out.
Comment: I’m excited to see how this site turns out.

9. Click Save under the comment, as shown in Figure 5.8.

Your Welcome to Drupalville article should now look like Figure 5.9.

That was easy, right? You’ve just published your first Drupal article. Now do it again. Create an article about the Drupal mascot:
1. Go to http://drupal.org/node/9068 and download the Drupal mascot from the top of the page. Save the mascot onto your computer desktop.
2. In your Drupal site, click Add content.
3. Click Article.
4. Enter the following information:
![]() Title: Have You Seen The Drupal Mascot?
Title: Have You Seen The Drupal Mascot?
![]() Tags: Drupal, mascot, introduction
Tags: Drupal, mascot, introduction
![]() Body: The Drupal mascot is designed to look like a drop of water.
Body: The Drupal mascot is designed to look like a drop of water.
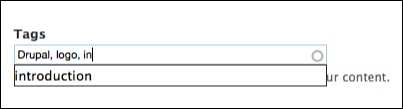
You might notice that the Tags box will make suggestions for you as you type. Enter the letters “in” and Drupal will suggest “introduction,” as shown in Figure 5.10.
Now upload your mascot to the article:
1. Find the image field.
2. Click Browse, as shown in Figure 5.11.

3. Find the Drupal mascot on your desktop, and click Upload.
4. You can now see a thumbnail of the mascot, as shown in Figure 5.12.

It isn’t required by Drupal, but it is useful to enter an Alternate Text description. This text shows to search engines and people who may be partially sighted and can’t see images clearly.
Your whole article should now look like Figure 5.13.

5. Click Save at the bottom of the page.
Your article should now look like Figure 5.14.

Creating a Basic Page
Now that you’ve created two Articles, you can see what the other default content type looks like.
You can create an About Us page on your Drupalville site, as shown in Figure 5.15. When people are discussing websites, pages like this are often called static pages. Static refers to content that seldom or never changes. In Drupal, static pages are called Basic pages.

About Us is a great example. You might write your About Us page once and then not update it for months or years.
You can walk slowly through the process of creating a Basic page. We will explore the screen in front of you and introduce you to the options you see. After you are familiar with the style of the content form, you can speed up the process, slowing only when something new comes along:
1. Notice the black menu bar across the top of your site. Under that menu is the gray menu bar with two links: Add Content and Find Content. Click Add Content.
2. You now see your two content types: Basic Page and Article. Click Basic Page, as marked in Figure 5.15.
You now have a screen that looks like Figure 5.16.

3. Here are the details of what to enter. You can see the results in Figure 5.17:
![]() Title: About Us
Title: About Us
![]() Body: Drupalville is a great resource for everything you want to know about Drupal. It has information about events, sites, companies, and more.
Body: Drupalville is a great resource for everything you want to know about Drupal. It has information about events, sites, companies, and more.

4. Click Save at the bottom of the page.
Now that you’ve finished your first Basic page, your screen will look like Figure 5.18.

Notice anything missing? What did you have on Articles that you don’t have on your Basic page? Let’s see an Article and Basic page side-by-side, as shown in Figure 5.19.

The Article has the title, author name, the publishing date, an image, body, tags, and comments. The Basic page has only the title and body.
1. Click the Home link on the Main menu, as highlighted in Figure 5.20.

Your site’s homepage should look like Figure 5.21. What’s missing? Your Basic Page again. The Articles are there, but the Basic Page is missing.

Fortunately, there is one place where you can find all the content on your Drupal site.
2. Click Find Content, as highlighted in Figure 5.22.

You’ll now see a list of all the content on your site, as shown in Figure 5.23. If you ever get stuck looking for content on your site, this is the place to come.

3. Edit your About Us page so that it’s easier to find. Click the Edit link in the About Us row, as shown in Figure 5.24.

Add a menu link so that this Basic page is easy to find:
1. Scroll down to the bottom of the page and click the Provide a Menu Link box.
2. You’ll see some more options appear. You won’t need to change these options. Simply confirm that they look like Figure 5.25.

3. Click Save.
4. Click the Home icon on the black menu bar, as shown in Figure 5.26. If you ever get lost in Drupal’s admin area, click this icon to go back to the homepage.

There will now be a Main Menu link to your About Us page, as shown in Figure 5.27. By default, menus are ordered alphabetically. You learn how to change the order of menu links in Chapter 8, “Drupal Menus Explained.”

What Have We Learned?
Let’s recap. Drupal comes with two content types: Articles and Basic pages.
Why does Drupal come with two content types? Because different types of content require different features.
What are the different features on these content types? Look at Table 5.1.

Why do you think that the Basic page has all these features removed? It is because static, unchanging content probably doesn’t need those features.
We recently spoke with a student who admitted not updating his About Us page since 2000. It certainly would be embarrassing if visitors saw that as the publishing date for that page.
On the other hand, if you have topical news and use an Article, you probably need the publishing date. It’s important to know if the information in the Article is fresh or out of date.
Repeat after us, “Different types of content have different features.”
The wonderful thing about Drupal content is that it’s possible to expand the previous chart in both directions. You can add more content types and features.
In the next section, you see how to add more content types and more features.
Extra Content Types Explained
You’ve seen that Drupal provides two default content types: Article and Basic page. There are also more content types available but not yet enabled. Now see how to enable those extra content types.
Creating a Blog Entry
A blog entry is similar to an article, but is likely to contain more of the author’s own personal opinion. Because of this, blog posts are often organized by author rather than topic.
Drupal provides a blog content type, but it is disabled by default. Let’s see how to enable the Blog content type for our site:
1. On the black menu bar located at the top of your screen, click Modules. Your screen should look like Figure 5.28.

A lot of information is conveyed on this Module page, which Chapter 4, “Drupal Administration Explained,” briefly covers and Chapter 7, “Drupal Modules Explained,” further explores. For now, we’re simply going to enable the Blog module.
2. Check the box next to Blog, as highlighted in Figure 5.29.

3. Scroll to the bottom of the page, and click Save Configuration, as highlighted in Figure 5.30.

Now use exactly the same processes you used when creating an Article and a Basic page:
1. Click Add Content.
2. Click Blog entry. Notice the description provided by Drupal is “Use for multi-user blogs. Every user gets a personal blog.”
3. Title: My First Blog on Drupalville
4. Body: This is great. I have my own area to blog on Drupaville!
5. Click Save.
Let’s repeat this process one more time:
1. Click Add Content.
2. Click Blog entry.
3. Title: I’m building a great site with Drupal!
4. Body: We’re underway. I’m excited to get this site built.
5. Click Save.
6. Look for the new addition on the blog entries, which is highlighted in Figure 5.31.
7. The new feature provided by the Blog module is a simple link. Click the link highlighted in Figure 5.31, and you see a list of all the blog posts provided by the author, as shown in Figure 5.32.


Each user on the site now has the ability to create a blog like this.
Now see how Blog entries compare to Articles and Basic pages, as shown in Table 5-2.

Creating a Poll
Do you want to find what your site visitors are thinking on a certain topic? Would it help you to ask them questions?
You can do that with Drupal’s Poll module. Poll enables you to ask simple questions with multiple choice answers.
It might seem strange to include Poll in a chapter on content types, but it is relevant. You see, Polls are content in the same way as Articles, Blogs, and Basic Pages.
Here’s how to enable the Poll module and add a Poll:
1. Click Modules on the black menu bar.
2. Check the box next to Poll in the module list.
3. Click Save Configuration.
4. Click Add Content.
5. Click Poll. You’ll now see a screen shown in Figure 5.33.
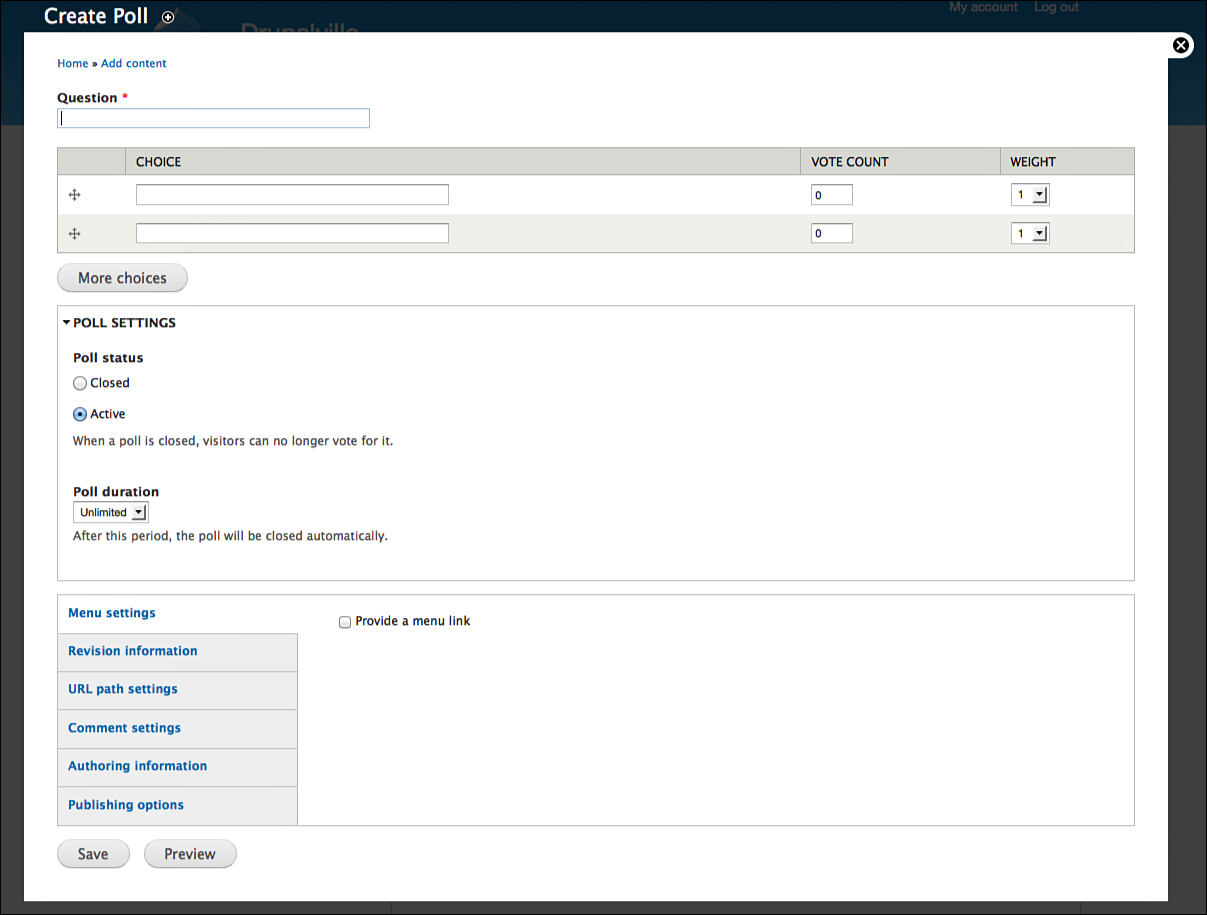
6. Here are the details to fill in when creating a poll:
![]() Question: How long have you been using Drupal?
Question: How long have you been using Drupal?
![]() Choice: One day
Choice: One day
![]() Choice: One week
Choice: One week
![]() Click More Choices
Click More Choices
![]() Click More Choices
Click More Choices
![]() Choice: One year
Choice: One year
When you finish, your screen should look like Figure 5.34

Your Poll will appear, as shown in Figure 5.35.

8. Notice the two new tabs: Results and Votes. Click Results and you can see all the totals for each answer. Click Votes and you see each individual vote.
9. Click View and choose one response.
10. Click Vote. Drupal will now show you the results of your poll, as in Figure 5.36.
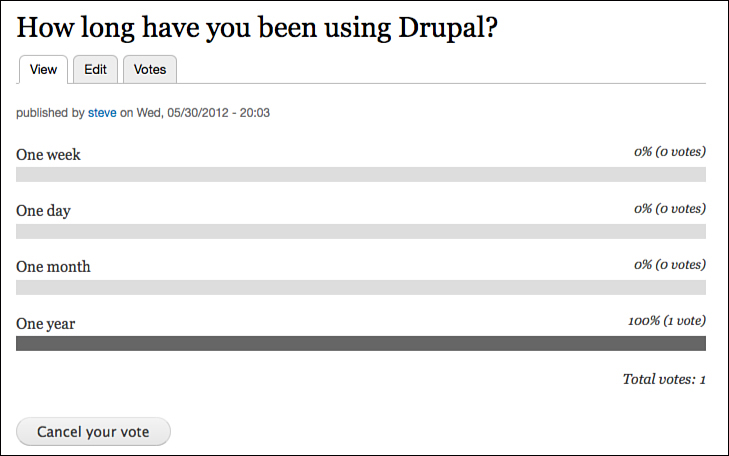
Notice that the Results tab disappears. The default view of the poll for you becomes the results. Why? The Poll module does not allow users on the site to vote more than once. It also does not allow anonymous visitors to vote more than once unless they go to another computer. Okay, so it isn’t perfect at preventing vote scams from anonymous visitors, but it does quite well.
Table 5-3 shows how Polls compare to Articles, Basic pages, and Blog entries.

Creating a Forum
On your site, you want to encourage visitors to post questions and respond to other visitor questions, so your plan includes a discussion forum. You can find a great example of a discussion forum using Drupal at http://drupal.org/forum.
Forum topics are content in exactly the same way as the Articles, Basic pages, Blog entries, and Polls you’ve seen before. The Forum module simply organizes the content into a discussion forum layout.
Now, create some discussion posts. Here are the steps:
1. Go to the Modules page.
2. Enable the Forum module.
3. Click Save Configuration.
4. Click Add Content.
5. Click Forum Topic.
6. Enter the following information. Your screen should look like Figure 5.37.

![]() Title: How did you discover Drupal?
Title: How did you discover Drupal?
![]() Forums: General discussion.
Forums: General discussion.
![]() Body: What’s your Drupal story? Me: I started using it at school and have been addicted ever since.
Body: What’s your Drupal story? Me: I started using it at school and have been addicted ever since.
7. Click Save. Your forum topic should look like Figure 5.38.
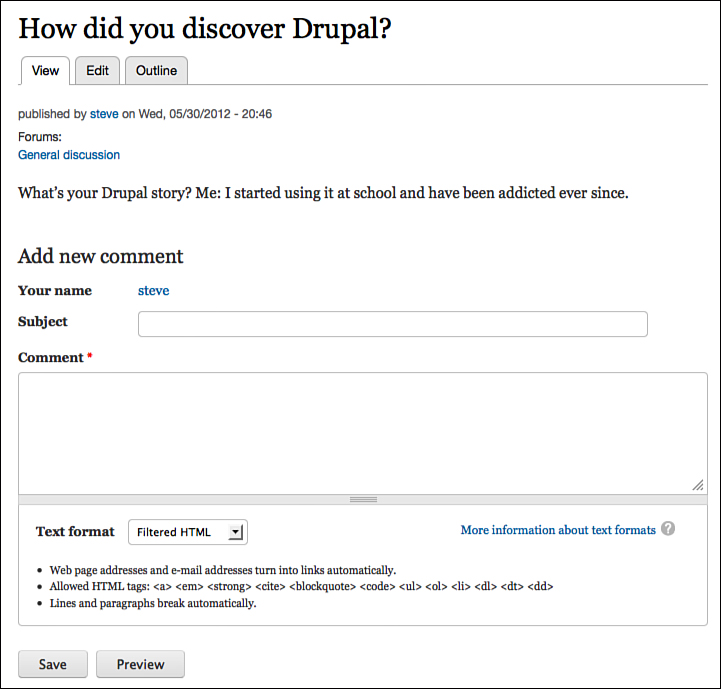
8. Post a reply in the comments for this forum post.
9. When you save your forum topic, it should look like Figure 5.39.
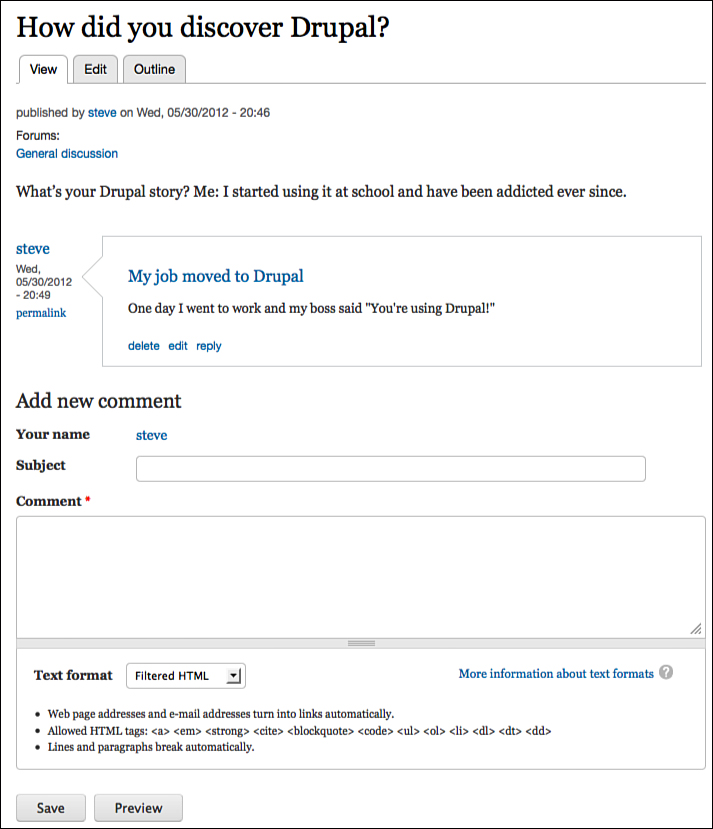
10. To be honest, this looks identical to the Article with a comment you created at the beginning of this chapter. Where is the discussion forum? You can see it by clicking the General discussion link, which is highlighted in Figure 5.40.

You now see your forum topic organized into a discussion forum layout, as shown in Figure 5.41.

Click Add new Forum topic and add some new posts. No matter how many you add, the topics stack up on the main General Discussion page, as shown in Figure 5.41.
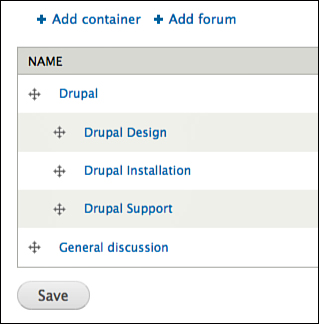
By default, all Drupal forum topics are entered into General Discussion. If you want a more elaborate organization for your topics, follow these steps:
1. Click Structure on the black top menu.
2. Click Forums. You now see a screen that looks like Figure 5.42.

There are two things to know here:
![]() Container: This includes the top level categories such as Drupal or Sports.
Container: This includes the top level categories such as Drupal or Sports.
![]() Forum: This includes the subcategories such as Drupal Installation, Drupal Design and Drupal Support or Tennis, Golf, and Football.
Forum: This includes the subcategories such as Drupal Installation, Drupal Design and Drupal Support or Tennis, Golf, and Football.
Now see how that works in practice:
1. Click Add container.
2. Container name: Drupal.
3. Click Save.
4. Click Add Forum.
5. Forum name: Drupal Installation.
6. Parent: Drupal.
7. Click Save.
8. Click Add Forum.
9. Forum name: Drupal Design.
10. Parent: Drupal.
11. Click Save.
12. Click Add Forum.
13. Forum name: Drupal Support.
14. Parent: Drupal.
15. Click Save.
Your forum organization should now look like Figure 5.43.
Now that you’ve seen how your fifth content type works, let’s recap. How do Forum topics compare to Articles, Basic pages, Blog entries, and Polls? See Table 5-4.

Creating a Book
Now let’s turn our attention to the last of the six content types available with Drupal by default.
We’re going to create a Drupal User Manual as a section for your site. As the name suggests, a user manual is an organized set of pages. For an example of an online book created using Drupal’s Book module, visit http://drupal.org/documentation/. Click through the pages using the navigation links at the bottom of the page content. You can see that content is organized using links like those shown in Figure 5.44.

![]() The five links organized vertically are to pages in a lower level in the documentation.
The five links organized vertically are to pages in a lower level in the documentation.
![]() The Up link takes you to a higher level in the documentation.
The Up link takes you to a higher level in the documentation.
![]() The Administration Guide and Working with the toolbar links enable you to browse through pages in the same level of the documentation.
The Administration Guide and Working with the toolbar links enable you to browse through pages in the same level of the documentation.
To add a manual like this to your site, you need to enable the Book module; then you can create some pages for your book. Follow these steps:
1. Click Modules on the black menu bar at the top of your screen.
2. Check the box next to Book in the module list.
3. Click Save Configuration.
4. Click Add Content.
5. Click Book Page.
6. Enter the following information:
![]() Title: Drupal User Manual.
Title: Drupal User Manual.
![]() Body: Welcome to the Drupal manual provided by Drupalville.
Body: Welcome to the Drupal manual provided by Drupalville.
![]() Menu settings: Check the Provide a Menu link box.
Menu settings: Check the Provide a Menu link box.
![]() Book outline: Create a new book. Your screen should look like Figure 5.45. This is where you tell Drupal that the page you are creating is the page that defines the book.
Book outline: Create a new book. Your screen should look like Figure 5.45. This is where you tell Drupal that the page you are creating is the page that defines the book.

7. Click Save. Your book page should look like the image in Figure 5.46.

The Book module is called Book for a reason. Book is designed to link content together like the table of contents in a book. The process ends with a series of pages with parent and child relationships. For example, book pages are parents to chapter pages. In turn, chapter pages are parents to topic pages. In this next activity, you create child pages to the book you just defined. Now create the first chapter:
1. Click Add Child Page, as highlighted in Figure 5.47.

2. Enter the following information:
![]() Title: Chapter 1: How to Install Drupal.
Title: Chapter 1: How to Install Drupal.
![]() Body: This part of the Drupal User Manual will show you how to install Drupal.
Body: This part of the Drupal User Manual will show you how to install Drupal.
![]() Book Outline > Book: Drupal User Manual.
Book Outline > Book: Drupal User Manual.
![]() Book Outline > Parent Item: Drupal User Manual.
Book Outline > Parent Item: Drupal User Manual.
3. Click Save.
4. Click Add Child Page.
5. Enter the following information to create a child page for your documentation:
![]() Title: How to Install Drupal Automatically
Title: How to Install Drupal Automatically
![]() Book Outline > Book: Drupal User Manual
Book Outline > Book: Drupal User Manual
![]() Parent Item > Book: Chapter 1: How to Install Drupal
Parent Item > Book: Chapter 1: How to Install Drupal
6. Click Save.
7. Click Up. This link is highlighted in Figure 5.48.

8. Enter the following information to create another child page:
![]() Click Add Child Page.
Click Add Child Page.
![]() Title: How to Install Drupal Manually.
Title: How to Install Drupal Manually.
![]() Book Outline > Book: Drupal User Manual.
Book Outline > Book: Drupal User Manual.
![]() Parent Item > Book: Chapter 1: How to Install Drupal.
Parent Item > Book: Chapter 1: How to Install Drupal.
9. Click Save.
10. Click Up.
11. Enter the following information to create another child page:
![]() Click Add Child Page.
Click Add Child Page.
![]() Title: How to Install Drupal on a Mac.
Title: How to Install Drupal on a Mac.
![]() Book Outline > Book: Drupal User Manual.
Book Outline > Book: Drupal User Manual.
![]() Parent Item > Book: Chapter 1: How to Install Drupal.
Parent Item > Book: Chapter 1: How to Install Drupal.
12. Click Save.
13. Click Up.
14. Enter the following information next:
![]() Click Add Child Page.
Click Add Child Page.
![]() Title: How to Install Drupal on a PC.
Title: How to Install Drupal on a PC.
![]() Book Outline > Book: Drupal User Manual.
Book Outline > Book: Drupal User Manual.
![]() Parent Item > Book: Chapter 1: How to Install Drupal.
Parent Item > Book: Chapter 1: How to Install Drupal.
15. Click Save.
16. Click Up.
You can now see that your User Manual is starting to take shape, as shown in Figure 5.49.

If your pages don’t end up where you want them, you can move them around easily, as follows:
1. Click the Outline tab on one of your book pages.
2. Click Reorder an Entire Book in the top-right corner.
3. Click Edit Order and Titles.
4. Find the + symbol next to each page. If you click, hold and drag the + symbol, you can rearrange the pages up, down, in, and out.
5. Click Save Book Pages.
Now we’ve seen how your sixth content type works. How do Book pages compare to Articles, Basic pages, Blog entries, Polls, and Forum topics?
Table 5.5 shows the extra features provided by the Book module are automatically available to all your content types.

Let’s recap. Drupal comes with two content types: Articles and Basic pages. If you enable four modules disabled by default, you can also use these content types: Blog entries, Polls, Forum topics, and Book pages.
Why does Drupal come with six content types? Because different types of content need different features.
In the final section, we see how to add new content types and customize the ones you already have.
Custom Content Types Explained
Now that you are familiar with several types of content, you can create custom content types.
In your Drupalville site, you’re going to create content types called Events, Sites, User Groups, and Companies. Before diving in and creating them, let’s talk briefly about each content type:
![]() Events: This content type can be used to post Drupal-related events, such as the annual DrupalCons and regional Drupal Camps.
Events: This content type can be used to post Drupal-related events, such as the annual DrupalCons and regional Drupal Camps.
![]() Sites: This content type can be used to post sites that provide information, tutorials, modules, or themes for Drupal.
Sites: This content type can be used to post sites that provide information, tutorials, modules, or themes for Drupal.
![]() User Groups: This content type can be used to post sites for local groups that meet to talk and learn about Drupal.
User Groups: This content type can be used to post sites for local groups that meet to talk and learn about Drupal.
![]() Companies: This content type can be used to post businesses that provide Drupal-related services.
Companies: This content type can be used to post businesses that provide Drupal-related services.
Creating the Events Content Type
Create your first custom content type: Events.
1. Click Structure on the black menu bar.
2. Click Content Types. You see that all the content types used so far are now available here, as shown in Figure 5.50.

3. Click Add Content Type in the top-left of the screen. Take a moment and compare the Add Content Type link on the screen and the Add Content on the menu bar at the top of the page. These links are often confused. Pay close attention going forward because you create a content type and then add content using that content type. Add Content Type always comes before Add Content.
You now see a screen like the one in Figure 5.51.
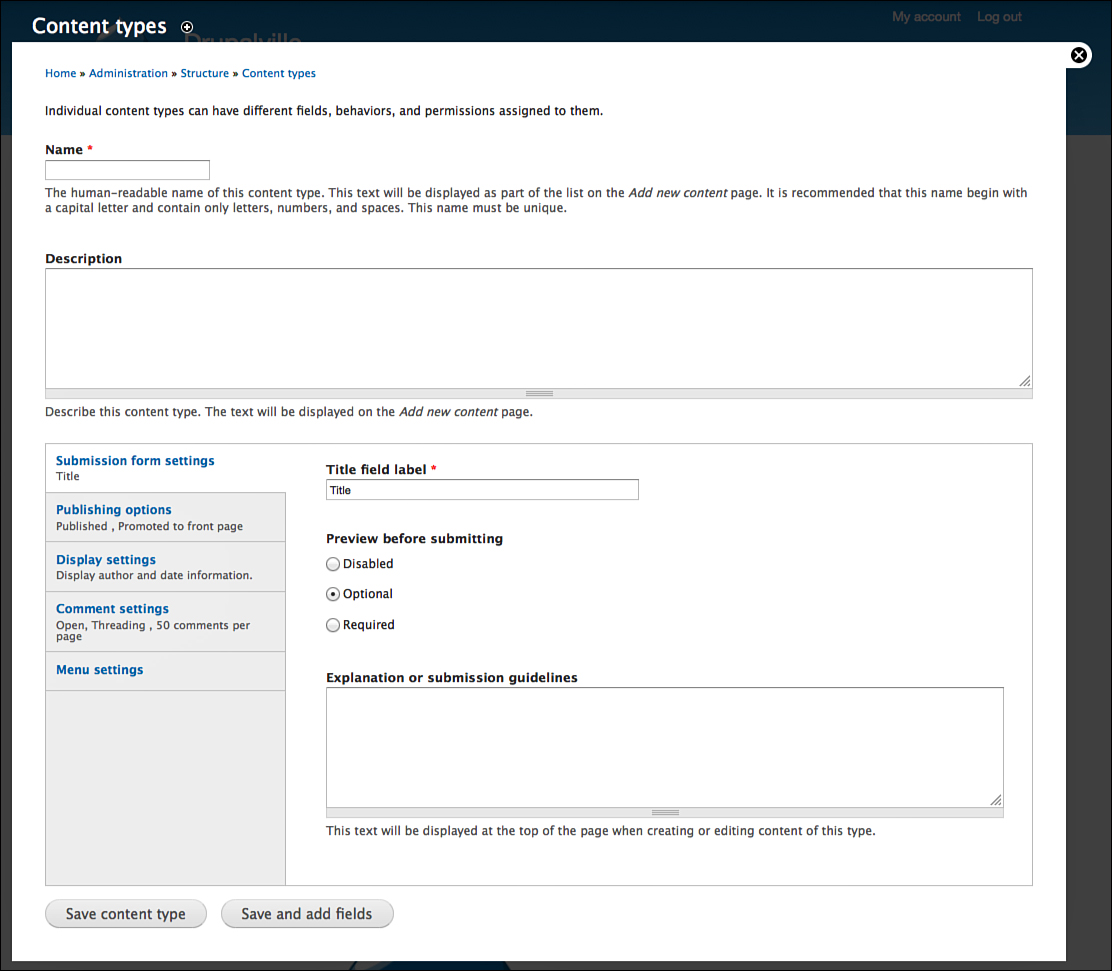
4. Enter the following information. The title will be shown to your visitors but your screen will look like Figure 5.52:
![]() Name: Events.
Name: Events.
![]() Description: This is where we enter information about Drupal events around the world.
Description: This is where we enter information about Drupal events around the world.
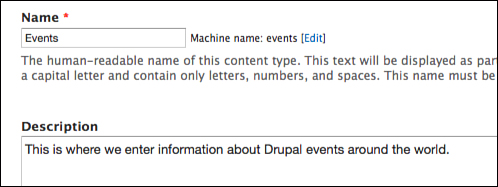
Although the description is private and won’t be made public, try to use it. The name of the content type might seem obvious when you create it and remain so for the life of the project. But, I’ve been on several projects where the name was not so obvious 6 months later. Thus, try to clearly explain the purpose of the content type.
Further down the screen, there are five areas with options to configure your content type. Now look at them one-by-one.
Submission Form Settings
This area controls the form that users see when they add Events content.
Enter the following information. Note that the Title field label is an important setting. It often shows on the screen. The Explanation won’t be made public. Your screen should look like Figure 5.53:
![]() Title: Name of Event.
Title: Name of Event.
![]() Explanation: Make sure that you fill in all the fields. Make sure to include as much information as possible about why someone should attend this event.
Explanation: Make sure that you fill in all the fields. Make sure to include as much information as possible about why someone should attend this event.

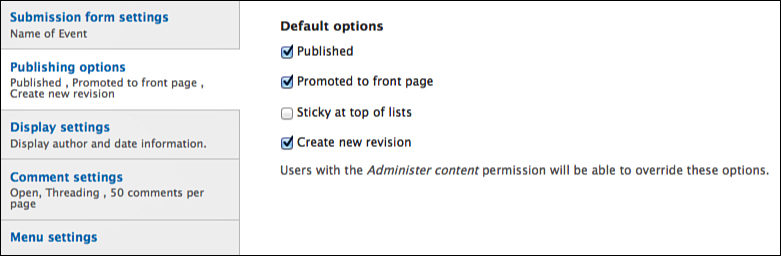
Publishing Options
This area controls the default publishing options for Events content. Consider each option:
![]() Published: Will Events content be published automatically? This is one way to moderate the content submitted to your site. Each time a page is created with a content type that has this option unchecked, the page will be saved but the page will not be available. The administrators can use the Find Content administrative page to locate unpublished pages and manually edit and publish them.
Published: Will Events content be published automatically? This is one way to moderate the content submitted to your site. Each time a page is created with a content type that has this option unchecked, the page will be saved but the page will not be available. The administrators can use the Find Content administrative page to locate unpublished pages and manually edit and publish them.
![]() Promoted to Front Page: Will Events content be published to the front page automatically?
Promoted to Front Page: Will Events content be published to the front page automatically?
![]() Sticky at Top of List: This is most useful for keeping forum guidelines at the top of the list of new forum posts. You probably won’t use this setting for other content types.
Sticky at Top of List: This is most useful for keeping forum guidelines at the top of the list of new forum posts. You probably won’t use this setting for other content types.
![]() Create New Revision: Now this is an important feature. If you check this box, Drupal saves a copy of your article every time you make a change. If the new version has a problem, you can easily roll back to the previous version.
Create New Revision: Now this is an important feature. If you check this box, Drupal saves a copy of your article every time you make a change. If the new version has a problem, you can easily roll back to the previous version.
So, here are the boxes we recommend checking, as shown in Figure 5.54:
![]() Published: Yes
Published: Yes
![]() Promoted to Front Page: Yes
Promoted to Front Page: Yes
![]() Sticky at Top of Lists: No
Sticky at Top of Lists: No
![]() Create New Revision: Yes
Create New Revision: Yes
Display Settings
This option simply asks whether you want the author name and published date shown on the article. Unfortunately, you can’t easily split these up. You have to choose both or none.
Uncheck the following box (as shown in Figure 5.55):
![]() Display Author and Date Information: No
Display Author and Date Information: No

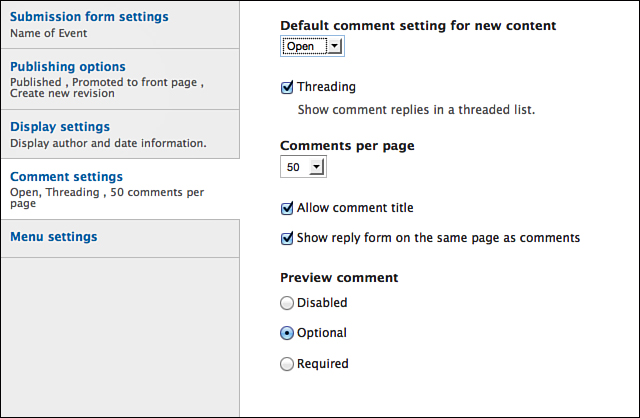
Comment Settings
This option asks if you want people to comment on your content. Think carefully before turning this on. Comments will probably be appropriate for some content, such as Articles, Blogs, and Events. You probably don’t want comments for your About Us page or if you add pages for your staff members.
The most confusing setting is first. Here’s the meaning of the three options:
![]() Open: People can post new comments.
Open: People can post new comments.
![]() Closed: People can see previously posted comments but can’t post new ones.
Closed: People can see previously posted comments but can’t post new ones.
![]() Hidden: Neither comments nor the comment form show on the site.
Hidden: Neither comments nor the comment form show on the site.
I recommend leaving the default settings, as shown in Figure 5.56.
Menu Settings
This area controls whether users can make menu links to individual content items. The key question to ask is this: Is each new Event important enough to make into a menu link?
In this case, the answer is possibly No. There are so many events that it would be difficult to provide menu links for them all.
I recommend leaving the default settings, as shown in Figure 5.57.

Creating an Events Content Item
Now that you have set up your Events content type, you can use it to create a content item:
1. Click Save Content Type at the bottom of the screen.
2. Click Add Content on the menu at the top of the screen.
3. Click Events.
4. Enter the following information:
![]() Name of Event: DrupalCon Portland.
Name of Event: DrupalCon Portland.
![]() Body: DrupalCon Portland is the large Drupal event in North America for 2013.
Body: DrupalCon Portland is the large Drupal event in North America for 2013.
Notice that all the options just discussed are available at the bottom of this page. You can set options globally for your content type. You can also set options for each individual content item.
In addition to the options just discussed, there are additional options, including Book outline and URL path settings. Those options are controlled in other parts of the site, often under the Configuration link in the top menu.
5. Click Save.
Now test Revisions, which is a new feature you have turned on for Events:
1. Click the Edit tab under the DrupalCon Portland title.
2. Make a small change to the content. For example, change the word large to huge.
3. Click Save.
4. Click the new Revisions tab under the DrupalCon Portland title.
5. You can now see a screen like the one in Figure 5.58. You can click the date of the revision to see the previous content. You can click the revert link to restore that previous version of the content.

There are some extra features available for Drupal that enable you to take even greater control over this Revision feature. Visit http://www.Drupal7Explained.com/chapter5 for more details.
Creating the Sites Content Type
Now create your second custom content type: Sites. This gives your visitors information about useful Drupal sites:
1. Click Structure on the black menu bar.
2. Click Content Types.
3. Click Add Content Type.
4. Enter the following information.
![]() Title: Sites
Title: Sites
![]() Description: This is where you enter information about useful Drupal websites and resources.
Description: This is where you enter information about useful Drupal websites and resources.
5. Find the Submission form settings area and enter this information:
![]() Title: Site Name
Title: Site Name
6. Find the Publishing options area and enter this information:
![]() Published: Yes
Published: Yes
![]() Promoted to front page: Yes
Promoted to front page: Yes
![]() Sticky at top of list: No.
Sticky at top of list: No.
![]() Create new revision: Yes.
Create new revision: Yes.
7. Find the Display settings area and enter this information:
![]() Display author and date information: Yes
Display author and date information: Yes
8. Comments settings: Leave as default.
9. Menu settings: uncheck Main menu.
10. Click Save.
11. Click Add Content.
12. Click Sites.
13. Enter the following information:
![]() Name of Site: Drupal.org.
Name of Site: Drupal.org.
![]() Body: http://Drupal.org is the official homepage of Drupal. Here you can find documentation, support, downloads, and much more.
Body: http://Drupal.org is the official homepage of Drupal. Here you can find documentation, support, downloads, and much more.
14. Click Save.
15. The first Site you add will look like Figure 5.59.
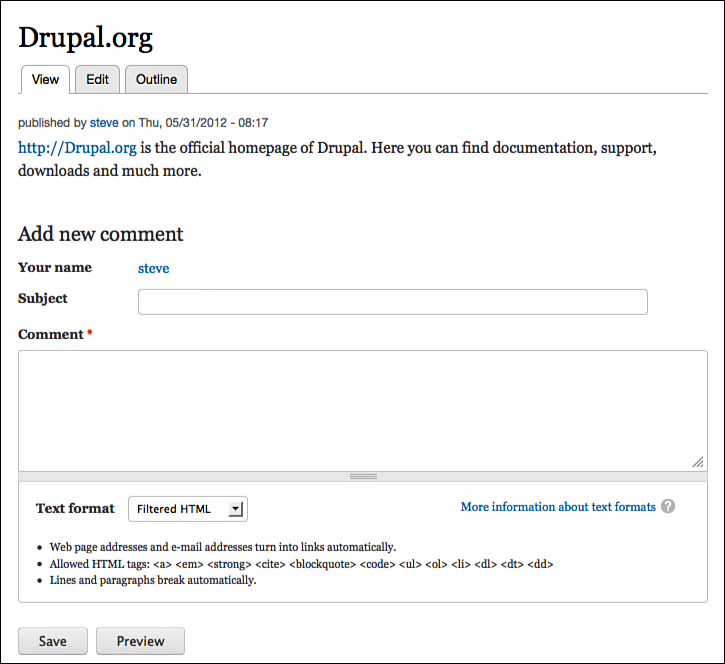
Notice that Drupal has automatically converted http://Drupal.org into a link. At the moment, Drupal allows only a small amount of HTML code. Chapter 7 shows you how to allow more code in the body. You also see how to add a text editor.
Creating User Groups
Now create another content type: User Groups. This content type can help your visitors to find a Drupal User Group near them:
1. Click Structure on the black menu bar.
2. Click Content Types.
3. Click Add Content Type.
4. Enter the following information:
![]() Title: User Groups
Title: User Groups
![]() This is where you enter information about Drupal User Groups around the world.
This is where you enter information about Drupal User Groups around the world.
5. Find the Submission Form Settings area and enter this information:
![]() Title: User Group Name
Title: User Group Name
6. Find the Publishing options area and enter this information:
![]() Published: Yes
Published: Yes
![]() Promoted to Front Page: Yes
Promoted to Front Page: Yes
![]() Sticky at Top of List: No
Sticky at Top of List: No
![]() Create New Revision: Yes
Create New Revision: Yes
7. Find the Display settings area and enter this information:
![]() Display Author and Date Information: Yes
Display Author and Date Information: Yes
8. Comments settings: Leave as default.
9. Menu settings: Uncheck Main menu.
10. Click Save.
11. Click Add Content.
12. Click User Groups.
13. Enter the following information:
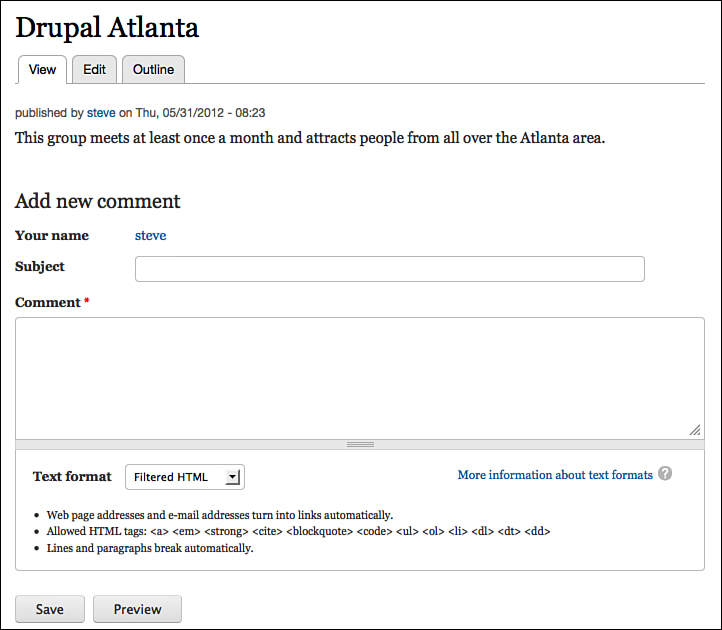
![]() User Group name: Drupal Atlanta.
User Group name: Drupal Atlanta.
![]() Body: This group meets at least once a month and attracts people from all over the Atlanta area.
Body: This group meets at least once a month and attracts people from all over the Atlanta area.
14. The first User Group you have added should look like Figure 5.60.
Congratulations. You now have multiple content types on your site!
Creating Companies
Now create your final custom content type: Companies.
1. Click Structure on the black menu bar.
2. Click Content Types.
3. Click Add Content Type.
4. Enter the following information:
![]() Title: Companies
Title: Companies
![]() Description: This is where you enter information about Drupal companies.
Description: This is where you enter information about Drupal companies.
![]() Title: Company name
Title: Company name
6. Publishing options:
![]() Published: Yes
Published: Yes
![]() Promoted to Front Page: Yes
Promoted to Front Page: Yes
![]() Sticky at Top of List: No.
Sticky at Top of List: No.
![]() Create New Revision: Yes.
Create New Revision: Yes.
7. Display settings:
![]() Display author and date information: Yes
Display author and date information: Yes
8. Comments settings: Leave as default.
9. Menu settings: Uncheck Main menu.
10. Click Save.
11. Click Add Content.
12. Click Sites.
13. Enter the following information:
![]() Company name: Acquia.
Company name: Acquia.
![]() Body: Acquia is a large Drupal company with offices around the world. It was started by Dries Buytaert, the founder of Drupal.
Body: Acquia is a large Drupal company with offices around the world. It was started by Dries Buytaert, the founder of Drupal.
14. The first company you add should look like Figure 5.61.

Editing Content Types
If you want to change any of the settings for any of your 10 content types, here is what you do:
1. Click Structure.
2. Click Content Types.
3. Click Edit next to the content type you want to change.
One thing to note: If you do change any content types settings, the changes will apply only for new content items in that content type. For example, if you make a change to the Events content type, it can impact future Events content that you add, but it does not change your DrupalCon Portland content. You must open and change that manually.
What Have You Learned?
Now recap what you’ve learned during this chapter:
![]() Content types are crucial for setting up content on your Drupal site. Why? Because different types of content need different features.
Content types are crucial for setting up content on your Drupal site. Why? Because different types of content need different features.
![]() Drupal comes with two content types enabled by default: Basic Page and Article.
Drupal comes with two content types enabled by default: Basic Page and Article.
![]() Drupal comes with four modules that add four more content types: Blog entry, Book page, Forum topic, and Poll.
Drupal comes with four modules that add four more content types: Blog entry, Book page, Forum topic, and Poll.
![]() You can create your own custom content types.
You can create your own custom content types.
![]() You can edit existing content types.
You can edit existing content types.
You now have 10 different content types on your site. Each of those 10 has a customized set of features. You started with two default content types, enabled four more content types, and now added four custom content types.
Click Add Content on the black menu bar, and you can now see all 10 content types with a description of what they do, as shown in Figure 5.62.
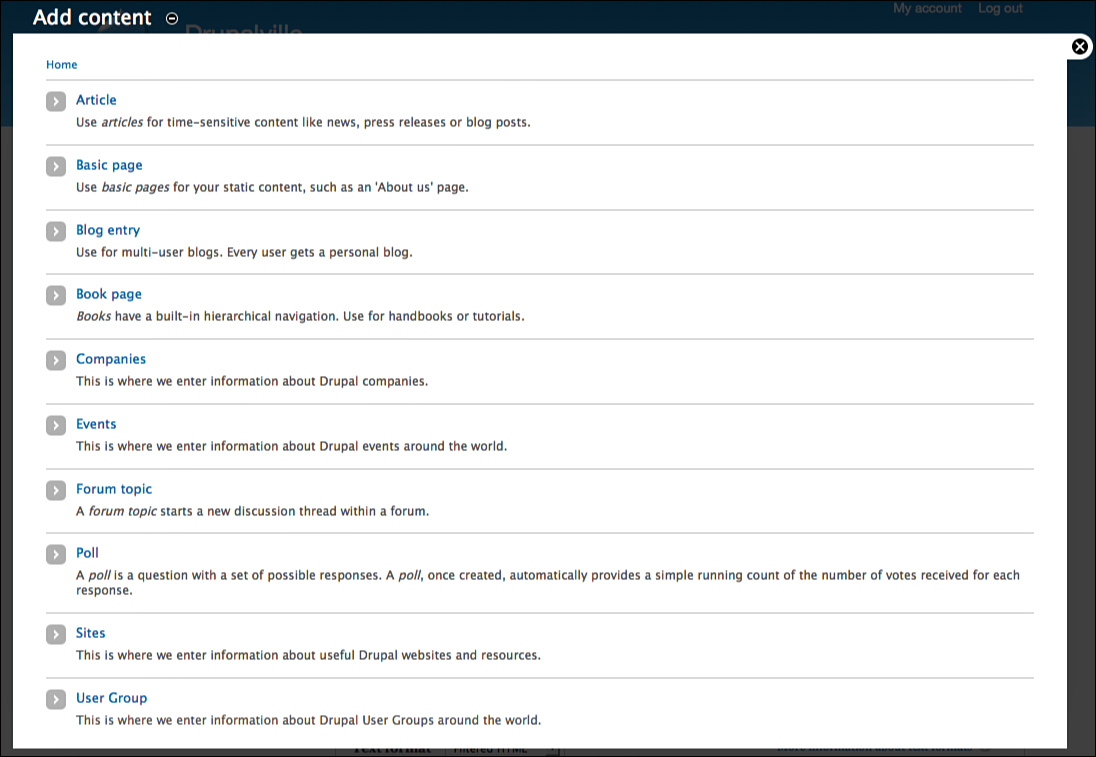
Table 5.6 shows a detailed list of all the features for those 10 content types. The wonderful thing about Drupal content is that you can expand the Table 5.6 in both directions by adding more content types and more features.

What’s Next?
See what our Drupalville site looks like at the end of this chapter. It should look similar to Figure 5.63.

Don’t worry if your site doesn’t match this exactly. If you understand the concepts that we covered in this chapter, you can move on to Chapter 6, “Drupal Fields Explained.”
At the moment, our new content types still look almost identical. There’s little to distinguish between our Events, Sites, User Groups, and Companies.
What do we need to do to make our content types more interesting and useful?
![]() We need to add specific information to each content type.
We need to add specific information to each content type.
![]() We need to add dates and locations to our events.
We need to add dates and locations to our events.
![]() We need to add screenshots and site information to our sites.
We need to add screenshots and site information to our sites.
![]() We need to add meeting locations and organizer details to our User Groups.
We need to add meeting locations and organizer details to our User Groups.
![]() We need to add company logos and addresses to our Companies.
We need to add company logos and addresses to our Companies.
That’s what you do in Chapter 6. You make your content types more interesting by using Fields. Fields are the next step in the Drupal workflow, which you can see in Figure 5.64.