
Graphite pencil is a versatile, practical medium that makes learning to draw convenient for any beginning artist. All you really need are a few basic tools, which are relatively inexpensive and easily can be taken with you almost anywhere. Even when you’re just starting out, it’s best to purchase the highest quality materials you can afford—better-quality materials last longer and will produce the most pleasing results. Here you’ll find a quick overview of the items that I find most helpful.


![]()

CHOOSING PENCILS The first thing you’ll want to do when starting to draw is purchase several different kinds of graphite pencils. Pencils are labeled with numbers and letters—and the combination of the two indicates the softness of the graphite. B pencils, for example, are soft and produce dark, heavy strokes, whereas H pencils are harder and create thin, light lines. An HB pencil is somewhere between the two, which makes it a good, versatile tool for most artists. The number that accompanies a letter indicates how hard or soft each pencil is—the higher the number, the more intense the softness or hardness of your lines will be. (A 4H pencil is harder than a 2H, and a 4B is softer than a 2B.)

SEEING THE WHOLE PICTURE A magnifying glass is a helpful tool for artists, especially when using a photograph as a reference. Use a magnifying glass to enlarge areas of the photograph so you can see exactly what to reproduce. A reducing glass will make the drawing appear smaller so that you can better see any elements you may have missed. When using a photograph as a reference, hold the reducing glass above your drawing until it appears the same size as the photo. Then compare what you see through the reducing glass to the photo itself and make any necessary changes.

FINDING A GOOD SURFACE Drawing paper comes in a range of different surfaces, from smooth to rough; it also can be purchased in single sheets or in conveniently bound books. Most artists choose to use single sheets of high-quality drawing paper, but a sketch pad is often helpful for drawing on the go—especially when you’re drawing figures and need to sit outside and people-watch for inspiration. You may want to begin drawing on paper that has a smooth- to medium-grain texture, as this kind of paper provides the most versatile drawing surface.
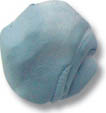


REMOVING TONE Use an eraser to make adjustments, correct mistakes, or pull out highlights. Vinyl erasers (center) are best for large areas, but kneaded erasers (left and right) can be formed into points for erasing small areas or for blending strokes to create smooth transitions. Be gentle when erasing so you don’t damage your paper or smudge your drawing.
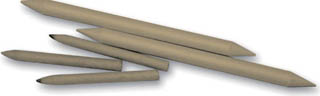
SMOOTHING TRANSITIONS Blending stumps (or “tortillons”) are used to blend and soften pencil strokes, smoothing transitions between dark and light values. When the blending stump becomes dirty, rub it on a cloth to remove the excess graphite. Use stumps sparingly, as overuse can make your drawing appear overworked.

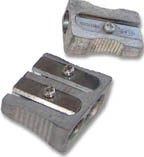
SHARPENING YOUR TOOLS Electric sharpeners create a very sharp pencil point, but they aren’t very portable. Handheld pencil sharpeners easily fit into a pocket or bag, and they allow greater control. A sandpaper block also can form a variety of good pencil points.
This chart shows the colors used to complete the last two projects in this book. Look for colored pencils that closely match these colors at your local art and craft store. Purchase artist’s quality colored pencils for the best results.
Because colored pencils have a translucent quality, the paper underneath the pencil strokes shows through, affecting the color you perceive. White paper appears to lighten the pencil color, whereas toned or colored papers darken the color of your strokes. Experiment with different paper colors to see the varied effects and changes.
You also can layer colored pencil, applying one color over another to achieve the appearance of a “mixed” color when viewed. Layered colors become more visually complex, adding more depth to the forms. Practice on a small piece of the paper you plan to use for your drawing to see the various effects you can create by layering your colored pencils.
![]()
90% gray
![]()
Black
![]()
Black cherry
![]()
Burnt ochre
![]()
Burnt yellow ochre
![]()
Celadon green
![]()
Cerulean blue
![]()
Chartreuse
![]()
Chestnut
![]()
Cool gray 70%
![]()
Cream
![]()
Dahlia purple
![]()
Dark brown
![]()
Dark green
![]()
French gray 50%
![]()
Ginger root
![]()
Geranium lake
![]()
Grass green
![]()
Henna
![]()
Imperial purple
![]()
Indigo blue
![]()
Jasmine
![]()
Kelp green
![]()
Kingfisher blue
![]()
Light brown
![]()
Light peach
![]()
Lilac
![]()
Madder carmine
![]()
Magenta
![]()
Muted turquoise
![]()
Olive green
![]()
Peacock blue
![]()
Periwinkle
![]()
Pink
![]()
Pink rose
![]()
Powder blue
![]()
Prussian blue
![]()
Pumpkin orange
![]()
Putty beige
![]()
Raw sienna
![]()
Slate grey
![]()
Spanish orange
![]()
Terra cotta
![]()
True blue
![]()
Tuscan red
![]()
Ultra-marine
![]()
Violet
![]()
White
![]()
Yellow ochre
![]()
Yellow oxide