Although a graphite pencil portrait certainly can stand on its own as a finished work of art, sometimes it’s nice to introduce color into your drawings of people. Colored pencil is amazingly satisfying to work with, partly because it’s so easy to manipulate and control. The way you sharpen your pencil, the way you hold it, and the amount of pressure you apply all affect the strokes you make.
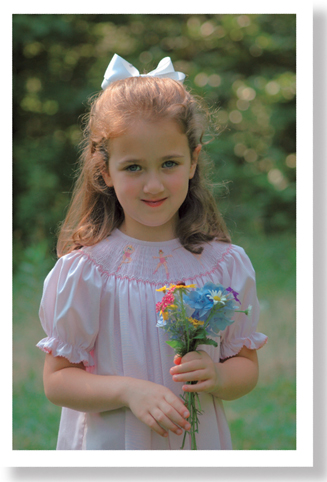
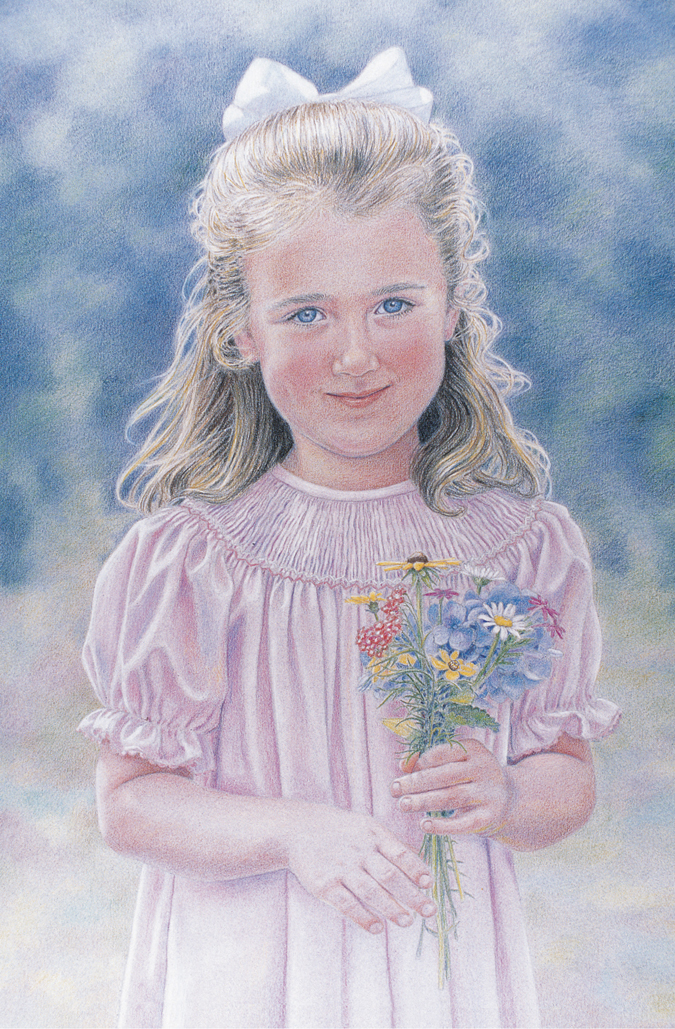
When working with colored pencils, you can create anything from soft blends to brilliant highlights to realistic textures. Here this versatile medium permits replication of this little girl’s likeness, including her peaches-and-cream complexion and dazzling blue eyes. For more information on drawing in color, see Colored Pencil Step by Step (AL39) in Walter Foster’s Artist’s Library series.

1 Working on colored paper can enhance a colored pencil image, as the paper color influences subsequent applications of pencil and affects the overall mood and tone of a piece. But it’s wise to work out your drawing on inexpensive sketch paper first, transferring it to the colored art paper once the basic sketch is established. Start your sketch with a basic oval for the head, allowing the chin to come to a defined point to match the child’s. Then draw the neck and the body shapes, keeping in mind the girl’s specific proportions. After drawing in feature placement lines, use ovals to indicate the child’s more rounded chin and nose. Then block in the general shapes of the hair, bow, dress, flowers, and arms.
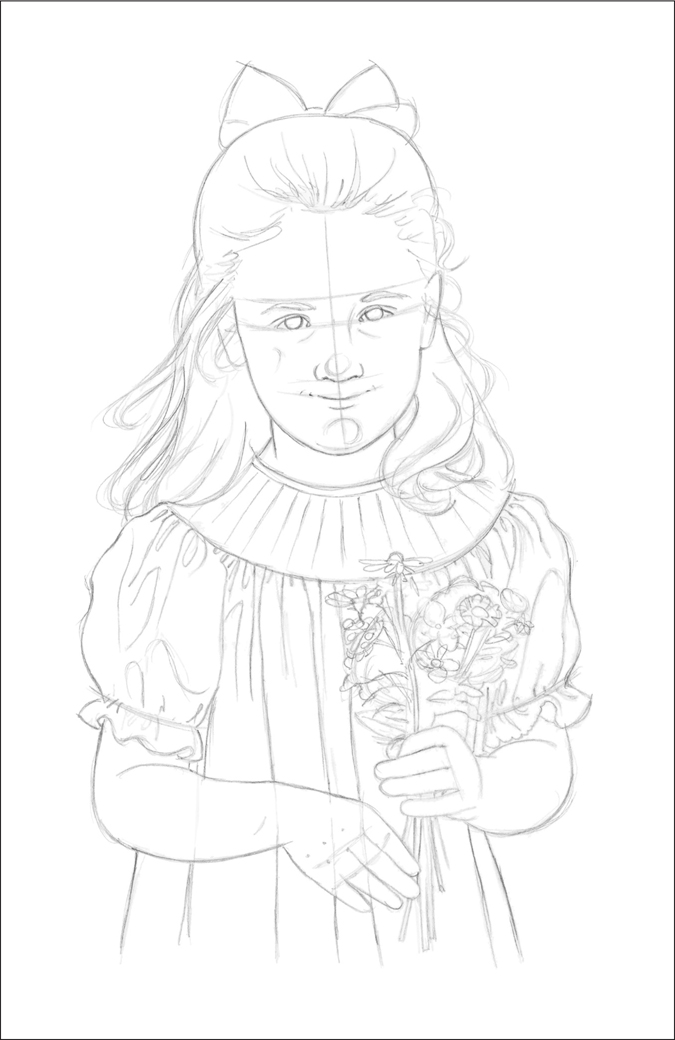
2 Start refining the shapes of the face, arms, and hands. Indicate the angle of the lines formed by the gathered area at the neckline of the dress. Then place the eyes, nose, and mouth using the guidelines to check the proportions. Pay careful attention to the specific shapes of the girl’s features, such as her bow-shaped mouth and the way her eyes taper at the sides as she smiles. Indicate the shape of the hair with long, flowing lines. Then draw in the long folds of the fabric, making sure they line up above and below her arm—“draw through” the arm, and then erase any lines that are no longer needed. Once you’re happy with the drawing, transfer it to your final drawing surface—in this case, the smooth side of a gray-toned paper. You might want to use a light-colored transfer paper if your drawing surface is dark.)
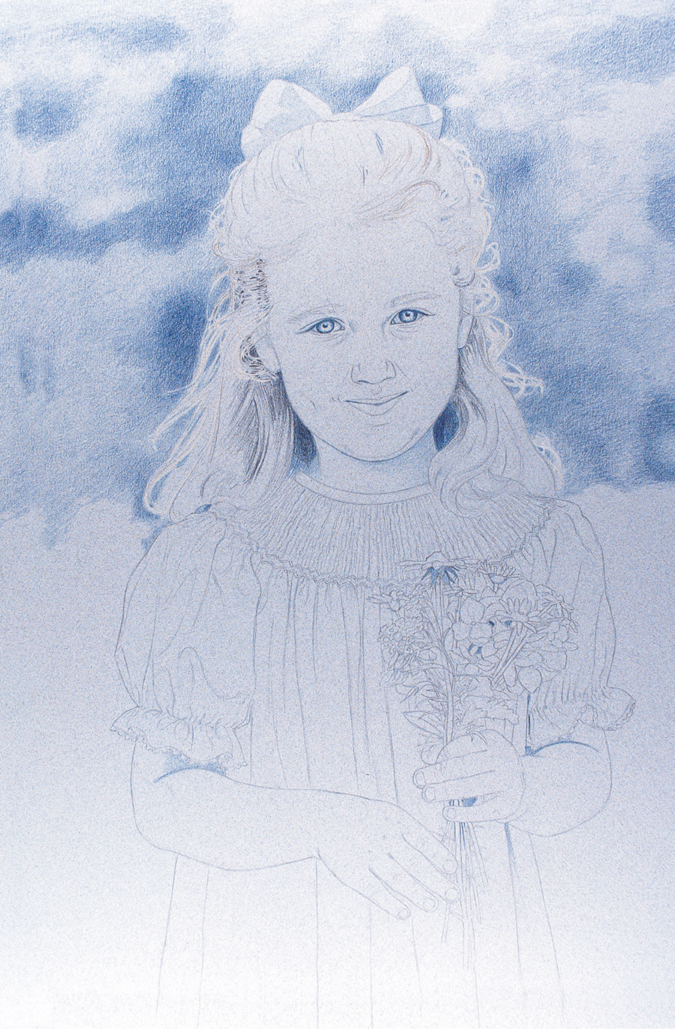
3 Once you have transferred the drawing to the art paper, you can start adding color. Use indigo blue for the shadowed areas of the skin, dress, and hair bow; the creases of the arms and outer rim of the irises and pupils; and the details of the neckline and the flowers. Lightly touch black into the darkest areas of the hair. The gray paper provides a wonderful base for this girl’s bright eyes, which the indigo blue outline enhances. Now draw further attention to her eye coloring by creating highlights in the eyes with a very sharp white. In the hair, use white for the lightest areas, and add cream to the light areas. Switch back to indigo blue for the mottling in the upper background, using more pressure for the darkest areas. Add a light layer of blue to the neck and a darker layer of blue to the hair on each side of the neck.

4 Use small, circular strokes and medium pressure to add more indigo blue to the background. Add white to define the sunlit areas of the bow and hair. Refine the flower petals and the center of the daisy by lightly adding yellow ochre. Lightly apply indigo blue to the undersides of the arms to establish the shadows. Use black cherry to shade the darkest areas of the ear and the crease of the arm. Lightly apply imperial purple to the chin to emphasize the folds of skin; then mark the creases in the neckline, the folds of the fabric, and the shadowed areas under the arms. Switch to pink along the scalloped edge of the sleeve, and then apply a lighter pink to the neckband of the dress. Color the leaves in the bouquet with dark green and olive green. Add a very, very light touch of black cherry to the crease under the eyes, beneath the nose, and at the corners of the mouth; the dark color provides definition, depth, and dimension, but too heavy of a touch will make the child look older than she actually is.
The simplest way to transfer a sketch is to use transfer paper—thin sheets of paper that are coated on one side with an even application of graphite. To transfer a sketch to your drawing surface, place the transfer paper onto your drawing paper, graphite-side down. Use masking tape or artist’s tape to hold the papers in place. Then place the sketch on top of the transfer paper (you may need to enlarge or reduce the sketch on a photocopier to fit your support), and lightly trace over the lines with a pencil or a sharp object that won’t leave an ink or pencil mark, such as a stylus or the pointed end of the handle of a thin paintbrush. Before you begin, test a small corner of the transfer paper to learn how much pressure to place on the tool to achieve the desired line weight. If you press too hard, you’ll leave a permanent indentation.
You also can create your own transfer paper using a pencil and a sheet of paper. First make a photocopy of your reference at the size you want to draw it. Then use a pencil to completely cover the back of the photocopy with graphite, pressing down firmly to create an even layer of coverage. Then turn the image right side up, so that the graphite-covered side is against the final drawing surface; secure it in place; and lightly trace the lines of the sketch to transfer them.

CHECKING YOUR LINES While tracing the lines of the photocopy, occasionally lift the corner of the transfer paper to make sure the transferred lines aren’t too dark.

5 Darken the edges of the flower stems with olive green followed by chartreuse. Apply light brown to the dark areas of the hair, and apply henna to the darkest areas of the face and neck. Now add sharp gray to the iris; layer the same gray over the indigo blue on the outside rim of the eye, and then layer cerulean blue over the gray. Apply 90% gray over the pupil and along the upper eyelid; then draw the eyelashes and eyebrows. Add black cherry between the lips and in the corners of the mouth; then lightly add henna over the mouth, leaving a highlight on the bottom lip. Bring out the darkest areas of the hands, fingers, and arms with black cherry, and darken the background with indigo blue. Add dark brown to the flower centers and the hair shadows. Use Prussian blue for the blue flowers and Spanish orange for the yellow flowers.

Tinted paper does more than simply act as a midtone for your drawings—it also influences the colors laid on top of it, affecting the overall feel of the subject. Choose a paper that will harmonize with the colors of the subject. Make a test sheet first on the back of your paper (or on a piece of scrap paper, as shown at right) to see how the colors in your palette will be affected by the colored background you choose.

6 Use medium pressure to add light cerulean blue to the flowers and the hair bow; then apply a light layer of kingfisher blue over the cerulean blue. Layer a bit of dahlia purple over the edges of the blue flowers, giving them more dimension. Add madder carmine to the cluster of small flowers at the left of the bouquet. Use heavy pressure to add white to the daisies, making strokes that follow the length of the petals. Next layer black cherry into the dark areas of the background for a little more dimension. Create a few long strokes of yellow ochre in the hair using medium pressure. To establish the girl’s peachy complexion, use light pressure to layer pink rose on the hands, arms, and face. Add more henna to the face (mostly to the cheeks—following the photo as a guide for placement), hands, and arms. Her complexion is smooth and light, a likeness you can achieve by applying light peach over all the skin areas. Use white to highlight the nose and the outer cheek. Then lightly add black cherry to the left side of the neck and under the chin where it is shadowed. Add a layer of white to the left side of the bow with medium pressure to smooth and blend the colors. Using medium pressure, also add white along the center of her right arm, back of her right hand, upper curve of her left arm, and the fingers holding the flowers to show where the sunlight strikes them. Then return to the background, applying burnt ochre to a few areas of the background’s lower half.
When drawing this young girl, pay close attention to the dimple in her cheek, her small mouth, and the slight double chin, which show her youth. She has small dimples in her hands, as most children do. Make the background indistinct as in the photo to keep the focus on the girl. Also cover the background with a blue-gray tone, which recedes behind the brighter, warmer color of the skin and dress.
7 Now that the basic coloring is established, focus on creating depth and form. Add strokes of pumpkin orange to the hair: Just a few strokes will add color, but too many will change the color. Using hard pressure, layer white over the rest of the hair bow, and add white to the dress on her right side, showing the sunlight on the outer folds of fabric. Apply white to the edges of the flowers, pressing hard to create highlights on the petals, and add dark brown to a few areas of the leaves and stems for more contrast. To deepen the color of the blue flowers, add heavy strokes of indigo blue. Use light applications of magenta in the shadowed, inner creases of the fabric to brighten the color of the dress. Using light pressure, layer grass green over the upper background colors; layer the same green, with medium pressure, over a few areas in the lower background. Add black cherry to create some abstract shapes in the lower background, and softly blend the edges of the background colors into one another for a subtle, muted look.

8 When you reach this stage, compare the drawing to the photo to be sure a likeness is achieved. Does the coloring of her hair, skin, and eyes match your reference? Adjust as necessary. To warm up her skin tones, very lightly apply a layer of yellow ochre all over her skin. With very light pressure, add a little more henna to the face, and go over it with light peach. Then look for areas that are dull or need highlights. To liven up the dress, add more imperial purple to some of the creases and folds. Also apply more white to the lighter areas of the folds using medium pressure. Apply some peacock blue in the darkest areas of the creases, and then use medium pressure to layer pink in a few areas. Using hard pressure with a white pencil, go over the top of the head in the most sunlit areas, following the form of the head and allowing some of the dark colors to remain in this upper portion of the hair. Now use a tissue in soft, circular motions to blend the background colors; lightly rub the pigment into the paper to create a smoother look. This softening of the edges also helps make the background appear more distant. In the darker areas of the upper background, use hard pressure to add more indigo blue. Apply dark brown with hard pressure to darken some areas of the hair, and add a few strands of hair over the forehead and along the side of the face. Finish by touching up the eyelashes and eyebrows with a very sharp 90% gray pencil.
Because colored pencils are translucent, artists use a transparent layering process to either build up color or create new hues. This layering process is wonderful because it creates a much richer hue than you could ever achieve if you were using just one pure color. To deepen a color, layer more of the same over it; to dull it, use its complement.

LAYERING WITH HATCH STROKES In the examples at right, yellow, orange, red, and blue were layered on top of one another with cross-hatch strokes to demonstrate one way of creating a new color. To avoid getting a hue that is too dark, begin with the lightest color and work up to the darkest. This way you can tell if the mix is getting too muddy or deep before it’s too late.