
7
Tracking User Actions
In the previous chapter, you built a JavaScript bookmarklet to share content from other websites on your platform. You also implemented asynchronous actions with JavaScript in your project and created an infinite scroll.
In this chapter, you will learn how to build a follow system and create a user activity stream. You will also discover how Django signals work and integrate Redis’s fast I/O storage into your project to store item views.
This chapter will cover the following points:
- Building a follow system
- Creating many-to-many relationships with an intermediary model
- Creating an activity stream application
- Adding generic relations to models
- Optimizing QuerySets for related objects
- Using signals for denormalizing counts
- Using Django Debug Toolbar to obtain relevant debug information
- Counting image views with Redis
- Creating a ranking of the most viewed images with Redis
The source code for this chapter can be found at https://github.com/PacktPublishing/Django-4-by-example/tree/main/Chapter07.
All Python packages used in this chapter are included in the requirements.txt file in the source code for the chapter. You can follow the instructions to install each Python package in the following sections, or you can install all requirements at once with the command pip install -r requirements.txt.
Building a follow system
Let’s build a follow system in your project. This means that your users will be able to follow each other and track what other users share on the platform. The relationship between users is a many-to-many relationship: a user can follow multiple users and they, in turn, can be followed by multiple users.
Creating many-to-many relationships with an intermediary model
In previous chapters, you created many-to-many relationships by adding the ManyToManyField to one of the related models and letting Django create the database table for the relationship. This is suitable for most cases, but sometimes you may need to create an intermediary model for the relationship. Creating an intermediary model is necessary when you want to store additional information about the relationship, for example, the date when the relationship was created, or a field that describes the nature of the relationship.
Let’s create an intermediary model to build relationships between users. There are two reasons for using an intermediary model:
- You are using the
Usermodel provided by Django and you want to avoid altering it - You want to store the time when the relationship was created
Edit the models.py file of the account application and add the following code to it:
class Contact(models.Model):
    user_from = models.ForeignKey('auth.User',
                                  related_name='rel_from_set',
                                  on_delete=models.CASCADE)
    user_to = models.ForeignKey('auth.User',
                                related_name='rel_to_set',
                                on_delete=models.CASCADE)
    created = models.DateTimeField(auto_now_add=True)
    class Meta:
        indexes = [
            models.Index(fields=['-created']),
        ]
        ordering = ['-created']
    def __str__(self):
        return f'{self.user_from} follows {self.user_to}'
The preceding code shows the Contact model that you will use for user relationships. It contains the following fields:
user_from: AForeignKeyfor the user who creates the relationshipuser_to: AForeignKeyfor the user being followedcreated: ADateTimeFieldfield withauto_now_add=Trueto store the time when the relationship was created
A database index is automatically created on the ForeignKey fields. In the Meta class of the model, we have defined a database index in descending order for the created field. We have also added the ordering attribute to tell Django that it should sort results by the created field by default. We indicate descending order by using a hyphen before the field name, like -created.
Using the ORM, you could create a relationship for a user, user1, following another user, user2, like this:
user1 = User.objects.get(id=1)
user2 = User.objects.get(id=2)
Contact.objects.create(user_from=user1, user_to=user2)
The related managers, rel_from_set and rel_to_set, will return a QuerySet for the Contact model. In order to access the end side of the relationship from the User model, it would be desirable for User to contain a ManyToManyField, as follows:
following = models.ManyToManyField('self',
                                   through=Contact,
                                   related_name='followers',
                                   symmetrical=False)
In the preceding example, you tell Django to use your custom intermediary model for the relationship by adding through=Contact to the ManyToManyField. This is a many-to-many relationship from the User model to itself; you refer to 'self' in the ManyToManyField field to create a relationship to the same model.
When you need additional fields in a many-to-many relationship, create a custom model with a ForeignKey for each side of the relationship. Add a ManyToManyField in one of the related models and indicate to Django that your intermediary model should be used by including it in the through parameter.
If the User model was part of your application, you could add the previous field to the model. However, you can’t alter the User class directly because it belongs to the django.contrib.auth application. Let’s take a slightly different approach by adding this field dynamically to the User model.
Edit the models.py file of the account application and add the following lines highlighted in bold:
from django.contrib.auth import get_user_model
# ...
# Add following field to User dynamically
user_model = get_user_model()
user_model.add_to_class('following',
                        models.ManyToManyField('self',
                            through=Contact,
                            related_name='followers',
                            symmetrical=False))
In the preceding code, you retrieve the user model by using the generic function get_user_model(), which is provided by Django. You use the add_to_class() method of Django models to monkey patch the User model.
Be aware that using add_to_class() is not the recommended way of adding fields to models. However, you take advantage of using it in this case to avoid creating a custom user model, keeping all the advantages of Django’s built-in User model.
You also simplify the way that you retrieve related objects using the Django ORM with user.followers.all() and user.following.all(). You use the intermediary Contact model and avoid complex queries that would involve additional database joins, as would have been the case had you defined the relationship in your custom Profile model. The table for this many-to-many relationship will be created using the Contact model. Thus, the ManyToManyField, added dynamically, will not imply any database changes for the Django User model.
Keep in mind that, in most cases, it is preferable to add fields to the Profile model you created before, instead of monkey patching the User model. Ideally, you shouldn’t alter the existing Django User model. Django allows you to use custom user models. If you want to use a custom user model, take a look at the documentation at https://docs.djangoproject.com/en/4.1/topics/auth/customizing/#specifying-a-custom-user-model.
Note that the relationship includes symmetrical=False. When you define a ManyToManyField in the model creating a relationship with itself, Django forces the relationship to be symmetrical. In this case, you are setting symmetrical=False to define a non-symmetrical relationship (if I follow you, it doesn’t mean that you automatically follow me).
When you use an intermediary model for many-to-many relationships, some of the related manager’s methods are disabled, such as add(), create(), or remove(). You need to create or delete instances of the intermediary model instead.
Run the following command to generate the initial migrations for the account application:
python manage.py makemigrations account
You will obtain an output like the following one:
Migrations for 'account':
  account/migrations/0002_auto_20220124_1106.py
    - Create model Contact
    - Create index account_con_created_8bdae6_idx on field(s) -created of model contact
Now, run the following command to sync the application with the database:
python manage.py migrate account
You should see an output that includes the following line:
Applying account.0002_auto_20220124_1106... OK
The Contact model is now synced to the database, and you are able to create relationships between users. However, your site doesn’t offer a way to browse users or see a particular user’s profile yet. Let’s build list and detail views for the User model.
Creating list and detail views for user profiles
Open the views.py file of the account application and add the following code highlighted in bold:
from django.shortcuts import get_object_or_404
from django.contrib.auth.models import User
# ...
@login_required
def user_list(request):
    users = User.objects.filter(is_active=True)
    return render(request,
                  'account/user/list.html',
                  {'section': 'people',
                   'users': users})
@login_required
def user_detail(request, username):
    user = get_object_or_404(User,
                             username=username,
                             is_active=True)
    return render(request,
                  'account/user/detail.html',
                  {'section': 'people',
                   'user': user})
These are simple list and detail views for User objects. The user_list view gets all active users. The Django User model contains an is_active flag to designate whether the user account is considered active. You filter the query by is_active=True to return only active users. This view returns all results, but you can improve it by adding pagination in the same way as you did for the image_list view.
The user_detail view uses the get_object_or_404() shortcut to retrieve the active user with the given username. The view returns an HTTP 404 response if no active user with the given username is found.
Edit the urls.py file of the account application, and add a URL pattern for each view, as follows. New code is highlighted in bold:
urlpatterns = [
    # ...
    path('', include('django.contrib.auth.urls')),
    path('', views.dashboard, name='dashboard'),
    path('register/', views.register, name='register'),
    path('edit/', views.edit, name='edit'),
    path('users/', views.user_list, name='user_list'),
    path('users/<username>/', views.user_detail, name='user_detail'),
]
You will use the user_detail URL pattern to generate the canonical URL for users. You have already defined a get_absolute_url() method in a model to return the canonical URL for each object. Another way to specify the URL for a model is by adding the ABSOLUTE_URL_OVERRIDES setting to your project.
Edit the settings.py file of your project and add the following code highlighted in bold:
from django.urls import reverse_lazy
# ...
ABSOLUTE_URL_OVERRIDES = {
    'auth.user': lambda u: reverse_lazy('user_detail',
                                        args=[u.username])
}
Django adds a get_absolute_url() method dynamically to any models that appear in the ABSOLUTE_URL_OVERRIDES setting. This method returns the corresponding URL for the given model specified in the setting. You return the user_detail URL for the given user. Now, you can use get_absolute_url() on a User instance to retrieve its corresponding URL.
Open the Python shell with the following command:
python manage.py shell
Then run the following code to test it:
>>> from django.contrib.auth.models import User
>>> user = User.objects.latest('id')
>>> str(user.get_absolute_url())
'/account/users/ellington/'
The returned URL follows the expected format /account/users/<username>/.
You will need to create templates for the views that you just built. Add the following directory and files to the templates/account/ directory of the account application:
/user/
    detail.html
    list.html
Edit the account/user/list.html template and add the following code to it:
{% extends "base.html" %}
{% load thumbnail %}
{% block title %}People{% endblock %}
{% block content %}
  <h1>People</h1>
  <div id="people-list">
    {% for user in users %}
      <div class="user">
        <a href="{{ user.get_absolute_url }}">
          <img src="{% thumbnail user.profile.photo 180x180 %}">
        </a>
        <div class="info">
          <a href="{{ user.get_absolute_url }}" class="title">
            {{ user.get_full_name }}
          </a>
        </div>
      </div>
    {% endfor %}
  </div>
{% endblock %}
The preceding template allows you to list all the active users on the site. You iterate over the given users and use the {% thumbnail %} template tag from easy-thumbnails to generate profile image thumbnails.
Note that the users need to have a profile image. To use a default image for users that don’t have a profile image, you can add an if/else statement to check whether the user has a profile photo, like {% if user.profile.photo %} {# photo thumbnail #} {% else %} {# default image #} {% endif %}.
Open the base.html template of your project and include the user_list URL in the href attribute of the following menu item. New code is highlighted in bold:
<ul class="menu">
  ...
  <li {% if section == "people" %}class="selected"{% endif %}>
    <a href="{% url "user_list" %}">People</a>
  </li>
</ul>
Start the development server with the following command:
python manage.py runserver
Open http://127.0.0.1:8000/account/users/ in your browser. You should see a list of users like the following one:

Figure 7.1: The user list page with profile image thumbnails
Remember that if you have any difficulty generating thumbnails, you can add THUMBNAIL_DEBUG = True to your settings.py file in order to obtain debug information in the shell.
Edit the account/user/detail.html template of the account application and add the following code to it:
{% extends "base.html" %}
{% load thumbnail %}
{% block title %}{{ user.get_full_name }}{% endblock %}
{% block content %}
  <h1>{{ user.get_full_name }}</h1>
  <div class="profile-info">
    <img src="{% thumbnail user.profile.photo 180x180 %}" class="user-detail">
  </div>
  {% with total_followers=user.followers.count %}
    <span class="count">
      <span class="total">{{ total_followers }}</span>
      follower{{ total_followers|pluralize }}
    </span>
    <a href="#" data-id="{{ user.id }}" data-action="{% if request.user in user.followers.all %}un{% endif %}follow" class="follow button">
      {% if request.user not in user.followers.all %}
        Follow
      {% else %}
        Unfollow
      {% endif %}
    </a>
    <div id="image-list" class="image-container">
      {% include "images/image/list_images.html" with images=user.images_created.all %}
    </div>
  {% endwith %}
{% endblock %}
Make sure that no template tag is split onto multiple lines; Django doesn’t support multiple-line tags.
In the detail template, the user profile is displayed and the {% thumbnail %} template tag is used to show the profile image. The total number of followers is presented and a link to follow or unfollow the user. This link will be used to follow/unfollow a particular user. The data-id and data-action attributes of the <a> HTML element contain the user ID and the initial action to perform when the link element is clicked – follow or unfollow. The initial action (follow or unfollow) depends on whether the user requesting the page is already a follower of the user. The images bookmarked by the user are displayed by including the images/image/list_images.html template.
Open your browser again and click on a user who has bookmarked some images. The user page will look as follows:
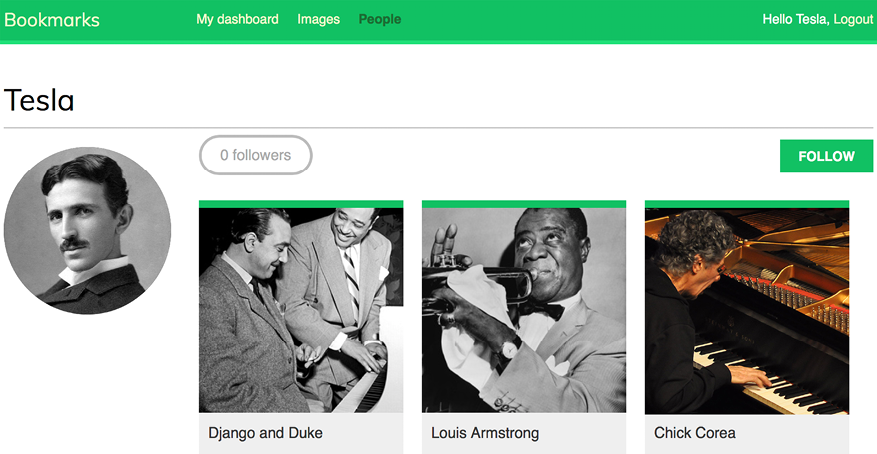
Figure 7.2: The user detail page
Image of Chick Corea by ataelw (license: Creative Commons Attribution 2.0 Generic: https://creativecommons.org/licenses/by/2.0/)
Adding user follow/unfollow actions with JavaScript
Let’s add functionality to follow/unfollow users. We will create a new view to follow/unfollow users and implement an asynchronous HTTP request with JavaScript for the follow/unfollow action.
Edit the views.py file of the account application and add the following code highlighted in bold:
from django.http import JsonResponse
from django.views.decorators.http import require_POST
from .models import Contact
# ...
@require_POST
@login_required
def user_follow(request):
    user_id = request.POST.get('id')
    action = request.POST.get('action')
    if user_id and action:
        try:
            user = User.objects.get(id=user_id)
            if action == 'follow':
                Contact.objects.get_or_create(
                    user_from=request.user,
                    user_to=user)
            else:
                Contact.objects.filter(user_from=request.user,
                                       user_to=user).delete()
            return JsonResponse({'status':'ok'})
        except User.DoesNotExist:
            return JsonResponse({'status':'error'})
    return JsonResponse({'status':'error'})
The user_follow view is quite similar to the image_like view that you created in Chapter 6, Sharing Content on Your Website. Since you are using a custom intermediary model for the user’s many-to-many relationship, the default add() and remove() methods of the automatic manager of ManyToManyField are not available. Instead, the intermediary Contact model is used to create or delete user relationships.
Edit the urls.py file of the account application and add the following URL pattern highlighted in bold:
urlpatterns = [
    path('', include('django.contrib.auth.urls')),
    path('', views.dashboard, name='dashboard'),
    path('register/', views.register, name='register'),
    path('edit/', views.edit, name='edit'),
    path('users/', views.user_list, name='user_list'),
    path('users/follow/', views.user_follow, name='user_follow'),
    path('users/<username>/', views.user_detail, name='user_detail'),
]
Ensure that you place the preceding pattern before the user_detail URL pattern. Otherwise, any requests to /users/follow/ will match the regular expression of the user_detail pattern and that view will be executed instead. Remember that in every HTTP request, Django checks the requested URL against each pattern in order of appearance and stops at the first match.
Edit the user/detail.html template of the account application and append the following code to it:
{% block domready %}
  var const = '{% url "user_follow" %}';
  var options = {
    method: 'POST',
    headers: {'X-CSRFToken': csrftoken},
    mode: 'same-origin'
  }
  document.querySelector('a.follow')
          .addEventListener('click', function(e){
    e.preventDefault();
    var followButton = this;
    // add request body
    var formData = new FormData();
    formData.append('id', followButton.dataset.id);
    formData.append('action', followButton.dataset.action);
    options['body'] = formData;
    // send HTTP request
    fetch(url, options)
    .then(response => response.json())
    .then(data => {
      if (data['status'] === 'ok')
      {
        var previousAction = followButton.dataset.action;
        // toggle button text and data-action
        var action = previousAction === 'follow' ? 'unfollow' : 'follow';
        followButton.dataset.action = action;
        followButton.innerHTML = action;
        // update follower count
        var followerCount = document.querySelector('span.count .total');
        var totalFollowers = parseInt(followerCount.innerHTML);
        followerCount.innerHTML = previousAction === 'follow' ? totalFollowers + 1 : totalFollowers - 1;
      }
    })
  });
{% endblock %}
The preceding template block contains the JavaScript code to perform the asynchronous HTTP request to follow or unfollow a particular user and also to toggle the follow/unfollow link. The Fetch API is used to perform the AJAX request and set both the data-action attribute and the text of the HTML <a> element based on its previous value. When the action is completed, the total number of followers displayed on the page is updated as well.
Open the user detail page of an existing user and click on the FOLLOW link to test the functionality you just built. You will see that the followers count is increased:

Figure 7.3: The followers count and follow/unfollow button
The follow system is now complete, and users can follow each other. Next, we will build an activity stream creating relevant content for each user that is based on the people they follow.
Building a generic activity stream application
Many social websites display an activity stream to their users so that they can track what other users do on the platform. An activity stream is a list of recent activities performed by a user or a group of users. For example, Facebook’s News Feed is an activity stream. Sample actions can be user X bookmarked image Y or user X is now following user Y.
You are going to build an activity stream application so that every user can see the recent interactions of the users they follow. To do so, you will need a model to save the actions performed by users on the website and a simple way to add actions to the feed.
Create a new application named actions inside your project with the following command:
python manage.py startapp actions
Add the new application to INSTALLED_APPS in the settings.py file of your project to activate the application in your project. The new line is highlighted in bold:
INSTALLED_APPS = [
    # ...
    'actions.apps.ActionsConfig',
]
Edit the models.py file of the actions application and add the following code to it:
from django.db import models
class Action(models.Model):
    user = models.ForeignKey('auth.User',
                             related_name='actions',
                             on_delete=models.CASCADE)
    verb = models.CharField(max_length=255)
    created = models.DateTimeField(auto_now_add=True)
    class Meta:
        indexes = [
            models.Index(fields=['-created']),
        ]
        ordering = ['-created']
The preceding code shows the Action model that will be used to store user activities. The fields of this model are as follows:
user: The user who performed the action; this is aForeignKeyto the DjangoUsermodel.verb: The verb describing the action that the user has performed.created: The date and time when this action was created. We useauto_now_add=Trueto automatically set this to the current datetime when the object is saved for the first time in the database.
In the Meta class of the model, we have defined a database index in descending order for the created field. We have also added the ordering attribute to tell Django that it should sort results by the created field in descending order by default.
With this basic model, you can only store actions such as user X did something. You need an extra ForeignKey field to save actions that involve a target object, such as user X bookmarked image Y or user X is now following user Y. As you already know, a normal ForeignKey can point to only one model. Instead, you will need a way for the action’s target object to be an instance of an existing model. This is what the Django contenttypes framework will help you to do.
Using the contenttypes framework
Django includes a contenttypes framework located at django.contrib.contenttypes. This application can track all models installed in your project and provides a generic interface to interact with your models.
The django.contrib.contenttypes application is included in the INSTALLED_APPS setting by default when you create a new project using the startproject command. It is used by other contrib packages, such as the authentication framework and the administration application.
The contenttypes application contains a ContentType model. Instances of this model represent the actual models of your application, and new instances of ContentType are automatically created when new models are installed in your project. The ContentType model has the following fields:
app_label: This indicates the name of the application that the model belongs to. This is automatically taken from theapp_labelattribute of the modelMetaoptions. For example, yourImagemodel belongs to theimagesapplication.model: The name of the model class.name: This indicates the human-readable name of the model. This is automatically taken from theverbose_nameattribute of the modelMetaoptions.
Let’s take a look at how you can interact with ContentType objects. Open the shell using the following command:
python manage.py shell
You can obtain the ContentType object corresponding to a specific model by performing a query with the app_label and model attributes, as follows:
>>> from django.contrib.contenttypes.models import ContentType
>>> image_type = ContentType.objects.get(app_label='images', model='image')
>>> image_type
<ContentType: images | image>
You can also retrieve the model class from a ContentType object by calling its model_class() method:
>>> image_type.model_class()
<class 'images.models.Image'>
It’s also common to obtain the ContentType object for a particular model class, as follows:
>>> from images.models import Image
>>> ContentType.objects.get_for_model(Image)
<ContentType: images | image>
These are just some examples of using contenttypes. Django offers more ways to work with them. You can find the official documentation for the contenttypes framework at https://docs.djangoproject.com/en/4.1/ref/contrib/contenttypes/.
Adding generic relations to your models
In generic relations, ContentType objects play the role of pointing to the model used for the relationship. You will need three fields to set up a generic relation in a model:
- A
ForeignKeyfield toContentType: This will tell you the model for the relationship - A field to store the primary key of the related object: This will usually be a
PositiveIntegerFieldto match Django’s automatic primary key fields - A field to define and manage the generic relation using the two previous fields: The
contenttypesframework offers aGenericForeignKeyfield for this purpose
Edit the models.py file of the actions application and add the following code highlighted in bold:
from django.db import models
from django.contrib.contenttypes.models import ContentType
from django.contrib.contenttypes.fields import GenericForeignKey
class Action(models.Model):
    user = models.ForeignKey('auth.User',
                             related_name='actions',
                             on_delete=models.CASCADE)
    verb = models.CharField(max_length=255)
   created = models.DateTimeField(auto_now_add=True)
    target_ct = models.ForeignKey(ContentType,
                                  blank=True,
                                  null=True,
                                  related_name='target_obj',
                                  on_delete=models.CASCADE)
    target_id = models.PositiveIntegerField(null=True,
                                            blank=True)
    target = GenericForeignKey('target_ct', 'target_id')
    class Meta:
        indexes = [
            models.Index(fields=['-created']),
            models.Index(fields=['target_ct', 'target_id']),
        ]
        ordering = ['-created']
We have added the following fields to the Action model:
target_ct: AForeignKeyfield that points to theContentTypemodeltarget_id: APositiveIntegerFieldfor storing the primary key of the related objecttarget: AGenericForeignKeyfield to the related object based on the combination of the two previous fields
We have also added a multiple-field index including the target_ct and target_id fields.
Django does not create GenericForeignKey fields in the database. The only fields that are mapped to database fields are target_ct and target_id. Both fields have blank=True and null=True attributes, so that a target object is not required when saving Action objects.
You can make your applications more flexible by using generic relations instead of foreign keys.
Run the following command to create initial migrations for this application:
python manage.py makemigrations actions
You should see the following output:
Migrations for 'actions':
  actions/migrations/0001_initial.py
    - Create model Action
    - Create index actions_act_created_64f10d_idx on field(s) -created of model action
    - Create index actions_act_target__f20513_idx on field(s) target_ct, target_id of model action
Then, run the next command to sync the application with the database:
python manage.py migrate
The output of the command should indicate that the new migrations have been applied, as follows:
Applying actions.0001_initial... OK
Let’s add the Action model to the administration site. Edit the admin.py file of the actions application and add the following code to it:
from django.contrib import admin
from .models import Action
@admin.register(Action)
class ActionAdmin(admin.ModelAdmin):
    list_display = ['user', 'verb', 'target', 'created']
    list_filter = ['created']
    search_fields = ['verb']
You just registered the Action model on the administration site.
Start the development server with the following command:
python manage.py runserver
Open http://127.0.0.1:8000/admin/actions/action/add/ in your browser. You should see the page for creating a new Action object, as follows:
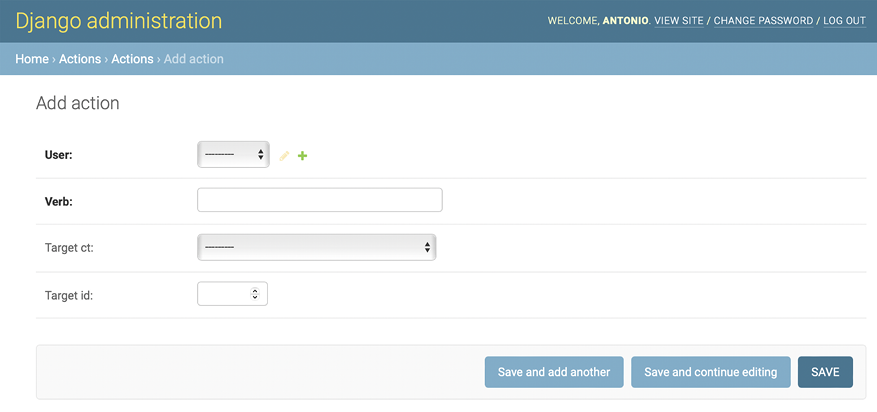
Figure 7.4: The Add action page on the Django administration site
As you will notice in the preceding screenshot, only the target_ct and target_id fields that are mapped to actual database fields are shown. The GenericForeignKey field does not appear in the form. The target_ct field allows you to select any of the registered models of your Django project. You can restrict the content types to choose from a limited set of models using the limit_choices_to attribute in the target_ct field; the limit_choices_to attribute allows you to restrict the content of ForeignKey fields to a specific set of values.
Create a new file inside the actions application directory and name it utils.py. You need to define a shortcut function that will allow you to create new Action objects in a simple way. Edit the new utils.py file and add the following code to it:
from django.contrib.contenttypes.models import ContentType
from .models import Action
def create_action(user, verb, target=None):
    action = Action(user=user, verb=verb, target=target)
    action.save()
The create_action() function allows you to create actions that optionally include a target object. You can use this function anywhere in your code as a shortcut to add new actions to the activity stream.
Avoiding duplicate actions in the activity stream
Sometimes, your users might click several times on the Like or Unlike button or perform the same action multiple times in a short period of time. This will easily lead to storing and displaying duplicate actions. To avoid this, let’s improve the create_action() function to skip obvious duplicated actions.
Edit the utils.py file of the actions application, as follows:
import datetime
from django.utils import timezone
from django.contrib.contenttypes.models import ContentType
from .models import Action
def create_action(user, verb, target=None):
    # check for any similar action made in the last minute
    now = timezone.now()
    last_minute = now - datetime.timedelta(seconds=60)
    similar_actions = Action.objects.filter(user_id=user.id,
                                       verb= verb,
                                       created__gte=last_minute)
    if target:
        target_ct = ContentType.objects.get_for_model(target)
        similar_actions = similar_actions.filter(
                                             target_ct=target_ct,
                                             target_id=target.id)
    if not similar_actions:
        # no existing actions found
        action = Action(user=user, verb=verb, target=target)
        action.save()
        return True
    return False
You have changed the create_action() function to avoid saving duplicate actions and return a Boolean to tell you whether the action was saved. This is how you avoid duplicates:
- First, you get the current time using the
timezone.now()method provided by Django. This method does the same asdatetime.datetime.now()but returns a timezone-aware object. Django provides a setting calledUSE_TZto enable or disable timezone support. The defaultsettings.pyfile created using thestartprojectcommand includesUSE_TZ=True. - You use the
last_minutevariable to store the datetime from one minute ago and retrieve any identical actions performed by the user since then. - You create an
Actionobject if no identical action already exists in the last minute. You returnTrueif anActionobject was created, orFalseotherwise.
Adding user actions to the activity stream
It’s time to add some actions to your views to build the activity stream for your users. You will store an action for each of the following interactions:
- A user bookmarks an image
- A user likes an image
- A user creates an account
- A user starts following another user
Edit the views.py file of the images application and add the following import:
from actions.utils import create_action
In the image_create view, add create_action() after saving the image, like this. The new line is highlighted in bold:
@login_required
def image_create(request):
    if request.method == 'POST':
        # form is sent
        form = ImageCreateForm(data=request.POST)
        if form.is_valid():
            # form data is valid
            cd = form.cleaned_data
            new_image = form.save(commit=False)
            # assign current user to the item
            new_image.user = request.user
            new_image.save()
            create_action(request.user, 'bookmarked image', new_image)
            messages.success(request, 'Image added successfully')
            # redirect to new created image detail view
            return redirect(new_image.get_absolute_url())
    else:
        # build form with data provided by the bookmarklet via GET
        form = ImageCreateForm(data=request.GET)
    return render(request,
                  'images/image/create.html',
                  {'section': 'images',
                   'form': form})
In the image_like view, add create_action() after adding the user to the users_like relationship, as follows. The new line is highlighted in bold:
@login_required
@require_POST
def image_like(request):
    image_id = request.POST.get('id')
    action = request.POST.get('action')
    if image_id and action:
        try:
            image = Image.objects.get(id=image_id)
            if action == 'like':
                image.users_like.add(request.user)
                create_action(request.user, 'likes', image)
            else:
                image.users_like.remove(request.user)
            return JsonResponse({'status':'ok'})
        except Image.DoesNotExist:
            pass
    return JsonResponse({'status':'error'})
Now, edit the views.py file of the account application and add the following import:
from actions.utils import create_action
In the register view, add create_action() after creating the Profile object, as follows. The new line is highlighted in bold:
def register(request):
    if request.method == 'POST':
        user_form = UserRegistrationForm(request.POST)
        if user_form.is_valid():
            # Create a new user object but avoid saving it yet
            new_user = user_form.save(commit=False)
            # Set the chosen password
            new_user.set_password(
                user_form.cleaned_data['password'])
            # Save the User object
            new_user.save()
            # Create the user profile
            Profile.objects.create(user=new_user)
            create_action(new_user, 'has created an account')
            return render(request,
                          'account/register_done.html',
                          {'new_user': new_user})
    else:
        user_form = UserRegistrationForm()
    return render(request,
                  'account/register.html',
                  {'user_form': user_form})
In the user_follow view, add create_action() as follows. The new line is highlighted in bold:
@require_POST
@login_required
def user_follow(request):
    user_id = request.POST.get('id')
    action = request.POST.get('action')
    if user_id and action:
        try:
            user = User.objects.get(id=user_id)
            if action == 'follow':
                Contact.objects.get_or_create(
                    user_from=request.user,
                    user_to=user)
                create_action(request.user, 'is following', user)
            else:
                Contact.objects.filter(user_from=request.user,
                                       user_to=user).delete()
            return JsonResponse({'status':'ok'})
        except User.DoesNotExist:
            return JsonResponse({'status':'error'})
    return JsonResponse({'status':'error'})
As you can see in the preceding code, thanks to the Action model and the helper function, it’s very easy to save new actions to the activity stream.
Displaying the activity stream
Finally, you need a way to display the activity stream for each user. You will include the activity stream on the user’s dashboard. Edit the views.py file of the account application. Import the Action model and modify the dashboard view, as follows. New code is highlighted in bold:
from actions.models import Action
# ...
@login_required
def dashboard(request):
    # Display all actions by default
    actions = Action.objects.exclude(user=request.user)
    following_ids = request.user.following.values_list('id',
                                                       flat=True)
    if following_ids:
        # If user is following others, retrieve only their actions
        actions = actions.filter(user_id__in=following_ids)
    actions = actions[:10]
    return render(request,
                  'account/dashboard.html',
                  {'section': 'dashboard',
                   'actions': actions})
In the preceding view, you retrieve all actions from the database, excluding the ones performed by the current user. By default, you retrieve the latest actions performed by all users on the platform. If the user is following other users, you restrict the query to retrieve only the actions performed by the users they follow. Finally, you limit the result to the first 10 actions returned. You don’t use order_by() in the QuerySet because you rely on the default ordering that you provided in the Meta options of the Action model. Recent actions will come first since you set ordering = ['-created'] in the Action model.
Optimizing QuerySets that involve related objects
Every time you retrieve an Action object, you will usually access its related User object and the user’s related Profile object. The Django ORM offers a simple way to retrieve related objects at the same time, thereby avoiding additional queries to the database.
Using select_related()
Django offers a QuerySet method called select_related() that allows you to retrieve related objects for one-to-many relationships. This translates to a single, more complex QuerySet, but you avoid additional queries when accessing the related objects. The select_related method is for ForeignKey and OneToOne fields. It works by performing a SQL JOIN and including the fields of the related object in the SELECT statement.
To take advantage of select_related(), edit the following line of the preceding code in the views.py file of the account application to add select_related, including the fields that you will use, like this. Edit the views.py file of the account application. New code is highlighted in bold:
@login_required
def dashboard(request):
    # Display all actions by default
    actions = Action.objects.exclude(user=request.user)
    following_ids = request.user.following.values_list('id',
                                                       flat=True)
    if following_ids:
        # If user is following others, retrieve only their actions
        actions = actions.filter(user_id__in=following_ids)
    actions = actions.select_related('user', 'user__profile')[:10]
    return render(request,
                  'account/dashboard.html',
                  {'section': 'dashboard',
                   'actions': actions})
You use user__profile to join the Profile table in a single SQL query. If you call select_related() without passing any arguments to it, it will retrieve objects from all ForeignKey relationships. Always limit select_related() to the relationships that will be accessed afterward.
Using select_related() carefully can vastly improve execution time.
Using prefetch_related()
select_related() will help you boost the performance for retrieving related objects in one-to-many relationships. However, select_related() doesn’t work for many-to-many or many-to-one relationships (ManyToMany or reverse ForeignKey fields). Django offers a different QuerySet method called prefetch_related that works for many-to-many and many-to-one relationships in addition to the relationships supported by select_related(). The prefetch_related() method performs a separate lookup for each relationship and joins the results using Python. This method also supports the prefetching of GenericRelation and GenericForeignKey.
Edit the views.py file of the account application and complete your query by adding prefetch_related() to it for the target GenericForeignKey field, as follows. The new code is highlighted in bold:
@login_required
def dashboard(request):
    # Display all actions by default
    actions = Action.objects.exclude(user=request.user)
    following_ids = request.user.following.values_list('id',
                                                       flat=True)
    if following_ids:
        # If user is following others, retrieve only their actions
        actions = actions.filter(user_id__in=following_ids)
    actions = actions.select_related('user', 'user__profile')
                     .prefetch_related('target')[:10]
    return render(request,
                  'account/dashboard.html',
                  {'section': 'dashboard',
                   'actions': actions})
actions = actions.select_related('user', 'user__profile'
This query is now optimized for retrieving the user actions, including related objects.
Creating templates for actions
Let’s now create the template to display a particular Action object. Create a new directory inside the actions application directory and name it templates. Add the following file structure to it:
actions/
    action/
        detail.html
Edit the actions/action/detail.html template file and add the following lines to it:
{% load thumbnail %}
{% with user=action.user profile=action.user.profile %}
<div class="action">
  <div class="images">
    {% if profile.photo %}
      {% thumbnail user.profile.photo "80x80" crop="100%" as im %}
      <a href="{{ user.get_absolute_url }}">
        <img src="{{ im.url }}" alt="{{ user.get_full_name }}"
         class="item-img">
      </a>
    {% endif %}
    {% if action.target %}
      {% with target=action.target %}
        {% if target.image %}
          {% thumbnail target.image "80x80" crop="100%" as im %}
          <a href="{{ target.get_absolute_url }}">
            <img src="{{ im.url }}" class="item-img">
          </a>
        {% endif %}
      {% endwith %}
    {% endif %}
  </div>
  <div class="info">
    <p>
      <span class="date">{{ action.created|timesince }} ago</span>
      <br />
      <a href="{{ user.get_absolute_url }}">
        {{ user.first_name }}
      </a>
      {{ action.verb }}
      {% if action.target %}
        {% with target=action.target %}
          <a href="{{ target.get_absolute_url }}">{{ target }}</a>
        {% endwith %}
      {% endif %}
    </p>
  </div>
</div>
{% endwith %}
This is the template used to display an Action object. First, you use the {% with %} template tag to retrieve the user performing the action and the related Profile object. Then, you display the image of the target object if the Action object has a related target object. Finally, you display the link to the user who performed the action, the verb, and the target object, if any.
Edit the account/dashboard.html template of the account application and append the following code highlighted in bold to the bottom of the content block:
{% extends "base.html" %}
{% block title %}Dashboard{% endblock %}
{% block content %}
  ...
  <h2>What's happening</h2>
  <div id="action-list">
    {% for action in actions %}
      {% include "actions/action/detail.html" %}
    {% endfor %}
  </div>
{% endblock %}
Open http://127.0.0.1:8000/account/ in your browser. Log in as an existing user and perform several actions so that they get stored in the database. Then, log in using another user, follow the previous user, and take a look at the generated action stream on the dashboard page.
It should look like the following:

Figure 7.5: The activity stream for the current user
Figure 7.5 image attributions:
- Tesla’s induction motor by Ctac (license: Creative Commons Attribution Share-Alike 3.0 Unported: https://creativecommons.org/licenses/by-sa/3.0/)
- Turing Machine Model Davey 2012 by Rocky Acosta (license: Creative Commons Attribution 3.0 Unported: https://creativecommons.org/licenses/by/3.0/)
- Chick Corea by ataelw (license: Creative Commons Attribution 2.0 Generic: https://creativecommons.org/licenses/by/2.0/)
You just created a complete activity stream for your users, and you can easily add new user actions to it. You can also add infinite scroll functionality to the activity stream by implementing the same AJAX paginator that you used for the image_list view. Next, you will learn how to use Django signals to denormalize action counts.
Using signals for denormalizing counts
There are some cases when you may want to denormalize your data. Denormalization is making data redundant in such a way that it optimizes read performance. For example, you might be copying related data to an object to avoid expensive read queries to the database when retrieving the related data. You have to be careful about denormalization and only start using it when you really need it. The biggest issue you will find with denormalization is that it’s difficult to keep your denormalized data updated.
Let’s take a look at an example of how to improve your queries by denormalizing counts. You will denormalize data from your Image model and use Django signals to keep the data updated.
Working with signals
Django comes with a signal dispatcher that allows receiver functions to get notified when certain actions occur. Signals are very useful when you need your code to do something every time something else happens. Signals allow you to decouple logic: you can capture a certain action, regardless of the application or code that triggered that action, and implement logic that gets executed whenever that action occurs. For example, you can build a signal receiver function that gets executed every time a User object is saved. You can also create your own signals so that others can get notified when an event happens.
Django provides several signals for models located at django.db.models.signals. Some of these signals are as follows:
pre_saveandpost_saveare sent before or after calling thesave()method of a modelpre_deleteandpost_deleteare sent before or after calling thedelete()method of a model or QuerySetm2m_changedis sent when aManyToManyFieldon a model is changed
These are just a subset of the signals provided by Django. You can find a list of all built-in signals at https://docs.djangoproject.com/en/4.1/ref/signals/.
Let’s say you want to retrieve images by popularity. You can use the Django aggregation functions to retrieve images ordered by the number of users who like them. Remember that you used Django aggregation functions in Chapter 3, Extending Your Blog Application. The following code example will retrieve images according to their number of likes:
from django.db.models import Count
from images.models import Image
images_by_popularity = Image.objects.annotate(
    total_likes=Count('users_like')).order_by('-total_likes')
However, ordering images by counting their total likes is more expensive in terms of performance than ordering them by a field that stores total counts. You can add a field to the Image model to denormalize the total number of likes to boost performance in queries that involve this field. The issue is how to keep this field updated.
Edit the models.py file of the images application and add the following total_likes field to the Image model. The new code is highlighted in bold:
class Image(models.Model):
    # ...
    total_likes = models.PositiveIntegerField(default=0)
    class Meta:
        indexes = [
            models.Index(fields=['-created']),
            models.Index(fields=['-total_likes']),
        ]
        ordering = ['-created']
The total_likes field will allow you to store the total count of users who like each image. Denormalizing counts is useful when you want to filter or order QuerySets by them. We have added a database index for the total_likes field in descending order because we plan to retrieve images ordered by their total likes in descending order.
There are several ways to improve performance that you have to take into account before denormalizing fields. Consider database indexes, query optimization, and caching before starting to denormalize your data.
Run the following command to create the migrations for adding the new field to the database table:
python manage.py makemigrations images
You should see the following output:
Migrations for 'images':
  images/migrations/0002_auto_20220124_1757.py
    - Add field total_likes to image
    - Create index images_imag_total_l_0bcd7e_idx on field(s) -total_likes of model image
Then, run the following command to apply the migration:
python manage.py migrate images
The output should include the following line:
Applying images.0002_auto_20220124_1757... OK
You need to attach a receiver function to the m2m_changed signal.
Create a new file inside the images application directory and name it signals.py. Add the following code to it:
from django.db.models.signals import m2m_changed
from django.dispatch import receiver
from .models import Image
@receiver(m2m_changed, sender=Image.users_like.through)
def users_like_changed(sender, instance, **kwargs):
    instance.total_likes = instance.users_like.count()
    instance.save()
First, you register the users_like_changed function as a receiver function using the receiver() decorator. You attach it to the m2m_changed signal. Then, you connect the function to Image.users_like.through so that the function is only called if the m2m_changed signal has been launched by this sender. There is an alternate method for registering a receiver function; it consists of using the connect() method of the Signal object.
Django signals are synchronous and blocking. Don’t confuse signals with asynchronous tasks. However, you can combine both to launch asynchronous tasks when your code gets notified by a signal. You will learn how to create asynchronous tasks with Celery in Chapter 8, Building an Online Shop.
You have to connect your receiver function to a signal so that it gets called every time the signal is sent. The recommended method for registering your signals is by importing them into the ready() method of your application configuration class. Django provides an application registry that allows you to configure and intropect your applications.
Application configuration classes
Django allows you to specify configuration classes for your applications. When you create an application using the startapp command, Django adds an apps.py file to the application directory, including a basic application configuration that inherits from the AppConfig class.
The application configuration class allows you to store metadata and the configuration for the application, and it provides introspection for the application. You can find more information about application configurations at https://docs.djangoproject.com/en/4.1/ref/applications/.
In order to register your signal receiver functions, when you use the receiver() decorator, you just need to import the signals module of your application inside the ready() method of the application configuration class. This method is called as soon as the application registry is fully populated. Any other initializations for your application should also be included in this method.
Edit the apps.py file of the images application and add the following code highlighted in bold:
from django.apps import AppConfig
class ImagesConfig(AppConfig):
    default_auto_field = 'django.db.models.BigAutoField'
    name = 'images'
    def ready(self):
        # import signal handlers
        import images.signals
You import the signals for this application in the ready() method so that they are imported when the images application is loaded.
Run the development server with the following command:
python manage.py runserver
Open your browser to view an image detail page and click on the Like button.
Go to the administration site, navigate to the edit image URL, such as http://127.0.0.1:8000/admin/images/image/1/change/, and take a look at the total_likes attribute. You should see that the total_likes attribute is updated with the total number of users who like the image, as follows:

Figure 7.6: The image edit page on the administration site, including denormalization for total likes
Now, you can use the total_likes attribute to order images by popularity or display the value anywhere, avoiding using complex queries to calculate it.
Consider the following query to get images ordered by their likes count in descending order:
from django.db.models import Count
images_by_popularity = Image.objects.annotate(
    likes=Count('users_like')).order_by('-likes')
The preceding query can now be written as follows:
images_by_popularity = Image.objects.order_by('-total_likes')
This results in a less expensive SQL query thanks to denormalizing the total likes for images. You have also learned how you can use Django signals.
Use signals with caution since they make it difficult to know the control flow. In many cases, you can avoid using signals if you know which receivers need to be notified.
You will need to set initial counts for the rest of the Image objects to match the current status of the database.
Open the shell with the following command:
python manage.py shell
Execute the following code in the shell:
>>> from images.models import Image
>>> for image in Image.objects.all():
...    image.total_likes = image.users_like.count()
...    image.save()
You have manually updated the likes count for the existing images in the database. From now on, the users_like_changed signal receiver function will handle updating the total_likes field whenever the many-to-many related objects change.
Next, you will learn how to use Django Debug Toolbar to obtain relevant debug information for requests, including execution time, SQL queries executed, templates rendered, signals registered, and much more.
Using Django Debug Toolbar
At this point, you will already be familiar with Django’s debug page. Throughout the previous chapters, you have seen the distinctive yellow and grey Django debug page several times. For example, in Chapter 2, Enhancing Your Blog with Advanced Features, in the Handling pagination errors section, the debug page showed information related to unhandled exceptions when implementing object pagination.
The Django debug page provides useful debug information. However, there is a Django application that includes more detailed debug information and can be really helpful when developing.
Django Debug Toolbar is an external Django application that allows you to see relevant debug information about the current request/response cycle. The information is divided into multiple panels that show different information, including request/response data, Python package versions used, execution time, settings, headers, SQL queries, templates used, cache, signals, and logging.
You can find the documentation for Django Debug Toolbar at https://django-debug-toolbar.readthedocs.io/.
Installing Django Debug Toolbar
Install django-debug-toolbar via pip using the following command:
pip install django-debug-toolbar==3.6.0
Edit the settings.py file of your project and add debug_toolbar to the INSTALLED_APPS setting, as follows. The new line is highlighted in bold:
INSTALLED_APPS = [
    # ...
    'debug_toolbar',
]
In the same file, add the following line highlighted in bold to the MIDDLEWARE setting:
MIDDLEWARE = [
    'debug_toolbar.middleware.DebugToolbarMiddleware',
    'django.middleware.security.SecurityMiddleware',
    'django.contrib.sessions.middleware.SessionMiddleware',
    'django.middleware.common.CommonMiddleware',
    'django.middleware.csrf.CsrfViewMiddleware',
    'django.contrib.auth.middleware.AuthenticationMiddleware',
    'django.contrib.messages.middleware.MessageMiddleware',
    'django.middleware.clickjacking.XFrameOptionsMiddleware',
]
Django Debug Toolbar is mostly implemented as middleware. The order of MIDDLEWARE is important. DebugToolbarMiddleware has to be placed before any other middleware, except for middleware that encodes the response’s content, such as GZipMiddleware, which, if present, should come first.
Add the following lines at the end of the settings.py file:
INTERNAL_IPS = [
    '127.0.0.1',
]
Django Debug Toolbar will only display if your IP address matches an entry in the INTERNAL_IPS setting. To prevent showing debug information in production, Django Debug Toolbar checks that the DEBUG setting is True.
Edit the main urls.py file of your project and add the following URL pattern highlighted in bold to the urlpatterns:
urlpatterns = [
    path('admin/', admin.site.urls),
    path('account/', include('account.urls')),
    path('social-auth/',
         include('social_django.urls', namespace='social')),
    path('images/', include('images.urls', namespace='images')),
    path('__debug__/', include('debug_toolbar.urls')),
]
Django Debug Toolbar is now installed in your project. Let’s try it out!
Run the development server with the following command:
python manage.py runserver
Open http://127.0.0.1:8000/images/ with your browser. You should now see a collapsible sidebar on the right. It should look as follows:

Figure 7.7: The Django Debug Toolbar sidebar
Figure 7.7 image attributions:
- Chick Corea by ataelw (license: Creative Commons Attribution 2.0 Generic: https://creativecommons.org/licenses/by/2.0/)
- Al Jarreau – Düsseldorf 1981 by Eddi Laumanns aka RX-Guru (license: Creative Commons Attribution 3.0 Unported: https://creativecommons.org/licenses/by/3.0/)
- Al Jarreau by Kingkongphoto & www.celebrity-photos.com (license: Creative Commons Attribution-ShareAlike 2.0 Generic: https://creativecommons.org/licenses/by-sa/2.0/)
If the debug toolbar doesn’t appear, check the RunServer shell console log. If you see a MIME type error, it is most likely that your MIME map files are incorrect or need to be updated.
You can apply the correct mapping for JavaScript and CSS files by adding the following lines to the settings.py file:
if DEBUG:
    import mimetypes
    mimetypes.add_type('application/javascript', '.js', True)
    mimetypes.add_type('text/css', '.css', True)
Django Debug Toolbar panels
Django Debug Toolbar features multiple panels that organize the debug information for the request/response cycle. The sidebar contains links to each panel, and you can use the checkbox of any panel to activate or deactivate it. The change will be applied to the next request. This is useful when we are not interested in a specific panel, but the calculation adds too much overhead to the request.
Click on Time in the sidebar menu. You will see the following panel:

Figure 7.8: Time panel – Django Debug Toolbar
The Time panel includes a timer for the different phases of the request/response cycle. It also shows CPU, elapsed time, and the number of context switches. If you are using WIndows, you won’t be able to see the Time panel. In Windows, only the total time is available and displayed in the toolbar.
Click on SQL in the sidebar menu. You will see the following panel:

Figure 7.9: SQL panel – Django Debug Toolbar
Here you can see the different SQL queries that have been executed. This information can help you identify unnecessary queries, duplicated queries that can be reused, or long-running queries that can be optimized. Based on your findings, you can improve QuerySets in your views, create new indexes on model fields if necessary, or cache information when needed. In this chapter, you learned how to optimize queries that involve relationships using select_related() and prefetch_related(). You will learn how to cache data in Chapter 14, Rendering and Caching Content.
Click on Templates in the sidebar menu. You will see the following panel:

Figure 7.10: Templates panel – Django Debug Toolbar
This panel shows the different templates used when rendering the content, the template paths, and the context used. You can also see the different context processors used. You will learn about context processors in Chapter 8, Building an Online Shop.
Click on Signals in the sidebar menu. You will see the following panel:

Figure 7.11: Signals panel – Django Debug Toolbar
In this panel, you can see all the signals that are registered in your project and the receiver functions attached to each signal. For example, you can find the users_like_changed receiver function you created before, attached to the m2m_changed signal. The other signals and receivers are part of the different Django applications.
We have reviewed some of the panels that ship with Django Debug Toolbar. Besides the built-in panels, you can find additional third-party panels that you can download and use at https://django-debug-toolbar.readthedocs.io/en/latest/panels.html#third-party-panels.
Django Debug Toolbar commands
Besides the request/response debug panels, Django Debug Toolbar provides a management command to debug SQL for ORM calls. The management command debugsqlshell replicates the Django shell command but it outputs SQL statements for queries performed with the Django ORM.
Open the shell with the following command:
python manage.py debugsqlshell
Execute the following code:
>>> from images.models import Image
>>> Image.objects.get(id=1)
You will see the following output:
SELECT "images_image"."id",
       "images_image"."user_id",
       "images_image"."title",
       "images_image"."slug",
       "images_image"."url",
       "images_image"."image",
       "images_image"."description",
       "images_image"."created",
       "images_image"."total_likes"
FROM "images_image"
WHERE "images_image"."id" = 1
LIMIT 21 [0.44ms]
<Image: Django and Duke>
You can use this command to test ORM queries before adding them to your views. You can check the resulting SQL statement and the execution time for each ORM call.
In the next section, you will learn how to count image views using Redis, an in-memory database that provides low latency and high-throughput data access.
Counting image views with Redis
Redis is an advanced key/value database that allows you to save different types of data. It also has extremely fast I/O operations. Redis stores everything in memory, but the data can be persisted by dumping the dataset to disk every once in a while, or by adding each command to a log. Redis is very versatile compared to other key/value stores: it provides a set of powerful commands and supports diverse data structures, such as strings, hashes, lists, sets, ordered sets, and even bitmaps or HyperLogLogs.
Although SQL is best suited to schema-defined persistent data storage, Redis offers numerous advantages when dealing with rapidly changing data, volatile storage, or when a quick cache is needed. Let’s take a look at how Redis can be used to build new functionality into your project.
You can find more information about Redis on its homepage at https://redis.io/.
Redis provides a Docker image that makes it very easy to deploy a Redis server with a standard configuration.
Installing Docker
Docker is a popular open-source containerization platform. It enables developers to package applications into containers, simplifying the process of building, running, managing, and distributing applications.
First, download and install Docker for your OS. You will find instructions for downloading and installing Docker on Linux, macOS, and Windows at https://docs.docker.com/get-docker/.
Installing Redis
After installing Docker on your Linux, macOS, or Windows machine, you can easily pull the Redis Docker image. Run the following command from the shell:
docker pull redis
This will download the Redis Docker image to your local machine. You can find information about the official Redis Docker image at https://hub.docker.com/_/redis. You can find other alternative methods to install Redis at https://redis.io/download/.
Execute the following command in the shell to start the Redis Docker container:
docker run -it --rm --name redis -p 6379:6379 redis
With this command, we run Redis in a Docker container. The -it option tells Docker to take you straight inside the container for interactive input. The --rm option tells Docker to automatically clean up the container and remove the file system when the container exits. The --name option is used to assign a name to the container. The -p option is used to publish the 6379 port, on which Redis runs, to the same host interface port. 6379 is the default port for Redis.
You should see an output that ends with the following lines:
# Server initialized
* Ready to accept connections
Keep the Redis server running on port 6379 and open another shell. Start the Redis client with the following command:
docker exec -it redis sh
You will see a line with the hash symbol:
#
Start the Redis client with the following command:
# redis-cli
You will see the Redis client shell prompt, like this:
127.0.0.1:6379>
The Redis client allows you to execute Redis commands directly from the shell. Let’s try some commands. Enter the SET command in the Redis shell to store a value in a key:
127.0.0.1:6379> SET name "Peter"
OK
The preceding command creates a name key with the string value "Peter" in the Redis database. The OK output indicates that the key has been saved successfully.
Next, retrieve the value using the GET command, as follows:
127.0.0.1:6379> GET name
"Peter"
You can also check whether a key exists using the EXISTS command. This command returns 1 if the given key exists, and 0 otherwise:
127.0.0.1:6379> EXISTS name
(integer) 1
You can set the time for a key to expire using the EXPIRE command, which allows you to set the time-to-live in seconds. Another option is using the EXPIREAT command, which expects a Unix timestamp. Key expiration is useful for using Redis as a cache or to store volatile data:
127.0.0.1:6379> GET name
"Peter"
127.0.0.1:6379> EXPIRE name 2
(integer) 1
Wait for more than two seconds and try to get the same key again:
127.0.0.1:6379> GET name
(nil)
The (nil) response is a null response and means that no key has been found. You can also delete any key using the DEL command, as follows:
127.0.0.1:6379> SET total 1
OK
127.0.0.1:6379> DEL total
(integer) 1
127.0.0.1:6379> GET total
(nil)
These are just basic commands for key operations. You can find all Redis commands at https://redis.io/commands/ and all Redis data types at https://redis.io/docs/manual/data-types/.
Using Redis with Python
You will need Python bindings for Redis. Install redis-py via pip using the following command:
pip install redis==4.3.4
You can find the redis-py documentation at https://redis-py.readthedocs.io/.
The redis-py package interacts with Redis, providing a Python interface that follows the Redis command syntax. Open the Python shell with the following command:
python manage.py shell
Execute the following code:
>>> import redis
>>> r = redis.Redis(host='localhost', port=6379, db=0)
The preceding code creates a connection with the Redis database. In Redis, databases are identified by an integer index instead of a database name. By default, a client is connected to database 0. The number of available Redis databases is set to 16, but you can change this in the redis.conf configuration file.
Next, set a key using the Python shell:
>>> r.set('foo', 'bar')
True
The command returns True, indicating that the key has been successfully created. Now you can retrieve the key using the get() command:
>>> r.get('foo')
b'bar'
As you will note from the preceding code, the methods of Redis follow the Redis command syntax.
Let’s integrate Redis into your project. Edit the settings.py file of the bookmarks project and add the following settings to it:
REDIS_HOST = 'localhost'
REDIS_PORT = 6379
REDIS_DB = 0
These are the settings for the Redis server and the database that you will use for your project.
Storing image views in Redis
Let’s find a way to store the total number of times an image has been viewed. If you implement this using the Django ORM, it will involve a SQL UPDATE query every time an image is displayed.
If you use Redis instead, you just need to increment a counter stored in memory, resulting in much better performance and less overhead.
Edit the views.py file of the images application and add the following code to it after the existing import statements:
import redis
from django.conf import settings
# connect to redis
r = redis.Redis(host=settings.REDIS_HOST,
                port=settings.REDIS_PORT,
                db=settings.REDIS_DB)
With the preceding code, you establish the Redis connection in order to use it in your views. Edit the views.py file of the images application and modify the image_detail view, like this. The new code is highlighted in bold:
def image_detail(request, id, slug):
    image = get_object_or_404(Image, id=id, slug=slug)
    # increment total image views by 1
    total_views = r.incr(f'image:{image.id}:views')
    return render(request,
                  'images/image/detail.html',
                  {'section': 'images',
                   'image': image,
                   'total_views': total_views})
In this view, you use the incr command, which increments the value of a given key by 1. If the key doesn’t exist, the incr command creates it. The incr() method returns the final value of the key after performing the operation. You store the value in the total_views variable and pass it into the template context. You build the Redis key using a notation such as object-type:id:field (for example, image:33:id).
The convention for naming Redis keys is to use a colon sign as a separator for creating namespaced keys. By doing so, the key names are especially verbose and related keys share part of the same schema in their names.
Edit the images/image/detail.html template of the images application and add the following code highlighted in bold:
...
<div class="image-info">
  <div>
    <span class="count">
      <span class="total">{{ total_likes }}</span>
      like{{ total_likes|pluralize }}
    </span>
    <span class="count">
      {{ total_views }} view{{ total_views|pluralize }}
    </span>
    <a href="#" data-id="{{ image.id }}" data-action="{% if request.user in users_like %}un{% endif %}like"
    class="like button">
      {% if request.user not in users_like %}
        Like
      {% else %}
        Unlike
      {% endif %}
    </a>
  </div>
  {{ image.description|linebreaks }}
</div>
...
Run the development server with the following command:
python manage.py runserver
Open an image detail page in your browser and reload it several times. You will see that each time the view is processed, the total views displayed is incremented by 1. Take a look at the following example:
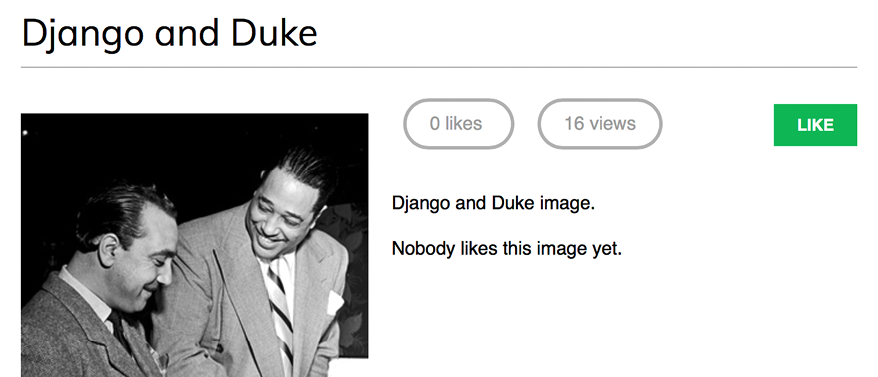
Figure 7.12: The image detail page, including the count of likes and views
Great! You have successfully integrated Redis into your project to count image views. In the next section, you will learn how to build a ranking of the most viewed images with Redis.
Storing a ranking in Redis
We will now create something more complex with Redis. We will use Redis to store a ranking of the most viewed images on the platform. We will use Redis sorted sets for this. A sorted set is a non-repeating collection of strings in which every member is associated with a score. Items are sorted by their score.
Edit the views.py file of the images application and add the following code highlighted in bold to the image_detail view:
def image_detail(request, id, slug):
    image = get_object_or_404(Image, id=id, slug=slug)
    # increment total image views by 1
    total_views = r.incr(f'image:{image.id}:views')
    # increment image ranking by 1
    r.zincrby('image_ranking', 1, image.id)
    return render(request,
                  'images/image/detail.html',
                  {'section': 'images',
                   'image': image,
                   'total_views': total_views})
You use the zincrby() command to store image views in a sorted set with the image:ranking key. You will store the image id and a related score of 1, which will be added to the total score of this element in the sorted set. This will allow you to keep track of all image views globally and have a sorted set ordered by the total number of views.
Now, create a new view to display the ranking of the most viewed images. Add the following code to the views.py file of the images application:
@login_required
def image_ranking(request):
    # get image ranking dictionary
    image_ranking = r.zrange('image_ranking', 0, -1,
                             desc=True)[:10]
    image_ranking_ids = [int(id) for id in image_ranking]
    # get most viewed images
    most_viewed = list(Image.objects.filter(
                           id__in=image_ranking_ids))
    most_viewed.sort(key=lambda x: image_ranking_ids.index(x.id))
    return render(request,
                  'images/image/ranking.html',
                  {'section': 'images',
                   'most_viewed': most_viewed})
The image_ranking view works like this:
- You use the
zrange()command to obtain the elements in the sorted set. This command expects a custom range according to the lowest and highest scores. Using0as the lowest and-1as the highest score, you are telling Redis to return all elements in the sorted set. You also specifydesc=Trueto retrieve the elements ordered by descending score. Finally, you slice the results using[:10]to get the first 10 elements with the highest score. - You build a list of returned image IDs and store it in the
image_ranking_idsvariable as a list of integers. You retrieve theImageobjects for those IDs and force the query to be executed using thelist()function. It is important to force the QuerySet execution because you will use thesort()list method on it (at this point, you need a list of objects instead of a QuerySet). - You sort the
Imageobjects by their index of appearance in the image ranking. Now you can use themost_viewedlist in your template to display the 10 most viewed images.
Create a new ranking.html template inside the images/image/ template directory of the images application and add the following code to it:
{% extends "base.html" %}
{% block title %}Images ranking{% endblock %}
{% block content %}
  <h1>Images ranking</h1>
  <ol>
    {% for image in most_viewed %}
      <li>
        <a href="{{ image.get_absolute_url }}">
          {{ image.title }}
        </a>
      </li>
    {% endfor %}
  </ol>
{% endblock %}
The template is pretty straightforward. You iterate over the Image objects contained in the most_viewed list and display their names, including a link to the image detail page.
Finally, you need to create a URL pattern for the new view. Edit the urls.py file of the images application and add the following URL pattern highlighted in bold:
urlpatterns = [
    path('create/', views.image_create, name='create'),
    path('detail/<int:id>/<slug:slug>/',
         views.image_detail, name='detail'),
    path('like/', views.image_like, name='like'),
    path('', views.image_list, name='list'),
    path('ranking/', views.image_ranking, name='ranking'),
]
Run the development server, access your site in your web browser, and load the image detail page multiple times for different images. Then, access http://127.0.0.1:8000/images/ranking/ from your browser. You should be able to see an image ranking, as follows:
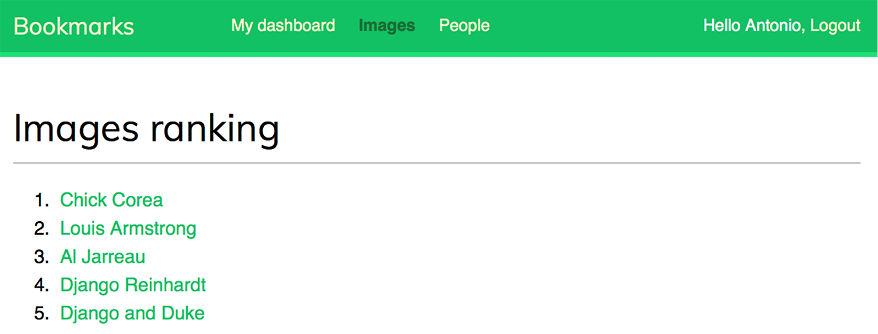
Figure 7.13: The ranking page built with data retrieved from Redis
Great! You just created a ranking with Redis.
Next steps with Redis
Redis is not a replacement for your SQL database, but it does offer fast in-memory storage that is more suitable for certain tasks. Add it to your stack and use it when you really feel it’s needed. The following are some scenarios in which Redis could be useful:
- Counting: As you have seen, it is very easy to manage counters with Redis. You can use
incr()andincrby()for counting stuff. - Storing the latest items: You can add items to the start/end of a list using
lpush()andrpush(). Remove and return the first/last element usinglpop()/rpop(). You can trim the list’s length usingltrim()to maintain its length. - Queues: In addition to
pushandpopcommands, Redis offers the blocking of queue commands. - Caching: Using
expire()andexpireat()allows you to use Redis as a cache. You can also find third-party Redis cache backends for Django. - Pub/sub: Redis provides commands for subscribing/unsubscribing and sending messages to channels.
- Rankings and leaderboards: Redis’ sorted sets with scores make it very easy to create leaderboards.
- Real-time tracking: Redis’s fast I/O makes it perfect for real-time scenarios.
Additional resources
The following resources provide additional information related to the topics covered in this chapter:
- Source code for this chapter – https://github.com/PacktPublishing/Django-4-by-example/tree/main/Chapter07
- Custom user models – https://docs.djangoproject.com/en/4.1/topics/auth/customizing/#specifying-a-custom-user-model
- The
contenttypesframework – https://docs.djangoproject.com/en/4.1/ref/contrib/contenttypes/ - Built-in Django signals – https://docs.djangoproject.com/en/4.1/ref/signals/
- Application configuration classes – https://docs.djangoproject.com/en/4.1/ref/applications/
- Django Debug Toolbar documentation – https://django-debug-toolbar.readthedocs.io/
- Django Debug Toolbar third-party panels – https://django-debug-toolbar.readthedocs.io/en/latest/panels.html#third-party-panels
- Redis in-memory data store – https://redis.io/
- Docker download and install instructions – https://docs.docker.com/get-docker/
- Official Redis Docker image — https://hub.docker.com/_/redis.
- Redis download options – https://redis.io/download/
- Redis commands – https://redis.io/commands/
- Redis data types – https://redis.io/docs/manual/data-types/
redis-pydocumentation – https://redis-py.readthedocs.io/
Summary
In this chapter, you built a follow system using many-to-many relationships with an intermediary model. You also created an activity stream using generic relations and you optimized QuerySets to retrieve related objects. This chapter then introduced you to Django signals, and you created a signal receiver function to denormalize related object counts. We covered application configuration classes, which you used to load your signal handlers. You added Django Debug Toolbar to your project. You also learned how to install and configure Redis in your Django project. Finally, you used Redis in your project to store item views, and you built an image ranking with Redis.
In the next chapter, you will learn how to build an online shop. You will create a product catalog and build a shopping cart using sessions. You will learn how to create custom context processors. You will also manage customer orders and send asynchronous notifications using Celery and RabbitMQ.