
Appendix B
freeDiameter from Sources
B.1 Introduction
This appendix provides more details on how to build freeDiameter. It is recommended for anyone interested in developing new features in Diameter or hacking in the existing freeDiameter code. As a prerequisite, the reader should be familiar with software development and the Linux environment.
The general steps to compile and then run freeDiameter are the following:
- 1. Install the required tools and dependencies.
- 2. Obtain the source code.
- 3. Set up your build environment.
- 4. Run make, which will in turn call the C compiler and other tools needed to compile
freeDiameter. - 5. Create a
freeDiameterconfiguration file. - 6. Run and test
freeDiameter.
The following sections provide more details on these steps, which will create the environment covered in Appendix A.
B.2 Tools and Dependencies
As freeDiameter source code is not tied to any integrated development environment, almost any system can be used as a development machine. There are, however, a few dependencies that need to be matched. Use the latest stable release for your operating system when installing or updating dependencies.
Operating System
The freeDiameter code follows the programming interface specified by POSIX, so it can run on any UNIX® compliant system, and it has been tested successfully on several flavors of GNU/Linux, FreeBSD, and Mac OS X. See http://www.unix.org for details on the POSIX API.
Build System
freeDiameter uses CMake for configuring its build system. CMake is a command‐line tool available on most platforms and usually comes with a graphical user interface, ccmake, for easier use. For more information about CMake and ccmake, see http://cmake.org.
The make tool is used for automating the build. freeDiameter has been tested with GNU Make, the default version in many distributions.
Compilers
The source code of freeDiameter is written mainly in C language, but Lex and Yacc languages are also used, and some extensions use additional languages. In order to compile the C source code, you will need a C/C++ compiler. The default GNU C compiler gcc toolchain is a good choice, but in some cases a different compiler may be preferred; such an option can be easily configured in CMake.
You will need the GNU Flex and GNU Bison tools to compile the Lex and Yacc files – tokenizer and grammar parser, respectively – used for parsing the freeDiameter configuration file.
Source Code Management
The source code of freeDiameter is managed with Mercurial, an open‐source and platform‐independent source code management (SCM) tool. Although not absolutely necessary for retrieving the source code, Mercurial allows access to any previous version of the freeDiameter project and will allow you to check code into the freeDiameter repository if you choose to contribute. To obtain Mercurial, visit https://www.mercurial‐scm.org/.
B.2.1 Runtime Dependencies
freeDiameter depends on a number of libraries used at runtime and their corresponding header files for compilation.
B.2.1.1 SCTP
At the time of writing, the SCTP protocol is not fully supported by default on many systems, and requires a library to be installed, e.g., libsctp1 and libsctp‐dev packages on Ubuntu. The SCTP library for OS X, libusrsctp, is not equivalent to other SCTP libraries, so you will need to disable support for SCTP in order to build freeDiameter in OS X. This is described in the section that covers the build process.
B.2.1.2 TLS
freeDiameter depends on the GnuTLS library for the support of TLS security. To download this library, visit http://gnutls.org.
freeDiameter also has a dependency on libgcrypt, a general‐purpose cryptographic library. Visit https://www.gnu.org/software/libgcrypt/ for pointers on where to download it.
B.2.1.3 Internationalized Domain Names
For the support of internationalized domain names, the GNU IDN library is used and can be downloaded from http://www.gnu.org/software/libidn. However, if this feature is not required in the target deployment, a CMake setting, described below, can toggle the dependency off.
B.3 Obtaining freeDiameter Source Code
The source code of freeDiameter is freely accessible from the project website: http://www.freediameter.net/. Using Mercurial, clone the repository from the project website to a local directory:
- 1. Create a directory called
freeDiameter. - 2. Change to the
freeDiameterdirectory. - 3. Type at the command line:

This copies freeDiameter source files into a directory named src and duplicates the complete history of the freeDiameter project locally, making it easy to access any version of the project. To list versions and check out a specific one:
- 1. Change to the
srcdirectory. - 2. Type at the command line:

A list of versions is presented:

- 3. To check out an older version, type at the command line:

- 4. To download an archive of a specific version of the source code, use the following pattern for the URL, replacing
N.N.Nwith any released version corresponding to the tags in Mercurial:
The complete list of tags can be found at http://www.freediameter.net/hg/freeDiameter/tags.
To read the most up‐to‐date information about dependencies and how to further configure your particular environment, look at the INSTALL files found in the src directory.
B.4 Configuring the Build
Disabling SCTP Support
If you do not want to support SCTP, or your system cannot support SCTP, build freeDiameter following these steps:
- 1. Change to the
freeDiameterdirectory. - 2. Create a
builddirectory. - 3. Change to the
builddirectory. - 4. Type at the prompt:

This populates the build directory with subdirectories and files for the build. Once you have run CMake to disable SCTP, you may run CMake again, or ccmake, to make any other build configuration changes.
Interactive Mode for Configuration
freeDiameter offers flexible build configuration with ccmake, an interactive interface to CMake for configuring the build. To use this interactive interface:
- 1. Change to the
freeDiameterdirectory. - 2. Create a
builddirectory if you have not already done so. - 3. Change to the
builddirectory. - 4. Type at the prompt:

The interactive interface will be displayed. Navigation guidance can be found at the bottom of the screen:

- 5. Press the
ckey (configure) to list allfreeDiametervariables that ccmake needs to configure. If you are missing any dependencies, errors will be displayed, but ccmake will continue on to the variables list similar to the following:
- 6. Press the
tkey (toggle) to access a full list of the configuration options. By default many options are hidden since they usually do not need to be changed. - 7. Use arrow keys to navigate the list and press Enter to edit the selected option.
- 8. Once you have configured your options, type
cagain to store this configuration and reiterate the process, as setting some options may have unlocked new features to be configured. That is, when enabling some extensions, new dependencies will need to be resolved. - 9. When finished, press the
g(generate) key and ccmake will write the Makefiles that are needed for the next step. In addition, ccmake generates the freeDiameter‐host.h file in theinclude/freeDiameter/directory that contains values that will be used by thefreeDiametersource code, such as system parameters and features.
The following describes a few of the useful options. Refer to the embedded help text for additional information. In general all options prefixed with CMAKE_* are standard options that are documented in the CMake product:
- ALL_EXTENSIONS Setting this to
ONwill enable the compilation of all the provided extensions. By setting this option toOFF, you can select which extensions are built by configuring theBUILD_*options. For example, set theBUILD_APP_DIAMEAPoption toONto compile the Diameter EAP server application (the app_diameap.fdx extension). - CMAKE_BUILD_TYPE This configures a set of flags for different profiles. When developing or testing
freeDiameter, set this toDebug, which unlocks additional options (the CMake configuration process is iterative). - CMAKE_C_COMPILER Change here if you want to use a different C compiler.
- CMAKE_INSTALL_PREFIX If the
make installcommand is used, this configuration controls where the files must be installed. See also theINSTALL_*_SUFFIXoptions described in the installation section below. - DEBUG_WITH_META Set to
ONif you want logs with additional contextual information such as the thread ID, the producing function, etc. - DEBUG_SCTP Set to
ONfor more verbose messages in the SCTP code offreeDiameter. Only useful when working on this part of the code. - SCTP_USE_MAPPED_ADDRESSES Some earlier versions of the SCTP stack did not handle mixed IP and IPv6 arrays, so setting to
ONwill force the use of IPv4‐mapped IPv6 addresses 1 to work around the issue. - FLEX_EXECUTABLE This specifies the flex tool that will be used to compile the Lex files.
- GNUTLS_INCLUDE_DIR, GNUTLS_LIBRARY Specify the GnuTLS header files and library to use for compiling
freeDiameter. Note that the library used at runtime is selected using the default loader mechanism, which can be controlled with theLD_LIBRARY_PATHenvironment variable. These options are useful when working with a non‐default GnuTLS library. - DIAMID_IDNA_REJECT Set to
OFFif you do not have the GNU libidn library installed or internationalized domain names are not required in the target deployment.
Instead of using the ccmake interactive process, you can use the CMake command line directly:

B.5 Compiling freeDiameter
Once the Makefile has been generated as described in the previous section, type the following to compile the source code:

If the compiler is auto‐configured properly, you should see an output similar to the following:

By default, CMake generates silent Makefile rules, but the compilation line can be made visible by typing:

B.6 Installing freeDiameter
For this tutorial, we will not use the installation mechanism that is described below, but will run freeDiameter from the build tree directly, which is the standard method during development. Note that the information below is provided for completeness only.
To install from the source, specify the top‐level directory where freeDiameter will be installed with the CMake directive, CMAKE_INSTALL_PREFIX, which is /usr/local on most systems by default, and specify the subdirectory for different types of built files with the INSTALL_*_SUFFIX directives. For example, the following directives will install extensions into /usr/local/lib/freeDiameter/:
CMAKE_INSTALL_PREFIX=/usr/localINSTALL_EXTENSIONS_SUFFIX=lib/freeDiameter
After CMake has generated a Makefile with the proper path set, run the following command to copy the generated files into the configured locations. If the target is a system location, then run this command as a privileged user:

Note that there is no make uninstall target generated by default, but a list of the installed files can be found in install_manifest.txt. If you want to remove all the files that have been installed by the make install command, use the following command:

B.7 freeDiameter Configuration File
freeDiameter reads its configuration during startup from a file specified on the command line. This configuration file contains the settings for the core module and references to additional files that are related to specific extensions. The freeDiameter.conf.sample file in the /src/doc/ directory documents all the parameters. The parameters in this file are grouped as follows:
- Network protocol IP and IPv6 related configuration.
- Transport protocol Information such as the port numbers to use, the number of SCTP streams, etc.
- Transport layer security Certificate, private key, trusted authorities.
- Diameter protocol Identity, timers values, number of application threads.
- Peers List of the Diameter peers to maintain a connection to. Extension may add additional peers dynamically.
- Extensions The
freeDiameterextensions to be loaded, with their respective configuration files when appropriate. Documentation for the extensions configuration files is found in thesrc/doc/directory, and named after the extension.
Most parameters have reasonable defaults. For example, freeDiameter will use the hostname of the machine as DiameterIdentity unless the configuration file contains an Identity=... line. Only the information on the private key and certificate pertaining to the TLS configuration are mandatory parameters that must be present in the file because no default can be set. An example of a working configuration file is freeDiameter‐1.conf found in the /src/doc/single_host/ directory.
B.8 Running and Debugging freeDiameter
We are now going to set two Diameter peers running on a single machine, and let them exchange some example messages:
- 1. Change to the
builddirectory. - 2. Configure the Makefile to compile the test_app.fdx extension:

- 3. Run make:

- 4. Copy configuration files for running two peers:

- 5. Use OpenSSL to generate a local certificate infrastructure for this test that matches the identities declared in the configuration files:

We now have two sets of files in the current directory for two peers. The first set contains freeDiameter‐1.conf, the main configuration for a peer with identity peer1.localdomain. This file references cacert.pem, the certificate authority for the local test, and peer1.cert.pem and peer1.key.pem, respectively the certificate and private key for this peer1. The configuration file also references test_app1.conf, the configuration file for the test_app.fdx extension for peer1. The second set contains freeDiameter‐2.conf, with a similar structure as peer1. Note that only the certificate authority file is shared between both peers, since this is the common root of trust.
- 6. Start the stack. The
‐cflag allows you to specify the configuration file:
Provided that everything was done properly and you have all the dependencies available, you will see the following output:

In order to run our two‐peers scenario, we need to launch the second peer.
- 1. In a separate terminal window, launch the second peer using the configuration freeDiameter‐2.conf:

Once both instances are running, the following output shows that a connection was successfully established:

- 2. Trigger a message exchange with the following command in another terminal window:

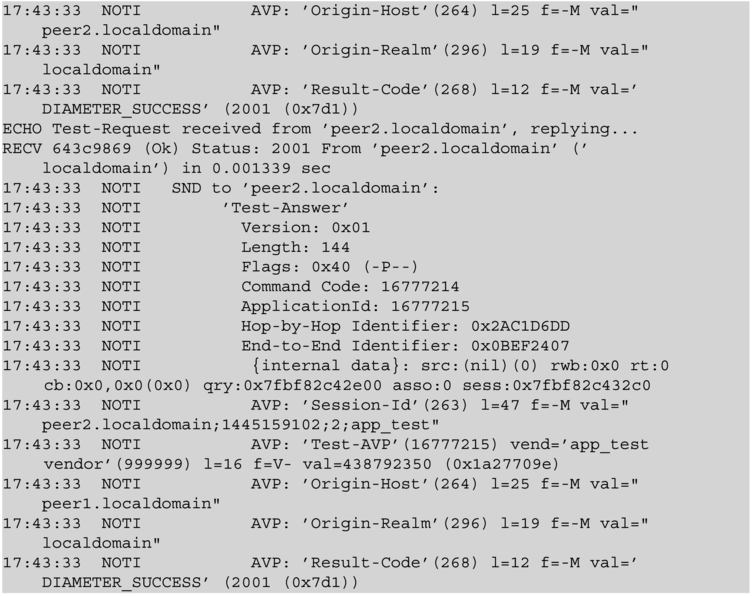
Once triggered with this signal, both peers instances generate a test message and send to their peer, as shown on the console of the running processes:

- 3. When done, press Ctrl‐C in each terminal window to halt the peers.
This concludes our tutorial for running freeDiameter from the source code. The remainder of this chapter provides more information on debugging, hacking, and extending the framework.
B.9 Extensions for Debug Support
Because freeDiameter was initially designed for academics and prototyping, it comes with a fair number of features built for facilitating the modification of the code.
B.9.1 Extended Trace
When you are developing and debugging, you may need to have more verbose output of the stack. There are two debugging options that you can apply.
First, in the CMake step, set the DEBUG_WITH_META option to ON. The DEBUG_WITH_META option adds a more precise timestamp, the name of the thread that triggered a log – useful since freeDiameter is multithreaded – and the function name, source file, and line where the log was triggered.
The second debugging option is to increase the verbosity level with the ‐dd switch when you start freeDiameter:

You will now have much more information available on what is happening in the stack:On the downside, the readability of the log decreases when these options are used; in addition, if you are storing the output on disk, the file size will increase rapidly. These options should be used only during the development phase.

The ‐dd command line switch triggers more traces to be displayed. The verbosity can be increased by adding the flag multiple times (e.g., ‐ddd), but the stack will not run properly if too much time is spent producing the traces. You can limit higher verbosity to a source file or a single function only, which may help while developing or debugging a specific module. Here is an example output:

B.9.2 Logging Diameter Messages: dbg_msg_dumps.fdx
It is useful to get a view of all the Diameter messages going in and out of the framework to understand why an application misbehaves. Although network analyzers such as Wireshark are excellent tools for such a purpose, they have some limitations if the traffic is encrypted with TLS or generated locally between two processes instead of sent over a real network. For this reason, freeDiameter comes with a Diameter message logger extension, dbg_msg_dumps.fdx.
To use the dbg_msg_dumps.fdx extension:
- 1. Enable
BUILD_DBG_MSG_DUMPSin your CMake configuration:
- 2. Run make:

- 3. Include the following line in the freeDiameter‐1.conf file:

- 4. Start the same test as in previous section:

- 5. In a separate terminal window, launch the second peer:

The triggered exchange is displayed as follows for peer1:

- 6. When done, press Ctrl‐C in each terminal window to halt the peers.
This format is the most readable for humans, but it is also very space‐ (and therefore time‐) consuming. Another option is to use the value 0x0040 in the configuration line, so that each message is written on a single line and may be reformatted post‐mortem. That may be a better option for pilot runs before actual deployment of an application, for example. Not only are the sent and received messages displayed by this mechanism, but also different internal events, such as peers connections and message routing.
B.9.3 Measuring Processing Time: dbg_msg_timings.fdx
The dbg_msg_timings.fdx extension measures the processing time of the local stack for incoming messages and the network time between sent requests and received answers. This is useful for checking that a local application is fast enough and for determining if more application threads are required.
- 1. By default, the CMake option
BUILD_MSG_TIMINGSis set toONso you do not have to reconfigure the build. - 2. Include the following line in the freeDiameter‐1.conf file:
- 3. Start the same test as in previous section. You will see the following:

- 4. When done, press Ctrl‐C in each terminal window to halt the peers.
B.9.4 Viewing Queue Statistics: dbg_monitor.fdx
The dbg_monitor.fdx extension displays some statistics of the framework every 30 seconds. To add it:
- 1. By default, the CMake option
BUILD_DBG_MONITORis set toONso you do not have to reconfigure the build. - 2. Include the following line in the freeDiameter‐1.conf file:

- 3. Start the same test as in previous section. You will see the following on peer1:

- 4. When done, press Ctrl‐C in each terminal window to halt the peers.
The first part of the output shows the states of the queues. This can help to identify the location of bottlenecks in a given deployment and adjust the number of consuming threads accordingly. It shows the global queues first and then each peer‐specific queue.
The second part of the output shows the server sockets information. It displays the number of pending connections and may be used to detect some denial‐of‐service attacks, or identify some issues on very busy servers.
B.9.5 Understanding Routing Decisions: dbg_rt.fdx
The dbg_rt.fdx extension relates to the routing mechanism of freeDiameter. When a Diameter request message is to be sent, a specific thread selects the message's next hop. The algorithm is fairly complex. To avoid a lot of manual configuration, which is usually error prone, freeDiameter attempts to manage this task as reasonably and autonomously as possible. As a result, the default behavior of the stack takes into account a number of parameters such as the state of the connection, the applications advertised by the remote peer, the routing AVPs of the message, including Destination‐Host, Destination‐Realm, Route‐Record, and the decorated Network Access Identifier (NAI) in User‐Name.
Additional extensions can influence or change the routing decisions made by the framework; an example of such an extension is rt_load_balance.fdx, which can help to create a load balancer relay. All extensions with names starting with rt_* are related to the routing mechanism.
To be as flexible as possible, the freeDiameter routing mechanism within the framework builds a list of the possible target peers, excluding peers that are temporarily disconnected, then allocates a score to each candidate based on different parameters, as described above. The list is then passed to each routing extension, which can freely change the score of different candidates. Once all routing extensions have been invoked, the framework orders the list and sends the message to the peer with the highest score.
The purpose of the dbg_rt.fdx extension is to help understand routing decisions. For each request being routed, it simply outputs the list of candidate peers and their score to the console. To enable:
- 1. By default, the CMake option
BUILD_DBG_RTis set toONso you do not have to reconfigure the build. - 2. Include the following line in the freeDiameter‐1.conf file:

Note that the simple test application that we have been interacting with has only one peer and thus does not provide a useful example of this extension. It is fairly easy to extend this simple setup with two additional peers in order to obtain a result similar to the following.

B.9.6 The Interactive Python Shell Extension: dbg_interactive.fdx
Since one of the design goals of freeDiameter was to enable improvements to the Diameter protocol by allowing easy prototyping of new Diameter applications, the dbg_interactive.fdx extension was created to allow developers with a limited knowledge of the C language to write freeDiameter extensions using the Python language interactively. The conversion to and from Python adds some overhead and a factor of instability; for this reason it is not recommended to use this mechanism for deploying in real production environments, but for prototyping or research activities, using the interpreter is a nice option.
- 1. Ensure that you have the swig and swig‐python libraries installed. SWIG is a tool that connects programs written in C and C++ with a variety of high‐level programming languages like Python.
- 2. Enable
BUILD_DBG_INTERACTIVEin your CMake configuration:
- 3. Run make:

- 4. Include the following line in the freeDiameter‐1.conf file:

- 5. Start the stack:

The interactive Python interpreter, which interacts directly with the framework, will start:

The Python interface is described in dbg_interactive.py.sample found in the
src/docdirectory, with examples for each service. This interface may not be complete, but it can be extended fairly easily. - 6. Press Ctrl‐D to stop the interpreter.
It becomes possible to create freeDiameter structures from Python and to register Python functions as callbacks to freeDiameter events. The following example shows how to create an AVP:

The first line retrieves a reference to the dictionary that is loaded in the framework. This dictionary contains the base protocol objects defined in the framework as well as any objects loaded by extensions such as dict_sip.fdx. The second line retrieves the definition of the Origin‐Host AVP in this dictionary. The third line creates a new, blank instance of this AVP. The following three lines create and assign a value to the AVP. Finally, the dump() function shows the the content of the AVP as defined in the framework.
B.10 Further Reading
For more details on freeDiameter, and for more information on dependencies, visit http://www.freediameter.net/.
Reference
- 1 R. Hinden and S. Deering. IP Version 6 Addressing Architecture. RFC 4291, Internet Engineering Task Force, Feb. 2006.