Appendix A
freeDiameter Tutorial
A.1 Introduction to Virtual Machines
In the real world, Diameter applications are deployed on multiple machines within a single organization or across different organizations and networks. Because such a multi‐machine environment is expensive to set up and challenging to maintain, this book's examples use an environment based on virtual machines.
A virtual machine (VM) is an emulation of a complete computer system with its own operating system and applications. A VM is created using virtualization software that runs on a physical machine. The virtualization software allows for quick and easy configuration of the VM, for example adding a new network interface is just a matter of a few clicks. The interface between the VM (called the guest) and the system running the virtualization software (your computer, the host) is clearly delimited, so there is no problem, for example, for a machine running Microsoft Windows 10 to host a guest that is running Linux and another guest that is running FreeBSD. Using such a VM environment, we can create the network between Diameter peers for our tests, without the need for several physical computers and network equipment. All the examples in the book can run easily on a regular office laptop. However, we recommend that you use a large screen, or several screens, in order to display the multiple VM screens simultaneously.
We have pre‐configured a VM image containing freeDiameter to reduce your work effort, and we will walk you through the steps to run the examples. At a high level, these steps are as follows:
- Create your first VM from our pre‐built image.
- Use this master VM as a template to create the other machines used in the different examples throughout the book via cloning, a simple operation performed through virtualization software.
- Issue a few commands on each VM to set their network configuration and to start
freeDiameterwith the correct profile.
Our VM runs under the Ubuntu operating system. We have chosen Ubuntu mostly because it seems more (new‐)user‐friendly. For more information about working with Ubuntu, please visit https://help.ubuntu.com.
A.2 Installing the Virtualization Software
We have chosen Oracle VirtualBox as the virtualization software application. VirtualBox, which is freely available and can be used on Windows, OS X, Linux, and Solaris, should allow you to run all the examples without having to go through painful operating system installations and network configurations.
To install Oracle VirtualBox, visit https://www.virtualbox.org and follow the instructions to retrieve the correct package for your environment and install the application.
You may also use another virtualization software application that supports Open Virtualization Format (OVF) to launch the provided VM.
A.3 Creating Your Own Environment
If you do not want to or cannot use the provided VM environment, you can set up your own environment. Visit the official freeDiameter website at http://www.freediameter.net where you can find the source code and guidance for building and configuring freeDiameter. Note that while freeDiameter source code can be compiled easily on most POSIX systems, it relies on several libraries for specific operations, for example the GNU TLS library for the cryptography, the GNU IDN library for international domain names support, etc. As a result, freeDiameter can only be used (with reasonable effort) on systems that provide these dependencies within their package system. Fortunately, most modern operating systems provide the necessary packages.
The building and configuration information provided by the freeDiameter website can also be useful if you want to develop your own Diameter applications on top of this framework. Along with the examples you will also find a description of the network topology used in the respective tests. We believe that this will help you to recreate the setup in a different environment. This book is, however, not a tutorial for configuring IP‐based networks. If you want to go beyond the examples described in the book you will have to consult books covering IP fundamentals.
A.4 Downloading the VM Image
Download the VM image freeDiameter.ova from this book's website at https://diameter‐book.info. The file is rather large (2 GB) and may take some time to download.
A.5 Installing and Starting the Master VM freeDiameter
- 1. Start the VirtualBox application. The Oracle VM VirtualBox Manager screen appears.
- 2. From the File menu, select Import Appliance. The Appliance to import dialog box appears. Locate the
freeDiameter.ovafile that you downloaded and click Continue. A summary of the configuration of the imported VM image is displayed. You can review this information then click Import without changing anything.Once the process completes, a new VM called
freeDiameterappears in the list in the main VirtualBox application screen. - 3. On the Oracle VM VirtualBox Manager screen, select this new machine, and click the Start button. A new window appears and displays the screen of your
freeDiameterVM booting – exactly as if it was the physical display of a separate machine, starting after power on.Once the boot sequence is complete, the VM will enter the Ubuntu desktop environment.
- Optional If you are not using a US keyboard (‘QWERTY’), click the Keyboard Layout icon located in the upper right of the VM's desktop and select Keyboard Layout Settings…. The Keyboard Layout screen appears. Press the small + sign at the bottom of the screen to add the appropriate layout option. Use the controls near the + to move this added layout to the top of the list, so that it will be selected automatically when the machine restarts.
- 4. Read the freeDiameter‐START.pdf document on the VM's desktop. It contains general information about this VM installation, such as file structure and the username and password. It may also contain pertinent updates since this book was published.
- 5. To power down the
freeDiameterVM, click the small gear icon at the upper right of the VM screen, then click the Shut Down… option. The VM window will disappear once the shutdown sequence completes.
You are now ready to set up your first example network topology.
h3
The VM's Internet access is enabled by default to make it easy for you to install additional software packages you may want, such as your favorite text editor.
To minimize the risk of breaking the compatibility with the included freeDiameter, be careful with any system updates of the VM. In general, installing the security updates or additional packages should not cause issues, but if you are upgrading the base Ubuntu distribution to a newer release, some scripts included in this VM may not work as expected and freeDiameter may need to be updated to support changes in dependent packages.
If you are uncertain about deploying updates, it is safer not to upgrade any package and to avoid using this VM environment to browse the Internet, instead using your host machine for browsing.
It is important to note that the above guidance applies only to your experimental Diameter setups using the provided VM. For operational deployments, you must have a software update process in place to ensure that security vulnerabilities are patched as quickly as possible.
A.6 Creating a Connection Between Two Diameter Peers
Our first example topology consists of two Diameter peers, named client.example.net and server.example.net, that can exchange data over an IP network, as shown in Figure A.1. The clouds conventionally represent an unspecified IP network, and the small planet represents the Internet, although in our VM environment the communication will be contained in virtual network links. We will create this topology step by step in this section.

Figure A.1 Topology for the example setup.
A.6.1 Building client.example.net
We will start by creating the client.example.net peer.
- 1. In the VirtualBox application, ensure that the
freeDiameterVM is switched off.Note: Do not delete the master
freeDiameterVM image, or all linked clones will stop functioning. - 2. Select the
freeDiameterVM in the list. From the Machine menu, select Clone. On the New machine name screen, enter ‘fD‐client.example.net’ as the new machine name, and enable the Reinitialize the MAC address of all network cards option. This is important, as otherwise no communication between the cloned machines will be possible. - 3. Click the Continue button. On the Clone type screen that appears, select the Linked clone option to save significant disk space and time.
- 4. Click the Clone button. A new VM appears in the main VirtualBox application.
- 5. Select this new VM and click the Start button. Allow the VM to complete its startup sequence.
- 6. Open the Terminal application by double‐clicking the icon located on the desktop. A new terminal window appears and displays a blue dollar sign
$followed by a blinking cursor; this is called the shell prompt, and the blinking cursor indicates that it is ready to handle a new command that you will type on your keyboard.When we describe the commands that must be entered in the terminal we will start the line with a bold dollar sign. Enter the command as given after the bold dollar sign.
- 7. Apply the network configuration profile to this VM by entering the following command and pressing Enter:

As the script
nw_configure.shexecutes, the following lines will be displayed: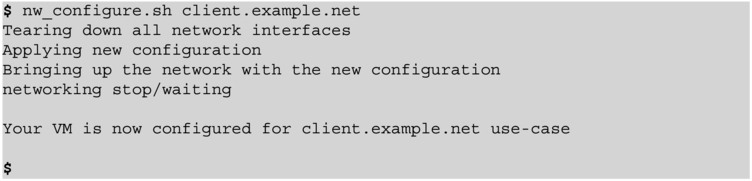
The network has now been configured successfully. You can no longer access the Internet from this VM.
- 8. To prepare the
freeDiameterinstance that will run on this machine, enter the following command (the parameter starts with the digit 1, not the lower case letter L):
The
fD_configure.shscript builds and configures thefreeDiameterframework and takes some time to complete, outputting many lines of messages. When the terminal returns to the prompt, a fresh set offreeDiameterframework binaries (libfdproto, libfdcore, and freeDiameterd) can be found in the folder/home/freediameter/freeDiameter/test/, along with configuration files specific to our first test scenario.
The first VM instance, fD‐client.example.net, is now ready to use, and we will next prepare the second machine of our topology, server.example.net.
You can return to the previous network configuration that enables Internet access by using the command:

However, you must reapply the client.example.net configuration before continuing with these examples.
A.6.2 Building server.example.net
The creation of this other VM is similar to the creation of the fD‐client.example.net VM.
- 1. In the VirtualBox application, ensure that the
freeDiameterVM is switched off. The fD‐client.example.net VM can be left running. - 2. Select the
freeDiameterVM in the list. From the Machine menu, select Clone. On the New machine name screen, enter ‘fD‐server.example.net’ as the new machine name, and enable the Reinitialize the MAC address of all network cards option. - 3. Click the Continue button. On the Clone type screen that appears, select the Linked clone option.
- 4. Click the Clone button. A new VM appears in the mainVirtualBox application.
- 5. Select this new VM and click the Start button. Allow the VM to complete its startup sequence.
- 6. Open a terminal window and run the following command:

The test network topology is now configured.
- 7. Enter the following command to prepare the
freeDiameterframework on the server:
You can test the IP configuration by running the following command:

You will see a new line of information displayed each second. This line shows the duration of a simple round trip exchange of data over the network with the client.example.net machine. If a time value is displayed, like above, the network configuration on both the client and the server are correctly applied for this test. At the bottom of the VM window, the network sign blinks periodically to show network activity on both virtual machines, emphasizing the exchange of data over the virtual network.
To stop the ping command, press Ctrl‐C. The terminal will display a summary of the packet exchanges, then will return to the prompt, ready to receive the next command.
A.6.3 Creating the Diameter Connection
- 1. Ensure both fD‐server.example.net and fD‐client.example.net VMs are running.
- 2. Arrange the VM desktop windows so you can see the two VM screens side by side. Maximize the terminal window in each VM so the lines will wrap as little as possible.
- 3. Enter the following command on the fD‐server.example.net VM Terminal prompt:

These lines are produced by the
freeDiameterframework. Each line starts with a timestamp, followed by an indicator of the importance of the line (NOTI for notifications, ERROR for errors, etc.) and the message itself. The above capture shows the initialization sequence offreeDiameter, starting with the different component versions displayed, followed by a summary of the configuration, and finally a notification that the initialization is complete, which means the framework is ready to handle Diameter connections.This machine is configured to establish a Diameter connection with client.example.net, so it attempts to establish a connection to that machine periodically. The attempts are failing because there is no Diameter stack running on the other machine to accept the incoming connection.
- 4. Run the
freeDiameterdcommand in the fD‐client.example.net VM window:
Note that the following additional lines have appeared in parallel on the fD‐server.example.net screen:

Here is what has happened: after the initialization of
freeDiameteron the fD‐client.example.net VM, the client attempted to connect to server.example.net and succeeded. The client sent a Diameter message called Capabilities‐Exchange‐Request (line starting with SND) to the server, where it appears as a received (RCV) message. The server sends the corresponding answer, Capabilities‐Exchange‐Answer, and each peer displays the information that it is now CONNECTED TO the other peer, and that the connection is moved to the STATE_OPEN state. From this point, the peers are able to exchange Diameter traffic. If a peer does not receive a message on the connection during a configured period (30 seconds by default), it sends a message called Device‐Watchdog‐Request to verify that the connection is still alive. You can observe this if you wait for a few seconds:
- 5. To stop the
freeDiameterinstance running on the fD‐client.example.net VM, ensure that its terminal window has the focus, then enter Ctrl‐C.
The above log shows the shutdown sequence of
freeDiameterinitiated when we press Ctrl‐C. We can see that the connection is not closed immediately, but a final Disconnect‐Peer‐Request message is sent to the other peer, and connection is kept open waiting for the corresponding answer. This final exchange is also part of the Diameter base protocol and allows the remote peer some control over the connection termination, for example by sending pending messages. After the answer has been received,freeDiameterterminates and the Terminal prompt reappears.On the other VM screen, you can see that new periodical attempts are made to re‐establish the connection.
- 6. You can now stop the
freeDiameterinstance running on the fD‐server.example.net VM by ensuring that its terminal window has the focus, then entering Ctrl‐C.
This concludes our first experiment, in which we have configured two VMs and let them establish a Diameter link using the Diameter Base protocol. We have seen three different Diameter commands in action: Capabilities‐Exchange at the initial connection establishment, Device‐Watchdog exchanged periodically over the open connection, and Disconnect‐Peer when the connection is being closed by one of the peers.