
Chapter 9
Connecting and Configuring Peripherals
Although most peripherals connect via the omnipresent USB port, many peripherals require you to do more than simply plug in the device. Other types of devices, such as speakers and displays, use different interfaces. In this chapter, you learn the major features of CompTIA IT Fundamentals+ Infrastructure Objective 2.2: Given a scenario, set up and install common peripheral devices to a laptop/PC. Devices: Printer, Scanner, Keyboard, Mouse, Camera, External hard drive, Speakers, Display. Installation types: Plug-and-play vs. driver installation, Other required steps, IP-based peripherals, Web-based configuration steps.
Foundation Topics
Devices
In your IT career, you may be called upon to connect a variety of devices to a laptop or desktop computer. In the following sections, you learn what to expect.
Figure 9-1 shows the locations of peripheral connections on the back of a typical desktop computer. Many desktop computers also have USB and speaker jacks on their front.

Note
Many motherboards no longer include a PS/2 port. Motherboards that are not designed for use with CPUs that have onboard graphics (GPUs) don’t have video or A/V ports. Instead, these ports are located on a video card that contains a GPU.
Laptop computers, unlike desktop computers, don’t have a port cluster where all ports are located. Instead, laptop ports might be located on the left edge, right edge, or back edge. Figure 9-2 provides an example.

Printer
Printers, including multifunction devices (print/scan/copy or print/scan/copy/fax), require specific drivers be installed before the device is connected to enable full use of device features. Although Microsoft Windows has some printer drivers included in the operating system, most of these drivers are for older printers and are limited in function.
The following is the basic procedure for installing a local or network printer in Microsoft Windows. This procedure works with Windows 7 through Windows 10.
Step 1. Install the driver files, preferably downloaded from the vendor’s website. Do not discard the driver disc, though. It may be necessary for the installation of bundled software that is not available by download. Choose network driver files if you are planning to connect to the printer via a network.
Step 2. Make sure the printer is turned off.
Step 3. With a local printer, connect a USB cable to the port on the printer (see Figure 9-3). With a network printer, set it up to connect to your local wired or wireless network. This might be accomplished using the printer’s own control panel or during installation.

Step 4. If you are installing a local printer, after the driver files are installed, connect the other end of the printer cable to a USB 2.0 or 3.x port (USB 2.0 preferred) on the computer (see Figure 9-4).

Step 5. Open Control Panel (search for cpanel and click the matching program).
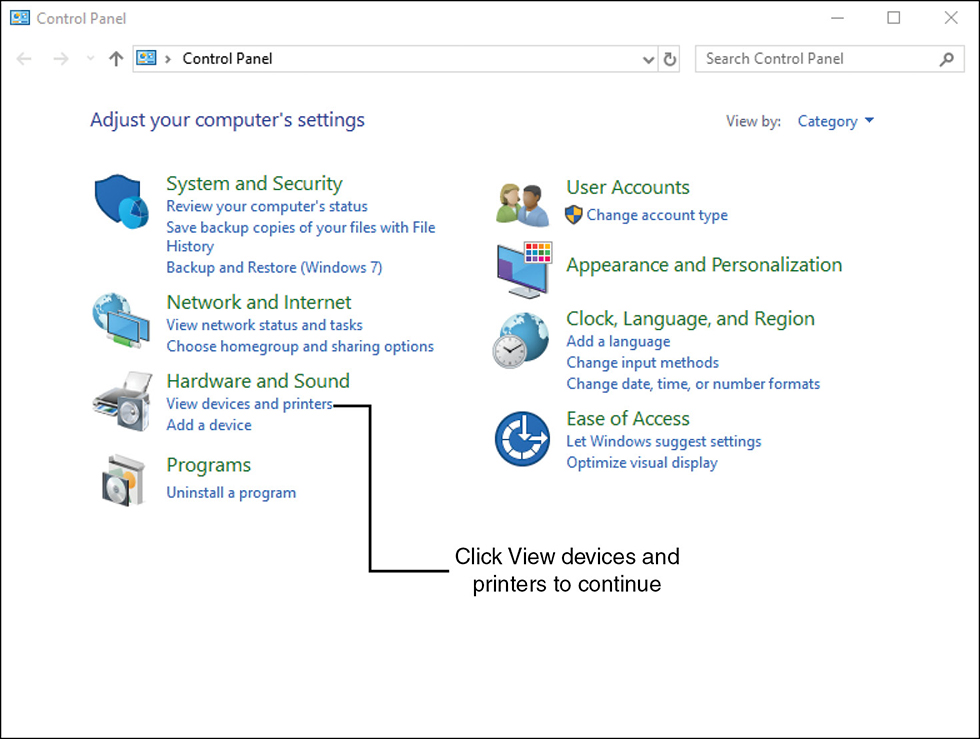
Step 6. Click View devices and printers (see Figure 9-5).
Step 7. Scroll down to the Printers section to view existing printers and multifunction devices.
Step 8. Click Add a printer (see Figure 9-6).

Step 9. Turn on the printer.
Step 10. Windows will search USB and network connections for the printer. Click the printer to select it.
Step 11. Click Next to continue (see Figure 9-7).

Step 12. Make sure the Set as the default printer box is checked if you want to use this as your normal printer (see Figure 9-8).
Step 13. Click Print a test page to make sure the printer is working (see Figure 9-8).
Step 14. Click Finish to close the dialog (see Figure 9-8).
Step 15. Click OK to close the printer properties sheet.
If your printer is not detected in Step 10, click the The printer that I want isn’t listed link shown in Figure 9-7. This will open the Find a printer by other options dialog shown in Figure 9-9. In this dialog, you can choose from many other ways to connect to a local or network printer.


Note
Why not use a USB 3.x port for a printer or multifunction device? Printers, multifunction devices, and scanners don’t need the 10× faster speed of USB 3.0/3.1 Gen 1 or 20x faster speed of USB 3.1 Gen 2, compared to USB 2.0. Save the faster ports for mass storage devices.
Scanner
An image scanner can convert documents and photos (and sometimes transparencies and negatives) into digital form. If the scanner is part of a multifunction device, the installation process for that device (see “Printer” earlier in this chapter) will also install the scanner.
Step 1. Install the driver files, preferably downloaded from the vendor’s website. Do not discard the driver disc, though. It may be necessary for the installation of bundled software that is not available by download.
Step 2. After the driver files are installed, connect the scanner to a USB 2.0 or 3.x port (USB 2.0 preferred) and turn it on.
Step 3. When the scanner is recognized, the installation program completes the process.
Step 4. Be sure to scan a photo or document when prompted or after the installation process is over to verify the scanner is working properly.
Here are the steps to install a network scanner:
Step 1. Make sure the scanner is connected to a wired or wireless network.
Step 2. Install the driver files.
Step 3. Start the installation process.
Step 4. Choose the option to set up a network scanner.
Step 5. Scan a test photo or document.
Keyboard
A standard keyboard, unlike a printer, multifunction device, or scanner, is a plug-and-play device: It is automatically recognized by the operating system.
Caution
You can connect a USB keyboard or any other USB device while the system is turned on. However, some computers use the old PS/2 keyboard port. PS/2 devices can be safely connected only when the computer is turned off. Refer to Figure 9-1 for an example of a PS/2 port.
On the other hand, a specialty keyboard made for gaming may require driver software to enable features such as LED light control, game-specific settings, and macros. Here are the steps to follow to install software for a typical gaming keyboard:
Step 1. Make sure the computer is turned on and the operating system is loaded.
Step 2. Connect the keyboard to a USB 2.0 port. On a desktop computer, the USB 2.0 ports at the top (left) of the port cluster are recommended.
Step 3. Download the software from the vendor’s website.
Step 4. Install the software.
If the keyboard is a wireless keyboard, the installation process varies. With a keyboard that includes a proprietary wireless dongle, the process is very simple:
Step 1. Plug the dongle into a USB 2.0 port.
Step 2. After installing batteries, turn on the keyboard.
Step 3. If the computer is already on, the keyboard will be recognized and can be used in a few seconds. When the computer is turned on, the keyboard will be recognized during the startup process.
If the keyboard connects via Bluetooth, follow this procedure:
Step 1. After installing batteries in the keyboard, turn it on.
Step 2. Turn on the Bluetooth receiver in the computer.
Step 3. Start the pairing process. During the pairing process, you might need to press a Connect button on the keyboard or enter a sequence of alphanumeric text on the keyboard.
Step 4. When the pairing process is complete, the keyboard is ready to use.
Note
Some keyboards include a dongle designed to support multiple devices. Logitech refers to its version as “Unifying.” To add a Logitech Unifying keyboard to a system that already has a Unifying receiver for a mouse or other input device, run the Unifying software and pair the receiver with the keyboard.
Mouse
A standard mouse, unlike a printer, multifunction device, or scanner, is a plug-and-play device, meaning it is automatically recognized by the operating system. However, a specialty mouse made for gaming may require driver software to enable features such as game-specific settings. To install software for a typical gaming mouse, follow these steps:
Step 1. Make sure the computer is turned on and the operating system is loaded.
Step 2. Connect the mouse to a USB 2.0 port. On a desktop computer, the USB 2.0 ports at the top (left) of the port cluster are recommended.
Step 3. Download the software from the vendor’s website.
Step 4. Install the software.
For a wireless mouse, the installation process varies. With a mouse that includes a proprietary wireless dongle, the process is very simple:
Step 1. Plug the dongle into a USB 2.0 port.
Step 2. After installing batteries in the mouse, turn it on.
Step 3. If the computer is already on, the mouse will be recognized and can be used in a few seconds. When the computer is turned on, the mouse will be recognized during the startup process.
Note
Some mice include a dongle designed to support multiple devices. Logitech refers to its version as “Unifying.” To add a Logitech Unifying mouse to a system that already has a Unifying receiver for a keyboard or other input device, run the Unifying software and pair the receiver with the keyboard.
If the mouse connects via Bluetooth, follow this procedure:
Step 1. After installing batteries in the mouse, turn it on.
Step 2. Turn on the Bluetooth receiver in the computer.
Step 3. Start the pairing process. During the pairing process, you might need to press a Connect button on the mouse or move the mouse.
Step 4. When the pairing process is complete, the mouse is ready to use.
Camera
You can add two different types of cameras to a desktop or laptop computer:
A webcam, which can be used for live video chatting or for recording still photos and videos
A digital camera, which can use the desktop or laptop as a permanent storage location for the photos or videos you have already taken
Both types of cameras connect to a USB port.
Connecting a Webcam
A webcam is a USB Video Class (UVC) device that is supported by most video calling/chatting clients in Windows, macOS, or Linux. Thus, you can connect it to a USB 2.0 port and start using it right away.
Some webcams have additional features such as pan, tilt, or zoom; video and photo capture; motion detection; face tracking; background replacement. To enable these features, download and install the software drivers provided by the vendor.
Connecting a Digital Camera
You can connect your camera to your computer to transfer images and videos using this process:
Step 1. Connect a USB cable from your camera to a suitable USB port on your computer. Some digital cameras use a proprietary cable that connects to the computer’s USB port, but most recent ones use a mini-USB cable. Some support USB 3.x.
Step 2. Turn on the camera.
Step 3. Your camera may be recognized automatically. If not, press the playback button on the camera.
If you connect a digital camera to a Windows laptop or desktop, you can select how to access it. Click the prompt shown in Figure 9-10a to display a dialog similar to the one shown in Figure 9-10b. The exact apps shown vary with the version of Windows and the photo-handling apps installed on your system.

If you choose File Explorer/Windows Explorer, you can view the pictures on the camera and manually transfer them. If you choose an import app, select the photos or videos to transfer and then the app transfers them for you.
With a macOS computer, the picture/video import process opens automatically as soon as the camera is connected. Choose the pictures or videos to transfer.
External Hard Drive
An external hard drive is a USB mass storage device. In most cases, the operating system will recognize it and install it as soon as you plug it into a USB port. For maximum speed with a USB 3.0 (USB 3.1 Gen 1) drive, plug it into a USB 3.0 (or faster) port.
Some vendors also provide diagnostic, backup, or utility software for the drive. Install it as prompted.
Note
A drive designed for Windows is factory-formatted in a different way from a drive designed for macOS. To use a drive on a different operating system than it was designed for, you must reformat it after backing up any data on the drive.
Speakers
Computer speakers can be connected in one of several ways to a PC (refer to Figure 9-1 and Figure 9-11), depending on the computer:
3.5mm (mini-jack)
HDMI
S/PDIF
Most desktop computers use integrated sound, but some use a sound card for higher-quality sound.
3.5mm Mini-Jack
The most common method continues to be the analog 3.5mm (mini-jack) array shown in Figure 9-11. The color coding commonly used for audio 3.5mm jacks is as follows:
Light blue—Line-in
Lime green—Stereo headphone/speaker
Pink—Microphone
Some systems add the following to provide support for 5.1/7.1 surround audio:
Black—Rear speaker
Orange—Center or subwoofer
Silver—Side stereo

HDMI
The HDMI port shown in Figure 9-1 transmits digital audio as well as HD video. Thus, the HDMI port can run speakers built in to an HDTV or a home theater receiver.
Note
DisplayPort, mini-DisplayPort, and mini-HDMI also support digital audio and video.
S/PDIF
On older PCs, you might also encounter one or two S/PDIF ports (refer to Figure 9-11). These can transmit digital audio to HDTVs or receivers that have the appropriate port. Figure 9-12 compares a stereo 3.5mm mini-jack, coaxial S/PDIF, and optical S/PDIF cable to each other.

Caution
Do not bend or fold an optical S/PDIF cable, as this might damage the optical fiber and prevent the cable from working.
After connecting speakers to your PC, use the audio mixer function in the operating system to select which speaker connection to use. If you switch from the default analog speaker setting to a digital speaker output but don’t update the settings in your audio mixer, you won’t hear sound coming from your preferred speaker. Figure 9-13 illustrates the mixer function in Microsoft Windows 10.

Display
There are many ways to connect a display to a desktop or laptop PC, and most recent models offer at least two different ports. You were introduced to these ports in Chapter 8, “I/O: Input/Output Device Interfaces,” but in this chapter we’ll cover how to connect cables to these ports and how to configure displays after they’re connected.
Note
Desktop computers may have a video card in an expansion slot (refer to Figure 9-14), built-in video ports in a port cluster (refer to Figure 9-1), or both. Generally, when a computer has a video card as well as built-in video, the primary video source is the video card.
Connecting VGA
The VGA port (see Figure 9-14) uses a heavy cable that is normally attached with thumbscrews. To connect the cable, follow these steps:
Step 1. Turn off the display and the computer.
Step 2. If necessary, attach the VGA cable to the display (some use a built-in cable).
Step 3. Line up the cable with the VGA port.
Step 4. Push the cable into place.
Step 5. Attach the cable with the provided thumbscrews if possible.

Connecting DVI
The DVI port is available in two variations: DVI-D (digital signals only) and DVI-I (digital and analog signals; can be adapted to VGA). The connector is larger than VGA and, like VGA, should be fastened into place after installation with the included thumbscrews. Figure 9-15 illustrates attaching a DVI cable to a video capture device. The same process is used for attaching the cable to a video card.

Follow these steps to connect the cable:
Step 1. Turn off the display and the computer.
Step 2. If necessary, attach the DVI cable to the display (some use a built-in cable).
Step 3. Line up the cable with the DVI port.
Step 4. Push the cable into place.
Step 5. Attach the cable with the provided thumbscrews if possible.
Connecting HDMI and DisplayPort
HDMI, DisplayPort, and their reduced-size versions do not require thumbscrews, as the cables and connectors are smaller and lighter than VGA or DVI. These cables carry HD video and digital audio. Follow this procedure:
Step 1. Turn off the display and the computer.
Step 2. If necessary, attach the cable to the display (some use a built-in cable).
Step 3. Line up the cable with the appropriate port.
Step 4. Push the cable into place.
Figure 9-16 illustrates connecting HDMI and mini-DisplayPort cables to a computer.

Configuring Multiple Displays
Most video cards and systems with built-in video can use two or more displays at the same time. The user can select which display is primary and which one is used as the extended desktop, or whether to duplicate the primary display. The user can also select the desired resolution for each display and, in extended mode, drag different programs to each display.
The configuration process is performed through the operating system. Figure 9-17 provides examples of the Windows 10 display configuration dialog.

Installation Types
There are many ways to install devices. The following sections help you understand each method covered on the IT Fundamentals+ exam.
Plug-and-Play vs. Driver Installation
A plug-and-play installation takes place when you connect a device and the operating system recognizes it and installs the appropriate drivers. Mass storage, keyboards, and mice generally use plug-and-play installation.
If a device cannot be recognized by the operating system (OS) because the OS lacks the correct drivers, the drivers must be installed. Depending on the device, the drivers may be installed before the device is connected or after the device is connected.
After a device that requires drivers is installed with the correct drivers, the device is treated as a plug-and-play device when it is reconnected to the device. Figure 9-18 illustrates the Windows 10 Device Manager’s listings for a USB mass storage device and an HD webcam.
Note
To open the Windows Device Manager, search for Devmgr and click the matching program on your system.

Other Required Steps
When printers, scanners, or multifunction devices are installed, the user is often prompted to connect the device and turn it on to complete the installation process.
If the device is located on a network rather than being plugged into a computer, the installation program may prompt the user to browse for the correct device.
When a device is bundled with apps, the installation process may prompt the user to select whether to install any or all bundled apps.
IP-based Peripherals
Many peripherals today are based on the Internet Protocol (IP). That is, they are configured, managed, or use information via the Internet. For these devices to work, you must make sure the device has a working connection to a local area network or the Internet. This might require you to perform the following steps:
Step 1. Connect the device to a working wired or wireless network.
Step 2. Verify the device can connect to the network.
Step 3. Verify the device can connect to the Internet.
Step 4. Verify the device can be managed via its Internet connection.
Some IP-based peripherals you might encounter include wireless access points (Wireless AP, or WAP), wireless routers, IP security cameras, network print servers, and network printers or multifunction devices.
Depending on the device, configuring the device for an IP connection might be performed through a touch panel, via a setup program, or via the device’s embedded (built-in) web browser. A device that is managed through an embedded web browser is referred to as using a web-based configuration.
Web-based Configuration Steps
To manage a new device with an embedded web browser, follow these steps:
Step 1. Look up the IP address and login information for the device.
Step 2. After connecting the device to the network and powering it on, open your web browser and navigate to the device’s IP address.
Step 3. Enter the username and password to gain access to the device.
Step 4. At this point, you can begin the management process.
I recommend you use a screen capture utility to document the changes you make.
One of the most common web-based devices you are likely to manage is a wireless router. To learn more about this process, see Chapter 15, “Given a Scenario, Install, Configure, and Secure a Basic Wireless Network.”
Exam Preparation Tasks
Review All Key Topics
Review the most important topics in this chapter, noted with the Key Topics icon in the outer margin of the page. Table 9-1 lists these key topics and the page number on which each is found.
Table 9-1 Key Topics for Chapter 9
Key Topic Element |
Description |
Page Number |
USB, PS/2, sound, and display connections on a rear of a typical desktop computer |
||
USB, sound, and display connections on the left edge of a laptop computer |
||
Step List |
General procedure for installing a local printer |
|
Step List |
Procedure for installing a network scanner |
|
Step List |
Procedure for installing a wireless keyboard |
|
Step List |
Procedure for installing a wireless mouse |
|
Paragraph |
External hard drive |
|
Analog and Digital Audio Jacks on a System with High-End Audio Support |
||
Connecting a VGA Cable to a Video Card |
||
Step List |
Procedure for connecting HDMI and DisplayPort |
|
Paragraph |
Plug-and-play vs. Driver Installation |
|
Step list |
Procedure for connecting IP-based peripherals |
|
Step List |
Web-based configuration steps |
Define Key Terms
Define the following key terms from this chapter and check your answers in the glossary:
Practice Questions for Objective 2.2
1. You are responsible for setting up a new wireless network. Which type of configuration will you be performing on the router?
Web-based
Driver
Plug-and-play
Browse for device
2. Your client wants you to install a projector as a second display. The projector needs to show the same information as the first display. You need to set it up with which of the following options?
Extended
RF
IP
Duplicate
3. You are connecting a PC to an HDTV. Which of the following connections will provide digital audio?
VGA
DVI-D
S/PDIF
DVI-I
4. You are connecting a stereo headset using a 3.5mm mini-jack to a computer. Which of the following connectors do you use?
Black
Light blue
Lime green
Pink
5. Your client has asked for a deluxe webcam with pan, tilt, and zoom as a replacement for the existing webcam. Which of the following most accurately describes the setup process?
Connect the new webcam and use it immediately.
Set up the webcam to use the Internet.
Install drivers for the webcam.
Cut the wire to the old webcam.
6. You are installing an all-in-one (print/copy/scan/fax) device and notice that the copyright date on the driver disc is two years old. The driver on the website is newer. What should you do with the driver disc?
Throw it away.
Save it as a backup.
Install the bundled apps after using the updated drivers online.
Install the driver and bundled apps from the disc.
7. You have two USB 3.x ports and four USB 2.0 ports. You have two 4TB external drives. Where should you connect your new scanner?
USB 2.0 port
Fastest USB 3.x port
Slowest USB 3.x port
Any USB port
8. Your projector has built-in speakers that you want to use for a presentation. It can accept a variety of connections. Which connection will deliver both audio and video (A/V) signals to the projector?
USB
HDMI
VGA
DVI
9. You are installing a gaming keyboard and you want to change the LED lighting settings. What do you need to do to accomplish this?
Change the keycaps.
Install a DSL modem.
Connect the keyboard to a network.
Install drivers.
10. A client calls and is wondering why her new Bluetooth mouse doesn’t work. You need to ask if she went through the ________ process. (Fill in the blank.)
Channel-bonding
Pairing
Driver installation
UVC
11. You are connecting your computer to a receiver using HDMI and the audio is still coming from the speakers. The receiver is set correctly. What do you need to do?
Change default video source.
Change default ISP.
Change the default audio source.
Mute the onboard speakers.
12. You need to record audio from a cassette deck so you can turn the sound into an MP3 audio file. Which of the following connectors on your computer do you use?
S/PDIF
Black mini-jack
Pink mini-jack
Light blue mini-jack
13. A client is reporting that their VGA display is not working. When you arrive, you notice that the _______ holding the cable in place are not fastened properly. (Fill in the blank.)
Retaining clips
Thumbscrews
Mini-jacks
Lock washers
14. You are planning to install an external hard drive, a gaming mouse, and a flash drive on a user’s laptop computer. Which of the following do you need to make sure is available before you go?
Optical drive
Internet access
USB hub
IP management
15. Your client has recently switched from Windows to macOS. When the client connects his digital camera to the macOS laptop and turns on the camera, what happens?
Nothing.
The client must select what to do.
The import process opens.
The client must install the driver for the camera.
16. Your client recently found an outstanding deal on an external hard drive formatted for macOS. However, the client has a Windows computer. The drive cannot be returned. What is the best option for the client?
Donate the drive for a tax deduction.
Connect the drive to a wireless router and share it.
Buy a macOS laptop to use with the drive.
Reformat the drive.
17. When you originally connected a new printer to your computer, you had to install the driver software before the printer would work. You lent the printer to a friend for a few days. When you reconnect it to your computer and turn it on, what is most likely to happen?
Printer is ready to work.
You must reinstall the printer driver.
You must update the printer driver.
The printer is no longer compatible with your computer.
18. The documentation for a new device states that it has a default IP address of 192.168.1.1. This device uses which type of setup?
IP-based
Driver-based
Web-based
Plug-and-play
19. A friend has lent you an audio cable for use with your older computer. He cautions you not to bend or crease the cable. Which type of cable is it?
HDMI
S/PDIF optical
Mini-jack surround
S/PDIF coaxial
20. Which pair of cables carry both digital audio and digital video signals?
S/PDIF coaxial, S/PDIF optical
DVI, VGA
DisplayPort, HDMI
Mini-jack, USB
Your Next Steps (More Certs)
We’ve just scratched the surface of all the possibilities there are in connecting and configuring devices. Want to learn more? Make your next certification the CompTIA A+ certification!
No matter where you’re heading next in your technology journey, consider joining the IEEE Computer Society. It’s responsible for a lot of today’s technology standards. Learn more at www.computer.org.