
15 Continuous delivery and GitOps
- Understanding continuous delivery and release management
- Configuring Spring Boot for production with Kustomize
- Deploying in production with GitOps and Kubernetes
Chapter after chapter, we have gone through patterns, principles, and best practices for working with cloud native applications, and we’ve built a bookshop system using Spring Boot and Kubernetes. It’s time to deploy Polar Bookshop to production.
I expect you have the projects of the Polar Bookshop system in separate Git repositories stored on GitHub. If you haven’t followed along in the previous chapters, you can refer to the Chapter15/15-begin folder in the source code accompanying the book, and use it as a foundation to define those repositories.
This chapter will guide you through some final aspects of preparing applications for production. First I’ll discuss versioning strategies for release candidates and how to design the acceptance stage of a deployment pipeline. Then you’ll see how to configure Spring Boot applications for production and deploy them on a Kubernetes cluster in a public cloud. Next, I’ll show you how to complete the deployment pipeline by implementing the production stage. Finally, you’ll use Argo CD to implement continuous deployment based on the GitOps principles.
Note The source code for the examples in this chapter is available in the Chapter15/15-begin and Chapter15/15-end folders, containing the initial and final states of the project (https://github.com/ThomasVitale/cloud-native-spring-in-action).
15.1 Deployment pipeline: Acceptance stage
Continuous delivery is one of the fundamental practices we have identified that can support us in our journey to achieve the cloud native goals: speed, resilience, scale, and cost optimization. It’s a holistic approach for delivering high-quality software quickly, reliably, and safely. The main idea behind continuous delivery is that an application is always in a releasable state. The primary pattern for adopting continuous delivery is the deployment pipeline, which goes from code commit to releasable software. It should be automated as much as possible and represent the only path to production.
Chapter 3 explained that a deployment pipeline can be composed of three key stages: commit stage, acceptance stage, and production stage. Throughout the book, we have automated the commit stage as a workflow in GitHub Actions. After a developer commits new code to the mainline, this stage goes through build, unit tests, integration tests, static code analysis, and packaging. At the end of this stage, an executable application artifact is published to an artifact repository. That is a release candidate.
This section will cover how we can version release candidates for continuous delivery. Then you’ll learn more about the acceptance stage, its purpose, and its outcome. Finally, I’ll show you how to implement a minimal workflow in GitHub Actions for the acceptance stage. At the end of this stage, the release candidate will be ready to be deployed to production.
15.1.1 Versioning release candidates for continuous delivery
The output of the commit stage of the deployment pipeline is a release candidate. That’s the deployable artifact for an application. In our case, it’s a container image. All the subsequent steps in the pipeline will evaluate the quality of that container image through different tests. If no issue is found, the release candidate is ultimately deployed to production and released to users.
A release candidate is stored in an artifact repository. If it’s a JAR, it would be stored in a Maven repository. In our case, it’s a container image and will be stored in a container registry. In particular, we’ll use GitHub Container Registry.
Each release candidate must be uniquely identified. So far, we have used the implicit latest tag for all container image versions. Also, we ignored the 0.0.1-SNAPSHOT version configured in each Spring Boot project by default in Gradle. How should we version release candidates?
A popular strategy is semantic versioning (https://semver.org). It consists of identifiers in the form of <major>.<minor>.<patch>. Optionally, you can also add a hyphen at the end, followed by a string, marking a pre-release. By default, a Spring Boot project generated from Spring Initializr (https://start.spring.io) is initialized with version 0.0.1-SNAPSHOT, which identifies a snapshot release. A variation of this strategy is calendar versioning (https://calver.org), which combines the concepts of semantic versioning with date and time.
Both those strategies are broadly used for open source projects and software released as products to customers, because they provide implicit information about what a new release contains. For example, we expect a new major version to contain new functionality and API changes incompatible with the previous major version. On the other hand, we would expect a patch to have a limited scope and guarantee backward compatibility.
Note If you’re working on software projects for which semantic versioning makes sense, I recommend checking out JReleaser, a release automation tool. “Its goal is to simplify creating releases and publishing artifacts to multiple package managers while providing customizable options” (https://jreleaser.org).
Semantic versioning will require some form of manual step to assign a version number based on the content of the release artifact: Does it contain breaking changes? Does it only contain bug fixes? When we have a number, it’s still not clear what’s included in the new release artifact, so we need to use Git tags and define a mapping between Git commit identifiers and version numbers.
Things get even more challenging for snapshot artifacts. Let’s consider a Spring Boot project as an example. By default, we start with version 0.0.1-SNAPSHOT. Until we’re ready to cut the 0.0.1 release, every time we push new changes to the main branch, the commit stage will be triggered, and a new release candidate will be published with the number 0.0.1-SNAPSHOT. All release candidates will have the same number until version 0.0.1 is released. This approach doesn’t ensure traceability of changes. Which commits are included in release candidate 0.0.1-SNAPSHOT? We can’t tell. Furthermore, it’s affected by the same unreliability as using latest. Any time we retrieve the artifact, it might be different from the last time.
When it comes to continuous delivery, using an approach like semantic versioning is not ideal for uniquely identifying release candidates. When we follow the principles of continuous integration, we’ll have many release candidates built daily. And every release candidate can potentially be promoted to production. Will we have to update the semantic version for each new code commit, with a different approach based on its content (major, minor, patch)? The path from code commit to production should be automated as much as possible, trying to eliminate manual intervention. If we go with continuous deployment, even the promotion to production will happen automatically. What should we do?
One solution would be using the Git commit hash to version release candidates—that would be automated, traceable, and reliable, and you wouldn’t need Git tags. You could use the commit hash as is (for example, 486105e261cb346b87920aaa4ea6dce6eebd6223) or use it as the base for generating a more human-friendly number. For example, you could prefix it with a timestamp or with an increasing sequence number, with the goal of making it possible to tell which release candidate is the newest (for example, 20220731210356-486105e261cb346b87920aaa4ea6dce6eebd6223).
Still, semantic versioning and similar strategies have their place in continuous delivery. They can be used as display names in addition to the unique identifier, as Dave Farley suggests in his book Continuous Delivery Pipelines (2021). That would be a way to provide users with information about the release candidate while still making it possible to benefit from continuous delivery.
For Polar Bookshop, we’ll adopt a simple solution and use the Git commit hash directly to identify our release candidates. Therefore, we’ll ignore the version number configured in the Gradle project (which could instead be used as the display version name). For example, a release candidate for Catalog Service would be ghcr.io/ <your_github_username>/catalog-service:<commit-hash>.
Now that we have a strategy, let’s see how we can implement it for Catalog Service. Go to your Catalog Service project (catalog-service), and open the commit-stage.yml file within the .github/workflows folder. We previously defined a VERSION environment variable to hold the release candidate’s unique identifier. At the moment, it’s statically set to latest. Let’s replace that with ${{ github.sha }}, which will be dynamically resolved to the current Git commit hash by GitHub Actions. For convenience, we’ll also add the latest tag to the newest release candidate, which is useful for local development scenarios.
Listing 15.1 Using the Git commit hash to version release candidates
name: Commit Stage
on: push

env:
  REGISTRY: ghcr.io
  IMAGE_NAME: polarbookshop/catalog-service
  VERSION: ${{ github.sha }}                                             ❶

build:
  name: Build and Test
  ...

package:
  name: Package and Publish
  ...
  steps:
    ...
    - name: Publish container image                                      ❶
      run: docker push
             ${{ env.REGISTRY }}/${{ env.IMAGE_NAME }}:${{ env.VERSION }}
    - name: Publish container image (latest)                             ❷
      run: |
        docker tag
          ${{ env.REGISTRY }}/${{ env.IMAGE_NAME }}:${{ env.VERSION }}
          ${{ env.REGISTRY }}/${{ env.IMAGE_NAME }}:latest
        docker push ${{ env.REGISTRY }}/${{ env.IMAGE_NAME }}:latest
❶ Publishes a release candidate with a version equal to the Git commit hash
❷ Adds the “latest” tag to the newest release candidate
After updating the workflow, commit your changes and push them to GitHub. That will trigger the execution of the commit stage workflow (figure 15.1). The outcome will be a container image published to GitHub Container Registry, versioned with the current Git commit hash and the additional latest tag.

Figure 15.1 The commit stage goes from code commit to release candidate published to an artifact repository.
Once the pipeline is executed successfully, you’ll be able to see the newly published container image from your catalog-service repository main page on GitHub. In the sidebar you’ll find a Packages section with a “catalog-service” item. Click that, and you’ll be directed to the container repository for Catalog Service (figure 15.2). When using the GitHub Container Registry, container images are stored next to the source code, which is very convenient.
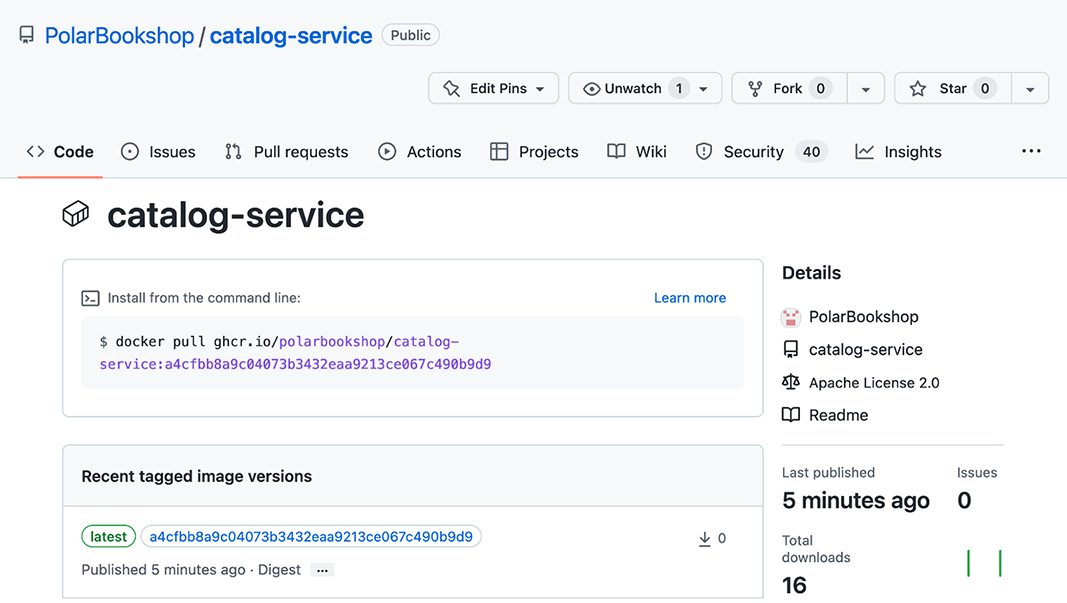
Figure 15.2 In our case, release candidates are container images published to GitHub Container Registry.
At this point, the container image (our release candidate) is uniquely identified and ready to go through the acceptance stage. That’s the topic of the next section.
15.1.2 Understanding the acceptance stage of the deployment pipeline
The acceptance stage of the deployment pipeline is triggered whenever a new release candidate is published to the artifact repository at the end of the commit stage. It consists of deploying the application to a production-like environment and running additional tests to increase the confidence in its releasability. The tests that run in the acceptance stage are usually slow, but we should strive to keep the whole deployment pipeline’s execution under one hour.
In chapter 3, you learned about the software test classification provided by the Agile Testing Quadrants (figure 15.3). The quadrants classify software tests based on whether they are technology or business facing, and whether they support development teams or are used to critique the project.

Figure 15.3 The Agile Testing Quadrants are a taxonomy helpful for planning a software testing strategy.
In the commit stage, we mainly focus on the first quadrant, including unit and integration tests. They are technology-facing tests that support the team, ensuring they build the software right. On the other hand, the acceptance stage focuses on the second and fourth quadrants and tries to eliminate the need for manual regression testing. This stage includes functional and non-functional acceptance tests.
The functional acceptance tests are business-facing tests that support development teams, ensuring they are building the right software. They take on the user perspective and are usually implemented via executable specifications using a high-level domain-specific language (DSL), which is then translated into a lower-level programming language. For example, you could use Cucumber (https://cucumber.io) to write scenarios like “browse the book catalog” or “place a book order” in human-friendly plain text. Those scenarios can then be executed and verified using a programming language like Java.
In the acceptance stage, we can also verify the quality attributes of a release candidate via non-functional acceptance tests. For example, we could run performance and load tests using a tool like Gatling (https://gatling.io), security and compliance tests, and resilience tests. In this last case, we could embrace chaos engineering, a discipline made popular by Netflix and consisting of making certain parts of the system fail to verify how the rest will react and how resilient the system is to failures. For Java applications, you can look at Chaos Monkey for Spring Boot (https://codecentric.github.io/chaos-monkey-spring-boot).
Note How about the third quadrant? Following the continuous delivery principles, we strive not to include manual tests in the deployment pipeline. Yet we usually need them. They are particularly important for software products aimed at end users like web and mobile applications. Therefore, we run them on the side in the form of exploratory testing and usability testing, so that we ensure more freedom for testers and fewer constraints on the pace and timing required by continuous integration and the deployment pipeline.
An essential feature of the acceptance stage is that all tests are run against a production-like environment to ensure the best reliability. The deployment would follow the same procedure and scripts as production and could be tested via dedicated system tests (first quadrant).
If a release candidate passes all the tests in the acceptance stage, that means it’s in a releasable state and can be delivered and deployed to production. Figure 15.4 illustrates inputs and outputs for the commit and acceptance stages in a deployment pipeline.

Figure 15.4 The commit stage goes from code commit to a release candidate, which then goes through the acceptance stage. If it passes all the tests, it’s ready for production.
15.1.3 Implementing the acceptance stage with GitHub Actions
In this section, you’ll see how to implement the skeleton of a workflow for the acceptance stage using GitHub Actions. Throughout the book we’ve focused on unit and integration tests, which we run in the commit stage. For the acceptance stage, we would need to write functional and non-functional acceptance tests. That’s out of scope for this book, but I still want to show you some principles for designing the workflow using Catalog Service as an example.
Open your Catalog Service project (catalog-service), and create a new acceptance-stage.yml file within the .github/workflows folder. The acceptance stage is triggered whenever a new release candidate is published to the artifact repository. One option for defining such a trigger is listening for the events published by GitHub whenever the commit stage workflow has completed a run.
Listing 15.2 Triggering the acceptance stage after the commit stage is done
name: Acceptance Stage            ❶
on:
  workflow_run:                   ❷
    workflows: ['Commit Stage']
    types: [completed]
    branches: main                ❸
❷ This workflow is triggered when the Commit Stage workflow completes a run.
❸ This workflow runs only on the main branch.
However, that’s not enough. Following the continuous integration principles, developers commit often during the day and repeatedly trigger the commit stage. Since the commit stage is much faster than the acceptance stage, we risk creating a bottleneck. When an acceptance stage run has completed, we are not interested in verifying all the release candidates that have queued up in the meantime. We are only interested in the newest one, so the others can be discarded. GitHub Actions provides a mechanism for handling this scenario via concurrency controls.
Listing 15.3 Configuring concurrency for the workflow execution
name: Acceptance Stage
on:
  workflow_run:
    workflows: ['Commit Stage']
    types: [completed]
    branches: main
concurrency: acceptance    ❶
❶ Ensures that only one workflow runs at a time
Next, you would define several jobs to run in parallel against a production-like environment, accomplishing functional and non-functional acceptance tests. For our example, we’ll simply print a message, since we haven’t implemented the autotests for this stage.
Listing 15.4 Running functional and non-functional acceptance tests
name: Acceptance Stage
on:
  workflow_run:
    workflows: ['Commit Stage']
    types: [completed]
    branches: main
concurrency: acceptance

jobs:
  functional:                                                         ❶
    name: Functional Acceptance Tests
    if: ${{ github.event.workflow_run.conclusion == 'success' }}
    runs-on: ubuntu-22.04
    steps:
      - run: echo "Running functional acceptance tests"
  performance:                                                        ❶
    name: Performance Tests
    if: ${{ github.event.workflow_run.conclusion == 'success' }}
    runs-on: ubuntu-22.04
    steps:
      - run: echo "Running performance tests"
  security:                                                           ❶
    name: Security Tests
    if: ${{ github.event.workflow_run.conclusion == 'success' }}
    runs-on: ubuntu-22.04
    steps:
      - run: echo "Running security tests"
❶ The job runs only if the commit stage completed successfully.
Note The acceptance tests could be run against a staging environment that closely resembles production. The application could be deployed using the staging overlay we configured in the previous chapter.
At this point, push your changes to your GitHub catalog-service repository, and have a look at how GitHub first runs the commit stage workflow (triggered by your code commit) and then the acceptance stage workflow (triggered by the commit stage workflow completing successfully). Figure 15.5 shows the result of the acceptance stage workflow’s execution.

Figure 15.5 The commit stage goes from code commit to a release candidate, which then goes through the acceptance stage. If it passes all the tests, it’s ready for production.
Deploying to production requires a combination of a release candidate and its configuration. Now that we’ve validated that a release candidate is ready for production, it’s time to customize its configuration.
15.2 Configuring Spring Boot for production
We’re getting closer and closer to deploying cloud native applications to a Kubernetes cluster in production. So far we have worked with local clusters using minikube. We now need a full-fledged Kubernetes cluster for our production environment. Before you continue reading this section, follow the instructions in appendix B (sections B.1 through B.6) to initialize a Kubernetes cluster on the DigitalOcean public cloud. You’ll also find some tips if you want to use a different cloud provider.
Once you have a Kubernetes cluster up and running in the cloud, you can continue reading this section, which will cover the additional configuration we need to provide our Spring Boot applications with before deploying them to the production environment.
In the previous chapter, you learned about Kustomize and the overlay technique for managing customizations for different deployment environments on top of a common base. You also tried your hand at customizing the Catalog Service deployment for a staging environment. In this section we’ll do something similar for production. Extending what you saw in chapter 14, I’ll show you how to customize volume mounts for ConfigMaps and Secrets. Also, you’ll see how to configure the CPU and memory for containers running in Kubernetes, and you’ll learn more about how the Paketo Buildpacks manage resources for the Java Virtual Machine (JVM) within each container.
15.2.1 Defining a configuration overlay for production
First we need to define a new overlay to customize the deployment of Catalog Service for a production environment. As you’ll probably remember from the previous chapter, the Kustomization base for Catalog Service is stored in the catalog-service repository. We keep the overlays in the polar-deployment repository.
Go ahead and create a new “production” folder within kubernetes/applications/ catalog-service (in the polar-deployment repository). We’ll use it to store all customizations related to the production environment. Any base or overlay requires a kustomization.yml file, so let’s create one for the production overlay. Remember, in the following listing, to replace <your_github_username> with your GitHub username in lowercase. Also, replace <release_sha> with the unique identifier associated with your latest release candidate for Catalog Service. You can retrieve that version from the Packages section of your catalog-service GitHub repository main page.
Listing 15.5 Defining an overlay for production on top of a remote base
apiVersion: kustomize.config.k8s.io/v1beta1
kind: Kustomization

resources:                                                                 ❶
  - github.com/<your_github_username>/catalog-service/k8s?ref=<release_sha>
❶ The git commit hash (sha) identifying your latest release candidate
Note I’ll assume that all the GitHub repositories you created for Polar Bookshop are publicly accessible. If that’s not the case, you can go to the specific repository page on GitHub and access the Settings section for that repository. Scroll to the bottom of the settings page, and make the package public by clicking the Change Visibility button.
Customizing environment variables
The first customization we’ll apply is an environment variable to activate the prod Spring profile for Catalog Service. Following the same approach as in the previous chapter, create a patch-env.yml file within the production overlay for Catalog Service (kubernetes/applications/catalog-service/production).
Listing 15.6 A patch for customizing environment variables in a container
apiVersion: apps/v1
kind: Deployment
metadata:
  name: catalog-service
spec:
  template:
    spec:
      containers:
        - name: catalog-service
          env:
            - name: SPRING_PROFILES_ACTIVE    ❶
              value: prod
❶ Defines which Spring profiles should be activated
Next, we need to instruct Kustomize to apply the patch. In the kustomization.yml file for the production overlay of Catalog Service, list the patch-env.yml file as follows.
Listing 15.7 Getting Kustomize to apply the patch for environment variables
apiVersion: kustomize.config.k8s.io/v1beta1
kind: Kustomization

resources:
  - github.com/<your_github_username>/catalog-service/k8s?ref=<release_sha>

 patchesStrategicMerge:     ❶
  - patch-env.yml           ❷
❶ Section containing the list of patches to apply, according to the strategic merge strategy
❷ The patch for customizing the environment variables passed to the Catalog Service container
Customizing Secrets and volumes
In the previous chapter, you learned how to define ConfigMaps and Secrets, and you saw how to mount them as volumes to Spring Boot containers. In the base Kustomization we have no Secrets configured, since we are relying on the same default values from development. In production we need to pass different URLs and credentials to make it possible for Catalog Service to access the PostgreSQL database and Keycloak.
When you set up the production environment on DigitalOcean earlier, you also created a Secret with the credentials to access the PostgreSQL database (polar-postgres-catalog-credentials) and another for Keycloak (keycloak-issuer-resourceserver-secret). Now we can mount them as volumes to the Catalog Service container, similar to what we did with ConfigMaps in chapter 14. We’ll do that in a dedicated patch.
Create a patch-volumes.yml file within the production overlay for Catalog Service (kubernetes/applications/catalog-service/production), and configure the patch as shown in listing 15.8. When Kustomize applies this patch to the base deployment manifests, it will merge the ConfigMap volume defined in the base with the Secret volumes defined in the patch.
Listing 15.8 Mounting Secrets as volumes to the Catalog Service container
apiVersion: apps/v1
kind: Deployment
metadata:
  name: catalog-service
spec:
  template:
    spec:
      containers:
        - name: catalog-service
          volumeMounts:
            - name: postgres-credentials-volume
              mountPath: /workspace/secrets/postgres              ❶
            - name: keycloak-issuer-resourceserver-secret-volume
              mountPath: /workspace/secrets/keycloak              ❷
      volumes:
        - name: postgres-credentials-volume
          secret:                                                 ❸
            secretName: polar-postgres-catalog-credentials
        - name: keycloak-issuer-resourceserver-secret-volume
          secret:                                                 ❹
            secretName: keycloak-issuer-resourceserver-secret
❶ Mounts the volume with the Secret containing the PostgreSQL credentials
❷ Mounts the volume with the Secret containing the Keycloak issuer URL
❸ Defines a volume from the Secret containing the PostgreSQL credentials
❹ Defines a volume from the Secret containing the Keycloak issuer URL
Then, just like you learned in the previous section, we need to reference the patch in the kustomization.yml file for the production overlay.
Listing 15.9 Getting Kustomize to apply the patch for mounting Secrets
apiVersion: kustomize.config.k8s.io/v1beta1
kind: Kustomization

resources:
  - github.com/<your_github_username>/catalog-service/k8s?ref=<release_sha>

patchesStrategicMerge:
  - patch-env.yml
  - patch-volumes.yml     ❶
❶ Defines a patch for mounting Secrets as volumes
Currently, the Secrets are configured to be provided to the container, but Spring Boot is not aware of them yet. In the next section I’ll show you how to instruct Spring Boot to load those Secrets as config trees.
The base Kustomization for Catalog Service instructs Kustomize to generate a catalog-config ConfigMap starting with an application.yml file. As you learned in the previous chapter, we can ask Kustomize to add an additional file to that same ConfigMap, application-prod.yml, which we know takes precedence over the base application.yml file. That’s how we’re going to customize the application configuration for production.
First, create an application-prod.yml file within the production overlay for Catalog Service (kubernetes/applications/catalog-service/production). We’ll use this property file to configure a custom greeting. We also need to instruct Spring Boot to load the Secrets as config trees, using the spring.config.import property. For more information on config trees, refer to chapter 14.
Listing 15.10 Production-specific configuration for Catalog Service
polar:
  greeting: Welcome to our book catalog from a production
➥Kubernetes environment!
spring:
  config:
    import: configtree:/workspace/secrets/*/     ❶
❶ Imports configuration from the path where volumes with Secrets are mounted. Make sure you include the final slash, or the import will fail.
Next, we can rely on the ConfigMap Generator provided by Kustomize to combine the application-prod.yml file (defined in the production overlay) with the application.yml file (defined in the base Kustomization), within the same catalog-config ConfigMap. Go ahead and update the kustomization.yml file for the production overlay as follows.
Listing 15.11 Merging property files within the same ConfigMap
apiVersion: kustomize.config.k8s.io/v1beta1
kind: Kustomization

resources:
  - github.com/<your_github_username>/catalog-service/k8s?ref=<release_sha>

patchesStrategicMerge:
  - patch-env.yml
  - patch-volumes.yml

configMapGenerator:
  - behavior: merge             ❶
    files:
      - application-prod.yml    ❷
    name: catalog-config        ❸
❶ Merges this ConfigMap with the one defined in the base Kustomization
❷ The additional property file added to the ConfigMap
❸ The same ConfigMap name used in the base Kustomization
Customizing image name and version
The next step is updating the image name and version, following the same procedure we used in the previous chapter. This time we’ll be able to use a proper version number for the container image (our release candidate).
First, make sure you have the kustomize CLI installed on your computer. You can refer to the instructions at https://kustomize.io. If you’re on macOS or Linux, you can install kustomize with the following command: brew install kustomize.
Then open a Terminal window, navigate to the production overlay for Catalog Service (kubernetes/applications/catalog-service/production), and run the following command to define which image and version to use for the catalog-service container. Remember to replace <your_github_username> with your GitHub username in lowercase. Also, replace <sha> with the unique identifier associated with your latest release candidate for Catalog Service. You can retrieve that version from the Packages section of your catalog-service GitHub repository main page:
$ kustomize edit set image
    catalog-service=ghcr.io/<your_github_username>/catalog-service:<sha>
This command will automatically update the kustomization.yml file with the new configuration, as you can see in the following listing.
Listing 15.12 Configuring the image name and version for the container
apiVersion: kustomize.config.k8s.io/v1beta1
kind: Kustomization

resources:
  - github.com/<your_github_username>/catalog-service/k8s?ref=<release_sha>

patchesStrategicMerge:
  - patch-env.yml
  - patch-volumes.yml

configMapGenerator:
  - behavior: merge
    files:
      - application-prod.yml
    name: catalog-config

images:
  - name: catalog-service                                ❶
    newName:
    ➥ ghcr.io/<your_github_username>/catalog-service    ❷
    newTag: <release_sha>                                ❸
❶ The name of the container as defined in the Deployment manifest
❷ The new image name for the container (with your GitHub username in lowercase)
❸ The new tag for the container (with your release candidate’s unique identifier)
Note Images published to GitHub Container Registry will have the same visibility as the related GitHub code repository. I’ll assume that all the images you build for Polar Bookshop are publicly accessible via the GitHub Container Registry. If that’s not the case, you can go to the specific repository page on GitHub and access the Packages section for that repository. Then select Package Settings from the sidebar menu, scroll to the bottom of the settings page, and make the package public by clicking the Change Visibility button.
Currently we use the release candidate’s unique identifier in two places: the URL for the remote base and the image tag. Whenever a new release candidate is promoted to production, we need to remember to update both of them. Even better, we should automate the update. I’ll describe that later when we implement the production stage of the deployment pipeline.
Customizing the number of replicas
Cloud native applications are supposed to be highly available, but only one instance of Catalog Service is deployed by default. Similar to what we did for the staging environment, let’s customize the number of replicas for the application.
Open the kustomization.yml file within the production overlay for Catalog Service (kubernetes/applications/catalog-service/production) and define two replicas for the catalog-service container.
Listing 15.13 Configuring the number of replicas for the container
apiVersion: kustomize.config.k8s.io/v1beta1
kind: Kustomization

resources:
  - github.com/<your_github_username>/catalog-service/k8s?ref=<release_sha>

patchesStrategicMerge:
  - patch-env.yml
  - patch-volumes.yml

configMapGenerator:
  - behavior: merge
    files:
      - application-prod.yml
    name: catalog-config
images:
  - name: catalog-service
    newName: ghcr.io/<your_github_username>/catalog-service
    newTag: <release_sha>

replicas:
  - name: catalog-service    ❶
    count: 2                 ❷
❶ The name of the Deployment you’re defining the number of replicas for
Note In a real scenario, you would probably want Kubernetes to dynamically scale applications in and out depending on the current workload, rather than providing a fixed number. Dynamic scaling is a pivotal feature of any cloud platform. In Kubernetes, it’s implemented by a dedicated component called Horizontal Pod Autoscaler based on well-defined metrics, such as the CPU consumption per container. For more information, refer to the Kubernetes documentation (https://kubernetes.io/docs).
The next section will cover configuring CPU and memory for Spring Boot containers running in Kubernetes.
15.2.2 Configuring CPU and memory for Spring Boot containers
When dealing with containerized applications, it’s best to assign resource limits explicitly. In chapter 1 you learned that containers are isolated contexts leveraging Linux features, like namespaces and cgroups, to partition and limit resources among processes. However, suppose you don’t specify any resource limits. In that case, each container will have access to the whole CPU set and memory available on the host machine, with the risk of some of them taking up more resources than they should and causing other containers to crash due to a lack of resources.
For JVM-based applications like Spring Boot, defining CPU and memory limits is even more critical because they will be used to properly size items like JVM thread pools, heap memory, and non-heap memory. Configuring those values has always been a challenge for Java developers, and it’s critical since they directly affect application performance. Fortunately, if you use the Paketo implementation of Cloud Native Buildpacks included in Spring Boot, you don’t need to worry about that. When you packaged the Catalog Service application with Paketo in chapter 6, a Java Memory Calculator component was included automatically. When you run the containerized application, that component will configure the JVM memory based on the resource limits assigned to the container. If you don’t specify any limits, the results will be unpredictable, which is not what you want.
There’s also an economic aspect to consider. If you run your applications in a public cloud, you’re usually charged based on how many resources you consume. Consequently, you’ll probably want to be in control of how much CPU and memory each of your containers can use to avoid nasty surprises when the bill arrives.
When it comes to orchestrators like Kubernetes, there’s another critical issue related to resources that you should consider. Kubernetes schedules Pods to be deployed in any of the cluster nodes. But what if a Pod is assigned to a node that has insufficient resources to run the container correctly? The solution is to declare the minimum CPU and memory a container needs to operate (resource requests). Kubernetes will use that information to deploy a Pod to a specific node only if it can guarantee the container will get at least the requested resources.
Resource requests and limits are defined per container. You can specify both requests and limits in a Deployment manifest. We haven’t defined any limits in the base manifests for Catalog Service because we’ve been operating in a local environment and we didn’t want to constrain it too much in terms of resource requirements. However, production workloads should always contain resource configurations. Let’s look at how we can do that for the production deployment of Catalog Service.
Assigning resource requests and limits to a container
It shouldn’t be a surprise that we’ll use a patch to apply CPU and memory configurations to Catalog Service. Create a patch-resources.yml file within the production overlay for Catalog Service (kubernetes/applications/catalog-service/production), and define both requests and limits for the container resources. Even though we’re considering a production scenario, we’ll use low values to optimize the resource usage in your cluster and avoid incurring additional costs. In a real-world scenario, you might want to analyze more carefully which requests and limits would be appropriate for your use case.
Listing 15.14 Configuring resource requests and limits for the container
apiVersion: apps/v1
kind: Deployment
metadata:
  name: catalog-service
spec:
  template:
    spec:
      containers:
        - name: catalog-service
          resources:
            requests:           ❶
              memory: 756Mi     ❷
              cpu: 0.1          ❸
            limits:             ❹
              memory: 756Mi     ❺
              cpu: 2            ❻
❶ Minimum amount of resources required by the container to operate
❷ The container is guaranteed 756 MiB.
❸ The container is guaranteed CPU cycles equivalent to 0.1 CPU.
❹ Maximum amount of resources the container is allowed to consume
❺ The container can consume 756 MiB at most.
❻ The container can consume CPU cycles equivalent to 2 CPUs at most.
Next, open the kustomization.yml file in the production overlay for Catalog Service, and configure Kustomize to apply the patch.
Listing 15.15 Applying the patch for defining resource requests and limits
apiVersion: kustomize.config.k8s.io/v1beta1
kind: Kustomization
resources:
  - github.com/<your_github_username>/catalog-service/k8s?ref=<release_sha>

patchesStrategicMerge:
  - patch-env.yml
  - patch-resources.yml     ❶
  - patch-volumes.yml

configMapGenerator:
  - behavior: merge
    files:
      - application-prod.yml
    name: catalog-config

images:
  - name: catalog-service
    newName: ghcr.io/<your_github_username>/catalog-service
    newTag: <release_sha>

replicas:
  - name: catalog-service
    count: 2
❶ Configures resource requests and limits
In listing 15.14, the memory request and limit are the same, but that’s not true for the CPU. The following section will explain the reasoning behind those choices.
Optimizing CPU and memory for Spring Boot applications
The amount of CPU available to a container directly affects the startup time of a JVM-based application like Spring Boot. In fact, the JVM leverages as much CPU as available to run the initialization tasks concurrently and reduce the startup time. After the startup phase, the application will use much lower CPU resources.
A common strategy is to define the CPU request (resources.requests.cpu) with the amount the application will use under normal conditions, so that it’s always guaranteed to have the resources required to operate correctly. Then, depending on the system, you may decide to specify a higher CPU limit or omit it entirely (resources .limits.cpu) to optimize performance at startup so that the application can use as much CPU as available on the node at that moment.
CPU is a compressible resource, meaning that a container can consume as much of it as is available. When it hits the limit (either because of resources.limits.cpu or because there’s no more CPU available on the node), the operating system starts throttling the container process, which keeps running but with possibly lower performance. Since it’s compressible, not specifying a CPU limit can be a valid option sometimes to gain a performance boost. Still, you’ll probably want to consider the specific scenario and evaluate the consequences of such a decision.
Unlike CPU, memory is a non-compressible resource. If a container hits the limit (either because of resources.limits.memory or because there’s no more memory available on the node), a JVM-based application will throw the dreadful OutOfMemoryError, and the operating system will terminate the container process with an OOMKilled (OutOfMemory killed) status. There is no throttling. Setting the correct memory value is, therefore, particularly important. There’s no shortcut to inferring the proper configuration; you must monitor the application running under normal conditions. That’s true for both CPU and memory.
Once you find a suitable value for how much memory your application needs, I recommend you use it both as a request (resources.requests.memory) and as a limit (resources.limits.memory). The reason for that is deeply connected to how the JVM works, and particularly how the JVM heap memory behaves. Growing and shrinking the container memory dynamically will affect the application’s performance, since the heap memory is dynamically allocated based on the memory available to the container. Using the same value for the request and the limit ensures that a fixed amount of memory is always guaranteed, resulting in better JVM performance. Furthermore, it allows the Java Memory Calculator provided by the Paketo Buildpacks to configure the JVM memory in the most efficient way.
I’ve mentioned the Java Memory Calculator a few times now. The following section will expand on the subject.
Configuring resources for the JVM
The Paketo Buildpacks used by the Spring Boot plugin for Gradle/Maven provide a Java Memory Calculator component when building container images for Java applications. This component implements an algorithm that has been refined and improved over the years, thanks to the Pivotal (now VMware Tanzu) experience with running containerized Java workloads in the cloud.
In a production scenario, the default configuration is a good starting point for most applications. However, it can be too resource-demanding for local development or demos. One way to make the JVM consume fewer resources is to lower the default 250 JVM thread count for imperative applications. For that reason, we’ve been using the BPL_JVM_THREAD_COUNT environment variable to configure a low number of threads for the two Servlet-based applications in Polar Bookshop: Catalog Service and Config Service. Reactive applications are already configured with fewer threads, since they are much more resource-efficient than their imperative counterparts. For that reason, we haven’t customized the thread count for Edge Service, Order Service, or Dispatcher Service.
Note The Paketo team is working on extending the Java Memory Calculator to provide a low-profile mode, which will be helpful when working locally or on low-volume applications. In the future, it will be possible to control the memory configuration mode via a flag rather than having to tweak the individual parameters. You can find more information about this feature on the GitHub project for Paketo Buildpacks (http://mng.bz/5Q87).
The JVM has two main memory areas: heap and non-heap. The Calculator focuses on computing values for the different non-heap memory parts according to a specific formula. The remaining memory resources are assigned to the heap. If the default configuration is not good enough, you can customize it as you prefer. For example, I experienced some memory issues with an imperative application handling session management with Redis. It required more direct memory than was configured by default. In that case, I used the standard -XX:MaxDirectMemorySize=50M JVM setting via the JAVA_TOOL_OPTIONS environment variable and increased the maximum size for the direct memory from 10 MB to 50 MB. If you customize the size of a specific memory region, the Calculator will adjust the allocation of the remaining areas accordingly.
Note Memory handling in the JVM is a fascinating topic that would require its own book to fully cover. Therefore, I won’t go into details regarding how to configure it.
Since we are configuring deployments for production, let’s update the thread count for Catalog Service using a more suitable number like 100. In a real-world scenario, I would recommend starting with the default value of 250 as a baseline. For Polar Bookshop, I’m trying to compromise between showing what an actual production deployment would look like and minimizing the resources you need to consume (and perhaps pay for) on a public cloud platform.
We can update the thread count for Catalog Service in the patch we defined earlier to customize environment variables. Open the patch-env.yml file in the production overlay for Catalog Service (kubernetes/applications/catalog-service/production), and update the JVM thread count as follows.
Listing 15.16 Number of JVM threads used by the Java Memory Calculator
apiVersion: apps/v1
kind: Deployment
metadata:
  name: catalog-service
spec:
  template:
    spec:
      containers:
        - name: catalog-service
          env:
            - name: BPL_JVM_THREAD_COUNT    ❶
              value: "100"
            - name: SPRING_PROFILES_ACTIVE
              value: prod
❶ The number of threads considered in the memory calculation
That was the last configuration change we needed to make before deploying the application in production. We’ll do that next.
15.2.3 Deploying Spring Boot in production
Our end goal is to automate the full process from code commit to production. Before looking into the production stage of the deployment pipeline, let’s verify that the customizations we’ve defined so far are correct by deploying Catalog Service in production manually.
As you learned in the previous chapter, we can use the Kubernetes CLI to deploy applications on Kubernetes from a Kustomization overlay. Open a Terminal window, navigate to the production overlay folder for Catalog Service (polar-deployment/ kubernetes/applications/catalog-service/production), and run the following command to deploy the application via Kustomize:
$ kubectl apply -k .
You can follow their progress and see when the two application instances are ready to accept requests by running this command:
$ kubectl get pods -l app=catalog-service --watch
For additional information on the deployment, you can keep using the Kubernetes CLI or rely on Octant, a tool that lets you visualize your Kubernetes workloads via a convenient GUI. As explained in chapter 7, you can start Octant with the command octant. Furthermore, the application logs might be interesting for verifying that Catalog Service is running correctly:
$ kubectl logs deployment/catalog-service
The application is not exposed outside the cluster yet (for that, we need Edge Service), but you can use the port-forwarding functionality to forward traffic from your local environment on port 9001 to the Service running in the cluster on port 80:
$ kubectl port-forward service/catalog-service 9001:80
Note The process started by the kubectl port-forward command will keep running until you explicitly stop it with Ctrl-C.
Now you can call Catalog Service from your local machine on port 9001, and the request will be forwarded to the Service object inside the Kubernetes cluster. Open a new Terminal window and call the root endpoint exposed by the application to verify that the polar.greeting value specified in the ConfigMap for the prod Spring profile is used instead of the default one:
$ http :9001/
Welcome to our book catalog from a production Kubernetes environment!
Congratulations! You are officially in production! When you’re done, you can terminate the port-forwarding with Ctrl-C. Finally, delete the deployment by running the following command from the production overlay folder for Catalog Service:
$ kubectl delete -k .
Kubernetes provides the infrastructure for implementing different types of deployment strategies. When we update our application manifests with a new release version and apply them to the cluster, Kubernetes performs a rolling update. This strategy consists in incrementally updating Pod instances with new ones and guarantees zero downtime for the user. You saw that in action in the previous chapter.
By default, Kubernetes adopts the rolling update strategy, but there are other techniques that you can employ based on the standard Kubernetes resources or you can rely on a tool like Knative. For example, you might want to use blue/green deployments, consisting of deploying the new version of the software in a second production environment. By doing that, you can test one last time that everything runs correctly. When the environment is ready, you move the traffic from the first (blue) to the second (green) production environment.1
Another deployment technique is the canary release. It’s similar to the blue/green deployment, but the traffic from the blue to the green environment is moved gradually over time. The goal is to roll out the change to a small subset of users first, perform some verifications, and then do the same for more and more users until everyone is using the new version.2 Both blue/green deployments and canary releases provide a straightforward way to roll back changes.
Note If you’re interested in learning more about deployment and release strategies on Kubernetes, I recommend reading chapter 5 of Continuous Delivery for Kubernetes by Mauricio Salatino, published by Manning (https://livebook.manning.com/book/continuous-delivery-for-kubernetes/chapter-5).
Currently, every time you commit changes, a new release candidate is ultimately published and approved if it passes successfully through the commit and acceptance stages. Then you need to copy the version number of the new release candidate and paste it into the Kubernetes manifests before you can update the application in production manually. In the next section, you’ll see how to automate that process by implementing the final part of the deployment pipeline: the production stage.
15.3 Deployment pipeline: Production stage
We started implementing a deployment pipeline back in chapter 3, and we have come a long way since then. We’ve automated all the steps from code commit up to having a release candidate ready for production. There are still two operations that we have performed manually so far: updating the production scripts with the new application version, and deploying it to Kubernetes.
In this section, we’ll start looking at the final part of a deployment pipeline, the production stage, and I’ll show you how to implement it as a workflow in GitHub Actions.
15.3.1 Understanding the production stage of the deployment pipeline
After a release candidate has gone through the commit and acceptance stages, we are confident enough to deploy it to production. The production stage can be triggered manually or automatically, depending on whether you’d like to achieve continuous deployment.
Continuous delivery is “a software development discipline where you build software in such a way that the software can be released to production at any time.”3 The key part is understanding that the software can be released to production, but it doesn’t have to. That’s a common source of confusion between continuous delivery and continuous deployment. If you also want to take the newest release candidate and deploy it to production automatically, then you would have continuous deployment.
The production stage consists of two main steps:
Note An optional third step would be to run some final automated tests to verify that the deployment was successful. Perhaps you could reuse the same system tests that you will have included in the acceptance stage to verify the deployment in a staging environment.
The next section will show you how to implement the first step of the production stage using GitHub Actions, and we’ll discuss some implementation strategies for the second step. We’ll aim to automate the whole path from code commit to production and achieve continuous deployment.
15.3.2 Implementing the production stage with GitHub Actions
Compared to the previous stages, implementing the production stage of a deployment pipeline can differ a lot depending on several factors. Let’s start by focusing on the first step of the production stage.
At the end of the acceptance stage, we have a release candidate that’s proven to be ready for production. After that, we need to update the Kubernetes manifests in our production overlay with the new release version. When we’re keeping both the application source code and deployment scripts in the same repository, the production stage could be listening to a specific event published by GitHub whenever the acceptance stage completes successfully, much like how we configured the flow between the commit and acceptance stages.
In our case, we are keeping the deployment scripts in a separate repository, which means that whenever the acceptance stage workflow completes its execution in the application repository, we need to notify the production stage workflow in the deployment repository. GitHub Actions provides the option of implementing this notification process via a custom event. Let’s see how it works.
Open your Catalog Service project (catalog-service), and go to the acceptance-stage.yml file within the .github/workflows folder. After all the acceptance tests have run successfully, we have to define a final step that will send a notification to the polar-deployment repository and ask it to update the Catalog Service production manifests with the new release version. That will be the trigger for the production stage, which we’ll implement in a moment.
Listing 15.17 Triggering the production stage in the deployment repository
name: Acceptance Stage
on:
  workflow_run:
    workflows: ['Commit Stage']
    types: [completed]
    branches: main
concurrency: acceptance

env:                                                                 ❶
  OWNER: <your_github_username>
  REGISTRY: ghcr.io
  APP_REPO: catalog-service
  DEPLOY_REPO: polar-deployment
  VERSION: ${{ github.sha }}

jobs:
  functional:
    ...
  performance:
    ...
  security:
    ...
  deliver:
    name: Deliver release candidate to production
    needs: [ functional, performance, security ]                     ❷
    runs-on: ubuntu-22.04
    steps:
      - name: Deliver application to production
        uses: peter-evans/repository-dispatch@v2                     ❸
        with:
          token: ${{ secrets.DISPATCH_TOKEN }}                       ❹
          repository:
          ➥ ${{ env.OWNER }}/${{ env.DEPLOY_REPO }}                 ❺
          event-type: app_delivery                                   ❻
          client-payload: '{                                         ❼
            "app_image":
              "${{ env.REGISTRY }}/${{ env.OWNER }}/${{ env.APP_REPO }}",
            "app_name": "${{ env.APP_REPO }}",
            "app_version": "${{ env.VERSION }}"
          }'
❶ Defines relevant data as environment variables
❷ Runs only when all functional and non-functional acceptance tests are completed successfully
❸ An action to send an event to another repository and trigger a workflow
❹ A token to grant the action permission to send events to another repository
❻ A name to identify the event (this is up to you)
❼ The payload of the message sent to the other repository. Add any information that the other repository might need to perform its operations.
With this new step, if no error is found during the execution of the acceptance tests, a notification is sent to the polar-deployment repository to trigger an update for Catalog Service.
By default, GitHub Actions doesn’t allow you to trigger workflows located in other repositories, even if they both belong to you or your organization. Therefore, we need to provide the repository-dispatch action with an access token that grants it such permissions. The token can be a personal access token (PAT), a GitHub tool that we used in chapter 6.
Go to your GitHub account, navigate to Settings > Developer Settings > Personal Access Token, and choose Generate New Token. Input a meaningful name, and assign it the workflow scope to give the token permissions to trigger workflows in other repositories (figure 15.6). Finally, generate the token and copy its value. GitHub will show you the token value only once. Make sure you save it since you’ll need it soon.

Figure 15.6 A personal access token (PAT) granting permissions to trigger workflows in other repositories
Next, go to your Catalog Service repository on GitHub, navigate to the Settings tab, and then select Secrets > Actions. On that page, choose New Repository Secret, name it DISPATCH_TOKEN (the same name we used in listing 15.17), and input the value of the PAT you generated earlier. Using the Secrets feature provided by GitHub, we can provide the PAT securely to the acceptance stage workflow.
Warning As explained in chapter 3, when using actions from the GitHub marketplace, you should handle them like any other third-party application and manage the security risks accordingly. In the acceptance stage, we provide an access token to a third-party action with permissions to manipulate repositories and workflows. You shouldn’t do that light-heartedly. In this case, I trusted the author of the action and decided to trust the action with the token.
Don’t commit your changes to the catalog-service repository yet. We’ll do that later. At this point, we have implemented the trigger for the production stage, but we haven’t initialized the final stage yet. Let’s move on to the Polar Deployment repository and do that.
Open your Polar Deployment project (polar-deployment), and create a production-stage.yml file within a new .github/workflows folder. The production stage is triggered whenever the acceptance stage from an application repository dispatches an app_ delivery event. The event itself contains contextual information about the application name, image, and version for the newest release candidate. Since the application-specific information is parameterized, we can use this workflow for all the applications of the Polar Bookshop system, not only Catalog Service.
The first job of the production stage is updating the production Kubernetes manifests with the new release version. This job will consist of three steps:
We can implement those three steps as follows.
Listing 15.18 Updating the image version upon a new application delivery
name: Production Stage

on:
  repository_dispatch:                                               ❶
    types: [app_delivery]

jobs:
  update:
    name: Update application version
    runs-on: ubuntu-22.04
    permissions:
      contents: write
    env:                                                             ❷
      APP_IMAGE: ${{ github.event.client_payload.app_image }}
      APP_NAME: ${{ github.event.client_payload.app_name }}
      APP_VERSION: ${{ github.event.client_payload.app_version }}
    steps:
      - name: Checkout source code
        uses: actions/checkout@v3                                    ❸
      - name: Update image version
        run: |
          cd                                                        ❹
            kubernetes/applications/${{ env.APP_NAME }}/production
          kustomize edit set image                                  ❺
            ${{ env.APP_NAME }}=${{ env.APP_IMAGE }}:${{ env.APP_VERSION }}
          sed -i 's/ref=[w+]/${{ env.APP_VERSION }}/'
            kustomization.yml                                        ❻
      - name: Commit updated manifests
        uses: stefanzweifel/git-auto-commit-action@v4                ❼
        with:                                                        ❽
          commit_message: "Update ${{ env.APP_NAME }}
➥to version ${{ env.APP_VERSION }}"
          branch: main
❶ Executes the workflow only when a new app_delivery event is received, dispatched from another repository
❷ Saves the event payload data as environment variables for convenience
❹ Navigates to the production overlay for the given application
❺ Updates the image name and version via Kustomize for the given application
❻ Updates the tag used by Kustomize to access the correct base manifests stored in the application repository
❼ An action to commit and push the changes applied to the current repository from the previous step
❽ Details about the commit operation
That’s all we need for now. Commit and push the changes to your remote polar-deployment on GitHub. Then go back to your Catalog Service project, commit your previous changes to the acceptance stage, and push them to your remote catalog-service on GitHub.
The new commit to the catalog-service repository will trigger the deployment pipeline. First, the commit stage will produce a container image (our release candidate) and publish it to GitHub Container Registry. Then the acceptance stage will fictitiously run further tests on the application and finally send a notification (a custom app_delivery event) to the polar-deployment repository. The event triggers the production stage, which will update the production Kubernetes manifests for Catalog Service and commit the changes to the polar-deployment repository. Figure 15.7 illustrates the inputs and outputs for the three stages of the deployment pipeline.

Figure 15.7 The commit stage goes from code commit to a release candidate, which goes through the acceptance stage. If it passes all the tests, the production stage updates the deployment manifests.
Go to your GitHub projects and follow the execution of the three stages. In the end, you’ll find a new commit in your polar-deployment repository, which was submitted by GitHub Actions and contains a change to the Catalog Service production overlay so it uses the newest release version.
Perfect! We just got rid of the first of the two remaining manual steps: updating the deployment scripts with the newest release version. We still have to apply the Kubernetes manifests to the cluster manually, using the Kubernetes CLI. The second step of the production stage will take care of automating the application deployment whenever a new version is promoted to production. That’s the topic of the next section.
15.4 Continuous deployment with GitOps
Traditionally, continuous deployment is implemented by adding a further step to the production stage of the deployment pipeline. This additional step would authenticate with the target platform (such as a virtual machine or a Kubernetes cluster) and deploy the new version of the application. In recent years, a different approach has become more and more popular: GitOps. The term was coined by Alexis Richardson, CEO and founder of Weaveworks (www.weave.works).
GitOps is a set of practices for operating and managing software systems, enabling continuous delivery and deployment while ensuring agility and reliability. Compared to the traditional approach, GitOps favors decoupling between delivery and deployment. Instead of having the pipeline pushing deployments to the platform, it’s the platform itself pulling the desired state from a source repository and performing deployments. In the first case, the deployment step is implemented within the production stage workflow. In the second case, which will be our focus, the deployment is still theoretically considered part of the production stage, but the implementation differs.
GitOps doesn’t enforce specific technologies, but it’s best implemented with Git and Kubernetes. That will be our focus.
The GitOps Working Group, part of the CNCF, defines GitOps in terms of four principles (https://opengitops.dev):
-
Declarative—“A system managed by GitOps must have its desired state expressed declaratively.”
-
Versioned and immutable—“Desired state is stored in a way that enforces immutability, versioning and retains a complete version history.”
-
Pulled automatically—“Software agents automatically pull the desired state declarations from the source.”
-
Examples of software agents (GitOps agents) are Flux (https://fluxcd.io), Argo CD (https://argoproj.github.io/cd), and kapp-controller (https://carvel.dev/kapp-controller).
-
Rather than granting CI/CD tools like GitHub Actions full access to the cluster or running commands manually, we grant the GitOps agent access to a source like Git so that it pulls changes automatically.
-
-
Continuously reconciled—“Software agents continuously observe actual system state and attempt to apply the desired state.”
-
Kubernetes is composed of controllers that keep observing the system and ensuring the actual state of the cluster matches the desired state.
-
On top of that, GitOps ensures that it’s the right desired state to be considered in the cluster. Whenever a change is detected in the Git source, the agent steps up and reconciles the desired state with the cluster.
-
Figure 15.8 illustrates the result of applying the GitOps principles.
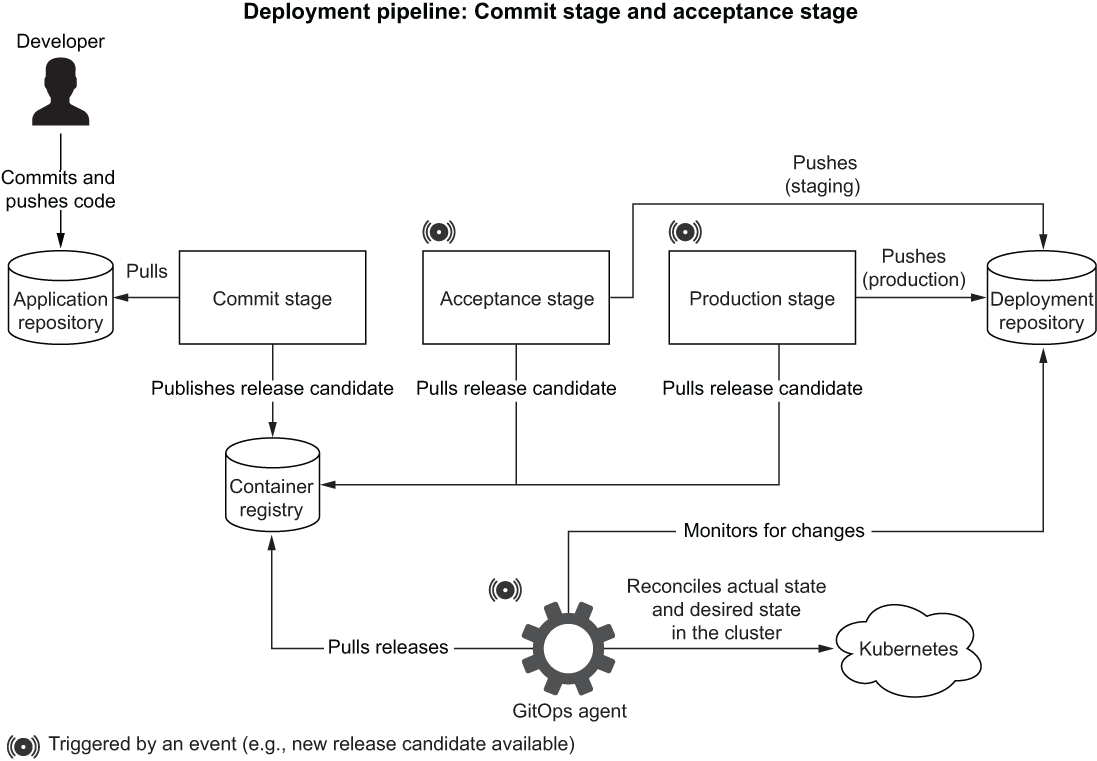
Figure 15.8 Every time the production stage workflow updates the deployment repository, the GitOps controller reconciles the desired and actual states.
If you consider the four principles, you’ll notice that we’ve applied the first two already. We expressed the desired state for our applications declaratively using Kubernetes manifests and Kustomize. And we stored the desired state in a Git repository on GitHub (polar-deployment), making it versioned and immutable. We are still missing a software agent that automatically pulls the desired state declarations from the Git source and continuously reconciles them inside the Kubernetes cluster, therefore achieving continuous deployment.
We’ll start by installing Argo CD (https://argo-cd.readthedocs.io), a GitOps software agent. Then we’ll configure it to complete the final step of the deployment pipeline and let it monitor our polar-deployment repository. Whenever there’s a change in the application manifests, Argo CD will apply the changes to our production Kubernetes cluster.
15.4.1 Implementing GitOps with Argo CD
Let’s start by installing the Argo CD CLI. Refer to the project website for installation instructions (https://argo-cd.readthedocs.io). If you are on macOS or Linux, you can use Homebrew as follows:
$ brew install argocd
We’ll use the CLI to instruct Argo CD about which Git repository to monitor, and we’ll configure it to apply changes to the cluster to achieve continuous deployment automatically. But first we need to deploy Argo CD to the production Kubernetes cluster.
Note I’ll assume your Kubernetes CLI is still configured to access the production cluster on DigitalOcean. You can check that with kubectl config current-context. If you need to change the context, you can run kubectl config use-context <context-name>. A list of all the contexts available can be retrieved from kubectl config get-contexts.
Open a Terminal window, go to your Polar Deployment project (polar-deployment), and navigate to the kubernetes/platform/production/argocd folder. You should have copied that folder over to your repository when you set up the production cluster. If that’s not the case, please do so now from the source code repository accompanying this book (Chapter15/15-end/polar-deployment/platform/production/argocd).
Then run the following script to install Argo CD into the production cluster. Feel free to open the file and look at the instructions before running it:
$ ./deploy.sh
Tip You might need to make the script executable first, with the command chmod +x deploy.sh.
The deployment of Argo CD consists of several components, including a convenient web interface where you can visualize and control all the deployments controlled by Argo CD. For now, we’ll use the CLI. During the installation, Argo CD will have autogenerated a password for the admin account (the username is admin). Run the following command to fetch the password value (it will take a few seconds before the value is available):
$ kubectl -n argocd get secret argocd-initial-admin-secret
    -o jsonpath="{.data.password}" | base64 -d; echo
Next, let’s identify the external IP address assigned to Argo CD server:
$ kubectl -n argocd get service argocd-server

NAME            TYPE           CLUSTER-IP     EXTERNAL-IP
argocd-server   LoadBalancer   10.245.16.74   <external-ip>
The platform might take a few minutes to provision a load balancer for Argo CD. During the provisioning, the EXTERNAL-IP column will show a <pending> status. Wait and try again until an IP address is shown. Note it down, because we’re going to use it soon.
Since the Argo CD server is now exposed via a public load balancer, we can use the external IP address to access its services. For this example, we’ll use the CLI, but you can achieve the same results by opening <argocd-external-ip> (the IP address assigned to your Argo CD server) in a browser window. Either way, you’ll have to log in with the auto-generated admin account. The username is admin, and the password is the one you fetched earlier. Be aware that you might get a warning, since you are not using HTTPS:
$ argocd login <argocd-external-ip>
It’s now time to see continuous deployment in action with GitOps. I’ll assume you have been through all the previous sections of this chapter. At this point, the commit stage of your Catalog Service repository on GitHub (catalog-service) should have built a container image, the acceptance stage should have triggered the Polar Deployment repository on GitHub (polar-deployment), and the production stage should have updated the production overlay for Catalog Service with the newest release version (polar-deployment/kubernetes/applications/catalog-service/production). Now we’ll configure Argo CD to monitor the production overlay for Catalog Service and synchronize it with the production cluster whenever it detects a change in the repository. In other words, Argo CD will continuously deploy new versions of Catalog Service as made available by the deployment pipeline.
$ argocd app create catalog-service                                    ❶
  --repo                                                               ❷
    https://github.com/<your_github_username>/polar-deployment.git
  --path kubernetes/applications/catalog-service/production            ❸
  --dest-server https://kubernetes.default.svc                         ❹
  --dest-namespace default                                             ❺
  --sync-policy auto                                                   ❻
  --auto-prune                                                          ❼
❶ Creates a catalog-service application in Argo CD
❷ The Git repository to monitor for changes. Insert your GitHub username.
❸ The folder to monitor for changes within the configured repository
❹ The Kubernetes cluster where the application should be deployed. We are using the default cluster configured in the kubectl context.
❺ The namespace where the application should be deployed. We are using the “default” namespace.
❻ Configures Argo CD to automatically reconcile the desired state in the Git repo with the actual state in the cluster
❼ Configures Argo CD to delete old resources after a synchronization automatically
You can verify the status of the continuous deployment of Catalog Service with the following command (I have filtered the results for the sake of clarity):
$ argocd app get catalog-service

GROUP  KIND        NAMESPACE  NAME                       STATUS  HEALTH
       ConfigMap   default    catalog-config-6d5dkt7577  Synced
       Service     default    catalog-service            Synced  Healthy
apps   Deployment  default    catalog-service            Synced  Healthy
Argo CD has automatically applied the production overlay for Catalog Service (polar-deployment/kubernetes/applications/catalog-service/production) to the cluster.
Once all the resources listed by the previous command have the Synced status, we can verify that the application is running correctly. The application is not exposed outside the cluster yet, but you can use the port-forwarding functionality to forward traffic from your local environment on port 9001 to the Service running in the cluster on port 80:
$ kubectl port-forward service/catalog-service 9001:80
Next, call the root point exposed by the application. We expect to get the value we configured for the polar.greeting property in the Catalog Service production overlay.
$ http :9001/
Welcome to our book catalog from a production Kubernetes environment!
Perfect! In one step we automated not only the first deployment but also any future updates. Argo CD will detect any change in the production overlay for Catalog Service and apply the new manifests to the cluster immediately. There could be a new release version to deploy, but it could also be a change to the production overlay. For example, let’s try configuring a different value for the polar.greeting property.
Open your Polar Deployment project (polar-deployment), go to the production overlay for Catalog service (kubernetes/applications/catalog-service/production), and update the value of the polar.greeting property in the application-prod.yml file.
Listing 15.19 Updating the production-specific configuration for the app
polar:
  greeting: Welcome to our production book catalog
  ➥ synchronized with Argo CD!
spring:
  config:
    import: configtree:/workspace/secrets/*/
Then commit and push the changes to your remote polar-deployment repository on GitHub. By default, Argo CD checks the Git repository for changes every three minutes. It will notice the change and apply the Kustomization again, resulting in a new ConfigMap being generated by Kustomize and a rolling restart of the Pods to refresh the configuration. Once the deployment in the cluster is in sync with the desired state in the Git repo (you can check this with argocd app get catalog-service), call the root endpoint exposed by Catalog Service again. We’ll expect to get the value we have just updated. If you get a network error, it might be that the port-forwarding process was interrupted. Run kubectl port-forward service/catalog-service 9001:80 again to fix it:
$ http :9001/
Welcome to our production book catalog synchronized with Argo CD!
Great! We have finally achieved continuous deployment! Pause for a minute and celebrate with a beverage of your choice. You deserve it!
15.4.2 Putting it all together
If you followed along and completed all the Polar Labs, you’ll now have the whole Polar Bookshop system up and running in a production Kubernetes cluster in the public cloud. That’s a huge accomplishment! In this section, we’ll give it a try and refine a few last points. Figure 15.9 shows the status of the applications from the Argo CD GUI, accessible via the <argocd-external-ip> address discovered earlier.

Figure 15.9 The Argo CD GUI shows an overview of all the applications managed via a GitOps flow.
So far, we have worked with Catalog Service, an internal application that is not exposed outside the cluster. For that reason, we relied on the port-forwarding functionality to test it out. Now that the whole system is deployed, we can access the applications as intended: via the Edge Service. The platform automatically configures a load balancer with an external IP address whenever we deploy an Ingress resource. Let’s discover the external IP address for the Ingress sitting in front of Edge Service:
$ kubectl get ingress

NAME            CLASS   HOSTS   ADDRESS           PORTS   AGE
polar-ingress   nginx   *       <ip-address>      80      31m
Using the Ingress external IP address, you can use Polar Bookshop from the public internet. Open a browser window and navigate to <ip-address>.
Try logging in as Isabelle. Feel free to add some books and browse the catalog. Then log out and log in again, this time as Bjorn. Verify that you can’t create or edit books, but you can place orders.
When you are done testing the application using the two accounts, log out and ensure that you can’t access the Actuator endpoints by visiting <ip-address>/actuator/health, for example. NGINX, the technology that powers the Ingress Controller, will reply with a 403 response.
Note If you’d like to provision the Grafana observability stack, refer to the instructions in the source code repository accompanying the book.
Great job! When you’re done using the production cluster, follow the last section of appendix B to delete all the cloud resources from DigitalOcean. That’s fundamental to avoid incurring unexpected costs.
Summary
-
The idea behind continuous delivery is that an application is always in a releasable state.
-
When the delivery pipeline completes its execution, you’ll obtain an artifact (the container image) you can use to deploy the application in production.
-
When it comes to continuous delivery, each release candidate should be uniquely identifiable.
-
Using the Git commit hash, you can ensure uniqueness, traceability, and automation. Semantic versioning can be used as the display name communicated to users and customers.
-
At the end of the commit stage, a release candidate is delivered to the artifact repository. Next, the acceptance stage deploys the application in a production-like environment and runs functional and non-functional tests. If they all succeed, the release candidate is ready for production.
-
The Kustomize approach to configuration customization is based on the concepts of bases and overlays. Overlays are built on top of base manifests and customized via patches.
-
You saw how to define patches for customizing environment variables, Secrets mounted as volumes, CPU and memory resources, ConfigMaps, and Ingress.
-
The final part of a deployment pipeline is the production stage, where the deployment manifests are updated with the newest release version and ultimately deployed.
-
GitOps is a set of practices for operating and managing software systems.
-
GitOps is based on four principles according to which a system deployment should be declarative, versioned and immutable, pulled automatically, and continuously reconciled.
-
Argo CD is a software agent running in a cluster that automatically pulls the desired state from a source repository and applies it to the cluster whenever the two states diverge. That’s how we implemented continuous deployment.
1. See M. Fowler, “BlueGreenDeployment,” MartinFowler.com, March 1, 2010, http://mng.bz/WxOl.
2. See D. Sato, “CanaryRelease,” MartinFowler.com, June 25, 2014, http://mng.bz/8Mz5.
3. See M. Fowler, “ContinuousDelivery,” MartinFowler.com, May 30, 2013, http://mng.bz/7yXV.