
6 Containerizing Spring Boot
- Working with container images on Docker
- Packaging Spring Boot applications as container images
- Managing Spring Boot containers with Docker Compose
- Automating image build and push with GitHub Actions
So far, we have developed a Catalog Service application that exposes a REST API and persists data through a PostgreSQL database running inside a container. We’re getting closer to deploying the first components of the Polar Bookshop system to a Kubernetes cluster. Before doing that, however, you need to learn how to package Spring Boot applications as container images and manage their life cycles.
This chapter will teach you the essential characteristics of container images and how to build one. We’ll use Docker to work with containers, but you can do the same with any other container runtime compatible with the Open Container Initiative (OCI) standards (https://opencontainers.org). In the remainder of the book, whenever I refer to a container image or Docker image, I mean an image compatible with the OCI Image Specification.
Along the way, I’ll share with you several considerations regarding building container images for production, such as security and performance. We’ll explore two possibilities: Dockerfiles and Cloud Native Buildpacks.
When we start working with more than one container, the Docker CLI is not very efficient. Instead, we’ll use Docker Compose to manage several containers and their life cycles.
Finally, we’ll continue work on the deployment pipeline we started in chapter 3. I’ll show you how to add new steps to the commit stage for packaging and publishing container images automatically to GitHub Container Registry.
Note The source code for the examples in this chapter is available in the Chapter06/06-begin and Chapter06/06-end folders, which contain the initial and final states of the project (https://github.com/ThomasVitale/cloud-native-spring-in-action).
6.1 Working with container images on Docker
In chapter 2, I introduced the main components of the Docker platform. The Docker Engine has a client/server architecture. The Docker CLI is the client you use to interact with the Docker server. The latter is responsible for managing all Docker resources (for example, images, containers, and networks) through the Docker daemon. The server can also interact with container registries to upload and download images. For your convenience, figure 6.1 shows the interaction flow among those components again.
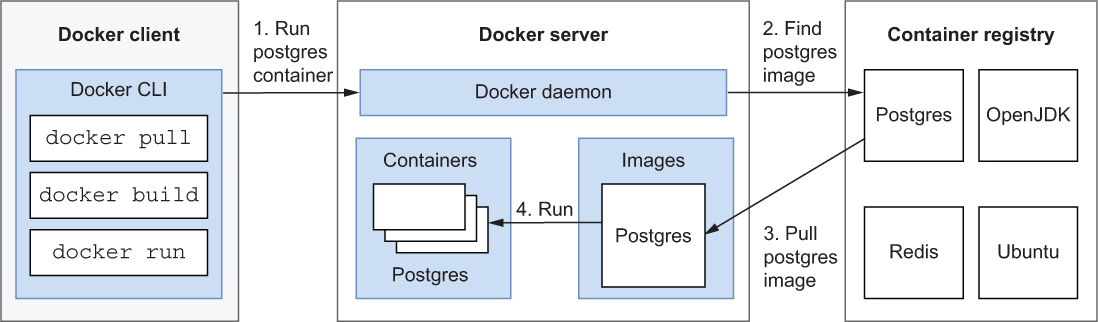
Figure 6.1 The Docker Engine has a client/server architecture and interacts with a container registry.
This section will continue from where we left off in chapter 2 and elaborate more on container images, which are lightweight executable packages that include everything needed to run the application that’s inside. You’ll learn the main characteristics of a container image, how to create one, and finally how to publish it to a container registry. Before moving on, make sure the Docker Engine on your computer is up and running by executing the docker version command from a Terminal window.
6.1.1 Understanding container images
Container images are the product of executing an ordered sequence of instructions, each resulting in a layer. Each image is made up of several layers, and each layer represents a modification produced by the corresponding instruction. The final artifact, an image, can be run as a container.
Images can be created from scratch or starting from a base image. The latter is the most common approach. For example, you can start from an Ubuntu image and apply a series of modifications on top of it. The sequence of instructions would be as follows:
Each of these instructions will generate a layer, producing the final container image shown in figure 6.2.

Figure 6.2 Container images are composed of an ordered sequence of read-only layers. The first one represents the base image; the others represent modifications applied on top of it.
All layers in a container image are read-only. Once they are applied, you can’t modify them anymore. If you need to change something, you can do so by applying a new layer on top of it (by executing a new instruction). Changes applied to the upper layers will not affect the lower ones. This approach is called copy-on-write: a copy of the original item is created in the upper layer, and changes are applied to the copy rather than to the original item.
When an image is run as a container, one last layer is automatically applied on top of all the existing ones: the container layer. It is the only writable layer, and it’s used to store data created during the execution of the container itself. At runtime, this layer might be used to generate files required by the application to run or maybe to store temporary data. Even though it’s writable, remember that it’s volatile: once you delete your container, everything stored in that layer is gone. Figure 6.3 compares the layers in a running container and those in the corresponding image.

Figure 6.3 Running containers have an extra layer on top of the image layers. That is the only writable layer, but remember that it’s volatile.
Note The fact that all the layers in a container image are read-only has some security implications. You should never store secrets or sensitive information in the lower layers because they will always be accessible, even if the upper layers delete them. For example, you shouldn’t package passwords or encryption keys within a container image.
So far you have learned how container images are composed, but you haven’t yet seen how to create one. That’s coming up next.
6.1.2 Creating images with Dockerfiles
Following the OCI format, you can define a container image by listing the sequence of instructions in a particular file called a Dockerfile. It’s a script that acts as a recipe containing all the steps to build the desired image.
In a Dockerfile, each instruction starts with a command from the Docker-specific syntax. Then you can pass familiar shell commands as arguments to the instructions, depending on which Linux distribution you’re using as your base image. The format is as follows:
INSTRUCTION arguments
Note Docker supports Linux containers on machines with AMD64 and ARM64 architectures. It also supports working with Windows containers (runnable only on Windows systems), but we will exclusively use Linux containers in this book.
Let’s put that into practice by defining a Dockerfile to build the container image mentioned in the previous section, composed of the following main instructions:
Create a my-java-image folder and an empty file inside it named Dockerfile, with no extension (Chapter06/06-end/my-java-image). You might name it differently, but in this case let’s go with the default convention.
Listing 6.1 A Dockerfile with the instructions to build an OCI image
FROM ubuntu:22.04                                      ❶

RUN apt-get update && apt-get install -y default-jre   ❷

ENTRYPOINT ["java", "--version"]                       ❸
❶ Bases the new image on the official image for Ubuntu, version 22.04
❷ Installs the JRE using familiar bash commands
❸ Defines the execution entry point for the running container
By default, Docker is configured to use Docker Hub to find and download images. That’s where the ubuntu:22.04 image comes from. Docker Hub is a registry that you can use for free (within specific rate limits), and it’s automatically configured when you install Docker.
The java --version command is the entry point of the executing container. If you don’t specify any entry point, the container will not run as an executable. Unlike virtual machines, containers are meant to run tasks, not operating systems. Indeed, when running an Ubuntu container with docker run ubuntu, the container will exit right away because no task has been defined as the entry point, only the operating system.
The most common instructions defined in a Dockerfile are listed in table 6.1.
Table 6.1 The most common instructions used in a Dockerfile for building container images
Once you have the specifications for creating a container image declared in a Dockerfile, you can use the docker build command to run all the instructions one by one, producing a new layer for each of them. The whole process from Dockerfile to image to container is illustrated in figure 6.4. Notice how the first instruction in a Dockerfile produces the lowest layer of the image.

Figure 6.4 Images are built starting from Dockerfiles. Each instruction in a Dockerfile results in an ordered sequence of layers in the image.
Now open a Terminal window, navigate to the my-java-image folder where your Dockerfile is located, and run the following command (don’t forget the final dot).
$ docker build -t my-java-image:1.0.0 .
The command syntax is explained in figure 6.5.
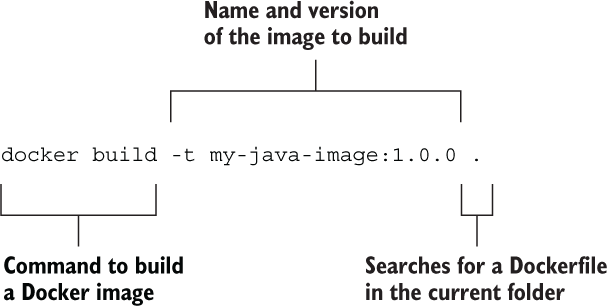
Figure 6.5 The Docker CLI command to build a new image with a given name and version
When it’s done, you can get some details about your newly created image using the docker images command:
$ docker images my-java-image
REPOSITORY      TAG       IMAGE ID       CREATED         SIZE
my-java-image   1.0.0     96d1f58857aa   6 seconds ago   549MB
The layered approach makes the image build very performant. Each image layer is a delta from the previous one, and Docker caches all of them. If you make changes to only one of them and build the image again, only that layer and the subsequent ones are recreated. If you run a container from a new version of an image stored in a registry, only the new layers will be downloaded, improving performance at runtime.
For that reason, it’s recommended that you order layers based on their likelihood to change, optimizing the image build process. Place the instructions that change more often toward the end of the Dockerfile.
A container image can be run with the docker run command, which starts a container and executes the process described in the Dockerfile as the entry point:
$ docker run --rm my-java-image:1.0.0

openjdk 11.0.15 2022-04-19
OpenJDK Runtime Environment (build 11.0.15+10-Ubuntu-0ubuntu0.22.04.1)
OpenJDK 64-Bit Server VM (build 11.0.15+10-Ubuntu-0ubuntu0.22.04.1, mixed mode)
After completing the execution, the container will stop. Since you used the --rm argument, the container will be removed automatically after the execution ends.
Note When you run the previous command, you’ll see that the default OpenJDK in Ubuntu 22.04 is Java 11 instead of the 17 version we are working with throughout the book.
Let’s now see how to publish the image to a container registry.
6.1.3 Publishing images on GitHub Container Registry
So far you have learned how to define, build, and run a container image. In this section, I’ll complete the picture by expanding on container registries.
A container registry is to images what a Maven repository is to Java libraries. Many cloud providers offer their own registry solutions with extra services, like image scanning for vulnerabilities and certified images. By default, a Docker installation is configured to use the container registry provided by the Docker company (Docker Hub), which hosts images for many popular open source projects, like PostgreSQL, RabbitMQ, and Redis. We’ll keep using it to pull images for third parties, as you did for Ubuntu in the previous section.
How about publishing your own images? You can certainly use Docker Hub or one of the registries offered by cloud providers like Azure Container Registry. For the specific project we are working on throughout the book, I chose to rely on the GitHub Container Registry (https://docs.github.com/en/packages) for a few reasons:
-
It is available for use with all personal GitHub accounts, and it’s free for public repositories. You can also use it with private repositories, but with some limitations.
-
It allows you to access public container images anonymously without rate limiting, even with a free account.
-
It is fully integrated into the GitHub ecosystem making it possible to navigate from images to related source code seamlessly.
-
It lets you generate multiple tokens to access the registry even with a free account. It’s recommended that you issue a different access token for each use case, and GitHub lets you do that via the personal access token (PAT) feature without limitations on the number of tokens. Furthermore, if you access GitHub Container Registry from GitHub Actions, you don’t need to configure a PAT—you get a token auto-configured by GitHub out of the box, and it’s provided securely to the automated pipeline without further configuration.
Publishing images to the GitHub Container Registry requires you to be authenticated, and for that you’ll need a personal access token (PAT). Go to your GitHub account, navigate to Settings > Developer Settings > Personal access tokens, and choose Generate New Token. Input a meaningful name, and assign it the write:packages scope to give the token permissions to publish images to the container registry (figure 6.6). Finally, generate the token and copy its value. GitHub will show you the token value only once. Make sure you save it, because you’ll need it soon.

Figure 6.6 A personal access token granting write access to the GitHub Container Registry
Next, open a Terminal window and authenticate with GitHub Container Registry (make sure your Docker Engine is running). When asked, insert username (your GitHub username) and password (your GitHub PAT):
$ docker login ghcr.io
If you followed along, you should have your custom my-java-image Docker image on your machine. If not, make sure you performed the operations described in the previous section.
Container images follow common naming conventions, which are adopted by OCI-compliant container registries: <container_registry>/<namespace>/<name>[:<tag>]:
-
Container registry—The hostname for the container registry where the image is stored. When using Docker Hub, the hostname is docker.io and it’s usually omitted. The Docker Engine will implicitly prepend the image name with docker.io if you don’t specify a registry. When using GitHub Container Registry, the hostname is ghcr.io and must be explicit.
-
Namespace—When using Docker Hub or GitHub Container Registry, the namespace will be your Docker/GitHub username written all in lowercase. In other registries, it might be the path to the repository.
-
Name and tag—The image name represents the repository (or package) that contains all the versions of your image. It’s optionally followed by a tag for selecting a specific version. If no tag is defined, the latest tag will be used by default.
Official images like ubuntu or postgresql can be downloaded by specifying the name only, which is implicitly converted to fully qualified names like docker.io/library/ ubuntu or docker.io/library/postgres.
When uploading your images to GitHub Container Registry, you are required to use fully qualified names, according to the ghcr.io/<your_github_username>/ <image_name> format. For example, my GitHub username is ThomasVitale, and all my personal images are named ghcr.io/thomasvitale/<image_name> (notice how the username is converted to lowercase).
Since you previously built an image with the name my-java-image:1.0.0, you have to assign it a fully qualified name before publishing it to a container registry (that is, you need to tag the image). You can do so with the docker tag command:
$ docker tag my-java-image:1.0.0
    ghcr.io/<your_github_username>/my-java-image:1.0.0
Then you can finally push it to GitHub Container Registry:
$ docker push ghcr.io/<your_github_username>/my-java-image:1.0.0
Go to your GitHub account, navigate to your profile page, and enter the Packages section. You should see a new my-java-image entry. If you click on it, you’ll find the ghcr.io/<your_github_username>/my-java-image:1.0.0 image you just published (figure 6.7). By default, the repository hosting your new image will be private.
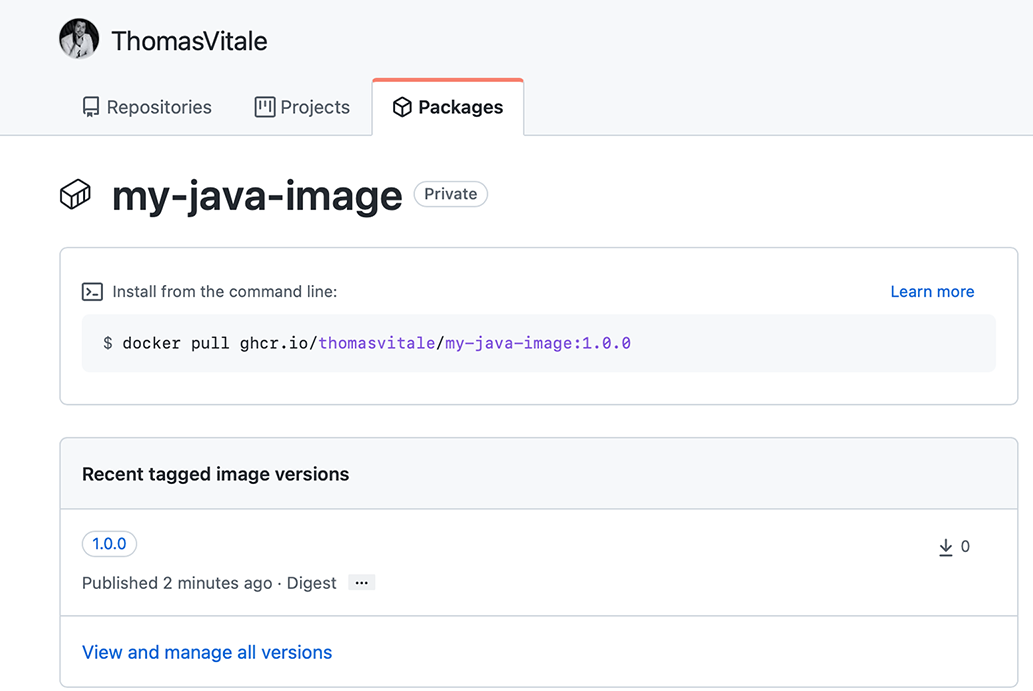
Figure 6.7 GitHub Container Registry is a public registry that you can use to publish your container images. You can see your images in the Packages section of your GitHub profile.
Tip From the same Packages page, you can also delete the published image or the entire image repository (called a package in GitHub) by going to the Package Settings via the link in the sidebar.
That concludes this section. Now that you know the main features of container images, how to create them, and how to publish them, let’s dive deeper into packaging Spring Boot applications as images.
6.2 Packaging Spring Boot applications as container images
In the previous chapters, we built the Catalog Service application, featuring a REST API and database integration. In this section, as an intermediate step before deploying it to Kubernetes, we’ll build an image to run Catalog Service as a container on Docker.
First I’ll review some aspects you should consider when packaging a Spring Boot application as a container image. Then I’ll show you how to do that with a Dockerfile and with Cloud Native Buildpacks.
6.2.1 Preparing Spring Boot for containerization
Packaging a Spring Boot application as a container image means that the application will run in an isolated context, including computational resources and network. Two main questions may arise from this isolation:
We’ll look at those two issues next.
Exposing application services through port forwarding
In chapter 2, when you ran Catalog Service as a container, you mapped port 8080, on which the application exposed its services, to port 8080 on your local machine. After doing that, you could use the application by visiting http://localhost:8080. What you did there is called port forwarding or port mapping or port publishing, and it’s used to make your containerized application accessible from the outside world.
By default, containers join an isolated network inside the Docker host. If you want to access any container from your local network, you must explicitly configure the port mapping. For example, when you ran the Catalog Service application, you specified the mapping as an argument to the docker run command: -p 8080:8080 (where the first is the external port and the second is the container port). Figure 6.8 illustrates how this works.

Figure 6.8 Port mapping lets you access the services exposed by a containerized application by forwarding the traffic from the container network to the outside world.
Using Docker’s built-in DNS server for service discovery
Thanks to port forwarding, the Catalog Service application in the previous chapter could access the PostgreSQL database server through the URL jdbc:postgresql://localhost:5432, even if it was running inside a container. The interaction is shown in figure 6.9. When running Catalog Service as a container, however, you will not be able to do that anymore, since localhost would represent the inside of your container and not your local machine. How can you solve this problem?

Figure 6.9 The Catalog Service application can interact with the PostgreSQL container thanks to the port mapping, making the database accessible from the outside world.
Docker has a built-in DNS server that can enable containers in the same network to find each other using the container name rather than a hostname or an IP address. For example, Catalog Service will be able to call the PostgreSQL server through the URL jdbc:postgresql://polar-postgres:5432, where polar-postgres is the container name. Figure 6.10 shows how it works. Later in the chapter you’ll see how to achieve this result in code.
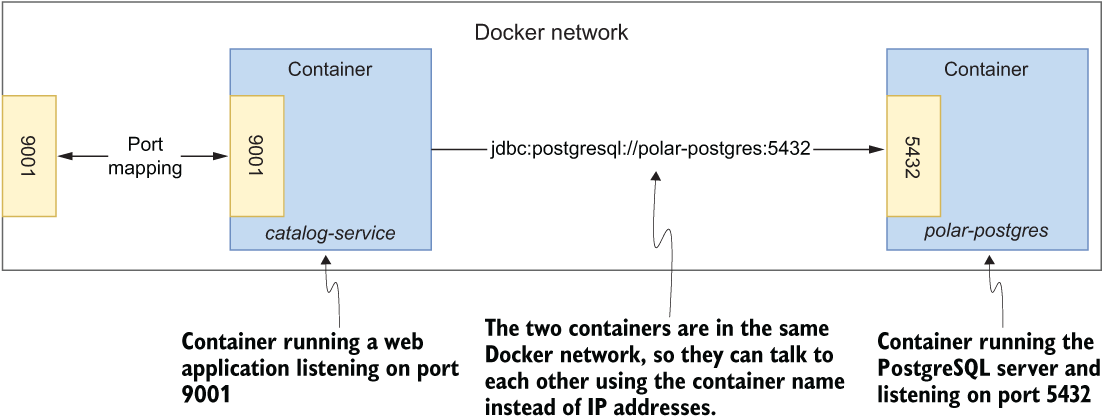
Figure 6.10 The Catalog Service container can directly interact with the PostgreSQL container because they are both on the same Docker network.
So before moving on, let’s create a network inside which Catalog Service and PostgreSQL can talk to each other using the container name instead of an IP address or a hostname. You can run this command from any Terminal window:
$ docker network create catalog-network
Next, verify that the network has been successfully created:
$ docker network ls
NETWORK ID     NAME              DRIVER    SCOPE
178c7a048fa9   catalog-network   bridge    local
...
You can then start a PostgreSQL container, specifying that it should be part of the catalog-network you just created. Using the --net argument ensures the container will join the specified network and rely on the Docker built-in DNS server:
$ docker run -d
    --name polar-postgres
    --net catalog-network
    -e POSTGRES_USER=user
    -e POSTGRES_PASSWORD=password
    -e POSTGRES_DB=polardb_catalog
    -p 5432:5432
    postgres:14.4
If the command fails, you might have the PostgreSQL container from chapter 5 still running. Remove it with docker rm -fv polar-postgres and run the previous command again.
6.2.2 Containerizing Spring Boot with Dockerfiles
Cloud native applications are self-contained. Spring Boot lets you package your applications as standalone JARs, including everything they need to run except the runtime environment. That makes the containerization very straightforward, since all you need in a container image besides the JAR artifact is an operating system and a JRE. This section will show you how to containerize the Catalog Service application using a Dockerfile.
First, you need to identify which image you want to base yours on. You could choose an Ubuntu image, as we did before, and then explicitly install the JRE, or you could choose a base image that provides a JRE already, which is more convenient. All the major OpenJDK distributions have a related image available on Docker Hub. Feel free to choose the one you prefer. In this example I’ll be using Eclipse Temurin 17, which is the same OpenJDK distribution I’ve been using locally so far. Then you need to copy the JAR file of Catalog Service into the image itself. Finally, declare that the entry point for the container execution is the command to run the application on the JRE.
Open your Catalog Service project (catalog-service), and create an empty file called Dockerfile (with no extension) in the root folder. That file will contain the recipe for containerizing your application.
Listing 6.2 Dockerfile for describing the Catalog Service image
FROM eclipse-temurin:17                                ❶
WORKDIR workspace                                      ❷
ARG JAR_FILE=build/libs/*.jar                          ❸
COPY ${JAR_FILE} catalog-service.jar                   ❹
ENTRYPOINT ["java", "-jar", "catalog-service.jar"]     ❺
❶ Ubuntu base image with the Eclipse Temurin distribution of the JRE pre-installed
❷ Changes the current working directory to “workspace”
❸ Builds argument specifying the location of the application JAR file in your project
❹ Copies the application JAR file from the local machine into the image
❺ Sets the container entry point to run the application
This Dockerfile declares a JAR_FILE argument that can be specified when creating the image with the docker build command.
Before moving on, you need to build the JAR artifact for the Catalog Service application. Open a Terminal window and navigate to the Catalog Service project’s root folder. First, build the JAR artifact:
$ ./gradlew clean bootJar
By default, the Dockerfile script will copy the application’s JAR file from the location path used by Gradle: build/libs/. So if you’re using Gradle, you can build the container image by running this command:
$ docker build -t catalog-service .
If you’re using Maven, you can specify the location used by Maven as a build argument with the following command (don’t forget the final dot):
$ docker build --build-arg JAR_FILE=target/*.jar -t catalog-service .
In either case, you’ll end up with your Catalog Service application packaged as a container image. Since we haven’t specified any version, the image will be tagged as latest automatically. Let’s verify that it works.
Remember the two aspects I covered in the previous section: port forwarding and using the Docker built-in DNS server. You can handle them by adding two arguments to the docker run command:
-
-p 9001:9001 will map port 9001 inside the container (where the Catalog Service is exposing its services) to port 9001 on your localhost.
-
--net catalog-network will connect the Catalog Service container to the catalog-network you previously created so that it can contact the PostgreSQL container.
That is still not enough. In the previous chapter, we set the spring.datasource.url property for Catalog Service to jdbc:postgresql://localhost:5432/polardb_catalog. Since it points to localhost, it will not work from within a container. You already know how to configure a Spring Boot application from the outside without having to recompile it, right? An environment variable will do. We need to overwrite the spring.datasource.url property and specify the same URL, replacing localhost with the PostgreSQL container name: polar-postgres. Using another environment variable, we can also enable the testdata Spring profile to trigger the creation of test data in the catalog:
$ docker run -d
    --name catalog-service
    --net catalog-network
    -p 9001:9001
    -e SPRING_DATASOURCE_URL=
➥jdbc:postgresql://polar-postgres:5432/polardb_catalog
    -e SPRING_PROFILES_ACTIVE=testdata
    catalog-service
That’s quite a long command, isn’t it? You won’t use the Docker CLI for long, though, I promise. Later in the chapter I’ll introduce Docker Compose.
Open a Terminal window, call the application, and verify that it works correctly, as it did in chapter 5:
$ http :9001/books
When you’re done, remember to delete both containers:
$ docker rm -f catalog-service polar-postgres
The approach you’ve just followed is perfectly fine for experimenting with Docker in your development environment and understanding how images work, but you’ll need to consider several aspects before achieving a production-grade image. That’s the topic of the next section.
6.2.3 Building container images for production
Getting started with Dockerfiles might not be that difficult at the beginning, but building production-grade images can be challenging. In this section, you’ll see how to improve the image you built in the previous section.
You’ll use the layered-JAR feature provided by Spring Boot to build more efficient images. Then you’ll consider essential security aspects related to container images. Finally, I’ll discuss some factors to consider when choosing between Dockerfiles and Cloud Native Buildpacks for containerizing applications.
When building container images, you should consider performance at build time and at run time. The layered architecture characterizing OCI images enables the caching and reusing of unchanged layers when building an image. Container registries store images by layers, so that when you pull a new version, only the changed layers are downloaded. That is quite an advantage in a cloud environment, considering the time and bandwidth you’ll save for all your application instances.
In the previous section, you copied the Catalog Service standalone JAR file into a layer in the image. As a result, whenever you change something in your application, the whole layer must be rebuilt. Consider the scenario where you just add a new REST endpoint to your application. Even if all the Spring libraries and dependencies are unchanged, and the only difference is in your own code, you must rebuild the whole layer, since everything is together. We can do better. And Spring Boot can help us.
Putting uber-JARs inside a container image has never been efficient. A JAR artifact is a compressed archive containing all the dependencies, classes, and resources used by the application. All those files are organized in folders and subfolders within the JAR. We could expand standard JAR artifacts and put each folder on a different container image level. Starting with version 2.3, Spring Boot made that even more efficient by introducing a new way of packaging applications as JAR artifacts: the layered-JAR mode. And since Spring Boot 2.4, that’s been the default mode, so you don’t need any extra configuration to use the new functionality.
Applications packaged using the layered-JAR mode are made up of layers, similar to how container images work. This new feature is excellent for building more efficient images. When using the new JAR packaging, we can expand the JAR artifact and then create a different image layer for each JAR layer. The goal is to have your own classes (which change more frequently) on a separate layer from the project dependencies (which change less frequently).
By default, Spring Boot applications are packaged as JAR artifacts made up of the following layers, starting from the lowest:
-
dependencies—For all the main dependencies added to the project
-
spring-boot-loader—For the classes used by the Spring Boot loader component
If you consider the previous scenario where you added a new REST endpoint to an existing application, only the application layer must be built when you containerize it. Moreover, when you upgrade the application in production, only that new layer must be downloaded to the nodes where the container is running, making the upgrade faster and cheaper (especially on cloud platforms, which bill for the bandwidth used).
Let’s update the previous Dockerfile to containerize Catalog Service more efficiently using the layered-JAR mode. Using this new strategy means doing some preparation work to copy the JAR file into the image and expand it into the four layers described previously. We don’t want to keep the original JAR file inside the image, or our optimization plan will not work. Docker provides a solution for that: multi-stage builds.
We’ll divide the work into two stages. In the first stage we extract the layers from the JAR file. The second stage is where we place each JAR layer into a separate image layer. In the end, the result of the first stage is discarded (including the original JAR file), while the second stage will produce the final container image.
Listing 6.3 More efficient Dockerfile to build a Catalog Service image
FROM eclipse-temurin:17 AS builder                      ❶
WORKDIR workspace
ARG JAR_FILE=build/libs/*.jar                           ❷
COPY ${JAR_FILE} catalog-service.jar                    ❸
RUN java -Djarmode=layertools -jar
➥ catalog-service.jar extract                          ❹

FROM eclipse-temurin:17                                 ❺
WORKDIR workspace
COPY --from=builder workspace/dependencies/ ./          ❻
COPY --from=builder workspace/spring-boot-loader/ ./
COPY --from=builder workspace/snapshot-dependencies/ ./
COPY --from=builder workspace/application/ ./
ENTRYPOINT ["java",
➥ "org.springframework.boot.loader.JarLauncher"]       ❼
❶ OpenJDK base image for the first stage
❷ Builds argument specifying the location of the application JAR file in your project
❸ Copies the application JAR file from the local machine into the image inside the “workspace” folder
❹ Extracts the layers from the archive applying the layered-JAR mode
❺ OpenJDK base image for the second stage
❻ Copies each JAR layer from the first stage to the second stage inside the “workspace” folder
❼ Uses the Spring Boot Launcher to start the application from the layers rather than an uber-JAR
Note What if you want to change the configuration for the layers in the JAR file? As always, Spring Boot provides sensible defaults, but you can customize it and adapt it to your needs. Perhaps your project has internal shared dependencies you might want to place in a separate layer, since they change more often than third-party dependencies. You can do that through the Spring Boot Gradle or Maven plugin. For more information, refer to the Spring Boot documentation at https://spring.io/projects/spring-boot.
The process for building and running the container is the same as before, but now the image is more efficient and is optimized at build and execution time. However, it’s still not ready for production. What about security? That’s the topic of the next section.
Security is a critical aspect that is too often underestimated by people getting started with Docker and containerization. You should be aware that containers run using the root user by default, potentially letting them get root access to the Docker host. You can mitigate the risk by creating a non-privileged user and using it to run the entry-point process defined in the Dockerfile, following the principle of least privilege.
Consider the Dockerfile you wrote for Catalog Service. You can improve it by adding new steps to create a new non-root user that will run the application.
Listing 6.4 More secure Dockerfile to build a Catalog Service image
FROM eclipse-temurin:17 AS builder
WORKDIR workspace
ARG JAR_FILE=build/libs/*.jar
COPY ${JAR_FILE} catalog-service.jar
RUN java -Djarmode=layertools -jar catalog-service.jar extract

FROM eclipse-temurin:17
RUN useradd spring           ❶
USER spring                  ❷
WORKDIR workspace
COPY --from=builder workspace/dependencies/ ./
COPY --from=builder workspace/spring-boot-loader/ ./
COPY --from=builder workspace/snapshot-dependencies/ ./
COPY --from=builder workspace/application/ ./
ENTRYPOINT ["java", "org.springframework.boot.loader.JarLauncher"]❷ Configures “spring” as the current user
As previously noted, you should never store secrets like passwords or keys in a container image. Even if they are removed in an upper layer, they will remain intact in the original layer and be easily accessible.
Finally, it’s also critical to use up-to-date base images and libraries in your Dockerfile. Scanning your container images for vulnerabilities is a best practice that should be embraced and automated in your deployment pipeline. In chapter 3, you learned how to use grype to scan codebases for vulnerabilities. Now we’ll also use it to scan a container image.
Using the updated Dockerfile, build a new container image for Catalog Service. Open a Terminal window, navigate to the Catalog Service root folder, and run this command (don’t forget the final dot):
$ docker build -t catalog-service .
Next, use grype to check if the newly created image contains any vulnerabilities:
$ grype catalog-service
Have you found any high-severity vulnerabilities? Discussing supply chain security and related risk management is out of scope for this book. I want to show you how to perform and automate vulnerability scanning for application artifacts, but I’ll leave it up to you to follow up on the scan results. I can’t stress enough how important it is to define a security strategy in your organization and automate, as much as possible, its compliance verification throughout the whole value stream.
In this section, I mentioned a few essential aspects you should consider when building production-grade container images, but there’s even more to cover. Is there another way to build production-grade container images? The following section introduces a different option.
Dockerfiles are very powerful, and they give you complete fine-grained control over the result. However, they require extra care and maintenance and can lead to several challenges in your value stream.
As a developer, you might not want to deal with all the performance and security concerns we’ve discussed. You might prefer to focus on the application code instead. After all, one reason to move to the cloud is to deliver value to customers faster. Adding the Dockerfile step and considering all those issues might not be for you.
As an operator, it might be challenging to control and secure the supply chain within the organization when container images are built from a Dockerfile. It’s pretty common to invest some time in scripting the perfect Dockerfile and to copy that into multiple repositories for different applications. But it’s hard to keep all teams on the same page, verify adherence to the approved Dockerfile, synchronize any changes throughout the organization, and understand who is responsible for what.
Cloud Native Buildpacks provide a different approach, focusing on consistency, security, performance, and governance. As a developer, you get a tool that automatically builds a production-ready OCI image from your application source code without having to write a Dockerfile. As an operator, you get a tool that defines, controls, and secures application artifacts within the entire organization.
Ultimately, the decision to use a Dockerfile or a tool like Buildpacks depends on your organization and requirements. Both approaches are valid and are used in production. In general, my recommendation is to use Buildpacks unless it makes sense not to.
Note Another option for packaging Java applications as container images without writing a Dockerfile is using Jib, a Gradle and Maven plugin developed by Google (https://github.com/GoogleContainerTools/jib).
In the next section and the rest of the book, we’ll use Cloud Native Buildpacks rather than Dockerfiles. It was important for me to show you how a Dockerfile works, because it makes understanding the container image features and layers easier. Furthermore, I wanted to show you how to write a basic Dockerfile for containerizing a Spring Boot application to highlight what’s needed and illustrate the execution of the application JAR from within the container. Finally, it will be easier for you to debug containers when something goes wrong, even if they’re automatically generated by Buildpacks, because you now know how to build images from scratch. If you’d like to learn more about Dockerfiles for Spring Boot applications, I recommend you look at the official documentation (https://spring.io/projects/spring-boot).
6.2.4 Containerizing Spring Boot with Cloud Native Buildpacks
Cloud Native Buildpacks (https://buildpacks.io) is a project hosted by the CNCF to “transform your application source code into images that can run on any cloud.” When introducing containers in chapter 1, I underlined how PaaS platforms like Heroku and Cloud Foundry are actually using containers behind the scenes, converting your application source code into containers before running them. Buildpacks is the tool they use to accomplish that.
Cloud Native Buildpacks has been developed and advanced based on Heroku and Pivotal’s many years of experience running cloud native applications as containers on their PaaS platforms. It’s a mature project, and since Spring Boot 2.3, it has been integrated natively in the Spring Boot Plugin for both Gradle and Maven, so you’re not required to install the dedicated Buildpacks CLI (pack).
These are some of its features:
Note If you’d like to know more about Cloud Native Buildpacks, I recommend watching “Cloud Native Buildpacks with Emily Casey” (http://mng.bz/M0xB). Emily Casey is a member of the Buildpacks core team.
The container generation process is orchestrated by a builder image containing the complete information on how to containerize your application. Such information is provided as a sequence of buildpacks, each dedicated to a specific aspect of the application (such as the operating system, OpenJDK, and JVM configuration). The Spring Boot Plugin adopts the Paketo Buildpacks builder, an implementation of the Cloud Native Buildpacks specification that provides support for many types of applications, including Java and Spring Boot ones (https://paketo.io).
The Paketo builder component relies on a series of default buildpacks for the actual build operation. This structure is highly modular and customizable. You can add new buildpacks to the sequence (for example, to add a monitoring agent to the application), replace existing ones (for example, to replace the default Bellsoft Liberica OpenJDK with Microsoft OpenJDK), or even use a different builder image entirely.
Note The Cloud Native Buildpacks project manages a registry where you can discover and analyze buildpacks you can use to containerize your applications, including all the buildpacks from the Paketo implementation (https://registry.buildpacks.io).
The Buildpacks integration provided by the Spring Boot Plugin can be configured in the build.gradle file located in your Catalog Service project. Let’s configure the image name and define which Java version to use through an environment variable.
Listing 6.5 Configuration for containerizing Catalog Service
bootBuildImage {                              ❶
  imageName = "${project.name}"               ❷
  environment = ["BP_JVM_VERSION" : "17.*"]   ❸
}
❶ The Spring Boot Plugin task to build an OCI image using Buildpacks
❷ The name of the OCI image to build. The name is the same one defined in the Gradle configuration for the project. We rely on the implicit “latest” tag when working locally rather than a version number.
❸ The JVM version to be installed in the image. It uses the latest Java 17 version.
Go ahead and build the image by running the following command:
$ ./gradlew bootBuildImage
Warning At the time of writing, the Paketo project is working on adding support for ARM64 images. You can follow the feature’s progress on the Paketo Buildpacks project on GitHub: https://github.com/paketo-buildpacks/stacks/issues/51. Until it’s complete, you can still use Buildpacks to build containers and run them via Docker Desktop on Apple Silicon computers. However, the build process and the application startup phase will be slower than usual. Until official support is added, you can alternatively use the following command, pointing to an experimental version of Paketo Buildpacks with ARM64 support: ./gradlew bootBuildImage --builder ghcr.io/thomasvitale/java-builder-arm64. Be aware that it’s experimental and not ready for production. For more information, you can refer to the documentation on GitHub: https://github.com/ThomasVitale/paketo-arm64.
The first time you run the task, it will take a minute to download the packages used by Buildpacks to create the container image. The second time, it will take only a few seconds. If you look closely at the output of the command, you can see all the steps performed by Buildpacks to generate the image. These steps include adding a JRE and using the layered JAR built by Spring Boot. The plugin accepts more properties to customize its behavior, such as providing your own builder component instead of Paketo’s. Check the official documentation for the complete list of configuration options (https://spring.io/projects/spring-boot).
Let’s try running Catalog Service as a container once again, but this time we’ll use the image generated by Buildpacks. Remember to start the PostgreSQL container first, following the instructions in section 6.2.1:
$ docker run -d
    --name catalog-service
    --net catalog-network
    -p 9001:9001
    -e SPRING_DATASOURCE_URL=
➥jdbc:postgresql://polar-postgres:5432/polardb_catalog
    -e SPRING_PROFILES_ACTIVE=testdata
    catalog-service
Warning If you’re running the container on an Apple Silicon computer, the previous command might return a message like “WARNING: The requested image’s platform (linux/amd64) does not match the detected host platform (linux/arm64/v8) and no specific platform was requested.” In that case, you’ll need to include this additional argument to the previous command (before the image name) until support for ARM64 is added to Paketo Buildpacks: --platform linux/amd64.
Open a browser window, call the application on http://localhost:9001/books, and verify that it works correctly. When you’re done, remember to delete both the PostgreSQL and Catalog Service containers:
$ docker rm -f catalog-service polar-postgres
Finally, you can remove the network you used to make Catalog Service communicate with PostgreSQL. You won’t need it anymore, after I introduce Docker Compose in the next section:
$ docker network rm catalog-network
Since Spring Boot 2.4, you can also configure the Spring Boot plugin to publish the image directly to a container registry. To do so, you first need to add configuration for authenticating with the specific container registry in the build.gradle file.
Listing 6.6 Configuration for containerizing Catalog Service
bootBuildImage {
  imageName = "${project.name}"
  environment = ["BP_JVM_VERSION" : "17.*"]

  docker {                                                   ❶
    publishRegistry {                                        ❷
      username = project.findProperty("registryUsername")
      password = project.findProperty("registryToken")
      url = project.findProperty("registryUrl")
    }
  }
}
❶ Section to configure the connection with a container registry
❷ Section to configure authentication to the publishing container registry. The values are passed as Gradle properties.
The details on how to authenticate with the container registry are externalized as Gradle properties both for flexibility (you can publish the image to different registries without changing the Gradle build) and for security (the token, in particular, should never be included in version control).
Remember this golden rule of credentials: you should never give your password away. Never! If you need to delegate some service to access a resource on your behalf, you should rely on an access token. The Spring Boot plugin lets you use a password to authenticate with the registry, but you should use a token instead. In section 6.1.3, you generated a personal access token in GitHub to let you push images to the GitHub Container Registry from your local environment. If you don’t know its value anymore, feel free to generate a new one following the procedure I explained earlier in the chapter.
Finally, you can build and publish the image by running the bootBuildImage task. With the --imageName argument, you can define a fully qualified image name as container registries require. With the --publishImage argument, you can instruct the Spring Boot plugin to push the image to the container registry directly. Also, remember to pass values for the container registry via the Gradle properties:
$ ./gradlew bootBuildImage
    --imageName ghcr.io/<your_github_username>/catalog-service
    --publishImage
    -PregistryUrl=ghcr.io
    -PregistryUsername=<your_github_username>
    -PregistryToken=<your_github_token>
Tip If you’re working on ARM64 machines (such as Apple Silicon computers), you can add the --builder ghcr.io/thomasvitale/java-builder-arm64 argument to the previous command to use an experimental version of Paketo Buildpacks with ARM64 support. Be aware that it’s experimental and not ready for production. For more information, you can refer to the documentation on GitHub: https://github.com/ThomasVitale/paketo-arm64. Without this workaround, until official support is added (https://github.com/paketo-buildpacks/stacks/issues/51), you can still use Buildpacks to build containers and run them via Docker Desktop on Apple Silicon computers, but the build process and application startup phase will be slower than usual.
Once the command completes successfully, go to your GitHub account, navigate to your profile page, and enter the Packages section. You should see a new catalog-service entry (by default, packages hosting container images are private), similar to what you saw with the my-java-image you published in section 6.1.3. If you click on the catalog-service entry, you’ll find the ghcr.io/<your_github_username>/catalog-service:latest image you just published (figure 6.11).

Figure 6.11 Images published to the GitHub Container Registry are organized as “packages.”
However, the catalog-service package is not linked to your catalog-service source code repository yet. Later, I’ll show you how to automate building and publishing your images with GitHub Actions, which makes it possible to publish images in the context of the source code repository from which they are built.
For now, let’s remove the catalog-service package that was created when you published the image so that it won’t cause any conflicts once you start using GitHub Actions to publish images. From the catalog-service package page (figure 6.11), click Package Settings in the sidebar menu, scroll to the bottom of the settings page, and click Delete This Package (figure 6.12).

Figure 6.12 Delete the catalog-service package created manually.
Note So far, we’ve been using the implicit latest tag for naming container images. That’s not recommended for production scenarios. In chapter 15, you’ll see how to handle versions when releasing your applications. Until then, we’ll rely on the implicit latest tag.
6.3 Managing Spring Boot containers with Docker Compose
Cloud Native Buildpacks lets you containerize Spring Boot applications quickly and efficiently without writing a Dockerfile yourself. But when it comes to running multiple containers, the Docker CLI can be a bit cumbersome. Writing commands in a Terminal window can be error-prone, hard to read, and challenging when it comes to applying version control.
Docker Compose provides a better experience than the Docker CLI. Instead of a command line, you work with YAML files that describe which containers you want to run and their characteristics. With Docker Compose, you can define all the applications and services composing your system in one place, and you can manage their life cycles together.
In this section, you’ll configure the execution of the Catalog Service and PostgreSQL containers using Docker Compose. Then you’ll learn how to debug a Spring Boot application running within a container.
If you have installed Docker Desktop for Mac or Docker Desktop for Windows, you already have Docker Compose installed. If you’re on Linux, visit the Docker Compose installation page at www.docker.com and follow the instructions for your distribution. In any case, you can verify that Docker Compose is correctly installed by running the command docker-compose --version.
6.3.1 Using Docker Compose to manage the container life cycle
The Docker Compose syntax is very intuitive and self-explanatory. Often, it can be mapped one-to-one to Docker CLI arguments. The two root sections of a docker-compose.yml file are version, where you specify which syntax of Docker Compose you want to use, and services, containing the specifications for all the containers you want to run. Other optional root-level sections you may add are volumes and networks.
Note If you don’t add any network configuration, Docker Compose will automatically create one for you and make all the containers in the file join it. That means they can interact with each other through their container names, relying on Docker’s built-in DNS server.
It’s good practice to gather all deployment-related scripts in a separate codebase and, possibly, in a separate repository. Go ahead and create a new polar-deployment repository on GitHub. It’ll contain all the Docker and Kubernetes scripts needed to run the applications composing the Polar Bookshop system. Inside the repository, create a “docker” folder to host the Docker Compose configuration for Polar Bookshop. In the source code accompanying the book, you can refer to Chapter06/06-end/ polar-deployment for the final result.
In the polar-deployment/docker folder, create a docker-compose.yml file, and define the services to run as follows.
Listing 6.7 Docker Compose file describing the catalog services
version: "3.8"                                ❶
services:                                     ❷

  catalog-service:                            ❸
    depends_on:
      - polar-postgres                        ❹
    image: "catalog-service"                  ❺
    container_name: "catalog-service"         ❻
    ports:                                    ❼
      - 9001:9001
    environment:                              ❽
      - BPL_JVM_THREAD_COUNT=50               ❾
      - SPRING_DATASOURCE_URL=
➥jdbc:postgresql://polar-postgres:5432/polardb_catalog
      - SPRING_PROFILES_ACTIVE=testdata       ❿

  polar-postgres:                             ⓫
    image: "postgres:14.4"
    container_name: "polar-postgres"
    ports:
      - 5432:5432
    environment:
      - POSTGRES_USER=user
      - POSTGRES_PASSWORD=password
      - POSTGRES_DB=polardb_catalog
❶ The Docker Compose syntax version
❷ The section containing all the containers to run
❸ The section describing the catalog-service container
❹ Catalog Service should start after the PostgreSQL database.
❺ The image used to run the container
❼ The section listing the port mappings
❽ The section listing the environment variables
❾ A Paketo Buildpacks environment variable to configure the number of threads for memory calculation
❿ Enables the “testdata” Spring profile
⓫ The section describing the polar-postgres container
You might have noticed the presence of an additional environment variable for the Catalog Service container. In chapter 15, you’ll learn about the Java memory calculator provided by Paketo Buildpacks and how to configure CPU and memory for Spring Boot applications. For now, it’s enough to know that the BPL_JVM_THREAD_COUNT environment variable is used to configure the number of threads memory should be allocated for in the JVM stack. The default value for Servlet-based applications is 250. In chapter 3, we used a low value for the Tomcat thread pool, and it’s good to do the same for the JVM memory configuration to keep the container’s memory usage low locally. You’re going to deploy many containers throughout the book (both applications and backing services), and such configuration helps make that possible without overloading your computer.
Docker Compose configures both containers on the same network by default, so you don’t need to specify one explicitly, as you did previously.
Let’s see now how to spin them up. Open a Terminal window, navigate to the folder containing the file, and run the following command to start the containers in detached mode:
$ docker-compose up -d
When the command is done, try calling the Catalog Service application at http:// localhost:9001/books and verify that it works correctly. Then keep your containers running and move on to the next section, where you’ll debug the Catalog Service application.
6.3.2 Debugging Spring Boot containers
When running a Spring Boot application as standard Java from your IDE, you can specify whether you want to run it in debug mode. If you do, the IDE will attach a debugger to the local Java process running your application. However, when you run it from within a container, your IDE can’t do that anymore because the process is not running on the local machine.
Fortunately, Spring Boot applications running in a container can be debugged almost as easily as when running locally. First you need to instruct the JVM inside the container to listen for debug connections on a specific port. The container image produced by Paketo Buildpacks supports dedicated environment variables for running the application in debug mode (BPL_DEBUG_ENABLED and BPL_DEBUG_PORT). Then you need to expose the debug port outside the container so that your IDE can reach it. Figure 6.13 illustrates how it works.

Figure 6.13 From a container, you can expose as many ports as you want. For Catalog Service, expose both the server port and the debug port.
Next, update your docker-compose.yml file to configure the Catalog Service application for debugging.
Listing 6.8 Configuring Catalog Service to run in debug mode
version: "3.8"
services:

  catalog-service:
    depends_on:
      - polar-postgres
    image: "catalog-service"
    container_name: "catalog-service"
    ports:
      - 9001:9001
      - 8001:8001                        ❶
    environment:
      - BPL_JVM_THREAD_COUNT=50
      - BPL_DEBUG_ENABLED=true           ❷
      - BPL_DEBUG_PORT=8001              ❸
      - SPRING_DATASOURCE_URL=
➥jdbc:postgresql://polar-postgres:5432/polardb_catalog
      - SPRING_PROFILES_ACTIVE=testdata
  ...
❶ The port where the JVM will listen for debug connections
❷ Activates the JVM configuration for accepting debug connections (provided by Buildpacks)
❸ Debug connections are accepted via a socket on port 8001 (provided by Buildpacks).
From a Terminal window, navigate to the folder where the docker-compose.yml file is located, and rerun the following command:
$ docker-compose up -d
You’ll notice that Docker Compose is smart enough to know that the PostgreSQL container configuration is unchanged, and it will do nothing about it. Instead, it will reload the Catalog Service container with the new configuration.
Then, in your IDE of choice, you need to configure a remote debugger and point it to port 8001. Refer to your IDE’s documentation to find the instructions on how to do that. Figure 6.14 shows how to configure a remote debugger in IntelliJ IDEA.

Figure 6.14 Configuration to debug a containerized Java application from IntelliJ IDEA
Once you run the Catalog Service, you can debug it as though it were running locally.
That’s it for this section. You can stop and remove both containers with the following command from the same folder where you keep your docker-compose.yml file:
$ docker-compose down
Note In this book I’m only covering those Docker topics needed in your journey to successfully deploy Spring Boot applications in production with Kubernetes. If you’re interested in learning more about Docker images, networks, volumes, security, and architecture, refer to the official documentation on https://docs.docker.com. Also, Manning has a few books in its catalog on the subject, such as Learn Docker in a Month of Lunches by Elton Stoneman (Manning, 2020) and Docker in Practice, second edition, by Ian Miell and Aidan Hobson Sayers (Manning, 2019).
When you make changes to an application, you don’t want to build and publish a new image manually. That’s a job for an automated workflow engine like GitHub Actions. The following section will show you how to complete the commit stage of the deployment pipeline we started in chapter 3.
6.4 Deployment pipeline: Package and publish
In chapter 3, we started implementing a deployment pipeline to support continuous delivery for the Polar Bookshop project. Continuous delivery is a holistic engineering approach for quickly, reliably, and safely delivering high-quality software. The deployment pipeline is the primary pattern for automating the entire journey from code commit to releasable software. We identified three main stages for the deployment pipeline: commit stage, acceptance stage, and production stage.
We’ll continue focusing on the commit stage. After a developer commits new code to the mainline, this stage goes through build, unit tests, integration tests, static code analysis, and packaging. At the end of this stage, an executable application artifact is published to an artifact repository. That is a release candidate. Chapter 3 covered all the main steps except for the final packaging and publishing of a release candidate. That’s what you’ll see in this section.
6.4.1 Building release candidates in the commit stage
After running static code analysis, compilation, unit tests, and integration tests, it’s time to package the application as an executable artifact and publish it. In our case, the executable artifact is a container image that we’ll publish to a container registry.
An essential idea in continuous delivery, also present in the 15-Factor methodology, is that you should build artifacts only once. At the end of the commit stage, we’ll produce a container image that we can reuse in any following stage in the deployment pipeline up to production. If the pipeline proves something is wrong (a test fails) at any point, the release candidate is rejected. If the release candidate goes through all subsequent stages successfully, it’s proven to be ready for deployment in production.
After we build an executable artifact, we can perform additional operations before publishing it. For example, we could scan it for vulnerabilities. That’s what we’re going to do with grype, much as we did for the codebase. A container image includes application libraries but also system libraries that were not included in the previous security analysis. That’s why we need to scan both the codebase and the artifact for vulnerabilities. Figure 6.15 illustrates the new steps we will add to the commit stage for building and publishing a release candidate.
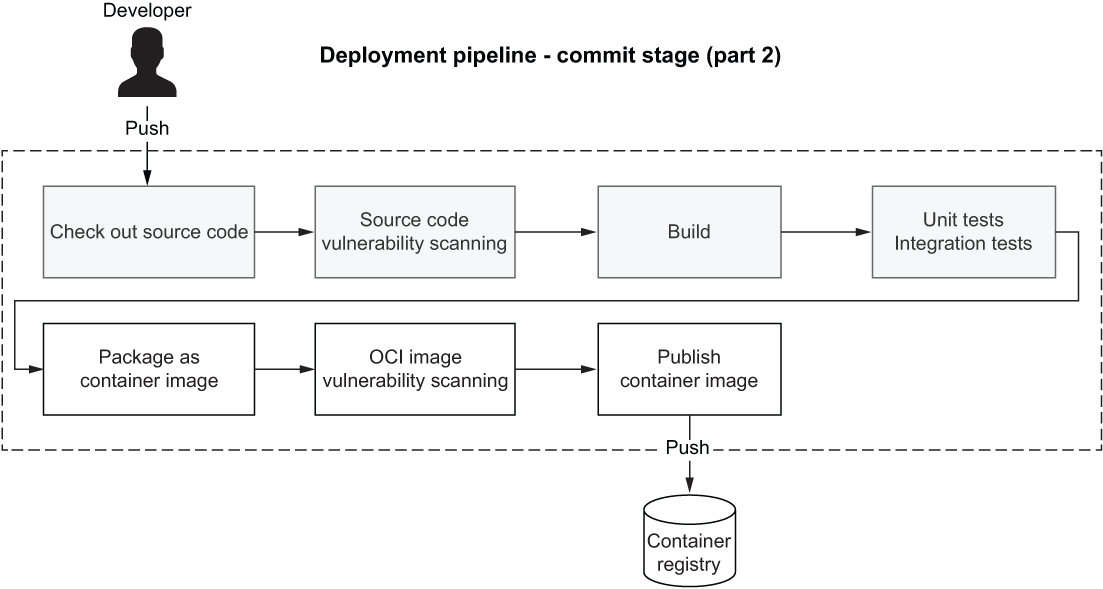
Figure 6.15 At the end of the commit stage, a release candidate is published to an artifact repository. In this case, a container image is published to a container registry.
Once a release candidate is published, several parties can download it and use it, including the next stages in the deployment pipeline. How can we ensure that all interested parties use a legitimate container image from the Polar Bookshop project, and not one that has been compromised? We can achieve that by signing the image. After the publishing step, we could add a new step for signing the release candidate. For example, we could use Sigstore (www.sigstore.dev), a non-profit service that provides open source tools for signing, verifying, and protecting software integrity. If you’re interested in this subject, I recommend visiting the project’s website.
In the following section, I’ll show you how to implement the new steps in the commit stage of our deployment pipeline.
6.4.2 Publishing container images with GitHub Actions
GitHub Actions is an engine that you can use to automate software workflows directly from your GitHub repositories. Workflow definitions are conventionally stored in a .github/workflows directory placed in the root of a repository on GitHub.
In chapter 3, we started developing a workflow to implement the commit stage of the deployment pipeline for Catalog Service. Let’s now continue the implementation by adding further steps to package and publish the application.
From your Catalog Service project (catalog-service), open the workflow definition for the commit stage (.github/workflows/commit-stage.yml) and define a few environment variables to store some essential facts you’ll need when building a container image for the application. By using environment variables, you can easily change which container registry you use or the version for the release artifact. Remember to add your GitHub username, all in lowercase, instead of the placeholder in the following listing. Chapter 15 will cover software release strategies, but until then we’re going to tag every image with latest instead of a version number.
Listing 6.9 Configuring facts about the release candidate
name: Commit Stage
on: push

env:
  REGISTRY: ghcr.io                                    ❶
  IMAGE_NAME: <your_github_username>/catalog-service   ❷
  VERSION: latest                                      ❸

jobs:
  ...
❶ Uses the GitHub Container Registry
❷ The name of the image. Remember to add your GitHub username, all in lowercase.
❸ For the moment, any new image will be tagged as “latest”.
Next let’s add a new “Package and Publish” job to the workflow. If the “Build and Test” job completes successfully, and the workflow runs on the main branch, the new job will be executed. We’ll use the same strategy we used locally to package Catalog Service as a container image, relying on the Buildpacks integration provided by the Spring Boot Gradle plugin. Notice that we are not pushing the image directly. That’s because we first want to scan the image for vulnerabilities, which we’ll do in a moment. For now, update the commit-stage.yml file as follows.
Listing 6.10 Packaging the application as an OCI image using Buildpacks
name: Commit Stage
on: push

env:
  REGISTRY: ghcr.io
  IMAGE_NAME: <your_github_username>/catalog-service
  VERSION: latest

jobs:
  build:
    ...
  package:                                       ❶
    name: Package and Publish
    if: ${{ github.ref == 'refs/heads/main' }}   ❷
    needs: [ build ]                             ❸
    runs-on: ubuntu-22.04                        ❹
    permissions:
      contents: read                             ❺
      packages: write                            ❻
      security-events: write                     ❼
    steps:
      - name: Checkout source code
        uses: actions/checkout@v3                ❽
      - name: Set up JDK
        uses: actions/setup-java@v3              ❾
        with:
          distribution: temurin
          java-version: 17
          cache: gradle
      - name: Build container image
        run: |
          chmod +x gradlew
          ./gradlew bootBuildImage              ❿
            --imageName
➥ ${{ env.REGISTRY }}/${{ env.IMAGE_NAME }}:${{ env.VERSION }} ❷ Runs the job only on the main branch
❸ Runs the job only if the “build” job completes successfully
❹ Runs the job on an Ubuntu 22.04 machine
❺ Permission to check out the current Git repository
❻ Permission to upload images to GitHub Container Registry
❼ Permission to submit security events to GitHub
❽ Checks out the current Git repository (catalog-service)
❾ Installs and configures a Java runtime
❿ Relies on the Buildpacks integration in Spring Boot to build a container image and defines the name for the release candidate
After packaging the application as a container image, let’s update the commit-stage.yml file to use grype to scan the image for vulnerabilities and publish a report to GitHub, similar to what we did in chapter 3. Finally, we can authenticate with the container registry and push the image representing our release candidate.
Listing 6.11 Scanning the image for vulnerabilities and publishing it
name: Commit Stage
on: push

env:
  REGISTRY: ghcr.io
  IMAGE_NAME: polarbookshop/catalog-service
  VERSION: latest

jobs:
  build:
    ...
  package:
    ...
    steps:
      - name: Checkout source code
        ...
      - name: Set up JDK
        ...
      - name: Build container image
        ...
      - name: OCI image vulnerability scanning
        uses: anchore/scan-action@v3                         ❶
        id: scan
        with:                                                ❷
          image:
          ➥ ${{ env.REGISTRY }}/${{ env.IMAGE_NAME }}:${{ env.VERSION }}
          fail-build: false                                  ❸
          severity-cutoff: high
          acs-report-enable: true
      - name: Upload vulnerability report
        uses: github/codeql-action/upload-sarif@v2           ❹
        if: success() || failure()
        with:
          sarif_file: ${{ steps.scan.outputs.sarif }}
      - name: Log into container registry
        uses: docker/login-action@v2                         ❺
        with:
          registry: ${{ env.REGISTRY }}                      ❻
          username: ${{ github.actor }}                      ❼
          password: ${{ secrets.GITHUB_TOKEN }}              ❽
      - name: Publish container image                        ❾
        run: docker push
        ➥ ${{ env.REGISTRY }}/${{ env.IMAGE_NAME }}:${{ env.VERSION }}
❶ Scans the release candidate image for vulnerabilities using grype
❷ The image to scan is the release candidate.
❸ It won’t fail the build if vulnerabilities are found in the image.
❹ Uploads the security vulnerability report to GitHub (SARIF format)
❺ Authenticates with GitHub Container Registry
❻ The registry value as defined in the environment variable earlier
❼ The GitHub username of the current user, provided by GitHub Actions
❽ The token needed to authenticate with the registry, provided by GitHub Actions
❾ Pushes the release candidate to the registry
In listing 6.11 we do not fail the workflow if serious vulnerabilities are discovered. However, you can find the scanning results in the Security section of your catalog-service GitHub repository. At the time of writing, no high or critical vulnerabilities are found in the Catalog Service project, but things might be different in the future. As already mentioned in chapter 3, in a real-world scenario, I recommend that you configure and tune grype carefully and according to your company’s policies regarding supply chain security, and make the workflow fail if the result is not compliant (setting the fail-build property to true). For more information, refer to the official grype documentation (https://github.com/anchore/grype).
After completing the commit stage of the deployment pipeline, make sure your catalog-service GitHub repository is public. Then push your changes to the main branch of your remote repository, and see the workflow execution results in the Actions tab.
Warning The action of uploading the vulnerability report requires the GitHub repository to be public. It works for private repositories only if you have an enterprise subscription. If you prefer to keep your repository private, you’ll need to skip the “Upload vulnerability report” step. Throughout the book, I’ll assume all the repositories you create on GitHub for the Polar Bookshop project are public.
Images published from GitHub Actions and named after a repository are automatically associated. After the workflow completes its execution, you’ll find a Packages section in the sidebar of your GitHub catalog-service repository’s main page, with a “catalog-service” item (figure 6.16). Click on that item, and you’ll be directed to the container image repository for Catalog Service.

Figure 6.16 When using the GitHub Container Registry, you can store container images next to the source code.
Note Images published to GitHub Container Registry will have the same visibility as the related GitHub code repository. If no repository is associated with the image, it’s private by default. Throughout the book I’ll assume that all the images you build for Polar Bookshop are publicly accessible via the GitHub Container Registry. If that’s not the case, you can go to the package’s main page, select Package Settings from the sidebar menu, scroll to the bottom of the settings page, and make the package public by clicking the Change Visibility button.
Great job! So far you’ve built a Spring Boot application that exposes a REST API and interacts with a relational database; you wrote unit and integration tests for the application; you handled the database schema with Flyway so it was production-ready; and you ran everything within containers and dealt with image generation, Docker, Cloud Native Buildpacks, and vulnerability scanning. The next chapter will complete the first part of this cloud native journey toward production by diving deep into Kubernetes. But before moving on, take a break, congratulate yourself on what you have achieved so far, and perhaps celebrate with a beverage of your choice.
Summary
-
Container images are lightweight executable packages that include everything needed to run the application inside.
-
Each image is made up of several layers, and each layer represents a modification produced by the corresponding instruction. The final artifact can be run as a container.
-
When you run a container, an additional writable layer is added on top of the image layers.
-
The standard way to define a container image is by listing the sequence of instructions in a particular file called a Dockerfile.
-
A Dockerfile acts as a recipe containing all the steps to build the desired image.
-
Performance and security are important concerns when building container images. For example, you shouldn’t store secrets in any image layer, and never run the container with a root user.
-
A container registry is to OCI images what a Maven repository is to Java libraries. Examples of container registries are Docker Hub and GitHub Container Registry.
-
You can package Spring Boot applications as container images in different ways.
-
Dockerfiles give you maximum flexibility but make it your responsibility to configure everything you need.
-
Cloud Native Buildpacks (integrated with the Spring Boot Plugin) let you build OCI images directly from the source code, optimizing security, performance, and storage for you.
-
When you run Spring Boot applications as containers, you should consider which ports you want to make available to the outside world (such as 8080) and whether containers should communicate with each other. If yes, you can use the Docker DNS server to contact containers in the same network by container name instead of IP or hostname.
-
If you want to debug an application running as a container, remember to expose the debug port.
-
Docker Compose is a client for interacting with the Docker server, and it provides a better user experience than Docker CLI. From a YAML file, you can manage all your containers.
-
You can use GitHub Actions to automate the process of packaging an application as a container image, scanning it for vulnerabilities, and publishing it to a container registry. That’s part of the commit stage of a deployment pipeline.
-
The outcome of the commit stage of a deployment pipeline is a release candidate.