
3 Getting started with cloud native development
- Bootstrapping a cloud native project
- Working with embedded servers and Tomcat
- Building a RESTful application with Spring MVC
- Testing a RESTful application with Spring Test
- Automating the build and tests with GitHub Actions
The cloud native landscape is so broad that getting started can be overwhelming. In part 1 of this book, you got a theoretical introduction to cloud native applications and the processes supporting them, and you had a first hands-on experience building a minimal Spring Boot application and deploying it to Kubernetes as a container. All of that will help you better understand the overall cloud native picture and correctly place the topics I’ll be covering in the rest of the book.
The cloud opened up endless possibilities for what we can achieve with many types of applications. In this chapter, I’ll start with one of the most common types: a web application that exposes its functionality over HTTP through a REST API. I’ll guide you through the development process you’ll follow in all the subsequent chapters, addressing the significant differences between traditional and cloud native web applications, consolidating some necessary aspects of Spring Boot and Spring MVC, and highlighting essential testing and production considerations. I’ll also explain some of the guidelines recommended by the 15-Factor methodology, including dependency management, concurrency, and API first.
Along the way, you’ll implement the Catalog Service application you initialized in the previous chapter. It will be responsible for managing the catalog of books in the Polar Bookshop system.
Note The source code for the examples in this chapter is available in the Chapter03/03-begin and Chapter03/03-end folders, which contain the initial and final states of the project (https://github.com/ThomasVitale/cloud-native-spring-in-action).
3.1 Bootstrapping a cloud native project
Starting a new development project is always exciting. The 15-Factor methodology contains some practical guidelines for bootstrapping a cloud native application.
-
One codebase, one application—Cloud native applications should consist of a single codebase tracked in a version control system.
-
Dependency management—Cloud native applications should use a tool that manages dependencies explicitly and shouldn’t rely on implicit dependencies from the environment where they are deployed.
In this section, I’ll provide a few more details about those two principles and explain how to apply them to Catalog Service, the first cloud native application in the Polar Bookshop system.
3.1.1 One codebase, one application
A cloud native application should consist of a single codebase tracked in a version control system like Git. Each codebase must produce immutable artifacts, called builds, that can be deployed to multiple environments. Figure 3.1 shows the relationship between codebase, build, and deployments.

Figure 3.1 Each application has its codebase, from which immutable builds are produced and then deployed to the appropriate environments without changes to the code.
As you’ll see in the next chapter, anything environment-specific like configuration must be outside of the application codebase. In case of code that’s needed by more than one application, you should either turn it into an independent service or into a library that you can import into the project as a dependency. You should carefully evaluate the latter option to prevent the system from becoming a distributed monolith.
Note Thinking about how your code is organized into codebases and repositories can help you focus more on the system architecture and identify those parts that might actually stand on their own as independent services. If this is done correctly, the codebase’s organization can favor modularity and loose coupling.
According to the 15-Factor methodology, each codebase should be mapped to an application, but nothing is said about repositories. You can decide to track each codebase in a separate repository or in the same one. Both options are used in the cloud native business. Throughout the book, you’ll build several applications, and I recommend you track each codebase in its own Git repository because it’ll improve maintainability and deployability.
In the previous chapter, you initialized the first application in the Polar Bookshop system, Catalog Service, and placed it in a catalog-service Git repository. I recommend you use GitHub for storing your repositories because later we’re going to use GitHub Actions as the workflow engine to define deployment pipelines in support of continuous delivery.
3.1.2 Dependency management with Gradle and Maven
How you manage dependencies for your applications is relevant because it affects their reliability and portability. In the Java ecosystem, the two most used tools for dependency management are Gradle and Maven. Both provide the functionality to declare dependencies in a manifest and download them from a central repository. The reason for listing all the dependencies your project needs is to ensure that you do not depend on any implicit library leaking from the surrounding environment.
Note Apart from dependency management, Gradle and Maven offer additional features for building, testing, and configuring a Java project, which are fundamental for application development. All the examples in the book will use Gradle, but feel free to use Maven instead.
Even though you have a dependency manifest in place, you’ll still need to provide the dependency manager itself. Both Gradle and Maven offer a feature to run the tool from a wrapper script named gradlew or mvnw that you can include in your codebase. For example, rather than running a Gradle command like gradle build (which assumes you have Gradle installed on your machine), you can run ./gradlew build. The script invokes the specific version of the build tool defined in the project. If the build tool is not present yet, the wrapper script will download it first and then run the command. Using the wrapper, you can ensure that all team members and automated tools building the project use the same Gradle or Maven version. When you’re generating a new project from Spring Initializr, you’ll also get a wrapper script that’s ready to use, so you don’t need to download or configure anything.
Note No matter what, you’ll usually have at least one external dependency: the runtime. In our case, that’s the Java Runtime Environment (JRE). If you package your application as a container image, the Java runtime will be included in the image itself, granting you more control over it. On the other hand, the final application artifact will depend on the container runtime required to run the image. You’ll learn more about the containerization process in chapter 6.
Now, on to the code. The Polar Bookshop system has a Catalog Service application that’s responsible for managing the books available in the catalog. In the previous chapter, we initialized the project. The architecture of the system is shown again in figure 3.2.
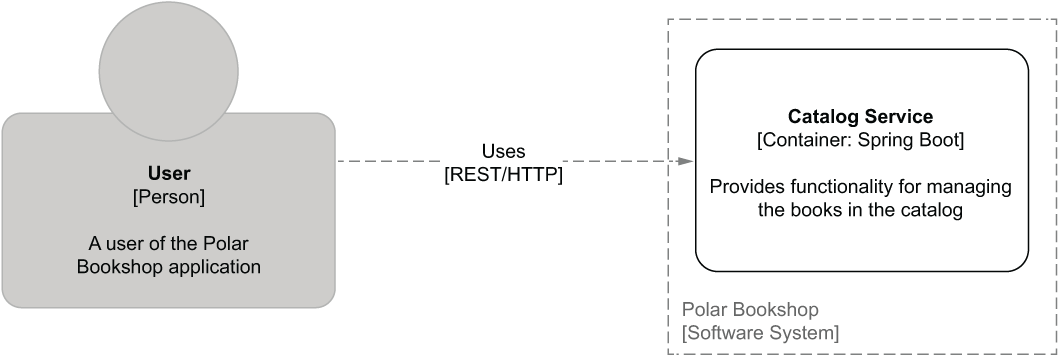
Figure 3.2 The architecture of the Polar Bookshop system, currently consisting of only one application service
All the dependencies required by the application are listed in the autogenerated build.gradle file (catalog-service/build.gradle).
dependencies {
  implementation 'org.springframework.boot:spring-boot-starter-web'
  testImplementation 'org.springframework.boot:spring-boot-starter-test'
}
These are the main dependencies:
-
Spring Web (org.springframework.boot:spring-boot-starter-web) provides the necessary libraries for building web applications with Spring MVC and includes Tomcat as the default embedded server.
-
Spring Boot Test (org.springframework.boot:spring-boot-starter-test) provides several libraries and utilities for testing applications, including Spring Test, JUnit, AssertJ, and Mockito. It’s automatically included in every Spring Boot project.
One of the great features of Spring Boot is the way it handles dependency management. Starter dependencies like spring-boot-starter-web relieve you of managing many more dependencies and verifying that the particular versions you import are compatible with each other. It’s yet another Spring Boot feature that will get you started in a simple and productive way.
In the next section, you’ll learn more about how the server embedded in Spring Boot works and how to configure it.
3.2 Working with embedded servers
With Spring Boot, you can build different types of applications (e.g., web, event-driven, serverless, batch, and task applications) characterized by various use cases and patterns. In a cloud native context, they all share some common aspects:
Consider a web application. Traditionally, you would package it as a WAR or EAR file (archive formats used to package Java applications) and deploy it to a web server like Tomcat or an application server like WildFly. The external dependency on a server would limit the portability and evolution of the application itself and increase the maintenance costs.
In this section, you’ll see how to solve those problems in a cloud native web application with Spring Boot, Spring MVC, and an embedded server, but similar principles apply to other types of applications as well. You’ll learn the differences between traditional and cloud native applications, how an embedded server like Tomcat works, and how you can configure it. I’ll also elaborate on a few guidelines from the 15-Factor methodology regarding servers, port binding, and concurrency:
-
Port binding—Unlike traditional applications that depend on an external server being available in the execution environment, cloud native applications are self-contained and export their services by binding to a port that can be configured depending on the environment.
-
Concurrency—In JVM applications, we handle concurrency through multiple threads available as thread pools. When the concurrency limit is hit, we favor horizontal over vertical scaling. Instead of adding more computational resources to the application, we prefer to deploy more instances and distribute the workload among them.
Following those principles, we’ll continue working on Catalog Service to ensure it’s self-contained and packaged as an executable JAR.
3.2.1 Executable JARs and embedded servers
One of the differences between a traditional approach and a cloud native one is how you package and deploy applications. Traditionally, we used to have application servers or standalone web servers. They were expensive to set up and maintain in production, so they were used to deploy several applications, packaged as EAR or WAR artifacts for the sake of efficiency. Such a scenario created coupling among the applications. If any of them wanted to change something at the server level, the change would have to be coordinated with other teams and applied to all the applications, limiting agility and application evolution. Besides that, the deployment of an application depended on a server being available on the machine, limiting the application’s portability across different environments.
When you go cloud native, things are different. Cloud native applications should be self-contained and not dependent on a server being available in the execution environment. Instead, the necessary server capabilities are included in the application itself. Spring Boot offers built-in server functionality that helps you remove the external dependency and make the application standalone. Spring Boot comes bundled with a preconfigured Tomcat server, but it’s possible to replace it with Undertow, Jetty, or Netty.
Having solved the server dependency problem, we need to change how we package the application accordingly. In the JVM ecosystem, cloud native applications are packaged as JAR artifacts. Since they are self-contained, they can run as standalone Java applications with no external dependency apart from the JVM. Spring Boot is flexible enough to allow both JAR and WAR types of packaging. Still, for cloud native applications, you’ll want to use self-contained JARs, also called fat-JARs or uber-JARs, since they contain the application itself, the dependencies, and the embedded server. Figure 3.3 compares the traditional and cloud native ways of packaging and running web applications.

Figure 3.3 Traditionally, applications are packaged as WARs and require a server to be available in the execution environment to run. Cloud native applications are packaged as JARs, are self-contained, and use an embedded server.
The embedded servers used for cloud native applications usually comprise a web server component and an execution context to make a Java web application interact with the web server. For example, Tomcat contains a web server component (Coyote) and an execution context based on the Java Servlet API, usually called the Servlet container (Catalina). I will use web server and Servlet container interchangeably. On the other hand, application servers are not recommended for cloud native applications.
In the previous chapter, when generating the Catalog Service project, we chose the JAR packaging option. We then ran the application using the bootRun Gradle task. That is a convenient way to build a project and run it as a standalone application during development. But now that you know more about the embedded server and JAR packaging, I’ll show you another way.
First, let’s package the application as a JAR file. Open a Terminal window, navigate to the root folder of the Catalog Service project (catalog-service), and run the following command.
$ ./gradlew bootJar
The bootJar Gradle task compiles the code and packages the application as a JAR file. By default, the JAR is generated in the build/libs folder. You should get an executable JAR file named catalog-service-0.0.1-SNAPSHOT.jar. Once you get the JAR artifact, you can go ahead and run it like any standard Java application.
$ java -jar build/libs/catalog-service-0.0.1-SNAPSHOT.jar
Note Another practical Gradle task is build, which combines the operations of the bootJar and test tasks.
Since the project contains the spring-boot-starter-web dependency, Spring Boot automatically configures an embedded Tomcat server. By looking at the logs in figure 3.4, you can see that one of the first execution steps is initializing a Tomcat server instance embedded in the application itself.

Figure 3.4 The startup logs from the Catalog Service application
In the next section, you’ll learn more about how the embedded server works in Spring Boot. Before moving on, though, you can stop the application with Ctrl-C.
3.2.2 Understanding the thread-per-request model
Let’s consider the request/response pattern commonly used in web applications to establish synchronous interactions over HTTP. A client sends an HTTP request to a server that performs some computation, and it then replies with an HTTP response.
In web applications running in a Servlet container like Tomcat, requests are processed based on a model called thread-per-request. For each request, the application dedicates a thread exclusively to handling that specific request; the thread will not be used for anything else until a response is returned to the client. When the request-handling involves intensive operations like I/O, the thread will block until the operations are completed. For example, if a database read is required, the thread will wait until data is returned from the database. That’s why we say that this type of processing is synchronous and blocking.
Tomcat is initialized with a thread pool that’s used to manage all incoming HTTP requests. New requests will be queued when all threads are in use, waiting for a thread to become free. In other words, the number of threads in Tomcat defines an upper limit to how many requests are supported concurrently. This is very useful to remember when debugging performance issues. If the thread concurrency limit is hit continuously, you can always tune the thread pool configuration to accept more workload. With traditional applications we would add more computational resources to a specific instance. For cloud native applications, we rely on horizontal scaling and deploying more replicas.
Note In some applications that have to respond to high demands, the thread-per-request model might not be ideal, because it doesn’t use the available computational resources in the most efficient way due to the blocking. In chapter 8, I’ll introduce an asynchronous and non-blocking alternative with Spring WebFlux and Project Reactor, adopting the reactive programming paradigm.
Spring MVC is the library included in the Spring Framework to implement web applications, either full MVC or REST-based. Either way, the functionality is based on a server like Tomcat that provides a Servlet container compliant with the Java Servlet API. Figure 3.5 shows how the REST-based request/response interaction works in a Spring web application.
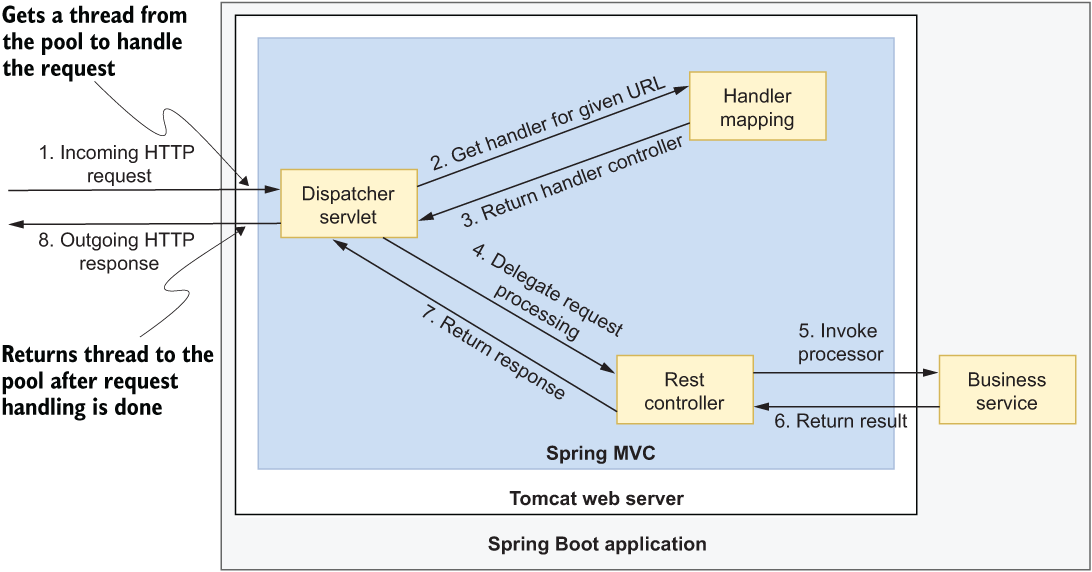
Figure 3.5 The DispatcherServlet component is the entry point to the Servlet container (Tomcat). It delegates the actual HTTP request processing to a controller identified by HandlerMapping as the one responsible for a given endpoint.
The DispatcherServlet component provides a central entry point for request processing. When a client sends a new HTTP request for a specific URL pattern, DispatcherServlet asks the HandlerMapping component for the controller responsible for that endpoint, and it finally delegates the actual processing of the request to the specified controller. The controller processes the request, possibly by calling some other services, and then returns a response to DispatcherServlet, which finally replies to the client with an HTTP response.
Notice how the Tomcat server is embedded in the Spring Boot application. Spring MVC relies on the web server to accomplish its functionality. The same is true for any web server implementing the Servlet API, but since we are explicitly using Tomcat, let’s go ahead and explore some options for configuring it.
3.2.3 Configuring the embedded Tomcat
Tomcat is the default server that comes preconfigured with any Spring Boot web application. Sometimes the default configuration might be enough, but for applications in production, you’ll likely need to customize its behavior to meet the specific requirements.
Note In a traditional Spring application, you would configure a server like Tomcat in dedicated files such as server.xml and context.xml. With Spring Boot, you can configure an embedded web server in two ways: through properties or in a WebServerFactoryCustomizer bean.
This section will show you how to configure Tomcat through properties. You’ll learn more about configuring applications in the next chapter. For now, it’s enough to know that you can define properties in an application.properties or application.yml file located in the src/main/resources folder of your project. You’re free to choose which format to use: .properties files rely on key/value pairs while .yml files use the YAML format. In this book, I’ll define properties using YAML. Spring Initializr generates an empty application.properties file by default, so remember to change its extension from .properties to .yml before moving on.
Let’s go ahead and configure the embedded server for the Catalog Service application (catalog-service). All the configuration properties will go in the application.yml file.
By default, the embedded server is listening on port 8080. That is fine as long as you are working with only one application. If you run more Spring applications during development, which is usually the case with cloud native systems, you’ll want to specify a different port number for each application using the server.port property.
Listing 3.1 Configuring the web server port
server:
  port: 9001
The server.tomcat.connection-timeout property defines a limit for how much time Tomcat should wait between accepting a TCP connection from a client and actually receiving the HTTP request. It helps prevent denial-of-service (DoS) attacks where a connection is established, Tomcat reserves a thread to handle the request, and the request never comes. The same timeout is used to limit the time spent reading the HTTP request body when there is one.
The default value is 20s (20 seconds), which is probably too much for a standard cloud native application. In the context of highly distributed systems in the cloud, we probably don’t want to wait more than a couple of seconds and risk a cascading failure due to a Tomcat instance hanging for too long. Something like 2s would be better. You can also use the server.tomcat.keep-alive-timeout property to configure how long to keep a connection open while waiting for new HTTP requests.
Listing 3.2 Configuring timeouts for Tomcat
server:
  port: 9001
  tomcat:
    connection-timeout: 2s
keep-alive-timeout: 15s Tomcat has a pool of threads that process requests, following the thread-per-request model. The number of available threads will determine how many requests can be handled simultaneously. You can configure the maximum number of request processing threads through the server.tomcat.threads.max property. You can also define the minimum number of threads that should always be kept running (server.tomcat .threads.min-spare), which is also how many threads are created at startup.
Determining the best configuration for a thread pool is complicated, and there’s no magic formula for computing it. Resource analysis, monitoring, and many trials are usually necessary to find a suitable configuration. The default thread pool can grow up to 200 threads and has 10 worker threads always running, which are good starting values in production. In your local environment, you might want to lower those values to optimize resource consumption, since it increases linearly with the number of threads.
Listing 3.3 Configuring the Tomcat thread pool
server:
  port: 9001
  tomcat:
    connection-timeout: 2s
    keep-alive-timeout: 15s
    threads:
      max: 50
      min-spare: 5
So far, you’ve seen that cloud native applications with Spring Boot are packaged as JAR files and rely on an embedded server to remove extra dependencies on the execution environment and enable agility. You learned how the thread-per-request model works, familiarized yourself with the request processing flow with Tomcat and Spring MVC, and configured Tomcat. In the next section, we’ll move on to the business logic of Catalog Service and the implementation of a REST API with Spring MVC.
3.3 Building a RESTful application with Spring MVC
If you’re building cloud native applications, chances are that you are working on a distributed system composed of several services, such as microservices, interacting with each other to accomplish the overall functionality of the product. Your application might be consumed by a service developed by another team in your organization, or you might be exposing its functionality to third parties. Either way, there’s an essential element in any inter-service communication: the API.
The 15-Factor methodology promotes the API first pattern. It encourages you to establish the service interface first and work on the implementation later. The API represents a public contract between your application and its consumers, and it’s in your best interests to define it first thing.
Suppose you agree on a contract and define the API first. In that case, other teams can start working on their solutions and develop against your API to implement their integration with your application. If you don’t develop the API first, there will be a bottleneck, and other teams will have to wait until you’re done with your application. Discussing the API up front also enables productive discussions with stakeholders, which can lead to you clarifying the scope of the application and even defining user stories to implement.
In the cloud, any application can be a backing service for another one. Adopting an API first mentality will help you evolve your applications and adapt them to future requirements.
This section will guide you by defining a contract for Catalog Service as a REST API, the most used service interface model for cloud native applications. You’ll use Spring MVC to implement the REST API, validate it, and test it. I’ll also outline some considerations for evolving an API for future requirements, a common issue in highly distributed systems like cloud native applications.
3.3.1 REST API first, business logic later
Designing the API first assumes you have already defined the requirements, so let’s start with those. Catalog Service will be responsible for supporting the following use cases:
In other words, we can say the application should provide an API to perform CRUD operations on books. The format will follow the REST style applied to HTTP. There are several ways to design an API to fulfill those use cases. In this chapter, we’ll use the approach described in table 3.1.
Table 3.1 Specifications for the REST API that will be exposed by Catalog Service
The contract is established through the REST API, so let’s move on and look at the business logic. The solution is centered around three concepts:
-
Entity—An entity represents the noun in a domain, such as “book.”
-
Service—A service defines the use cases for the domain. For example, “adding a book to the catalog.”
-
Repository—A repository is an abstraction to let the domain layer access data independently from its source.
Let’s start with the domain entity.
The REST API defined in table 3.1 should make it possible to operate on books. That’s the domain entity. In the Catalog Service project, create a new com.polarbookshop.catalogservice.domain package for the business logic, and create a Book Java record to represent the domain entity.
Listing 3.4 Using the Book record to define a domain entity for the application
package com.polarbookshop.catalogservice.domain;

public record Book (    ❶
  String isbn,          ❷
  String title,
  String author,
  Double price
){}
❶ The domain model is implemented as a record, an immutable object.
The use cases enumerated by the application requirements can be implemented in a @Service class. In the com.polarbookshop.catalogservice.domain package, create a BookService class, as shown in the following listing. The service relies on some classes that you’ll create in a minute.
Listing 3.5 Implementing the use cases for the application
package com.polarbookshop.catalogservice.domain;

import org.springframework.stereotype.Service;

@Service                                                  ❶
public class BookService {
  private final BookRepository bookRepository;

  public BookService(BookRepository bookRepository) {
    this.bookRepository = bookRepository;                 ❷
  }

  public Iterable<Book> viewBookList() {
    return bookRepository.findAll();
  }

  public Book viewBookDetails(String isbn) {
    return bookRepository.findByIsbn(isbn)                ❸
      .orElseThrow(() -> new BookNotFoundException(isbn));
  }

  public Book addBookToCatalog(Book book) {
    if (bookRepository.existsByIsbn(book.isbn())) {       ❹
     throw new BookAlreadyExistsException(book.isbn());
    }
    return bookRepository.save(book);
  }

  public void removeBookFromCatalog(String isbn) {
    bookRepository.deleteByIsbn(isbn);
  }

  public Book editBookDetails(String isbn, Book book) {
    return bookRepository.findByIsbn(isbn)
      .map(existingBook -> {
        var bookToUpdate = new Book(                      ❺
          existingBook.isbn(),
          book.title(),
          book.author(),
          book.price());
        return bookRepository.save(bookToUpdate);
      })
      .orElseGet(() -> addBookToCatalog(book));           ❻
  }
}
❶ Stereotype annotation that marks a class to be a service managed by Spring
❷ BookRepository is provided through constructor autowiring.
❸ When trying to view a book that doesn’t exist, a dedicated exception is thrown.
❹ When adding the same book to the catalog multiple times, a dedicated exception is thrown.
❺ When editing the book, all the Book fields can be updated except the ISBN code, because it’s the entity identifier.
❻ When changing the details for a book not in the catalog yet, create a new book.
Note The Spring Framework provides two flavors of dependency injection: constructor-based and setter-based. We’ll use constructor-based dependency injection in any production code, as advocated by the Spring team, because it ensures that the required dependencies are always returned fully initialized and never null. Furthermore, it encourages building immutable objects and improves their testability. For more information, refer to the Spring Framework documentation (https://spring.io/projects/spring-framework).
Using the repository abstraction for data access
The BookService class relies on a BookRepository object to retrieve and save books. The domain layer should be unaware of how data is persisted, so BookRepository should be an interface to decouple the abstraction from the actual implementation. Create a BookRepository interface in the com.polarbookshop.catalogservice.domain package to define the abstraction for accessing book data.
Listing 3.6 The abstraction used by the domain layer to access data
package com.polarbookshop.catalogservice.domain;

import java.util.Optional;

public interface BookRepository {
  Iterable<Book> findAll();
  Optional<Book> findByIsbn(String isbn);
  boolean existsByIsbn(String isbn);
  Book save(Book book);
  void deleteByIsbn(String isbn);
}
While the repository interface belongs to the domain, its implementation is part of the persistence layer. We’ll add a data persistence layer using a relational database in chapter 5. For now, it’s enough to add a simple in-memory map to retrieve and save books. You can define the implementation in an InMemoryBookRepository class, located in a new com.polarbookshop.catalogservice.persistence package.
Listing 3.7 In-memory implementation of the BookRepository interface
package com.polarbookshop.catalogservice.persistence;

import java.util.Map;
import java.util.Optional;
import java.util.concurrent.ConcurrentHashMap;
import com.polarbookshop.catalogservice.domain.Book;
import com.polarbookshop.catalogservice.domain.BookRepository;
import org.springframework.stereotype.Repository;

@Repository                                                      ❶
public class InMemoryBookRepository implements BookRepository {
  private static final Map<String, Book> books =                 ❷
    new ConcurrentHashMap<>();

  @Override
  public Iterable<Book> findAll() {
    return books.values();
  }

  @Override
  public Optional<Book> findByIsbn(String isbn) {
    return existsByIsbn(isbn) ? Optional.of(books.get(isbn)) :
      Optional.empty();
  }

  @Override
  public boolean existsByIsbn(String isbn) {
    return books.get(isbn) != null;
  }

  @Override
  public Book save(Book book) {
    books.put(book.isbn(), book);
    return book;
  }

  @Override
  public void deleteByIsbn(String isbn) {
    books.remove(isbn);
  }
}
❶ Stereotype annotation that marks a class to be a repository managed by Spring
❷ In-memory map to store books for testing purposes
Using exceptions to signal errors in the domain
Let’s complete the business logic for Catalog Service by implementing the two exceptions we used in listing 3.5.
BookAlreadyExistsException is a runtime exception thrown when we try to add a book to the catalog that is already there. It prevents duplicate entries in the catalog.
Listing 3.8 Exception thrown when adding a book that already exists
package com.polarbookshop.catalogservice.domain;

public class BookAlreadyExistsException extends RuntimeException {
  public BookAlreadyExistsException(String isbn) {
    super("A book with ISBN " + isbn + " already exists.");
  }
}
BookNotFoundException is a runtime exception thrown when we try to fetch a book that is not in the catalog.
Listing 3.9 Exception thrown when a book cannot be found
package com.polarbookshop.catalogservice.domain;

public class BookNotFoundException extends RuntimeException {
  public BookNotFoundException(String isbn) {
    super("The book with ISBN " + isbn + " was not found.");
  }
}
That completes the business logic for the Catalog Service. It’s relatively simple, but it’s recommended not to be influenced by how data is persisted or exchanged with clients. The business logic should be independent of anything else, including the API. If you’re interested in this topic, I suggest exploring the concepts of domain-driven design and hexagonal architecture.
3.3.2 Implementing a REST API with Spring MVC
After implementing the business logic, we can expose the use cases through a REST API. Spring MVC provides @RestController classes to define methods that handle incoming HTTP requests for specific HTTP methods and resource endpoints.
As you saw in the previous section, the DispatcherServlet component will invoke the right controller for each request. Figure 3.6 shows the scenario where a client sends an HTTP GET request to view the details of a specific book.
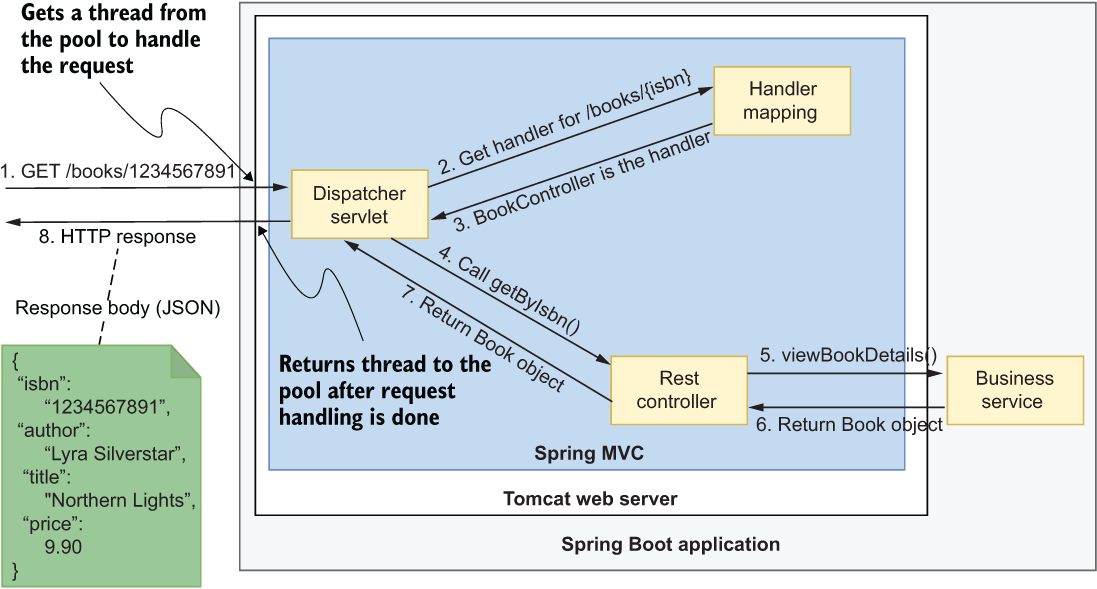
Figure 3.6 The processing flow for an HTTP GET request arriving at the /books/<isbn> endpoint
We want to implement a method handler for each use case defined in the application requirements, since we want to make all of them available to clients. Create a package for the web layer (com.polarbookshop.catalogservice.web) and add a BookController class responsible for handling HTTP requests sent to the /books base endpoint.
Listing 3.10 Defining handlers for REST endpoints
package com.polarbookshop.catalogservice.web;

import com.polarbookshop.catalogservice.domain.Book;
import com.polarbookshop.catalogservice.domain.BookService;
import org.springframework.http.HttpStatus;
import org.springframework.web.bind.annotation.*;

@RestController                                              ❶
@RequestMapping("books")                                     ❷
public class BookController {
  private final BookService bookService;

  public BookController(BookService bookService) {
    this.bookService = bookService;
  }

  @GetMapping                                                ❸
  public Iterable<Book> get() {
    return bookService.viewBookList();
  }

  @GetMapping("{isbn}")                                      ❹
  public Book getByIsbn(@PathVariable String isbn) {         ❺
    return bookService.viewBookDetails(isbn);
  }

  @PostMapping                                               ❻
  @ResponseStatus(HttpStatus.CREATED)                        ❼
  public Book post(@RequestBody Book book) {                 ❽
    return bookService.addBookToCatalog(book);
  }

  @DeleteMapping("{isbn}")                                   ❾
  @ResponseStatus(HttpStatus.NO_CONTENT)                     ❿
  public void delete(@PathVariable String isbn) {
    bookService.removeBookFromCatalog(isbn);
  }

  @PutMapping("{isbn}")                                      ⓫
  public Book put(@PathVariable String isbn, @RequestBody Book book) {
    return bookService.editBookDetails(isbn, book);
  }
}
❶ Stereotype annotation marking a class as a Spring component and a source of handlers for REST endpoints
❷ Identifies the root path mapping URI for which the class provides handlers ("/books")
❸ Maps HTTP GET requests to the specific handler method
❹ A URI template variable appended to the root path mapping URI ("/books/{isbn}")
❺ @PathVariable binds a method parameter to a URI template variable ({isbn}).
❻ Maps HTTP POST requests to the specific handler method
❼ Returns a 201 status if the book is created successfully
❽ @RequestBody binds a method parameter to the body of a web request.
❾ Maps HTTP DELETE requests to the specific handler method
❿ Returns a 204 status if the book is deleted successfully
⓫ Maps HTTP PUT requests to the specific handler method
Go ahead and run the application (./gradlew bootRun). When verifying HTTP interactions with an application, you can either use a command-line tool like curl or software with a graphical user interface like Insomnia. I’m going to use a convenient command-line tool called HTTPie (https://httpie.org). You can find information about how to install it in section A.4 of appendix A.
Open a Terminal window and perform an HTTP POST request to add a book to the catalog:
$ http POST :9001/books author="Lyra Silverstar"
    title="Northern Lights" isbn="1234567891" price=9.90
The result should be an HTTP response with the 201 code, meaning that the book has been created successfully. Let’s double-check by submitting an HTTP GET request to fetch the book with the ISBN code we used on creation.
$ http :9001/books/1234567891

HTTP/1.1 200
Content-Type: application/json

{
  "author": "Lyra Silverstar",
  "isbn": "1234567891",
  "price": 9.9,
  "title": "Northern Lights"
}
When you’re done trying the application, stop its execution with Ctrl-C.
The application we have implemented so far is still not complete. For example, nothing prevents you from posting a new book with an ISBN in the wrong format or without specifying a title. We need to validate the input.
3.3.3 Data validation and error handling
As a general rule, before saving any data, you should always validate the content, both for data consistency and security reasons. A book with no title will be of no use in our application, and it would probably make it fail.
For the Book class, we might think of using these validation constraints:
Java Bean Validation is a popular specification for expressing constraints and validation rules on Java objects via annotations. Spring Boot provides a convenient starter dependency containing the Java Bean Validation API and its implementation. Add the new dependency in the build.gradle file for your Catalog Service project. Remember to refresh or reimport the Gradle dependencies after the new addition.
Listing 3.11 Adding dependency for Spring Boot Validation
dependencies {
  ...
  implementation 'org.springframework.boot:spring-boot-starter-validation'
}
You can now use the Java Bean Validation API to define validation constraints as annotations directly on the Book record fields.
Listing 3.12 Validation constraints defined for each field
package com.polarbookshop.catalogservice.domain;

import javax.validation.constraints.NotBlank;
import javax.validation.constraints.NotNull;
import javax.validation.constraints.Pattern;
import javax.validation.constraints.Positive;

public record Book (

  @NotBlank(message = "The book ISBN must be defined.")
  @Pattern(                                               ❶
    regexp = "^([0-9]{10}|[0-9]{13})$",
    message = "The ISBN format must be valid."
  )
  String isbn,

  @NotBlank(                                              ❷
    message = "The book title must be defined."
  )
  String title,

  @NotBlank(message = "The book author must be defined.")
  String author,

  @NotNull(message = "The book price must be defined.")
  @Positive(                                              ❸
    message = "The book price must be greater than zero."
  )
  Double price
){}
❶ The annotated element must match the specified regular expression (standard ISBN format).
❷ The annotated element must not be null and must contain at least one non-whitespace character.
❸ The annotated element must not be null and must be greater than zero.
Note Books are uniquely identified by their ISBN (International Standard Book Number). ISBNs used to be composed of 10 digits, but they now consist of 13. For simplicity, we’ll limit ourselves to checking for their length and whether all the elements are digits by using a regular expression.
The annotations from the Java Bean Validation API define the constraints, but they are not enforced yet. We can instruct Spring to validate the Book object in the BookController class by using the @Valid annotation whenever a @RequestBody is specified as a method argument. In this way, whenever we create or update a book, Spring will run the validation and throw an error if any constraint is violated. We can update the post() and put() methods in the BookController class as follows.
Listing 3.13 Validating books passed in a request body
...
@PostMapping
@ResponseStatus(HttpStatus.CREATED)
public Book post(@Valid @RequestBody Book book) {
  return bookService.addBookToCatalog(book);
}
@PutMapping("{isbn}")
public Book put(@PathVariable String isbn, @Valid @RequestBody Book book) {
  return bookService.editBookDetails(isbn, book);
}
...
Spring lets you handle error messages in different ways. When building an API, it’s good to consider which types of errors it can throw, since they are just as important as the domain data. When it’s a REST API, you want to ensure that the HTTP response uses a status code that best fits the purpose and includes a meaningful message to help the client identify the problem.
When the validation constraints we have just defined are not met, a MethodArgumentNotValidException is thrown. What if we try to fetch a book that doesn’t exist? The business logic we previously implemented throws dedicated exceptions (BookAlreadyExistsException and BookNotFoundException). All those exceptions should be handled in the REST API context to return the error codes defined in the original specification.
To handle errors for a REST API, we can use the standard Java exceptions and rely on a @RestControllerAdvice class to define what to do when a given exception is thrown. It’s a centralized approach that allows us to decouple the exception handling from the code throwing the exception. In the com.polarbookshop.catalogservice .web package, create a BookControllerAdvice class as follows.
Listing 3.14 The advice class defining how to handle exceptions
package com.polarbookshop.catalogservice.web;

import java.util.HashMap;
import java.util.Map;
import com.polarbookshop.catalogservice.domain.BookAlreadyExistsException;
import com.polarbookshop.catalogservice.domain.BookNotFoundException;
import org.springframework.http.HttpStatus;
import org.springframework.validation.FieldError;
import org.springframework.web.bind.MethodArgumentNotValidException;
import org.springframework.web.bind.annotation.ExceptionHandler;
import org.springframework.web.bind.annotation.ResponseStatus;
import org.springframework.web.bind.annotation.RestControllerAdvice;

@RestControllerAdvice                                               ❶
public class BookControllerAdvice {

  @ExceptionHandler(BookNotFoundException.class)                    ❷
  @ResponseStatus(HttpStatus.NOT_FOUND)
  String bookNotFoundHandler(BookNotFoundException ex) {
    return ex.getMessage();                                         ❸
  }

  @ExceptionHandler(BookAlreadyExistsException.class)
  @ResponseStatus(HttpStatus.UNPROCESSABLE_ENTITY)                  ❹
  String bookAlreadyExistsHandler(BookAlreadyExistsException ex) {
    return ex.getMessage();
  }

  @ExceptionHandler(MethodArgumentNotValidException.class)
  @ResponseStatus(HttpStatus.BAD_REQUEST)
  public Map<String, String> handleValidationExceptions(
   MethodArgumentNotValidException ex                               ❺
  ) {
    var errors = new HashMap<String, String>();
    ex.getBindingResult().getAllErrors().forEach(error -> {
      String fieldName = ((FieldError) error).getField();
      String errorMessage = error.getDefaultMessage();
      errors.put(fieldName, errorMessage);                          ❻
    });
    return errors;
  }
}
❶ Marks the class as a centralized exception handler
❷ Defines the exception for which the handler must be executed
❸ The message that will be included in the HTTP response body
❹ Defines the status code for the HTTP response created when the exception is thrown
❺ Handles the exception thrown when the Book validation fails
❻ Collects meaningful error messages about which Book fields were invalid instead of returning an empty message
The mapping provided in the @RestControllerAdvice class makes it possible to obtain an HTTP response with status 422 (unprocessable entity) when we try to create a book that already exists in the catalog, a response with status 404 (not found) when we try to read a book that doesn’t exist, and a response with status 400 (bad request) when one or more fields in a Book object are invalid. Each response will contain a meaningful message that we defined as part of the validation constraint or custom exception.
Build and rerun the application (./gradlew bootRun): if you now try to create a book without a title and with a wrongly formatted ISBN, the request will fail.
$ http POST :9001/books author="Jon Snow" title="" isbn="123ABC456Z"
    price=9.90
The result will be an error message with a “400 Bad Request” status, meaning that the server couldn’t process the HTTP request because it was incorrect. The response body contains a detailed message about which part of the request was incorrect and how to fix it, just as we defined in listing 3.12.
HTTP/1.1 400
Content-Type: application/json

{
  "isbn": "The ISBN format must be valid.",
  "title": "The book title must be defined."
}
When you’re done trying the application, stop its execution with Ctrl-C.
That concludes our implementation of the REST API that exposes the Catalog Service’s book-management functionality. Next I’ll discuss a few aspects of how we can evolve APIs to adapt to new requirements.
3.3.4 Evolving APIs for future requirements
In a distributed system, we need a plan to evolve APIs so we don’t break the functionality of other applications. This is a challenging task because we want independent applications, but they probably exist to provide services to other applications, so we are somewhat limited in the number of changes we can make independently of the clients.
The best approach is to make backward-compatible changes to the API. For example, we can add an optional field to the Book object without affecting the clients of the Catalog Service application.
Sometimes, breaking changes are necessary. In this situation, you can use API versioning. For example, should you decide to make a breaking change to the REST API for the Catalog Service application, you might introduce a versioning system for the endpoints. The version might be part of the endpoint itself, like /v2/books. Or it might be specified as an HTTP header. This system helps prevent existing clients from breaking, but they will have to update their interface to match the new API version sooner or later, meaning that coordination is needed.
A different approach focuses on making the REST API client as resilient to API changes as possible. The solution is to use the hypermedia aspect of the REST architecture, as described by Dr. Roy Fielding in his doctorate dissertation, “Architectural Styles and the Design of Network-based Software Architectures” (www.ics.uci.edu/~fielding/pubs/dissertation/top.htm). REST APIs can return the object requested along with information about where to go next and links to perform related operations. The beauty of this feature is that the links are only shown when it makes sense to follow them, providing information about when to go.
This hypermedia aspect is also called HATEOAS (Hypermedia as the Engine of Application State), and it represents the highest level of API maturity according to Richardson’s Maturity Model. Spring provides the Spring HATEOAS project to add hypermedia support to a REST API. I will not use it in this book, but I encourage you to check the project’s online documentation at https://spring.io/projects/spring-hateoas.
These considerations conclude our discussion of building a RESTful application with Spring. In the next section you’ll see how to write automated tests to verify the behavior of your application.
3.4 Testing a RESTful application with Spring
Automated tests are paramount to producing high-quality software. One of the goals for adopting a cloud native approach is speed. It’s impossible to move quickly if the code is not adequately tested in an automated fashion, let alone to implement a continuous delivery process.
As a developer, you’ll usually implement a feature, deliver it, and then move on to a new one, possibly refactoring the existing code. Refactoring code is risky, since you might break some existing functionality. Automated tests reduce the risk and encourage refactoring, because you know that a test will fail, should you break something. You’ll probably also want to reduce the feedback cycle so you’ll know if you made any mistakes as soon as possible. That will lead you to design tests in a way that maximizes their usefulness and efficiency. You shouldn’t aim to reach maximum test coverage but rather to write meaningful tests. For example, writing tests for standard getters and setters doesn’t make sense.
An essential practice of continuous delivery is test-driven development (TDD), which helps achieve the goal of delivering software quickly, reliably, and safely. The idea is to drive software development by writing tests before implementing the production code. I recommend adopting TDD in real-world scenarios. However, it’s not very suitable when teaching new technologies and frameworks in a book, so I won’t follow its principles here.
Automated tests assert that new features work as intended and that you haven’t broken any existing functionality. This means that automated tests work as regression tests. You should write tests to protect your colleagues and yourself from making mistakes. What to test and how in-depth to test is driven by the risk associated with a specific piece of code. Writing tests is also a learning experience and will improve your skills, especially if you’re beginning your software development journey.
One way of classifying software tests is defined by the Agile Testing Quadrants model originally introduced by Brian Marick, and later described and expanded on by Lisa Crispin and Janet Gregory in their books Agile Testing (Addison-Wesley Professional, 2008), More Agile Testing (Addison-Wesley Professional, 2014), and Agile Testing Condensed (Library and Archives Canada, 2019). Their model was also embraced by Jez Humble and Dave Farley in Continuous Delivery (Addison-Wesley Professional, 2010). The quadrants classify software tests based on whether they are technology or business-facing and whether they support development teams or are used to critique the product. Figure 3.7 shows some examples of testing types I’ll mention throughout the book, based on the model presented in Agile Testing Condensed.
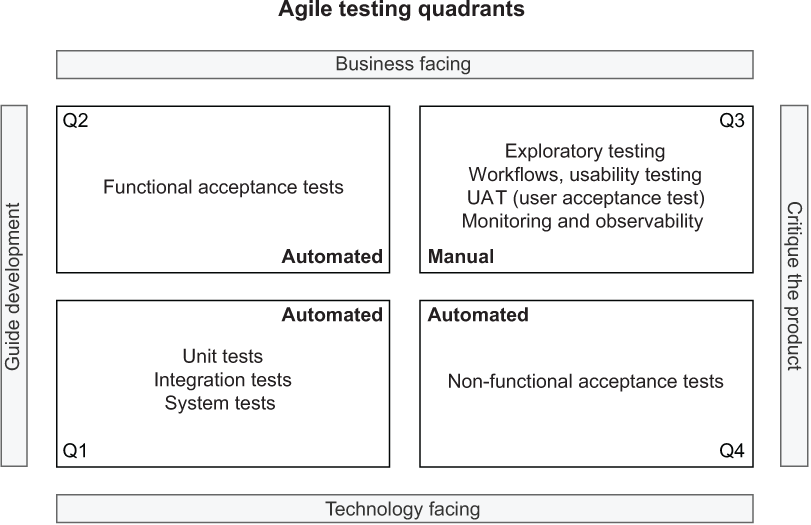
Figure 3.7 The Agile Testing Quadrants model is helpful in planning a software testing strategy.
Following continuous delivery practices, we should aim at achieving fully automated tests in three out of four quadrants, as shown in figure 3.7. Throughout the book, we’ll mainly focus on the bottom-left quadrant. In this section, we’ll work with unit tests and integration tests (sometimes called component tests). We write unit tests to verify the behavior of single application components in isolation, whereas integration tests assert the overall functioning of different parts of an application interacting with each other.
In a Gradle or Maven project, test classes are usually placed in a src/test/java folder. In Spring, unit tests aren’t required to load the Spring application context, and they don’t rely on any Spring library. On the other hand, integration tests need a Spring application context to run. This section will show you how to test a RESTful application like Catalog Service with unit and integration tests.
3.4.1 Unit tests with JUnit 5
Unit tests are not aware of Spring and don’t rely on any Spring library. They are intended to test the behavior of single components as isolated units. Any dependency at the edge of the unit is mocked to keep the test shielded from external components.
Writing unit tests for Spring applications is no different from writing them for any other Java application, so I won’t go into detail about them. By default, any Spring project created from Spring Initializr contains the spring-boot-starter-test dependency, which imports testing libraries like JUnit 5, Mockito, and AssertJ into the project. So we’re all set for writing unit tests.
The business logic of an application is usually a sensible area to cover with unit tests. In the Catalog Service application, a good candidate for unit testing might be the validation logic for the Book class. The validation constraints are defined using the Java Validation API annotations, and we are interested in testing that they are applied correctly to the Book class. We can check that in a new BookValidationTests class, as shown in the following listing.
Listing 3.15 Unit tests to verify book validation constraints
package com.polarbookshop.catalogservice.domain;

import java.util.Set;
import javax.validation.ConstraintViolation;
import javax.validation.Validation;
import javax.validation.Validator;
import javax.validation.ValidatorFactory;
import org.junit.jupiter.api.BeforeAll;
import org.junit.jupiter.api.Test;
import static org.assertj.core.api.Assertions.assertThat;

class BookValidationTests {
  private static Validator validator;

  @BeforeAll                                                 ❶
  static void setUp() {
    ValidatorFactory factory = Validation.buildDefaultValidatorFactory();
    validator = factory.getValidator();
  }

  @Test                                                      ❷
  void whenAllFieldsCorrectThenValidationSucceeds() {
    var book =                                               ❸
      new Book("1234567890", "Title", "Author", 9.90);
    Set<ConstraintViolation<Book>> violations = validator.validate(book);
    assertThat(violations).isEmpty();                        ❹
  }

  @Test
  void whenIsbnDefinedButIncorrectThenValidationFails() {
    var book =                                               ❺
      new Book("a234567890", "Title", "Author", 9.90);
    Set<ConstraintViolation<Book>> violations = validator.validate(book);
    assertThat(violations).hasSize(1);
    assertThat(violations.iterator().next().getMessage())
      .isEqualTo("The ISBN format must be valid.");          ❻
  }
}
❶ Identifies a block of code executed before all tests in the class
❸ Creates a book with a valid ISBN
❹ Asserts that there is no validation error
❺ Creates a book with a non-valid ISBN code
❻ Asserts that the violated validation constraint is about the incorrect ISBN
Then we can run the tests with the following command:
$ ./gradlew test --tests BookValidationTests
3.4.2 Integration tests with @SpringBootTest
Integration tests cover the interactions among software components, and in Spring they require an application context to be defined. The spring-boot-starter-test dependency also imports the test utilities from Spring Framework and Spring Boot.
Spring Boot offers a powerful @SpringBootTest annotation that you can use on a test class to bootstrap an application context automatically when running tests. The configuration used to create the context can be customized if needed. Otherwise, the class annotated with @SpringBootApplication will become the configuration source for component scanning and properties, including the usual auto-configuration provided by Spring Boot.
When working with web applications, you can run tests on a mock web environment or a running server. You can configure that by defining a value for the webEnvironment attribute that the @SpringBootTest annotation provides, as shown in table 3.2.
When using a mock web environment, you can rely on the MockMvc object to send HTTP requests to the application and check their results. For environments with a running server, the TestRestTemplate utility lets you perform REST calls to an application running on an actual server. By inspecting the HTTP responses, you can verify that the API works as intended.
Table 3.2 A Spring Boot integration test can be initialized with a mock web environment or a running server.
Recent versions of Spring Framework and Spring Boot have extended the features for testing web applications. You can now use the WebTestClient class to test REST APIs both on mock environments and running servers. Compared to MockMvc and TestRestTemplate, WebTestClient provides a modern and fluent API and additional features. Furthermore, you can use it for both imperative (e.g., Catalog Service) and reactive applications, optimizing learning and productivity.
Since WebTestClient is part of the Spring WebFlux project, you’ll need to add a new dependency in your Catalog Service project (build.gradle). Remember to refresh or reimport the Gradle dependencies after the new addition.
Listing 3.16 Adding test dependency for Spring Reactive Web
dependencies {
  ...
  testImplementation 'org.springframework.boot:spring-boot-starter-webflux'
}
Chapter 8 will cover Spring WebFlux and reactive applications. For now we’re only interested in using the WebTestClient object to test the API exposed by Catalog Service.
In the previous chapter you saw that Spring Initializr generated an empty CatalogServiceApplicationTests class. Let’s populate it with integration tests. For this setup, we’ll use the @SpringBootTest annotation configured to provide a full Spring application context, including a running server that exposes its services through a random port (because it doesn’t matter which one).
Listing 3.17 Integration tests for Catalog Service
package com.polarbookshop.catalogservice;

import com.polarbookshop.catalogservice.domain.Book;
import org.junit.jupiter.api.Test;
import org.springframework.beans.factory.annotation.Autowired;
import org.springframework.boot.test.context.SpringBootTest;
import org.springframework.test.web.reactive.server.WebTestClient;
import static org.assertj.core.api.Assertions.assertThat;

@SpringBootTest(                                             ❶
  webEnvironment = SpringBootTest.WebEnvironment.RANDOM_PORT
)
class CatalogServiceApplicationTests {

  @Autowired
  private WebTestClient webTestClient;                       ❷

  @Test
  void whenPostRequestThenBookCreated() {
    var expectedBook = new Book("1231231231", "Title", "Author", 9.90);

    webTestClient
      .post()                                                ❸
      .uri("/books")                                         ❹
      .bodyValue(expectedBook)                               ❺
      .exchange()                                            ❻
      .expectStatus().isCreated()                            ❼
      .expectBody(Book.class).value(actualBook -> {
        assertThat(actualBook).isNotNull();                  ❽
        assertThat(actualBook.isbn())
          .isEqualTo(expectedBook.isbn());                   ❾
      });
  }
}
❶ Loads a full Spring web application context and a Servlet container listening on a random port
❷ Utility to perform REST calls for testing
❹ Sends the request to the "/books" endpoint
❺ Adds the book in the request body
❼ Verifies that the HTTP response has status “201 Created”
❽ Verifies that the HTTP response has a non-null body
❾ Verifies that the created object is as expected
Note You might be wondering why I didn’t use constructor-based dependency injection in listing 3.17, considering that I previously stated that’s the recommended option. Using field-based dependency injection in production code has been deprecated and is strongly discouraged, but it’s still acceptable to autowire dependencies in a test class. In every other scenario, I recommend sticking with constructor-based dependency injection for the reasons I explained earlier. For more information, you can refer to the official Spring Framework documentation (https://spring.io/projects/spring-framework).
Then you can run the tests with the following command:
$ ./gradlew test --tests CatalogServiceApplicationTests
Depending on the application’s size, loading a full application context with auto-configuration for all integration tests might be too much. Spring Boot has a convenient feature (enabled by default) to cache the context, so that it’s re-used in all test classes that are annotated with @SpringBootTest and the same configuration. Sometimes that’s not enough.
Test execution time matters, so Spring Boot is fully equipped to run integration tests by loading only the parts of the application that are needed. Let’s see how that works.
3.4.3 Testing REST controllers with @WebMvcTest
Some integration tests might not need a fully initialized application context. For example, there’s no need to load the web components when you’re testing the data persistence layer. If you’re testing the web components, you don’t need to load the data persistence layer.
Spring Boot allows you to use contexts initialized only with a subgroup of components (beans), targeting a specific application slice. Slice tests don’t use the @SpringBootTest annotation, but one of a set of annotations dedicated to particular parts of an application: Web MVC, Web Flux, REST client, JDBC, JPA, Mongo, Redis, JSON, and others. Each of those annotations initializes an application context, filtering out all the beans outside that slice.
We can test that Spring MVC controllers work as intended by using the @WebMvcTest annotation, which loads a Spring application context in a mock web environment (no running server), configures the Spring MVC infrastructure, and includes only the beans used by the MVC layer, like @RestController and @RestControllerAdvice. It’s also a good idea to limit the context to the beans used by the specific controller under test. We can do so by providing the controller class as an argument to the @WebMvcTest annotation in a new BookControllerMvcTests class.
Listing 3.18 Integration tests for the web MVC slice
package com.polarbookshop.catalogservice.web;

import com.polarbookshop.catalogservice.domain.BookNotFoundException;
import com.polarbookshop.catalogservice.domain.BookService;
import org.junit.jupiter.api.Test;
import org.springframework.beans.factory.annotation.Autowired;
import org.springframework.boot.test.autoconfigure.web.servlet.WebMvcTest;
import org.springframework.boot.test.mock.mockito.MockBean;
import org.springframework.test.web.servlet.MockMvc;
import static org.mockito.BDDMockito.given;
import static org.springframework.test.web.servlet.request
➥.MockMvcRequestBuilders.get;
import static org.springframework.test.web.servlet.result
➥.MockMvcResultMatchers.status;

@WebMvcTest(BookController.class)                       ❶
class BookControllerMvcTests {

  @Autowired
  private MockMvc mockMvc;                              ❷

  @MockBean                                             ❸
  private BookService bookService;

  @Test
  void whenGetBookNotExistingThenShouldReturn404() throws Exception {
    String isbn = "73737313940";
    given(bookService.viewBookDetails(isbn))
      .willThrow(BookNotFoundException.class);          ❹
    mockMvc
      .perform(get("/books/" + isbn))                   ❺
      .andExpect(status().isNotFound());                ❻
  }
}
❶ Identifies a test class that focuses on Spring MVC components, explicitly targeting BookController
❷ Utility class to test the web layer in a mock environment
❸ Adds a mock of BookService to the Spring application context
❹ Defines the expected behavior for the BookService mock bean
❺ MockMvc is used to perform an HTTP GET request and verify the result.
❻ Expects the response to have a “404 Not Found” status
Warning If you use IntelliJ IDEA, you might get a warning that MockMvc cannot be autowired. Don’t worry. It’s a false positive. You can get rid of the warning by annotating the field with @SuppressWarnings("SpringJavaInjectionPointsAutowiringInspection").
Then you can run the tests with the following command:
$ ./gradlew test --tests BookControllerMvcTests
MockMvc is a utility class that lets you test web endpoints without loading a server like Tomcat. Such a test is naturally lighter than the one we wrote in the previous section, where an embedded server was needed to run the test.
Slice tests run against an application context containing only the parts of the configuration requested by that application slice. In the case of collaborating beans outside the slice, such as the BookService class, we use mocks.
Mocks created with the @MockBean annotation are different from standard mocks (for example, those created with Mockito) since the class is not only mocked, but the mock is also included in the application context. Whenever the context is asked to autowire that bean, it automatically injects the mock rather than the actual implementation.
3.4.4 Testing the JSON serialization with @JsonTest
The Book objects returned by the methods in BookController are parsed into JSON objects. By default, Spring Boot automatically configures the Jackson library to parse Java objects into JSON (serialization) and vice versa (deserialization).
Using the @JsonTest annotation, you can test JSON serialization and deserialization for your domain objects. @JsonTest loads a Spring application context and auto-configures the JSON mappers for the specific library in use (by default, it’s Jackson). Furthermore, it configures the JacksonTester utility, which you can use to check that the JSON mapping works as expected, relying on the JsonPath and JSONAssert libraries.
Note JsonPath provides expressions you can use to navigate a JSON object and extract data from it. For example, if I wanted to get the isbn field from the Book object’s JSON representation, I could use the following JsonPath expression: @.isbn. For more information on the JsonPath library, you can refer to the project documentation: https://github.com/json-path/JsonPath.
The following listing shows an example of both serialization and deserialization tests implemented in a new BookJsonTests class.
Listing 3.19 Integration tests for the JSON slice
package com.polarbookshop.catalogservice.web;

import com.polarbookshop.catalogservice.domain.Book;
import org.junit.jupiter.api.Test;
import org.springframework.beans.factory.annotation.Autowired;
import org.springframework.boot.test.autoconfigure.json.JsonTest;
import org.springframework.boot.test.json.JacksonTester;
import static org.assertj.core.api.Assertions.assertThat;

@JsonTest                                                             ❶
class BookJsonTests {

  @Autowired
  private JacksonTester<Book> json;                                   ❷

  @Test
  void testSerialize() throws Exception {
    var book = new Book("1234567890", "Title", "Author", 9.90);
    var jsonContent = json.write(book);                               ❸
    assertThat(jsonContent).extractingJsonPathStringValue("@.isbn")
      .isEqualTo(book.isbn());
    assertThat(jsonContent).extractingJsonPathStringValue("@.title")
      .isEqualTo(book.title());
    assertThat(jsonContent).extractingJsonPathStringValue("@.author")
      .isEqualTo(book.author());
    assertThat(jsonContent).extractingJsonPathNumberValue("@.price")
      .isEqualTo(book.price());
  }

  @Test
  void testDeserialize() throws Exception {
    var content = """                                                 ❹
      {
        "isbn": "1234567890",
        "title": "Title",
        "author": "Author",
        "price": 9.90
      }
      """;
    assertThat(json.parse(content))                                   ❺
      .usingRecursiveComparison()
      .isEqualTo(new Book("1234567890", "Title", "Author", 9.90));
  }
}
❶ Identifies a test class that focuses on JSON serialization
❷ Utility class to assert JSON serialization and deserialization
❸ Verifying the parsing from Java to JSON, using the JsonPath format to navigate the JSON object
❹ Defines a JSON object using the Java text block feature
❺ Verifies the parsing from JSON to Java
Warning If you use IntelliJ IDEA, you might get a warning that JacksonTester cannot be autowired. Don’t worry. It’s a false positive. You can get rid of the warning by annotating the field with @SuppressWarnings("SpringJavaInjectionPointsAutowiringInspection").
You can run the tests with the following command:
$ ./gradlew test --tests BookJsonTests
In the code repository accompanying the book, you can find more examples of unit and integration tests for the Catalog Service project.
After automating the tests for your application, it’s time to automate its execution whenever a new feature or bug fix is delivered. The following section will introduce the key pattern of continuous delivery: the deployment pipeline.
3.5 Deployment pipeline: Build and test
Continuous delivery is a holistic approach for quickly, reliably, and safely delivering high-quality software, as I explained in chapter 1. The primary pattern for adopting such an approach is the deployment pipeline, which goes from code commit to releasable software. It should be automated as much as possible, and it should represent the only path to production.
Based on the concepts described by Jez Humble and Dave Farley in their Continuous Delivery book (Addison-Wesley Professional, 2010) and by Dave Farley in his Continuous Delivery Pipelines book (2021), we can identify a few key stages in a deployment pipeline:
-
Commit stage—After a developer commits new code to the mainline, this stage goes through build, unit tests, integration tests, static code analysis, and packaging. At the end of this stage, an executable application artifact is published to an artifact repository. It is a release candidate. For example, it can be a JAR artifact published to a Maven repository or a container image published to a container registry. This stage supports the continuous integration practice. It’s supposed to be fast, possibly under five minutes, to provide developers with fast feedback about their changes and allow them to move on to the next task.
-
Acceptance stage—The publication of a new release candidate to the artifact repository triggers this stage, which consists of deploying the application to production-like environments and running additional tests to increase the confidence about its releasability. The tests that run in the acceptance stage are usually slow, but we should strive to keep the whole deployment pipeline execution to under one hour. Examples of tests included in this stage are functional acceptance tests and non-functional acceptance tests, such as performance tests, security tests, and compliance tests. If necessary, this stage can also include manual tasks like exploratory and usability tests. At the end of this stage, the release candidate is ready to be deployed to production at any time. If we are still not confident about it, this stage is missing some tests.
-
Production stage—After a release candidate has gone through the commit and acceptance stages, we are confident enough to deploy it to production. This stage is triggered manually or automatically, depending on whether the organization has decided to adopt a continuous deployment practice. The new release candidate is deployed to a production environment using the same deployment scripts employed (and tested) in the acceptance stage. Optionally, some final automated tests can be run to verify that the deployment was successful.
This section will guide you through bootstrapping a deployment pipeline for Catalog Service and defining the first steps in the commit stage. Then I’ll show you how to automate those steps using GitHub Actions.
3.5.1 Understanding the commit stage of the deployment pipeline
Continuous integration is a foundational practice of continuous delivery. When adopted successfully, developers work in small steps and commit to the mainline (the main branch) multiple times a day. After each code commit, the commit stage of the deployment pipeline takes care of building and testing the application with the new changes.
This stage should be fast, because a developer will wait until it completes successfully before moving on to their next task. That’s a critical point. If the commit stage fails, the developer responsible for it should immediately deliver a fix or revert their changes so as not to leave the mainline in a broken state and prevent all other developers from integrating their code.
Let’s start designing a deployment pipeline for a cloud native application like Catalog Service. For now, we’ll focus on the first few steps in the commit stage (figure 3.8).

Figure 3.8 The first part of the commit stage in a deployment pipeline
After a developer pushes new code to the mainline, the commit stage starts by checking out the source code from the repository. The starting point is always a commit to the main branch. Following continuous integration practices, we’ll aim to work in small steps and integrate our changes with the main branch multiple times a day (continuously).
Next, the pipeline can perform several types of static code analysis. For this example, we’ll focus on vulnerability scanning. In a real-world project, you would probably want to include additional steps, such as running static code analysis to identify security issues and check compliance with specific coding standards (code linting).
Finally, the pipeline builds the application and runs automated tests. In the commit stage, we include technically focused tests that don’t require deploying the entire application. These are unit tests and often integration tests. If the integration tests take too long, it’s better to move them to the acceptance stage to keep the commit stage fast.
The vulnerability scanner we’ll use in the Polar Bookshop project is grype (https://github.com/anchore/grype), a powerful open source tool that’s increasingly used in the cloud native world. For example, it’s part of the supply chain security solution provided by the VMware Tanzu Application Platform. You can find instructions on how to install it in section A.4 of appendix A.
Let’s see how grype works. Open a Terminal window, navigate to the root folder of your Catalog Service project (catalog-service), and build the application with ./gradlew build. Then use grype to scan your Java codebase for vulnerabilities. The tool will download a list of known vulnerabilities (a vulnerability database) and scan your project against them. The scanning happens locally on your machine, which means none of your files or artifacts is sent to an external service. That makes it a good fit for more regulated environments or air-gapped scenarios.
$ grype .
 ✔ Vulnerability DB        [updated]
 ✔ Indexed .
 ✔ Cataloged packages      [35 packages]
 ✔ Scanned image           [0 vulnerabilities]

No vulnerabilities found
Note Remember that security is not a static property of a system. At the time of writing, the dependencies used by Catalog Service have no known vulnerabilities, but that doesn’t mean this will be true forever. You should scan your projects continuously and apply security patches as soon as they are released, to fix newly discovered vulnerabilities.
Chapters 6 and 7 will cover the remaining steps in the commit stage. For now, let’s see how we can automate a deployment pipeline with GitHub Actions. That’s the subject of the following section.
3.5.2 Implementing the commit stage with GitHub Actions
When it comes to automating deployment pipelines, there are many solutions from which you can choose. In this book, I’m going to use GitHub Actions (https://github.com/features/actions). It’s a managed solution, it provides all the features we need for our project, and it’s conveniently already configured for all GitHub repositories. I’m introducing this topic early in this book so that you can use the deployment pipeline to verify your changes while working on the project throughout the book.
Note In the cloud native ecosystem, Tekton (https://tekton.dev) is a popular choice for defining deployment pipelines and other software workflows. It’s an open source and Kubernetes-native solution hosted at the Continuous Delivery Foundation (https://cd.foundation). It runs directly on a cluster and lets you declare pipelines and tasks as Kubernetes custom resources.
GitHub Actions is a platform built into GitHub that lets you automate software workflows directly from your code repositories. A workflow is an automated process. We’ll use workflows to model the commit stage of our deployment pipeline. Each workflow listens to specific events that trigger its execution.
Workflows should be defined in a .github/workflows folder in a GitHub repository root, and they should be described following the YAML format provided by GitHub Actions. In your Catalog Service project (catalog-service), create a commit-stage.yml file under a new .github/workflows folder. This workflow will be triggered whenever new code is pushed to the repository.
Listing 3.20 Defining a workflow name and trigger
name: Commit Stage     ❶
on: push               ❷
❷ The workflow is triggered when new code is pushed to the repository.
Each workflow is organized into jobs that run in parallel. For now, we’ll define a single job to collect the steps described previously in figure 3.8. Each job is executed on a runner instance, which is a server provided by GitHub. You can choose between Ubuntu, Windows, and macOS. For Catalog Service, we’ll run everything on Ubuntu runners provided by GitHub. We’ll also want to be specific regarding which permissions each job should have. The “Build and Test” job will need read access to the Git repository and write access to the security events when submitting a vulnerability report to GitHub.
Listing 3.21 Configuring a job for building and testing the application
name: Commit Stage
on: push

 jobs:
  build:                        ❶
    name: Build and Test        ❷
    runs-on: ubuntu-22.04       ❸
    permissions:                ❹
      contents: read            ❺
      security-events: write    ❻
❷ The type of machine where the job should be run
❸ A human-friendly name for the job
❹ The permissions granted to the job
❺ Permission to check out the current Git repository
❻ Permission to submit security events to GitHub
Each job is composed of steps, which are executed sequentially. A step could be either a shell command or an action. Actions are custom applications used to perform complex tasks in a more structured and reproducible way. For example, you could have actions for packaging an application into an executable, running tests, creating a container image, or pushing an image to a container registry. The GitHub organization provides a basic set of actions, but there’s also a marketplace with many more actions developed by the community.
Warning When using actions from the GitHub marketplace, handle them like any other third-party application and manage the security risks accordingly. Prefer using trusted actions provided by GitHub or verified organizations over other third-party options.
Let’s complete this first part of the commit stage by describing what steps the “Build and Test” job should run. The final result is shown in the following listing.
Listing 3.22 Implementing the steps to build and test the application
name: Commit Stage
on: push

jobs:
  build:
    name: Build and Test
    runs-on: ubuntu-22.04
    permissions:
      contents: read
      security-events: write
    steps:
      - name: Checkout source code
        uses: actions/checkout@v3                          ❶
      - name: Set up JDK
        uses: actions/setup-java@v3                        ❷
        with:                                              ❸
          distribution: temurin
          java-version: 17
          cache: gradle
      - name: Code vulnerability scanning
        uses: anchore/scan-action@v3                       ❹
        id: scan                                           ❺
        with:
          path: "${{ github.workspace }}"                  ❻
          fail-build: false                                ❼
          severity-cutoff: high                            ❽
          acs-report-enable: true                          ❾
      - name: Upload vulnerability report
        uses: github/codeql-action/upload-sarif@v2         ❿
        if: success() || failure()                         ⓫
        with:
          sarif_file: ${{ steps.scan.outputs.sarif }}      ⓬
      - name: Build, unit tests and integration tests
        run: |
          chmod +x gradlew                                 ⓭
          ./gradlew build                                  ⓮
❶ Checks out the current Git repository (catalog-service)
❷ Installs and configures a Java runtime
❸ Defines which version, distribution, and cache type to use
❹ Scans the codebase for vulnerabilities using grype
❺ Assigns an identifier to the current step so that it can be referenced from subsequent steps
❻ The path to the checked-out repository
❼ Whether to fail the build in the event of security vulnerabilities
❽ The minimum security category to be considered as an error (low, medium, high, critical)
❾ Whether to enable the generation of a report after the scan is completed
❿ Uploads the security vulnerability report to GitHub (SARIF format)
⓫ Uploads the report even if the previous step fails
⓬ Fetches the report from the output of the previous step
⓭ Ensures the Gradle wrapper is executable, solving Windows incompatibilities
⓮ Runs the Gradle build task, which compiles the codebase and runs unit and integration tests
Warning The action that uploads the vulnerability report requires the GitHub repository to be public. It works for private repositories only if you have an enterprise subscription. If you prefer keeping your repository private, you’ll need to skip the “Upload vulnerability report” step. Throughout the book, I’ll assume all the repositories we create on GitHub for the Polar Bookshop project are public.
After completing the declaration of the initial commit stage for the deployment pipeline, commit your changes and push them to the remote GitHub repository. The newly created workflow will be immediately triggered. You can see the execution results on your GitHub repository page on the Actions tab. Figure 3.9 shows an example of the results after running the workflow in listing 3.22. By keeping the result of the commit stage green, you can be quite sure that you haven’t broken anything or introduced new regressions (assuming that you have proper tests in place).
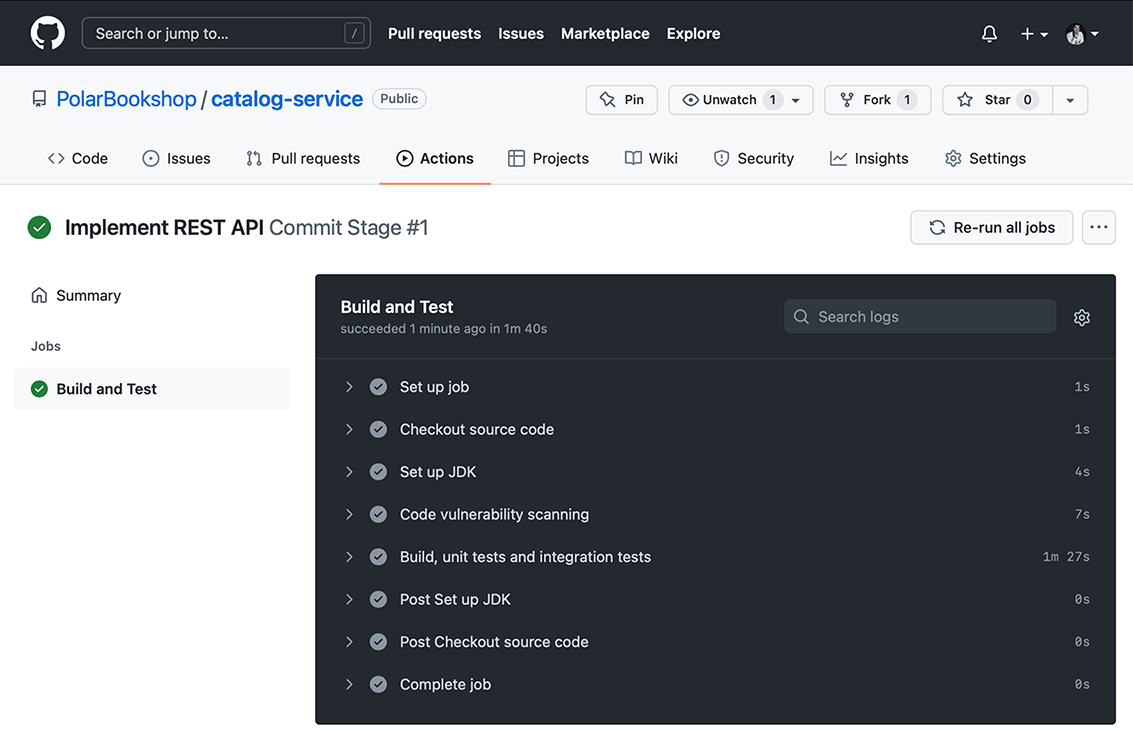
Figure 3.9 The commit stage workflow is executed after you push new changes to the remote repository.
The step for running the vulnerability scan is based on an action provided by Anchore, the company behind grype. In listing 3.22, we do not fail the workflow if serious vulnerabilities are discovered. However, you can find the scanning results in the Security section of your catalog-service GitHub repository.
At the time of writing, there is no high or critical vulnerability in the Catalog Service project, but things might be different in the future. If that’s the case, consider using the latest available security patches for the affected dependencies. For the sake of the example, and because I don’t want to disrupt your learning journey, I decided not to make the build fail on finding vulnerabilities. In a real-world scenario, however, I recommend you configure and tune grype carefully and according to your company policies regarding supply chain security, and make the workflow fail if the result is not compliant (setting the fail-build property to true). For more information, refer to the official grype documentation (https://github.com/anchore/grype).
After scanning the Java project for vulnerabilities, we also included a step to fetch the security report generated by grype and upload it to GitHub, independently of whether the build succeeds or not. If any security vulnerability is found, you can see the results in the Security tab of your GitHub repository page (figure 3.10).
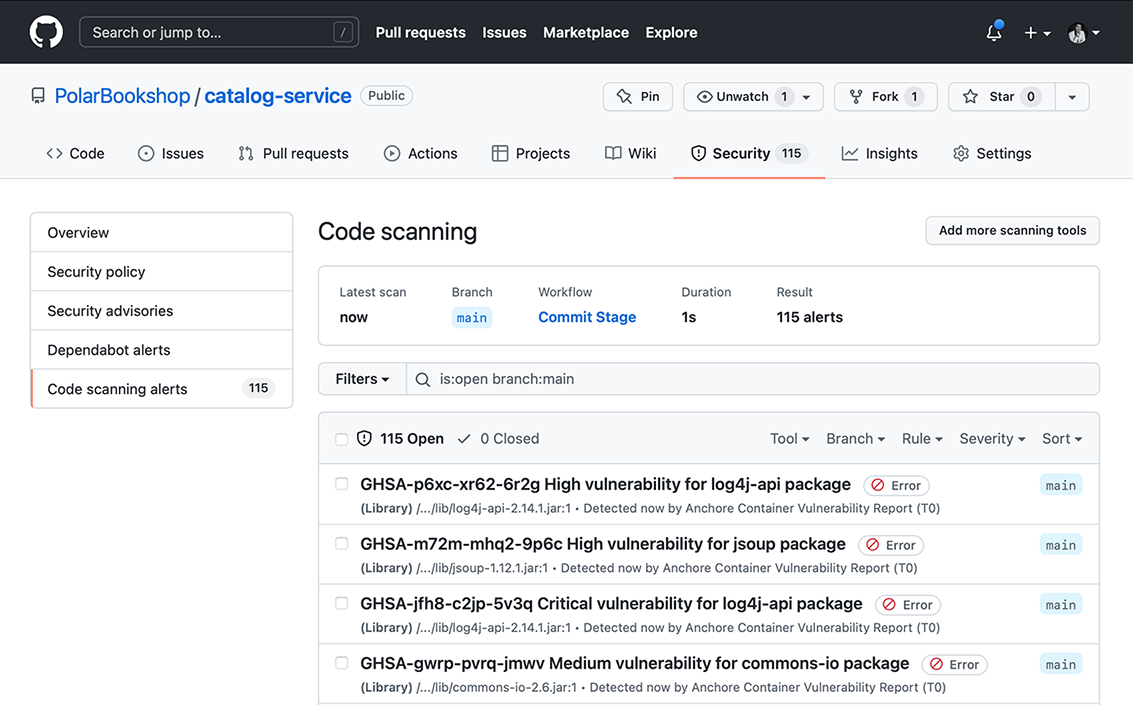
Figure 3.10 A security vulnerability report generated by grype and published to GitHub
Note At the time of writing, grype doesn’t find any vulnerabilities in the codebase provided with this book. To show you an example of a vulnerability report, figure 3.10 shows the results of grype scanning a different version of the project, purposely full of known vulnerabilities.
That’s it for this chapter. Next, I’ll cover one of the main cloud native development practices: externalized configuration.
Summary
-
Each cloud native application should be tracked in its own codebase, and all its dependencies should be declared in a manifest using tools like Gradle or Maven.
-
Cloud native applications don’t depend on servers being injected into the environment. Instead, they use an embedded server and are self-contained.
-
Tomcat is the default embedded server for Spring Boot applications, and it can be configured through properties to customize the ports it listens on, connections, timeouts, and threads.
-
The request/response interaction provided by a Servlet container like Tomcat is both synchronous and blocking. Each thread handles an HTTP request until a response is returned.
-
The API first principle recommends designing the API before implementing the business logic to establish a contract. In this way, other teams can develop their services to consume your application based on the contract itself, without waiting for the application to be finished.
-
In Spring MVC, REST APIs are implemented in @RestController classes.
-
Each REST controller method handles an incoming request with a specific method (GET, POST, PUT, DELETE) and endpoint (e.g., /books).
-
Controller methods can declare which endpoints and operations they handle through the annotations @GetMapping, @PostMapping, @PutMapping, @DeleteMapping, and @RequestMapping.
-
Methods of a @RestController class can validate the HTTP request body before the processing happens by applying the @Valid annotation.
-
The validation constraints for a given Java object are defined using annotations from the Java Bean Validation API on the fields (for example, @NotBlank, @Pattern, @Positive).
-
Java exceptions thrown during the processing of an HTTP request can be mapped to an HTTP status code and body in a centralized @RestControllerAdvice class, decoupling the exception handling for the REST API from the code throwing the exception.
-
Unit tests are not aware of the Spring configuration but can be written as standard Java tests using familiar tools like JUnit, Mockito, and AssertJ.
-
Integration tests need a Spring application context to run. A full application context, including an optional embedded server, can be initialized for testing using the @SpringBootTest annotation.
-
When tests are focused only on a “slice” of the application and only need a part of the configuration, Spring Boot provides several annotations for more targeted integration tests. When you use those annotations, a Spring application context is initialized, but only the components and configuration parts used by the specific functionality slice are loaded.
-
@JsonTest is for testing JSON serialization and deserialization.
-
GitHub Actions is a tool provided by GitHub to declare pipelines (or workflows) for automating tasks. It can be used to build a deployment pipeline.