
11 Security: Authentication and SPA
- Understanding the Spring Security fundamentals
- Managing user accounts with Keycloak
- Working with OpenID Connect, JWT, and Keycloak
- Authenticating users with Spring Security and OpenID Connect
- Testing Spring Security and OpenID Connect
Security is one of the most critical aspects of web applications and probably the one with the most catastrophic effects when done wrong. For educational purposes, I’m introducing this topic only now. In a real-world scenario, I recommend considering security from the beginning of each new project or feature and never letting it go until the application is retired.
Access control systems allow users access to resources only when their identity has been proven and they have the required permissions. To accomplish that, we need to follow three pivotal steps: identification, authentication, and authorization.
-
Identification happens when a user (human or machine) claims an identity. In the physical world, that’s when I introduce myself by stating my name. In the digital world, I would do that by providing my username or email address.
-
Authentication is about verifying the user’s claimed identity through factors like a passport, a driver’s license, a password, a certificate, or a token. When multiple factors are used to verify the user’s identity, we talk about multi-factor authentication.
-
Authorization always happens after authentication, and it checks what the user is allowed to do in a given context.
This chapter and the next one will cover implementing access control systems in cloud native applications. You’ll see how to add authentication to a system like Polar Bookshop and use a dedicated identity and access management solution like Keycloak. I’ll show you how to use Spring Security to secure applications and adopt standards like JWT, OAuth2, and OpenID Connect. In the process, you’ll also add an Angular frontend to the system and learn the best practices for security when a single-page application (SPA) is involved.
Note The source code for the examples in this chapter is available in the Chapter11/11-begin and Chapter11/11-end folders, which contain the initial and final states of the project (https://github.com/ThomasVitale/cloud-native-spring-in-action).
11.1 Understanding the Spring Security fundamentals
Spring Security (https://spring.io/projects/spring-security) is the de facto standard for securing Spring applications, supporting imperative and reactive stacks. It provides authentication and authorization features as well as protection against the most common attacks.
The framework provides its main functionality by relying on filters. Let’s consider a possible requirement for adding authentication to a Spring Boot application. Users should be able to authenticate with their username and password through a login form. When we configure Spring Security to enable such a feature, the framework adds a filter that intercepts any incoming HTTP request. If the user is already authenticated, it sends the request through to be processed by a given web handler, such as a @RestController class. If the user is not authenticated, it forwards the user to a login page and prompts for their username and password.
Note In imperative Spring applications, a filter is implemented as a Servlet Filter class. In reactive applications, the WebFilter class is used.
Most Spring Security features, when enabled, are handled via filters. The framework establishes a chain of filters that are executed according to a well-defined and sensible order. For instance, the filter that handles authentication runs before the one that checks for authorization because we can’t verify a user’s authority before knowing who it is.
Let’s start with a basic example to better understand how Spring Security works. We want to add authentication to the Polar Bookshop system. Since Edge Service is the entry point, it makes sense to handle cross-cutting concerns like security there. Users should be able to authenticate with a username and password via a login form.
First, add a new dependency on Spring Security in the build.gradle file for the Edge Service project (edge-service). Remember to refresh or reimport the Gradle dependencies after the new addition.
Listing 11.1 Adding dependency for Spring Security in Edge Service
dependencies {
  ...
  implementation 'org.springframework.boot:spring-boot-starter-security'
}
The central place for defining and configuring security policies in Spring Security is a SecurityWebFilterChain bean. That object tells the framework which filters should be enabled. You can build a SecurityWebFilterChain bean through the DSL provided by ServerHttpSecurity.
For now, we want to comply with the following requirements:
To collect all the configurations related to security, create a SecurityWebFilterChain bean in a new SecurityConfig class (com.polarbookshop.edgeservice.config package):
@Bean         ❶
SecurityWebFilterChain springSecurityFilterChain(
  ServerHttpSecurity http
) {}
❶ The SecurityWebFilterChain bean is used to define and configure security policies for the application.
The ServerHttpSecurity object, autowired by Spring, provides a convenient DSL for configuring Spring Security and building a SecurityWebFilterChain bean. With authorizeExchange(), you can define access policies for any request (called an exchange in reactive Spring). In this case, we want all requests to require authentication (authenticated()):
@Bean
SecurityWebFilterChain springSecurityFilterChain(ServerHttpSecurity http) {
  return http
    .authorizeExchange(exchange ->
      exchange.anyExchange().authenticated())    ❶
    .build();
}
❶ All requests require authentication.
Spring Security provides several authentication strategies, including HTTP Basic, login form, SAML, and OpenID Connect. For this example, we want to use the login form strategy, which we can enable via the formLogin() method exposed by the ServerHttpSecurity object. We’ll go with the default configuration (available via the Spring Security Customizer interface), which includes a login page, provided by the framework out of the box, and an automatic redirect to that page whenever a request is not authenticated:
@Bean
SecurityWebFilterChain springSecurityFilterChain(ServerHttpSecurity http) {
  return http
    .authorizeExchange(exchange -> exchange.anyExchange().authenticated())
    .formLogin(Customizer.withDefaults())      ❶
    .build();
}
❶ Enables user authentication via a login form
Next, annotate the SecurityConfig class with @EnableWebFluxSecurity to enable Spring Security WebFlux support. The final security configuration is shown in the following listing.
Listing 11.2 Requiring authentication for all endpoints via a login form
package com.polarbookshop.edgeservice.config;

import org.springframework.context.annotation.Bean;
import org.springframework.security.config.Customizer;
import org.springframework.security.config.annotation.web.reactive.
➥EnableWebFluxSecurity;
import org.springframework.security.config.web.server.ServerHttpSecurity;
import org.springframework.security.web.server.SecurityWebFilterChain;

@EnableWebFluxSecurity
public class SecurityConfig {

  @Bean
  SecurityWebFilterChain springSecurityFilterChain(
    ServerHttpSecurity http
  ) {
    return http
      .authorizeExchange(exchange ->
        exchange.anyExchange().authenticated())    ❶
      .formLogin(Customizer.withDefaults())        ❷
      .build();
  }
}
❶ All requests require authentication.
❷ Enables user authentication via a login form
Let’s verify that it works correctly. First, start your Redis container, required by Edge Service. Open a Terminal window, navigate to the folder where you keep your Docker Compose file (polar-deployment/docker/docker-compose.yml), and run the following command:
$ docker-compose up -d polar-redis
Then run the Edge Service application (./gradlew bootRun), open a browser window, and head to http://localhost:9000/books. You should be redirected to a login page served by Spring Security, where you can authenticate.
Wait a minute! How can we authenticate without defining a user in the system? By default, Spring Security defines a user account in memory with the username user and a password randomly generated and printed out in the application logs. You should look for a log entry like the following:
Using generated security password: ee60bdf6-fb82-439a-8ed0-8eb9d47bae08
You can authenticate with the predefined user account created by Spring Security. After successfully authenticating, you will be redirected to the /books endpoint. Since Catalog Service is down and Edge Service has a fallback method to return an empty list when querying books (implemented in chapter 9), you’ll see a blank page. That’s expected.
Note I recommend you open a new incognito browser window every time you test the application from now on. Since you’re going to try out different security scenarios, the incognito mode will prevent you from having issues related to browser caches and cookies from previous sessions.
The crucial point of this test is that a user tried to access a protected endpoint exposed by Edge Service. The application redirected the user to a login page, showed a login form, and asked the user to provide a username and password. Then Edge Service validated the credentials against its internal user database (auto-generated in memory) and, on discovering they were valid, started an authenticated session with the browser. Since HTTP is a stateless protocol, the user session is kept alive through a cookie whose value is provided by the browser with each HTTP request (a session cookie). Internally, Edge Service maintains a mapping between the session identifier and user identifier, as shown in figure 11.1.
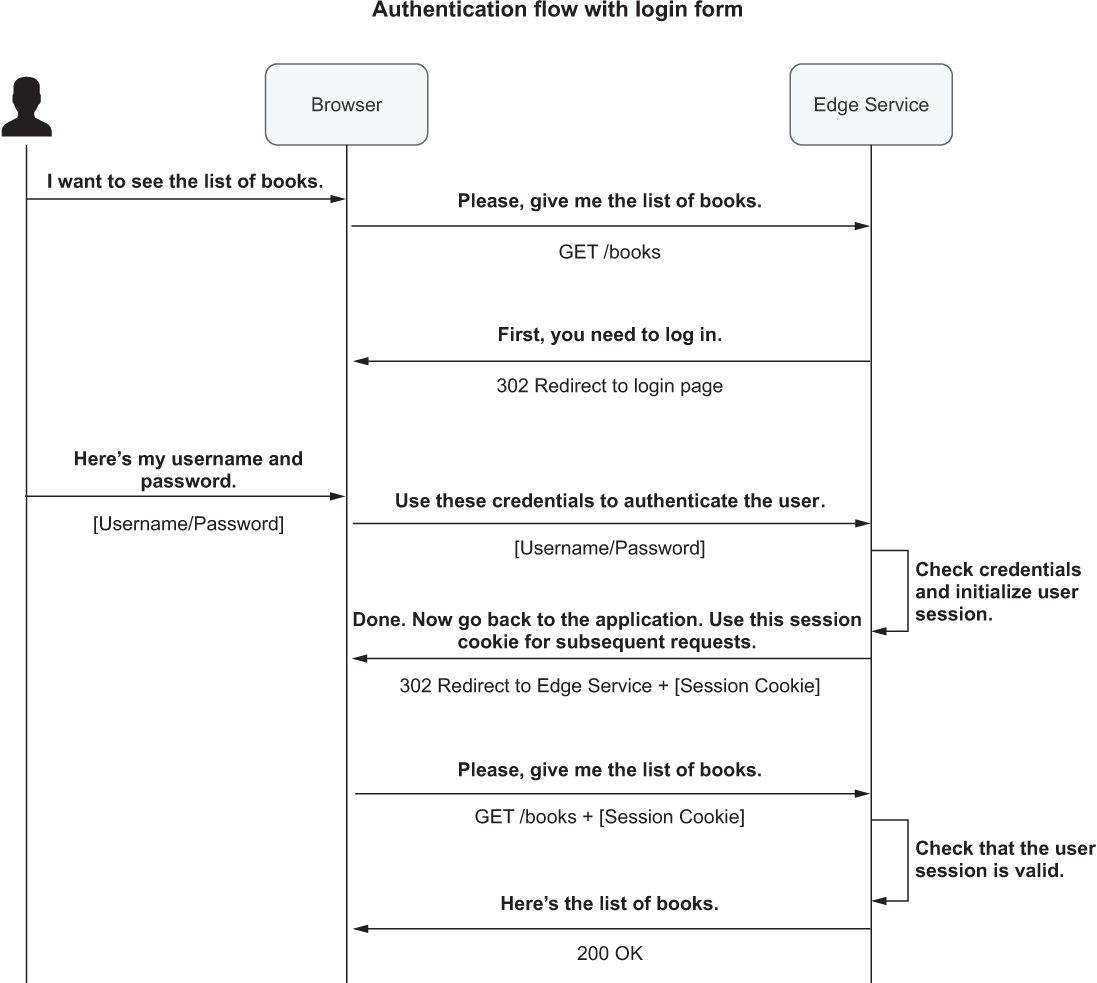
Figure 11.1 After the login step, the user session is kept alive through a session cookie.
When you are done testing the application, terminate the process with Ctrl-C. Then navigate to the folder where you keep your Docker Compose file (polar-deployment/docker/docker-compose.yml), and run the following command to stop the Redis container:
$ docker-compose down
There are a few problems with the previous approach when applied to a cloud native system. In the rest of the chapter, we’ll analyze those problems, identify viable solutions for cloud native applications, and use them on top of what we have just implemented.
11.2 Managing user accounts with Keycloak
In the previous section, we added user authentication to Edge Service based on a login form. You tried logging in via a user account that was auto-generated in memory at startup time. That’s fine for experimenting with Spring Security the first time, but it’s not something you’ll want to do in production.
As a minimum requirement, we need persistent storage for user accounts and an option to register new users. There should be a particular focus on storing passwords using a robust encryption algorithm and preventing unauthorized access to the database. Given the criticality of such a feature, it makes sense to delegate it to a dedicated application.
Keycloak (www.keycloak.org) is an open source identity and access management solution developed and maintained by the Red Hat community. It offers a broad set of features, including single sign-on (SSO), social login, user federation, multi-factor authentication, and centralized user management. Keycloak relies on standards like OAuth2, OpenID Connect, and SAML 2.0. For now, we’ll use Keycloak to manage user accounts in Polar Bookshop. Later I’ll show you how to use its OpenID Connect and OAuth2 features.
Note Spring Security provides all the necessary features to implement a user management service. If you’d like to learn more about this subject, you can refer to chapters 3 and 4 of Spring Security in Action by Laurențiu Spilcă (Manning, 2020).
You can run Keycloak locally as a standalone Java application or a container. For production, there are a few solutions for running Keycloak on Kubernetes. Keycloak also needs a relational database for persistence. It comes with an embedded H2 database, but you’ll want to replace it with an external one in production.
For Polar Bookshop, we’ll run Keycloak locally as a Docker container, relying on the embedded H2 database. In production we’ll use PostgreSQL. This might seem to contradict the environment parity principle, but since it’s a third-party application, it’s not your responsibility to test its interaction with a data source.
This section will guide you step-by-step through the Keycloak configuration for the Polar Bookshop use case. First, open your polar-deployment repository. Then define a new polar-keycloak container in docker/docker-compose.yml.
Listing 11.3 Defining a Keycloak container in Docker Compose
version: "3.8"
services:
  ...

  polar-keycloak:                           ❶
    image: quay.io/keycloak/keycloak:19.0
    container_name: "polar-keycloak"
    command: start-dev                      ❷
    environment:                            ❸
      - KEYCLOAK_ADMIN=user
      - KEYCLOAK_ADMIN_PASSWORD=password
    ports:
      - 8080:8080
❶ The section describing the Keycloak container
❷ Starts Keycloak in development mode (using an embedded database)
❸ Defines admin credentials as environment variables
Note Later I will provide you with a JSON file you can use to load the entire configuration when starting up the Keycloak container, so you won’t need to be concerned about the container’s persistence.
You can start a Keycloak container by opening a Terminal window, navigating to the folder where you keep the docker-compose.yml file, and running this command:
$ docker-compose up -d polar-keycloak
Before we can start managing user accounts, we need to define a security realm. We’ll do that next.
11.2.1 Defining a security realm
In Keycloak, any security aspect of an application or a system is defined in the context of a realm, a logical domain in which we apply specific security policies. By default, Keycloak comes preconfigured with a Master realm, but you’ll probably want to create a dedicated one for each product you build. Let’s create a new PolarBookshop realm to host any security-related aspects of the Polar Bookshop system.
Make sure the Keycloak container you started earlier is still running. Then open a Terminal window, and enter a bash console inside the Keycloak container:
$ docker exec -it polar-keycloak bash
Tip Keycloak might take several seconds to start up. If you try to access it right after starting the container, you might get an error because it’s not yet ready to accept connections. If that happens, wait a few seconds and try again. You can check the Keycloak logs with docker logs -f polar-keycloak. After the message “Running the server in development mode” is printed out, Keycloak is ready to be used.
We’ll configure Keycloak through its Admin CLI, but you can achieve the same result by using the GUI available at http://localhost:8080. First, navigate to the folder where the Keycloak Admin CLI scripts are located:
$ cd /opt/keycloak/bin
The Admin CLI is protected by the username and password we defined in Docker Compose for the Keycloak container. We’ll need to start an authenticated session before running any other commands:
$ ./kcadm.sh config credentials
    --server http://localhost:8080      ❶
    --realm master                      ❷
    --user user                         ❸
    --password password                  ❹
❶ Keycloak runs on port 8080 inside the container.
❷ The default realm configured in Keycloak
❸ The username we defined in Docker Compose
❹ The password we defined in Docker Compose
Tip You should keep the current Terminal window open until you’re done configuring Keycloak. If at any point the authenticated session expires, you can always start a new one by running the previous command.
At this point, you can go ahead and create a new security realm where all the policies associated with Polar Bookshop will be stored:
$ ./kcadm.sh create realms -s realm=PolarBookshop -s enabled=true
11.2.2 Managing users and roles
We’ll need some users to test different authentication scenarios. As anticipated in chapter 2, Polar Bookshop has two types of users: customers and employees.
To manage the different permissions associated with each type of user, let’s create two roles: customer and employee. Later you’ll protect application endpoints based on those roles. It’s an authorization strategy called role-based access control (RBAC).
First, create the two roles in the Polar Bookshop realm from the Keycloak Admin CLI console you have used so far:
$ ./kcadm.sh create roles -r PolarBookshop -s name=employee
$ ./kcadm.sh create roles -r PolarBookshop -s name=customer
Then create two users. Isabelle Dahl will be both an employee and a customer of the bookshop (username: isabelle). You can create an account for her as follows:
$ ./kcadm.sh create users -r PolarBookshop
    -s username=isabelle                     ❶
    -s firstName=Isabelle
    -s lastName=Dahl
    -s enabled=true                           ❷

$ ./kcadm.sh add-roles -r PolarBookshop
    --uusername isabelle                     ❸
    --rolename employee
    --rolename customer
❶ The username for the new user. It will be used for logging in.
❸ Isabelle is both an employee and a customer.
Then do the same for Bjorn Vinterberg (username: bjorn), a customer of the bookshop:
$ ./kcadm.sh create users -r PolarBookshop
    -s username=bjorn                        ❶
    -s firstName=Bjorn
    -s lastName=Vinterberg
    -s enabled=true                           ❷

$ ./kcadm.sh add-roles -r PolarBookshop
    --uusername bjorn                        ❸
    --rolename customer
❶ The username for the new user. It will be used for logging in.
In a real scenario, users would choose a password themselves and preferably enable two-factor authentication. Isabelle and Bjorn are test users, so assigning an explicit password (password) is OK. You can do that from the Keycloak Admin CLI as follows:
$ ./kcadm.sh set-password -r PolarBookshop
    --username isabelle --new-password password
$ ./kcadm.sh set-password -r PolarBookshop
    --username bjorn --new-password password
That’s it for user management. You can get out of the bash console inside the Keycloak container with the exit command, but keep Keycloak running.
Next, let’s explore how we can improve the authentication strategy in Edge Service.
11.3 Authentication with OpenID Connect, JWT, and Keycloak
At the moment, users must log in via a browser with a username and password. Since Keycloak now manages user accounts, we could go ahead and update Edge Service to check the user credentials with Keycloak itself, rather than using its internal storage. But what happens if we introduce different clients to the Polar Bookshop system, such as mobile applications and IoT devices? How should the users authenticate then? What if the bookshop employees are already registered in the company’s Active Directory (AD) and want to log in via SAML? Can we provide a single sign-on (SSO) experience across different applications? Will the users be able to log in via their GitHub or Twitter accounts (social login)?
We could think of supporting all those authentication strategies in Edge Service as we get new requirements. However, that is not a scalable approach. A better solution is delegating a dedicated identity provider to authenticate users following any supported strategy. Edge Service would then use that service to verify the identity of a user without being concerned about performing the actual authentication step. The dedicated service could let users authenticate in various ways, such as using the credentials registered in the system, through social login, or via SAML to rely on the identity defined in the company’s AD.
Using a dedicated service to authenticate users leads to two aspects we need to address for the system to work. First, we need to establish a protocol for Edge Service to delegate user authentication to the identity provider and for the latter to provide information about the authentication result. Second, we need to define a data format that the identity provider can use to securely inform Edge Service about the identity of users after they have been successfully authenticated. This section will address both issues using OpenID Connect and JSON Web Token.
11.3.1 Authenticating users with OpenID Connect
OpenID Connect (OIDC) is a protocol that enables an application (called the Client) to verify the identity of a user based on the authentication performed by a trusted party (called an Authorization Server) and retrieve the user profile information. The authorization server informs the Client application about the result of the authentication step via an ID Token.
OIDC is an identity layer on top of OAuth2, an authorization framework that solves the problem of delegating access using tokens for authorization but doesn’t deal with authentication. As you know, authorization can only happen after authentication. That’s why I decided to cover OIDC first; OAuth2 will be further explored in the next chapter. This is not the typical way of covering those subjects, but I think it makes sense when designing an access control system like we’re doing for Polar Bookshop.
Note This book will only cover some essential aspects of OAuth2 and OIDC. If you’re interested in learning more about them, Manning has a couple of books in its catalog on the subject: OAuth 2 in Action by Justin Richer and Antonio Sanso (Manning, 2017) and OpenID Connect in Action by Prabath Siriwardena (Manning, 2022).
When it comes to handling user authentication, we can identify three main actors in the OAuth2 framework that are used by the OIDC protocol:
-
Authorization Server—The entity responsible for authenticating users and issuing tokens. In Polar Bookshop, this will be Keycloak.
-
User—Also called the Resource Owner, this is the human logging in with the Authorization Server to get authenticated access to the Client application. In Polar Bookshop, it’s either a customer or an employee.
-
Client—The application requiring the user to be authenticated. This can be a mobile application, a browser-based application, a server-side application, or even a smart TV application. In Polar Bookshop, it’s Edge Service.
Figure 11.2 shows how the three actors are mapped to the Polar Bookshop architecture.

Figure 11.2 How the OIDC/OAuth2 roles are assigned to the entities in the Polar Bookshop architecture for user authentication
Note The roles defined by the OAuth2 framework are also known by different names when used in the context of OpenID Connect. The OAuth2 Authorization Server is also called the OIDC Provider. The OAuth2 Client, which relies on the Authorization Server for authentication and token issuing, is also called the Relying Party (RP). The OAuth2 User is also called the End-User. We’ll stick to the OAuth2 naming for consistency, but it’s helpful to know the alternative terminology used in OIDC.
In Polar Bookshop, Edge Service will initiate the user login flow, but then it will delegate the actual authentication step to Keycloak via the OIDC protocol (supported out of the box by Spring Security). Keycloak provides several authentication strategies, including traditional login forms, social logins via providers like GitHub or Twitter, and SAML. It also supports two-factor authentication (2FA). In the following sections, we’ll use the login form strategy as an example. Since users will interact directly with Keycloak to log in, their credentials will never be exposed to any component of the system except Keycloak, which is one of the benefits of adopting such a solution.
When an unauthenticated user calls a secure endpoint exposed by Edge Service, the following happens:
-
Edge Service (the Client) redirects the browser to Keycloak (the Authorization Server) for authentication.
-
Keycloak authenticates the user (for example, by asking for a username and password via a login form) and then redirects the browser back to Edge Service, together with an Authorization Code.
-
Edge Service calls Keycloak to exchange the Authorization Code with an ID Token, containing information about the authenticated user.
-
Edge Service initializes an authenticated user session with the browser based on a session cookie. Internally, Edge Service maintains a mapping between the session identifier and ID Token (the user identity).
Note The authentication flow supported by OIDC is based on the OAuth2 Authorization Code flow. The second step might seem redundant, but the Authorization Code is essential for ensuring that only the legitimate Client can exchange it with tokens.
Figure 11.3 describes the essential parts of the authentication flow supported by the OIDC protocol. Even if Spring Security supports that out of the box, and you won’t need to implement any of it yourself, it’s still beneficial to have an overview of the flow in mind.
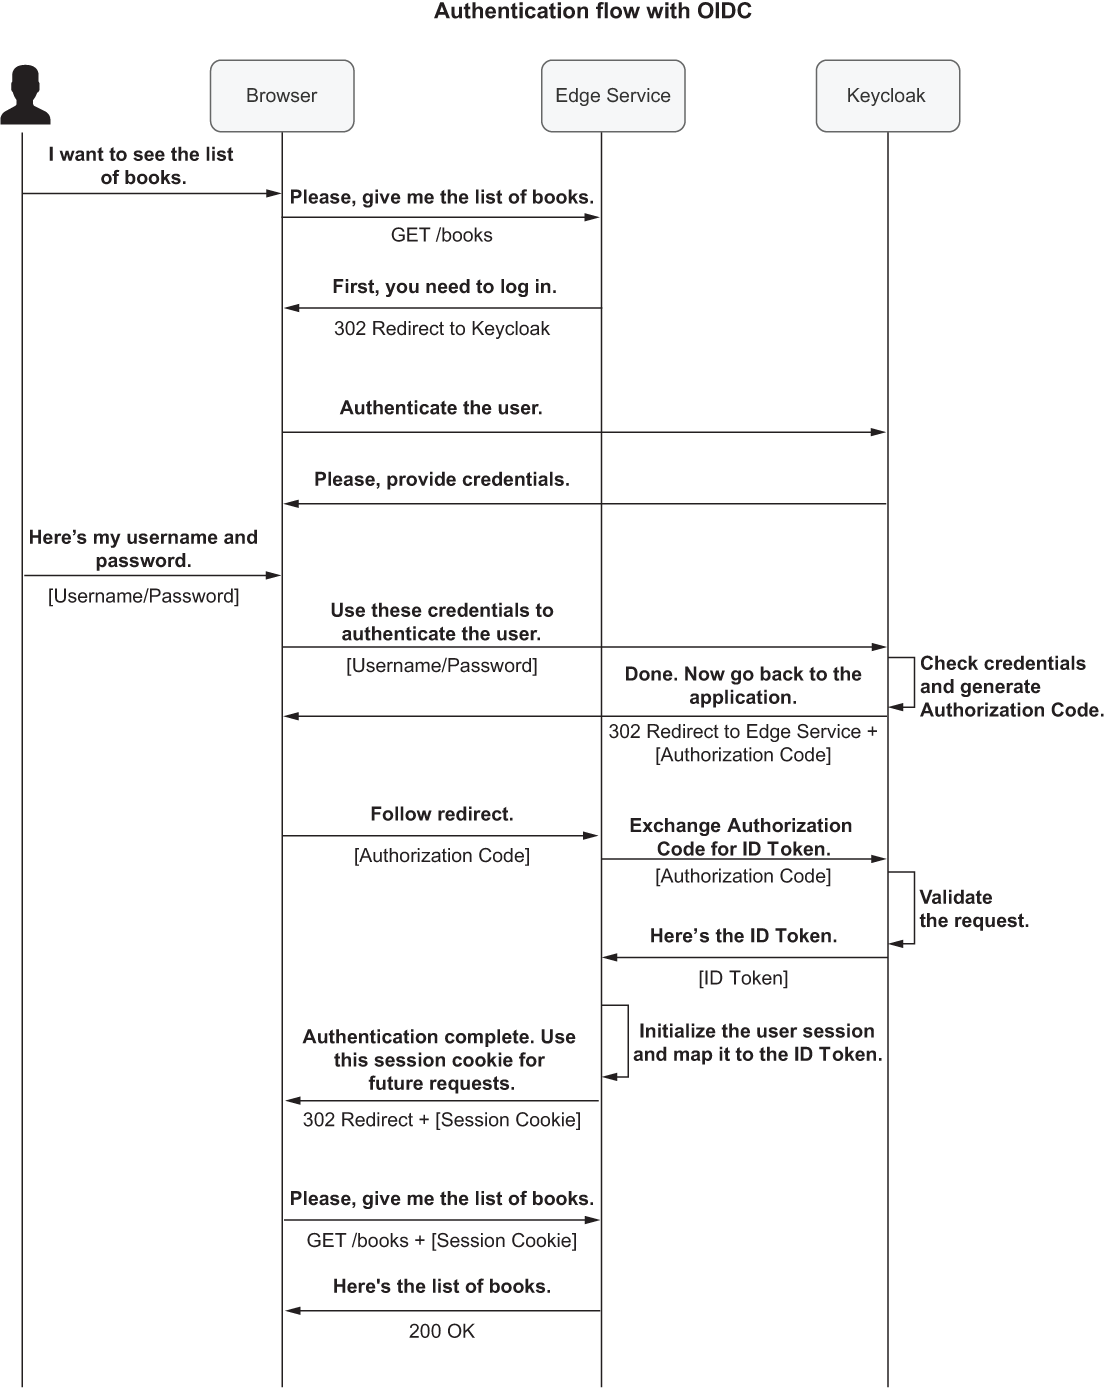
Figure 11.3 The authentication flow supported by the OIDC protocol
When adopting the authentication flow illustrated in figure 11.3, Edge Service is not affected by the specific authentication strategy. We could configure Keycloak to use an Active Directory or perform a social login via GitHub, and Edge Service would not require any changes. It only needs to support OIDC to verify that the authentication happened correctly and get information about the user via an ID Token. What’s an ID Token? It’s a JSON Web Token (JWT) containing information about the user authentication event. We’ll take a closer look at JWTs in the next section.
Note Whenever I mention OIDC, I am referring to the OpenID Connect Core 1.0 specification (https://openid.net/specs/openid-connect-core-1_0.html). Whenever I mention OAuth2, unless specified otherwise, I am referring to the OAuth 2.1 specification currently under standardization (https://oauth.net/2.1) and meant to replace the OAuth 2.0 standard described in RFC 6749 (https://tools.ietf.org/html/rfc6749).
11.3.2 Exchanging user information with JWT
In distributed systems, including microservices and cloud native applications, the most-used strategy for exchanging information about an authenticated user and their authorization is through tokens.
JSON Web Token (JWT) is an industry-standard for representing claims to be transferred between two parties. It’s a widely used format for propagating information about an authenticated user and their permissions securely among different parties in a distributed system. A JWT is not used by itself, but it’s included in a larger structure, the JSON Web Signature (JWS), which ensures the integrity of the claims by digitally signing the JWT object.
A digitally signed JWT (JWS) is a string composed of three parts encoded in Base64 and separated by a dot (.) character:
<header>.<payload>.<signature>
Note For debugging purposes, you can use the tool available on https://jwt.io to encode and decode tokens.
As you saw, a digitally signed JWT has three parts:
-
Header—A JSON object (called JOSE Header) containing information about the cryptographic operations performed on the payload. The operations follow the standards from the Javascript Object Signing and Encryption (JOSE) framework. A decoded header looks like this:
-
{ "alg": "HS256", ❶ "typ": "JWT" ❷ } -
Payload—A JSON object (called Claims Set) containing the claims conveyed by the token. The JWT specification defines some standard claim names, but you can also define your own. A decoded payload looks like the following:
-
{
  "iss": "https://sso.polarbookshop.com",    ❶
  "sub": "isabelle",                         ❷
  "exp": 1626439022                          ❸
}
❶ The entity that issued the JWT (the issuer)
-
Signature—The signature of the JWT, ensuring that the claims have not been tampered with. A prerequisite of using a JWS structure is that we trust the entity issuing the token (the issuer), and we have a way to check its validity.
When a JWT requires integrity and confidentiality, it’s first signed as a JWS and then encrypted with JSON Web Encryption (JWE). In this book, we’ll use only JWS.
Note If you’re interested in learning more about JWT and its related aspects, you can refer to the IETF standard specifications. JSON Web Token (JWT) is documented in RFC 7519 (https://tools.ietf.org/html/rfc7519), JSON Web Signature (JWS) is described in RFC 7515 (https://tools.ietf.org/html/rfc7515), and JSON Web Encryption (JWE) is presented in RFC 7516 (https://tools.ietf.org/html/rfc7516). You might also be interested in JSON Web Algorithms (JWA), which defines the available cryptographic operations for JWTs and is detailed in RFC 7518 (https://tools.ietf.org/html rfc7518).
In the case of Polar Bookshop, Edge Service can delegate the authentication step to Keycloak. After authenticating the user successfully, Keycloak will send a JWT to Edge Service with information about the newly authenticated user (ID Token). Edge Service will validate the JWT through its signature and inspect it to retrieve data (claims) about the user. Finally, it will establish an authenticated session with the user’s browser based on a session cookie, whose identifier is mapped to the JWT.
To delegate authentication and retrieve tokens securely, Edge Service must be registered as an OAuth2 Client in Keycloak. Let’s see how.
11.3.3 Registering an application in Keycloak
As you learned in the previous sections, an OAuth2 Client is an application that can request user authentication and ultimately receive tokens from an Authorization Server. In the Polar Bookshop architecture, this role is played by Edge Service. When using OIDC/OAuth2, you need to register each OAuth2 Client with the Authorization Server before using it for authenticating users.
Clients can be public or confidential. We register an application as a public Client if it can’t keep a secret. For example, mobile applications would be registered as public Clients. On the other hand, confidential Clients are those that can keep a secret, and they are usually backend applications like Edge Service. The registration process is similar either way. The main difference is that confidential Clients are required to authenticate themselves with the Authorization Server, such as by relying on a shared secret. It’s an additional protection layer we can’t use for public Clients, since they have no way to store the shared secret securely.
Since Edge Service will be the OAuth2 Client in the Polar Bookshop system, let’s register it with Keycloak. We can rely on the Keycloak Admin CLI one more time.
Make sure the Keycloak container you started earlier is still running. Then open a Terminal window and enter a bash console inside the Keycloak container:
$ docker exec -it polar-keycloak bash
Next, navigate to the folder where the Keycloak Admin CLI scripts are located:
$ cd /opt/keycloak/bin
As you learned earlier, the Admin CLI is protected by the username and password we defined in Docker Compose for the Keycloak container, so we need to start an authenticated session before running any other commands:
$ ./kcadm.sh config credentials --server http://localhost:8080
    --realm master --user user --password password
Finally, register Edge Service as an OAuth2 Client in the PolarBookshop realm:
$ ./kcadm.sh create clients -r PolarBookshop
    -s clientId=edge-service                        ❶
    -s enabled=true                                 ❷
    -s publicClient=false                           ❸
    -s secret=polar-keycloak-secret                 ❹
    -s 'redirectUris=["http://localhost:9000",
    ➥"http://localhost:9000/login/oauth2/code/*"]'  ❺
❶ The OAuth2 Client identifier
❸ Edge Service is a confidential client, not public.
❹ Since it’s a confidential client, it needs a secret to authenticate with Keycloak.
❺ The application URLs to which Keycloak is authorized to redirect a request after a user login or logout
The valid redirect URLs are the endpoints exposed by the OAuth2 Client application (Edge Service) where Keycloak will redirect authentication requests. Since Keycloak can include sensitive information in a redirect request, we want to limit which applications and endpoints are authorized to receive such information. As you’ll learn later, the redirect URL for authentication requests will be http://localhost:9000/login/oauth2/code/*, following the default format provided by Spring Security. To support redirects after logout operations, we also need to add http://localhost:9000 as a valid redirect URL.
That’s it for this section. In the source code repository accompanying the book, I included a JSON file you can use to load the entire configuration when starting up the Keycloak container in the future (Chapter11/11-end/polar-deployment/docker/keycloak/realm-config.json). Now that you’ve familiarized yourself with Keycloak, you can update the container definition to ensure you always have the needed configuration at startup. Copy the JSON file over the same path in your own project, and update the polar-keycloak service in your docker-compose.yml file as follows.
Listing 11.4 Importing realm configuration in Keycloak container
version: "3.8"
services:
  ...

  polar-keycloak:
    image: quay.io/keycloak/keycloak:19.0
    container_name: "polar-keycloak"
    command: start-dev --import-realm          ❶
    volumes:                                   ❷
      - ./keycloak:/opt/keycloak/data/import
    environment:
      - KEYCLOAK_ADMIN=user
      - KEYCLOAK_ADMIN_PASSWORD=password
    ports:
      - 8080:8080
❶ Imports the provided configuration at startup time
❷ Configures a volume to load the configuration file into the container
Before moving on, let’s stop any running containers. Open a Terminal window, navigate to the folder where you keep your Docker Compose file (polar-deployment/ docker/docker-compose.yml), and run the following command:
$ docker-compose down
We now have all the pieces for refactoring Edge Service so it can use an authentication strategy relying on OIDC/OAuth2, JWT, and Keycloak. The best part is that it’s based on standards and supported by all major languages and frameworks (frontend, backend, mobile, IoT), including Spring Security.
11.4 Authenticating users with Spring Security and OpenID Connect
As mentioned earlier, Spring Security supports several authentication strategies. The current security setup for Edge Service handles user accounts and authentication via a login form provided by the application itself. Now that you’ve learned about OpenID Connect, we can refactor the application to delegate user authentication to Keycloak via the OIDC protocol.
Support for OAuth2 used to be in a separate project called Spring Security OAuth, which you would use as part of Spring Cloud Security to adopt OAuth2 in a cloud native application. Both of those projects have now been deprecated in favor of the native, more comprehensive support for OAuth2 and OpenID Connect introduced in the main Spring Security project, starting from version 5. This chapter focuses on using the new OIDC/OAuth2 support in Spring Security 5 to authenticate the users of Polar Bookshop.
Note If you find yourself working on a project using the deprecated Spring Security OAuth and Spring Cloud Security projects, you might want to check out chapters 12 through 15 of Spring Security in Action by Laurenţiu Spilcǎ (Manning, 2020), where they are explained in great detail.
Using Spring Security and its OAuth2/OIDC support, this section will show you how to do the following for Edge Service:
11.4.1 Adding the new dependencies
First of all, we need to update the dependencies for Edge Service. We can replace the existing Spring Security starter dependency with the more specific OAuth2 Client one, which adds support for OIDC/OAuth2 client features. Furthermore, we can add the Spring Security Test dependency, which provides additional support for testing security scenarios in Spring.
Open the build.gradle file for the Edge Service project (edge-service) and add the new dependencies. Remember to refresh or reimport the Gradle dependencies after the new addition.
Listing 11.5 Adding dependencies for Spring Security OAuth2 Client
dependencies {
  ...
  implementation
  ➥ 'org.springframework.boot:spring-boot-starter-oauth2-client'
  testImplementation 'org.springframework.security:spring-security-test'
}11.4.2 Configuring the integration between Spring Security and Keycloak
After adding the relevant dependencies on Spring Security, we need to configure the integration with Keycloak. In the previous section we registered Edge Service in Keycloak as an OAuth2 Client, defining both a client identifier (edge-service) and a shared secret (polar-keycloak-secret). Now we’ll use that information to tell Spring Security how to interact with Keycloak.
Open the application.yml file in your Edge Service project, and add the following configuration.
Listing 11.6 Configuring Edge Service as an OAuth2 Client
spring:
  security:
    oauth2:
      client:
        registration:
          keycloak:                                 ❶
            client-id: edge-service                 ❷
            client-secret: polar-keycloak-secret    ❸
            scope: openid                           ❹
        provider:
          keycloak:                                 ❺
            issuer-uri:
➥http://localhost:8080/realms/PolarBookshop        ❻
❶ The name identifying the Client registration in Spring Security (called “registrationId”). It can be any string.
❷ The OAuth2 Client identifier as defined in Keycloak
❸ The shared secret used by the Client to authenticate with Keycloak
❹ The list of scopes the Client would like to have access to. The openid scope triggers OIDC authentication on top of OAuth2.
❺ The same name used as “registrationId” a few lines above
❻ The Keycloak URL providing information about all the relevant OAuth2 and OIDC endpoints for the specific realm
Each Client registration in Spring Security must have an identifier (registrationId). In this example, it’s keycloak. The registration identifier is used to build the URL where Spring Security receives the Authorization Code from Keycloak. The default URL template is /login/oauth2/code/{registrationId}. For Edge Service, the full URL is http://localhost:9000/login/oauth2/code/keycloak, which we already configured in Keycloak as a valid redirect URL.
Scopes are an OAuth2 concept for limiting an application’s access to user resources. You can think of them as roles, but for applications instead of users. When we use the OpenID Connect extension on top of OAuth2 to verify the user’s identity, we need to include the openid scope to inform the Authorization Server and receive an ID Token containing data about the user authentication. The next chapter will explain more about scopes in the context of authorization.
Now that we’ve defined the integration with Keycloak, let’s configure Spring Security to apply the desired security policies.
11.4.3 Basic Spring Security configuration
The central place for defining and configuring security policies in Spring Security is a SecurityWebFilterChain class. Edge Service is currently configured to require user authentication for all endpoints, and it uses an authentication strategy based on a login form. Let’s change that to use OIDC authentication instead.
The ServerHttpSecurity object provides two ways of configuring an OAuth2 Client in Spring Security. With oauth2Login(), you can configure an application to act as an OAuth2 Client and also authenticate users through OpenID Connect. With oauth2Client(), the application will not authenticate users, so it’s up to you to define another authentication mechanism. We want to use OIDC authentication, so we’ll use oauth2Login() and the default configuration. Update the SecurityConfig class as follows.
Listing 11.7 Requiring authentication for all endpoints through OIDC
@EnableWebFluxSecurity
public class SecurityConfig {

  @Bean
  SecurityWebFilterChain springSecurityFilterChain(
   ServerHttpSecurity http
  ) {
    return http
      .authorizeExchange(exchange ->
        exchange.anyExchange().authenticated())
      .oauth2Login(Customizer.withDefaults())      ❶
      .build();
  }
}
❶ Enables user authentication with OAuth2/OpenID Connect
Let’s verify that this works correctly. First, start the Redis and Keycloak containers. Open a Terminal window, navigate to the folder where you keep your Docker Compose file (polar-deployment/docker/docker-compose.yml), and run the following command:
$ docker-compose up -d polar-redis polar-keycloak
Then run the Edge Service application (./gradlew bootRun), open a browser window, and head to http://localhost:9000. You should be redirected to a login page served by Keycloak, where you can authenticate as one of the users we created previously (figure 11.4).
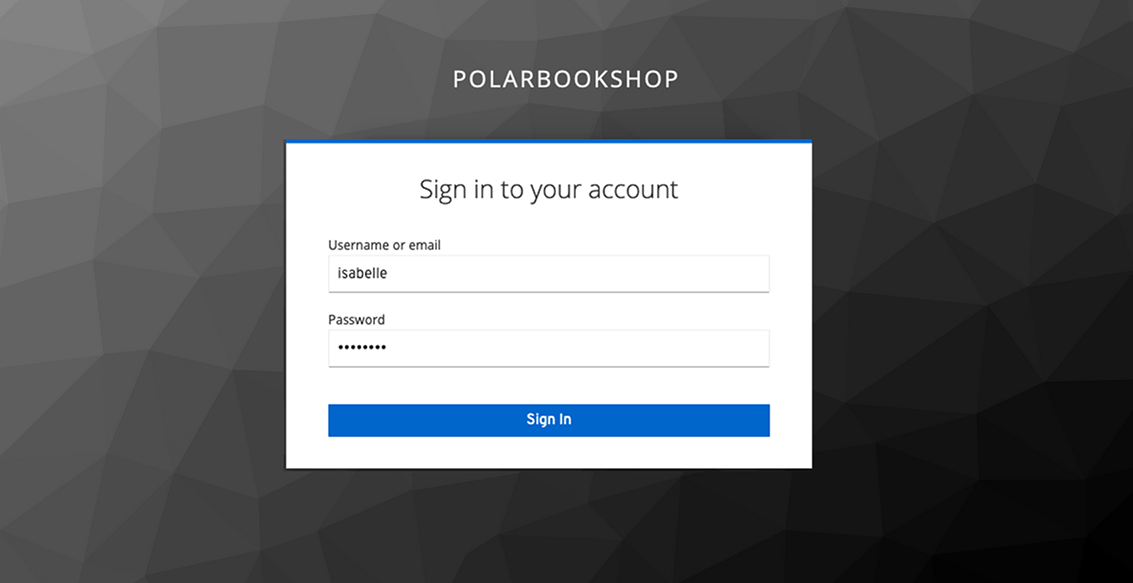
Figure 11.4 The Keycloak login page for the Polar Bookshop realm, shown after Edge Service triggered the OIDC authentication flow
For example, log in as Isabelle (isabelle/password) and pay attention to how Keycloak redirects you back to Edge Service after validating the provided credentials. Since Edge Service doesn’t expose any content through the root endpoint, you’ll see an error message (“Whitelabel Error Page”). But don’t worry! That’s where we’ll integrate an Angular frontend later. The crucial point of this test is that Edge Service required you to be authenticated before accessing any of its endpoints, and it triggered the OIDC authentication flow.
When you’re done trying out the OIDC authentication flow, stop the application with Ctrl-C.
If the authentication is successful, Spring Security will start an authenticated session with the browser and save information about the user. In the next section, you’ll see how we can retrieve and use that information.
11.4.4 Inspecting the authenticated user context
As part of the authentication process, Spring Security defines a context to hold information about the user and map a user session to an ID Token. In this section, you’ll learn more about this context, what classes are involved, and how to retrieve the data and expose it through a new /user endpoint in Edge Service.
First, let’s define a User model to collect the username, first name, last name, and roles of an authenticated user. That’s the same information we provided when registering the two users in Keycloak, and it is the information returned in the ID Token. In a new com.polarbookshop.edgeservice.user package, create a User record as follows.
Listing 11.8 Creating the User record to hold info about an authenticated user
package com.polarbookshop.edgeservice.user;

import java.util.List;

public record User(     ❶
  String username,
  String firstName,
  String lastName,
  List<String> roles
){}
❶ Immutable data class holding user data
Independent of the authentication strategy adopted (whether username/password, OpenID Connect/OAuth2, or SAML2), Spring Security keeps the information about an authenticated user (also called the principal) in an Authentication object. In the case of OIDC, the principal object is of type OidcUser, and it’s where Spring Security stores the ID Token. In turn, Authentication is saved in a SecurityContext object.
One way to access the Authentication object for the currently logged-in user is extracting it from the related SecurityContext retrieved from the ReactiveSecurityContextHolder (or SecurityContextHolder for imperative applications). Figure 11.5 illustrates how all these objects are related to each other.
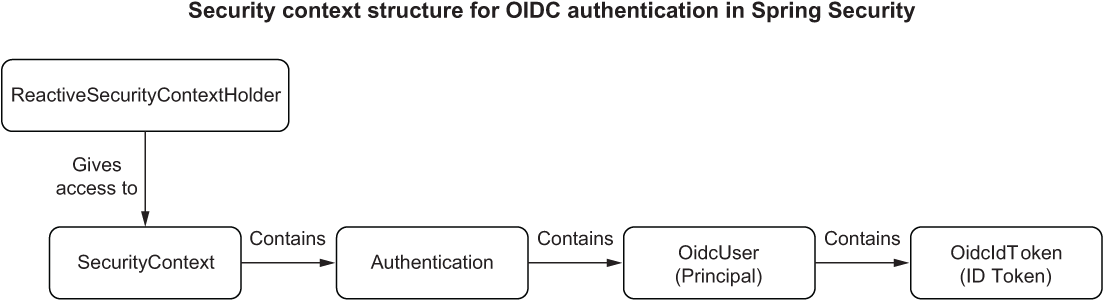
Figure 11.5 The main classes used to store information about the currently authenticated user
You can make that work by doing the following:
-
Create a UserController class annotated with @RestController in the com.polarbookshop.edgeservice.user package.
-
Define a method to handle GET requests to a new /user endpoint.
-
Return a User object for the currently authenticated user, retrieving the necessary information from OidcUser. To get the correct data, we can use the call hierarchy shown in figure 11.5.
The resulting method in the UserController class will look like this:
@GetMapping("user")
public Mono<User> getUser() {
  return ReactiveSecurityContextHolder.getContext()   ❶
    .map(SecurityContext::getAuthentication)          ❷
    .map(authentication ->
      (OidcUser) authentication.getPrincipal())       ❸
    .map(oidcUser ->                                  ❹
      new User(
        oidcUser.getPreferredUsername(),
        oidcUser.getGivenName(),
        oidcUser.getFamilyName(),
        List.of("employee", "customer")
      )
  );
}
❶ Gets SecurityContext for the currently authenticated user from ReactiveSecurityContextHolder
❷ Gets Authentication from SecurityContext
❸ Gets the principal from Authentication. For OIDC, it’s of type OidcUser.
❹ Builds a User object using data from OidcUser (extracted from the ID Token)
In the next chapter, which focuses on authorization strategies, we’ll configure Keycloak to include a custom roles claim in the ID Token and use that value to build the User object in the UserController class. Until then, we’ll use a fixed list of values.
For Spring Web MVC and WebFlux controllers, besides using ReactiveSecurityContextHolder directly, we can use the annotations @CurrentSecurityContext and @AuthenticationPrincipal to inject the SecurityContext and the principal (in this case, OidcUser) respectively.
Let’s simplify the implementation of the getUser() method by injecting the OidcUser object directly as an argument. The final result for the UserController class is shown in the following listing.
Listing 11.9 Returning information about the currently authenticated user
package com.polarbookshop.edgeservice.user;

import java.util.List;
import reactor.core.publisher.Mono;
import org.springframework.security.core.annotation.
➥AuthenticationPrincipal;
import org.springframework.security.oauth2.core.oidc.user.OidcUser;
import org.springframework.web.bind.annotation.GetMapping;
import org.springframework.web.bind.annotation.RestController;

@RestController
public class UserController {

  @GetMapping("user")
  public Mono<User> getUser(
   @AuthenticationPrincipal OidcUser oidcUser    ❶
  ) {
    var user = new User(                         ❷
      oidcUser.getPreferredUsername(),
      oidcUser.getGivenName(),
      oidcUser.getFamilyName(),
      List.of("employee", "customer")
    );
    return Mono.just(user);                      ❸
  }
}
❶ Injects an OidcUser object containing info about the currently authenticated user
❷ Builds a User object from relevant claims contained in OidcUser
❸ Wraps the User object in a reactive publisher, since Edge Service is a reactive application
Ensure that Keycloak and Redis are still running from the previous section, run the Edge Service application (./gradlew bootRun), open an incognito browser window, and navigate to http://localhost:9000/user. Spring Security will redirect you to Keycloak, which will prompt you to log in with a username and password. For example, authenticate as Bjorn (bjorn/password). After successfully authenticating, you will be redirected back to the /user endpoint. The result is the following:
{
  "username": "bjorn",
  "firstName": "Bjorn",
  "lastName": "Vinterberg",
  "roles": [
    "employee",
    "customer"
  ]
}
Note The roles list includes hardcoded values. In the next chapter, we’ll change it to return the actual roles assigned to each user in Keycloak.
When you’re done trying out the new endpoint, stop the application with Ctrl-C and the containers with docker-compose down.
Consider what happened when you tried to access the /user endpoint and got redirected to Keycloak. After successfully validating the user’s credentials, Keycloak called Edge Service back and sent the ID Token for the newly authenticated user. Then Edge Service stored the token and redirected the browser to the required endpoint, together with a session cookie. From that point on, any communication between the browser and Edge Service will use that session cookie to identify the authenticated context for that user. No token is exposed to the browser.
The ID Token is stored in OidcUser, part of Authentication and ultimately included in SecurityContext. In chapter 9, we used the Spring Session project to make Edge Service store session data in an external data service (Redis), so it could remain stateless and be able to scale out. SecurityContext objects are included in the session data and are therefore stored in Redis automatically, making it possible for Edge Service to scale out without any problem.
Another option for retrieving the currently authenticated user (the principal) is from the context associated with a specific HTTP request (called the exchange). We’ll use that option to update the rate limiter configuration. In chapter 9, we implemented rate-limiting with Spring Cloud Gateway and Redis. Currently the rate-limiting is computed based on the total number of requests received every second. We should update it to apply the rate limits to each user independently.
Open the RateLimiterConfig class and configure how the username of the currently authenticated principal should be extracted from the request. If no user is defined (that is, the request is unauthenticated, anonymous), we use a default key to apply rate-limiting to all unauthenticated requests as a whole.
Listing 11.10 Configuring rate limiting for each user
@Configuration
public class RateLimiterConfig {

  @Bean
  KeyResolver keyResolver() {
    return exchange -> exchange.getPrincipal()    ❶
      .map(Principal::getName)                    ❷
      .defaultIfEmpty("anonymous");               ❸
  }
}
❶ Gets the currently authenticated user (the principal) from the current request (the exchange)
❷ Extracts the username from the principal
❸ If the request is unauthenticated, it uses “anonymous” as the default key to apply rate-limiting.
That concludes the basic configuration for authenticating users of Polar Bookshop using OpenID Connect. The following section will cover how logout works in Spring Security and how we can customize it for the OAuth2/OIDC scenario.
11.4.5 Configuring user logout in Spring Security and Keycloak
So far, we have addressed the challenges and solutions for authenticating users in a distributed system. Still, we should consider what happens when a user logs out.
In Spring Security, logging out results in all the session data associated with the user being deleted. When OpenID Connect/OAuth2 is used, the tokens stored by Spring Security for that user are also deleted. However, the user will still have an active session in Keycloak. Just as the authentication process involves both Keycloak and Edge Service, completely logging a user out requires propagating the logout request to both components.
By default, a logout performed against an application protected by Spring Security will not affect Keycloak. Fortunately, Spring Security provides an implementation of the “OpenID Connect RP-Initiated Logout” specification, which defines how a logout request should be propagated from an OAuth2 Client (the Relying Party) to the Authorization Server. You’ll see how to configure it for Edge Service soon.
Note The OpenID Connect specification includes a few different scenarios for session management and logout. If you’d like to learn more, I recommend you check the official documents for OIDC Session Management (https://openid.net/specs/openid-connect-session-1_0.html), OIDC Front-Channel Logout (https://openid.net/specs/openid-connect-frontchannel-1_0.html), OIDC Back-Channel Logout (https://openid.net/specs/openid-connect-backchannel-1_0.html), and OIDC RP-Initiated Logout (https://openid.net/specs/openid-connect-rpinitiated-1_0.html).
Spring Security supports logging out by sending a POST request to the /logout endpoint implemented and exposed by the framework by default. We want to enable the RP-Initiated Logout scenario so that when a user logs out of the application, they are also logged out of the Authorization Server. Spring Security has full support for this scenario and provides an OidcClientInitiatedServerLogoutSuccessHandler object you can use to configure how to propagate a logout request to Keycloak.
Let’s say the RP-Initiated Logout feature is enabled. In that case, after a user has been successfully logged out of Spring Security, Edge Service will send a logout request to Keycloak through the browser (using a redirect). Next you’ll probably want the user to be redirected back to the application after the logout operation has been performed on the Authorization Server as well.
You can configure where the user should be redirected after a logout with the setPostLogoutRedirectUri() method, which is exposed by the OidcClientInitiatedServerLogoutSuccessHandler class. You might specify a direct URL, but that will not work well in a cloud environment due to many variables such as hostnames, service names, and protocols (http vs. https). The Spring Security team knew that, and they added support for placeholders that are resolved dynamically at runtime. Instead of hardcoding a URL value, you can use the {baseUrl} placeholder. When you run Edge Service locally, the placeholder will be resolved to http://localhost:9000. If you ran it in the cloud behind a proxy with TLS termination and accessible through the DNS name polarbookshop.com, it would automatically be replaced with https://polarbookshop.com.
However, the Client configuration in Keycloak requires an exact URL. That’s why we added http://localhost:9000 to the list of valid redirect URLs when we registered Edge Service in Keycloak. In production you’ll have to update the list of valid redirect URLs in Keycloak to match the actual URLs used there.
Figure 11.6 illustrates the logout scenario I’ve just described.
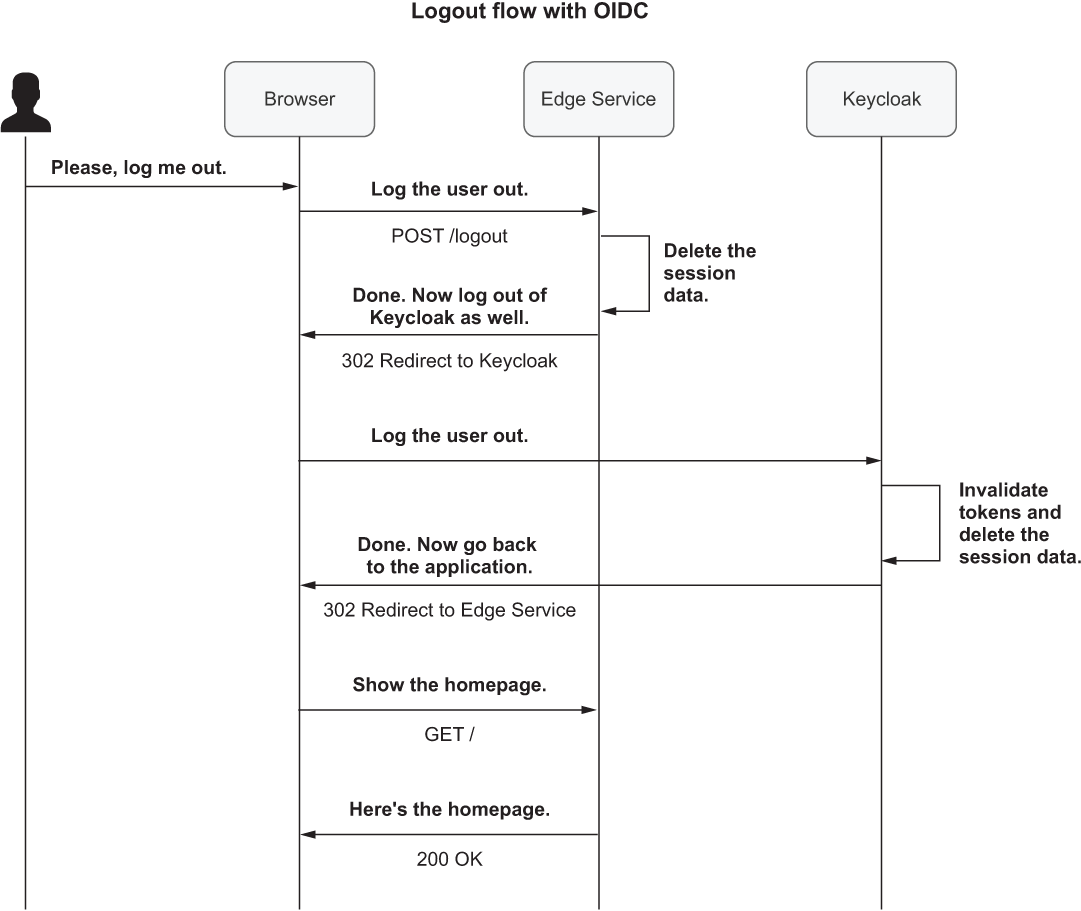
Figure 11.6 When a user logs out, the request is processed by Spring Security first, then forwarded to Keycloak, and the user is finally redirected to the application.
Since the application’s logout functionality is already provided by default in Spring Security, you only need to enable and configure the RP-Initiated Logout for Edge Service:
-
In the SecurityConfig class, define an oidcLogoutSuccessHandler() method to build an OidcClientInitiatedServerLogoutSuccessHandler object.
-
Configure the post-logout redirect URL using the setPostLogoutRedirectUri() method.
-
Call the oidcLogoutSuccessHandler() method from the logout() configuration defined in the SecurityWebFilterChain bean.
The resulting configuration in the SecurityConfig class is as follows.
Listing 11.11 Configuring RP-Initiated Logout and redirecting on logout
package com.polarbookshop.edgeservice.config;

import org.springframework.context.annotation.Bean;
import org.springframework.security.config.Customizer;
import org.springframework.security.config.annotation.web.reactive.
➥ EnableWebFluxSecurity;
import org.springframework.security.config.web.server.ServerHttpSecurity;
import org.springframework.security.oauth2.client.oidc.web.server.logout.
➥ OidcClientInitiatedServerLogoutSuccessHandler;
import org.springframework.security.oauth2.client.registration.
➥ ReactiveClientRegistrationRepository;
import org.springframework.security.web.server.SecurityWebFilterChain;
import org.springframework.security.web.server.authentication.logout.
➥ ServerLogoutSuccessHandler;

@EnableWebFluxSecurity
public class SecurityConfig {

  @Bean
  SecurityWebFilterChain springSecurityFilterChain(
    ServerHttpSecurity http,
    ReactiveClientRegistrationRepository clientRegistrationRepository
  ) {
    return http
      .authorizeExchange(exchange ->
        exchange.anyExchange().authenticated())
      .oauth2Login(Customizer.withDefaults())
      .logout(logout -> logout.logoutSuccessHandler(               ❶
        oidcLogoutSuccessHandler(clientRegistrationRepository)))
      .build();
  }

  private ServerLogoutSuccessHandler oidcLogoutSuccessHandler(
    ReactiveClientRegistrationRepository clientRegistrationRepository
  ) {
    var oidcLogoutSuccessHandler =
        new OidcClientInitiatedServerLogoutSuccessHandler(
          clientRegistrationRepository);
    oidcLogoutSuccessHandler
      .setPostLogoutRedirectUri("{baseUrl}");                      ❷
    return oidcLogoutSuccessHandler;
  }
}
❶ Defines a custom handler for the scenario where a logout operation is completed successfully
❷ After logging out from the OIDC Provider, Keycloak will redirect the user to the application base URL computed dynamically from Spring (locally, it’s http://localhost:9000).
Note The ReactiveClientRegistrationRepository bean is automatically configured by Spring Boot for storing the information about the clients registered with Keycloak, and it’s used by Spring Security for authentication/ authorization purposes. In our example, there’s only a client: the one we configured earlier in the application.yml file.
I won’t ask you to test the logout functionality just yet. The reason will be apparent after we introduce the Angular frontend to the Polar Bookshop system.
The user authentication feature based on OpenID Connect/OAuth2 is now complete, including logout and scalability concerns. If Edge Service used a template engine like Thymeleaf to build the frontend, the work we’ve done so far would be enough. However, when you’re integrating a secured backend application with an SPA like Angular, there are a few more aspects to consider. That will be the focus of the next section.
11.5 Integrating Spring Security with SPAs
The web frontend part of microservice architectures and other distributed systems is often built as one or more single-page applications using frameworks like Angular, React, or Vue. Analyzing how SPAs are created is not in the scope of this book, but it’s essential to look at what changes are needed to support such frontend clients.
So far, you have interacted with the services composing the Polar Bookshop system through a Terminal window. In this section, we’ll add an Angular application that will be the frontend of the system. It will be served by an NGINX container and be accessible via the gateway provided by Edge Service. Supporting an SPA will require some additional configuration in Spring Security to address concerns like Cross-Origin Request Sharing (CORS) and Cross-Site Request Forgery (CSRF). This section shows how to do that.
11.5.1 Running an Angular application
The Polar Bookshop system will have an Angular application as the frontend. Since this book doesn’t cover frontend technologies and patterns, I have prepared one already. We just need to decide how to include it in the Polar Bookshop system.
One option is to let Edge Service serve the SPA static resources. Spring Boot applications serving a frontend usually host the source code in src/main/resources. That’s a convenient strategy when using template engines like Thymeleaf, but for SPAs like Angular, I prefer keeping the code in a separate module. SPAs have their own development, build, and release tools, so having a dedicated folder is cleaner and more maintainable. Then you can configure Spring Boot to process the SPA’s static resources at build time and include them in the final release.
Another option is to have a dedicated service take care of serving the Angular static resources. That’s the strategy we’ll use for Polar Bookshop. I have already packaged the Angular application in an NGINX container. NGINX (https://nginx.org) provides HTTP server features, and it’s very convenient for serving static resources such as the HTML, CSS, and JavaScript files composing the Angular application.
Let’s go ahead and run the Polar Bookshop frontend (polar-ui) in Docker. First, go to your polar-deployment repository, and open your Docker Compose file (docker/docker-compose.yml). Then add the configuration to run polar-ui and expose it through port 9004.
Listing 11.12 Running the Angular application as a container
version: "3.8"
services:
  ...

  polar-ui:
    image: "ghcr.io/polarbookshop/polar-ui:v1"   ❶
    container_name: "polar-ui"
    ports:
      - 9004:9004                                ❷
    environment:
      - PORT=9004                                ❸
❶ The container image I built to package the Angular application
❷ NGINX will serve the SPA on port 9004.
❸ Configures the NGINX server port
Like the other applications in the Polar Bookshop system, we don’t want the Angular application to be accessible directly from the outside. Instead, we want to make it accessible via the gateway provided by Edge Service. We can do that by adding a new route for Spring Cloud Gateway to forward any requests for static resources to the Polar UI application.
Go to your Edge Service project (edge-service), open the application.yml file, and configure the new route as follows.
Listing 11.13 Configuring a new gateway route for the SPA static resources
spring:
  gateway:
    routes:
      - id: spa-route                             ❶
        uri: ${SPA_URL:http://localhost:9004}     ❷
        predicates:                               ❸
- Path=/,/*.css,/*.js,/favicon.ico ❷ The URI value comes from an environment variable, or else the specified default.
❸ The predicate is a list of paths matching the root endpoint and the SPA static resources.
The URI for the Polar UI application is computed using the value from an environment variable (SPA_URL). If it’s not defined, the default value written after the first colon (:) symbol will be used.
Note When running Edge Service as a container, remember to configure the SPA_URL environment variable. On Docker you can use the container name and port as the value, resulting in http://polar-ui:9004.
Let’s test it out. First, run the Polar UI container together with Redis and Keycloak. Open a Terminal window, navigate to the folder where you keep your Docker Compose file (polar-deployment/docker/docker-compose.yml), and run the following command:
$ docker-compose up -d polar-ui polar-redis polar-keycloak
Then build the Edge Service project again, and run the application (./gradlew bootRun). Finally, open an incognito browser window and navigate to http://localhost:9000.
Spring Security is configured to protect all endpoints and resources, so you’ll automatically be redirected to the Keycloak login page. After you authenticate as either Isabelle or Bjorn, you’ll be redirected back to the Edge Service root endpoint from which the Angular frontend is served.
For now, there’s not much you can do. The authentication flow is triggered by Spring Security when it receives an unauthenticated request, but it won’t work if it’s an AJAX request due to CORS issues. Furthermore, POST requests (including the logout operation) will fail due to the CSRF protection enabled by Spring Security. In the following sections, I’ll show you how to update the Spring Security configuration to overcome those issues.
Before moving on, stop the application with Ctrl-C (but keep the containers running—you’ll need them).
11.5.2 Controlling the authentication flow
In the previous section, you tried accessing the Edge Service homepage and experienced being automatically redirected to Keycloak to provide a username and password. When the frontend consists of server-rendered pages (such as when using Thymeleaf), that behavior works fine, and it’s convenient since it doesn’t require any extra configuration. If you’re not authenticated yet, or your session has expired, Spring Security will automatically trigger the authentication flow and redirect your browser to Keycloak.
With a single-page application, things work a bit differently. The Angular application is returned by the backend when accessing the root endpoint through a standard HTTP GET request performed by the browser. After that first step, the SPA interacts with the backend through AJAX requests. When the SPA sends an unauthenticated AJAX request to a protected endpoint, you don’t want Spring Security to reply with an HTTP 302 response redirecting to Keycloak. Instead, you want it to return a response with an error status like HTTP 401 Unauthorized.
The main reason for not using redirects with SPAs is that you would run into Cross-Origin Request Sharing (CORS) issues. Consider the scenario where an SPA is served from https://client.polarbookshop.com and makes HTTP calls through AJAX to a backend at https://server.polarbookshop.com. The communication is blocked because the two URLs don’t have the same origin (the same protocol, domain, and port). That’s the standard same-origin policy enforced by all web browsers.
CORS is a mechanism for allowing a server to accept HTTP calls through AJAX from a browser-based client like an SPA, even if the two have different origins. In Polar Bookshop, we serve the Angular frontend via the gateway implemented in Edge Service (same origin). Therefore, there aren’t any CORS issues between these two components. However, suppose Spring Security is configured to reply to an unauthenticated AJAX call with a redirect to Keycloak (having a different origin). In that case, the request will be blocked because redirects to different origins are not permitted during AJAX requests.
Note To learn more about CORS in Spring Security, you can check out chapter 10 of Spring Security in Action by Laurențiu Spilcă (Manning, 2020), where the subject is explained in great detail. For a comprehensive explanation of CORS, see CORS in Action by Monsur Hossain (Manning, 2014).
When changing the Spring Security configuration to reply with an HTTP 401 response to unauthenticated requests, it’s up to the SPA to handle the error and call the backend to initiate the authentication flow. Redirects are only a problem during AJAX requests. The crucial part here is that the call to the backend to start the user authentication is not an AJAX request sent by Angular. Instead, it’s a standard HTTP call sent from the browser, like the following:
login(): void {
  window.open('/oauth2/authorization/keycloak', '_self');
}
I’d like to stress that the login call is not an AJAX request sent from the Angular HttpClient. Instead, it instructs the browser to call the login URL. Spring Security exposes an /oauth2/authorization/{registrationId} endpoint that you can use to start the authentication flow based on OAuth2/OIDC. Since the client registration identifier for Edge Service is keycloak, the login endpoint will be /oauth2/authorization/ keycloak.
To make that possible, we need to define a custom AuthenticationEntryPoint to instruct Spring Security to reply with an HTTP 401 status when an unauthenticated request is received for a protected resource. The framework already provides an HttpStatusServerEntryPoint implementation that perfectly suits this scenario, since it lets you specify which HTTP status to return when a user is required to authenticate.
Listing 11.14 Returning 401 when the user is not authenticated
@EnableWebFluxSecurity
public class SecurityConfig {
  ...

  @Bean
  SecurityWebFilterChain springSecurityFilterChain(
    ServerHttpSecurity http,
    ReactiveClientRegistrationRepository clientRegistrationRepository
  ) {
    return http
      .authorizeExchange(exchange -> exchange.anyExchange().authenticated())
      .exceptionHandling(exceptionHandling ->
        exceptionHandling.authenticationEntryPoint(                 ❶
          new HttpStatusServerEntryPoint(HttpStatus.UNAUTHORIZED)))
      .oauth2Login(Customizer.withDefaults())
      .logout(logout -> logout.logoutSuccessHandler(
      oidcLogoutSuccessHandler(clientRegistrationRepository)))
      .build();
  }
}
❶ When an exception is thrown because a user is not authenticated, it replies with an HTTP 401 response.
At this point, the Angular application can explicitly intercept HTTP 401 responses and trigger the authentication flow. However, since the SPA is now in charge of starting the flow, we need to permit unauthenticated access to its static resources. We would also like to retrieve the books in the catalog without being authenticated, so let’s permit GET requests to the /books/** endpoints as well. Go ahead and update the SecurityWebFilterChain bean in the SecurityConfig class as follows.
Listing 11.15 Allowing unauthenticated GET requests to SPA and books
@EnableWebFluxSecurity
public class SecurityConfig {
  ...

  @Bean
  SecurityWebFilterChain springSecurityFilterChain(
    ServerHttpSecurity http,
    ReactiveClientRegistrationRepository clientRegistrationRepository
  ) {
    return http
      .authorizeExchange(exchange -> exchange
        .pathMatchers("/", "/*.css", "/*.js", "/favicon.ico")
          .permitAll()                                         ❶
        .pathMatchers(HttpMethod.GET, "/books/**")
          .permitAll()                                         ❷
        .anyExchange().authenticated()                         ❸
      )
      .exceptionHandling(exceptionHandling -> exceptionHandling
        .authenticationEntryPoint(
        new HttpStatusServerEntryPoint(HttpStatus.UNAUTHORIZED)))
      .oauth2Login(Customizer.withDefaults())
      .logout(logout -> logout.logoutSuccessHandler(
        oidcLogoutSuccessHandler(clientRegistrationRepository)))
      .build();
  }
}
❶ Allows unauthenticated access to the SPA static resources
❷ Allows unauthenticated read access to the books in the catalog
❸ Any other request requires user authentication.
Let’s test how Edge Service works now. Ensure that the Polar UI, Redis, and Keycloak containers are still running. Next, build and run the Edge Service application (./gradlew bootRun), and then go to http://localhost:9000 from an incognito browser window. The first thing to notice is that you don’t get redirected to the login page but are presented with the Angular frontend application immediately. You can start the authentication flow by clicking the Login button in the upper-right menu.
After logging in, the upper-right menu will contain a Logout button, which is only shown if the current user is successfully authenticated. Click the button to log out. It should trigger the logout flow, but it won’t work due to CSRF issues. You’ll learn how to fix that in the next section. In the meantime, stop the application with Ctrl-C.
11.5.3 Protecting against Cross-Site Request Forgery
The interaction between the frontend and backend is based on a session cookie. After the user is successfully authenticated with the OIDC/OAuth2 strategy, Spring will generate a session identifier to match the authenticated context and send it to the browser as a cookie. Any subsequent request to the backend will have to contain the session cookie, from which Spring Security can retrieve the tokens associated with the specific user and validate the request.
However, session cookies are not enough to validate requests, which are vulnerable to Cross-Site Request Forgery (CSRF) attacks. CSRF affects modifying HTTP requests like POST, PUT, and DELETE. An attacker could induce users to perform requests they didn’t intend by forging a request meant to cause harm. Forged requests could do things like transfer money from your bank account or compromise critical data.
Warning Many online tutorials and guides show how to disable the CSRF protection as the first thing when configuring Spring Security. That’s dangerous to do without explaining the reasoning or considering the consequences. I recommend keeping the protection enabled unless there’s a good reason not to (you’ll see one good reason in chapter 12). As a general guideline, browser-facing applications like Edge Service should be protected against CSRF attacks.
Fortunately, Spring Security has built-in protection against such attacks. The protection is based on a so-called CSRF token generated by the framework that’s provided to the client at the beginning of the session and required to be sent along with any state-changing requests.
Note To learn more about CSRF protection in Spring Security, you can check out chapter 10 of Spring Security in Action by Laurențiu Spilcă (Manning, 2020), where the subject is explained in great detail.
In the previous section, you tried to log out, but the request failed. Since the logout operation is available through a POST request to the /logout endpoint, the application expects to receive the CSRF token generated by Spring Security for that user session. By default, the generated CSRF token is sent to the browser as an HTTP header. However, Angular applications cannot work with that and expect to receive the token value as a cookie. Spring Security supports this specific requirement, but it’s not enabled by default.
You can instruct Spring Security to provide CSRF tokens as cookies through the csrf() DSL exposed by ServerHttpSecurity and the CookieServerCsrfTokenRepository class. For imperative applications, that would be enough. However, for reactive applications like Edge Service, you need to take an extra step to ensure the CsrfToken value is actually provided.
In chapter 8, you learned that reactive streams need to be subscribed to in order to activate them. At the moment, CookieServerCsrfTokenRepository doesn’t ensure a subscription to CsrfToken, so you must explicitly provide a workaround in a WebFilter bean. This problem should be solved in future versions of Spring Security (see issue 5766 on GitHub: https://mng.bz/XW89). For now, update the SecurityConfig class as follows.
Listing 11.16 Configuring CSRF to support a cookie-based strategy for SPAs
@EnableWebFluxSecurity
public class SecurityConfig {
  ...

  @Bean
  SecurityWebFilterChain springSecurityFilterChain(
    ServerHttpSecurity http,
    ReactiveClientRegistrationRepository clientRegistrationRepository
  ) {
    return http
      ...
      .csrf(csrf -> csrf.csrfTokenRepository(                   ❶
        CookieServerCsrfTokenRepository.withHttpOnlyFalse()))
      .build();
  }

  @Bean
  WebFilter csrfWebFilter() {                                   ❷
    return (exchange, chain) -> {
      exchange.getResponse().beforeCommit(() -> Mono.defer(() -> {
        Mono<CsrfToken> csrfToken =
          exchange.getAttribute(CsrfToken.class.getName());
        return csrfToken != null ? csrfToken.then() : Mono.empty();
      }));
      return chain.filter(exchange);
    };
  }
}
❶ Uses a cookie-based strategy for exchanging CSRF tokens with the Angular frontend
❷ A filter with the only purpose of subscribing to the CsrfToken reactive stream and ensuring its value is extracted correctly
Let’s verify that the logout flow works now. Ensure that the Polar UI, Redis, and Keycloak containers are still up and running. Next, build and run the application (./gradlew bootRun), and then go to http://localhost:9000 from an incognito browser window. Start the authentication flow by clicking the Login button from the upper-right menu. Then click the Logout button. Under the hood, Spring Security will now accept your logout request (Angular adds the CSRF token value from the cookie as an HTTP header), terminate your web session, propagate the request to Keycloak, and finally redirect you to the homepage, unauthenticated.
Thanks to this change, you can also perform any POST, PUT, and DELETE requests without receiving a CSRF error. Feel free to explore the Angular application. If you start up Catalog Service and Order Service, you can try adding new books to the catalog, modifying them, or placing an order.
Both Isabelle and Bjorn can perform any action at the moment, which is not what we want, since customers (like Bjorn) shouldn’t be allowed to manage the book catalog. The next chapter will cover authorization, and you’ll see how to protect each endpoint with different access policies. Before addressing authorization, though, we need to write autotests to cover the new functionality. That’s coming up in the next section.
Before moving on, stop the application with Ctrl-C and all the containers with docker-compose down (from polar-deployment/docker).
11.6 Testing Spring Security and OpenID Connect
The importance of writing autotests is usually apparent to developers. Still, things can get challenging when it comes to security, and it sometimes ends up not being covered by automated tests because of its complexity. Fortunately, Spring Security provides several utilities to help you include security in your slice and integration tests in a simple way.
In this section, you’ll learn how to use the WebTestClient support for Spring Security to test OIDC authentication and CSRF protection. Let’s get started.
11.6.1 Testing OIDC authentication
In chapter 8, we tested REST controllers exposed by Spring WebFlux by relying on the @SpringWebFlux annotation and WebTestClient. In this chapter, we added a new controller (UserController), so let’s write some autotests for it with different security setups.
First of all, open your Edge Service project, create a UserControllerTests class annotated with @WebFluxTest(UserController.class) in src/test/java, and autowire a WebTestClient bean. So far, the setup is similar to what we used in chapter 8: a slice test for the web layer. But we need some extra setup to cover security scenarios, as shown in the following listing.
Listing 11.17 Defining a class to test the security policies for UserController
@WebFluxTest(UserController.class)
@Import(SecurityConfig.class)        ❶
class UserControllerTests {

  @Autowired
  WebTestClient webClient;

  @MockBean                          ❷
  ReactiveClientRegistrationRepository clientRegistrationRepository;
}
❶ Imports the application’s security configuration
❷ A mock bean to skip the interaction with Keycloak when retrieving information about the Client registration
Since we configured Edge Service to return an HTTP 401 response when a request is unauthenticated, let’s verify that happens when calling the /user endpoint without authenticating first:
@Test
void whenNotAuthenticatedThen401() {
  webClient
    .get()
    .uri("/user")
    .exchange()
    .expectStatus().isUnauthorized();
}
To test the scenario where a user is authenticated, we can use mockOidcLogin(), a configuration object supplied by SecurityMockServerConfigurers to mock an OIDC login, synthesize an ID Token, and mutate the request context in WebTestClient accordingly.
The /user endpoint reads claims from the ID Token through the OidcUser object, so we need to build an ID Token with username, first name, and last name (the roles are hardcoded in the controller for now). The following code shows how to do that:
@Test
void whenAuthenticatedThenReturnUser() {
  var expectedUser = new User("jon.snow", "Jon", "Snow",
    List.of("employee", "customer"));                            ❶

  webClient
    .mutateWith(configureMockOidcLogin(expectedUser))            ❷
    .get()
    .uri("/user")
    .exchange()
    .expectStatus().is2xxSuccessful()
    .expectBody(User.class)                                      ❸
    .value(user -> assertThat(user).isEqualTo(expectedUser));
}

private SecurityMockServerConfigurers.OidcLoginMutator
➥ configureMockOidcLogin(User expectedUser) {
  return SecurityMockServerConfigurers.mockOidcLogin().idToken(
   builder -> {                                                  ❹
      builder.claim(StandardClaimNames.PREFERRED_USERNAME,
        expectedUser.username());
      builder.claim(StandardClaimNames.GIVEN_NAME,
        expectedUser.firstName());
      builder.claim(StandardClaimNames.FAMILY_NAME,
        expectedUser.lastName());
    });
}
❶ The expected authenticated user
❷ Defines an authentication context based on OIDC and uses the expected user
❸ Expects a User object with the same information as the currently authenticated user
Finally, run the tests as follows:
$ ./gradlew test --tests UserControllerTests
The testing utilities supplied by Spring Security cover a wide array of scenarios and integrate well with WebTestClient. In the next section, you’ll see how to test CSRF protection using a similar approach.
11.6.2 Testing CSRF
In Spring Security, CSRF protection applies to all mutating HTTP requests by default (such as POST, PUT, and DELETE). As you saw in previous sections, Edge Service accepts POST requests to the /logout endpoint to initiate the logout flow, and such requests require a valid CSRF token to be executed. Furthermore, we configured the RP-Initiated Logout feature from OIDC, so a POST request to /logout will actually result in an HTTP 302 response, redirecting the browser to Keycloak to also log the user out of there.
Create a new SecurityConfigTests class and use the same strategy you learned in the previous section to set up a Spring WebFlux test with security support, as shown in the following listing.
Listing 11.18 Defining a class for testing the authentication flow
@WebFluxTest
@Import(SecurityConfig.class)   ❶
class SecurityConfigTests {

  @Autowired
  WebTestClient webClient;

  @MockBean                     ❷
  ReactiveClientRegistrationRepository clientRegistrationRepository;
}
❶ Imports the application security configuration
❷ A mock bean to skip the interaction with Keycloak when retrieving information about the Client registration
Then add a test case to check whether the application returns an HTTP 302 response after sending an HTTP POST request to the /logout with the correct OIDC login and CSRF context.
@Test
void whenLogoutAuthenticatedAndWithCsrfTokenThen302() {
  when(clientRegistrationRepository.findByRegistrationId("test"))
    .thenReturn(Mono.just(testClientRegistration()));

  webClient
    .mutateWith(
     SecurityMockServerConfigurers.mockOidcLogin())                 ❶
    .mutateWith(SecurityMockServerConfigurers.csrf())               ❷
    .post()
    .uri("/logout")
    .exchange()
    .expectStatus().isFound();                                      ❸
}

private ClientRegistration testClientRegistration() {
  return ClientRegistration.withRegistrationId("test")              ❹
    .authorizationGrantType(AuthorizationGrantType.AUTHORIZATION_CODE)
    .clientId("test")
    .authorizationUri("https://sso.polarbookshop.com/auth")
    .tokenUri("https://sso.polarbookshop.com/token")
    .redirectUri("https://polarbookshop.com")
    .build();
}
❶ Uses a mock ID Token to authenticate the user
❷ Enhances the request to provide the required CSRF token
❸ The response is a redirect to Keycloak to propagate the logout operation.
❹ A mock ClientRegistration used by Spring Security to get the URLs to contact Keycloak
Finally, run the tests as follows:
$ ./gradlew test --tests SecurityConfigTests
As always, you can find more test examples in the source code repository accompanying this book. When it comes to security, unit and integration tests are critical for ensuring the correctness of an application, but they are not enough. Those tests cover the default security configuration, which might be different in production. That’s why we also need security-oriented autotests in the acceptance stage of the deployment pipeline (as explained in chapter 3), to test applications deployed in a production-like environment.
The next chapter will expand on the subject of security. It will cover how to propagate the authentication context from Edge Service to the downstream applications, and how to configure authorization.
Summary
-
Access control systems require identification (who are you?), authentication (can you prove it’s really you?), and authorization (what are you allowed to do?).
-
A common strategy for implementing authentication and authorization in cloud native applications is based on JWT as the data format, OAuth2 as the authorization framework, and OpenID Connect as the authentication protocol.
-
When using OIDC authentication, a Client application initiates the flow and delegates an Authorization Server for the actual authentication. Then the Authorization Server issues an ID Token to the Client.
-
The ID Token includes information about the user authentication.
-
Keycloak is an identity and access management solution that supports OAuth2 and OpenID Connect and can be used as an Authorization Server.
-
Spring Security provides native support for OAuth2 and OpenID Connect, and you can use it to turn Spring Boot applications into OAuth2 Clients.
-
In Spring Security, you can configure both authentication and authorization in a SecurityWebFilterChain bean. To enable the OIDC authentication flow, you can use the oauth2Login() DSL.
-
By default, Spring Security exposes a /logout endpoint for logging a user out.
-
In an OIDC/OAuth2 context, we also need to propagate the logout request to the Authorization Server (such as Keycloak) to log the user out of there. We can do that via the RP-Initiated Logout flow supported by Spring Security via the OidcClientInitiatedServerLogoutSuccessHandler class.
-
When a secure Spring Boot application is the backend for an SPA, we need to configure CSRF protection through cookies and implement an authentication entry point that returns an HTTP 401 response when a request is not authenticated (as opposed to the default HTTP 302 response redirecting to the Authorization Server automatically).
-
The Spring Security Test dependency supplies several convenient utilities for testing security.
-
The WebTestClient bean can be enhanced by mutating its request context through a particular configuration for OIDC login and CSRF protection.