CHAPTER 1
ESSENTIAL TOOLS AND MATERIALS
In this chapter, you’ll learn about the basic materials needed to take you from bright idea to successful linocut print. Linocut printing is a form of relief printing, the process of pulling a print from a carved block, where the ink is deposited on the remaining (uncarved) areas of the block. One of my favorite things about relief printmaking is that you don’t need expensive equipment to make studio-quality prints, and most tools are relatively affordable. There are lots of brands of tools, papers, blocks, and inks to try, so research and experiment to find what works best for you.

ESSENTIAL TOOLS
Blocks
CARVING BLOCKS
Though printmaking encompasses many different types of carving surfaces, this book focuses on the use of linoleum and rubber blocks. Soft rubber is often a good choice for younger, less experienced printmakers as it is easy to cut with beginner’s tools. I also prefer soft rubber when printing on fabric. The sturdier linoleum is harder to cut and requires sharp tools but its density holds detailed cuts beautifully, and it is less likely to accidentally squish and bleed during printing.

LINOLEUM BLOCKS
Made of linseed oil, cork dust, wood flour, and pine resin, linoleum is a medium that many artists choose to work in because of its renewable composition. It comes in a variety of small-to-medium standard sizes as well as in large rolls, and due to its flexibility it can be cut into any shape. Many professional printmakers prefer the unmounted “battleship gray” linoleum.
Linoleum sometimes comes mounted on thick blocks of composite wood and although these can’t be easily manipulated into different shapes, the wooden backing provides extra support and protection for your carving. The weight of the mounted block also helps to keep your carving stable when you peel off the print.
Linoleum (mounted or unmounted) can be heated to help carving tools move through them more smoothly: you can do this by covering the block with a towel and gliding over it with a clothes iron on a medium setting. Or you can simply warm it with a hairdryer. I personally find that sitting on a block heats it up just enough. If you keep your carving tools sharp, however, you may not need to heat your block.
Linoleum should always be stored flat, away from direct sunlight and extreme temperatures. Light, extreme temperatures, and time will eventually cause your linoleum to become hard, warped, crumbly, and infuriating to carve. I don’t keep much linoleum on hand because fresh linoleum cuts best.

From top to bottom: MOO Carve Professional Carving Block; Speedball Speedy-Carve; Speedball Speedy-Cut; Speedball mounted linoleum block; Blick battleship gray unmounted linoleum.

The loose-weave burlap on the back of unmounted linoleum, also referred to as the hessian backing.
RUBBER BLOCKS
Rubber blocks such as Soft-Kut, MOO Carve, and Speedy-Carve are a good alternative to traditional linoleum: they’re generally much softer and easier for the blade of your carving tools to bite into. It takes only a fraction of the power necessary to push a blade through linoleum. The softest of the blocks, like MOO Carve, require only the lightest flicks of your blades so a steady hand is very helpful. Rubber blocks are great for detailed work and won’t get crumbly as linoleum sometimes does.
Carving Tools and Tool Care
Most starter kits come with a variety of blade widths and shapes, ranging from the narrowest veiners to the widest U-shaped blades. Veiners are for making very thin, fine lines. V gouges are formed at either 45- or 90-degree angles. U gouges are—you guessed it—shaped like Us, and are great for scooping out lino cleanly. You should also consider the size of your hand and the type of handle that will give you the best grip—full-size tools can be harder to wield but provide greater leverage for more power behind your cuts. Mushroom-shaped palm tools can provide a more comfortable, stable grip for carving fine details.
Though I keep many tools at hand, I usually end up reaching for the same four tools over and over again: a 1-mm U gouge, 3-mm U gouge, 1-mm V gouge, and a 0.5-mm veiner. Those are my workhorses, suitable for most projects with fine details under 11" x 14" (28 x 35.5 cm).

Top to bottom: Pfeil full size no. 11 veiner; Pfeil palm tools set C; Powergrip set; Speedball linoleum cutter with interchangeable blade heads.

Pfeil Swiss-made carving tools, set C
The density of your linoleum has an impact on your tools. Dense battleship gray lino will dull a blade much faster than its soft rubbery counterparts. Because your blades will take a beating just from regular use, it is worthwhile to buy the best quality blades you can afford. However don’t discount the cheaper starter sets—they are perfect for beginners and some have interchangeable blades that you can conveniently store in the handle of the tool itself.
Sharpening Your Tools
Over time, the blades of carving tools lose their edge and become dull. A dull blade is a printmaker's nightmare, because it is more difficult to push through linoleum. This will cause you to tire quickly and also makes the blade more likely to slip or tear the linoleum. A good practice is to sharpen your blades regularly to keep them free from nicks and burrs, which are rough little bits of metal that can form on the edge of the blade. And to any art student who had to endure the struggle of carving with a raggedy tool used by a hundred other students that semester, this one’s for you.

Flatlay of sharpening tools
Using a Slipstrop
Here is how to hone your tools using the Flexcut SlipStrop.

1 Start with sharpening the outside of the tool. Rub the yellow honing compound (included with the set) onto the flat side of the slipstrop, applying it to the leather surface liberally.

2 Hold the tool at about a 15-degree angle and place it on the leather, pointing away from you. Pulling it back toward you, gently push the outer edge of the blade against the leather. If you’re sharpening a U gouge, start on one side of the gouge, and roll it to the other side as you pull it back toward you. Rolling the tool gradually from side to side ensures that the entire edge makes contact.
3 If you’re sharpening a V-parting tool, do one side at a time instead of rolling. Don't rub the tool back and forth; pick it up and place it at the top of the slipstrope for each stroke.

4 Flip the slipstrop over to reveal the funky, ridged side. These curved and steepled ridges correspond to the shape of most gouge tools. Select the ridge that matches your blade and rub the yellow honing compound liberally along it. Repeat the same process for the inner portion of the blade as you used on the outer edge.
Using a Whetstone and Slipstone
1 Submerge the whetstone in water for 5 to 10 minutes before use. Place on a paper towel.

2 Hold the tool against the blue side of the whetstone at about a 15-degree angle (or so that the cutting edge is flush with the surface of the stone). If you're sharpening a V-parting tool, gently move it up and down against the stone about 5 times or until you see the edge start to sharpen.

3 If you're sharpening a U-gouge, rock the tool by turning your wrist as you move it left to right.

4 Run a slipstone, also called an Arkansas stone, along the inside curve of the tool, pushing the stone out toward the blade edge. Use a rounded stone for U gouges and a pointed one for V-parting tools.
5 Flip over the whetstone and repeat the process on the finer-grit side to further hone/finish the blade.
Brayers, Barens, Plates, and Knives
BRAYERS
Brayers are rollers used to evenly spread ink onto the surface of a carved block. They come in a variety of sizes and are made of either hard or soft rubber. The hard rubber brayers are great for coaxing out fine details, and soft rubber brayers apply ink very uniformly across a block. You hardly need to exert any pressure to apply ink to the block with a soft rubber brayer.
Consider the size of the block you’ll be printing when selecting a brayer. Ideally, the brayer should be slightly wider than the shortest side of the block. This will allow an even application of ink without any stray marks left by the edge of the roller. The brayer should also be smooth, without any bumps, dents, or ridges in the rubber roller, as these imperfections in the roller will transfer directly to your print. Keep your brayers clean of ink when not in use and store them so that the rubber roller isn’t touching anything.

BARENS
A baren is the essential tool for hand pulling a successful print: you use it to burnish the back of the paper on your inked block. This tool allows you to apply even pressure across the block without ripping holes in your paper. The most readily available (and not to mention inexpensive!) baren is a simple wooden spoon like mine (see 2 in the photo). A smooth, hard surface is really all you need! Steer clear of metal spoons, as the friction needed for printing causes them to become hot. Hold the spoon near the top, putting the pads of your index finger and middle finger in the bowl; this will give you a stable grip and sufficient leverage to burnish your paper.
Traditional barens intended for Japanese woodblock printing are covered in bamboo leaves that make up the handle (see 3). Over time, the bamboo will wear out and need to be replaced.
The Speedball brand baren (see 1) has a higher handle profile and plush pad. I find this works great for printing with softer rubber blocks.

INKING PLATES
Every printmaker needs an inking plate or platen, which is a clean, smooth, nonporous surface on which to mix, spread, and roll out ink. Various materials can be used as an inking plate, such as a metal tray, metal bench hook, a piece of safety glass with a beveled edge, or a piece of plexiglass with the edges sanded or taped. I made the inking plate featured in this book simply by screwing a piece of plexiglass to a similarly sized wood board. It helps when the inking plate is heavy or anchored, as inks are tacky and can sometimes cause the plate to stick to the brayer. Always clean your inking plate immediately after finishing a print run, as dried ink on the plate will keep you from getting an even application of ink the next time you use it.
PALETTE KNIVES
An essential tool for preparing ink is the palette knife, or spatula, used to scrape ink from its container and spread and mix it on the inking plate. Palette knives come in a variety of shapes and degrees of flexibility. If you plan to do large print runs, which involves pulling many prints in the same session, a wider knife would be appropriate for mixing and spreading large amounts of ink. I prefer flexible knives with rounded edges, as I’m less likely to scratch my inking surface.

ESSENTIAL MATERIALS
In addition to the right tools, every printmaker needs ink and paper. Each type of ink yields a different result, and the paper options today are seemingly endless. Read on to learn about ink, paper, and a handful of other materials that will round out your toolkit.
Inks
Choosing the right ink is an important part of the print process, and there are many considerations to be made. It’s important to use ink that is specifically formulated for relief printing, as opposed to just using any old paint or ink. Paint will ruin your brayers and blocks. The right inks will extend the life of your block as well as look gorgeous on paper.

WATER-BASED INKS
Water-based inks are a good choice for beginners and kids, and when you have to print in crampled conditions, because they clean up easily with soap and water. Also, they are fast-drying, which is nice when you’re short on time or if you run a small edition of prints. However, water-based inks tend to have a flaky appearance upon drying and are often difficult to roll evenly over the block.
OIL-BASED INKS
There are two kinds of oil-based inks: those that require solvents for cleanup and those that are water soluble/washable. Both yield equally velvety finishes and hold strong, vivid color. Solvents such as turpentine and kerosene are the most efficient cleaners of oil-based inks, but are quite toxic. A safer cleanser is plain old vegetable oil. Simply saturate a paper towel and wipe. This tends to leave a residue on the block, so I usually follow up with a disinfectant wipe. My favorite ink of this variety is Gamblin Relief Ink.
Water-soluble oil-based inks are made with vegetable oil. Wonderfully nontoxic, these inks are vibrant and have a tack that makes for uniform coverage. They’re easy to clean up with soap and water or disinfectant wipes. Caligo Safe Wash Relief Inks are a great choice, and were used for the majority of the projects in this book.
INK MODIFIERS
There are many different kinds of additives that you can mix into your ink to achieve different results. Adding a drop of cobalt drier to ink will significantly speed up the drying time of your prints. Cobalt drier is quite toxic, however, so handle it with gloves. Adding extenders or transparent base will dilute the color of the ink without changing its viscosity—think of it as turning down an ink’s opacity.
Adding retarder will slow down the drying time of the ink, which is nice if you like to work slowly or you’re pulling a large number of prints. However, keep in mind you’ll need to keep your prints in the drying rack a little longer, too.
Papers
Although, technically, you can print onto nearly any flat surface, the cheapest, easiest, and most widely available surface is paper. There’s something so tactile and rich and just plain pleasant about rubbing a decadently thick sheet of gorgeous paper between your fingers. Lucky for me (and you too) there are many different kinds of paper on the market today. The most common ingredients in artists’ papers are wood pulp, cotton rag, pulped linen, and mulberry/kozo—all are great choices for printing linoleum blocks by hand. It’s fine to use any old paper when you’re learning in your own home for fun, but you’ll find that the higher quality paper you choose, the better your prints will be.

Here are some helpful things to know about paper as you experiment and decide what you like best.

Left column
Blick Masterprinter paper, 74 gsm
Yasutomo Japanese mulberry paper, 71.5 gsm
Daler Rowney Canford paper in dreadnought gray, 150 gsm
Canson Edition paper in antique white, 250 gsm
Right column
Thai Tamarind Leaves mulberry paper, 30 gsm
Canson Mi-Teintes drawing paper in no. 502 bisque, 160 gsm
Stonehenge paper in warm white, 250 gsm
BFK Rives paper in white, 280 gsm.
ACID FREE AND ARCHIVAL
The ideal papers to use are free of lignin, an acidic substance in wood pulp that causes paper to yellow and turn brittle over time. Paper that is acid free is known as archival, which essentially means that it will last a really long time. One hundred percent cotton rag paper is naturally acid free and is a great choice. Professional printmakers are sure to select archival, acid-free papers to ensure their artwork lasts for many years.
WEIGHT
The weight or thickness of a given paper is measured in grams per square meter (gsm). The higher the gsm, the thicker the paper. You can use papers of all thicknesses in relief printmaking, depending on the type of inks and blocks you use and the final look you hope to achieve. Thinner papers are great for printing by hand, but they can sometimes lack the luxurious feel and look of thicker papers. Some handmade papers have lots of texture that can drastically affect the evenness of a print. Try out a wide variety of papers, and you will come to learn which works best for you and your specific project.
HOT PRESSED AND COLD PRESSED
Machine-made papers pass through a series of metal cylinders that are heated and compressed or cooled and more loosely compressed to create different textures. Hot-pressed paper has a smooth surface with a fine grain. Cold-pressed paper has a slightly toothier, or more textured, surface.
MISCELLANEOUS EQUIPMENT
Drawing Materials
Sketchbook
Pencils
Pencil case
Eraser
Black permanent markers
Tracing paper
Drafting brush/duster
Carbon paper

Scissors
Roll of butcher/kraft paper
Washi or masking tape
Ink scraper
Mat board strips
Disinfectant wipes
Paper towels
Pumice soap

Mixed Media Materials
Craft knife
Self-healing cutting mat
A yard (1 m) of unbleached 100% cotton duck (also known as duck cloth)
Basic sewing kit (needle set, all-purpose thread)
Embroidery hoop
Embroidery floss
Embroidery needle
Set of gouache or watercolor paints
Palette, water cup, paintbrushes
Bone folder
Adhesives
A Note on Adhesives
You’ll need to join paper to paper for multiple projects in this book, and using the wrong adhesive can be disastrous for the fate of your prints. Some glues can cause papers to warp, wrinkle, turn yellow, and deteriorate. PVA glues, however, are acid free and will not yellow over time. They dry clear and remain flexible. Yes Paste and Nori Paste are both good options, as they are slow-drying (giving you more time to position your work) and won’t cause excessive buckling of your papers.

ANATOMY OF A PRINT STUDIO
Now that all of your materials are sorted, the next challenge is finding the space to do it all. I recall the following quote by Joseph Campbell as I set up my studio space in my home:
“[A sacred place] is an absolute necessity for anybody today. You must have a room, or a certain hour or so a day, where you don't know what was in the newspapers that morning, you don't know who your friends are, you don't know what you owe anybody, you don't know what anybody owes to you. This is a place where you can simply experience and bring forth what you are and what you might be. This is the place of creative incubation. At first you may find that nothing happens there. But if you have a sacred place and use it, something eventually will happen.”


The studio is a world apart from politics, bills, and the million tiny worries that bombard me throughout the day. It’s a place where magic lives—I just have to show up and activate it. But first I have to invite the magic in. My own humble space boasts of an awkward L-shaped layout with a lot of homemade equipment, dotted with too many stacks of paper. But it is heaven on earth to me. You don’t need a studio that rivals one you’d find at the Rhode Island School of Design and it doesn’t need to make Martha Stewart turn green with envy. The main goal of your creative space—whether it is a separate room, alcove, or just a temporary tabletop—is to make the print process as efficient, comfortable, and inspiring as possible.

Potential tabletop layout
An efficient studio layout starts with consideration of the activities you’ll be performing, in my case, the basic steps to pulling a print:
Drafting designs
Carving blocks
Inking
Printing
Drying
Storing
The whole point of the studio is to be a space that is exclusive to artmaking, but sometimes you don’t have the luxury of having a whole room to yourself. The good news is that all you really need is one good-sized tabletop and a few key pieces of equipment. When planning your space, consider the following needs.
1. Clean space
For drafting designs, preparing printing papers, and carving blocks and signing prints. Keep this area completely free of ink in order to preserve the cleanliness of your papers. It would be sad to pull a five-color print only to ruin it with a big stray ink smudge picked up from the table!
2. Dry space
A place to keep your wet prints as you pull them. DIY drying rack plans can be found shown here.
3. Print space
This is the area where you’ll print your inked blocks. I like to cover this area with butcher paper and tape it down to the table for easy cleanup after a project. This is also where you will put any registration device/printing jig (see here) you may be using for your project. Keep a mini-clean zone above the jig so that there’s a safe place to stack your prepared papers.
4. Ink space
For making a mess! This is where your inking plate lives for mixing, rolling out, and applying ink to blocks. On one of my studio tables, I have a large sheet of plexiglass screwed directly into the tabletop as a permanent ink surface.
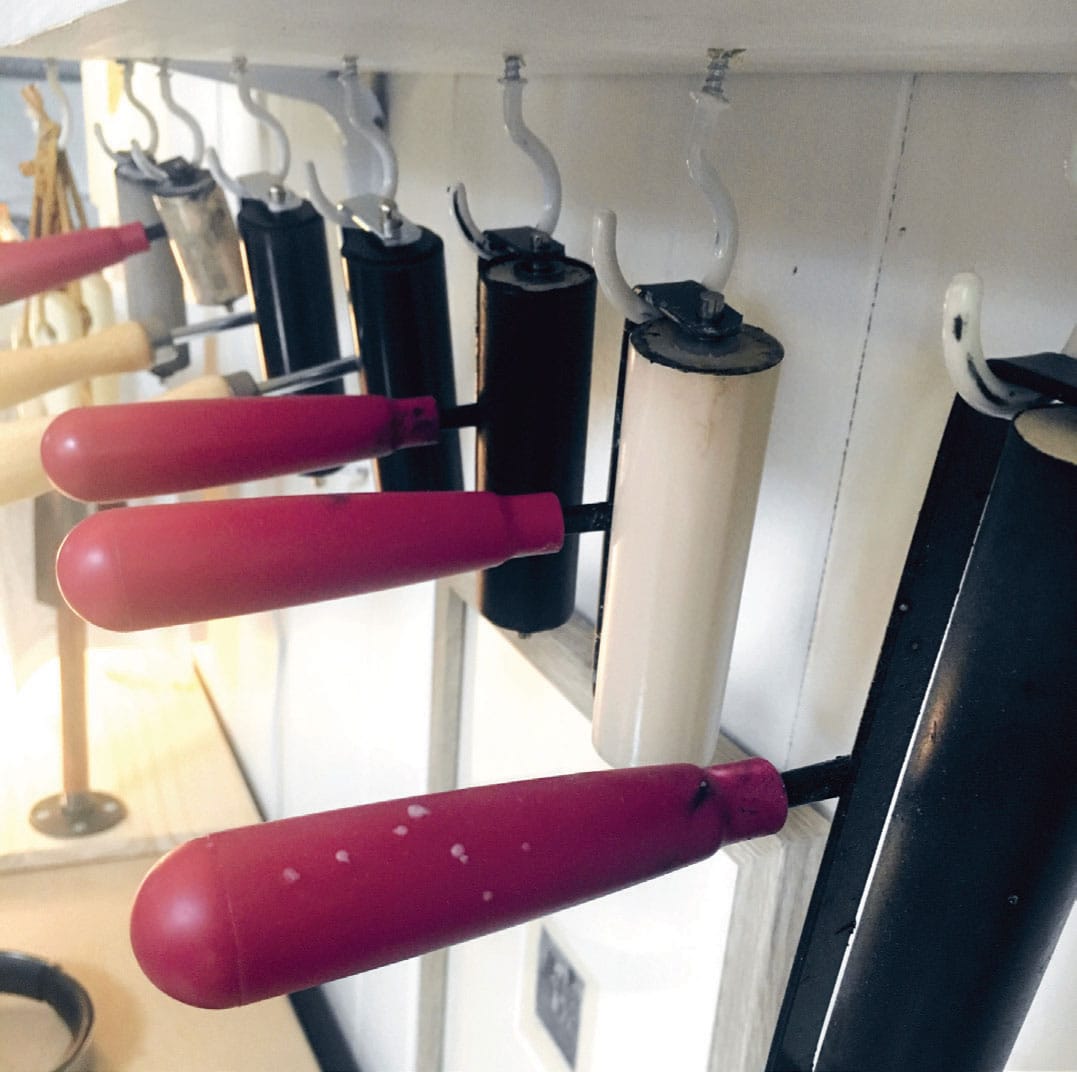
Underneath the shelf are hooks for hanging my brayers, which further help to corral the ink. Hanging brayers keeps the rubber roller from becoming dented or otherwise damaged over time. I also keep all of my essential ink cleaning supplies within easy reach: a roll of paper towels, a container of cotton swabs, disinfectant wipes, mat board strips, gloves, baby oil, a stack of old magazines, and a garbage can, which is tucked under the table.


Blocks that have already been printed, cleaned, and dried are stacked in milk crates, with titles visible for easy access


Inks, brayers, and other tools organized on a shelf above my worktable

When I’m not pulling by hand I use my Richeson Medium Etching Press. Though expensive and bulky, pulling prints with a press takes a lot of the physical gruntwork for you.
MAKE IT:
TIGHTROPE DRYING RACK
One of the most challenging aspects of working in a small space is finding a convenient place to store prints as they dry. This tabletop drying rack is a cheap alternative to specialty racks. It takes under an hour to build and requires no special skills or equipment. Have your board and copper pipes cut to size at your local hardware store. Be sure to sand off any rough edges before you begin, and remember to observe basic studio safety procedures.

Tools and Materials
Ruler
Pencil
Drill
3/4" (2 cm) Phillips head screwdriver bit
1/8" (3 mm) drill bit
Two 1/2" (1.3 cm) floor flanges
Two 1/2" (1.3 cm) nipples
3/4" (2 cm) wood screws, Phillips head
Birch plywood board, 11 1/2" x 28" (29 x 73.5 cm)
Two 16" (40.5 cm) long pieces of 1/2" (1.3 cm) wide copper pipe
32" (81.5 cm) of heavy-duty picture hanging wire
15 small bulldog clips
Steel wool

MAKE IT!
1 Make a center mark at the end of your board 5 3/4" (14.5 cm) along the shortest end.
2 Come in 3/4" (2 cm) from the center mark on the edge and make another mark. Repeat on the other end of the board.
3 Lay one of your floor flanges on the board as shown, centering one of the holes over your 3/4" (2 cm) mark. Make marks in the remaining three holes.
4 Remove the flange. Use each of the marks to drill pilot holes with your drill and 1/8" (3 mm) drill bit. This will keep your board from splitting.

5 Replace the flange. Screw in place with four 3/4" (2 cm) wood screws.
6 Repeat steps 3 to 5 on the other end of the board.
7 Insert 1/2" (1.3 cm) nipple into each flange and screw in tightly.

8 Take one of the copper pipe pieces. Measure and make a mark 1/2" (1.3 cm) from the end of the pipe. Holding the pipe steady with one hand, use your electric drill with a 1/8" (3 mm) drill bit to perforate two holes in the end of the copper pipe. Clean off any rough bits with steel wool.
9 Repeat step 8 with the second piece of pipe.
10 Take one of the copper pipes and attach the end without the hole onto the nipple set inside the flange. This may take a little bit of elbow grease and/or vise grips if you have them. Make sure that, as you screw it in, the two holes going through the top of the pipe are parallel with the grain of the board.
11 If you mark up or marr the pipe as you install them, a quick rub with steel wool will tidy them right back up.
12 Take your length of wire and thread it through one of the pipes. Tie a knot on the outside, trimming any excess wire (can be done with scissors or wire cutters).
13 Thread 15 small bulldog clips onto the wire.

14 Thread the other end of the wire through the opposite pipe, pull gently until taut, and then wrap the excess wire around the pipe, twisting the wire to secure in place.
15 Install your finished drying rack in your studio space and proceed to fill it with gorgeous, handmade prints!