
6
Deploying and Scaling Applications with Kubernetes
In this chapter, we’ll continue exploring Kubernetes with its rich functionality and ecosystem. We’ll see which other Kubernetes resources exist and what their purpose is, how to implement the self-healing and scaling of applications with Kubernetes, how to use Kubernetes service discovery, and how to run stateful workloads with Kubernetes. We will also perform several exercises with the minikube Kubernetes we’ve installed in the previous chapter (in case you’ve skipped it – check the last section of Chapter 5).
This is going to be one of the densest and most important chapters, so make sure to answer all the questions at the end and complete all practical assignments firsthand before moving further on. If you find it hard to understand some parts, read them twice and refer to the Further reading section.
We’re about to cover the following exciting topics:
- Deployments, ReplicaSets, and DaemonSets
- Running stateful workloads
- Application configuration and service discovery
- Ensuring applications are alive and healthy
So, let’s jump right into it!
Deployments, ReplicaSets, and DaemonSets
As we saw in the previous chapter, there are more resources in Kubernetes than just Pods and namespaces. Let’s learn about Deployments, for starters.
Deployment
It is a wrapper for declarative updates for Pods and ReplicaSets. After you describe the desired state in the Deployment resource spec, the Kubernetes Deployment controller changes the current state to the desired state at a configured rate.
It sounds complicated, but essentially Deployment is for controlling Pods and managing the application life cycle of those Pods. Pods are the smallest deployment units that wrap around containers, but they don’t provide any advanced Kubernetes features, such as self-healing, rolling updates, or autoscaling. However, Deployments do.
Because Pods are not resilient, an application container that fails in a pod takes the pod down with it. That is why in practice you’ll often use one of the advanced Kubernetes resources such as Deployment to automatically recreate Pods in case of failure. The deployment controller constantly watches the current state of the Pods it is managing and ensures that the desired number of Pods is running. We will shortly have a demonstration to see how this works.
ReplicaSet
A ReplicaSet is used to maintain the given number of replica Pods running at any given time. ReplicaSets are also used by Deployments to ensure the desired number of Pods (even if only one pod should be running at a time).
Compared to ReplicaSet, Deployment is a higher-level wrapper resource that manages ReplicaSets itself and provides other useful features. ReplicaSet does not allow you to implement custom update orchestration and therefore it is recommended that you use Deployments instead of directly using ReplicaSets.
Let’s get back to our minikube Kubernetes setup from the previous chapter for a quick demo. If you’ve stopped the cluster before, start it first with the minikube start command:
$ minikube start
?  minikube v1.25.2 on Darwin 12.4
✨  Using the docker driver based on existing profile
?  Starting control plane node minikube in cluster minikube
?  Pulling base image ...
?  Restarting existing docker container for "minikube" ...
?  Preparing Kubernetes v1.23.3 on Docker 20.10.12 ...
    ▪ kubelet.housekeeping-interval=5m
?  Verifying Kubernetes components...
    ▪ Using image kubernetesui/dashboard:v2.3.1
    ▪ Using image gcr.io/k8s-minikube/storage-provisioner:v5
    ▪ Using image kubernetesui/metrics-scraper:v1.0.7
?  Enabled addons: storage-provisioner, default-storageclass, dashboard
?  Done! kubectl is now configured to use "minikube" cluster and "default" namespace by default
If you are not sure about the state of your minikube Kubernetes, you can also use the minikube status command. Make sure that you have host, kubelet, and apiserver in a Running state:
$ minikube status
minikube
type: Control Plane
host: Running
kubelet: Running
apiserver: Running
kubeconfig: Configured
Previously, we created a simple pod running the Nginx web server in the kcna Kubernetes namespace. Let’s create a Deployment of the same nginx web server, but with three replicas (three Pods):
$ minikube kubectl -- create -f https://k8s.io/examples/controllers/nginx-deployment.yaml --namespace kcna
deployment.apps/nginx-deployment created
The complete Deployment specification (found in nginx-deployment.yaml in the GitHub repository accompanying this book) looks like the following:
apiVersion: apps/v1
kind: Deployment
metadata:
  name: nginx-deployment
  labels:
    app: nginx
spec:
  replicas: 3
  selector:
    matchLabels:
      app: nginx
  template:
    metadata:
      labels:
        app: nginx
    spec:
      containers:
      - name: nginx
        image: nginx:1.14.2
        ports:
        - containerPort: 80
It is somewhat similar to the specification of the pod we used previously, but with a number of differences, such as the following:
- kind: Deployment
- apps/v1 indicating the API version
- An additional app: nginx label in the metadata
- The number of Pods is defined by replicas: 3
- There is a selector for matching Pods by the app: nginx label
- It labels templates with an app: nginx label
The selector: under the spec: field defines how this Deployment finds the pods that it manages. In this example, it picks the Pods that have an app: nginx label.
The template block has the same pod containers: specification with the image: and ports: fields like we used in the previous chapter for the standalone pod scenario. Additionally, it has metadata with an app: nginx label that will be added to each pod created by this specification. Once again, the label is needed for the Deployment to be able to find its Pods.
Let’s check what happened in the kcna namespace after we applied our Deployment specification:
$ minikube kubectl -- get pods -n kcna
NAME                               READY    STATUS    RESTARTS   AGE
nginx-deployment-9456bbbf9-cl95h   1/1      Running   0          10m
nginx-deployment-9456bbbf9-ghxb2   1/1      Running   0          10m
nginx-deployment-9456bbbf9-nvl7r   1/1      Running   0          10m
We can see the three nginx Pods, each with its own unique name. Those names will look slightly different for you because the second part of the string is randomized. Now let’s query ReplicaSets in the kcna namespace with the kubectl get replicasets command:
$ minikube kubectl -- get replicasets -n kcna
NAME                         DESIRED   CURRENT   READY   AGE
nginx-deployment-9456bbbf9   3         3         3       12m
OK, we can see one ReplicaSet; however, we did not define it! It was the nginx Deployment that automatically created a ReplicaSet in order to keep the desired number of Pods. So, it is the Deployment that works on top of ReplicaSets; ReplicaSets that works on top of Pods; and Pods are wrappers on top of containers, as shown in Figure 6.1. You can also see that ReplicaSet gets a unique ID, and the final Pods inherit this ID in their names.

Figure 6.1 – The hierarchy of Deployment, ReplicaSet, and Pod
Let’s carry out a quick experiment, let’s delete one of the three nginx pods created by our Deployment and see what happens (you’ll have to specify the name of one pod that you have as pod names are unique):
$ minikube kubectl -- delete pods nginx-deployment-9456bbbf9-cl95h -n kcna
pod "nginx-deployment-9456bbbf9-cl95h" deleted
Now, even if you are really fast at typing, you probably won’t notice how the deleted pod terminated and a new one was created. Next, get the list of Pods in the kcna namespace:
$ minikube kubectl -- get pods -n kcna
NAME                               READY    STATUS    RESTARTS   AGE
nginx-deployment-9456bbbf9-9zv5c   1/1      Running   0          3s
nginx-deployment-9456bbbf9-ghxb2   1/1      Running   0          42m
nginx-deployment-9456bbbf9-nvl7r   1/1      Running   0          42m
And there we go – we have a new pod with an AGE of 3 seconds with a status of Running, and the old, deleted pod (nginx-deployment-9456bbbf9-cl95h) is completely gone. Now that’s the Kubernetes self-healing magic we’ve talked about so much! In just a couple of seconds, Kubernetes detected that the current state of the Nginx deployment was different because only two replicas (Pods) were running when the desired state is three replicas. The Kubernetes reconciliation loop kicked in and spawned a new, third replica of the nginx pod.
Self-healing is great and helps to keep our applications running in situations such as node hardware failure (of course, assuming that you run multiple Kubernetes nodes as you should do in production); when an application has a bug and crashes on a certain request type; and in the case of planned or unplanned maintenance when we have to migrate the payloads to another node.
But that’s only the beginning. Let’s imagine for a second that we are anticipating a high number of requests for an application we run on Kubernetes, so we have to get ready and add additional replicas in our application. With Kubernetes, it is as easy as executing a single kubectl scale deployment command:
$ minikube kubectl -- scale deployment nginx-deployment --replicas 5 -n kcna
deployment.apps/nginx-deployment scaled
If you check the state of the respective ReplicaSet fast enough, you might see that new Pods are spawning:
$ minikube kubectl -- get replicaset -n kcna
NAME                         DESIRED   CURRENT   READY   AGE
nginx-deployment-9456bbbf9   5         5         4       52m
And voilà! Just a moment later, both new Pods are already up and running:
$ minikube kubectl -- get pods -n kcna
NAME                               READY    STATUS    RESTARTS   AGE
nginx-deployment-9456bbbf9-9zv5c   1/1      Running   0          30m
nginx-deployment-9456bbbf9-ghxb2   1/1      Running   0          52m
nginx-deployment-9456bbbf9-hgjnq   1/1      Running   0          23s
nginx-deployment-9456bbbf9-nvl7r   1/1      Running   0          52m
nginx-deployment-9456bbbf9-pzm8q   1/1     Running   0          23s
Note
Obviously, adding more application replicas on a single node K8s cluster does not bring a lot of practicality for performance or service availability. In production, you should always run multi-node Kubernetes clusters and spread the replicas of your applications across multiple nodes. We are doing these exercises on a single node Kubernetes instance, only for demonstration and educational purposes.
Next, let’s see how we can perform rolling updates with Deployments. Rolling updates play an important role because they help to ensure rapid software development cycles with frequent releases and allow us to make updates with zero downtime for customers.
Zero downtime
Zero downtime is a deployment method where the updated application is able to serve requests as usual, with no interruptions or errors.
With rolling updates, we can do the following:
- Promote application changes from one environment to another (for example, a new image version, configuration, or labels)
- Rollback to the previous version in case of any issues
- Define how many application replicas can be replaced at a time
Let’s see this in action with our Nginx deployment. We will update the nginx container image version tag to 1.20 using kubectl. First, check that our deployment is intact:
$ minikube kubectl -- get deployment -n kcna
NAME               READY   UP-TO-DATE   AVAILABLE   AGE
nginx-deployment   5/5     5            5           9h
Now, change the image to nginx:1.20:
$ minikube kubectl -- set image deployment/nginx-deployment nginx=nginx:1.20 -n kcna
deployment.apps/nginx-deployment image updated
Then observe what is happening to the Nginx Pods right after you have changed the image (you have to be quick to witness the process!):
$ minikube kubectl -- get pods -n kcna
NAME                                READY    STATUS              RESTARTS   AGE
nginx-deployment-7b96fbf5d8-dwskw   0/1      ContainerCreating   0          2s
nginx-deployment-7b96fbf5d8-grkv6   0/1      ContainerCreating   0          2s
nginx-deployment-7b96fbf5d8-jcb4p   0/1      ContainerCreating   0          2s
nginx-deployment-9456bbbf9-9zv5c    1/1      Running             0          6h
nginx-deployment-9456bbbf9-ghxb2    1/1      Running             0          9h
nginx-deployment-9456bbbf9-hgjnq    1/1      Running             0          2h
nginx-deployment-9456bbbf9-nvl7r    1/1      Running             0          9h
nginx-deployment-9456bbbf9-pzm8q    1/1      Terminating         0          2h
From five replicas of our Nginx deployment, we see that one has a Terminating status, four have a Running status, and three new have appeared and are in the ContainerCreating status. Just a moment later, we may see that the last few Pods with an old Nginx image are have a Terminating status, four new ones are in the Running state and one more is in the ContainerCreating state:
$ minikube kubectl -- get pods -n kcna
NAME                                READY    STATUS              RESTARTS   AGE
nginx-deployment-7b96fbf5d8-6dh9q   0/1      ContainerCreating   0          2s
nginx-deployment-7b96fbf5d8-dwskw   1/1      Running             0          25s
nginx-deployment-7b96fbf5d8-grkv6   1/1      Running             0          25s
nginx-deployment-7b96fbf5d8-jcb4p   1/1      Running             0          25s
nginx-deployment-7b96fbf5d8-zt7bj   1/1     Running             0          4s
nginx-deployment-9456bbbf9-ghxb2    1/1     Terminating         0          9h
nginx-deployment-9456bbbf9-nvl7r    1/1     Terminating         0          9h
It won’t take long before all old Pods are gone and the last new ones enter a Running state. We can also verify that the new image is used, by performing kubectl describe pod on any new pod (on Windows, use findstr instead of grep command):
$ minikube kubectl -- describe pod nginx-deployment-7b96fbf5d8-dwskw -n kcna | grep Image
    Image:        nginx:1.20
Now, what do we do if a new image of the deployed application is not the right one or if it has a bug that may cause Pods to crash? Just as easy as updating a Kubernetes Deployment, we can roll back to the previous revision of our Deployment. Each change will be tracked by Kubernetes and gets its own revision version that we can see with the kubectl rollout history command:
$ minikube kubectl -- rollout history deployment -n kcna
deployment.apps/nginx-deployment
REVISION  CHANGE-CAUSE
1         <none>
2         <none>
Note
CHANGE-CAUSE is an optional description that can be set by adding an annotation to the Deployment. For example, we can do the following: kubectl -n kcna annotate deployment/nginx-deployment kubernetes.io/change-cause="image updated to 1.20".
If we realized that we need to get our deployment back to a previous revision, we can simply call kubectl rollout undo and optionally specify the exact, possibly older deployment revision. Let’s try to roll back to the previous, first revision of the nginx deployment (current revision is 2):
$ minikube kubectl -- rollout undo deployment/nginx-deployment -n kcna
deployment.apps/nginx-deployment rolled back
A moment later, all Pods are recreated in the same rolling update fashion. And we can verify that the image version tag is back to 1.14.2 using the kubectl get pods command with an extra -o yaml option that will show us complete, detailed information about the pod (the naming will be different in your case, pick any pod from your output list):
$ minikube kubectl -- get pods -n kcna
NAME                               READY    STATUS    RESTARTS   AGE
nginx-deployment-9456bbbf9-6xpq2   1/1      Running   0          22s
nginx-deployment-9456bbbf9-75m7d   1/1      Running   0          22s
nginx-deployment-9456bbbf9-hbglw   1/1      Running   0          22s
nginx-deployment-9456bbbf9-hxdjd   1/1      Running   0          16s
nginx-deployment-9456bbbf9-mtxzm   1/1      Running   0          17s
$ minikube kubectl -- get pod nginx-deployment-9456bbbf9-6xpq2 -n kcna -o yaml
apiVersion: v1
kind: Pod
… LONG OUTPUT OMITTED …
spec:
  containers:
  - image: nginx:1.14.2
    imagePullPolicy: IfNotPresent
    name: nginx
… LONG OUTPUT OMITTED …
You’ll see a long, long output with all the details about this particular pod. You can also use kubectl get in combination with -o yaml for any other Kubernetes resources (namespaces, Deployments, and others we’re about to learn) to get full information about the object. You don’t need to understand each and every line of the output at this stage, but it is very helpful to know about imagePullPolicy, which defines the rules for how container images should be pulled from the registry. The policy can be one of the following:
- IfNotPresent – this is the default setting. The image will be downloaded only if the requested name:tag combination is not already present locally (cached) on the node where the pod was scheduled.
- Always – this means that every time a pod with the respective container is started, the image registry will be asked for an image digest (resolved from the image tag). If an image with this exact digest is already cached locally on the node, it will be used; otherwise, a Kubernetes kubelet will pull the image with the digest resolved by the registry on the target node.
- Never – this means the kubelet won’t attempt to fetch the image from the registry. The image should be delivered to the node somehow in advance; otherwise, the container will fail to spawn.
Additionally, we can control the rolling update process with a number of optional settings and timeouts. The two most important ones are as follows:
- maxUnavailable – this defines the maximum number of unavailable pods during a rolling update. It can be specified as a percentage (for example, 25%) or as an absolute number (for example, 3).
- maxSurge – this defines the maximum number of pods that can be created over the desired number of replicas. It can also be specified as a percentage or an absolute number. If set, for example to 25%, then the total number of old and new Pods won’t exceed 125% of the desired number of replicas.
Finally, if we don’t want to do rolling updates, we can instead choose the Recreate strategy, which means all existing Pods are killed at once and new ones are only created after all old Pods have been terminated. Obviously, this strategy doesn’t allow you to perform zero-downtime updates, as all Pods of an application will be down for at least a few seconds. The strategy can be configured by defining the .spec.strategy.type setting in the YAML spec file of the respective deployment.
Now that we know about deployments, let’s move on to DaemonSets. As you probably know, Daemon in Unix/Linux world is a background process or service that provides additional functionality or supervises the system. A common example is sshd, a service that allows us to log in to remote systems over the Secure Shell protocol.
DaemonSet
DaemonSet is a wrapper for pods that ensures that all or certain nodes in the Kubernetes cluster each run a single replica of the target pod. If more nodes are added to the cluster, DaemonSet will ensure that a pod is automatically spawned on a new node as soon as it joins the cluster.
Where Deployment is considered a universal resource in Kubernetes for all kinds of user workloads, DaemonSet’s typical use cases are as follows:
- To run a log collection service on every Kubernetes node (for example, software such as Fluent Bit)
- To run a node-monitoring daemon on every node (for example, a node exporter for Prometheus)
- To run a cluster storage daemon on every node
Similar to ReplicaSet, DaemonSet will ensure that the desired state is met, meaning that in the case of a pod failure, it will automatically spawn a new one. By default, DaemonSet will create Pods on all worker nodes in the cluster, but it is also possible to select specific nodes in the cluster or control plane nodes (how to do this will be covered in the next chapter, Chapter 7). What cannot be done with DaemonSet is setting the number of replicas per node, because DaemonSet will always run only one pod per node. The spec file of DaemonSet is very similar to that of a Deployment, with a few differences, such as kind: DaemonSet or a lack of the replicas: setting.
Moving on, we will not create a DaemonSet now, because a proper demonstration requires a multi-node Kubernetes cluster. Feel free to check out the Further reading section at the end of the chapter and try it out yourself if you’d like. In the following section, we’ll see how to run applications that need to persist information on the disk with Kubernetes.
Running stateful workloads
Everything we’ve tried so far with Kubernetes has not answered one important question – what do we do if we need to persist the application state between pod restarts? Data written on a container filesystem is not persisted by default. If you just take a deployment spec from the recent examples with Nginx and replace the image with PostgreSQL, that won’t be enough. Technically, your pod with PostgreSQL will come up, and the database will run, but any data written to that database instance won’t survive a pod restart. But, of course, Kubernetes has something to offer for stateful applications too.
As you hopefully remember from Chapter 4, Exploring Container Runtimes, Interfaces, and Service Meshes, Kubernetes has a Container Storage Interface or CSI that allows you to integrate various storage solutions into a K8s cluster. In order to augment Pods with external storage, we need volumes that can be dynamically provisioned via the Kubernetes API. Let’s begin with two new resource definitions:
- PersistentVolume (PV): This is a piece of storage in the cluster that can be provisioned either dynamically (by K8s when requested) or statically (for example, provisioned in some way by the cluster administrator and exposed for use in K8s).
- PersistentVolumeClaim (PVC): This is a request for storage by the user that consumes PVs.
When we want to use persistent storage for our containerized application, we need to define a PVC spec in YAML format that can look like the following:
apiVersion: v1
kind: PersistentVolumeClaim
metadata:
  name: kcna-pv-claim
spec:
  storageClassName: standard
  accessModes:
    - ReadWriteOnce
  resources:
    requests:
      storage: 3Gi
This PVC can then be referenced in deployments and Pods as a volume. Claim allows you to request a specific size (3Gi in the previous example) and one of the following four accessModes:
- ReadWriteOnce – this allows the volume to be mounted as a read-write by a single node. This mode can allow multiple Pods on this node to access the volume.
- ReadOnlyMany – this allows the volume to be mounted as read-only by one or multiple nodes.
- ReadWriteMany – this allows the volume to be mounted as read-write by many nodes. This should be supported by the storage solution and protocol (for example, NFS).
- ReadWriteOncePod – This is the same as ReadWriteOnce, but with a hard limit of only one pod in the whole cluster being able to write to this volume.
Since PVs are the actual storage resources in the Kubernetes cluster, we might have a situation when there is no suitable PV for the PVC request. In that case, Kubernetes can dynamically provision a PV based on the storage class specified in the PVC spec (storageClassName: standard in the previous example).
Storage classes
Storage classes provide a way to classify different storage options available in the cluster. Those might differ by performance, supported access modes and protocols, backup policies, and more.
It is also possible to instruct Kubernetes to only use already provisioned (possibly statically) and available PVs by setting storageClassName: "" (empty string) in the PVC spec. In the case of dynamic PV provisioning, the volume will always be of the exact size requested in the PVC spec. However, where we ask to only use already available PVs, we might get a larger volume than specified in PVC resource requests (for example, 3Gi is requested, but if the closest available PV in the cluster is 5Gi, it will be taken and all 5Gi will be usable by the container that mounts it).
Let’s get back to the minikube setup to see this in action. First, create kcna-pv-claim with the previous specification (the file can be downloaded from the book’s GitHub repository):
$ minikube kubectl -- create -f kcna-pv-claim.yaml -n kcna
persistentvolumeclaim/kcna-pv-claim created
Now, get the list of PVs in the cluster (the name will be unique in this case):
$ minikube kubectl -- get pv -n kcna
NAME                                       CAPACITY   ACCESS MODES   RECLAIM POLICY   STATUS   CLAIM                 STORAGECLASS   REASON   AGE
pvc-6b56c062-a36b-4bd5-9d92-f344d02aaf5c   3Gi        RWO             Delete           Bound     kcna/kcna-pv-claim   standard                74s
A PV was automatically provisioned by Kubernetes in seconds! At this point, we can start using kcna-pv-claim as a volume in our deployment or pod specifications. Let’s delete the old nginx-deployment that we created at the beginning of this chapter:
$ minikube kubectl -- get deployment -n kcna
NAME               READY   UP-TO-DATE   AVAILABLE   AGE
nginx-deployment   5/5     5            5           2d
$ minikube kubectl -- delete deployment nginx-deployment -n kcna
deployment.apps "nginx-deployment" deleted
And create another one, with our new volume attached. For that, we’ll need to make a few changes to the old nginx-deployment.yaml spec file (the modified version is available on GitHub):
$ cat nginx-deployment-with-volume.yaml
apiVersion: apps/v1
kind: Deployment
metadata:
  name: nginx-deployment-with-volume
  labels:
    app: nginx
spec:
  replicas: 1
  selector:
    matchLabels:
      app: nginx
  template:
    metadata:
      labels:
        app: nginx
    spec:
      containers:
      - name: nginx
        image: nginx:1.14.2
        ports:
        - containerPort: 80
        volumeMounts:
        - name: kcna-volume
          mountPath: "/usr/share/nginx/html"
      volumes:
      - name: kcna-volume
        persistentVolumeClaim:
          claimName: kcna-pv-claim
Besides a new name for the deployment (nginx-deployment-with-volume) and the number of replicas being set to 1, the changes are as follows:
- We have added a volumeMounts: block under the respective nginx container stating which volume (kcna-volume) should be mounted at which path ("/usr/share/nginx/html" – this is a location for static HTML content).
- Additionally, we have defined the volumes: block that maps kcna-volume to our PVC named kcna-pv-claim that we created in the previous step.
Note
The volumeMounts is located within the individual container section because different containers in one pod can mount different (or the same) volumes. The volumes block is located at the same level as containers, and it should list all volumes that will be used within the Pods.
Now, let’s create a modified nginx deployment and see what happens:
$ minikube kubectl -- create -f nginx-deployment-with-volume.yaml -n kcna
deployment.apps/nginx-deployment-with-volume created
$ minikube kubectl -- get pod -n kcna
NAME                                            READY   STATUS    RESTARTS   AGE
nginx-deployment-with-volume-6775557df5-bjmr6    1/1     Running   0          39s
At this stage, nothing looks different, but we can use the kubectl exec -it command to get inside our container by starting a new shell process. You might remember that we did something similar in Chapter 3, when we used docker run -it. You’ll need to specify the name of your unique pod here:
$ minikube kubectl -- -n kcna exec -it nginx-deployment-with-volume-6775557df5-bjmr6 -- bash
root@nginx-deployment-with-volume-6775557df5-bjmr6:/#
Let’s see whether there is a volume mount at /usr/share/nginx/html as we’ve requested:
root@nginx-deployment-with-volume-6775557df5-bjmr6:/# mount | grep nginx
/dev/vda1 on /usr/share/nginx/html type ext4 (rw,relatime)
There it is! Our dynamically provisioned PV was automatically mounted to the node where our pod runs. If the pod dies, the data on the volume is preserved, and if the new pod starts on another node, Kubernetes will take care of unmounting and remounting the volume to the right node reaching the desired state we described in the spec file. To make sure that the data really is persisted, we can do a small exercise inside the container. Let’s install the curl utility and try to run it against localhost:
root@nginx-deployment-with-volume-6775557df5-bjmr6:/# apt update
… LONG OUTPUT OMITTED …
root@nginx-deployment-with-volume-6775557df5-bjmr6:/# apt -y install curl
Reading package lists... Done
Building dependency tree
Reading state information... Done
… LONG OUTPUT OMITTED …
root@nginx-deployment-with-volume-6775557df5-bjmr6:/ # curl localhost
<html>
<head><title>403 Forbidden</title></head>
<body bgcolor="white">
<center><h1>403 Forbidden</h1></center>
<hr><center>nginx/1.14.2</center>
</body>
</html>
Next, let’s create a simple one-liner index.html file in the /usr/share/nginx/html path and try running curl again:
root@nginx-deployment-with-volume-6775557df5-bjmr6:/# echo "Kubernetes Rocks!" > /usr/share/nginx/html/index.html
root@nginx-deployment-with-volume-6775557df5-bjmr6:/# curl localhost
Kubernetes Rocks!
The last part of this exercise is on you. Log out of the container (by either entering the exit command or by pressing Ctrl + D) and delete the pod with the kubectl delete pods command and log in to the new pod when it is spawned. Check whether the index.html file that we created is still present at the mount point and has the correct Kubernetes Rocks! string inside.
While it is normal practice to use PVs with Kubernetes deployments, another workload resource was specifically made to manage stateful applications.
StatefulSet
StatefulSet is a resource to manage the deployment and scaling of Pods that guarantees the ordering and uniqueness of these Pods.
What that means is that Pods created by StatefulSets have stable naming (without randomly generated UUIDs) and allow ordered, graceful deployment as well as ordered rolling updates. In addition to that, StatefulSets can provision a PV per pod replica. That means you won’t need to define and apply a new PVC every time you want to scale your application by adding a new replica. Let’s have a quick look at a StatefulSet example spec:
apiVersion: apps/v1
kind: StatefulSet
metadata:
  name: nginx-statefulset
spec:
  selector:
    matchLabels:
      app: nginx
  serviceName: "nginx"
  replicas: 3
  template:
    metadata:
      labels:
        app: nginx
    spec:
      containers:
      - name: nginx
        image: nginx:1.14.2
        ports:
        - containerPort: 80
        volumeMounts:
        - name: nginx-html
          mountPath: /usr/share/nginx/html
  volumeClaimTemplates:
  - metadata:
      name: nginx-html
    spec:
      accessModes: [ "ReadWriteOnce" ]
      storageClassName: "standard"
      resources:
        requests:
          storage: 1Gi
As you can see, the PVC spec is essentially a part of the StatefulSet spec located under the volumeClaimTemplates block at the end. Feel free to apply this StatefulSet spec yourself and see what happens. You should get three new PVCs and three new Pods spawned with PVs automatically provisioned and attached.
While this might seem complicated at first, think about how many manual steps you’d have to do to achieve the same result without Kubernetes. How much time would it take to create multiple volumes, download container images, and configure and start containers? Kubernetes makes many operational tasks trivial, and in the upcoming section, we will learn more about how Kubernetes allows you to configure applications running in containers and how service discovery works.
Application configuration and service discovery
So far, we have explored quite a few of K8s features and resources, but how do we do application configuration? We could add configuration files or environment variables to the container images during the build, but this is wrong. If you do so, for even the smallest configuration change, you’ll have to rebuild container images. Also, where you need to have different settings for different environments, you’ll need to maintain multiple images of the same application. Things get messy, complicated, and error-prone, so don’t do this.
Instead, the better approach in Kubernetes is to use ConfigMaps and Secrets.
ConfigMap
A ConfigMap is a resource to store non-confidential data and configuration settings in key-value pairs that can be consumed inside Pods as environment variables, command-line arguments, or configuration files. ConfigMaps do not provide secrecy or encryption, so they are not suitable for keeping confidential information, such as passwords or access tokens.
Secret
A Secret is a resource to store sensitive data such as passwords, tokens, and access keys. Similar to ConfigMaps, Secrets can be consumed inside Pods as environment variables or configuration files.
Both ConfigMaps and Secrets allow us to decouple configuration from container images, enabling better application portability and reuse of the same container images for different environments.
Let’s explore a quick example. Imagine you are developing a web application that requires access to the database. The application is written in a way that it looks for the DATABASE_HOST, DATABASE_USERNAME, and DATABASE_PASSWORD environment variables. In this case, you can use a ConfigMap to set DATABASE_HOST and a Secret to keep information about the username and the password. This configuration would be consumed in the container with the application and would allow us to use different settings for different environments (for example, different databases and passwords for development, testing, and production).
Besides mapping ConfigMaps and Secrets to environment variables inside containers, we can also mount them inside as if they were regular files. This is done with the volume concept that we have just covered in the preceding section when learning about PVs and PVCs.
Let’s get back to the keyboard and create a simple Secret using the kubectl create secret command:
$ minikube kubectl -- create secret generic kcna-secret --from-literal="username=kcnauser" --from-literal="password=topsecret" -n kcna
secret/kcna-secret created
Note
Needless to say, it is also possible to create Secrets by defining a YAML spec file with kind: Secret and calling kubectl create -f like we previously did for other resources.
Next, find the nginx-statefulset spec file that we used in the last section and modify it to mount our new kcna-secret as an additional volume at /etc/nginx/kcna.secret. Try to do this on your own, but if you experience any difficulties, the following are the relevant changes to the spec file (a complete modified spec file is also available on GitHub):
… BEGINNING OF THE SPEC OMITTED …
      containers:
      - name: nginx
        image: nginx:1.14.2
        ports:
        - containerPort: 80
        volumeMounts:
        - name: nginx-html
          mountPath: /usr/share/nginx/html
        - name: nginx-kcna-secret
          mountPath: /etc/nginx/kcna/
      volumes:
      - name: nginx-kcna-secret
        secret:
          secretName: kcna-secret
  volumeClaimTemplates:
  - metadata:
      name: nginx-html
    spec:
      accessModes: [ "ReadWriteOnce" ]
      storageClassName: "standard"
      resources:
        requests:
          storage: 1Gi
Note
It is possible to modify resources already created in Kubernetes instead of deleting them and creating them again from the scratch. However, some fields and resources are immutable and cannot be modified on the fly.
Now, let’s apply the modified spec file using the kubectl apply -f command (the spec filename is statefulset_with_secret.yaml, as follows):
$ minikube kubectl -- apply -f statefulset_with_secret.yaml -n kcna
statefulset.apps/nginx-statefulset configured
Because we’ve added a new volume, Pods will be recreated straight after:
$ minikube kubectl -- get pods -n kcna
NAME                                            READY   STATUS    RESTARTS   AGE
nginx-statefulset-0                             1/1     Running   0          12s
nginx-statefulset-1                             1/1     Running   0          15s
nginx-statefulset-2                             1/1     Running   0          18s
Let’s execute into one of the pods to see whether our Secret was correctly mounted inside:
$ minikube kubectl -- -n kcna exec -it nginx-statefulset-0 -- bash
root@nginx-statefulset-0:/# cat /etc/nginx/kcna/username
kcnauser
root@nginx-statefulset-0:/# cat /etc/nginx/kcna/password
topsecret
There you go, the Secret has been mounted inside our nginx containers. It is worth mentioning that Kubernetes makes it possible to perform all sorts of combinations: Secrets (and individual keys) can be used as environment variables; Secrets can be created from existing files; Secrets can be used to store and mount SSL certificates or SSH keys; individual keys from K8s Secrets can be mounted into different paths and more.
ConfigMaps are very similar in terms of their capabilities, but their purpose is to store generic configuration. For example, we can create a new ConfigMap with nginx configuration and mount it over the /etc/nginx/nginx.conf in container overriding the default config file.
In terms of the scope of the KCNA exam, you are not expected to know all details, but as you get to work with Kubernetes, you’ll encounter the need to do one or another, therefore, feel free to check out the links in the Further reading section at the end of the chapter if you have time.
Coming next, we will talk about service discovery in Kubernetes.
Service discovery
Service discovery provides the automatic detection of devices and the services offered by these devices on a network.
As you may remember, in the case of microservice architectures, we have a lot of small services that need to talk to each other over the network. That means service discovery plays a huge role because it helps services to find their counterparts, for example, a backend service that has to discover the database it shall connect to. Luckily, Kubernetes solves that problem, too, with its service discovery mechanism based on Domain Name System (DNS).
Kubernetes implements an internal DNS system that keeps track of applications with their names and respective pod IPs (each pod gets its own unique cluster-wide IP address on start). This allows different applications to easily find the endpoints of each other by resolving application names to pod IPs. Kubernetes Service resource comes into play here.
Service
Service is an abstraction layer that enables loose coupling between dependent pods. It is a resource that allows you to publish application names inside the cluster and expose applications to be reachable from outside the cluster.
Kubernetes Pods can have a relatively short life cycle. If we add a new volume or update the deployment image, or if the node dies, in all cases, Pods are recreated with a new name and a new IP address. That means we cannot rely on pod names, and we should use a Service that will target one or multiple Pods by matching Kubernetes labels and selectors.
Labels and selectors
Labels are simple key/value metadata pairs that can be attached to any Kubernetes objects during or after creation. Labels can contain the name of the application, version tags, or any other object classification.
Selectors allow the identification of a set of Kubernetes objects. For example, a label selector can be used to find a group of objects that have the same app label, as shown in Figure 6.2.
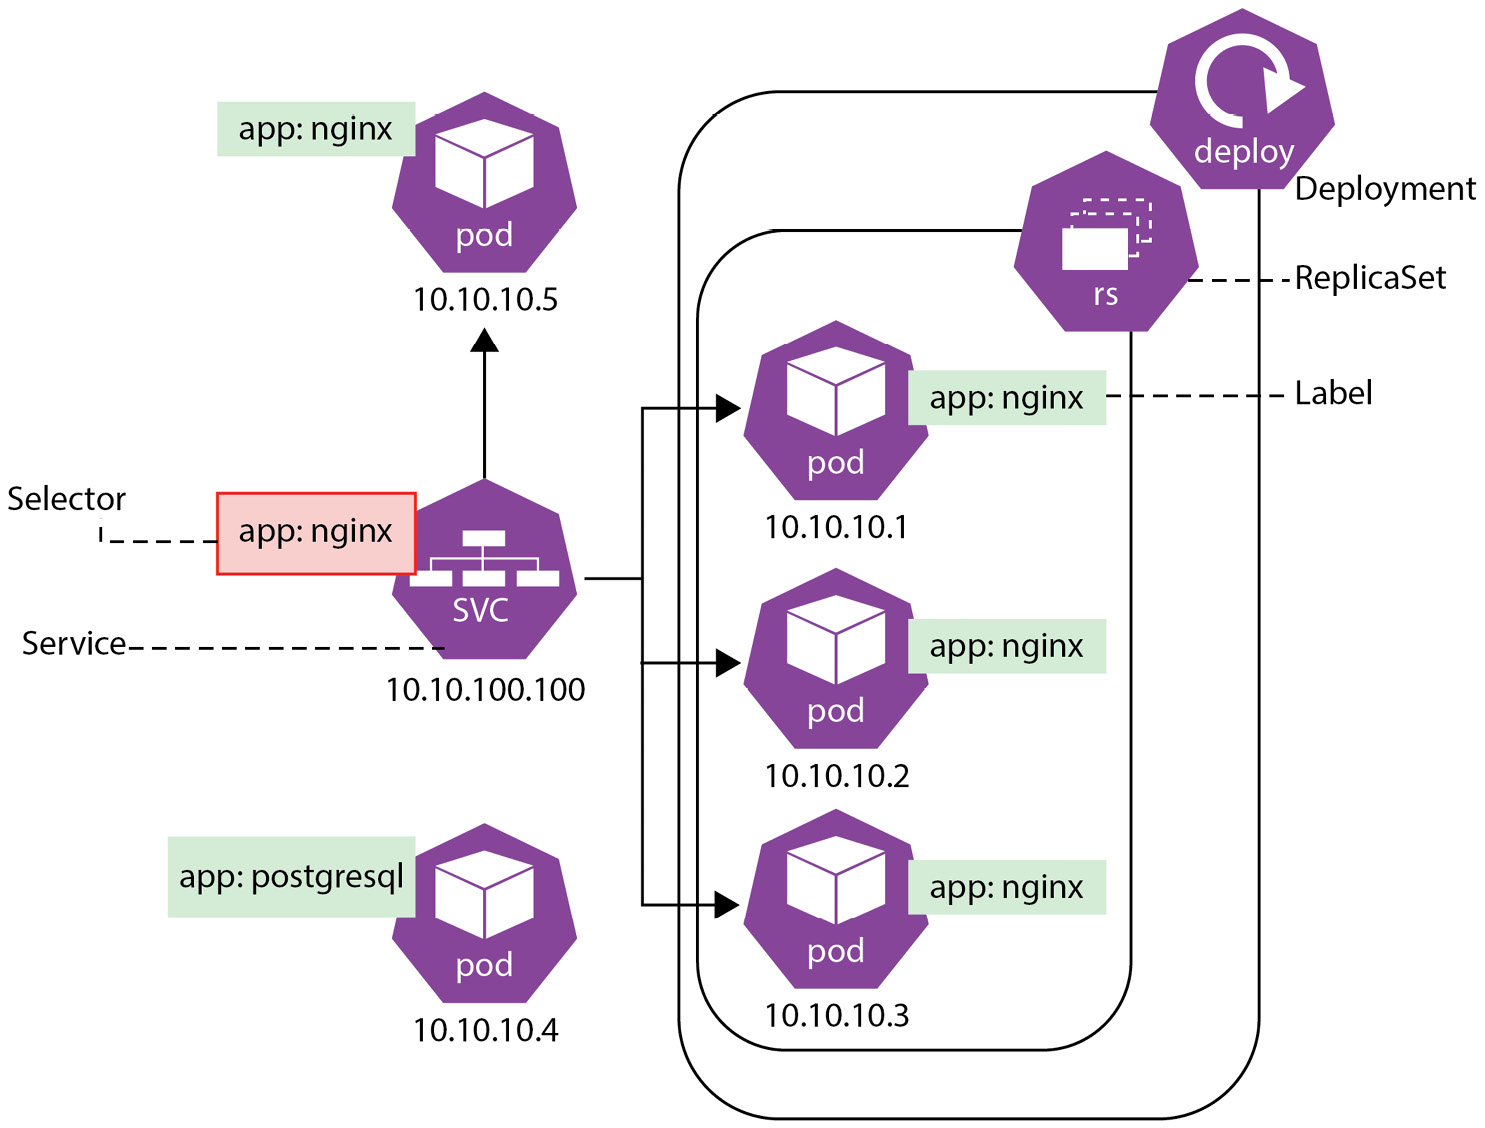
Figure 6.2 – Service abstraction in Kubernetes
Figure 6.2 demonstrates how a Service selects all pods that have an app: nginx label assigned. Those can be pods created by a Deployment as well as any other pods that have the selected label assigned. You can list the labels of objects by adding the --show-labels parameter to kubectl get commands, for example:
NAME                                            READY   STATUS    RESTARTS   AGE     LABELS
nginx-deployment-with-volume-6775557df5-f6ll7   1/1      Running   0          23h     app=nginx,pod-template-hash=6775557df5
nginx-statefulset-0                             1/1     Running   0          46m     app=nginx,controller-revision-hash=nginx-statefulset-6fbdf55d78,statefulset.kubernetes.io/pod-name=nginx-statefulset-0
nginx-statefulset-1                             1/1     Running   0          46m     app=nginx,controller-revision-hash=nginx-statefulset-6fbdf55d78,statefulset.kubernetes.io/pod-name=nginx-statefulset-1
nginx-statefulset-2                             1/1      Running   0          46m     app=nginx,controller-revision-hash=nginx-statefulset-6fbdf55d78,statefulset .kubernetes.io/pod-name=nginx-statefulset-2
See, our nginx deployment pod as well as pods from the nginx-statefulset all have the same app=nginx label because both the Deployment and StatefulSet have it defined in their spec templates:
  template:
    metadata:
      labels:
        app: nginx
Now, let’s create a Service that will target all pods with this label. The following is what a simple spec targeting port 80 of selected pods might look like:
apiVersion: v1
kind: Service
metadata:
  name: nginx
spec:
  selector:
    app: nginx
  ports:
    - protocol: TCP
      port: 80
      targetPort: 80
$ minikube kubectl -- create -f nginx-service.yaml -n kcna
service/nginx created
$ minikube kubectl -- get service -n kcna
NAME    TYPE        CLUSTER-IP       EXTERNAL-IP   PORT(S)   AGE
nginx   ClusterIP   10.105.246.191   <none>        80/TCP    36s
After creation, you should be able to see the endpoints behind the Service that are, in fact, the IPs of running pods with an app=nginx label. Listing endpoints can be done with the kubectl get endpoints command, as follows:
$ minikube kubectl -- get endpoints -n kcna
NAME    ENDPOINTS                                               AGE
nginx   172.17.0.2:80,172.17.0.6:80,172.17.0.7:80 + 1 more...   4m
If we’re now execute inside to one of the Pods again and run curl nginx (the name of the service we created) we should get a reply. Run it a few times (5-10 times) after installing curl into the container:
$ minikube kubectl -- -n kcna exec -it nginx-statefulset-0 -- bash
root@nginx-statefulset-0:/# apt update && apt -y install curl
… LONG OUTPUT OMITTED …
root@nginx-statefulset-0:/# curl nginx
Kubernetes Rocks!
root@nginx-statefulset-0:/# curl nginx
Kubernetes Rocks!
root@nginx-statefulset-0:/# curl nginx
<html>
<head><title>403 Forbidden</title></head>
<body bgcolor="white">
<center><h1>403 Forbidden</h1></center>
<hr><center>nginx/1.14.2</center>
</body>
</html>
And we get different replies! One of the four pods that we’re currently running has a custom index.html file that we created earlier in this chapter, while the three others don’t.
What happens is the service we created load balances the requests between all available nginx pod IPs. The Service will also automatically update the list of endpoints if we scale out the number of replicas or if we do the opposite.
Now, let’s see which Service types exist and what they allow you to accomplish:
- ClusterIP: This type exposes an application on an internal cluster IP. Only Pods running in the same cluster can reach such a service. This is the default type that gets created unless overridden in the spec.
- NodePort: This type exposes the application on the same static port of each node in the cluster. Users will be able to reach the application from outside the cluster by requesting the IP of any node and configured port.
- LoadBalancer: This type exposes the application outside of cluster using a cloud provider’s load balancer.
- ExternalName: This type maps the service to an external DNS name (for example, mybestservice.app.com) by returning a CNAME record (to map one domain to another) with a configured value. ExternalName is not acting as a proxy for application requests like other service types do.
What that means is that in practice you’ll use the LoadBalancer type in most cases when you need to expose an application running in Kubernetes outside of the cluster (assuming your cloud provider or on-premises infrastructure offers load balancers). And in case of multiple applications that need to communicate with each other within the cluster, you’ll use the default ClusterIP type. For example, when your backend deployment needs to talk with the database running as a StatefulSet and the database should not be exposed to the internet.
Coming next is the final section of the chapter. As you were doing all of the exercises, you might have wondered how Kubernetes knows that the application is actually running when a pod is running. What happens if an application needs time before it can serve the requests? How do we know that the application is not stuck in a deadlock? Let’s figure that out!
Ensuring applications are alive and healthy
By default, Kubernetes ensures that the desired state of applications in a cluster is reached. It will restart and recreate failed containers when a process exits or a node fails. However, that might not be enough to tell if the application running inside the pod is healthy. In order to ensure that the workloads are alive and healthy, Kubernetes implements the concept of probes.
Probe
A probe is a diagnostic that is performed by a Kubernetes kubelet on a container. A diagnostic can be an arbitrary command executed inside a container or TCP probe, or an HTTP request.
Kubernetes offers three types of probes, as shown in the following list:
- Liveness: Ensures that a process in a container is alive and, if not, restarts the container. For the case when the application catches a deadlock, restarting the container usually helps to make the application more available despite bugs.
- Readiness: Ensures that the application is ready to accept traffic. A pod with multiple containers is considered ready when all its containers are ready and all readiness probes succeed.
- Startup: Allows you to know when an application in a container has started. If a startup probe is configured, it disables liveness and readiness probes until it succeeds. This might be needed for slow-starting applications to avoid them being killed due to a failed liveness probe before they are up.
All those probes serve the purpose of increasing the availability of containerized applications, but they cover different scenarios. For example, a liveness probe will cause a container to restart if a probe fails. Complex applications running for a long time might eventually transition to a broken state, and this is where the Kubernetes liveness probe helps.
Note
The whole pod is not recreated when the liveness probe of a single container has failed. Only a certain container within the pod is restarted. This is different from the case when the application in the container exits and the pod gets recreated by a controller such as a Deployment, ReplicaSet, or StatefulSet.
A readiness probe is needed when an application in a container is unable to serve the traffic. Some applications might take a long time to start because of the large datasets they are loading into memory or because they need to perform an initial configuration that takes time. An application might also depend on an external service. In all those situations, we don’t want to kill and restart the container; rather, we don’t want to send any traffic to it.
Readiness probes help to determine which Pods behind a Service are ready to accept connections and serve traffic. If a container fails the readiness probe, its pod IP is automatically taken out from the list of endpoints of the Service. This helps prevent situations when a user request is routed to a not-yet-working application replica.
Note
If both liveness and readiness probes are defined, the first does not wait for the second to succeed. It is possible to set initial delays for probes (via the initialDelaySeconds setting) or use a startupProbe that temporarily disables the liveness and readiness checks.
Each probe can execute a custom command, perform an HTTP request, or a TCP probe. In addition to that, liveness and readiness probes are tunable with several parameters: how often the check should be performed (configurable via periodSeconds), how long to wait for a probe to finish (configurable via timeoutSeconds) or the thresholds for how many times the probe should be retried before giving up and either restarting the container or stopping the traffic depending on the probe type.
Now, let’s examine the following pod with a simple liveness probe defined:
apiVersion: v1
kind: Pod
metadata:
  labels:
    test: liveness
  name: liveness-exec
spec:
  containers:
  - name: liveness
    image: k8s.gcr.io/busybox
    args:
    - /bin/sh
    - -c
    - touch /tmp/healthy; sleep 30; rm -f /tmp/healthy; sleep 600
    livenessProbe:
      exec:
        command:
        - cat
        - /tmp/healthy
      initialDelaySeconds: 5
      periodSeconds: 5
When the pod container is started it creates an empty file at the /tmp/healthy path, waits for 30 seconds, and deletes that file. After that, the container does nothing for another 600 seconds before exiting. The liveness probe executes the cat /tmp/healthy command every 5 seconds after an initial check delay of 5 seconds.
Let’s create the spec and see it in action:
$ minikube kubectl -- create -f https://k8s.io/examples/pods/probe/exec-liveness.yaml -n kcna
pod/liveness-exec created
At first, the pod runs fine, its liveness probe succeeds, and its restart counter shows 0 restarts:
$ minikube kubectl -- get pod -n kcna
NAME                                            READY   STATUS    RESTARTS   AGE
liveness-exec                                   1/1     Running   0          59s
Sometime later, we can see that there was a restart:
$ minikube kubectl -- get pod -n kcna
NAME                                            READY   STATUS    RESTARTS      AGE
liveness-exec                                   1/1     Running   1 (20s ago)   95s
If we describe the pod, we can see the timeline of events:
$ minikube kubectl -- describe pod liveness-exec -n kcna
… LONG OUTPUT OMITTED …
Events:
  Type     Reason     Age                From                Message
  ----     ------     ----               ----               -------
  Normal   Scheduled  85s                default-scheduler  Successfully assigned kcna/liveness-exec to minikube
  Normal   Pulled     81s                kubelet             Successfully pulled image "k8s.gcr.io/busybox" in 3.4078911s
  Warning  Unhealthy  41s (x3 over 51s)  kubelet            Liveness probe failed: cat: can't open '/tmp/healthy': No such file or directory
  Normal   Killing    41s                kubelet             Container liveness failed liveness probe, will be restarted
  Normal   Pulling    11s (x2 over 85s)  kubelet             Pulling image "k8s.gcr.io/busybox"
  Normal   Created    10s (x2 over 81s)  kubelet             Created container liveness
  Normal   Pulled     10s                kubelet             Successfully pulled image "k8s.gcr.io/busybox" in 1.2501457s
  Normal   Started    9s (x2 over 81s)   kubelet             Started container liveness
We are now approaching the end of this long and intense chapter. By now, you’ve learned a lot about Kubernetes features and some of its advanced resources. Many of the in-depth details explained here are not required to pass the KCNA exam, but they will be required to start working with Kubernetes and will undoubtedly help you in the future if you decide to become CKA or CKAD certified. If you have not been able to grasp 100% of this chapter’s content, that is unlikely to stop you from passing the KCNA exam, but try to get into it as much as you can now. Check out the Further reading section resources and do additional research if needed.
Summary
In this chapter, we’ve seen Kubernetes’ self-healing capabilities in action and how K8s reconciliation loops allow it to reach the desired state of resources in a very short time. Since Pods themselves do not have any means to recover from a failure, we commonly use Kubernetes Deployments to ensure that the requested number of application replicas are running. Deployments also allow us to perform controllable rolling updates, rollbacks, and zero-downtime deployments to enable rapid software development cycles that require the frequent release of versions.
DaemonSet is another resource for the scenario when we need to run one replica of the application on each or a particular set of nodes. DaemonSets are often used for running logging or monitoring agents across the cluster.
StatefulSet is a resource for managing stateful workloads with Kubernetes. It allows us to easily integrate volumes to Pods to keep persistent data between container restarts and automate the dynamic provisioning of PVs.
Next, we have explored ways to provide configuration and sensitive information to applications running in Kubernetes. ConfigMaps are suitable for generic non-confidential data, and Secrets are intended to be used for passwords, tokens, and so on. Both ConfigMaps and Secrets are essentially volumes that can be mounted into specific file paths inside containers.
We have also learned that service discovery plays an important role and allows applications to find and communicate with each other within the Kubernetes cluster. The Service resource allows for the exposure of the application with its Pods both inside and outside of the cluster using distinct Service types such as LoadBalancer, NodePort, or ClusterIP.
Last but not least, we’ve explored the options for ensuring that applications running in Kubernetes are alive and healthy. Kubernetes offers three types of probes (liveness, readiness, and startup) that serve the purpose of verifying the state of the application on startup or periodically at regular intervals. If the application fails the liveness probes, its container is restarted and in case it fails the Readiness probes, it just won’t receive any traffic, and the pod IP will be excluded from the list of Service endpoints. The startup probes are intended for slow-starting applications that need extra time before they can handle other probes or real traffic.
Note
Feel free to delete any Kubernetes resources created in this chapter unless you’re planning to come back to them later.
In the upcoming chapter, we will continue exploring Kubernetes and its features. We will learn about placement controls, resource requests, and ways to debug applications running on Kubernetes. Make sure to answer all recap questions and check out the Further reading section if you’d like to learn more about the topics in this chapter.
Questions
As we conclude, here is a list of questions for you to test your knowledge regarding this chapter’s material. You will find the answers in the Assessments section of the Appendix:
- Which of the following Kubernetes resources allows you to recover an application if the node it was running on has failed (select multiple)?
- Pod
- Service
- StatefulSet
- Deployment
- Which of the following Kubernetes resources ensures that the defined number of replicas are always running (select multiple)?
- Pod
- ReplicaSet
- Deployment
- DaemonSet
- Which of the following Kubernetes resources allows us to perform rolling updates and zero-downtime deployments?
- Service
- Deployment
- ReplicaSet
- DeploySet
- Which statement best describes the relationship between Pods and various Kubernetes controllers (resources)?
- Pods are managing the resources
- Pods are managed by the container runtime
- Pods are always managed by one of the Kubernetes controllers
- Pods can be managed by one of the Kubernetes controllers
- What is the purpose of label selectors?
- They help to determine the purpose of each pod in the cluster
- They help to distinguish more important Pods from less important ones
- They are simply auxiliary metadata
- They allow us to group and select resources by labels
- Which of the following image pull policies will cause a download from the registry only when the image is not already cached on the node?
- IfNotCached
- IfNotPresent
- IfNotAvailable
- Always
- How does a Service determine the Pods that are ready to accept traffic?
- Pods that are ready will have the ready: true label on them
- Only Pods managed by Deployment can accept traffic from a Service
- A pod’s readiness probe has to succeed
- A pod’s startup probe has to succeed
- Which type of probe delays the execution of other probes?
- Delayed
- Liveness
- Startup
- Readiness
- Which spec setting controls the number of Pods managed by a Deployment?
- podnum
- Replicas
- Containers
- Instances
- Which Kubernetes controller is best suited for applications that need to save data to disk?
- Deployment
- DaemonSet
- ReplicaSet
- StatefulSet
- Which of the following allows Kubernetes controllers to detect drift from the desired state?
- Replica controller
- Kubelet
- Reconciliation loop
- Liveness probes
- Which type of service allows the exposure of applications inside the cluster?
- LoadBalancer
- ClusterIP
- InternalIP
- NodePort
- Which technology is used behind service discovery in Kubernetes?
- Avahi
- Iptables
- NTP
- DNS
- Which of the following service types are suitable for exposing applications outside of the Kubernetes cluster (select multiple)?
- ClusterIP
- NodePort
- LoadBalancer
- ExternalIP
- Which of the following resources is suitable for storing and injecting generic configuration into containers?
- ConfigMap
- Secret
- SettingMap
- PV
- Which object in Kubernetes represents an actual storage volume?
- StatefulSet
- PVC
- PV
- SV
- Which resource is suitable for representing sensitive information to applications in containers?
- ConfigMap
- Secret
- Volume
- PVC
- Which probe will restart the container if failed?
- Aliveness
- Readiness
- Startup
- Liveness
Further reading
To learn more about the topics that were covered in this chapter, take a look at the following resources:
- Dynamic Volume provisioning: https://kubernetes.io/docs/concepts/storage/dynamic-provisioning/
- Managing Kubernetes Secrets: https://kubernetes.io/docs/tasks/configmap-secret/
- Creating and using ConfigMaps: https://kubernetes.io/docs/tasks/configure-pod-container/configure-pod-configmap/
- Kubernetes probes configuration: https://kubernetes.io/docs/tasks/configure-pod-container/configure-liveness-readiness-startup-probes/