Lighting: principles and equipment
In the early days of photography the principal function of subject lighting was to give enough illumination to get a reasonably short exposure. Today, of course faster lenses and films allow you far more options, so that lighting can be used to express (or repress) chosen aspects such as texture, form, depth, detail and mood. The way you select and organize your lighting is highly creative and individualistic – in fact you will find lighting one of the most stimulating, exciting aspects of picture making. A photographer’s work can frequently be identified through its use of lighting, and you have probably noticed how often a studio portrait or a movie can be ‘dated’ by the way it was lit.
The illumination of your subject relies on the same characteristics of light – its straight-line travel, the effect of size of source, diffusion, reflection, colour content, etc. – discussed in Chapter 2. You can use each of them in various practical ways to alter the appearance of a subject, and they apply to any source, whether the sun, a flashgun, a studio lamp or even a candle. Of course there are ‘tricks of the trade’ too, some of which are dealt with towards the end of this chapter, but even these are just short-cuts based on the same logic of how light behaves.
By far the best place to learn lighting is in a studio, however basic this may be. Work with a still-life subject on a table in a large, blacked-out room, and have your camera fixed on a tripod. Make sure there is ample room to position lights or reflectors anywhere around all four sides of the table. Once you have experienced how lighting works with everything under your control, it is easier to understand the cause and effect of the many ‘existing light’ situations you will meet away from studio conditions.
Basic characteristics of lighting
The six features of lighting to bear in mind are its quality, direction, contrast, unevenness, colour and intensity. Start by looking at these one at a time, then see how they relate to different kinds of equipment and techniques.
Quality
The term ‘quality’ is used in connection with the type of shadow the light source causes objects to cast – hard and clear-cut, or soft and graduated. As Figure 2.5 showed, lighting quality depends on the size of the source relative to its distance from your subject. Hardest light comes from direct use of the most compact, point-like source, such as a spotlight or projector bulb, a small flashgun, a clear glass domestic lamp, a lighted match or direct light from the sun or moon. (The sun and moon are vast in size, but because of their immense distances they form relatively small, compact sources in our sky.) All these light sources are of course very different in other respects, such as their intensity and colour, but when used direct they all make sharp-edged shadows form; see Figure 7.1.
Softest light on the other hand comes from a large, enveloping source. This might be totally overcast sky or light from a blue sky excluding the sun. It could be a lamp or flashgun with a large-diameter matt white reflector, or a cluster of fluorescent tubes. You can make any hard light source give soft lighting by placing a large sheet of diffusing material, such as tracing paper, between it and the subject. The larger and closer your diffuser is to the subject the softer the lighting. Similarly you can direct a hard source on to a large matt reflector such as a white-lined umbrella, card, the ceiling or a nearby wall, and use only the light bounced from this for your subject illumination.

Figure 7.1 Lighting quality. Top: Illuminated by a distant, compact light source, these tennis balls cast hard-edged shadows. Bottom: The light source is effectively enlarged by inserting tracing paper close to the subject. Softer-edged shadows and more subtle modelling then appear. This ‘soft, directional’ lighting looks less dramatic in the studio, but often gives best results when photographed. (Outdoors the same differences in lighting quality are created by direct sunlight, and by cloudy conditions)
The opposite conversion is also possible. You can make a large soft light source give hard illumination by blocking it off with black card leaving only a small hole. Indoors, if you almost close opaque window blinds you can produce fairly hard light even when the sky outside is overcast.
The way size and closeness of your light source alters lighting quality also changes the character of reflections from gloss-surfaced subjects. A hard light source gives a small, brilliant highlight. Typical of this is the catchlight in the eyes of a portrait. Soft light gives a paler, spread highlight, which may sometimes dilute the underlying colour of an entire glossy surface, making it look less rich.
Direction
The direction of your light source determines where your subject’s light and shade will fall. This in turn affects the appearance of texture and volume (form). There are infinite variations in height and position around your subject, particularly when you have free movement of a light source in the studio. If you must use fixed, existing, light you may be able to move or rotate your subject instead, or perhaps plan out the right time of day to catch the direction of sunlight you need.
We tend to accept lighting as most natural when directed from above; after all, this is usually the situation in daylight. Lighting a subject from below tends to give a macabre, dramatic, even menacing effect. Compare (C) with (H) in Figure 7.2. Frontal light from next to the camera (G) illuminates detail, gives small shadows, minimizes texture and flattens form. Reflective surfaces seen flat-on flare light straight back towards the lens. This is typical of direct flash from the camera.
Side lighting or top lighting helps to emphasize texture in surfaces facing the camera, and shows the form of three-dimensional subjects. Back lighting can create a bold edge line and give you a strong shape (B), but most of the subject detail is lost in shadow which also flattens form. All these changes of direction work with both hard and soft light sources, but they are more marked with hard light because of its sharp-edged shadows.
Contrast
Lighting contrast is the ratio between light reaching the lit parts and light reaching the shadowed parts of your subject. Photographic film (and CCD sensors in digital cameras) cannot accommodate as wide a range of brightness in the same scene as can the eye. Often this means that when you expose to get detail in the lightest areas the shadows reproduce featureless black, even though you could see details there at the time. Alternatively, exposing to suit shadows ‘burns out’ details in lighter areas.
The problem is greatest with hard side or top lighting: although the lit surfaces then show excellent form and texture there are often large shadow areas. If you want to improve shadow detail you might be tempted to add an extra, direct, light source from the opposite direction, but this often forms an extra set of cross-shadows which can be confusing, ‘stagey’ and unnatural. A much better solution is to have some kind of matt reflector board near the subject’s shadow side to bounce back spilt main light as soft, diffused illumination. This is known as shadow-filling. For relatively small subjects, portraits, etc., you can fill-in using white card, cloth, newspaper or a nearby pale-surfaced wall. With large subjects in direct sunlight you may have to wait until there is cloud elsewhere in the sky to reflect back some soft light, or until the sun itself is diffused. With fairly close subjects you can use flash on the camera preferably diffused with care to add a little soft frontal light, without overwhelming the main light; see page 198.

Figure 7.2 Lighting direction. The same piece of stone changes greatly in apparent shape and form according to the relative position of the light source. See central key
As a guide, an average subject with the most illuminated parts lit ten times as bright as shadowed parts (a lighting contrast of 10:1) will just about record with detail throughout, in a black and white photograph. That represents 3½ stops difference between exposure readings for the most illuminated and the most shaded subject areas of inherently equal tone. The equivalent for a colour shot is about 3:1 (see also page 182). With experience you can judge how contrast will translate onto film, but as a beginner you should remember to use lower lighting contrast than might seem best at the time of shooting.
Unevenness
Lighting unevenness is most often a problem when you use hard lighting from an undiffused spotlight or flashgun, too close to the subject. When you double the distance of what is effectively a point source of light, the intensity of the illumination at your subject drops to one-quarter. This means that if you have a still-life set up 1 m wide and then side light it from a position 1 m away the illumination across your subject will be four times (2 stops) brighter at one side than the other; see Figure 7.5.
If you want to avoid such unevenness (without also affecting lighting quality or direction) just pull the light source back farther, in a direct line from the set. At 2 metres the variation becomes 1¼ stops, and at 3 metres only 2/3 stop. Alternatively diffuse the light, narrow the set, or help yourself by positioning the darkest, least reflective objects nearest the light source.

Figure 7.3 Flat-on frontal lighting given by flash from the camera illuminates all the subject detail, suppressing form and texture. Here its stark effect seems to suit the theme of this documentary picture of the Depression: ‘nobody had a dime, but they had each other’

Figure 7.4 Controlling lighting contrast. All three pictures are lit by one diffused floodlight about 90° from one side. Left: no fill-in. Centre: a large matt white reflector is added left, directly facing the light. Right: using red instead of white reflector board
Colour
Most light sources used for photography produce so-called ‘white’ light, a mixture of all colours. They are said to have a continuous spectrum, although its precise mixture may vary considerably from an ordinary domestic light bulb, rich in red and yellow but weak in blue, to electronic flash which has relatively more energy in blue wavelengths than red. As Figure 7.6 shows, most sources can be given a ‘colour temperature’; the higher the Kelvin figure the bluer the light.
When shooting colour, especially colour slides, you must be careful to use lighting of the correct colour temperature to suit your film. Normally this is 3200K (for ‘tungsten light’ film) or 5500K (‘daylight’ film). Alternatively you can use a tinted correction filter to bring light source and film into alignment, such as an 85B or 80A (their effect is shown on page 165). If all your subject lighting is the same colour temperature, the adjusting filter can be used over your camera lens. If it is mixed – daylight and studio lamps, for example – you must place a filter over one of these sources to make it match the other, as well as the film. Some light sources, such as sodium street lights and lasers, do not produce a full range of wavelengths and so cannot be filtered to give a white-light result.
This colour content of your light source is much less important when shooting black and white film, although strongly coloured light will make the colours of your subject record with distorted tone values (in red light, for example, blues look and record black, reds very light); see Chapter 9.
Most digital camera CCDs have colour sensitivity which is variable. A mosaic of red, green and blue filters is present in front of each lightsensitive pixel. Then special software calculates the image colour the pixel has received by referencing these filter clusters. Cameras often offer ‘auto white balance’ which works like a video camera, sampling the colour content of surrounding light and adjusting the CCDs colour sensitivity so that, say, a sheet of white paper always records white no matter what the colour temperature of the lighting. Within limits you can make further colour corrections later using digital manipulation software, page 277.
The intensity of the light
Most of the effects of the intensity of the lighting on your subject can be controlled by what exposure settings are made, and the sensitivity of your film or CCD. With an auto-exposure camera lighting level indirectly affects depth of field and movement blur – bright illumination and fast film leading to small aperture and fast shutter speed, for example. And with very dim light and long exposure times colour film often gives distorted colours too.
The light intensity of tungsten studio lamps can be quoted in watts, and electronic flash in watt-seconds (see also ‘Working from guide numbers’, page 195). High-wattage lamps – say 1 kilowatt and above – are so intense they are generally uncomfortable to use in the studio. Sometimes, however, high-intensity lighting is necessary. Perhaps you are using a large- or medium-format camera with slow film and must shoot at very small aperture for depth of field. This is where powerful studio flash offers a better alternative, see below.
Flash intensity can be reduced by selecting full, half, or quarter power settings without any change in the colour of the light. Most hand flashguns measure light reflected off the subject and control their own light duration; you can further increase the effective light output of a flashgun by firing it several times during a time exposure (see Chapter 10). The best way to dim tungsten lighting is by fitting a wire gauze ‘scrim’, Figure 7.8, or just moving lamps farther away. It is possible to dim lamps too by reducing the voltage of the supply with a variable resistor, but this is unsuitable for colour photography because dimmed lamps have a lower colour temperature and give results with a reddish cast.
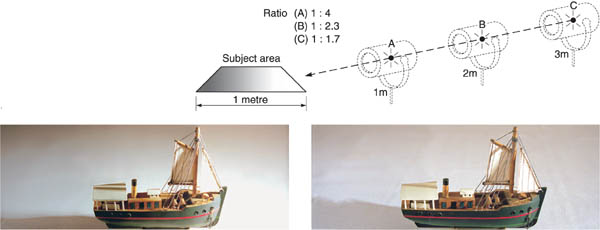
Figure 7.5 Distance and evenness. Below, left: A hard light source positioned obliquely at A is too close to the subject – the nearest part of this model boat receives four times more light than the furthest end. Below, right: pulled back to position C, three times the original distance, this ratio is reduced to 1.7 times. The subject is much more evenly lit and easier to expose correctly

Figure 7.6 The colour – expressed as colour temperature kelvins (K) – of common ‘white light’ sources. Daylight balanced film (D) needs a blue 80A filter for use with 3200K lamps. Tungsten film (T) must be used with an 85B filter for daylight or flash, for correct colour rendering. See also Figure 9.29
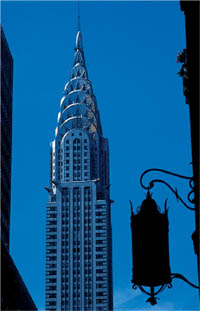
Figure 7.7 Typical cast created when subject shadows only receive light from a clear blue sky. To show the silvery Chrysler Building the correct hue, shoot when there is sufficient clou around to reflect back ‘white’ light, or pick a time of day when it is less backlit
As already indicated, lighting kit divides into two types – tungsten lamps, and flash. Tungsten units allow you to see precisely how the light affects your subject’s appearance. Flash (flashgun or studio flash units) avoids the heat and glare of tungsten lamps, yet gives out vastly more light for a brief instant. This allows you to work with the camera hand-held, and can give blur-free images of moving subjects. The colour of flash also matches that of daylight. Most forms of studio flash contain a built-in tungsten modelling lamp to help you to predict how lighting will look when the flash goes off. Flashguns, being battery powered, free you from the need for electricity supplies when working on location, outdoors, etc.

Figure 7.8 Tungsten lamp units which give hard lighting. Compact coiled-filament lamps (A) used in a focusing spotlight (B) or open-fronted reflector lamp (C). Lamphead attachments: barndoors (D), wire gauze ‘scrim’ (E), acetate filter holder (F), and snoot (G)

Figure 7.9 Focusing spotlight. Top: shaped ‘Fresnel lens’ bends illumination like the fatter lens (left) but is less bulky, with larger cooling surface. Bottom: shifting the lamp position in a focusing spotlight adjusts the beam width. Broadest beam gives hardest, most point-like lighting; see Figure 2.5
Both tungsten and flash equipment will allow you to create hard or soft quality illumination. And unlike working with sunlight they offer you complete freedom to pick the height and direction of your subject lighting.
Tungsten lighting units
Tungsten lighting is so called because the lamps contain a fine filament of tungsten metal which heats up, becomes incandescent and radiates light when electric current passes through it. Units designed to give hard lighting (Figure 7.8) use bunched filaments to produce an effect as close as possible to a point of light. The filament is sealed into a sleeve of clear quartz filled with a halogen (often iodine) vapour and is therefore known as a tungsten-halogen or quartz-iodine type. Do not finger the quartz when fitting or replacing such lamps – handle them in the small plastic sleeve provided, which slides off once the lamp is mounted in its lighting unit.
Some lighting units can simply be a polished concave reflector, open at the front. The lamp holder shifts backwards or forwards slightly within the reflector to give a narrower or broader beam. Alternatively the lamp can fit within an optical spotlight. This is an enclosed lamphouse with a curved reflector at the back and a large simple lens at the front to focus the light in a controllable beam. You shift the lamp using an external control to form either a wide beam or a concentrated pool of light, Figure 7.9.
Both these units accept fit-on accessories. Hinged ‘barndoors’ on a rotary fitting allow you to shade off any part of the light beam. A conical ‘snoot’ narrows the whole beam, limiting it to some local part of your subject. A ‘scrim’ reduces light intensity, usually by one stop, without altering its colour or quality, and a filter holder (spaced away from the unit to prevent overheating) accepts sheets of tough, theatre-type dyed acetate, also known as ‘gels’.
You will find that each unit gives hardest quality light when the beam is at broadest beam setting. Only focus a narrow beam when you want a graduated patch of illumination, say on a background behind a portrait. This focus setting will also give softer edges to the shadows. To light a small area evenly and with sharp-edged shadows, first focus a broad beam then restrict this with barndoors or a snoot.
Units for soft lighting (Figure 7.10) use a large translucent glass lamp, usually with a 500 W or 1000 W tungsten filament. This is housed in a wide, often matt white, dish reflector to form a floodlight. The lamp sometimes faces inwards, to turn the whole dish into a more even large-area light source. You can also buy, or make up, a grid of floodlight bulbs behind a diffusing sheet of opal plastic. (For black and white work this unit could instead contain fluorescent tubes, which give out far less heat.) The quality of illumination this gives is like overcast daylight through a large north-facing window – which is why it is called a ‘window light’.

Figure 7.10 Tungsten lamp units for soft illumination. The larger the unit the more diffused the light. They use 3200K diffuse-glass floodlamps in (A) matt white open-fronted reflector, (B) wider dish flood with direct light shield and (C) large opal plastic-fronted box giving lighting quality similar to overcast light from a window
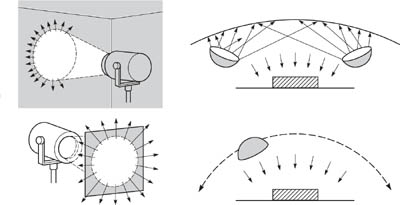
Figure 7.11 Producing soft, diffused lighting from a relatively hard source. Left: ‘bouncing’ illumination from a spotlight off a large area of matt white wall, or directing it through tracing paper. Right: spreading light from a small flood by reflection from a white overhead canopy, or (lower) by moving it in a wide arc over your subject during a time exposure of several seconds
Your lighting units should have stands which allow the head to be set at any angle or position, from floor level to above head height. For location work, lightweight heads such as QI lamps can have clamps with ball and socket heads, so they will attach to doors, backs of chairs, etc. Consider too the use of a ‘sun gun’ – a totally mobile small, hard QI unit which can be hand-held by an assistant and powered from a belt of rechargeable batteries. Typically this gives up to 20 minutes of 300 W lighting.
When you use tungsten lighting for colour photography, make sure you have lamps that all give the same colour temperature, preferably matching your film, and run them at their specified voltage. Over- or under-running voltage by as little as 10 per cent will give a noticeable blue or orange tint to results.
Flash units
Electronic flash produces its light when a relatively high-voltage pulse is discharged through a gas-filled tube. The flash is typically 1/1000 second or less and matches the colour of ‘daylight’. Otherwise it complies with the same optical principles as tungsten lighting. There are two forms of equipment – a flashgun either built into or mounted on the camera for use hand-held, and freestanding studio units which you move around more like tungsten lamps.

Figure 7.12 Tungsten lighting for use on location. A: battery-belt powered sun gun. B: suitcase lighting kit containing three tungsten-halogen lampheads and stands. C: lightweight lamphead on clamp. D: dyed acetates E: cable and multi-sockets. F: folding lightweight reflector surfaces
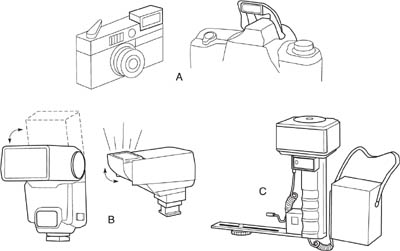
Figure 7.13 Battery-powered flash units. A: built into compact and SLR camera bodies. The SLR flash rises from the pentaprism housing to distance it from lens viewpoint. B: add-on units with tilt-up heads for bouncing light off the ceiling, etc. C: powerful ‘hammerhead’ type gun with rotatable head, bracket for camera, and separate power pack. All these units give hard light, unless bounced or diffused

Figure 7.14 Studio/location flash units requiring an electricity supply. Each has a tungsten modelling lamp to forecast its lighting effect. Left: Monohead type unit, with both power pack and tube in the head. Right: More powerful, separate generator type, powering one of up to three heads. Both types give hard lighting if used as shown here
Battery-powered flashguns range from the tiny units built into camera bodies, through clip-on accessory guns (brighter, and capable of tilting, Figure 7.13) to still more powerful ‘hammerhead’ guns which attach alongside the camera. All these tend to have short flash tubes and highly polished reflectors which give hard quality light when used direct, unless some form of diffuser is fitted or illumination is bounced, Figures 7.11 and 10.31. A plastic ‘beam-shaper’ condenser lens over the flash window often allows you to narrow or widen the light beam, to match the different angles of view of tele or wide-angle camera lenses. Battery flashguns contain no modelling lamp.

Figure 7.15 Head detail and fittings for studio flash. Left: Tungsten modelling lamp surrounded by the flash tube. Centre: White-lined umbrella reflector. Right: Fabric ‘soft box’ attachment. Both these heads give soft, diffused lighting
Studio flash is mains-operated, and of two types – monoheads and generator systems. All the electronics plus flash tube are combined in a monohead unit, supported on a lighting stand, see Figure 7.14. A generator (or ‘power-pack’) system is more powerful and expensive, often hired rather than bought. Electronics and controls are contained in one unit which can feed several flash-tube heads on separate stands. Both kinds of studio flash use a small tungsten modelling lamp in each head. To do its job properly and show you how the lighting will look when the flash fires, this lamp must match the size and position of the flash-tube as closely as possible, see Figure 7.15. The modelling lamp is dimmed if you adjust the flash output of its particular head from full to fractional power. This is important when you are using several heads set to different outputs.

Figure 7.16 Ring flash unit with battery power-pack. Far right: the soft-edged rim shadow here is typical when using ring flash with the subject close to the background
Lighting quality from studio flash is determined by the size and shape of tube and type of reflector or diffuser you fit to the head. Monoheads use one permanent flash-tube and rear reflector, to which a variety of accessories fit. Generator systems allow you to choose from a range of designed heads, having tubes of various shapes as well as attachments ranging from a spotlight to a large fabric ‘soft box’ giving a very diffused window light effect. An umbrella, white-lined or made of translucent material, will act as a large reflector or diffuser respectively, yet it is easily transportable. Umbrellas fit to generator heads or monoheads (but be careful that stands are anchored, particularly with monoheads, in case draught or wind topples them over); see Figure 7.17.
Bear in mind that the accessories, heads, or just the way flash is deployed (bounced off wall or ceiling for example) can give you lighting matching the quality of a tungsten lamp of the same size and used in the same way. The lighting principles behind flash and tungsten light sources are not as different as they at first seem. See also flash exposure, and practical techniques, pages 194 and 198.
Other artificial light sources
There is a wide range of tungsten lamps other than the 3200K studio types which are standard for artificial light colour film. For example, you will come across over-run ‘photo lamps’ or photofloods’ and QI movie lamps, which are high intensity but operate at 3400K designed for colour negative movie stock. Results on 3200K tungsten light film show a slightly bluish cast unless you shoot with a pale orange correction filter, page 171.
Domestic lamps are less bright and give out light of a warmer colour than studio lamps – the lower the wattage the more orange results will be. If you have to use such lighting pick 100 watt lamps, have an 82 A correction filter over the lens and shoot on artificial light colour film.
Fluorescent tubes can form useful studio light sources for black and white photography. You can group them vertically, in clusters, to softly light standing figures, still-lifes, etc. To shoot in colour pick ‘colour matching’ tubes and use daylight colour film. They are not recommended for critically accurate results, but often on location you are forced to work with them – when they form the existing light in shops, for example. If you are unlucky enough to be shooting somewhere lit with a mixture of different tube types (or tubes and lamps) try to swap them around to get greater uniformity. Alternatively change to your own flood or portable tungsten lighting instead.
Lighting accessories
As well as the attachments described on page 114, back-up items for your lighting might include reflector boards (folding ones are particularly handy, Figure 7.23), supports for paper backdrops, a boom light stand, clamps, sticky tape and black card. Blue acetate or blue-dyed ‘daylight’ lamps to make tungsten lighting match the colour of daylight when two kinds of light have to be combined on location can be useful. Similarly orange acetate, fitted over flash, can match it into a tungsten-lit environment.
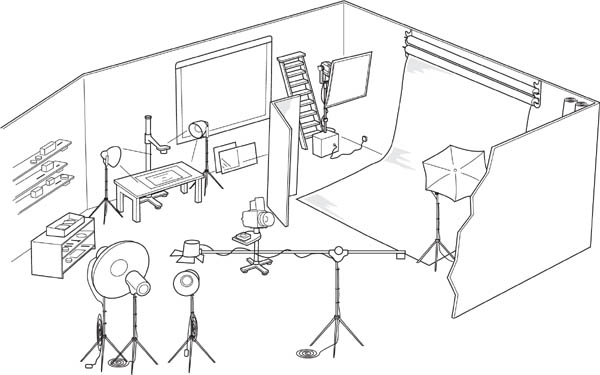
Figure 7.17 Layout of a general studio. Window has a removable blackout. Main set, using 3 m wide background paper, is equipped with a flash soft box (window light) head. A separate monohead unit has an umbrella. Two tungsten floods are in use for copying with a 35 mm camera on pillar stand. Other lighting, stored foreground, includes a boom stand with lamphead. The half-height adjustable stand, centre studio, supports a rollfilm camera plus tray for meter, filters, etc. Card, glass, blocks, clamps, tape and tools are all vital elements

Figure 7.18 Direct evening sunlight skim-lights a Cotswold cottage wall. Hard light directed so obliquely dramatically shows up texture, provided that the subject is all on one plane
Have sufficient cable to link your units to the nearest supply, and don’t exceed its fuse rating. Remember:
![]()
So one 250 V socket fused at 13 A will power a maximum of 3250 W of lighting. When servicing the equipment check that your lighting units and plugs are all properly grounded (earthed). If you are using a drum of cable always unwind this fully before passing current through it, or the coils will over-heat. Check out the electrical hazards advice on page 321. Finally, don’t jolt lamps while they are hot – especially tungsten-halogen types which easily short out their closely coiled filaments, and are expensive to replace.
Figure 7.19 The same principle of single-source skim light as Figure 7.18, but using an overhead desk lamp in a darkened studio. Once again, only one plane of the subject is being shown
Think carefully what your lighting should actually do for your subject, other than simply allow convenient exposure settings. Perhaps it must emphasize the form and surface textures of a new building, or a small product in the studio. It might heighten features in a dramatic male character portrait, or be kind to an ageing woman’s wrinkles. Your lighting will often be the best way to emphasize one element and suppress others, or reveal extreme detail throughout. It can ‘set the scene’ in terms of mood and atmosphere, or simply solve a technical problem such as excessive contrast in an existing light situation.

Figure 7.20 Complex still-life arrangements can be illuminated to reveal forms without confusing shadows by using a large diffused light source across the top and side of the set. Here, a window light from top left is used with a second diffused light from the right
Existing light
Learn to observe ‘existing light’, noticing what is causing the lighting effect you see, and how this will reproduce in a photograph. For example, look up from this book for a moment and observe how your own surroundings are lit. Hard illumination or soft, even or uneven? Which areas are picked out by lighting direction and which suppressed? Are any textures or forms emphasized? Try slitting your eyes and looking through your eyelashes – this makes shadows seem darker and contrast greater, a good guide to their appearance on a final print.
Daylight. The lighting quality of daylight ranges from intensely hard (direct sun in clear atmosphere conditions) to extremely soft (totally clouded sky in an open environment). Colour varies from 18000K intense blue when your subject is in shadow and only lit from blue sky, to an orangey 3000K around dawn or dusk. (Strictly ‘daylight’ colour film is balanced to give correct colour reproduction at 5500K, this being a mixture of direct noon sun plus some skylight.) As for direction, this of course changes throughout the day as the sun tracks from east to west and – unless you are on the equator throughout the year – passing most directly overhead on the longest summer day. Considered use of daylight for subject matter such as architecture and landscapes calls for planning, patience and the good fortune of getting all the aspects you need together at one time. Fortunately, outdoors, the varied character of natural daylight is often an important feature in pictures. It would be foolish, for instance, to try and ‘correct’ the orange tint of a setting sun when an evening atmosphere is vital to the realism of your result.


Figure 7.21 Supplementing uneven existing light. A: correctly exposed for the daylight-lit parts of the room, using 1/60 at f/8. B: flash bounced off ceiling above the camera (see diagram) set to autoflash exposure. Result has overlit foreground. C: flash positioned as B but set on manual mode and reduced to one-quarter the correct power. Exposure settings as A. Result shows realistic balance of 4.1 daylight/flash
Supplementary daylight. Often when you are working with existing light you will need to modify it in some way. When shooting a black and white portrait outdoors, you may find direct sunlight too harsh and contrasty, but the light changes completely if you move your subject into the shadow of a building. However, this gives an unacceptable blue cast with colour photography, so it may be better to remain in sunlight but work near a white wall, or have a reflector board (page 124) or even just a newspaper to return light to the shadow side. Another way to soften harsh shadows with close subjects such as portraits is to use a diffused flashgun on the camera. Since the latter is likely to be a battery-operated flash unit you cannot see the effect created unless you are using a digital camera or shooting Polaroid picture material (see ‘Fill-flash’ page 198), and results have to be worked out by careful calculation of exposure.

Figure 7.22 Mixed lighting. Mass celebrated at a tungsten-lit altar, with daylight illuminating the surrounding interior. In this instance the best compromise was to shoot through an 80A, blue filter onto daylight film (see page 164) or use tungsten balanced film if available. Either gives this result showing the key area the correct colour, but an exaggerated blue cast elsewhere. On daylight film without a filter the central area would reproduce orange, surroundings the correct colour
Supplementary light is often necessary when you shoot an architectural interior using existing daylight. There may be excessive contrast between views through and areas near windows, and the other parts of a room. You can solve this by bouncing a powerful light source off a ceiling or wall not actually included in the picture, to raise shadow-area illumination to a level where detail just records at the exposure given for brighter parts.
This artificial light source might be portable QI lamps or a flash unit. If you are shooting in colour, have any tungsten supplementary lighting filtered to match the daylight, and be careful not to bounce off tinted surfaces. Sometimes a dimly lit interior can be ‘painted with light’ to reduce contrast, by moving a lamp in a wide arc over the camera during a time exposure.
Mixtures of existing light sources which have different colour temperatures are always a problem when shooting in colour. You may be able to switch off, or screen off, most of one type of illumination and use the correct film or filter for the other. Otherwise decide which of the two kinds of lighting will look least unpleasant if uncorrected. A scene lit partly by daylight and partly by existing tungsten lighting often looks best shot on daylight-balanced film. The warm cast this gives to tungsten-lit areas is more acceptable than the deep blue that daylight-lit parts will show on tungsten-balanced film. However, much depends on what you consider the key part of your picture; see Figure 7.22.
Fully controlled lighting
If you are working in the studio, or some other area where you have complete control, try to build up your subject lighting one source at a time. Don’t just switch on lights indiscriminately – each unit should have a role to play. And keep the camera on a tripod so you can keep returning to it to check results from this viewpoint every time you alter the light.
Starting from darkness, switch on your main light (soft or hard) and seek out its best position. If you are just showing a single textured surface – such as a fabric sample, or weathered boarding – try a hard light source from an oblique direction. By ‘skimming’ the surface it will emphasize all the texture and undulations. But take care if this means that one end receives much more light than the other – move your light source farther away.
A single hard light will probably exaggerate dips in the surface into featureless cavities. Also, if the picture includes other surface planes at different angles, some of these may be totally lost or confused in shadows. One solution is to introduce a second or ‘fill’ light, but without adding a second set of hard shadows. (We are rather conditioned by seeing the world lit by one sun, not two.) Try adding very diffused light – perhaps just ‘spill light’ from the first source bounced off a white card reflector – sufficient to reveal detail in what still remain shadows. The reflector will have to be quite large, and probably set up near the camera to ensure it redirects some light into all shadows seen by the lens. If you cannot produce enough fill-in in this way, try illuminating your reflector card with a separate lighting unit. Another approach is to change your harsh main light to something of softer quality, perhaps by diffusing it.


If your picture contains a more distant background, you can light this independently with a third source (maybe limited by barndoors) so that the surface separates out from the main subject in front. Again be careful not to spread direct light into other areas, if this creates confusing crisscross shadows. In fact, when you have a great mixture of objects and separate planes to deal with in the same picture, there is a lot to be said for using one large, soft, directional light source (i.e. from one side and/or above). This can produce modelling without excessive contrast or complicated cast shadow lines, giving a natural effect like overcast daylight from a large window or doorway, see Figure 7.20.
Much the same kind of build-up can be applied to formal studio portraiture. Decide viewpoint and pose, then pick the direction of your main light, watching particularly for its effect on nose shadow and eyes. With a ‘three-quarter’ head shot (Figure 7.23) think carefully whether the larger or the smaller area of face should be the lighter part. Consider how much, if any, detail needs restoring in shadows by means of a reflector. If you want to stress an interesting outline you could light the background unevenly, so that darker parts of the sitter appear against the lightest area of background, and vice versa – a device called ‘tonal interchange’.
You could even add a further low-powered or distant spot to rim-light hair, shoulders or hands from high at the rear. However, there is a danger of so-called ‘overlighting’ which puts your sitter in a straitjacket. He or she cannot be allowed to move more than a few inches for fear of destroying your over-organized set-up, and this can result in wooden, self-conscious portraits. The more generalized and simple your lighting, too, the more freely you can concentrate on expression and people relationships.
The build-up approach to lighting applies equally to tungsten units and flash sources. Studio-flash modelling lamps will show you exactly what is happening at a comfortable illumination level, changing only in intensity when the flash is fired. See also flash exposure technique, page 199.
Copying
The main aim when copying flat surfaced originals such as photographs, drawings, etc., is to create totally even lighting free from reflections off the surface of the original. Figure 7.24 shows the best way to approach this, using two floods at about 30° each directed towards the far edge of the subject. Black card around the camera will prevent its shiny parts reflecting and showing up in your picture. See also polarising filters, page 173.

Figure 7.23 Lighting build-up: Top left: one diffused flood main light from the side the sitter is facing. Centre: a second flood added to lighten one side of the background and pick out the head outline by ‘tonal interchange’. Bottom left: the further addition of a large matt white reflector board softly fills in some shadow detail
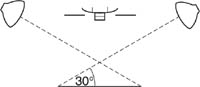
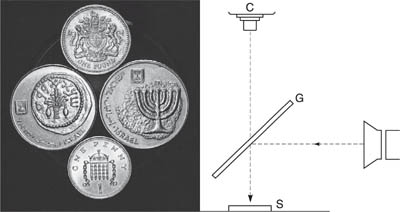
Figure 7.24 Flat-on lighting setups. Above: Set-up for copying artwork, etc. Lamps are at 30° to subject’s surface, distanced at least twice the width of the artwork and directed towards its opposite edge. Black card near camera blocks reflections. Centre: coins photographed through (G) thin glass at 45° (see diagram, right). The camera lens (C) looks down the same path as the light from the lamp illuminating the subject (S)
Macro work
Sometimes in extreme close-up photography you want flat-on frontal illumination to light every tiny detail of a coin, etc., or some recessed item such as a watch mechanism or electronic layout. A ring flash is sometimes the answer, but you can also work with a piece of clean, thin, clear glass set at 45° between lens and subject. A snooted spotlight or similar hard light source is directed at 90° from one side so that it reflects off the glass and is directed down on to your subject, sharing the same axis as the lens.
Transparent/translucent subjects

Figure 7.25 Lighting simple glassware. Below left: Using a separately lit white surface some distance behind the glasses to get a silhouette effect. A spotlight, shielded from the glasses direct, illuminates white card to reflect soft highlights suggesting the roundness and sheen of the glasses. Below right: The same set re-lit to give a more delicate, luminous look to the glass. Grey card covers the background seen by the camera, and soft lighting is directed through the glasses from side and rear. A frontal reflector board returns some light to help reveal form and surface
Glassware, etc., is often best lit from the rear. Either use a large white background spaced behind the objects and direct all your lighting evenly onto this, or direct lights on to the glass from the sides or rear so that the background remains dark. The former gives a dark outline to the glass against a predominantly light ground. The latter produces a white outline against dark. If the glass has a glossy surface you can suggest this quality by adding a rectangular-shaped light source from near the front, simply to appear as a window-like reflection.
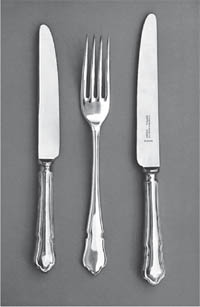
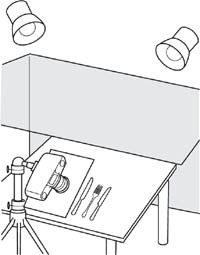
Figure 7.26 ‘Tent’ lighting. For this shot of highly reflective silver tableware a large sheet of tracing paper formed a canopy over the set, and was evenly illuminated from above by floods. In this instance, to prevent dark reflections, the camera was shielded behind white card leaving a hole for the lens
Highly reflective surfaces
Subjects with mirror-like surfaces such as polished silver or chrome bowls, spoons or trays impose special problems. They tend to reflect the entire studio in great detail, confusing their own form. You can treat them with a dulling spray but this may suggest a matt rather than a polished finish. Often the best approach is to enclose the subject in a large, preferably seamless, translucent ‘tent’ such as a white plastic garbage bag or sphere, or improvised from muslin or tracing paper. Cut a hole just wide enough for the camera lens to peer in, remembering that the longer its focal length the farther back it can be, giving a smaller and more easily hidden reflection. Illuminate the outside skin of the tent using several floods, or move a single flood over this surface, painting it with light throughout an exposure time of several seconds.
Summary. Lighting: principles and equipment
1 |
Experiment using an ordinary desk lamp, tracing paper and card to light a simple three-dimensional still-life subject. See how much you can vary the illumination quality, from hard to very soft. |
2 |
Photograph a white box in the studio on a white background, to show its top and two sides. Choose and arrange your lighting so that each of the three box surfaces photographs with a different tone. |
3 |
Take two photographs of either tennis balls or eggs. In one they should strongly reveal their rounded three-dimensional form. In the other make them look like flat two-dimensional discs or ovals. The only change between each version should be in the lighting. |
4 |
Check out the appearance of subjects when lit by direct or bounced flash, directed from various positions. If you have only a battery flashgun, tape a hand torch to it and work in a darkened room to preview results. Take pictures of the most interesting variations. See exposure, page 198. |
5 |
Set up a still-life group consisting of two or three neutral or pale-coloured, matt-surfaced items, lit either by daylight or by tungsten lamps. Have the camera on a tripod. Take colour pictures in pairs, demonstrating radical differences due to each of the following changes in subject lighting: (a) quality, (b) direction, (c) contrast and (d) colour. Measure and set correct exposure for every picture, but make no other alteration. Compare results. |