
Cameras using film
This chapter takes you from the lens alone to the camera as a whole. It explains the main camera components, and shows how – put together in different combinations – they make up today’s mainstream camera designs. It also compares the advantages and disadvantages of various camera types. Although this chapter and Chapter 5 concentrate on film cameras, much of the information here is valid even if you are considering using a digital camera. Plenty of ‘front end’ components such as viewfinder, auto-focusing, zoom lens and built-in flash are common to both kinds of camera. (Chapter 6 discusses features unique to cameras recording by digital means.)
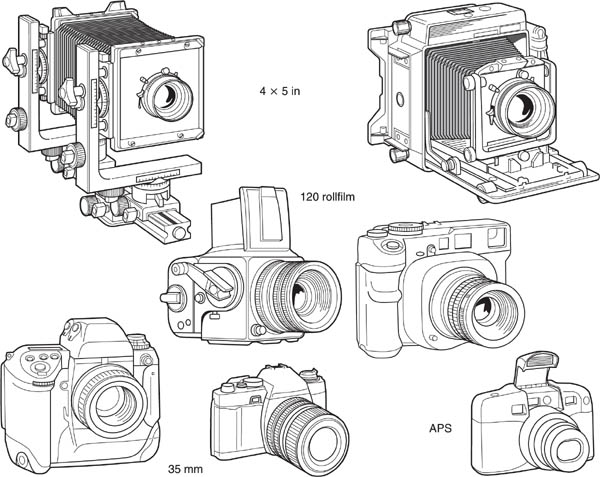
Figure 4.1 The main types and formats of current cameras using film. Back row: Large format monorail and baseboard view cameras. Middle row: medium format rollfilm single lens reflex and direct viewfinder cameras. Front row: Small format 35 mm single lens reflexes (manual and advanced), also APS compact camera
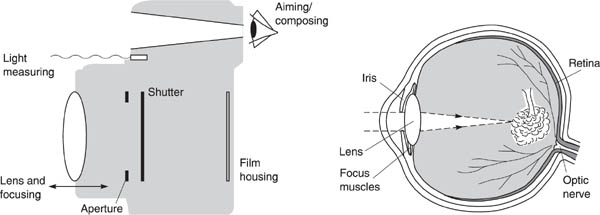
Figure 4.2 Left: the key components necessary in a photographic film camera, whatever its actual design or size. Right: components with similar functions in our human camera, the eye. Muscles alter lens shape to focus. The iris varies its diameter like a camera aperture. The retina forms the (curved) light-sensitive surface, and the optic nerve communicates image information signals to the brain. Clear fluid fills the eyeball, maintaining the lens-to-retina distance
When you look at modern sophisticated equipment it’s hard to believe that a camera is basically a box with a lens at the front and some form of light-sensitive surface at the back. Yet the first cameras were just that – wooden boxes put together by the local carpenter. A telescope objective was mounted over a hole at the front, and a holder for chemically coated material arranged to fit into the other end.
During 160 years’ evolution many different camera designs have been invented, improved or discarded. And yet today’s camera equipment can be divided into just four types: view cameras, compacts, twin-lens reflexes and single-lens reflexes. At the same time, camera picture sizes fall into three different groups:large format (sheet film, typically 5 × 4 in), medium format (rollfilm sizes giving 6 × 6 cm, etc.) and small format (principally 35 mm but also APS size film).
Whatever its picture size or type of design, a camera should offer the following controls and adjustments, either manual or automated:
1 |
A means of accurately aiming the camera and composing the picture. |
2 |
Ability to focus precisely. |
3 |
A shutter to control the moment of exposure and how long light acts on the sensitive surface. |
4 |
An aperture to control depth of field and image light intensity. |
5 |
A method of loading and removing film, without allowing unwanted light to affect it. And preferably: |
6 |
A meter to measure the light and indicate or set the exposure needed for each shot. |
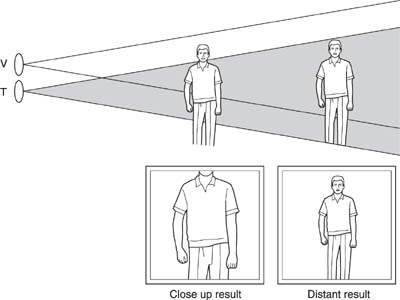
Figure 4.3 Direct viewfinding accuracy. The separate positioning of viewfinding (V) and taking lens (T) causes framing variations between what you see and what is photographed. This parallax error increases greatly at close subject distances (exaggerated here)
Composing and focusing
The oldest, and most awkward, way to accurately compose and focus your picture is still used in large format view cameras for professional photography. A ground glass screen at the back of the camera allows you to see and focus the actual image formed by the lens, Figure 4.16. You then exchange this for film before shooting.

Figure 4.4 Correction lines for parallax. The viewfinder in this compact camera suffers both horizontal and vertical parallax error, due to its location relative to the lens. Extra lines in the viewfinder display show the top and sides of the picture limits (broken lines) at closest focusing distance
Another arrangement, dating from early amateur cameras, is to have a line-of-sight viewfinder built into the body as found in today’s compact cameras. It gives a separate direct view of the subject, and is masked to have the same angle of view and height-to-width proportions as the picture given by the camera lens. The trouble with this direct vision viewfinder is that although it exactly frames up distant subjects, as you photograph closer up what you see through the finder becomes increasingly displaced and inaccurate, see Figure 4.3. Since this fault is due to the separate, parallel viewpoints of camera lens and viewfinder it is known as ‘parallax error’. Within the viewfinder window a correction line has to show the true top of your picture when shooting at your closest focusing distance.
To focus the lens on a direct viewfinder camera, simple types may just have a lens positioning control you set to one of a series of subject symbols (views; groups; portraits). A few high quality 35 mm or medium format direct viewfinder cameras have a precision, manual rangefinder system. As Figure 4.5 shows, you see your subject twice: once straight through the viewfinder, the other ducted (via a mirror and window) from a viewpoint further along the camera body. This second view is superimposed over the central area of the first, and moves sideways as you alter camera lens focusing. When you see both versions coincide in their detail of items at a particular distance the lens is correctly focused for this part of your subject. Optics in the viewfinder may also tilt to help compensate parallax error according to the lens focus setting.
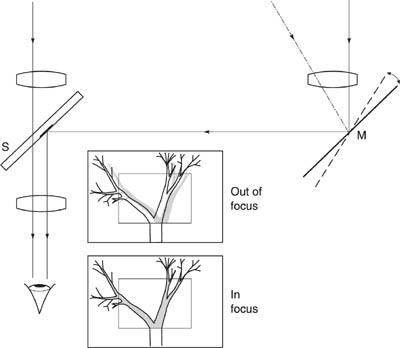
Figure 4.5 A manual rangefinder focusing system. This uses an optical rangefinder containing glass (S) with a semi-silvered spot, and a pivoting mirror (M) controlled by the camera lens focusing mechanism. In the viewfinder you see a second image centre-frame. The two coincide and merge when rangefinder (and lens) are set for the distance of this subject; see broken line at M
The majority of direct viewfinder compact cameras now have an automated rangefinding system which gives full autofocus (AF). As you begin to press the shutter release, the distance to that part of your subject composed centre-frame is measured by a form of electronic rangefinder, Figure 4.21, and lens focusing is automatically adjusted to the appropriate setting.
The above systems of composing and focusing your picture work reasonably satisfactorily for most general subjects. For real accuracy however you need to work viewing the image given by the camera lens (without the slowness and inconvenience of a view camera). Single lens reflex cameras allow this by having a mirror behind the lens to reflect the image up to a viewable focusing screen near the top of the camera body. This mirror shifts out of the way of the film just before exposure, Figure 4.31.
A focusing screen is the only film camera system offering ‘what you see is what you get’. It accurately displays the visual effects of depth of field on your picture at different aperture settings and lens focal lengths. Single lens reflex cameras are designed to hold the lens at widest aperture (brightest image, least depth of field) while you are composing and checking focus. So you really need some way of snapping the aperture down to the setting which will come into use when the shutter fires, to preview exactly how much of your picture will be sharp, see page 59. Most 35 mm single lens reflexes have autofocusing but allow you to select manual focus setting too.

Figure 4.6 Bladed, between-lens shutter. The lower drawing shows how the blades (simplified here to three) rapidly open or close when the ring is part-rotated
shutter
The camera shutter is a mechanical unit set in one of two positions, either (a) built into the middle of the lens, next to the aperture, or (b) at the back of the camera just in front of the film surface.

Figure 4.7 Metal bladed focal plane shutter opening sequence, as shown from the film side. Two spring blades pass downwards in turn, forming a moving slot through which the image reaches the film
A front or ‘between-lens’ shutter has several thin opaque blades which rapidly swing out of, and back into, the light beam to make the exposure when the release is pressed. In this central position the shutter has an even effect on the whole image, and only a small movement is needed to open and close the light path. It is also easy to synchronize this action with flash: contact is made to the (electronic) firing circuit the instant the blades are fully open. Often compact cameras combine the action of shutter and aperture, see page 58.
A rear or focal-plane (FP) shutter is more practical in cameras with interchangeable lenses. (Since it covers the film you can change lenses at any time.) Focal plane shutters in modern small format cameras often have sliding metal blades, Figure 4.7. Alternatively there are two roll-up fabric blinds. One blade or blind opens to start the exposure, the other follows to block out the light again. For short exposures the two follow each other across the film so closely they form a slit which actually exposes the picture. After each shot the blades or blinds are wound back, this time overlapped to avoid further exposure, ready for the next picture.
Having a focal-plane shutter also means that light can be allowed to pass through the lens and provide an image for viewfinding and focusing via a reflex system (Figure 4.27). And since one shutter will serve a range of lenses of different focal lengths you don’t have to have a between-lens shutter in each.
The usual range of shutter speeds, on both types of shutter, is:
1, 1/2, 1/4, 1/8, 1/15, 1/30, 1/60, 1/125, 1/250, 1/500 sec
Advanced cameras with FP shutters may continue this series down to 1/8000 sec. Most modern single-lens reflex cameras use electronically timed FP shutters offering settings up to 30 secs, or B (see below). Large diameter between-lens shutters for view cameras have big cumbersome blades to move and may not operate faster than 1/250 sec.

Figure 4.8 A fabric blind focal plane shutter. One blind follows the other horizontally. The sequence also shows how flash is usually triggered when the first blind has fully opened – at this point the film frame receives the full image
The doubling/halving progression of shutter settings (figures rounded up or down in some instances) complements the aperture f-number scale in terms of exposure given to the film. In other words, 1/30 at f/8 is the same exposure as 1/60 at f/5.6 or 1/15 at f/11. Actual choice depends on the depth of field you want and whether movement should record frozen or blurred (see pages 136 and 145). And if you combine fastest shutter speed with smallest aperture – or slowest speed with widest aperture – you can give correct exposure over a very wide range of subject brightness conditions.
If you want an exposure longer than offered by the scale of shutter speeds you may find that your camera has the setting ‘B’. (B stands for ‘Brief’, or ‘Bulb’ after early photographers’ use of an air bulb and tube system to hold the shutter open.) On B setting the shutter opens when you press the release button and remains open as long as you keep it pressed down, normally using a cable release.

Figure 4.9 The effect of shutter speed on a moving image. Left: 1/500 sec at f/2.8. Right: 1/8 sec at f/22. One shows detail but no sense of action, the other exaggerates movement (including camera shake). See also Figures 8.12 and 14.24
Flash can be fired by a between-lens shutter at all marked speeds. FP shutters are slightly more difficult here because the flash must only fire when the entire film frame is uncovered (Figure 4.8). Otherwise only part of your picture will appear. Contact to fire the flash is made when the edge of the opening blind gets to the far end of the frame. Provided you use the speed marked on the camera for flash, or any speed slower, the second blind will not yet have started to travel and the full frame is uncovered for exposure. (In general don’t exceed speeds of 1/250 with most 35 mm metal blade FP shutters; or 1/60 with large 6 × 7 cm blind FP shutters.)
Between-lens and FP shutters that are electronically timed integrate easily with the metering, autofocus and film wind-on circuits of smallformat cameras. They give ‘stepless’ settings – speeds between the marked times – when exposure is under the automatic control of the meter. Operating power is drawn from the camera’s main battery supply. (An electronic between-lens shutter for view camera use has a battery compartment attached.) However, if the battery fails or your camera meter circuit is not switched on, many electronic shutters default to 1/60 second. Some shutters cease functioning altogether.
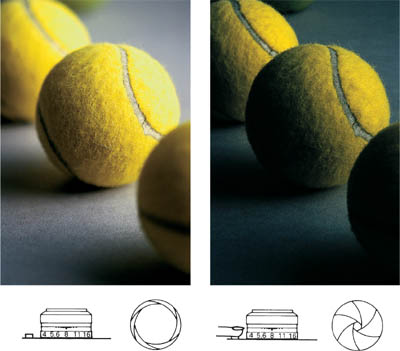
Figure 4.10 Depth of field preview. Lenses on single-lens reflex cameras have apertures you preset but remain fully open for easiest focusing and viewfinding (near right). If the camera offers a preview button this will stop down the lens to the taking aperture. The image on the focusing screen now becomes darker (far right) but shows you the actual depth of field you will record on film
After a shot is taken, all focal-plane and most between-lens shutters, mechanical or electronic, have to be re-tensioned before they can be fired to take the next picture. Often the cocking mechanism is set by winding on the film and so is hardly noticed. View cameras usually have a tensioning lever beside the shutter, and this must be activated before you fire the shutter with another lever or a cable release, Figure 4.15.
Aperture
Physically, the diaphragm system used for lens aperture control differs little from camera to camera. As shown in Chapter 3, a series of overlapping sliding blades forms a hole of continuously variable diameter. Sometimes, however, when the camera has a between-lens shutter, shutter and diaphragm are combined. The shutter then has five or six suitably shaped blades designed to open only part way, temporarily forming a hexagonal aperture of the correct size according to the f-number preset. This reduces the mechanism needed and is very suitable for linkage to the exposure setting in fully automated compact cameras.
In cameras that allow you to compose and focus the actual lens image, the aperture can be preset. This means that you (or the camera’s auto-exposure system) set the required f-number but the lens still stays fully open for brightest image viewing until just before the shutter is fired. On single-lens reflex cameras this last-minute stopping down is triggered automatically from the shutter release mechanism. On most view cameras you can stop down directly to a preset aperture by manually releasing a ‘press focus’ lever.
In all cases you will probably want to check depth of field effects at different shooting apertures. On some 35 mm and most rollfilm SLR cameras there is a special aperture-preview button on the camera body or lens; so long as you keep this pressed the diaphragm responds to any setting made on the f-number scale; see Figure 4.10. Regard an aperture-preview button as a desirable feature in any SLR camera intended for serious photography.
Light measurement
Practically all modern small- and medium-format cameras have some form of built-in circuit to measure the brightness of light from the subject and so assess correct exposure. The system signals when you have manually set a suitable combination of f-number and shutter speed, or else it automatically sets (a) the correct shutter speed for an aperture you have set (known as aperture priority or Av mode), (b) or the correct aperture for a shutter speed you have set (shutter priority or Tv mode), or (c) a suitable combination of shutter and aperture settings chosen by the system from a built-in programme. The practical advantages and disadvantages of each are compared on page 188.
A tiny light-sensitive measuring cell may be located on the front of the camera body pointing direct at the subject from close to the lens, or cells can be suitably positioned inside the camera, sampling light which has come through the camera lens itself. In both positions the cell should measure through any filter you may use over the lens. An internal cell system works equally well with any change of lens.
All modern exposure-measuring systems need to be powered by a battery. This is usually tapped off the same power circuit for autofocus, shutter timing and film drive. You may have to set the sensitivity of the film you are using (its ISO speed) although most 35 mm cameras do this automatically, reading a bar code on the cassette via electrical contacts in the film feed compartment. Large-format cameras seldom have light-measuring arrangements built in, and you have to add a metering attachment or use a hand meter instead; see Chapter 10. (Alternatively, if you are working with a medium or large camera without a meter, take readings with a small-format internal-meter camera and then transfer the settings it shows.)
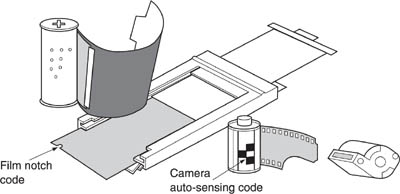
Figure 4.11 The four main forms in which light-sensitive film is loaded into cameras of differing sizes. Left to right: 120 rollfilm; 4 × 5 in sheet film, part-inserted into a double-sided film holder; cassette of 35 mm film; cartridge for APS (Advanced Photographic System) film. The film notch tells you which way up the sensitive surface is facing (see Figure 9.8). The cassette auto-sensing code sets the camera’s exposure system for the speed of the film
Unlike digital cameras, a film camera must allow you to repeatedly load and remove light-sensitive material without having it fogged by light. The oldest way to achieve this is to have separate sheets of film in a light-tight holder – a system still used for view cameras. The double-sided holder, Figure 4.16, slips into the back of the camera, displacing a focusing screen, and one side is then opened to face the (shuttered) lens. Most cameras, however, use film in lengths (35 mm wide, or 6.2 cm wide rollfilm) to allow many exposures at one loading. The film passes from feed to take-up compartments behind a picture-size aperture, flattened against it by a spring-loaded pressure plate. It is protected from light during loading and unloading because the film is contained in a cartridge, or a cassette having a velvet ‘light-trapped’ feed slot. Rollfilm is just tightly rolled up on a spool together with opaque backing paper.
Between exposures regular 35 mm cassette film is wound through the camera onto a permanently fitted open take-up spool. It must be rewound back into its light-proof cassette before you open the camera to remove the film for processing. Rollfilm does not need rewinding; it winds completely on to an identical, removable, take-up spool protected by the last few inches of backing paper. (You can also buy 35 mm bulk film for 250- or 500-exposure accessory backs, page 153.) Small, APS size cartridge film units are designed for easy drop-in loading of APS amateur cameras, see Figure 4.13. Once inside the camera the cartridge is automatically opened and film advanced; after the last exposure (or whenever you want to change film type) film is returned into the cartridge which recloses ready for removal.
Sheet film holders also allow you to change what is in your camera from one film type to another at any time. If you want to do the same with a 35 mm or rollfilm camera without wasting frames it is quickest to either have two bodies, changing the lens from one to the other, or use a camera designed with interchangeable film magazines. Most cameras with magazine backs also accept pack holders for instant picture film.
Lengths of film are shifted through the camera either by an electric motor triggered immediately the shutter closes after each exposure, or by hand using a wind-on lever. The wind-on, shutter cocking and exposure release are normally interlocked, so that you cannot take another picture until the previous shot has been wound on, and vice versa. Some cameras offer a button to over-ride the system for special superimposition effects. Cameras with built-in motor drive normally power-rewind the film back into its cassette after the end of the film has been reached.
Having reviewed the basic components present in some form in every camera system – for aiming; focusing; controlling depth of field and exposure; and housing the film – how do they go together to make up today’s range of camera types? No one camera is ideal. Some are extremely versatile but something of a compromise, not matched to any one kind of photography. Some are specialist tools which enable you to tackle a narrow range of tasks in ways impossible with any other gear.
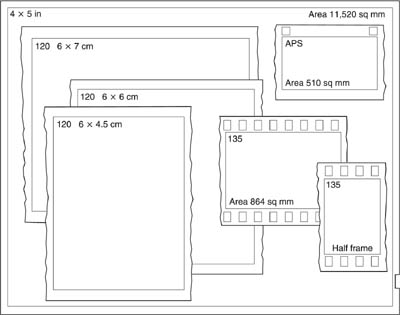
Figure 4.12 Picture formats. The picture areas given by large (4 × 5in), medium (120) and small (35 mm and APS) format cameras, drawn here life-size. 120 rollfilm and 35mm provide different formats according to the camera design. All APS cameras allow you to preset a choice of three formats, see page 68
Then again, modern small format (35 mm and APS) film cameras are internally very sophisticated, requiring least knowledge of photographic technicalities to get acceptable snap-shots. Medium and large format cameras often lack sophistication. So you must understand photographic principles more thoroughly to operate these cameras successfully. Another facet to consider is the rapidly improving performance of digital cameras (Chapter 6). However, since they retain most of the optics and mechanisms needed in film cameras, arguments for and against different camera designs raised here are largely common ground.
If possible try to get ‘hands on’ experience of all four main camera types (view cameras; compacts; twin and single lens reflexes). Compare convenience, toughness and reliability as well as all-important image quality. Decide what sort of camera controls feel right for you, and consider whether the size and proportions of the picture a particular camera gives are best suited to your work.
Large, medium or small format?
Figure 4.12 shows the most common picture formats given by today’s cameras using film. At first you might imagine that using an enlarger makes film size rather irrelevant, because all results can be blown up to make a given size print. However, consider the following:

Figure 4.13 APS film. Top: Cartridge is smaller than a 35 mm cassette. Light-proof apertures in the base signal (1) contains unexposed film; (2) is partly exposed; (3) exposed but unprocessed, or (4) contains processed film (see page 155). Bottom: The whole 30 × 17 mm picture area is exposed in the camera, but can be cropped in enlarging to give three alternative ratios. C (‘classic’) dimensions give 2:3 ratio proportions, like 35 mm, H (HDTV) dimensions give 9:16, and P (‘panorama’) give 1:3. Your choice when shooting is recorded magnetically on the film edge and later programmes the mini-lab enlarger
The other important consideration is format shape. Height-to-width proportions have a strong influence on picture composition. Most formats are rectangular, 35 mm regular frame having a ratio of 2:3. At first sight a square format would seem the easiest to work with. You don’t have to choose between vertical and horizontal shapes when framing up a shot. But then you don’t have the up/down or sideways thrust they can add to your picture either. Most pictures finally seem to be used in some rectangular format anyway.
Of course, during enlarging you can crop off unwanted image parts, but you will find that the original camera format still influences your picture making. Similarly some shapes are definitely more ‘comfortable’ to compose subjects within than others. A few panorama wide-angle rollfilm cameras (Figure 4.25) offer ratios of 1:2 or even 1:3. These long thin negatives, up to 6 × 17 cm, must be enlarged using a large format enlarger.
One final point concerns professional photography and client relations. Small-format cameras are still seen as amateur cameras, however excellent their performance. When you are commissioned for a commercial shot and turn up with a 35 mm outfit not dissimilar to the client’s own, the effect is less impressive than medium or large specialist-looking equipment. This is a valid aspect of business psychology.
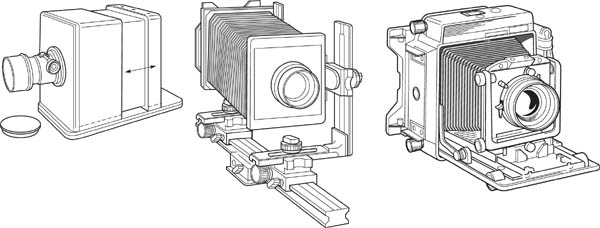
Figure 4.14 View cameras. Both monorail (centre), and baseboard (right) designs are derived from wooden sliding-box plate cameras (left) used by pioneer photographers in the 1840s
The review of how different camera types work which follows begins with view cameras. Although now less used because of improved medium- and small-format equipment, they are deceptively simple. Little is hidden away inside, and it is easy to see how the basic components work together.
This type of camera design relates back directly to the earliest form of photographic plate camera, as used by pioneers such as Louis Daguerre. Equipment then consisted of two boxes, one sliding inside the other for focusing, and having a lens at the front and a ground glass screen at the back. Today’s view cameras are still large format, but designed for sheet film. The most usual size is 4 × 5 in; others include 7 × 5 in and 9 × 6.5 cm, even 8 × 10 in. You can adapt down from any of these sizes by fitting an appropriate back or adaptor for smaller sheet film, rollfilm, instant-picture material, or digital recording (Chapter 6).
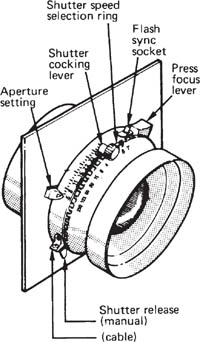
Figure 4.15 Shutter and lens unit. Typical view camera lens unit with mechanical bladed shutter. The panel it is mounted on makes it interchangeable with other lens units
The camera lens with its between-lens shutter is mounted on a clip-on panel which fits over the camera front. You can quickly change to lenses of different focal lengths, also ready-mounted on panels. The front of the camera is connected to the back by opaque concertina bellows to keep out non-image-forming light, yet allow a wide range of lens-to-film focusing distances. A finely etched glass screen at the back shows you the (upside-down) image for focusing and composition. This back can be rotated from horizontal to vertical format. As the screen is spring-loaded, when you push in a film-holder between glass and bellows your film surface becomes located in exactly the position previously occupied by the etched surface of the glass, Figure 4.16.
The lens-carrying front of the camera can be tilted, or offset sideways up or down independently from the back. These ‘camera movements’ are important for professional architectural and still-life photography. They allow you extra control over depth of field and shape distortion, explained in detail in Appendix B.
There are two main types of view-camera design, monorail and baseboard. Monorail types are unit-constructed on a bar, and are always used on a stand. To focus you move either the front (lens) standard or rear (focusing screen) standard along the rail. Having such an open unit structure, a monorail offers the same camera movements front and back, allowing an enormous amount of offsetting.
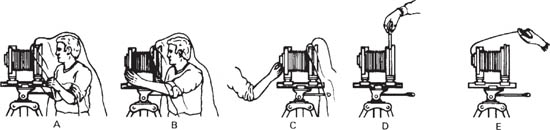
Figure 4.16 Photographing procedure with a view camera. A: Composing and focusing on the ground glass screen. B: stopping down while visually checking depth of field. C: closing and setting the shutter. D: after inserting a filmholder, withdrawing the darkslide covering the film. E: firing the shutter
The baseboard type of view camera, also called a ‘technical camera’, is a box-like unit with a hinged front. Opening this flap you find you can pull the lens standard out onto it, on runners. Then by turning a milled knob at the edge of the board you move the runners, focusing the lens backwards or forwards while you check the image on the focusing screen. A baseboard camera is quicker to set up on its stand and use than a monorail type. However, it offers less comprehensive movements, especially back movements.
With all view cameras you need a fold-out hood or an old-fashioned focusing cloth over your head and camera back to block out ambient light, so you can clearly see the image. Figure 4.16 shows the typical prolonged sequence needed to take a picture. Exposure is most often measured with a separate hand meter (Chapter 10).
View camera advantages
1 |
Cameras offer large format image quality (very apparent in really big exhibition prints) and an unrivalled range of camera movements. |
2 |
You can take and process single exposures. When working in the studio this allows a check on each result as you go along. |
3 |
Relatively simple construction. There’s little to go wrong. |
4 |
The large format and static nature of the camera encourage you to build up carefully considered compositions, almost like drawing or painting. |
5 |
Still often chosen for architectural, landscape and still-life photography; also for close-ups and copying because even the normal-length bellows allows considerable lens-film extension. |
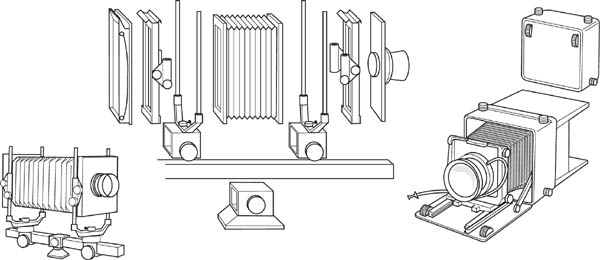
Figure 4.17 Below left: Monorail view cameras are unit constructed, allowing different lengths of bellows, rail, and size of back, as well as independent movements of lens and film. Some cameras have U-shaped standards, others L-shaped (Figure 4.14). Below right: Baseboard type view camera folded, and open for use on a tripod. The lens pulls forward onto a focusing track; flaps which fold out at the back shade the ground glass focusing screen
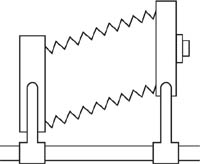
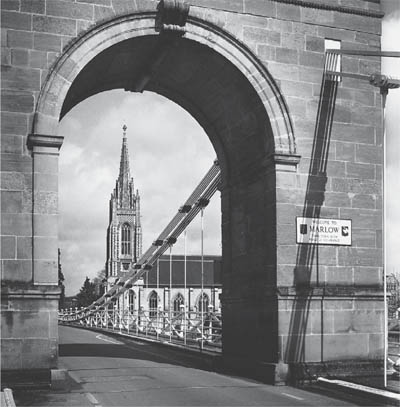
Figure 4.18 Rising front. A view camera offering this camera movement is still often used for architectural subjects where most elements are well above the lens centre. Tilting a normal camera upwards would make vertical lines converge. Instead, the camera back here was kept upright and the front lens standard raised to include more arch top, less road. (See also digital manipulation of perspective, page 287)
View camera disadvantages
1 |
Camera kit, film holders and tripod are bulky to carry and slow to set up and use. The dim, upside-down image is awkward to view. |
2 |
It takes time to measure exposure, and with a hand meter there are exposure calculations needed when working close, see page 191. |
3 |
Impractical camera for many subjects, e.g. sports, candids, etc. |
4 |
Continuous improvements in the resolution of films and lenses for medium- and small-format cameras have undermined the image quality advantage of large equipment. |
How direct viewfinder cameras work
This term covers cameras using direct vision (also known as real image) viewfinders, notably small-format ‘compacts’. Unlike view cameras or reflex cameras which allow you to see the actual image formed by the lens, they have a separate window set into the camera body through which you look at your subject directly; see Figures 4.3 and 4.4. Based on early user-friendly cameras invented to overcome the prolonged practical procedures that large-format view cameras demand, they are typically pocketable, and fully self-contained. Everything, including flash, is built-in. Technical settings are automated by sophisticated technology, making cameras instantly ready for shooting pictures hand-held.
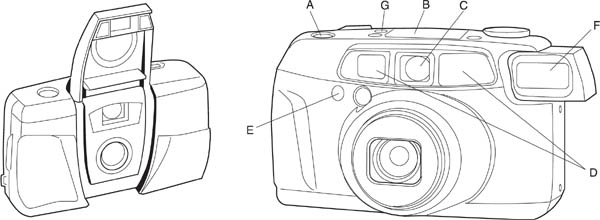
Figure 4.19 Direct viewfinder compact cameras. Left: Designed for APS film. Right: Uses 35mm film. A: shutter release and power wind-on. B: LCD panel, displayin frame counter, battery state, etc. C: Front window of viewfinder. D: Windows for IR autofocus system. E: light sensor for auto-exposure setting programme. F: Flip up or pull out flash. G: Lens zooming control
Direct viewfinder cameras come in a huge range of compact point-and-shoot designs – some for 35 mm, others for APS size film. There are also some more expensive versions having manually set exposure controls and rangefinders, which are designed more for professional work. These use either 35 mm or rollfilm.
Compact, point-and-shoot designs (35 mm and APS)
The aim of these cameras is to make photography of ‘typical’ subjects simple. They achieve a high technical success rate, even under quite a wide range of shooting conditions. Photographers with little interest or skill in controlling results can expect to get clearly recorded images, provided they work within limitations such as not too close; holding the camera steady; and not trying to light a huge landscape with flash. The ‘auto-almost-everything’ features put compact cameras well ahead when you make a quick decision to take actuality pictures of an event. There’s no delay over settings – you can even hold the camera up over your head in a crowd and get sharp, well exposed results. Also you are more likely to always carry a camera with you when it is smaller and more pocketable than a reflex type.
Features common to both 35 mm and APS compact cameras include:
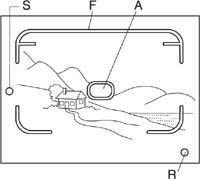
Figure 4.20 Information shown in a typical compact camera viewfinder. F: Suspended frameline, with parallax-correcting top lines for closest focusin distance. A: Autofocusing area. S: Shake warning diode (for when a slow speed is in use). R: ‘Flash ready’ indicator
Viewfinder. The direct vision viewfinder always shows your subject looking sharply focused. Picture limits often shown by a white outline ‘suspended’ on a slightly larger viewing area (Figure 4.20). Short extra lines near the top show the true upper limit of your framing when shooting close-up (parallax correction, page 54). Also a central zone is marked where autofocusing will take place. Information such as ‘flash ready’ or warning of ‘too close for focusing range’ may appear as light signals alongside the frame lines or beside the eyepiece of the viewfinder. It is important that your viewfinder has an eyepiece large enough to give you clear sight of all four corners of your picture at the same time – particularly if you wear glasses.
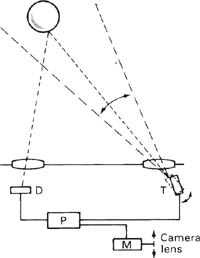
Figure 4.21 Infra-red AF system. When the shutter release is half depressed transmitter (T) scans centre of subject area. Detector (D) senses when the reflected signal is strongest. Processing circuit (P) relates this to the position of (T) halting the camera lens focusing motor at the step giving correct setting for the distance
Autofocus (AF). Most autofocusing systems are ‘active’, meaning that they use diodes transmitting and receiving infra-red wavelengths (like those used for TV remote control). These operate through two windows in the camera body, Figure 4.19. The system works on the rangefinder principle, page 54, but it sends out a beam of invisible IR rays from one window and has a narrow-angle detector cell behind the other. First pressure on the shutter release button causes a motor to adjust the camera lens focusing and scan the beam across your subject, Figure 4.21, within the mid-frame target area. Both stop when a strong return signal is detected. In practice the lens is ‘stepped’ through a series of settings between infinity and closest focusing distance. Low-cost cameras may work using only seven setting stages. Others have 100 or more stages, which allows the autofocusing to be much more precise.
An IR system will even focus in darkness, but it can be fooled sometimes if you are photographing through glass windows at 90°, or shooting against a bright light source. Watch out too for situations when you compose a picture containing two people and the AF measuring area falls entirely on background or foreground between the pair; see Figure 4.22. Cameras have an ‘AF lock’ button to deal with this – you first coincide the measuring area with one of the figures, autofocus with a half pressure on the shutter release, then apply the lock and recompose your picture as you want it with main subjects off-centre but now remaining sharply focused. However, the procedure takes time and it is tempting to shoot subjects centre-frame.
Figure 4.22 Using AF lock. Top: When the main subject is not positioned centre frame the background becomes autofocused instead. Centre: briefly re-compose the picture, autofocus and apply AF lock, then return to your chosen picture composition (bottom) before exposing
Zoom lens. Compact cameras don’t have interchangeable lenses like SLRs or view cameras. Apart from the cheapest models it is usual to have a zoom (variable focal length) lens. Control buttons then provide you with a smooth optical adjustment which enlarges or reduces how much of your subject fills the frame – in other words narrowing or widening angle of view. Optics within the direct viewfinder must also alter position to keep pace with what the camera lens includes.
Auto-exposure (AE). Shutter speeds and aperture settings are determined and set internally by a programme. This takes into account the light-sensitivity of the film you have loaded (read direct off the cassette or cartridge by modern cameras, page 155) and the brightness of the subject you are photographing as measured by a light sensor facing it from the front of the camera, Figure 4.19. A good compact camera may make settings ranging from 1/8 sec @ f/2.8 to 1/500 @ f/16, but not actually show you what these are. If conditions demand speeds of 1/30 sec or slower a signal warns you to use a tripod or change to flash; some cameras automatically switch the flash on.
Built-in flash. Flash built into a compact camera body is typically powerful enough to give correct exposure at subject distances up to about 3 m. The closer and more reflective the subject the shorter the flash duration, see page 206. The flash is triggered by the shutter and is followed by a recharging delay of up to 10 sec after each flash. You have to wait for a ‘flash ready’ signal in or beside the viewfinder before taking the next shot.
An inherent problem with compacts is ‘red-eye’ caused by the closely positioned flash illuminating the back of people’s eyes, page 53. To minimize red-eye, the flash is housed as far to one side of the camera lens as possible. Some designs use a fold-up or pull-out arrangement (Figure 7.13) to achieve this.
Compacts using 35 mm film. The widest range of compact cameras is still of this type. A great variety of film types is available in 35 mm. Films can be user-processed if you so wish; and the image is big enough to enlarge to exhibition sizes without much deterioration. The standard lens focal length is 34 mm but most have zoom lenses, typically 38–70 mm (x2 zoom range) or 38–105 mm (x3). However, the greater the zoom lens range the more bulky the camera becomes, which is self-defeating. With such a wide range of 35 mm compacts and prices, comparisons are difficult to make, but the best quality 35 mm types remain ahead of the best APS compacts.

Figure 4.23 The three picture formats offered by APS. In every case the full 30 × 17 mm frame is exposed, but you also record a magnetic signal on the film which later programmes lab equipment to make either a 6 × 4 in, 7 × 4 in, or 10 × 4 in print
APS compacts. Advanced Photographic System cameras are, as the name implies, intimately linked with modern processing and printing equipment used by photofinishing labs. Introduced in 1996, cameras are smaller than 35 mm compacts and only accept 23 mm wide APS film housed in a cartridge different in shape to 35 mm cassettes, Figure 4.13. The cartridge simply drops in, is opened when you shut the film compartment, and the film loaded, wound-on and rewound by motor. All APS negatives are 17 mm × 30 mm but three sizes of print are possible, nominated when you take each picture. By setting ‘panoramic’ for example the viewfinder re-masks to 3:1 format ratio. It also records signals on transparent magnetic coating on the film itself which programme the photofinisher’s equipment to enlarge only a long narrow part of the negative and make a print 10 in × 4 in. Other settings you can make for all or any pictures on the film are 2:3 ratio (prints 6 in × 4 in) or 9:16 (prints 7 in × 4 in); see Figure 4.23.
Other kinds of PQI (Print Quality Improvement) data may be recorded invisibly on their respective film frame – date and time of shooting, whether flash was used, etc. – to get the best quality out of automatic machine printing. Processed film is returned inside its cartridge, which is not intended for owner opening. Large-scale photofinishing machinery apart, little darkroom equipment is made for APS (although films can be digitally scanned like 35 mm, see page 270. Because APS format is smaller than 35 mm, cameras have 24 mm or 27 mm focal length lenses as standard. Almost all in fact have zoom lenses, e.g. 24–52 mm or 32–65 mm x2 zooms, or 30–90 mm or 25–100mm x3 and x4 zoom range.
APS compact cameras (in conjunction with APS photofinishing centres) allow photographers with no technical knowledge to get good results up to 10 × 4 in. But you may quite soon want to graduate to 35 mm with its greater range of equipment (particularly advanced equipment) and possibilities of do-it-yourself processing and printing.
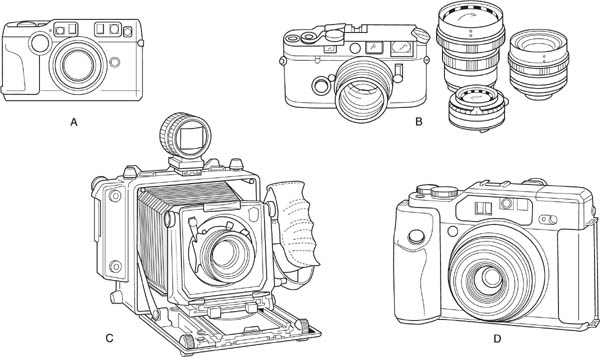
Figure 4.24 Direct viewfinder cameras for mainly professional usage. A: Contax 35 mm compact, with manual/auto rangefinder. B: Leica manual rangefinder 35mm with some of its interchangeable lenses. C: Baseboard 4 × 5 i camera with coupled rangefinder. D: Rollfilm 6 × 4 cm format camera with an auto-focus, zoom lens
Professional type direct viewfinder cameras
What are often referred to as rangefinder cameras are intended mostly for the professional market and priced accordingly. They include some 35 mm format cameras such as the Leica and Contax, several for medium format rollfilm, and a few large-format hand-held cameras; see Figure 4.24. Viewfinders are mostly ‘parallax corrected’, meaning that optics slightly shift the frame lines downwards the closer you focus.
An attraction of these cameras is their quiet shutters, and reduced weight relative to single-lens reflexes offering the same picture format, Figure 4.29. They are also rugged and have high precision optics. In the case of the Leica it has an almost soundless focal-plane shutter (good for photo-journalism) and a modest range of interchangeable lenses. The viewfinder automatically changes its frame lines according to the lens you fit. Exposure reading is made through the taking lens, by a hinged light-sensor just in front of the shutter blind which moves out of the way immediately before you shoot.
Rollfilm direct viewfinder cameras may also feature interchangeable lenses and manual rangefinding focusing, or have a zoom lens and autofocusing. Everything of course is scaled up in size – if the format is 6 × 7 cm the standard lens is likely to be 80 mm, or a 55–90 mm zoom on a 6 × 4.5 cm camera. They are popular with some professionals for wedding and social portrait work where both formal groups and actuality pictures will be needed.
Specials. A few direct viewfinder rollfilm cameras are designed for more limited, special applications. They include wide angle cameras giving a panoramic-type format such as 6 × 17 cm, and highly portable ‘shift’ and cameras for architectural photography which allow you to raise the lens to control perspective (see page 306). Some baseboard view cameras also accept a direct vision finder matching the lens in use, and have an optical rangefinder linked to the focusing track mechanism. You can then take hand held pictures on 4 × 5 in sheet film or change to medium format pictures by attaching a rollfilm back.

Figure 4.25 Specialist purpose direct viewfinder cameras. Top: A wide-angle 6 × 17 cm rollfilm camera (focus by distance scale only). Bottom: architectural ‘shift’ camera accepting a roll or sheet film back.
Direct viewfinder camera advantages
1 |
An all-in-one unit, mostly quick to bring into use and record things as they happen – getting a picture you would otherwise miss. Press photographers often carry an automatic compact as a back-up camera. |
2 |
The viewfinder gives a sharp, bright image. You may also see part of your subject in the viewfinder before it enters the marked frame, good for sport and action. |
3 |
Modern compacts pack in a wide range of practical features – motordrive, autofocus, auto-exposure setting programme, zoom lens, flash – yet remain small. |
4 |
Rollfilm DV cameras may be designed for specialist roles, hand-held architectural photography, panoramas; or more general work where portability plus medium format results are required. |
Direct viewfinder camera disadvantages
1 |
Parallax error between viewfinder and lens is a real problem when working close. Even though ‘parallax corrected’ cameras give accurate framing, the viewpoint difference still gives you a slightly different alignment of elements one behind another – sufficient to upset critical compositions. |
2 |
There is no convenient way of visually checking depth of field. |
3 |
It is easy to have a finger, or strap, accidentally blocking the lens, exposure sensor, or autofocus rangefinding window. You will not see this looking through the separate viewfinder. |
4 |
PS film cameras are quick and conveniently automatic to use, but not geared to user-processing or large prints. They offer little scope to extend your photography through knowledgeable use of technical controls when shooting (although, like 35 mm, pictures can be digitally manipulated later; see Chapter 14). |
5 |
Inexpensive autofocus compacts take a perceptible time to focus (typically 1/10 second). Delay between pressing and firing can mean you lose the key instant of a fast action shot. |
6 |
The small flash built into compact cameras is not very powerful and gives only ‘flat on’ light. It cannot be bounced unless the camera has a shoe accepting an add-on flashgun. |
7 |
Most small format compacts are totally reliant on battery power to function. |

Figure 4.26 Given time and a static subject you can correct both framing and viewpoint parallax error. Compose the picture, then finally raise the camera by the distance between lens and viewfinder
Reflex cameras can be traced back to one of the earliest forms of camera obscura used for sketching views. With a mirror fixed at 45° behind the lens the image is reflected up to a horizontal surface and becomes right way up. Soon after the invention of photography this reflex arrangement was mounted on top of a basic plate camera to act as a full-size focusing viewfinder. The combination was called a twin lens reflex. A few rollfilm versions of twin-lens reflexes (TLR) are still made, but further development resulted in single-lens reflex (SLR) cameras. These offer a much more accurate and informative image checking system.

Figure 4.27 For centuries before photography artists used the reflex ‘camera obscura’ to form a right-way-up image on glass, convenient for tracing
Twin-lens reflexes
As shown in Figure 4.28, a TLR camera has two lenses of identical focal length mounted one above the other on a common panel. The distance from the top lens (via the mirror) to the focusing screen must be the same as the distance between the bottom lens and the film. The focusing screen is also the same size as the picture format. You can therefore focus and compose the image on the top screen, where it is shaded from light by a hood, then fire the between-lens shutter in the lower lens knowing that the picture will be correctly focused on film. Differences in viewpoint between the two lenses give parallax error though, especially with close subjects.
The top lens has a fixed aperture, the same or wider than the maximum given by the diaphragm of the lower lens. This produces a bright image and minimal depth of field for easier visual focusing. The image on the screen is right way up, but reversed left to right, a feature which makes it almost impossible to follow moving subject matter. There is therefore a simple fold-in direct viewfinder in the metal hood. However, since this viewpoint is 75 mm (3 in) or more from the taking lens, parallax error is even more extreme.
TLR cameras are designed to give square format pictures. This is because the camera is awkward to use on its side – the image on screen goes upside-down. Some models have a built-in exposure meter, located behind a semi-silvered area of the mirror.

Figure 4.28 Twin-lens reflex. A: aperture and shutter setting controls. B: bladed shutter release. F: focusing knob, shifts entire twin-lens panel. R: rollfilm spool. W: film wind-on handle (folds out). M: fixed mirror. S: focusing screen. E: focusing magnifier. V: push-in hood section, forms direct viewfinder with rear eyepiece
TLR advantages
1 |
A mechanically simple design, with a very quiet shutter. |
2 |
You see the visual effect of focusing, on the full-size screen, even during the exposure itself. |
3 |
The camera is easy to use over a wide range of viewpoints from floor level to high above your head (holding the camera upside-down). |
4 |
A TLR costs less than a rollfilm SLR camera with similar lens quality. It is a cheap way into medium-format photography, practical for weddings and portraits. |
TLR disadvantages
1 |
Parallax error creates difficulties with close-up work. |
2 |
The image on the screen is reversed left-to-right. |
3 |
Depth of field is shown on a printed scale, but you cannot check its visual appearance. |
4 |
The camera is relatively bulky for its format. |
5 |
No zoom or interchangeable lenses. |
Single-lens reflexes
The SLR was developed to overcome most of the disadvantages of the twin-lens reflex camera. The design avoids parallax error completely, by using the same lens for both viewfinding and photography. A hinged 45° mirror reflects the image up to a horizontal focusing screen, but flips out of the way just before the (focal-plane) shutter fires. The distance between lens and focusing screen, via the mirror, equals the lens-to-film distance. So what is sharp on the screen will be sharp on the film.
On all 35 mm SLRs a pentaprism above the screen corrects the image left-to-right and reflects it out through an eyepiece at the back of the camera, so you see the subject as it might be seen direct, Figure 4.33. Typically the screen shows 95–98 per cent of what will record on film – you get in minutely more than you expect. If you wear glasses, buy an accessory dioptric corrector lens which fits over the camera eyepiece. Then you can remove your glasses and bring your eye close enough to view the entire screen, still seeing the image clearly.
The focusing screen itself may be interchangeable. The most popular type for non-autofocus cameras has central ‘crossed wedges’ moulded into its surface, which shows a rangefinder-type double image of subjects not properly in focus, Figure 4.34. A surrounding ring of microprisms breaks up an unsharp image into a shimmering dot pattern. Both focusing aids are designed to work with the lens at wide aperture; stopping down partly blacks out these areas.
Most autofocusing SLRs use a passive electronic system to detect when the image is sharp. Some of the centre part of the picture is directed down on to a charge-coupled device (CCD) sensor (Figure 4.35). With unsharp images the system also detects whether the lens should be focused towards or away from the camera body. It may respond by signalling which way you must manually turn the lens, alongside the focusing screen (‘focus confirmation’). More often it controls a motor within the camera body or lens which fast-shifts your focus setting by the required amount (full AF). Focus detection can be coupled to exposure release, so that you cannot shoot until the image has come into focus – useful in action photography (but sometimes a handicap too).
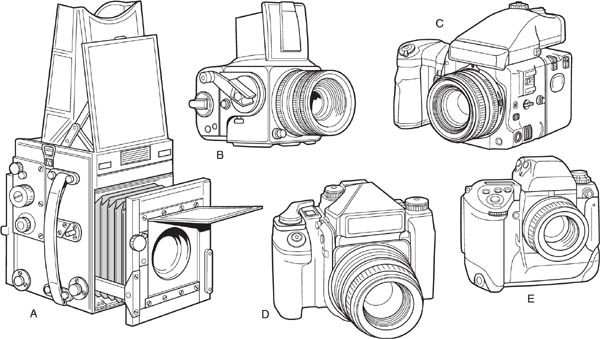
Figure 4.29 Single-lens reflexes, all based on 1920s plate camera design (A). Modern versions use formats 6 × 6 cm (B), 6 × 4.5cm (C). 6 × 7 cm (D). 35mm SLR cameras (E) are similarly related

Figure 4.30 Typical manual 35mm SLR showing basic internal structure. E: eyepiece at rear of camera. P: pentaprism. F: focusing screen. M: hinged mirror. S: shutter (film behind). W: film wind-on mechanism. D: tensioning drum for shutter blinds. C: typical cell position behind the lens for exposure measuring. For external controls see Figure 4.32
Exposure is read through-the-lens (TTL). The camera body contains suitably positioned light sensors which view subject brightness on the focusing screen, or else read it via light reflected off the shutter blind and film at the moment of exposure (Figure 10.7). The readings made are translated by the camera’s circuitry to give semi-automatic, fully automatic, or manual exposure settings; see pages 187–189. Where light is measured off the film surface the system can control the duration of a flash unit. The flash may be a ‘pop-up’ built-in type or, more usefully, an add-on ‘dedicated’ unit which links into the camera circuitry as described on page 197.
Its focal-plane shutter, and reflex design, make this an ideal camera to use with a range of interchangeable lenses of fixed or variable (zoom) focal length, described in Chapter 5. You can change lenses quickly with a positive bayonet-fitting twist action, the focusing screen revealing every image alteration given by change of focal length, the use of close-up extension tubes, adjustment of special effects attachments, etc. Lenses have ‘preset’ apertures, meaning that the lens remains wide open until just before shooting, for clarity of viewfinding and focusing. If you need to see the appearance of depth of field you can press an aperture preview button, Figure 4.32, provided the camera offers one. (The meter reads the image at open aperture but is programmed by the f-number you have set on the scale.)

Figure 4.31 Sequence of exposing actions in a single lens reflex camera. 1: composing and focusing. 2: when you press the release the aperture first closes to its pre-setting and the mirror rises. 3: shutter in front of the film fires. 4: mirror returns, aperture reopens, film winds on
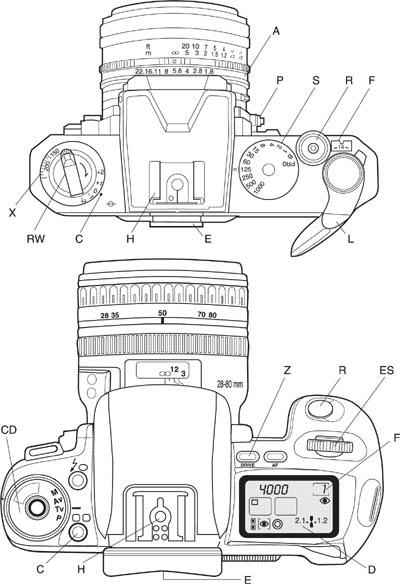
Figure 4.32 Typical 35 mm SLR external controls. Top: manual focus and wind-on type camera. Bottom: an autofocus multi-programmed model. R: release for shutter. S: shutter speed control. P: preview button. A: aperture setting. X: ISO setting. RW: rewind crank. C: exposure compensation control. H: hot shoe for clip-on flash unit. E: eyepiece. L: manual wind-on lever. F: frame counter. Z: power film rewind. With the advanced model, changes are made by selecting the mode or programme you need on command dial CD, and then operating electronic input dial ES. Settings produced appear on body-top display panel (D), and are also presented to your eye alongside the focusing screen
When the shutter release on an SLR camera is pressed a lot of mechanical things have to happen fast, Figure 4.31. Typically the mirror rises, the lens stops down, the focal plane shutter fires, the mirror returns, the lens opens fully, and the film is transported by motor or hand wind-on.
Figure 4.33 How a pentaprism works. This shaped block of glass reflects light across its ‘roof’ so that the (laterally reversed) image formed on the reflex camera’s focusing screen is seen by the eye as right-reading
Manual or automatic?
All the major manufacturers of 35 mm SLRs – Pentax, Nikon, Minolta, etc. – produce a range of camera bodies, from purely manual (including wind-on) to multimode automatic. At one time mere ability to build computer-type micro circuits into cameras resulted in every ‘bell and whistle’ being incorporated, irrespective of practical usefulness. ‘Advanced’ cameras still offer you a choice of programme modes giving settings the manufacturer considers best to cope with ‘landscapes’, ‘portraits’, ‘action scenes’, etc. Again you can customize such a camera to suit your preferred way of working, using a menu of twenty or more settings (from the length of the self-timer delay period to whether a new film advances when you close the camera or press the shutter button).

Figure 4.34 Top: Focusing aids, and camera setting readout, as presented in the viewfinder of a manual-focus SLR. Bottom: when the image is unsharp, prisms moulded into the focusing screen (bottom right) give the image a split and offset appearance, while a surrounding ring of microprisms forms a shimmering grid pattern
So although automatic SLRs are fast and reliable for set subject conditions, you may be buying a lot of modes which spend their time shut off once you have customized your camera. Again, if something does not perform as you expect, you may have to stop and thumb through a thick instruction book to discover what resettings to make.
A manually set camera is not only cheaper but having to select the three key controls – focus, aperture (with preview) and shutter speed – soon teaches you the technical principles which help enormously in creative image making. The lens you fit on your manual camera can be the same or have matching optical quality to the maker’s top-of-range cameras.
Finally don’t overlook the fact that most automatic or semiautomatic SLR cameras do also give you the option of switching to manual mode for lens focusing, exposure settings, etc. You can plan the camera to ‘grow up’ with you.

Figure 4.35 Autofocus arrangement in an SLR camera. The system samples some of the lens-focused light passed through a semi-silvered hole in the main mirror. Below aperture F (the same distance from the lens as the film) a pair of separator lenses bring the beam to two points of focus on a CCD sensor (S). The sensor’s 128 segments detect the relative spacing of the two points of light, and control motor (M) to adjust the camera lens focusing position. System works with a range of interchangeable lenses
Other SLR formats
Although the majority of SLR cameras are for 35 mm film, some are made for APS and others, larger and more expensive, for rollfilm (6 × 6, 6 × 4.5, 6 × 7 and 6 × 8 cm); see Figure 4.29. The medium format cameras mostly have interchangeable backs, so you can quickly change from colour to monochrome mid-film, or fit an instant picture back (page 92) or even a digital back, Chapter 6. They are used increasingly for professional photography, thanks to modern high-resolution films and the growth of digital photography.
Along with backs and lenses you can also change or remove the pentaprism, or switch to a special purpose body for wide-angle or camera movement work (see page 306). Such flexibility means that these medium-format ‘systems’ have taken over from large-format view camera kits.
SLR advantages
1 |
You can precisely frame up the picture, focus, and (models with preview) observe depth of field, without the slowness of a view camera. |
2 |
35 mm types offer you a choice of fast modes for setting correct exposure by using through-the-lens measurement of subject lighting (including flash). |
3 |
Key information such as correct exposure and focus, shutter speed and f-number, are signalled direct to your eye from alongside the focusing screen. |
4 |
There is a wide-ranging back-up of lenses and accessories. This makes SLR outfits versatile ‘unit systems’ – able to tackle most photography well. |
5 |
Interchangeable backs on some medium format models speed up film change, increasing versatility. |
6 |
Fully AF models adjust the lens faster than you can focus it by hand – particularly useful with subjects on the move – sport, natural history, etc. |
1 |
You cannot see through the viewfinder whilst exposure is taking place. This can be a nuisance during long exposures or when panning at slow shutter speeds, page 146. |
2 |
When you are viewing at open aperture (having set a small aperture) it is easy to forget the changes that increased depth of field will give to your picture. |
3 |
The camera is electronically and mechanically more complex (and noisy) than other designs. Relative to a compact it is more bulky, heavier and tends to be more complicated to use. |
4 |
The range of speed settings available for use with flash may be limited, especially with medium-format models. |
5 |
Use of passive autofocus sharpness detection relies on sufficient ambient light and subject contrast. And some systems fail to work when a linear polarizing filter is over the lens (see page 174). |
1 |
Organize for yourself ‘hands on’ experience of each of the four camera types described – view, compact, twin- and single-lens reflexes. Compare practical features such as weight and balance (hand-held cameras) and the ease of working fingertip controls. Do you feel at home with their format proportions, the clarity of focusing and ability to frame-up shots? Check prices, including any extra lenses and accessories you will eventually need, plus film processing and enlarger equipment necessary for this format. |
2 |
Decide the best pair of cameras together able to cover the widest range of work you expect to do. They are likely to complement rather than repeat each other’s features, but don’t leave gaps – tasks that neither camera can really tackle. |
3 |
Make a comprehensive list of the technical features you consider (1) essential, (2) useful but additional, and (3) unnecessary, in a 35 mm SLR camera. Obtain brochures on two or three competing models (similar price range) and compare them for each item on your list. |