Using different focal length lenses, camera kits
If you are using an SLR or view camera the camera itself is only part of the ‘tool box’ you need for taking photographs. Ability to interchange lenses means you will soon want to explore use of different focal lengths. Even if you work with a compact camera permanently fitted with a zoom it is worth understanding how its range of focal lengths influence picture making. Remember too that there are dozens of accessories – from tripods and other supports to flashguns and camera bags – worth considering as useful practical kit for your kind of photography.
Lenses of fixed focal length (i.e. not zoom) regarded as standard for cameras reviewed in the last chapter are typically 100 mm focal length for 6 × 7 cm format; 50 mm for 35 mm (compact cameras 34 mm focal length); and 27 mm for APS cameras. As Figure 3.4 showed, most of these combinations gives an angle of view of about 45°.

Figure 5.1 Changing focal length but keeping the same picture format alters the combination’s angle of view. Compare this with Figure 3.4
To help understand why 45° is considered normal, try looking through a 35 mm SLR fitted with a standard lens, holding the camera in upright format and keeping both eyes open. Compare picture detail on the focusing screen with the subject seen direct. Your naked eye sees a great deal more of your surroundings, of course. But within the area imaged by the standard lens and isolated by the picture format the relative sizes of things at different distances match normal eyesight.
If you keep to the same format camera but change or zoom the lens to a longer or shorter focal length you can:
1 |
Alter angle of view (enlarge or reduce image detail and so get less or more subject in). |
2 |
Disguise how far or how close you are from the subject and so suppress or exaggerate perspective in your picture. |
Each of these changes has an important influence on how your picture is structured.

Figure 5.2 Angles of view given by lenses of different focal lengths used on a 35 mm format camera. Right: appearance when focal length is altered without change of subject distance. Top left: enlarging part of the 28mm lens image proves that lens change alters magnification, but not perspective. All shots were taken at the same aperture. Note the 28 mm blow-up has greater depth of field, but enlarged grain gives poorer detail than sharply imaged parts of the 135 mm lens version
Getting less, or more, subject in
Changing the lens in your camera to a longer focal length (or zooming to ‘tele’) makes the image detail bigger – so you no longer include as much of the scene and the angle of view becomes narrower (Figure 5.1). At first sight you seem closer to your subject but this is only an illusion due to enlargement; see Figure 5.2. Creating larger detail this way is handy if you cannot get close enough to your subject – for example in sports and natural-history work, candids and architectural detail.
Any slight movement of the camera is also magnified, so if you are using it hand-held, consider picking a faster shutter speed to avoid blur. Other changes include less depth of field for the same f-number. A 100 mm lens gives half the angle and twice the image magnification of a 50 mm lens, assuming distant subjects.
Changing instead to a shorter focal length lens (or zooming to ‘wide’) gives all the opposite effects. You include more scene, noticeably foreground and surroundings, everything is imaged smaller, and there is greater depth of field. A wide-angle lens is particularly useful for cramped locations, especially building interiors where a standard lens never seems to show enough. Similarly, you can shoot views, groups, or any large subject where it is otherwise impossible to get back far enough to get everything in. The lens must be designed as a wide-angle. Don’t try to take a standard 50 mm lens from a 35 mm format camera and use it as a wide-angle in a large format camera – the picture will probably look unsharp and dark at the corners, see Figure 5.11.
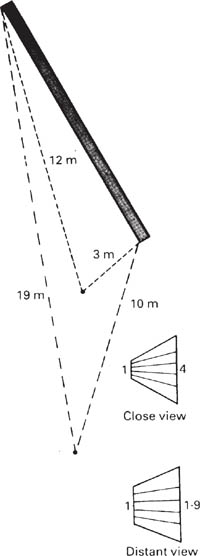
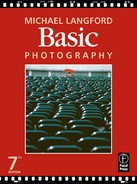
Figure 5.3 Viewpoint and perspective relationship. The apparent convergence of horizontal lines in this oblique wall grows less steep as the viewer’s distance increases. See text
Altering perspective
By changing focal length together with your distance from the subject you exert an important, powerful influence on the perspective of your pictures. Perspective itself is concerned with the way objects at different distances appear to relate in size, and how parallel lines seen from an oblique angle apparently converge towards some far-off point – all of which gives a strong sense of depth and distance in two-dimensional pictures of three-dimensional scenes.
As Figure 5.3 shows, if you look obliquely at a garden wall of uniform height you see the nearest end much taller than the far end. The difference between these two ‘heights’ is in direct ratio to their distances from you, so if the near end is 3 metres away and the far end 12 metres, ratio in height is 4:1. But move back until you are 10 metres from the near end and the far end will be 19 metres (10 m + 9 m) away. The ratio becomes only 1.9:1, and the wall’s visual perspective is less steep.
Perspective therefore alters according to the distance of your viewpoint from the subject. But if you can change lens focal length you can disguise a viewpoint change by adjusting the lens to include the same amount of subject. Imagine taking one photograph of the oblique wall using a 50 mm lens, 3 metres from its near end. If you then stepped back to 6 metres and took another shot using a 100 mm lens instead, the wall’s near end would record the same size but have a less diminished far end, giving flatter perspective and therefore less apparent depth.
Use steep perspective (close viewpoint, plus wide-angle lens or shortest focal length zoom setting) whenever you want to exaggerate distance, caricature a face into a big nose and tiny ears, or dramatically emphasize some foreground item such as an aggressive fist, Figure 5.8, by exaggerating its relative size. Similarly use it to create a dynamic angle shot looking up at a building and exaggerating its height.
Use flattened perspective (distant viewpoint, plus telephoto lens or longest focal length zoom setting) to compress space, to make a series of items one behind the other appear ‘stacked up’, adding a claustrophobic effect to a traffic jam or a crowd. In landscapes it helps to make background features dominate over the middle distance, or merges both into flat pattern. Portraits tend to be more flattering, with nose and ears shown in proportions closer to true size.
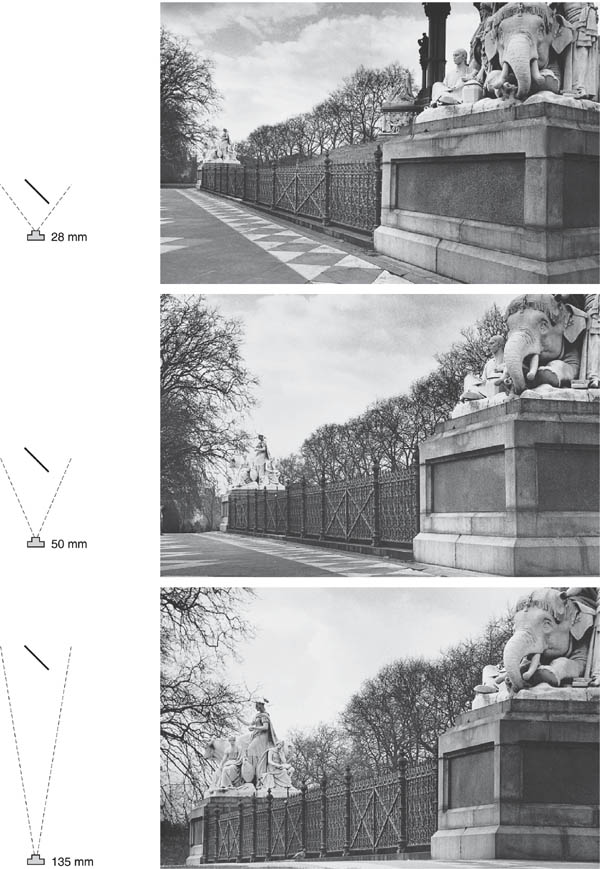
Figure 5.4 Controlling perspective. Each picture here was taken with a lens of different focal length (35 mm format), but the camera distance was altered each time. The near end of the monument remains about the same height but the scale of detail furthest away is dramatically different, changing your impression of depth and distance
Explore these controls over perspective and learn how they can help make the point of your picture. But if overdone (the two extremes of focal length giving either telescope or fishbowl effects) they easily become gimmicks which overwhelm your subject matter. See also digital manipulation of perspective, page 287.
The appearance of perspective in a photograph also depends finally on its finished size and the distance from which it is viewed. Strictly speaking, the image appears natural in scale and perspective if your ratio of picture width to viewer distance matches the ratio of subject width to camera distance when the shot was taken. This means that if something 4 metres wide is photographed from 8 metres (ratio 1: 2) the print will look normal seen from a distance twice its width – perhaps a 12.5 cm wide print viewed from 25 cm, or a 50 cm print viewed from 100 cm. In practice you tend to look at all hand-size prints from a ‘comfortable’ reading distance of about 25–30 cm, which usually works out right for natural perspective appearance from normal-angle lens photography. But reading wide-angle close shots and long focal-length distant shots from the same viewing position makes their steepened or flattened perspective very apparent. If you want to exaggerate the illusion of compressed space and flattened perspective, print long-focal-length (narrow-angle) shots big, and hang them in enclosed areas where the viewer has to stand close, see also Figure 5.14.

Figure 5.5 Walker Evans’ choice of a long focal length lens and distant viewpoint made these industrial chimneys of Bethlehem, Pennsylvania, dominate over the workers’ graveyard. Technique strengthens a powerful human statement

Figure 5.6 New York from the top of the Empire State Building using a 35 mm camera with 150mm lens. From such a distance perspective and scale change between foreground and background elements are minimized. This heightens the grid-like pattern
Interchanging lenses in practice
On view cameras the shuttered lenses are changed complete with panels. When you fit a wide-angle, the lens has to be quite close to the focusing screen to give a sharp image. This may mean changing to a recessed lens panel, or removing the regular bellows from a monorail and using shorter ‘bag bellows’ instead (Figure 5.9). You must be careful not to let the front of the rail (or the front track on a baseboard camera) be included in the lens’s wide angle of view.
The greatest variety of interchangeable lenses today are made for single-lens reflexes, especially 35 mm format. Originally their range was very restricted by the need for wide-angles to be placed close to the film, where they fouled mirror movement, and the awkward physical length of long focal length lenses. (This distancing problem is now solved optically by making long-focus lenses of telephoto construction and wide-angles of inverted telephoto construction.) Most small- and medium-format wide-angle optics today are of inverted-telephoto design, and virtually all long focal lengths intended as narrow-angle lenses are telephotos. This is why we tend to use the word ‘telephoto’ to mean the same as long focus.

Figure 5.7 Using a wide-angle (24 mm) lens here allowed all six benches to be included and exaggerates the much closer shadowy foreground.
Figure 5.8 Exaggerated scale gives dramatic emphasis. Shot from a viewpoint close to the fist, using a 35 mm camera with 28 mm wide-angle lens, at wide aperture
Lens coverage. As Figure 5.11 shows, there are limits to the area a lens will cover with an image of acceptable quality. Designed for a 35 mm camera it will certainly perform well over a patch at least 43 mm diameter. But used on a 6 × 6 cm format picture corners show poorer definition, and on 4 × 5 in edges and corners become darkened. Irrespective of focal length then a lens is designed to ‘cover’ adequately a particular picture size. You could possibly use it in a smaller format camera, but not a larger one. In practice you cannot make mistakes on small- and medium-format cameras because their lens mounts prevent you attaching unsuitable optics.
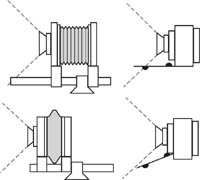
Figure 5.9 Top pair: using a wide-angle lens with a view camera, you risk including the front part of the rail or baseboard in your picture (only apparent when the lens is stopped down). Bottom: arrange that the monorail projects behind rather than in front, or use a drop baseboard. To focus the lens close enough to the film, change the monorail to compact bag bellows, or fit a recessed lens panel
The lens mounts for these camera sizes also differ brand-for-brand – you cannot fit lenses from a Nikon to an Olympus body, and so on. Each maker also has different (patented) mechanical and electrical couplings between body and lens to convey information about the aperture set, to control autofocus, etc. Occasionally, when a maker develops a new body, lens mounts are changed – but this is done as rarely as possible to keep faith with previous purchasers of their equipment.
Independent lens makers produce optics to fit a range of cameras; you specify the type of body and the lens comes fitted with the appropriate coupling. The quality of the independent lenses varies more than lenses supplied by the camera manufacturer. The latter have to reach a minimum optical standard common to an entire range. The best independent brands are consistently good too, but cheapest lenses undergo less rigid quality control and may be anything from quite good to poor.
Wide-angles. There is no doubt that standard lenses (normal focal length) represent best value for money. Made in large quantities, they tend to be cheaper and have wider maximum apertures than wide-angles and longer focal length lenses, including zooms. However, if you often photograph architectural interiors and exteriors or need to use dramatic angles and steep perspective, the next interchangeable lens to buy after a standard is a wide-angle. As Figure 5.12 shows, a popular focal length wide-angle, giving about 70–80°, is 28 mm for 35 mm format (40 mm for 6 × 6 cm, or 90 mm for 4 × 5 in). Using lenses wider than 80° (24 mm focal length on a 35 mm camera) begins to introduce ‘wide-angle distortion’, making objects near corners and furthest edges of your picture appear noticeably elongated and stretched. It is like having additionally steep perspective in these zones, although you can help to disguise the effect by composing plain areas of sky, ground or shadow here.
Another feature of a wide-angle lens is that it gives greater depth of field than a standard lens at the same aperture. This can be an advantage, but also makes it more difficult to pick out items by differential focus. Extreme wide-angles virtually need no focus adjustment and record everything in focus – from a few inches to infinity. Also they may no longer accurately image vertical and horizontal lines near picture edges as straight, becoming ‘fisheye’ lenses, Figure 5.13.
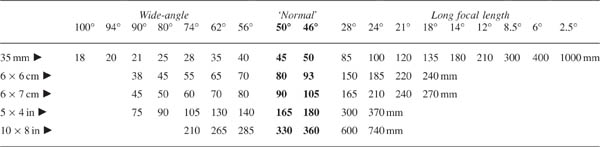
Figure 5.10 Angle of view given by different combinations of lens focal length and camera format diagonal. Lenses must be capable of fully covering the picture format
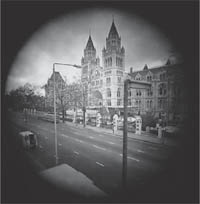
Figure 5.11 Lens coverage. The total circular image patch formed by an 85 mm lens designed to cover 35 mm format (inner frame). Used as a normal angle lens on a 6 × 6 cm format camera edges begin to darken. And attempting to use it as a wide-angle on 4 × 5 in (outer frame lines) uneven illumination and corner ‘cut off’ becomes obvious, particularly when the lens is stopped down. See also Camera movements, page 306
Long focal lengths. Perhaps you will choose a telephoto instead of, or as well as, a wide-angle. A moderately long focal length, such as 100 mm on 35 mm format (24°) makes a good portrait lens. It will allow you to fill the frame with a face from a distance of about 1.5 metres, which avoids steep perspective and a dominating camera presence. Longer lenses will be needed for natural history subjects, sports activities, etc., which you cannot approach closely, or any scene you want to shoot from a distance to show it with bunched-up, flattened perspective.
Working in the studio on still lifes, moderately long focal length lenses are again an asset. With food shots, for example, such a lens allows the camera to be kept back from the subject, avoiding any elliptical distortion of plates, tops of wine glasses, etc.
In general, lenses with angles of view of less than 18° begin to make you conscious of ‘unnatural’ scale relationships between nearest and farthest picture contents. This is more like looking through a telescope than seeing the scene direct. The longer the focal length, too, the more difficult it is to get sufficient depth of field and avoid camera shake when using the lens hand-held. (As a rule of thumb the longest safe shutter speed is the nearest fractional match to lens focal length, e.g. no slower than 1/250 sec with a 200 mm lens.)
Your image contrast is frequently lower than with a standard lens, especially in landscape work where atmospheric conditions over great distances also take their toll. Image definition is easily upset in pictures taken through window glass. Another problem is the size and weight of long focal length lenses. Beyond 500 mm it is usual to have to mount the lens on a tripod, with the camera body attached.
Wide-angle and telephoto ‘converter’ attachments are available for some SLR lenses. A wide-angle device fits over the front of the prime lens and typically reduces focal length by 40 per cent. A tele attachment fits between lens and body and typically doubles the focal length. Provided the tele attachment is a multi-element unit designed for your particular lens, image quality will be maintained. The combination has its aperture reduced by two f-number settings if focal length is doubled. Wide-angle attachments are more prone to upset your image definition near picture edges – you should always use them well stopped down.
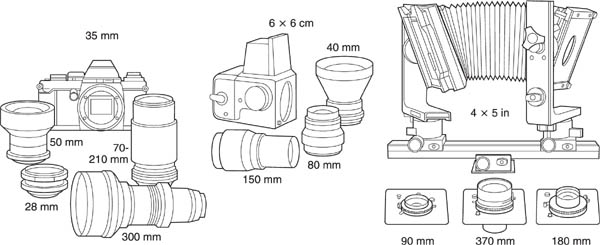
Figure 5.12 Some camera-body/lens kits. Each include normal, wide-angle and long focal length types designed for the format
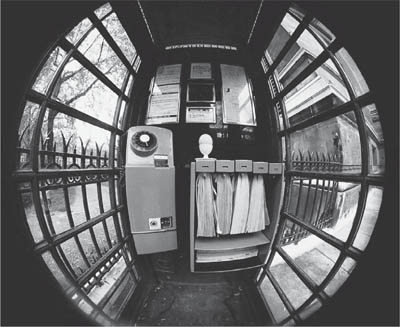
Figure 5.13 Fish-eye lens distortion. Inside an antique British telephone box, taken with a 35 mm camera and an 8mm fisheye lens designed to give a 220° angle of view. This extreme lens forms a circular picture with vertical and horizontal lines increasingly bowed according to their distance from the centre
Fixed focal lengths, or zooms?
A zoom is a lens of variable focal length – altered by shifting internal glass elements. It is built into most modern compact cameras which do not allow interchangeable lenses anyway. However, for cameras such as SLRs you can decide between a chosen set of lenses of fixed focal length, or have one (or perhaps more) zoom lenses. The control on the lens for changing focal length is usually a separate ring or, with some longer focal length zooms, a sleeve on the lens barrel that you slide forwards and backwards. Turning the same sleeve focuses the lens (‘one-touch’ zooms). A zoom lens fitted to a compact camera is altered by W and T buttons or a switch controlling a motor inside the body. This also adjusts the viewfinder optics to match the changing angle of view.
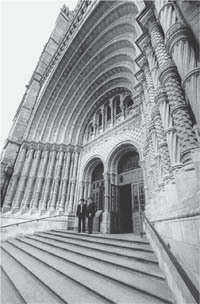
Figure 5.14 Wide-angle distortion. Extreme wide angle lenses (here 16 mm used on a 35 mm camera) gives unacceptable distortion with a subject of known shape, unless you want a special effect. However, viewing this page from 3.3 cm would make picture perspective appear normal
Good quality zooms are optically complex – the focused subject distance must not change when you alter focal length, and the diaphragm must widen or narrow to keep the f-number constant. Also aberration corrections must adjust to maintain acceptable image quality throughout the entire range of subject distances and focal lengths. The best-quality zooms give image quality as good as fixed-focal-length lenses. Limits to their aberration correction at the extremes of zoom range typically show up as straight lines near frame edges bowing inwards or outwards. As Figure 5.16 shows, the greatest choice of zoom lenses is to be found in the standard-to-telephoto (50–200 mm) range band. But increasingly you can also get wide-angle zooms spanning 24–85 mm, or tele-zooms 200–600 mm. Perhaps handiest of all are zooms which range more moderately either side of normal, such as 28–80 mm.
The practical advantages of a zoom are:
1 |
A continuous change of image size is possible within the limits of its zoom range – far more flexible than having several interchangeable fixed focal length lenses. |
2 |
Ability to frame up action shots, candids, and sports pictures where things can happen unexpectedly and you may be too far away or too close with any regular lens. |
3 |
No risk of losing a picture because you were changing lenses at the decisive moment. |
4 |
Fewer items to carry. |
5 |
Ability to zoom (or change image size in steps) during actual exposure, for special effects. |
6 |
On most zooms, there is a ‘macro mode’ facility for ultra-close work, see page 90. |

Figure 5.15 A 70–210 mm zoom used at its focal-length extremes (top) and when zoomed throughout a ½ second exposure (bottom)
1 |
Widest aperture is about 1–1½ stops smaller than a typical fixed focal length lens, e.g. f/3.5 instead of f/2. |
2 |
It is more expensive and often bigger than any one fixed lens within its range. |
3 |
The continuous focusing scale does not usually go down to close subject distances. |
4 |
Some cheaper types give poorer image contrast and definition, and distort shapes when used at either limit of their zoom range. |
5 |
Zooms can make you lazy about using perspective well. It is tempting to just fill up the frame from wherever you happen to stand. Instead, always try to choose a viewpoint and distance to make best use of juxtapositions, give steep or flattened perspective. Only then adjust focal length to exactly frame the area you want. |
Even high quality zooms may change their maximum aperture between the extremes of zoom range, for example giving half or one stop less light at the longest focal length setting (maximum aperture is then engraved f/3.5/4.5, or similar). This is unimportant provided you are using a through-the-lens meter, but remember to allow for it if you are shooting at the lens’s widest settable aperture and working with a separate meter, or a non-dedicated flashgun (page 195).
Depth of field always changes throughout the range, unless you compensate by altering f-number. It is greatest at shortest focal length, so whenever practical focus your zoom at its longest focal length setting, making critical sharpness easy to see – then change to whatever focal length you need.
Far fewer zoom lenses are designed to cover rollfilm formats. Not only is the market smaller, but size and weight greatly increase if the lens is to have a usefully wide aperture. (A 100–200 mm f/4.8 zoom may easily weigh 2180 g, against 480 g for a 80 mm f/2 fixed focal length lens.) Other lenses worth considering for a small- or mediumformat camera kit are a shift lens (page 306) and a macro lens (see below). It is seldom worth buying lenses of extreme focal length; for example a f/4 600 mm lens for 35 mm costs over thirty times the same maker’s 50 mm standard lens! Instead it is possible to hire them for unusual jobs, when optical distortion and unnatural perspective are perhaps an essential element in a picture. For most work such devices are a distraction, and become monotonous with overuse. You will often do better by moving either closer or farther back, and using more normal optics.
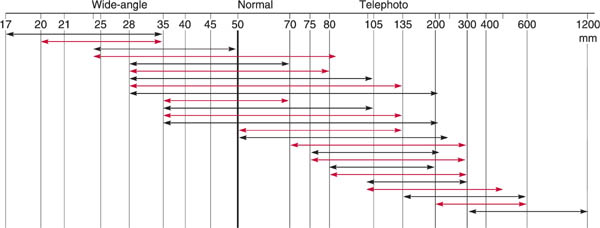
Figure 5.16 Zoom range. The focal-length range of some commercial zoom lenses designed for 35 mm format. Zoom range is also given as the relationship of longest to shortest settings (×2 for 35–70 mm or 25–50 mm lenses; ×3 for 35–105 mm, etc.)
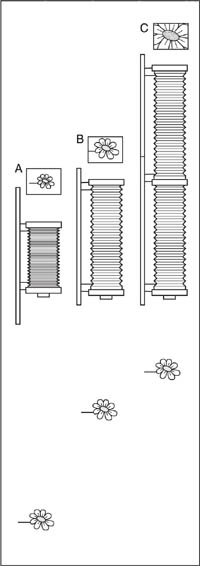
Figure 5.17 Bellows extension needed for close-ups. A: view camera focused on distant subject. B: imaging the subject life-size requires bellows twice the lens focal length. C: the same lens needs two sets of these bellows and an extension rail, to image the subject three times life-size. See also Figure 2.20
The closest you can approach a subject and still focus a sharp image depends on how far the lens can be spaced from the film relative to its focal length. Typically this subject distance in about ten times the focal length. A 35 mm camera with standard 50 mm lens focused out to its closest subject distance gives an image about one-tenth life size. This can also be written as a ratio of 1:10, or magnification of ×0.1.
Most 5 × 4 in monorail view cameras have bellows which will stretch to at least 36 cm. Used with its standard (180 mm) lens, this allows you to approach close enough to get an image up to life-size – a ratio of 1:1 or magnification of ×1. Anything larger calls for cumbersome extra bellows (Figure 5.17). To shoot close-ups using a small- or mediumformat camera you can expect to need some extra equipment. There are various options (Figure 5.18):
1 |
Adding one or more extension rings, or a set of bellows, between camera body and lens. |
2 |
Changing to a ‘macro’ lens with its own built-in, extra-long focusing movement. |
3 |
Using a zoom lens set to ‘macro’. |
4 |
Fitting an accessory close-up lens or adaptor over the front of your standard lens. |
Of these only option 4 (or in some instances 3) is practical on cameras fitted with non-interchangeable lenses.
Bellows, or rings
Bellows allow you maximum flexibility in focusing close subjects, although at minimum extension their bulk often prevents you getting a sharp image of anything further away than about 30 metres. Rings or tubes are cheaper than bellows, and come in sets of three (typically 7, 14 and 25 mm for small-format cameras). These can make up seven alternative lengths, used singly or in combinations. Together with your lens’s own focusing adjustment, each gives you an overlapping range of distances so you can achieve some continuity of focusing; see Figure 5.19.
Simplest bellows and tubes are ‘non-automatic’ meaning that the preset aperture of the camera lens no longer remains wide open until the moment of shooting. So you must be prepared to compose a dim image every time a small aperture is set. ‘Automatic’ extension units maintain a mechanical link between lens and body, so that the SLR aperture system still functions normally.
In all instances, your camera’s through-the-lens meter still gives an accurate exposure reading. However, with options 1–3 above, if you are using any other form of metering (such as a hand meter) the exposure shown must be increased to compensate for the effect of the unusual lens-film distance; see page 191.

Figure 5.18 Alternative ways of sharply focusing close-up subjects with a 35 mm camera
Macro lens
Macro lenses are designed for close-up purposes, computed to give best performance and maximum correction of optical aberrations when subject and image distances are similar. (The word ‘photomacrography’ refers to imaging at about 1:1 scale.) They cost more than regular lenses, and also stop down further. Typical focal length, for 35 mm format, is either 50 mm or 100 mm, with an aperture range of f/2.8–32.
The focusing movement on a general macro lens takes it continuously from infinity setting to 1:1 ratio or beyond. This range, plus its aperture preset facility, makes it very convenient to use. Such macro lenses give acceptable results with distant subjects too, but for close-ups offer better definition than a normal lens used in conjunction with bellows or rings.
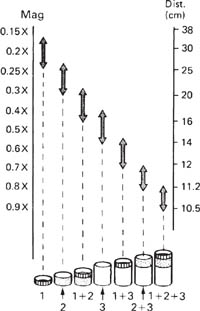
Figure 5.19 This set of extension rings (1, 2 and 3) can be used in seven different combinations. Added to the normal focusing adjustment of the 50 mm camera lens, they allow an overlapping sequence of sharply focused subject distances, from 38cm (nearest focusing for the lens used alone) down to 10.5cm
Macro zooms
Most zoom lenses, when set to shortest focal length, allow you to select a ‘macro’ setting which repositions internal elements. You can then sharply image subjects within a narrow range of close distances. Typical magnification ratios are around 1:4. Some zooms give quite poor quality close-ups, showing image softening towards corners of the frame.
Quite different in terms of performance, a few zoom macro lenses have recently been introduced for 35 mm cameras. Such a lens allows you to zoom around from, say, 70 mm to 170 mm while working just 150 cm from your subject, yet deliver high image quality. They are very expensive (but again may be hireable).
If you attach a converging ‘close-up lens’ over the front of your standard lens its focal length is changed. Or, to put it another way, the combination allows you to focus on a subject at a distance equal to the attachment’s focal length, when the prime camera lens is set for infinity. Attachments are usually calibrated in dioptres such as +1, +2, etc. The higher the dioptre the greater the magnification, and the shorter its focal length.
Adding a close-up lens means you can work without having to extend the normal lens-film distance, or alter exposure. They therefore suit cameras with non-interchangeable lenses.
Choosing other accessories for your camera kit is mostly a matter of personal selection. Build them up from essentials – for example, a cable release and a tripod (with a pan and tilt top) are needed sooner or later for every camera type. Match the tripod to the camera’s size and weight, and don’t overlook the value of a small table tripod or clamp fitted with a ball and socket head. One of these will pack easily into a shoulder bag. For support in action photography -especially when you use a telephoto lens – try out a monopod, or a pistol grip camera support. These are all more portable and less obtrusive than a tripod.

Figure 5.20 A selection of camera accessories. 1: rubber lens hood. 2: pistol grip hand-held camera support. 3: pocket tripod. 4: focusing screen viewing hood, replaces pentaprism on some models, for waist-level shooting. 5: eyepiece cup. 6: right-angle eyepiece. 7: cable release. 8: tripod carrying pan/tilt head, also monopod. 9: bulk 35 mm film back. 10: instant picture back for 6 × 6 cm. 11: rollfilm back for view camera. 12: changing bag. 13: flashgun. 14: travelling case for view camera kit. 15: aluminium, foam-filled, general camera case. 16: padded, compartmented shoulder bag
If your camera has no built-in exposure meter you must have a hand meter, see page 189. You will also need filters for black and white and colour photography (Chapter 9), plus some form of filter holder to suit the front diameter of your set of camera lenses. The holder can form part of a lens hood (Figure 5.20), an accessory always worth fitting to reduce flare when your subject is lit from the side or rear. It can also protect your lens. However the hood must not be so deep that it protrudes into the field of view. Take care when using a zoom lens set too wide, and stopped down.
You will probably need a portable flashgun for use on location. This might be a powerful ‘hammer-head’ type sufficient to light fairly large architectural subjects, or a smaller dedicated gun which mounts on the camera (page 197). See also studio flash, Chapter 7.
There are several worthwhile accessories for viewfinding and focusing. An SLR viewfinder eyecup helps to prevent reflections and stop sidelight entering the eyepiece, which confuses the meter system on some models. A right-angle unit is helpful for low viewpoints and when the camera is rigged vertically for copying. A few 35 mm and most rollfilm SLR cameras allow the pentaprism to be interchanged. You can then fit a waist-level finder, a high-magnification finder, or an action finder which allows you to see the image from a range of distances and angles. You can also change focusing screens to suit the work you are doing – perhaps fit a cross-line grid screen for copying.
Provide yourself with ample film holders for a view camera, or film magazines for cameras (i.e. rollfilm) which accept interchangeable backs. Instant-picture film backs are a good investment for large- and medium-format professional work. They allow a final visual check on lighting, critical layout and exposure, and confirm the correct functioning of your flash and shutter equipment.
All the leading camera brands offer dozens of other accessories, ranging from backs which light-print words and numbers on every frame, to underwater camera housings, and radio or IR remote shutter releases. See also digital backs, page 103. A changing bag is a useful standby if film jams inside any camera or magazine, or you must reload sheet film holders on location. Other ‘back-up’ includes a lens-cleaning blower brush, lens tissue, and spare batteries.
You will also need one or more cases for your camera kit. There are three main kinds. Large metal cases with plastic foam lining have compartments for the various components of a view camera outfit plus accessories. This kind of case has the advantage that you can stand on it – when, for example, you are focusing the camera at maximum tripod height. A smaller, foam-filled metal attache case suits a medium- or small-format kit and is designed for you to cut away lumps of foam to fit your own choice of components. (Avoid cases which make it obvious they contain photographic equipment, and so encourage theft.) A tough waterproof canvas shoulder bag with pouches and adjustable compartments is one of the most convenient ways of carrying a comprehensive 35 mm outfit.
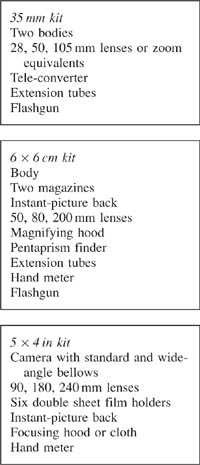
Figure 5.21 Examples of camera kits. In addition each kit needs an appropriate tripod, lens hood, filters and cable release
No two photographers will agree on the contents of an ‘ideal’ camera kit. The three outfits listed in Figure 5.21 are each reasonably versatile within the limits of a 4 × 5 in view camera, 6 × 6 cm SLR, and 35 mm SLR respectively. For more narrowly specialized subjects you could simplify each of these kits, discarding some accessories and perhaps adding others.
For example, for portraiture work using a medium-format SLR, have wide-aperture normal and medium long focal length lenses (or zoom equivalent) plus tripod. Include flash, a folding reflector board (Figure 7.23), some effects filters, and several film magazines.
For architectural interiors and exteriors you might use a monorail view camera outfit with normal and wide-angle lens, normal and bag bellows, tripod, high-sensitivity hand meter, film holders and instant-picture back, a powerful flashgun, and colour filters.
For sport and action you are likely to need a 35 mm motor-driven autofocusing SLR with 28–200 mm zoom, ultra-wide-aperture normal lens (for indoor activities), 300 mm lens plus ×2 adaptor, 21 mm wide-angle lens, tripod or monopod, and an additional body. If you cover sport for newspapers one body should be digital, complete with laptop computer and modem.
Finally, whatever your type of work, regard a radiophone as an essential part of your kit.
Summary. Using different focal length lenses, camera kits
1 |
Get some practical experience of a range of lens types for your camera. Compare the size of image detail, the depth of field (at same f-number), the balance and weight of body plus lens, and degree of image movement produced by camera shake when hand-held. Check out the closest subject distance you can focus. |
2 |
Take full-face head shots of someone you know, using each of a range of lenses from wide-angle to telephoto or different settings of an equivalent zoom. For each focal length adjust your distance so that the subject’s eyes are imaged the same distance apart in every picture. Compare the perspective in your results. |
3 |
Test a zoom lens by imaging a squared-up modern building or gridtype subject. Arrange horizontal and vertical lines to run parallel and close to all four picture edges. Check that these lines remain straight and in focus at longest and shortest focal length settings. |
4 |
Try zooming during exposure. Use shutter speeds around ¼ second. Have the camera on a tripod and either zoom smoothly throughout exposure or add a brief static movement at the start or finish. Make your centre of interest dead centre in the frame, and include patterned surroundings. |
5 |
Check out the maximum magnification you can obtain with your equipment. Image a ruler and count how many millimetres fills the width of your frame. (With rings or bellows it is easiest to set the lens as far as possible from the film, then focus by moving the whole camera forwards and backwards. |