
It is often useful to be able to determine the state of the devices that are attached to a telephone system. For example, a receptionist might require the ability to see the statuses of all the people in the office in order to determine whether somebody can take a phone call. Asterisk itself needs this same information. As another example, if you were building a call queue, as discussed in Chapter 13, Asterisk needs to know when an agent is available so that another call can be delivered. This chapter discusses device state concepts in Asterisk, as well as how devices and applications use and access this information.
There are two types of devices that device states refer to: real devices and virtual devices. Real devices are telephony endpoints that can make or receive calls, such as SIP phones. Virtual devices include things that are inside of Asterisk, but provide useful state information. Table 14-1 lists the available virtual devices in Asterisk.
Table 14-1. Virtual devices in Asterisk
| Virtual device | Description |
|---|---|
MeetMe: | The state of a MeetMe conference bridge. The state will
reflect whether or not the conference bridge currently has
participants called in. More information on using MeetMe() for call conferencing can be
found in Conferencing with MeetMe(). |
SLA: | Shared Line Appearance state information. This
state is manipulated by the SLATrunk() and SLAStation() applications. More detail
can be found in Shared Line Appearances. |
Custom: | Custom device states. These states have custom
names and are modified using the DEVICE_STATE() function. Example usage
can be found in Using Custom Device States. |
Park: | The state of a spot in a call parking lot. The state information will reflect whether or not a caller is currently parked at that extension. More information about call parking in Asterisk can be found in Parking Lots. |
Calendar: | Calendar state. Asterisk will use the contents of
the named calendar to set the state to available or busy. More information about calendar
integration in Asterisk can be found in Chapter 18. |
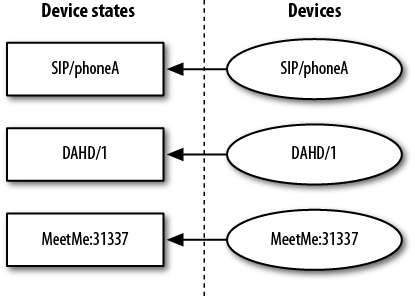
A device state is a simple one-to-one mapping to a device. Figure 14-1 shows this mapping.
The DEVICE_STATE() dialplan function can be used to read the current state of a device. Here
is a simple example of it being used in the dialplan:
exten => 7012,1,Answer()

; *** This line should not have any line breaks
    same => n,Verbose(3,The state of SIP/0004F2060EB4 is
${DEVICE_STATE(SIP/0004F2060EB4)})
    same => n,Hangup()
If we call extension 7012 from the same device that we are checking the state of, the following verbose message comes up on the Asterisk console:
-- The state of SIP/0004F2060EB4 is INUSE
Note
Chapter 20
discusses the Asterisk Manager Interface (AMI). The GetVar manager action can be used to
retrieve device state values in an external program. You can use it
to get the value of either a normal variable or a dialplan function,
such as DEVICE_STATE().
The following list includes the
possible values that will come back from the DEVICE_STATE() function:
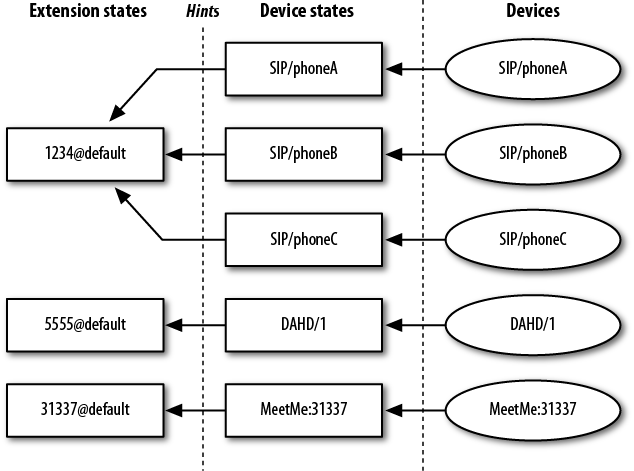
Extension states are another important concept in
Asterisk. Extension states
are what SIP devices subscribe to for presence information. (SIP
presence is discussed in more detail in SIP Presence). The state of an extension is
determined by checking the state of one or more devices. The list of
devices that map to extension states is defined in the Asterisk
dialplan, /etc/asterisk/extensions.conf, using a
special hint directive. Figure 14-2 shows the mapping between devices,
device states, and extension
states.
To define an extension state hint in the dialplan, the
keyword hint is used in place of a
priority. Here is a simple example dialplan that relates to Figure 14-2:
[default]

exten => 1234,hint,SIP/phoneA&SIP/phoneB&SIP/phoneC

exten => 5555,hint,DAHDI/1

exten => 31337,hint,MeetMe:31337
Typically, hints are simply defined along with the rest of the extension. This next example adds simple extension entries for what would happen if each of these extensions were called:
[default]

exten => 1234,hint,SIP/phoneA&SIP/phoneB&SIP/phoneC
exten => 1234,1,Dial(SIP/phoneA&SIP/phoneB&SIP/phoneC)

exten => 5555,hint,DAHDI/1
exten => 5555,1,Dial(DAHDI/1)

exten => 31337,hint,MeetMe:31337
exten => 31337,1,MeetMe(31337,dM)
In our example we’ve made a direct correlation between the hint’s extension number and the extension number being dialed, although there is no requirement that that be the case.
The easiest way to check the current state of an extension is at the Asterisk CLI. The core show hints command will show you all currently configured hints. Consider the following hint definition:
[phones]

exten => 7001,hint,SIP/0004F2060EB4
When core show hints is executed at the Asterisk CLI, the following output is presented when the device is currently in use:
*CLI>core show hints-= Registered Asterisk Dial Plan Hints =- 7001@phones : SIP/0004F2060EB4 State:InUse Watchers 0 ---------------- - 1 hints registered
In addition to showing you the state of the extension, the output of core show hints also provides a count of watchers. A watcher is something in Asterisk that has subscribed to receive updates on the state of this extension. If a SIP phone subscribes to the state of an extension, the watcher count will be increased.
Extension state can also be
retrieved with a dialplan function, EXTENSION_STATE(). This function operates similarly to the DEVICE_STATE() function described in the
preceding section. The following example shows an extension that will
print the current state of another extension to the Asterisk console:
exten => 7013,1,Answer()
    same => n,Verbose(3,The state of 7001@phones is ${EXTENSION_STATE(7001@phones)})
    same => n,Hangup()
When this extension is called, this is the verbose message that shows up on the Asterisk console:
-- The state of 7001@phones is INUSE
The following list includes the
possible values that may be returned back from the EXTENSION_STATE() function:
Asterisk provides the ability for devices to subscribe to extension state using the SIP protocol. This functionality is often referred to as BLF (Busy Lamp Field).[131]
To get this working, hints must be defined in /etc/asterisk/extensions.conf (see Hints for more information on configuring hints in the dialplan). Additionally, there are some important options that must be set in the configuration file for the SIP channel driver, which is /etc/asterisk/sip.conf. The following list discusses these options:
callcounterEnables/disables call counters. This must be enabled for Asterisk to be able to provide state information for SIP devices. This option may be set either in the
[general]section or in peer-specific sections of sip.conf.busylevelSets the number of calls that must be in progress for Asterisk to report that a device is busy. This option may only be set in peer-specific sections of sip.conf. By default, this option is not set. This means that Asterisk will report that a device is in use, but never busy.
call-limitThis option has been deprecated in favor of using the
GROUP()andGROUP_COUNT()functions in the Asterisk dialplan. You may find older documentation that suggests that this option is required for SIP presence to work. That used to be the case, but this option has been replaced by thecallcounteroption for that purpose.allowsubscribeAllows you to disable support for subscriptions. If this option has not been set, subscriptions will be enabled. To disable subscription support completely, set
allowsubscribetonoin the[general]section of sip.conf.subscribecontextAllows you to set a specific context for subscriptions. Without this set, the context defined by the
contextoption will be used. This option may be set either in the[general]section or in peer-specific sections of sip.conf.notifyringingControls whether or not a notification will be sent when an extension goes into a ringing state. This option is set to
yesby default. It only has an effect on subscriptions that use the dialog-info event package. This option can only be set globally in the[general]section of sip.conf.notifyholdAllows
chan_sipto set SIP devices’ states toONHOLD. This is set toyesby default. This option can only be set globally in the[general]section of sip.conf.notifycidEnables/disables sending of an inbound call’s caller ID information to an extension. This option applies to devices that subscribe to
dialog-info+xml-based extension state notifications, such as Snom phones. Displaying caller ID information can be useful to help an agent decide whether to execute a pickup on an incoming call. This option is set tonoby default.Note
This magic pickup only works if the extension and context of the hint are the same as the extension and context of the incoming call. Notably, the usage of the
subscribecontextoption usually breaks this option. This option can also be set to the valueignore-context. This will bypass the context issue, but should only be used in an environment where there is only a single instance of the extension that has been subscribed to. Otherwise, you might accidentally pick up calls that you did not mean to pick up.
Asterisk provides the ability to create custom device states. This lends itself to the development of some interesting custom applications. We’ll start by showing the basic syntax for controlling custom device states, and then we’ll build an example that uses them.
Custom device states all start with a
prefix of Custom:. The text that
comes after the prefix can be anything you want. To set or read the
value of a custom device state, use the DEVICE_STATE() dialplan function. For example,
to set a custom device state:
exten => example,1,Set(DEVICE_STATE(Custom:example)=BUSY)
Similarly, to read the current value of a custom device state:
exten => Verbose(1,The state of Custom:example is ${DEVICE_STATE(Custom:example)})Custom device states can be used as a way to directly control the state shown on a device that has subscribed to the state of an extension. Just map an extension to a custom device state using a hint in the dialplan:
exten => example,hint,Custom:example
There are a number of interesting use cases for custom device states. In this section we will build an example that implements a custom “do not disturb” (DND) button on a SIP phone. This same approach could be applied to many other things that you might like to be able to toggle at the touch of a button. For example, this approach could be used to let members know if they are currently logged into a queue or not.
The first piece of the example is
the hint in the dialplan. This is required so BLF can be configured on
a SIP phone to subscribe to this extension. In this case, the phone
must be configured to subscribe to the state of DND_7015:
exten => DND_7015,hint,Custom:DND_7015
Next, we will create an extension that will be called when the user presses the key associated with the custom DND feature. It is interesting to note that this extension does nothing with audio. In fact, the user of the phone most likely will not even know that a call is placed when he presses the button. As far as the user is concerned, pressing that key simply turns on or off the light next to the button that reflects whether or not DND is enabled. The extension should look like this:
exten => DND_7015,1,Answer()
    same => n,GotoIf($["${DEVICE_STATE(Custom:DND_7015)}"="BUSY"]?turn_off:turn_on)

    same => n(turn_off),Set(DEVICE_STATE(Custom:DND_7015)=NOT_INUSE)
    same => n,Hangup()

    same => n(turn_on),Set(DEVICE_STATE(Custom:DND_7015)=BUSY)
    same => n,Hangup()
The final part of this example shows how the DND state is used in the dialplan. If DND is enabled, a message is played to the caller saying that the agent is unavailable. If it is disabled, a call will be made to a SIP device:
exten => 7015,1,GotoIf($["${DEVICE_STATE(Custom:DND_7015)}"="BUSY"]?busy:available)
    same => n(available),Verbose(3,DND is currently off for 7015.)
    same => n,Dial(SIP/exampledevice)
    same => n,Hangup()

    same => n(busy),Verbose(3,DND is on for 7015.)
    same => n,Playback(vm-theperson)
    same => n,Playback(digits/7&digits/0&digits/1&digits/5)
    same => n,Playback(vm-isunavail)
    same => n,Playback(vm-goodbye)
    same => n,Hangup()
Example 14-1 shows the full example as it would appear in /etc/asterisk/extensions.conf.
Example 14-1. Custom “do not disturb” functionality using custom device states
;
; A hint so a phone can use BLF to signal the DND state.
;
exten => DND_7015,hint,Custom:DND_7015

;
; An extension to dial when the user presses the custom DND
; key on his phone.  This will toggle the state and will result
; in the light on the phone turning on or off.
;
exten => DND_7015,1,Answer()
    same => n,GotoIf($["${DEVICE_STATE(Custom:DND_7015)}"="BUSY"]?turn_off:turn_on)

    same => n(turn_off),Set(DEVICE_STATE(Custom:DND_7015)=NOT_INUSE)
    same => n,Hangup()

    same => n(turn_on),Set(DEVICE_STATE(Custom:DND_7015)=BUSY)
    same => n,Hangup()


;
; Example usage of the DND state.
;
exten => 7015,1,GotoIf($["${DEVICE_STATE(Custom:DND_7015)}"="BUSY"]?busy:available)
    same => n(available),Verbose(3,DND is currently off for 7015.)
    same => n,Dial(SIP/exampledevice)
    same => n,Hangup()

    same => n(busy),Verbose(3,DND is on for 7015.)
    same => n,Playback(vm-theperson)
    same => n,Playback(digits/7&digits/0&digits/1&digits/5)
    same => n,Playback(vm-isunavail)
    same => n,Playback(vm-goodbye)
same => n,Hangup()Asterisk is primarily designed to run on a single system. However, as requirements for scalability increase, it is common for deployments to require multiple Asterisk servers. Since that has become increasingly common, some features have been added to make it easier to coordinate multiple Asterisk servers. One of those features is distributed device state support.
What this means is that if a device is on a call on one Asterisk server, the state of that device on all servers reflects that. To be more specific, the way this works is that every server knows the state of each device from the perspective of each server. Using this collection of states, each server will calculate what the overall device state value is to report to the rest of Asterisk.
To accomplish distributed device state, some sort of messaging mechanism must be used for the servers to communicate with each other. Two such mechanisms are supported as of Asterisk 1.8: AIS and XMPP.
The Application Interface Specification (AIS) is a standardized set of messaging middleware APIs. The definition for the APIs is provided by the Service Availability Forum. The open source implementation of AIS that was used for the development and testing of this functionality is OpenAIS, which is built on Corosync.
Corosync, and thus OpenAIS, is built in such a way that nodes must be located on the same high-speed, low-latency LAN. If your deployment is geographically distributed, you should use the XMPP-based distributed device state support, which is discussed in Using XMPP.
The first step to getting the necessary components installed is to install Corosync and OpenAIS. Corosync depends on the NSS library. Install the libnss3-dev package on Ubuntu or the nss-devel package on CentOS.
Next, install Corosync and OpenAIS. There may be packages available, but they are also fairly straightforward to install from source. Download the latest releases from the Corosync and OpenAIS home pages. Then, execute the following commands to compile and install each package:
$tar xvzf corosync-1.2.8.tar.gz$cd corosync-1.2.8$./configure$make$sudo make install$tar xvzf openais-1.1.4.tar.gz$cd openais-1.1.4$./configure$make$sudo make install
If you installed Asterisk prior to installing Corosync and OpenAIS, you will need to re-compile and reinstall Asterisk to get AIS support. Start by running the Asterisk configure script. The configure script is responsible for inspecting the system to find out which optional dependencies can be found so that the build system knows which modules can be built:
$cd /path/to/asterisk$./configure
After running the configure script, run the menuselect tool to ensure that
Asterisk has been told to
build the res_ais module (this
module can be found in the Resource Modules
section of menuselect):
$make menuselect
Finally, compile and install Asterisk:
$make$sudo make install
Note
This is a pretty quick and crude set of instructions for compiling and installing Asterisk. For a much more complete set of instructions, please see Chapter 3.
Now that OpenAIS has been installed, it needs to be configured. There is a configuration file for both OpenAIS and Corosync that must be put in place. Check to see if /etc/ais/openais.conf and /etc/corosync/corosync.conf exist. If they do not exist, copy in the sample configuration files:
$sudo mkdir -p /etc/ais$cd openais-1.1.4$sudo cp conf/openais.conf.sample /etc/ais/openais.conf$sudo mkdir -p /etc/corosync$cd corosync-1.2.8$sudo cp conf/corosync.conf.sample /etc/corosync/corosync.conf
Next, you will need to edit both
the openais.conf and corosync.conf files. There are a number
of options here, but the most important one that must be changed is
the bindnetaddr option in the
totem-interface section. This
must be set to the IP address of the network interface that this
node will use to communicate with the rest of the cluster:
totem {
    ...
    interface {
        ringnumber: 0
        bindnetaddr: 10.24.22.144
        mcastaddr: 226.94.1.1
        mcastport: 5405
    }
}
For detailed documentation on the rest of the options in these configuration files, see the associated manpages:
$man openais.conf$man corosync.conf
To get started with testing out basic OpenAIS connectivity, try starting the aisexec application in the foreground and watching the output:
$sudo aisexec -f
For example, if you watch the output of aisexec on the first node while you bring up the second node, you should see output that reflects that the cluster now has two connected nodes:
Nov 13 06:55:30 corosync [CLM   ] CLM CONFIGURATION CHANGE
Nov 13 06:55:30 corosync [CLM   ] New Configuration:
Nov 13 06:55:30 corosync [CLM   ]       r(0) ip(10.24.22.144)
Nov 13 06:55:30 corosync [CLM   ]       r(0) ip(10.24.22.242)
Nov 13 06:55:30 corosync [CLM   ] Members Left:
Nov 13 06:55:30 corosync [CLM   ] Members Joined:
Nov 13 06:55:30 corosync [CLM   ]       r(0) ip(10.24.22.242)
Nov 13 06:55:30 corosync [TOTEM ] A processor joined or left the membership and a new
membership was formed.
Nov 13 06:55:30 corosync [MAIN  ] Completed service synchronization, ready to provide
service.
The res_ais module
for Asterisk has a single
configuration file, /etc/asterisk/ais.conf. One short section
is required in this file to enable distributed device state in an
AIS cluster. Place the following contents in the /etc/asterisk/ais.conf file:
[device_state]

type = event_channel
publish_event = device_state
subscribe_event = device_state
There is an Asterisk CLI command that can be used to ensure that this configuration has been loaded properly:
*CLI>ais evt show event channels============================================================= === Event Channels ========================================== ============================================================= === === --------------------------------------------------------- === Event Channel Name: device_state === ==> Publishing Event Type: device_state === ==> Subscribing to Event Type: device_state === --------------------------------------------------------- === =============================================================
Another useful Asterisk CLI command provided by the
res_ais module is used to list
the members of the AIS cluster:
*CLI>ais clm show members============================================================= === Cluster Members ========================================= ============================================================= === === --------------------------------------------------------- === Node Name: 10.24.22.144 === ==> ID: 0x9016180a === ==> Address: 10.24.22.144 === ==> Member: Yes === --------------------------------------------------------- === === --------------------------------------------------------- === Node Name: 10.24.22.242 === ==> ID: 0xf216180a === ==> Address: 10.24.22.242 === ==> Member: Yes === --------------------------------------------------------- === =============================================================
Now that you’ve set up and configured distributed device state using OpenAIS, there are some simple tests that can be done using custom device states to ensure that device states are being communicated between the servers. Start by creating a test hint in the Asterisk dialplan, /etc/asterisk/extensions.conf:
[devstate_test]

exten => foo,hint,Custom:abc
Now, you can adjust the custom device state from the Asterisk CLI using the dialplan set global CLI command and then check the state on each server using the core show hints command. For example, we can use this command to set the state on one server:
pbx1*CLI>dialplan set global DEVICE_STATE(Custom:abc) INUSE-- Global variable 'DEVICE_STATE(Custom:abc)' set to 'INUSE'
and then, check the state on another server using this command:
*CLI>core show hints-= Registered Asterisk Dial Plan Hints =- foo@devstatetest : Custom:abc State:InUse Watchers 0
If you would like to dive deeper into the processing of distributed device state changes, there are some useful debug messages that can be enabled. First, enable debug on the Asterisk console in /etc/asterisk/logger.conf. Then, enable debugging at the Asterisk CLI:
*CLI>core set debug 1
With the debug output enabled, you will see some messages that show how Asterisk is processing each state change. When the state of a device changes on one server, Asterisk checks the state information it has for that device on all servers and determines the overall device state. The following examples illustrate:
*CLI>dialplan set global DEVICE_STATE(Custom:abc) NOT_INUSE-- Global variable 'DEVICE_STATE(Custom:abc)' set to 'NOT_INUSE' [Nov 13 13:27:12] DEBUG[14801]: devicestate.c:652 handle_devstate_change: Processing device state change for 'Custom:abc' [Nov 13 13:27:12] DEBUG[14801]: devicestate.c:602 process_collection: Adding per-server state of 'Not in use' for 'Custom:abc' [Nov 13 13:27:12] DEBUG[14801]: devicestate.c:602 process_collection: Adding per-server state of 'Not in use' for 'Custom:abc' [Nov 13 13:27:12] DEBUG[14801]: devicestate.c:609 process_collection: Aggregate devstate result is 'Not in use' for 'Custom:abc' [Nov 13 13:27:12] DEBUG[14801]: devicestate.c:631 process_collection: Aggregate state for device 'Custom:abc' has changed to 'Not in use'*CLI>dialplan set global DEVICE_STATE(Custom:abc) INUSE-- Global variable 'DEVICE_STATE(Custom:abc)' set to 'INUSE' [Nov 13 13:29:30] DEBUG[14801]: devicestate.c:652 handle_devstate_change: Processing device state change for 'Custom:abc' [Nov 13 13:29:30] DEBUG[14801]: devicestate.c:602 process_collection: Adding per-server state of 'Not in use' for 'Custom:abc' [Nov 13 13:29:30] DEBUG[14801]: devicestate.c:602 process_collection: Adding per-server state of 'In use' for 'Custom:abc' [Nov 13 13:29:30] DEBUG[14801]: devicestate.c:609 process_collection: Aggregate devstate result is 'In use' for 'Custom:abc' [Nov 13 13:29:30] DEBUG[14801]: devicestate.c:631 process_collection: Aggregate state for device 'Custom:abc' has changed to 'In use'
The eXtensible Messaging and Presence Protocol (XMPP), formerly (and still commonly) known as Jabber, is an IETF standardized communications protocol. It is most commonly known as an IM protocol, but it can be used for a number of other interesting applications as well. The XMPP Standards Foundation (XSF) works to standardize extensions to the XMPP protocol. One such extension, referred to as PubSub, provides a publish/subscribe mechanism.
Asterisk has the ability to use XMPP PubSub to distribute device state information. One of the nice things about using XMPP to accomplish this is that it works very well for geographically distributed Asterisk servers.
To distribute device states using XMPP, you will need an XMPP server that supports PubSub. One such server that has been successfully tested against Asterisk is Tigase.
The Tigase website has instructions for installing and configuring the Tigase server. We suggest that you follow those instructions (or the instructions provided for whatever other server you may choose to use) and come back to this book when you’re ready to work on the Asterisk-specific parts.
On the Asterisk side of things,
you will need to ensure that you have installed the res_jabber module. You can check to see if
it is already loaded at the Asterisk CLI:
*CLI>module show like jabberModule Description Use Count res_jabber.so AJI - Asterisk Jabber Interface 0 1 modules loaded
If you are using a custom /etc/asterisk/modules.conf file that lists only specific modules to be loaded, you can also check the filesystem to see if the module was compiled and installed:
$ls -l /usr/lib/asterisk/modules/res_jabber.so-rwxr-xr-x 1 root root 837436 2010-11-12 15:33 /usr/lib/asterisk/modules/res_jabber.so
If you do not yet have res_jabber installed, you will need to
install the iksemel and OpenSSL libraries. Then, you will need
to recompile and reinstall Asterisk. Start by running the
Asterisk configure script, which is responsible for
inspecting the system and locating optional dependencies, so that
the build system knows which modules can be built:
$cd /path/to/asterisk$./configure
After running the configure script, run the menuselect tool to ensure that
Asterisk has been told to
build the res_jabber module. This
module can be found in the Resource Modules
section of menuselect:
$make menuselect
Finally, compile and install Asterisk:
$make$sudo make install
Note
This is a pretty quick and crude set of instructions for compiling and installing Asterisk. For a much more complete set of instructions, please see Chapter 3.
Unfortunately, Asterisk is currently not able to register new accounts on an XMPP server. You will have to create an account for each server via some other mechanism. The method we used while testing was to use an XMPP client such as Pidgin to complete the account registration process. After account registration is complete, the XMPP client is no longer needed. For the rest of the examples, we will use the following two buddies, both of which are on the server jabber.shifteight.org:
[email protected]/astvoip1[email protected]/astvoip2
The /etc/asterisk/jabber.conf file will need to be configured on each server. We will show the configuration for a two-server setup here, but the configuration can easily be expanded to more servers as needed. Example 14-2 shows the contents of the configuration file for server 1 and Example 14-3 shows the contents of the configuration file for server 2. For additional information on the jabber.conf options associated with distributed device states, see the configs/jabber.conf.sample file that is included in the Asterisk source tree.
Example 14-2. jabber.conf for server1
[general]
autoregister = yes

[asterisk]
type = client
serverhost = jabber.shifteight.org
pubsub_node = pubsub.jabber.shifteight.org
username = [email protected]/astvoip1
secret = mypassword
distribute_events = yes
status = available
usetls = no
usesasl = yes
buddy = [email protected]/astvoip2
Example 14-3. jabber.conf for server2
[general]
autoregister = yes

[asterisk]
type = client
serverhost = jabber.shifteight.org
pubsub_node = pubsub.jabber.shifteight.org
username = [email protected]/astvoip2
secret = mypassword
distribute_events = yes
status = available
usetls = no
usesasl = yes
buddy = [email protected]/astvoip1
To ensure that everything is working properly, start by doing some verification of the jabber.conf settings on each server. There are a couple of relevant Asterisk CLI commands that can be used here. The first is the jabber show connected command, which will verify that Asterisk has successfully logged in with an account on the jabber server. The output of this command on the first server shows:
*CLI>jabber show connectedJabber Users and their status: User: [email protected]/astvoip1 - Connected ---- Number of users: 1
Meanwhile, if jabber show connected is executed on the second server, it shows:
*CLI>jabber show connectedJabber Users and their status: User: [email protected]/astvoip2 - Connected ---- Number of users: 1
The next useful command for verifying the setup is jabber show buddies. This command allows you to verify that the other server is correctly listed on your buddy list. It also lets you see if the other server is seen as currently connected. If you were to run this command on the first server without Asterisk currently running on the second server, the output would look like this:
*CLI>jabber show buddiesJabber buddy lists Client: [email protected]/astvoip1 Buddy: [email protected] Resource: None Buddy: [email protected]/astvoip2 Resource: None
Next, start Asterisk on the second server and run jabber show buddies on that server. The output will contain more information, since the second server will see the first server online:
*CLI>jabber show buddiesJabber buddy lists Client: [email protected]/astvoip2 Buddy: [email protected] Resource: astvoip1 node: http://www.asterisk.org/xmpp/client/caps version: asterisk-xmpp Jingle capable: yes Status: 1 Priority: 0 Buddy: [email protected]/astvoip1 Resource: None
At this point, you should be ready to test out the distribution of device states. The procedure is the same as that for testing device states over AIS, which can be found in Testing device state changes.
In Asterisk, Shared Line Appearances (SLA)—sometimes also referred to in the industry as Bridged Line Appearances (BLA)—can be used. This functionality can be used to satisfy two primary use cases, which include emulating a simple key system and creating shared extensions on a PBX.
Building key system emulation is the use case for which these applications were primarily designed. In this environment, you have some small number of trunks coming into the PBX, such as analog phone lines, and each phone has a dedicated button for calls on that trunk. You may refer to these trunks as line 1, line 2, and line 3, for example.
The second primary use case is for creating shared extensions on your PBX. This use case seems to be the most common these days. There are many reasons you might want to do this. One example is that you may want an extension to appear on both the phones of an executive and her administrative assistant. Another example would be if you want the same extension to appear on all of the phones in the same lab.
While these use cases are supported to an extent, there are limitations. There is still more work to be done in Asterisk to make these features work really well for what people want to do with them. These limitations are discussed in Limitations.
The SLA applications are built on two key technologies
in Asterisk. The first is
device state processing, and the second is conferencing. Specifically,
the conferencing used by these applications is the MeetMe() application. The SLA applications
come with the same module as the MeetMe() application, so you must install
the app_meetme module.
You can check at the Asterisk CLI to see if you already have the module:
pbx*CLI>module show like app_meetme.soModule Description Use Count 0 modules loaded
In this case, the module is not
present. The most common reason that an Asterisk system does not have the
app_meetme module is because
DAHDI has not been
installed. The MeetMe() application
uses DAHDI to
perform conference mixing. Once DAHDI is installed (refer to Chapter 3 for installation information), rerun the
Asterisk configure script,
recompile, and reinstall. Once the module has been properly installed,
you should be able to see it at the CLI:
*CLI>module show like app_meetme.soModule Description Use Count app_meetme.so MeetMe conference bridge 0 1 modules loaded
Once the app_meetme module is loaded, you should have
both the SLAStation() and SLATrunk() applications available:
*CLI>core show applications like SLA-= Matching Asterisk Applications =- SLAStation: Shared Line Appearance Station. SLATrunk: Shared Line Appearance Trunk. -= 2 Applications Matching =-
The two main configuration files that must be edited to set up SLA are /etc/asterisk/extensions.conf and /etc/asterisk/sla.conf. The sla.conf file is used for defining trunks and stations. A station is any SIP phone that will be using SLA. Trunks are the literal trunks or shared extensions that will be appearing on two or more stations. The Asterisk dialplan, extensions.conf, provides some important glue that pulls an SLA configuration together. The dialplan includes some extension state hints and extensions that define how calls get into and out of an SLA setup. The next few sections provide detailed examples of the configuration for a few different use cases.
This usage of SLA comes with the simplest
configuration.[132] This scenario would typically be used for a fairly small
installation, where you have a few analog lines and SIP phones that
all have line keys directly associated with the analog lines. For the
purposes of this example, we will say we have two analog lines and
four SIP phones. Each SIP phone will have a button for line1 and a button for line2. This section will assume that you
have done some configuration up front, including:
For this example, we will use the following device names for the SIP phones and analog lines. Be sure to adapt the examples to match your own configuration:
As mentioned previously, sla.conf contains configuration that maps devices to trunks and stations. For this example, we will start by defining the two trunks:
[line1]
type = trunk
device = DAHDI/1

[line2]
type = trunk
device = DAHDI/2
Next, we will set up the station definitions. We have four SIP phones, which will each use both trunks. Note that the section names in sla.conf for stations do not need to match the SIP device names, but it is done that way here for convenience:
[station1]
type = station
device = SIP/station1
trunk = line1
trunk = line2

[station2]
type = station
device = SIP/station2
trunk = line1
trunk = line2

[station3]
type = station
device = SIP/station3
trunk = line1
trunk = line2

[station4]
type = station
device = SIP/station4
trunk = line1
trunk = line2
The station configuration is a bit repetitive. Asterisk configuration file template sections come in handy here to collapse the configuration down a bit. Here is the station configuration again, but this time using a template:
[station](!)
type = trunk
trunk = line1
trunk = line2

[station1](station)
device = SIP/station1

[station2](station)
device = SIP/station2

[station3](station)
device = SIP/station3

[station4](station)
device = SIP/station4
The next configuration file required for this example
is /etc/asterisk/extensions.conf. There are
three contexts. First, we have the line1 and line2 contexts. When a call comes in on
one of the analog lines, it will come in to one of these contexts in
the dialplan and execute the SLATrunk() application. This application will take care of ringing all of the
appropriate stations:
[line1]

exten => s,1,SLATrunk(line1)

[line2]

exten => s,1,SLATrunk(line2)
The next section of the dialplan
is the sla_stations context. All
calls from the SIP phones should be sent to this context. Further,
the SIP phones should be configured such that as soon as they go
off-hook, they immediately make a call to the station1 extension (or station2, station3, etc., as appropriate). If the
line1 key on the phone is
pressed, a call should be sent to the station1_line1 extension (or station2_line1, etc.).
Any time that a phone goes
off-hook or a line key is pressed, the call that is made will
immediately connect it to one of the analog lines. For a line that
is not already in use, the analog line will be providing a dialtone,
and the user will be able to send digits to make a call. If a user
presses a line key for a line that is already in use, that user will
be bridged into the existing call on that line. The sla_stations context looks like
this:
[sla_stations]

exten => station1,1,SLAStation(station1)
exten => station1_line1,hint,SLA:station1_line1
exten => station1_line1,1,SLAStation(station1_line1)
exten => station1_line2,hint,SLA:station1_line2
exten => station1_line2,1,SLAStation(station1_line2)

exten => station2,1,SLAStation(station2)
exten => station2_line1,hint,SLA:station2_line1
exten => station2_line1,1,SLAStation(station2_line1)
exten => station2_line2,hint,SLA:station2_line2
exten => station2_line2,1,SLAStation(station2_line2)

exten => station3,1,SLAStation(station3)
exten => station3_line1,hint,SLA:station3_line1
exten => station3_line1,1,SLAStation(station3_line1)
exten => station3_line2,hint,SLA:station3_line2
exten => station3_line2,1,SLAStation(station3_line2)

exten => station4,1,SLAStation(station4)
exten => station4_line1,hint,SLA:station4_line1
exten => station4_line1,1,SLAStation(station4_line1)
exten => station4_line2,hint,SLA:station4_line2
exten => station4_line2,1,SLAStation(station4_line2)
The previous section covered the dialplan for trunks and stations. There are some specific things to keep in mind when setting up phones for use with this setup. First, each phone should be configured to send a call as soon as it is taken off-hook.
The other important item is the configuration of the line keys. Asterisk uses extension state subscriptions to control the LEDs next to the line buttons. Beyond that, each line key should be configured as a speed-dial. Use the following checklist for your line key configuration (how you accomplish these tasks will depend on the specific phones you are using):
Set the label of the key to be Line 1 (etc.), or whatever you deem appropriate.
Set up the keys such that the Line 1 key on
station1subscribes to the state ofstation1_line1, and so on. This is required so Asterisk can make the LEDs reflect the state of the lines.Ensure that if the Line 1 key on
station1is pressed a call is sent to thestation1_line1extension, and so on.
This example is intended to be identical in functionality to the previous example. The difference is that instead of using analog lines as trunks, we will use a connection to a SIP provider that will terminate the calls to the PSTN. For more information on setting up Asterisk to connect to a SIP provider, see Chapter 7.
The sla.conf file for this scenario is a bit tricky.[133] You might expect to see the device line in the trunk configuration have a SIP channel listed, but instead we’re going to use a Local channel. This will allow us to use some additional dialplan logic for call processing. The purpose of the Local channel will become clearer in the next section, when the dialplan example is discussed. Here are the trunk configurations:
[line1]
type = trunk
device = Local/disa@line1_outbound

[line2]
type = trunk
device = Local/disa@line2_outbound
The station configuration is identical to the last example, so let’s get right to it:
[station](!)
type = trunk
trunk = line1
trunk = line2

[station1](station)
device = SIP/station1

[station2](station)
device = SIP/station2

[station3](station)
device = SIP/station3

[station4](station)
device = SIP/station4
As in the last example, you will need line1 and line2 contexts to process incoming calls
on these trunks:
[line1]

exten => s,1,SLATrunk(line1)

;
; If the provider specifies your phone number when sending you
; a call, you will need another rule in the dialplan to match that.
;
exten => _X.,1,Goto(s,1)

[line2]

exten => s,1,SLATrunk(line2)

exten => _X.,1,Goto(s,1)
This example requires an sla_stations context, as well. This is for
all calls coming from the phones. It’s the same as it was in the
last example:
[sla_stations]

exten => station1,1,SLAStation(station1)
exten => station1_line1,hint,SLA:station1_line1
exten => station1_line1,1,SLAStation(station1_line1)
exten => station1_line2,hint,SLA:station1_line2
exten => station1_line2,1,SLAStation(station1_line2)

exten => station2,1,SLAStation(station2)
exten => station2_line1,hint,SLA:station2_line1
exten => station2_line1,1,SLAStation(station2_line1)
exten => station2_line2,hint,SLA:station2_line2
exten => station2_line2,1,SLAStation(station2_line2)

exten => station3,1,SLAStation(station3)
exten => station3_line1,hint,SLA:station3_line1
exten => station3_line1,1,SLAStation(station3_line1)
exten => station3_line2,hint,SLA:station3_line2
exten => station3_line2,1,SLAStation(station3_line2)

exten => station4,1,SLAStation(station4)
exten => station4_line1,hint,SLA:station4_line1
exten => station4_line1,1,SLAStation(station4_line1)
exten => station4_line2,hint,SLA:station4_line2
exten => station4_line2,1,SLAStation(station4_line2)
The last piece of the dialplan
that is required is the implementation of the line1_outbound and line2_outbound contexts. This is what the
SLA applications use when they want to send calls out to a SIP
provider. The key to this setup is the usage of the DISA() application. In the last example, phones were directly connected
to an analog line. This allowed the upstream switch to provide a
dialtone, collect digits, and then complete the call. In this
example, we use the DISA()
application locally to provide a dialtone and collect digits. Once a
complete number has been dialed, the call will proceed to go out to
a SIP provider:
[line1_outbound]

exten => disa,1,DISA(no-password,line1_outbound)

;
; Add extensions for whatever numbers you would like to
; allow to be dialed.
;
exten => _1NXXNXXXXXX,1,Dial(SIP/${EXTEN}@myprovider)

[line2_outbound]

exten => disa,1,DISA(no-password,line2_outbound)

exten => _1NXXNXXXXXX,1,Dial(SIP/${EXTEN}@myprovider)The previous two examples were for small key system emulation. For this example, we’ll try something quite different. Many PBX vendors offer the ability to have the same extension shared across multiple phones. This is not simply a matter of having multiple phones ring when an extension is called: it is deeper integration than that. The behavior of the line key for a shared extension is similar to that of a line key on a key system. For example, you can simply put a call on hold from one phone and pick it up from another. Also, if multiple phones press the key for the shared extension, they will all be bridged into the same call. That is why this functionality is often also referred to as Bridged Line Appearances (BLA).
In the previous two examples, we
had two trunks and four stations. For this example, we’re going to set
up a single shared extension on two phones. The shared extension will
be referred to as extension 5001.
Every usage of the SLA applications requires trunk and
station definitions. This example, like the previous ones, will be
making use of the DISA()
application and the sla.conf
file will look very similar:
[5001]
type = trunk
device = Local/disa@5001_outbound

[5001_phone1]
device = SIP/5001_phone1
trunk = 5001

[5001_phone2]
device = SIP/5001_phone2
trunk = 5001
The first part of the dialplan that is required is
what will be executed when extension 5001 is dialed on the PBX. Normally, to
call a phone you would use the Dial() application. In this case, we’re going
to use the SLATrunk()
application. This will take care of ringing both phones and
keeping them bridged together:
exten => 5001,1,SLATrunk(5001)
Next, we will need a context that
will be used for making outbound calls from this shared extension.
This assumes that 5001_phone1 and
5001_phone2 have been configured
with their context options set to
5001 in sip.conf:
[5001]

;
; This extension is needed if you want the shared extension to
; be used by default. In that case, have this extension dialed
; when the phone goes off-hook.
;
exten => 5001_phone1,1,SLAStation(5001_phone1)
;
; This is the extension that should be dialed when the 5001 key is
; pressed on 5001_phone1.
;
exten => 5001_phone1_5001,hint,SLA:5001_phone1_5001
exten => 5001_phone1_5001,1,SLAStation(5001_phone1_5001)

exten => 5001_phone2,1,SLAStation(5001_phone2)
exten => 5001_phone2_5001,hint,SLA:5001_phone2_5001
exten => 5001_phone2_5001,1,SLAStation(5001_phone2_5001)
Finally, we need an
implementation of the 5001_outbound context. This will be used
to provide a dialtone and collect digits on the bridged line:
[5001_outbound]

exten => disa,1,DISA(no-password,5001_outbound)

;
; This context will also need to be able to see whatever
; extensions you would like to be reachable from this extension.
;
include => pbx_extensions
The /etc/asterisk/sla.conf file has some
optional configuration parameters that were not used in any of the
examples in this chapter. To give you an idea of what other behavior
can be configured, the options are covered here. This file has a
[general] section that is reserved for global configuration options.
Currently, there is only a single option that can be specified in this
section:
The trunk definitions in the previous examples only specified the type and device. Here are some additional options that can be specified for a trunk:
autocontext = line1If this option is set, Asterisk will automatically create a dialplan context using this name. The context will contain an
sextension that executes theSLATrunk()application with the appropriate argument for this trunk. By default, all dialplan entries must be created manually.ringtimeout = 20This option allows you to specify the number of seconds to allow an inbound call on this trunk to ring before the
SLATrunk()application will exit and consider it an unanswered call. By default, this option is not set.barge = noThe
bargeoption specifies whether or not other stations are allowed to join a call that is in progress on this trunk by pressing the same line button. Barging into a call on a trunk is allowed by default.hold = privateThe
holdoption specifies hold permissions for this trunk. If this option is set toopen, any station can place this trunk on hold and any other station is allowed to take it back off of hold. If this option is set toprivate, only the station that placed the trunk on hold is allowed to take it back off of hold. This option is set toopenby default.
When we defined the stations in the
previous examples, we only supplied the type, device, and a list of trunks. However,
station definitions accept some additional configuration options, as
well. They are listed here:
autocontext = sla_stationsIf this option is specified, Asterisk will automatically create the extensions required for calls coming from this station in the context specified. This is off by default, which means that all extensions must be specified manually.
ringtimeout = 20A timeout may be specified in seconds for how long this station will ring before the call is considered unanswered. There is no timeout set by default.
ringdelay = 5A ring delay in seconds can be specified for a station. If a delay is specified, this station will not start ringing until this number of seconds after the call first came in on this shared line. There is no delay set by default.
hold = privateHold permissions can be specified for a specific station as well. If this option is set to
private, any trunks put on hold by this station can only be picked back up by this station. By default, this is set toopen.trunk = line1,ringtimeout=20A
ringtimeoutcan be applied to calls coming from only a specific trunk.trunk = line1,ringdelay=5A
ringdelaycan also be applied to calls from a specific trunk.
While Asterisk makes many things easy, SLA is not one of them. Despite this functionality being intended to emulate simple features, the configuration required to make it work is fairly complex. Someone who is new to Asterisk and only wants a simple key system setup will have to learn a lot of complex Asterisk and SIP phone concepts to get it working.
Another feature that still needs some development work before it will work seamlessly with SLA is caller ID. At the time that this functionality was written, Asterisk did not have the appropriate infrastructure in place to be able to update caller ID information throughout the duration of the call. Based on how this functionality is implemented, this infrastructure is required to make the display on the phones useful. It does exist as of Asterisk 1.8 but the SLA applications have not yet been updated to use it. The end result is that you can either have no caller ID information at all, or you can enable it and understand that the phone displays are not always going to display correctly as changes happen throughout the duration of a call.
Another limitation, most relevant to usage of shared extensions, is that transfers do not work. The main reason is that transfers generally involve putting a call on hold for a short time. Call hold is processed in a special way with SLA, in that the held call is not controlled by the phone that initiated the hold. This breaks transfer processing.
In summary, SLA is not necessarily simple to set up, and it comes with some significant limitations. With that said, if what does exist suits your needs, by all means go for it.
This chapter discussed many aspects of device state handling in Asterisk. We started by discussing the core concepts of device states and extension states, and built up from there. We covered how SIP phones can subscribe to states, tools for creating custom states, and two mechanisms that can be used for distributing states among many servers. Finally, we covered one of the features in Asterisk, Shared Line Appearances, that relies heavily on the device state infrastructure in Asterisk to operate.