
John Malkovich: I have seen a world that NO man should see!
Craig Schwartz: Really? Because for most people it’s a rather enjoyable experience.
The Asterisk Manager Interface (AMI) is a system monitoring and management interface provided by Asterisk. It allows live monitoring of events that occur in the system, as well enabling you to request that Asterisk perform some action. The actions that are available are wide-ranging and include things such as returning status information and originating new calls. Many interesting applications have been developed on top of Asterisk that take advantage of the AMI as their primary interface to Asterisk.
This section is for getting your hands dirty with the AMI as quickly as possible. First, put the following configuration in /etc/asterisk/manager.conf:
;
; Turn on the AMI and ask it to only accept connections from localhost.
;
[general]
enabled = yes
webenabled = yes
bindaddr = 127.0.0.1

;
; Create an account called "hello", with a password of "world"
;
[hello]
secret=world
Note
This sample configuration is set up to only allow local connections to the AMI. If you intend on making this interface available over a network, it is strongly recommended that you only do so using TLS. The use of TLS is discussed in more detail later in this chapter.
Once the AMI configuration is ready, enable the built-in HTTP server by putting the following contents in /etc/asterisk/http.conf:
;
; Enable the built-in HTTP server, and only listen for connections on localhost.
;
[general]
enabled = yes
bindaddr = 127.0.0.1
There are multiple ways to connect to the AMI, but a TCP socket is the most common. We will use telnet to demonstrate AMI connectivity. This example shows these steps:
Here’s how the AMI responds to those actions:
$telnet localhost 5038Trying 127.0.0.1... Connected to localhost. Escape character is '^]'. Asterisk Call Manager/1.1Action: Login Username: hello Secret: worldResponse: Success Message: Authentication acceptedAction: PingResponse: Success Ping: Pong Timestamp: 1282739190.454046Action: LogoffResponse: Goodbye Message: Thanks for all the fish. Connection closed by foreign host.
Once you have this working, you have verified that AMI is accepting connections via a TCP connection.
It is also possible to use the AMI over HTTP. In this
section we will perform the same actions as before, but over HTTP
instead of the native TCP interface to the AMI. The responses will be
delivered over HTTP in the same format as the previous example, since
the rawman encoding type is being
used. AMI-over-HTTP responses can be encoded in other formats, such as
XML. These response-formatting options are covered in AMI over HTTP.
Note
Accounts used for connecting to the AMI over HTTP are the same accounts configured in /etc/asterisk/manager.conf.
This example demonstrates how to access the AMI over HTTP, log
in, execute the Ping action, and
log off:
$wget "http://localhost:8088/rawman?action=login&username=hello&secret=world" > --save-cookies cookies.txt -O ---2010-08-31 12:34:23-- Resolving localhost... 127.0.0.1 Connecting to localhost|127.0.0.1|:8088... connected. HTTP request sent, awaiting response... 200 OK Length: 55 [text/plain] Saving to: `STDOUT' Response: Success Message: Authentication accepted 2010-08-31 12:34:23 (662 KB/s) - written to stdout [55/55] $wget "http://localhost:8088/rawman?action=ping" --load-cookies cookies.txt -O ---2010-08-31 12:34:23-- Resolving localhost... 127.0.0.1 Connecting to localhost|127.0.0.1|:8088... connected. HTTP request sent, awaiting response... 200 OK Length: 63 [text/plain] Saving to: `STDOUT' Response: Success Ping: Pong Timestamp: 1283258063.040293 2010-08-31 12:34:23 (775 KB/s) - written to stdout [63/63] $wget "http://localhost:8088/rawman?action=logoff" --load-cookies cookies.txt -O ---2010-08-31 12:34:23-- Resolving localhost... 127.0.0.1 Connecting to localhost|127.0.0.1|:8088... connected. HTTP request sent, awaiting response... 200 OK Length: 56 [text/plain] Saving to: `STDOUT' Response: Goodbye Message: Thanks for all the fish. 2010-08-31 12:34:23 (696 KB/s) - written to stdout [56/56]
The HTTP interface to AMI lets you integrate Asterisk call control into a web service.
The section Quick Start showed a very basic set of configuration files to get you started. However, there are many more options available for the AMI.
The main configuration file for the AMI is /etc/asterisk/manager.conf. The [general] section contains options (listed
in Table 20-1) that control the overall operation
of the AMI. Any other sections in the manager.conf file will define accounts for
logging in and using the AMI.
Table 20-1. Options in the manager.conf [general] section
| Option | Value/Example | Description |
|---|---|---|
enabled | yes | Enables the AMI. The default is no. |
webenabled | yes | Allows access to the AMI through the built-in HTTP
server. The default is no.[a] |
port | 5038 | Sets the port number to listen on for AMI connections.
The default is 5038. |
bindaddr | 127.0.0.1 | Sets the address to listen on for AMI connections. The
default is to listen on all addresses (0.0.0.0). However, it is highly
recommended to set this to 127.0.0.1. |
tlsenable | yes | Enables listening for AMI connections using TLS. The
default is no. It is highly
recommended to only expose connectivity via TLS outside of the
local machine.[b] |
tlsbindport | 5039 | Sets the port to listen on for TLS connections to the
AMI. The default is 5039. |
tlsbindaddr | 0.0.0.0 | Sets the address to listen on for TLS-based AMI
connections. The default is to listen on all addresses
(0.0.0.0). |
tlscertfile | /var/lib/asterisk/keys/asterisk.pem | Sets the path to the server certificate for TLS. This
is required if tlsenable is
set to yes. |
tlsprivatekey | /var/lib/asterisk/keys/private.pem | Sets the path to the private key for TLS. If this is
not specified, the tlscertfile will be checked to see
if it also contains the private key. |
tlscipher | <cipher string> | Specifies a list of ciphers for OpenSSL to use. Setting this is optional. To see a list of available ciphers, run openssl ciphers -v at the command line. |
allowmultiplelogin | no | Allows the same account to make more than one
connection at the same time. The default is yes. |
displayconnects | yes | Reports connections to the AMI as verbose messages
printed to the Asterisk console. This is usually useful, but
it can get in the way on a system that uses scripts that make
a lot of connections to the AMI. The default is yes. |
timestampevents | no | Adds a Unix epoch-based timestamp to every event
reported to the AMI. The default is no. |
brokeneventsaction | no | Restores previously broken behavior for the Events AMI action, where a response
would not be sent in some circumstances. This option is there
for the sake of backward-compatibility for applications that
worked around a bug and should not be used unless absolutely
necessary. The default is no. |
channelvars | VAR1,VAR2,VAR3[,VAR4[...]] | Specifies a list of channel variables to include with all manager events that are channel-oriented. The default is to include no channel variables. |
debug | no | Enables some additional debugging in the AMI code. This
is primarily there for developers of the Asterisk C code. The
default is no. |
httptimeout | 60 | Sets the HTTP timeout, in seconds. This timeout affects
users of the AMI over HTTP: it sets the Max-Age of the HTTP cookie, sets how
long events are cached to allow retrieval of the events over
HTTP using the WaitEvents
action, and the amount of time that the HTTP server keeps a
session alive after completing an AMI action. The default is
60 seconds. |
[a] To access the AMI over HTTP, the built-in HTTP server must also be configured in /etc/asterisk/http.conf. [b] The OpenSSL development package must be installed for Asterisk to be able to use encryption. On Ubuntu, the package is libssl-dev. On CentOS, the package is openssl-devel. | ||
The manager.conf configuration file also
contains the configuration of AMI user accounts. An account is created
by adding a section with the username inside square brackets. Within
each [
section there are options that can be set that will apply only to that
account. Table 20-2 lists the options available
in a username][
section.username]
Table 20-2. Options for [username] sections
| Option | Value/Example | Description |
|---|---|---|
secret | password | Sets the password used for authentication. This must be set. |
deny | 0.0.0.0/0.0.0.0 | Sets an IP address Access Control List (ACL) for addresses that should be denied the ability to authenticate as this user. By default this option is not set. |
permit | 192.168.1.0/255.255.255.0 | Sets an IP address ACL for addresses that should be
allowed to authenticate as this user. As with deny, by default this option is not
set. Without these options set, any IP address that can reach
the AMI will be allowed to authenticate as this user. |
writetimeout | 100 | Sets the timeout used by Asterisk when writing data to
the AMI connection for this user. This option is specified in
milliseconds. The default value is 100. |
displayconnects | yes | Also available in the [general] section (refer to Table 20-1), but can be controlled on
a per-user basis. |
read | system,call[,...] | Defines which manager events this user will receive. By
default, the user will receive no events. Table 20-3 covers the available permission
types for the read and
write options. |
write | system,call[,...] | Defines which manager actions this user is allowed to
execute. By default, the user will not be able to execute any
actions. Table 20-3 covers the
available permission types for the read and write options. |
eventfilter | !Channel: DAHDI* | Used to provide a whitelist- or blacklist-style filtering of manager events before they are delivered to the AMI client application. Filters are specified using a regular expression. A specified filter is a whitelist filter unless preceded by an exclamation point.[a] |
[a] If no filters are specified, all
events that are allowed based on the | ||
As discussed in Table 20-2, the read
and write options set which manager
actions and manager events a particular user has access to. Table 20-3 shows the available permission values
that can be specified for these options.
Table 20-3. Available values for AMI user account read/write options
| Permission identifier | read | write |
|---|---|---|
all | Shorthand way of specifying that this user should have access to all available privilege options. | Grants user all privilege options. |
system | Allows user to receive general system information, such as notifications of configuration reloads. | Allows user to perform system management commands such as Restart, Reload, or Shutdown. |
call | Allows user to receive events about channels on the system. | Allows user to set information on channels. |
log | Gives user access to logging information.[a] | read-only |
verbose | Gives user access to verbose logging information.[b] | read-only |
agent | Gives user access to events regarding the status
of agents from the app_queue and chan_agent modules. | Enables user to perform actions for managing and retrieving the status of queues and agents. |
user | Grants access to user-defined events, as well as events about Jabber/XMPP users. | Lets user perform the UserEvent manager action, which provides the
ability to request that Asterisk generate a user-defined
event.[c] |
config | write-only | Allows user to retrieve, update, and reload configuration files. |
command | write-only | Allows user to execute Asterisk CLI commands over the AMI. |
dtmf | Allows user to receive events generated as DTMF passes through the Asterisk core.[d] | read-only |
reporting | Gives user access to call-quality events, such as jitterbuffer statistics or RTCP reports. | Enables user to execute a range of actions to retrieve statistics and status information from across the system. |
cdr | Grants user access to CDR records reported by
the cdr_manager
module. | read-only |
dialplan | Allows user to receive events generated when variables are set or new extensions are created. | read-only |
originate | write-only | Allows user to execute the Originate action, which allows an
AMI client to request that Asterisk create a new
call. |
agi | Allows user to receive events generated when AGI commands are processed. | Enables user to perform actions for managing channels that are running AGI in its asynchronous mode. AGI is discussed in more detail in Chapter 21. |
cc | Allows user to receive events related to Call Completion Supplementary Services (CCSS). | read-only |
aoc | Lets user see Advice of Charge events generated as AOC events are received. | Allows user to execute the AOCMessage manager action, for
sending out AOC messages. |
[a] This level has been defined, but it is not currently used anywhere in Asterisk. [b] This level has been defined, but it is not currently used anywhere in Asterisk. [c] The [d] DTMF events will not be generated in a bridged call between two channels unless generic bridging in the Asterisk core is being used. For example, if the DTMF is being transmitted with the media stream and the media stream is flowing directly between the two endpoints, Asterisk will not be able to report the DTMF events. | ||
As we’ve seen, the Asterisk Manager Interface can be
accessed over HTTP as well as TCP. To make that work, a very simple
HTTP server is embedded in Asterisk. All of the options relevant to
the AMI go in the [general] section
of /etc/asterisk/http.conf.
Note
Enabling access to the AMI over HTTP
requires both /etc/asterisk/manager.conf and
/etc/asterisk/http.conf. The AMI must be
enabled in manager.conf, with
the enabled option set to
yes, and the manager.conf option webenabled must be set to yes to allow access over HTTP. Finally,
the enabled option in http.conf must be set to yes to turn on the HTTP server
itself.
The available options are listed in Table 20-4:
Table 20-4. Options in the http.conf [general] section
| Option | Value/Example | Description |
|---|---|---|
enabled | yes | Enables the built-in HTTP server. The default is
no. |
bindport | 8088 | Sets the port number to listen on for HTTP connections.
The default is 8088. |
bindaddr | 127.0.0.1 | Sets the address to listen on for HTTP connections. The
default is to listen on all addresses (0.0.0.0). However, it is highly
recommended to set this to 127.0.0.1. |
tlsenable | yes | Enables listening for HTTPS connections. The default is
no. It is highly
recommended that you only use HTTPS if you wish to expose HTTP
connectivity outside of the local machine.[a] |
tlsbindport | 8089 | Sets the port to listen on for HTTPS connections. The
default is 8089. |
tlsbindaddr | 0.0.0.0 | Sets the address to listen on for TLS-enabled AMI
connections. The default is to listen on all addresses
(0.0.0.0). |
tlscertfile | /var/lib/asterisk/keys/asterisk.pem | Sets the path to the HTTPS server certificate. This is
required if tlsenable is
set to yes. |
tlsprivatekey | /var/lib/asterisk/keys/private.pem | Sets the path to the HTTPS private key. If this is not
specified, the tlscertfile
will be checked to see if it also contains the private
key. |
tlscipher | <cipher
string> | Specifies a list of ciphers for OpenSSL to use. Setting this is optional. To see a list of available ciphers, run openssl ciphers -v at the command line. |
[a] The OpenSSL development package must be installed for Asterisk to be able to use encryption. On Ubuntu, the package is libssl-dev. On CentOS, the package is openssl-devel. | ||
There are two main types of messages on the Asterisk Manager Interface: manager events and manager actions.
Manager events are one-way messages sent from Asterisk to AMI clients to report something that has occurred on the system. See Figure 20-1 for a graphical representation of the transmission of manager events.

Manager actions are requests from a client that have associated responses that come back from Asterisk. That is, a manager action may be a request that Asterisk perform some action and return the result. For example, there is an AMI action to originate a new call. See Figure 20-2 for a graphical representation of a client sending manager actions and receiving responses.

Other manager actions are requests for data that Asterisk knows about. For example, there is a manager action to get a list of all active channels on the system: the details about each channel are delivered as a manager event. When the list of results is complete, a final message will be sent to indicate that the end has been reached. See Figure 20-3 for a graphical representation of a client sending this type of manager action and receiving a list of responses.

All AMI messages, including manager events, manager actions, and manager action responses, are encoded in the same way. The messages are text-based, with lines terminated by a carriage return and a line-feed character. A message is terminated by a blank line:
Header1: This is the first header<CR><LF>
Header2: This is the second header<CR><LF>
Header3: This is the last header of this message<CR><LF>
<CR><LF>
Manager events always have an Event header and a Privilege header. The Event header gives the name of the event,
while the Privilege header lists
the privilege levels associated with the event. Any other headers
included with the event are specific to the event type. Here’s an
example:
Event: Hangup
Privilege: call,all
Channel: SIP/0004F2060EB4-00000000
Uniqueid: 1283174108.0
CallerIDNum: 2565551212
CallerIDName: Russell Bryant
Cause: 16
Cause-txt: Normal ClearingWhen executing a manager action, it
must include the Action header. The Action header identifies which manager
action is being executed. The rest of the headers are arguments to
the manager action. Some headers are required.
Tip
To get a list of the headers associated with a particular manager action, type manager show command <Action> at the Asterisk command line. To get a full list of manager actions supported by the version of Asterisk you are running, enter manager show commands at the Asterisk CLI.
The final response to a manager action is
typically a message that includes the Response header. The value of the Response header will be Success if the manager action was
successfully executed. If the manager action was not successfully
executed, the value of the Response header will be Error. For example:
Action: Login Username: russell Secret: russellResponse: Success Message: Authentication accepted
In addition to the native TCP interface, it is also possible to access the Asterisk Manager Interface over HTTP. Programmers with previous experience writing applications that use web APIs will likely prefer this over the native TCP connectivity.
There are two methods of performing authentication
against the AMI over HTTP. The first is to use the Login action, similar to authentication
with the native TCP interface. This is the method that was used in
the quick-start example, as seen in AMI over HTTP. The second authentication option
is HTTP digest authentication.[166] The next three sections discuss each of the AMI over
HTTP encoding options. To indicate that HTTP digest authentication
should be used, prefix the encoding type with an a.
Once successfully authenticated,
Asterisk will provide a
cookie that identifies the authenticated session. Here is an example
response to the Login action that
includes a session cookie from Asterisk:
$ curl -v "http://localhost:8088/rawman?action=login&username=hello&secret=world"

* About to connect() to localhost port 8088 (#0)
*   Trying 127.0.0.1... connected
* Connected to localhost (127.0.0.1) port 8088 (#0)
> GET /rawman?action=login&username=hello&secret=worlda HTTP/1.1
> User-Agent: curl/7.19.7 (x86_64-pc-linux-gnu) libcurl/7.19.7
OpenSSL/0.9.8k zlib/1.2.3.3 libidn/1.15
> Host: localhost:8088
> Accept: */*
>
< HTTP/1.1 200 OK
< Server: Asterisk/1.8.0-beta4
< Date: Tue, 07 Sep 2010 11:51:28 GMT
< Connection: close
< Cache-Control: no-cache, no-store
< Content-Length: 55
< Content-type: text/plain
< Cache-Control: no-cache;
< Set-Cookie: mansession_id="0e929e60"; Version=1; Max-Age=60
< Pragma: SuppressEvents
<

Response: Success
Message: Authentication accepted
* Closing connection #0
The rawman encoding
type is what has been used in all the AMI over HTTP examples in this
chapter so far. The responses received from requests using rawman are formatted in the exact same way
that they would be if the requests were sent over a direct TCP
connection to the AMI.
The manager
encoding type provides a response in simple HTML form. This
interface is primarily useful for experimenting with the AMI. Here
is an example Login using this
encoding type:
$ curl -v "http://localhost:8088/manager?action=login&username=hello&secret=world"
* About to connect() to localhost port 8088 (#0)
* Trying 127.0.0.1... connected
* Connected to localhost (127.0.0.1) port 8088 (#0)
> GET /manager?action=login&username=hello&secret=world HTTP/1.1
> User-Agent: curl/7.19.7 (x86_64-pc-linux-gnu) libcurl/7.19.7
OpenSSL/0.9.8k zlib/1.2.3.3 libidn/1.15
> Host: localhost:8088
> Accept: */*
>
< HTTP/1.1 200 OK
< Server: Asterisk/1.8.0-beta4
< Date: Tue, 07 Sep 2010 12:19:05 GMT
< Connection: close
< Cache-Control: no-cache, no-store
< Content-Length: 881
< Content-type: text/html
< Cache-Control: no-cache;
< Set-Cookie: mansession_id="139deda7"; Version=1; Max-Age=60
< Pragma: SuppressEvents
<
<title>Asterisk™ Manager Interface</title><body bgcolor="#ffffff">
<table align=center bgcolor="#f1f1f1" width="500">
<tr><td colspan="2" bgcolor="#f1f1ff"><h1>Manager Tester</h1></td></tr>
<tr><td colspan="2" bgcolor="#f1f1ff"><form action="manager" method="post">
Action: <select name="action">
<option value="">-----></option>
<option value="login">login</option>
<option value="command">Command</option>
<option value="waitevent">waitevent</option>
<option value="listcommands">listcommands</option>
</select>
or <input name="action"><br/>
CLI Command <input name="command"><br>
user <input name="username"> pass <input type="password" name="secret"><br>
<input type="submit">
</form>
</td></tr>
<tr><td>Response</td><td>Success</td></tr>
<tr><td>Message</td><td>Authentication accepted</td></tr>
<tr><td colspan="2"><hr></td></tr>
* Closing connection #0
</table></bodyThe mxml encoding
type provides responses to manager actions encoded in XML. Here is
an example Login using the
mxml encoding type:
$ curl -v "http://localhost:8088/mxml?action=login&username=hello&secret=world"

* About to connect() to localhost port 8088 (#0)
*   Trying 127.0.0.1... connected
* Connected to localhost (127.0.0.1) port 8088 (#0)
> GET /mxml?action=login&username=hello&secret=world HTTP/1.1
> User-Agent: curl/7.19.7 (x86_64-pc-linux-gnu) libcurl/7.19.7
OpenSSL/0.9.8k zlib/1.2.3.3 libidn/1.15
> Host: localhost:8088
> Accept: */*
>
< HTTP/1.1 200 OK
< Server: Asterisk/1.8.0-beta4
< Date: Tue, 07 Sep 2010 12:26:58 GMT
< Connection: close
< Cache-Control: no-cache, no-store
< Content-Length: 146
< Content-type: text/xml
< Cache-Control: no-cache;
< Set-Cookie: mansession_id="536d17a4"; Version=1; Max-Age=60
< Pragma: SuppressEvents
<

<ajax-response>
<response type='object' id='unknown'>
<generic response='Success' message='Authentication accepted' />
</response>
* Closing connection #0
</ajax-response>When connected to the native TCP interface for the
AMI, manager events are delivered asynchronously. When using the AMI
over HTTP, events must be retrieved by polling for them. Events are
retrieved over HTTP by executing the WaitEvent manager action. The following
example shows how events can be retrieved using the WaitEvent manager action. The steps
are:
The interaction looks like this:
$wget --save-cookies cookies.txt>"http://localhost:8088/mxml?action=login&username=hello&secret=world" -O -<ajax-response> <response type='object' id='unknown'> <generic response='Success' message='Authentication accepted' /> </response> </ajax-response> $wget --load-cookies cookies.txt "http://localhost:8088/mxml?action=waitevent" -O -<ajax-response> <response type='object' id='unknown'> <generic response='Success' message='Waiting for Event completed.' /> </response> <response type='object' id='unknown'> <generic event='PeerStatus' privilege='system,all' channeltype='SIP' peer='SIP/0000FFFF0004' peerstatus='Registered' address='172.16.0.160:5060' /> </response> <response type='object' id='unknown'> <generic event='WaitEventComplete' /> </response> </ajax-response>
Many application developers write code that directly interfaces with the AMI. However, there are a number of existing libraries that aim to make writing AMI applications easier. Table 20-5 lists a few that we know are being used successfully. If you search around for Asterisk libraries in any other popular programming language of your choice, you are likely to find one that exists.
Table 20-5. AMI development frameworks
| Framework | Language | URL |
|---|---|---|
| Adhearsion | Ruby | http://adhearsion.com/ |
| StarPy | Python | http://starpy.sourceforge.net/ |
| Asterisk-Java | Java | http://asterisk-java.org/ |
Computer-Supported Telecommunications Applications (CSTA) is a standard for Computer Telephony Integration (CTI). One of the biggest benefits of CSTA is that it is used by multiple manufacturers. Some of what is provided by CSTA can be mapped to operations available in the AMI. There have been multiple efforts to provide a CSTA interface to Asterisk. One of these efforts is the Open CSTA project. While none of the authors have experience with this CSTA interface to Asterisk, it is certainly worth considering if you have CSTA experience or an existing CSTA application you would like to integrate with Asterisk.
Many useful applications have been developed that take advantage of the AMI. Here are a couple of examples.
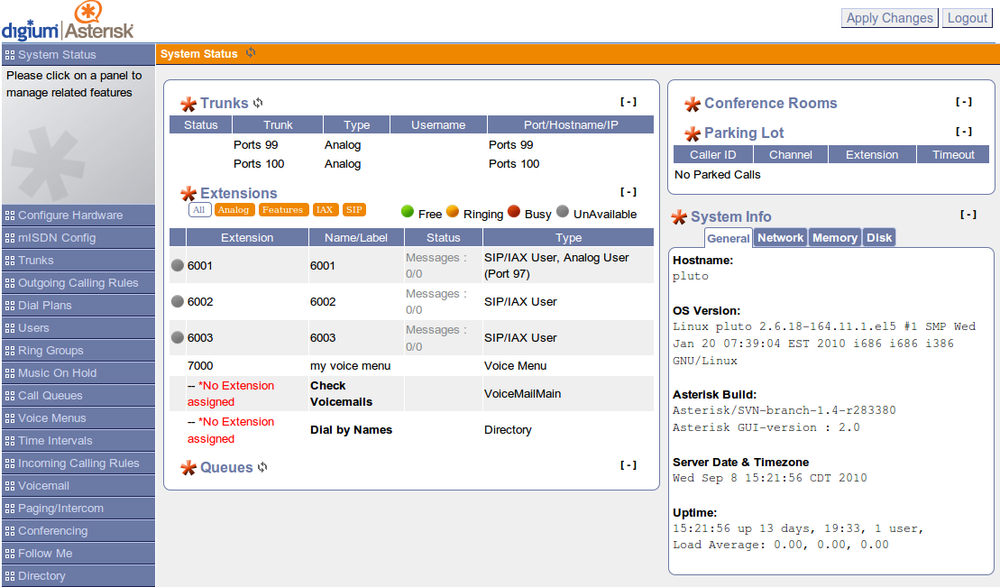
The AsteriskGUI is an open source PBX administration interface developed by Digium. It is intended for use on small installations. The AsteriskGUI is written entirely in HTML and JavaScript and uses the AMI over HTTP for all interaction with Asterisk. It has been especially popular for use in resource-constrained embedded Asterisk environments, since it does not require additional software to run on the Asterisk server. Figure 20-4 shows a page from the AsteriskGUI.
The AsteriskGUI can be obtained from the Digium subversion server:
$svn co http://svn.digium.com/svn/asterisk-gui/branches/2.0
It is also bundled as an option with the AsteriskNOW distribution.
Flash Operator Panel is an application that runs in a web browser using Flash. It is primarily used as an interface to see which extensions are currently ringing or in use. It also includes the ability to monitor conference room and call queue status. Some call actions can be performed as well, such as barging into a call and transferring calls. Figure 20-5 shows a screenshot of the Flash Operator Panel interface.
Downloads and more detailed information on Flash Operator Panel can be found at http://www.asternic.org.

The Asterisk Manager Interface provides an API for monitoring events from an Asterisk system, as well as requesting that Asterisk perform a wide range of actions. An HTTP interface has been provided and a number of frameworks have been developed that make it easier to develop applications. All of this information, as well as the examples we looked at at the end of this chapter, should help get you thinking about what new applications you might be able to build using the Asterisk Manager Interface.
[166] At the time of writing, there is a problem with HTTP digest authentication that prevents it from working properly. Issue 18598 in the Asterisk project issue tracker has been opened for this problem. Hopefully it will be fixed by the time you read this.