
Asterisk comes with several subsystems that allow you to obtain detailed information about the workings of your system. Whether for troubleshooting or for tracking usage for billing or staffing purposes, Asterisk’s various monitoring modules can help you keep tabs on the inner workings of your system.
When troubleshooting issues in your Asterisk system, you will find it very helpful to refer to some sort of historical record of what was going on in the system at the time the reported issue occurred. The parameters for the storing of this information are defined in /etc/asterisk/logger.conf.
Ideally, one might want the system to store a record of each and every thing it does. However, there is a cost to doing this. On a busy system, with full debug logging enabled, it is possible to completely fill the hard drive with logged data within a day or so. It is therefore necessary to achieve a balance between detail and storage requirements.
The /etc/asterisk/logger.conf file allows you to define all sorts of different levels of logging, to multiple files if desired. This flexibility is excellent, but it can also be confusing.
The format of an entry in the logger.conf file is as follows:
filename=>type[,type[,type[,...]]]
There is a sample logger.conf file that comes with the Asterisk source, but rather than just copying over the sample file, we recommend that you use the following for your initial logger.conf file:
[general]

[logfiles]
console => notice,warning,error,dtmf
messages => notice,warning,error
;verbose => notice,warning,error,verbose
When you have saved the file, you will need to reload the logger by issuing the following command from the shell:
$ asterisk -rx 'logger reload'*CLI> logger reloadYou can specify any filename you want, but the special filename console will in fact print the output to the Asterisk CLI, and not to any file on the hard drive. All other filenames will be stored in the filesystem in the directory /var/log/asterisk. The logger.conf types are outlined in Table 24-1.
Table 24-1. logger.conf types
| Type | Description |
|---|---|
notice | You will see a lot of these during a reload, but they will also happen during normal call flow. A notice is simply any event that Asterisk wishes to inform you of. |
warning | A warning represents a problem that could be severe enough to affect a call (including disconnecting a call because call flow cannot continue). Warnings need to be addressed. |
error | Errors represent significant problems in the system that must be addressed immediately. |
debug | Debugging is only useful if you are
troubleshooting a problem with the Asterisk code itself. You
would not use debug to
troubleshoot your dialplan, but you would use it if the Asterisk
developers asked you to provide logs for a problem you were
reporting. Do not use debug
in production, as the amount of detail stored can fill up a hard
drive in a matter of days.[a] |
verbose | This is one of the most useful of the logging types, but it is also one of the more risky to leave unattended, due to the possibility of the output filling your hard drive.[b] |
dtmf | Logging DTMF can be helpful if you are getting complaints that calls are not routing from the auto attendant correctly. |
fax | This type of logging causes fax-related messages
from the fax technology backend (res_fax_spandsp or res_fax_digium) to be logged to the
fax logger. |
* | This will log EVERYTHING (and we mean everything). Do not use this unless you understand the implications of storing this amount of data. It will not end well. |
[a] This is not theory. It has happened to us. It was not fun. [b] It’s not as risky as | |
Warning
There is a peculiarity in Asterisk’s
logging system that will cause you some consternation if you are
unaware of it. The level of logging for the verbose and debug logging types is tied to the verbosity
as set in the console. What this
means is that if you are logging to a file with the verbose or debug type, and somebody logs into the CLI
and issues the command core set verbose
0, or core set debug
0, the logging of those details to your log file will
stop.
Searching through log files can be a challenge. The trick is to be able to filter what you are seeing so that you are only presented with information that is relevant to what you are searching for.
To start with, you are going to need to have an approximate idea of the time when the trouble you are looking for occurred. Once you are oriented to the approximate time, you will need to find clues that will help you to identify the call in question. Obviously, the more information you have about the call, the faster you will be able to pin it down.
If, for example, you are doing verbose logging, you should note that each distinct call has a thread identifier, which, when used with grep, can often help you to filter out everything that does not relate to the call you are trying to debug. For example, in the following verbose log, we have more than one call in the log, and since the calls are happening at the same time, it can be very confusing to trace one call:
$ tail -1000 verbose
[Mar 11 09:38:35] VERBOSE[31362] logger.c:     -- IAX2/shifteight-4 answered Zap/1-1
[Mar 11 09:39:35] VERBOSE[2973] logger.c:     -- Starting simple switch on 'Zap/1-1'
[Mar 11 09:39:35] VERBOSE[31362] logger.c:   == Spawn extension (shifteight, s, 1)
exited non-zero on 'Zap/1-1'
[Mar 11 09:39:35] VERBOSE[2973] logger.c:     -- Hungup 'Zap/1-1'
[Mar 11 09:39:35] VERBOSE[3680] logger.c:     -- Starting simple switch on 'Zap/1-1'
[Mar 11 09:39:35] VERBOSE[31362] logger.c:     -- Hungup 'Zap/1-1'
To filter on one call specifically, we could grep on the thread ID. For example:
$ grep 31362 verbose[Mar 11 09:38:35] VERBOSE[31362] logger.c: -- IAX2/shifteight-4 answered Zap/1-1 [Mar 11 09:39:35] VERBOSE[31362] logger.c: == Spawn extension (shifteight, s, 1) exited non-zero on 'Zap/1-1' [Mar 11 09:39:35] VERBOSE[31362] logger.c: -- Hungup 'Zap/1-1'
This method does not guarantee that you will see everything relating to one call, since a call could in theory spawn additional threads, but for basic dialplan debugging we find this approach to be very useful.
Linux contains a very powerful logging engine, which Asterisk is capable of taking advantage of. While a discussion of all the various flavors of syslog and all the possible ways to handle Asterisk logging would be beyond the scope of this book, suffice it to say that if you want to have Asterisk send logs to the syslog daemon, you simply need to specify the following in your /etc/asterisk/logger.conf file:
syslog.local0 => notice,warning,error ; or whatever type(s) you want to log
You
will need to have a designation in your syslog
configuration file[170] named local0, which
should look something like:
local0.* /var/log/asterisk/syslog
Note
You can use local0 through local7 for this, but check your syslog.conf file to ensure that nothing
else is using one of those syslog
channels.
syslog[171] will allow much more powerful logging, but it will also require more knowledge than simply allowing Asterisk to log to files.
You can view the status of all your logger.conf settings through the Asterisk CLI by issuing the command:
*CLI> logger show channelsYou should see output similar to:
Channel                     Type     Status  Configuration
-------                     ----     ------  -------------
syslog.local0               Syslog   Enabled  - NOTICE WARNING ERROR VERBOSE
/var/log/asterisk/verbose   File     Enabled  - NOTICE WARNING ERROR VERBOSE
/var/log/asterisk/messages  File     Enabled  - NOTICE WARNING ERROR
                            Console  Enabled  - NOTICE WARNING ERROR DTMF
The CDR system in Asterisk is used to log the history of calls in the system. In some deployments, these records are used for billing purposes. In others, call records are used for analyzing call volumes over time. They can also be used as a debugging tool by Asterisk administrators.
A CDR has a number of fields that are included by default. Table 24-2 lists them.
Table 24-2. Default CDR fields
| Option | Value/Example | Notes |
|---|---|---|
accountcode | 12345 | An account ID. This field is user-defined and is empty by default. |
src | 12565551212 | The calling party’s caller ID number. It is set automatically and is read-only. |
dst | 102 | The destination extension for the call. This field is set automatically and is read-only. |
dcontext | PublicExtensions | The destination context for the call. This field is set automatically and is read-only. |
clid | "Big Bird" <12565551212> | The full caller ID, including the name, of the calling party. This field is set automatically and is read-only. |
channel | SIP/0004F2040808-a1bc23ef | The calling party’s channel. This field is set automatically and is read-only. |
dstchannel | SIP/0004F2046969-9786b0b0 | The called party’s channel. This field is set automatically and is read-only. |
lastapp | Dial | The last dialplan application that was executed. This field is set automatically and is read-only. |
lastdata | SIP/0004F2046969,30,tT | The arguments passed to the lastapp. This field is set
automatically and is read-only. |
start | 2010-10-26 12:00:00 | The start time of the call. This field is set automatically and is read-only. |
answer | 2010-10-26 12:00:15 | The answered time of the call. This field is set automatically and is read-only. |
end | 2010-10-26 12:03:15 | The end time of the call. This field is set automatically and is read-only. |
duration | 195 | The number of seconds between the start and end times for the call. This field
is set automatically and is read-only. |
billsec | 180 | The number of seconds between the answer and end times for the call. This field
is set automatically and is read-only. |
disposition | ANSWERED | An indication of what happened to the call. This may be
NO ANSWER, FAILED, BUSY, ANSWERED, or UNKNOWN. |
amaflags | DOCUMENTATION | The Automatic Message Accounting (AMA) flag associated
with this call. This may be one of the following: OMIT, BILLING, DOCUMENTATION, or Unknown. |
userfield | PerMinuteCharge:0.02 | A general-purpose user field. This field is empty by default and can be set to a user-defined string.[a] |
uniqueid | 1288112400.1 | The unique ID for the src channel. This field is set
automatically and is read-only. |
[a] The | ||
All fields of the CDR record can be
accessed in the Asterisk dialplan by using the CDR() function. The CDR() function is also used to set the
fields of the CDR that are user-defined.
exten => 115,1,Verbose(Call start time: ${CDR(start)})
   same => n,Set(CDR(userfield)=zombie pancakes)
In addition to the fields that are
always included in a CDR, it is possible to add custom fields. This is
done in the dialplan by using the Set() application with the CDR() function:
exten => 115,1,NoOp()
   same => n,Set(CDR(mycustomfield)=coffee)
   same => n,Verbose(I need some more ${CDR(mycustomfield)})
Note
If you choose to use custom CDR variables, make sure that the CDR backend that you choose is capable of logging them.
To view the built-in documentation for
the CDR() function, run the
following command at the Asterisk console:
*CLI>core show function CDR
In addition to the CDR() function, there are some dialplan
applications that may be used to influence CDR records. We’ll look at
these next.
There are a few dialplan applications that can be used to influence CDRs for the current call. To get a list of the CDR applications that are loaded into the current version of Asterisk, we can use the following CLI command:
*CLI> core show applications like CDR
    -= Matching Asterisk Applications =-
               ForkCDR: Forks the Call Data Record.
                 NoCDR: Tell Asterisk to not maintain a CDR for the current call
              ResetCDR: Resets the Call Data Record.
    -= 3 Applications Matching =-
Each application has documentation built into the Asterisk application, which can be viewed using the following command:
*CLI>core show application<application name>
The cdr.conf file
has a [general] section that
contains options that apply to the entire CDR system. Additional
optional sections may exist in this file that apply to specific CDR
logging backend modules. Table 24-3 lists
the options available in the [general] section.
Table 24-3. cdr.conf [general] section
| Option | Value/Example | Notes |
|---|---|---|
enable | yes | Enable CDR logging. The default is yes. |
unanswered | no | Log unanswered calls. Normally, only answered calls
result in a CDR. Logging all call attempts can result in a
large number of extra call records that most people do not
care about. The default value is no. |
endbeforehexten | no | Close out CDRs before running the h extension in the Asterisk
dialplan. Normally CDRs are not closed until the dialplan is
completely finished running. The default value is no. |
initiatedseconds | no | When calculating the billsec field, always round up. For
example, if the difference between when the call was answered
and when the call ended is 1 second and 1 microsecond, billsec will be set to 2 seconds.
This helps ensure that Asterisk’s CDRs match the behavior used
by telcos. The default value is no. |
batch | no | Queue up CDRs to be logged in batches instead of
logging synchronously at the end of every call. This prevents
CDR logging from blocking the completion of the call teardown
process within Asterisk. The default value is no, but we recommend turning it
on.[a] |
size | 100 | Set the number of CDRs to queue up before they are
logged during batch mode. The default value is 100. |
time | 300 | Set the maximum number of seconds that CDRs will wait
in the batch queue before being logged. The CDR batch logging
process will run at the end of this time period, even if
size has not been reached.
The default value is 300
seconds. |
scheduleronly | no | Set whether CDR batch processing should be done by
spawning a new thread, or within the context of the CDR batch
scheduler. The default value is no, and we recommend not changing
it. |
safeshutdown | yes | Block Asterisk shutdown to ensure that all queued CDR
records are logged. The default is yes, and we recommend leaving it
that way, as this option prevents important data loss. |
[a] The disadvantage of enabling this option is that if
Asterisk were to crash or die for some reason, the CDR
records would be lost, as they are only stored in memory
while the Asterisk process exists. See | ||
Asterisk CDR backend modules provide a way to log CDRs. Most CDR backends require specific configuration to get them going.
As the name suggests, the cdr_adaptive_odbc module allows CDRs to be
stored in a database through ODBC. The “adaptive” part of the name
refers to the fact that it works to adapt to the table structure:
there is no static table structure that must be used with this
module. When the module is loaded (or reloaded), it reads the table
structure. When logging CDRs, it looks for a CDR variable that
matches each column name. This applies to both the built-in CDR
variables and custom variables. If you want to log the built-in
channel CDR variable, just create
a column called channel.
Adding custom CDR content is as
simple as setting it in the dialplan. For example, if we wanted to
log the User-Agent that is
provided by a SIP device, we could add that as a custom CDR
variable:
exten => 105,n,Set(CDR(useragent)=${CHANNEL(useragent)})To have this custom CDR variable
inserted into the database by cdr_adaptive_odbc, all we have to do is
create a column called useragent.
Multiple tables may be configured in
the cdr_adaptive_odbc
configuration file. Each goes into its own configuration section.
The name of the section can be anything; the module does not use it.
Here is an example of a simple table configuration:
[mytable]

connection = asterisk
table = asterisk_cdr
A more detailed example of setting up a database for logging CDRs can be found in Storing Call Detail Records (CDRs).
Table 24-4 lists the options that can be specified in a table configuration section in the cdr_adaptive_odbc.conf file.
Table 24-4. cdr_adaptive_odbc.conf table configuration options
| Option | Value/Example | Notes |
|---|---|---|
connection | pgsql1 | The database connection to be used. This is a reference to the configured connection in res_odbc.conf. This field is required. |
table | asterisk_cdr | The table name. This field is required. |
usegmtime | no | Indicates whether to log timestamps using GMT instead
of local time. The default value for this option is no. |
In addition to the key/value pair
fields that are shown in the previous table, cdr_adaptive_odbc.conf allows for a few
other configuration items. The first is a column alias. Normally,
CDR variables are logged to columns of the same name. An alias allows the variable name to be
mapped to a column with a different name. The syntax is:
alias<CDR variable>=><column name>
Here is an example column mapping
using the alias option:
alias src => source
It is also possible to specify a content filter. This allows you to specify criteria that must match for records to be inserted into the table. The syntax is:
filter<CDR variable>=><content>
Here is an example content filter:
filter accountcode => 123
Finally, cdr_adaptive_odbc.conf allows static
content for a column to be defined. This can be useful when used
along with a set of filters. This
static content can help differentiate records that were inserted
into the same table by different configuration sections. The syntax
for static content is:
static<"Static Content Goes Here">=><column name>
Here is an example of specifying static content to be inserted with CDRs:
static "My Content" => my_identifier
The cdr_csv module
is a very simple CDR backend that logs CDRs into a CSV (comma
separated values) file. The file is /var/log/asterisk/cdr-csv/Master.csv. As
long as CDR logging is enabled in cdr.conf and this module has been loaded,
CDRs will be logged to the Master.csv file.
While no options are required to get
this module working, there are some options that customize its
behavior. These options, listed in Table 24-5, are placed in the [csv] section of cdr.conf.
Table 24-5. cdr.conf [csv] section options
The order of CDR variables in CSV
files created by the cdr_csv
module is:
<accountcode>,<src>,<dst>,<dcontext>,<clid>,<channel>,<dstchannel>,<lastapp>,
    <lastadata>,<start>,<answer>,<end>,<duration>,<billsec>,<disposition>,
    <amaflags>[,<uniqueid>][,<userfield>]
This CDR backend allows for custom formatting of CDR
records in a log file. This module is most commonly used for
customized CSV output. The configuration file used for this module
is /etc/asterisk/cdr_custom.conf. A single
section called [mappings] should exist in this file.
The [mappings] section contains
mappings between a filename and the custom template for a CDR. The
template is specified using Asterisk dialplan functions.
The following example shows a sample
configuration for cdr_custom that
enables a single CDR log file, Master.csv. This file will be created as
/var/log/asterisk/cdr-custom/Master.csv.
The template that has been defined uses both the CDR() and CSV_QUOTE() dialplan functions. The CDR()
function retrieves values from the CDR being logged. The CSV_QUOTE() function ensures that the
values are properly escaped for the CSV file format:
[mappings]

Master.csv => ${CSV_QUOTE(${CDR(clid)})},${CSV_QUOTE(${CDR(src)})},
   ${CSV_QUOTE(${CDR(dst)})},${CSV_QUOTE(${CDR(dcontext)})},
   ${CSV_QUOTE(${CDR(channel)})},${CSV_QUOTE(${CDR(dstchannel)})},
   ${CSV_QUOTE(${CDR(lastapp)})},${CSV_QUOTE(${CDR(lastdata)})},
   ${CSV_QUOTE(${CDR(start)})},${CSV_QUOTE(${CDR(answer)})},
   ${CSV_QUOTE(${CDR(end)})},${CSV_QUOTE(${CDR(duration)})},
   ${CSV_QUOTE(${CDR(billsec)})},${CSV_QUOTE(${CDR(disposition)})},
   ${CSV_QUOTE(${CDR(amaflags)})},${CSV_QUOTE(${CDR(accountcode)})},
${CSV_QUOTE(${CDR(uniqueid)})},${CSV_QUOTE(${CDR(userfield)})}The cdr_manager
backend emits CDRs as events on the Asterisk Manager Interface
(AMI), which we discussed in detail in Chapter 20. This module is configured in the
/etc/asterisk/cdr_manager.conf file.
The first section in this file is the [general] section, which contains a single
option to enable this module (the default value is no):
[general]

enabled = yes
The other section in cdr_manager.conf is the [mappings] section. This allows for adding
custom CDR variables to the manager event. The syntax is:
<CDR variable>=><Header name>
Here is an example of adding two custom CDR variables:
[mappings]

rate => Rate
carrier => Carrier
With this configuration in place, CDR records will appear as events on the manager interface. To generate an example manager event, we will use the following dialplan example:
exten => 110,1,Answer()
    same => n,Set(CDR(rate)=0.02)
    same => n,Set(CDR(carrier)=BS&S)
    same => n,Hangup()
This is the command used to execute this extension and generate a sample manager event:
*CLI>console dial 110@testing
Finally, this is an example manager event produced as a result of this test call:
Event: Cdr
Privilege: cdr,all
AccountCode:
Source:
Destination: 110
DestinationContext: testing
CallerID:
Channel: Console/dsp
DestinationChannel:
LastApplication: Hangup
LastData:
StartTime: 2010-08-23 08:27:21
AnswerTime: 2010-08-23 08:27:21
EndTime: 2010-08-23 08:27:21
Duration: 0
BillableSeconds: 0
Disposition: ANSWERED
AMAFlags: DOCUMENTATION
UniqueID: 1282570041.3
UserField:
Rate: 0.02
Carrier: BS&S
This module allows posting of CDRs to a MySQL
database. We recommend that new installations use cdr_adaptive_odbc instead.
This module enables the legacy ODBC interface for CDR
logging. New installations should use cdr_adaptive_odbc instead.
This module allows posting of CDRs to a PostgreSQL
database. We recommend that new installations use cdr_adaptive_odbc instead.
The cdr_radius
backend allows posting of CDRs to a RADIUS server. When using this
module, each CDR is reported to the RADIUS server as a single stop
event. This module is configured in the /etc/asterisk/cdr.conf file. Options for
this module are placed in a section called [radius]. The available options are listed
in Table 24-6.
Table 24-6. cdr.conf [radius] section options
This module allows posting of CDRs to a SQLite database using SQLite version 2. Unless you have a
specific need for SQLite
version 2 as opposed to version 3, we recommend that all new
installations use cdr_sqlite3_custom.
This module requires no configuration to work. If the module has been compiled and loaded into Asterisk, it will insert CDRs into a table called cdr in a database located at /var/log/asterisk/cdr.db.
This CDR backend inserts CDRs into a SQLite database using SQLite version 3. The database created by this module lives at /var/log/asterisk/master.db. This module requires a configuration file, /etc/asterisk/cdr_sqlite3_custom.conf. The configuration file identifies the table name, as well as customizes which CDR variables will be inserted into the database:
[master]

table = cdr

;
; List the column names to use when inserting CDRs.
;
columns => calldate, clid, dcontext, channel, dstchannel, lastapp, lastdata,
    duration, billsec, disposition, amaflags, accountcode, uniqueid, userfield,
    test


;
; Map CDR contents to the previously specified columns.
;
values => '${CDR(start)}','${CDR(clid)}','${CDR(dcontext)}','${CDR(channel)}',
    '${CDR(dstchannel)}','${CDR(lastapp)}','${CDR(lastdata)}','${CDR(duration)}',
    '${CDR(billsec)}','${CDR(disposition)}','${CDR(amaflags)}',
    '${CDR(accountcode)}','${CDR(uniqueid)}','${CDR(userfield)}','${CDR(test)}'
This module allows logging of CDRs using syslog. To enable this, first add an entry to the system’s syslog configuration file, /etc/syslog.conf. For example:
local4.* /var/log/asterisk/asterisk-cdr.log
The Asterisk module has a configuration file, as well. Add the following section to /etc/asterisk/cdr_syslog.conf:
[cdr]

facility = local4
priority = info
template = "We received a call from ${CDR(src)}"
Here is an example syslog entry using this configuration:
$ cat /var/log/asterisk/asterisk-cdr.log

Aug 12 19:17:36 pbx cdr: "We received a call from 2565551212"
We will use the cdr_custom module to illustrate some example
CDR records for different call scenarios. The configuration used for
/etc/asterisk/cdr_custom.conf is
shown in cdr_custom.
In this example, we’ll show what a CDR looks like for a simple one-party call. Specifically, we will use the example of a user calling in to check her voicemail. Here is the extension from /etc/asterisk/extensions.conf:
exten => *98,1,VoiceMailMain(@${GLOBAL(VOICEMAIL_CONTEXT)})This is the CDR from /var/log/asterisk/cdr-custom/Master.csv that was created as a result of calling this extension:
"""Console"" <2565551212>","2565551212","*98","UserServices","Console/dsp","",
    "VoiceMailMain","@shifteight.org","2010-08-16 01:08:44","2010-08-16 01:08:44",
    "2010-08-16 01:08:53","9","9","ANSWERED","DOCUMENTATION","","1281935324.0","",0
For this next example, we show what a CDR looks like for a simple two-party call. We’ll have one SIP phone place a call to another SIP phone. The call is answered and then hung up after a short period of time. Here is the extension that was dialed:
exten => 101,1,Dial(SIP/0000FFFF0002)
Here is the CDR that was logged to Master.csv as a result of this call:
"""Console"" <2565551212>","2565551212","101","LocalSets","Console/dsp",
    "SIP/0000FFFF0002-00000000","Dial","SIP/0000FFFF0002","2010-08-16 01:16:10",
    "2010-08-16 01:16:16","2010-08-16 01:16:29","19","13","ANSWERED",
    "DOCUMENTATION","","1281935770.2","",2
The CDR system in Asterisk works very well for fairly simple call scenarios. However, as call scenarios get more complicated, involving calls to multiple parties, transfers, parking, and other such features, the CDR system starts to fall short. Many users report that the records do not show all of the information that they expect. Many bug fixes have been made to address some of the issues, but the cost of regressions or changes in behavior when making changes in this area is very high since these records are used for billing.
As a result, the Asterisk development team has become increasingly resistant to making additional changes to the CDR system. Instead, a new system, channel event logging (CEL), has been developed that is intended to help address logging of more complex call scenarios. Bear in mind that call detail records are simpler and easier to consume, though, so we still recommend using CDRs if they suit your needs.
Channel event logging (CEL) is a new system that was created to provide a more flexible means of logging the details of complex call scenarios. Instead of collapsing a call down to a single log entry, a series of events are logged for the call. This provides a more accurate picture of what has happened to the call, at the expense of a more complex log.
Each CEL record represents an event that occurred for a channel in the Asterisk system. Table 24-7 lists the events that are generated by Asterisk as calls are processed.
Table 24-7. CEL event types
| CEL event type | Description |
|---|---|
CHAN_START | A channel has been created. |
CHAN_END | A channel has been destroyed. |
LINKEDID_END | The last channel with a given linkedid has been destroyed. |
ANSWER | A channel has been answered. On a channel created for an outbound call, this event will be generated when the remote end answers. |
HANGUP | A channel has hung up. Generally, this event
will be followed very shortly by a CHAN_END event. The difference is
that this event occurs as soon as a hangup request is
received, whereas CHAN_END
occurs after Asterisk has completed post-call cleanup and all
resources associated with that channel have been
released. |
APP_START | A tracked application has started executing on a channel. Tracked applications are set in the main CEL configuration file, which is covered in cel.conf. |
APP_END | A tracked application has stopped executing on a channel. |
PARK_START | A channel has been parked. |
PARK_END | A channel has left the parking lot. |
BRIDGE_START | A channel bridge has started. This event occurs
when two channels are bridged together by an application such
as Dial() or Queue(). |
BRIDGE_END | A channel bridge has ended. |
BRIDGE_UPDATE | An update to a bridge has occurred. This event will reflect if a channel’s name or other information has changed during a bridge. |
BLINDTRANSFER | A channel has executed a blind transfer. |
ATTENDEDTRANSFER | A channel has executed an attended transfer. |
USER_DEFINED | A user-defined channel event has occurred. These
events are generated by using the CELGenUserEvent()
application. |
There are some more events that have been defined, but are not yet used anywhere in the Asterisk code. Presumably, some future version will generate these events in the right place. They are listed in Table 24-8.[172]
Table 24-8. Defined but unused CEL event types
Each CEL event contains the fields listed in Table 24-9:
Table 24-9. CEL event fields
| Field name | Value/Example | Notes |
|---|---|---|
eventtype | CHAN_START | The name of the event. The list of events that may occur can be found in Table 24-7. |
eventtime | 2010-08-19 07:27:19 | The time that the event occurred. |
cidname | Julie Bryant | The caller ID name set on the channel associated with this event. |
cidnum | 18435551212 | The caller ID number set on the channel associated with this event. |
cidani | 18435551212 | The Automatic Number Identification (ANI) number set on the channel associated with this event. |
cidrdnis | 18435551234 | The redirecting number set on the channel associated with this event. |
ciddnid | 18435550987 | The dialed number set on the channel associated with this event. |
exten | 101 | The extension in the dialplan that is currently being executed. |
context | LocalSets | The context for the extension in the dialplan that is currently being executed. |
channame | SIP/0004F2060EB4-00000010 | The name of the channel associated with this event. |
appname | Dial | The name of the dialplan application currently being executed. |
appdata | SIP/0004F2060E55 | The arguments that were passed to the dialplan application that is currently being executed. |
amaflags | DOCUMENTATION | The Automatic Message Accounting (AMA) flag associated
with this call. This may be one of the following: OMIT, BILLING, DOCUMENTATION, or Unknown. |
accountcode | 1234 | An account ID. This field is user-defined and is empty by default. |
uniqueid | 1282218999.18 | The unique ID for the channel that is associated with this event. |
userfield | I like waffles! | User-defined event content. |
linkedid | 1282218999.18 | The per-call ID. This ID helps tie together multiple
events from multiple channels that are all a part of the same
logical call. The ID comes from the uniqueid of the first channel in the
call. |
peer | SIP/0004F2060E55-00000020 | The name of the channel bridged to the channel
identified by channame. |
Some of the contents of a CEL event are
user-defined. For example, the userfield is user-defined and will be empty
by default. To set it to something, use the CHANNEL() dialplan function. Here is an
example of setting the userfield
for a channel:
exten => 101,1,Set(CHANNEL(userfield)=I like waffles!)
The CEL system includes a single dialplan application
that lives in the app_celgenuserevent.so module. This
application is used to generate custom user-defined events of the type
EV_USER_EVENT. A practical example
of using this would be for logging a caller’s choices in a
menu:
exten => 7,1,CELGenUserEvent(MENU_CHOICE,Caller chose option 7)
For full current details on the syntax
of the CELGenUserEvent()
application, use the built-in documentation from the Asterisk CLI:
*CLI> core show application CELGenUserEventThe CEL system has a single configuration file,
/etc/asterisk/cel.conf. All
options set here affect CEL processing, regardless of which logging
backend modules are in use. Table 24-10 shows the options that exist
in this file. All options should be set in the [general] section of the configuration file.
Table 24-10. cel.conf [general] section options
As with the CDR system, there are a number of backend modules available for logging CEL events. In fact, all of the CEL backend modules were derived from CDR modules, so their configuration is very similar. In addition to the configuration options for cel.conf, which were described in the previous section, these modules require configuration to make them operate.
The cel_odbc.so module provides the ability to log CEL events to a database using ODBC. This module is not quite as adaptive as the CDR adaptive ODBC backend. For CEL events, there are no custom variables. However, this module will still adapt to the structure of the database, in that it will log the fields of CEL events for which there are corresponding columns and will not produce an error if there is not a column for every field. The configuration for this module goes in /etc/asterisk/cel_odbc.conf.
Multiple tables may be configured in
the cel_odbc configuration file.
Each goes into its own configuration section. The name of the
section can be anything; the module does not use it. Here is an
example of a simple table configuration:
[mytable]

connection = asterisk
table = asterisk_cel
The cel_odbc module will use the following
columns, if they exist (see the table following this list for a set
of mappings between event types and their integer value that will be
inserted into the database):
Table 24-11 shows the mapping between event
types and their integer values that will be inserted into the
eventtype column of the
database.
Table 24-11. Event type to integer value mappings for the eventtype column
| Event type | Integer value |
|---|---|
CHANNEL_START | 1 |
CHANNEL_END | 2 |
HANGUP | 3 |
ANSWER | 4 |
APP_START | 5 |
APP_END | 6 |
BRIDGE_START | 7 |
BRIDGE_END | 8 |
CONF_START | 9 |
CONF_END | 10 |
PARK_START | 11 |
PARK_END | 12 |
BLINDTRANSFER | 13 |
ATTENDEDTRANSFER | 14 |
TRANSFER | 15 |
HOOKFLASH | 16 |
3WAY_START | 17 |
3WAY_END | 18 |
CONF_ENTER | 19 |
CONF_EXIT | 20 |
USER_DEFINED | 21 |
LINKEDID_END | 22 |
BRIDGE_UPDATE | 23 |
PICKUP | 24 |
FORWARD | 25 |
Table 24-12 shows the options that can be specified in a table configuration section in the cel_odbc.conf file.
Table 24-12. cel_odbc.conf table configuration
In addition to the key/value pair
fields that are shown in the previous table, cel_odbc.conf allows for a few other
configuration items. The first is a column alias. Normally, CEL
fields are logged to columns of the same name. An alias allows the variable name to be
mapped to a column with a different name. The syntax is:
alias<CEL field>=><column name>
Here is an example column mapping
using the alias option:
alias exten => extension
It is also possible to specify a content filter. This allows you to specify criteria that must match for records to be inserted into the table. The syntax is:
filter<CEL field>=><content>
Here is an example content filter:
filter appname => Dial
Finally, cel_odbc.conf allows static content to be
specified for a column. This can be useful when used along with a
set of filters. This static
content can help differentiate records that were inserted into the
same table by different configuration sections. The syntax for
static content is:
static<"Static Content Goes Here">=><column name>
Here is an example of specifying static content to be inserted with a CEL event:
static "My Content" => my_identifier
This CEL backend allows for custom formatting of CEL
events in a log file. It is most commonly used for customized CSV
output. The configuration file used for this module is /etc/asterisk/cel_custom.conf. A single
section called [mappings] should
exist in this file. This section contains mappings between filenames
and the custom templates for CEL events. The templates are specified
using Asterisk dialplan functions and a few special CEL
variables.
The following example shows a sample
configuration for cel_custom that
enables a single CEL log file, Master.csv. This file will be created as
/var/log/asterisk/cel-custom/Master.csv.
The template that has been defined uses the CHANNEL(), CALLERID(), and CSV_QUOTE() dialplan functions. The
CSV_QUOTE() function ensures that
the values are properly escaped for the CSV file format. This
example also references some special CEL variables, which are listed
in Table 24-13.
Table 24-13. CEL variables available for use in [mappings]
Here is the example /etc/asterisk/cel_custom.conf file:
[mappings]

Master.csv => ${CSV_QUOTE(${eventtype})},${CSV_QUOTE(${eventtime})},
    ${CSV_QUOTE(${CALLERID(name)})},${CSV_QUOTE(${CALLERID(num)})},
    ${CSV_QUOTE(${CALLERID(ANI)})},${CSV_QUOTE(${CALLERID(RDNIS)})},
    ${CSV_QUOTE(${CALLERID(DNID)})},${CSV_QUOTE(${CHANNEL(exten)})},
    ${CSV_QUOTE(${CHANNEL(context)})},${CSV_QUOTE(${CHANNEL(channame)})},
    ${CSV_QUOTE(${CHANNEL(appname)})},${CSV_QUOTE(${CHANNEL(appdata)})},
    ${CSV_QUOTE(${CHANNEL(amaflags)})},${CSV_QUOTE(${CHANNEL(accountcode)})},
    ${CSV_QUOTE(${CHANNEL(uniqueid)})},${CSV_QUOTE(${CHANNEL(linkedid)})},
    ${CSV_QUOTE(${CHANNEL(peer)})},${CSV_QUOTE(${CHANNEL(userfield)})},
    ${CSV_QUOTE(${eventextra})}
The cel_manager
backend emits CEL events on the Asterisk Manager Interface (we
discussed the AMI in detail in Chapter 20). This module is configured in the /etc/asterisk/cel.conf file. This file
should contain a single section called [manager], which contains a single option
to enable this module. The default value is no, but you can enable it as
follows:
[manager]

enabled = yes
With this configuration in place, CEL events will appear as events on the manager interface. To generate example manager events, we will use the following dialplan example:
exten => 111,1,Answer()
    same => n,CELGenUserEvent(Custom Event,Whiskey Tango Foxtrot)
    same => n,Hangup()
This is the command used to execute this extension and generate sample CEL events:
*CLI>console dial 111@testing
Finally, this is one of the example manager events produced as a result of this test call:
Event: CEL
Privilege: call,all
EventName: CHAN_START
AccountCode:
CallerIDnum:
CallerIDname:
CallerIDani:
CallerIDrdnis:
CallerIDdnid:
Exten: 111
Context: testing
Channel: Console/dsp
Application:
AppData:
EventTime: 2010-08-23 08:14:51
AMAFlags: NONE
UniqueID: 1282569291.1
LinkedID: 1282569291.1
Userfield:
Peer:
This module allows posting of CEL events to a
PostgreSQL database. We recommend that new installations use
cel_odbc instead.
The cel_radius
backend allows posting of CEL events to a RADIUS server. When using
this module, each CEL event is reported to the RADIUS server as a
single stop event. This module is configured in the /etc/asterisk/cel.conf file. The options
for this module, listed in Table 24-14,
are placed in a section called [radius].
This CEL backend inserts CEL events into a SQLite database using SQLite version 3. The database created by this module lives at /var/log/asterisk/master.db. The configuration file for this module, /etc/asterisk/cel_sqlite3_custom.conf, identifies the table name, as well as customizes which CEL variables will be inserted into the database. It looks like this:
[master]

table = cel

;
; List the column names to use when inserting CEL events.
;
columns => eventtype, eventtime, cidname, cidnum, cidani, cidrdnis, ciddnid,
    context, exten, channame, appname, appdata, amaflags, accountcode, uniqueid,
    userfield, peer

;
; Map CEL event contents to the previously specified columns.
;
values => '${eventtype}','${eventtime}','${CALLERID(name)}','${CALLERID(num)}',
    '${CALLERID(ANI)}','${CALLERID(RDNIS)}','${CALLERID(DNID)}',
    '${CHANNEL(context)}','${CHANNEL(exten)}','${CHANNEL(channame)}',
    '${CHANNEL(appname)}','${CHANNEL(appdata)}','${CHANNEL(amaflags)}',
    '${CHANNEL(accountcode)}','${CHANNEL(uniqueid)}','${CHANNEL(userfield)}',
'${CHANNEL(peer)}'Now we will show you some example sets of call events
from the CEL system. The cel_custom
module will be used for its simplicity. The configuration used for
/etc/asterisk/cel_custom.conf is
the same as shown in cel_custom.
Additionally, the following configuration was used for /etc/asterisk/cel.conf:
[general]

enable = yes
apps = Dial,Playback
events = ALL
In this example, a single phone calls into an extension that plays back a prompt that says “Hello World.” This is the dialplan:
exten => 200,1,Answer()
    same => n,Playback(hello-world)
    same => n,Hangup()
Here are the CEL events that are logged as a result of making this call:
"CHAN_START","1282062437.436130","Julie Bryant","12565553333","","","","200",
   "LocalSets","SIP/0000FFFF0003-00000010","","","3","","1282062437.17",
   "1282062437.17","",""

"ANSWER","1282062437.436513","Julie Bryant","12565553333","12565553333","",
   "200","200","LocalSets","SIP/0000FFFF0003-00000010","Answer","","3","",
   "1282062437.17","1282062437.17","",""

"APP_START","1282062437.501868","Julie Bryant","12565553333","12565553333",
   "","200","200","LocalSets","SIP/0000FFFF0003-00000010","Playback",
   "hello-world","3","","1282062437.17","1282062437.17","",""

"APP_END","1282062439.008997","Julie Bryant","12565553333","12565553333","",
   "200","200","LocalSets","SIP/0000FFFF0003-00000010","Playback",
   "hello-world","3","","1282062437.17","1282062437.17","",""

"HANGUP","1282062439.009127","Julie Bryant","12565553333","12565553333","",
   "200","200","LocalSets","SIP/0000FFFF0003-00000010","","","3","",
   "1282062437.17","1282062437.17","",""

"CHAN_END","1282062439.009666","Julie Bryant","12565553333","12565553333",
   "","200","200","LocalSets","SIP/0000FFFF0003-00000010","","","3","",
   "1282062437.17","1282062437.17","",""

"LINKEDID_END","1282062439.009707","Julie Bryant","12565553333",
   "12565553333","","200","200","LocalSets","SIP/0000FFFF0003-00000010","",
   "","3","","1282062437.17","1282062437.17","",""
For the second example, one phone will call another
via extension 101. This results
in a call that has two channels that are bridged together. Here is
the extension that was called in the dialplan:
exten => 101,1,Dial(SIP/0000FFFF0001)
Here are the CEL events that are generated as a result of making this call:
"CHAN_START","1282062455.574611","Julie Bryant","12565553333","","","","101",
   "LocalSets","SIP/0000FFFF0003-00000011","","","3","","1282062455.18",
   "1282062455.18","",""

"APP_START","1282062455.574872","Julie Bryant","12565553333","12565553333","",
   "101","101","LocalSets","SIP/0000FFFF0003-00000011","Dial",
   "SIP/0000FFFF0001","3","","1282062455.18","1282062455.18","",""

"CHAN_START","1282062455.575044","Candice Yant","12565551111","","","","s",
   "LocalSets","SIP/0000FFFF0001-00000012","","","3","","1282062455.19",
   "1282062455.18","",""

"ANSWER","1282062458.068134","","101","12565551111","","","101","LocalSets",
   "SIP/0000FFFF0001-00000012","AppDial","(Outgoing Line)","3","",
   "1282062455.19","1282062455.18","",""

"ANSWER","1282062458.068361","Julie Bryant","12565553333","12565553333","",
   "101","101","LocalSets","SIP/0000FFFF0003-00000011","Dial",
   "SIP/0000FFFF0001","3","","1282062455.18","1282062455.18","",""

"BRIDGE_START","1282062458.068388","Julie Bryant","12565553333",
   "12565553333","","101","101","LocalSets","SIP/0000FFFF0003-00000011",
   "Dial","SIP/0000FFFF0001","3","","1282062455.18","1282062455.18","",""

"BRIDGE_END","1282062462.965704","Julie Bryant","12565553333","12565553333",
   "","101","101","LocalSets","SIP/0000FFFF0003-00000011","Dial",
   "SIP/0000FFFF0001","3","","1282062455.18","1282062455.18","",""

"HANGUP","1282062462.966097","","101","12565551111","","","","LocalSets",
   "SIP/0000FFFF0001-00000012","AppDial","(Outgoing Line)","3","",
   "1282062455.19","1282062455.18","",""

"CHAN_END","1282062462.966119","","101","12565551111","","","","LocalSets",
   "SIP/0000FFFF0001-00000012","AppDial","(Outgoing Line)","3","",
   "1282062455.19","1282062455.18","",""

"APP_END","1282062462.966156","Julie Bryant","12565553333","12565553333","",
   "101","101","LocalSets","SIP/0000FFFF0003-00000011","Dial",
   "SIP/0000FFFF0001","3","","1282062455.18","1282062455.18","",""

"HANGUP","1282062462.966215","Julie Bryant","12565553333","12565553333",
   "","101","101","LocalSets","SIP/0000FFFF0003-00000011","","","3","",
   "1282062455.18","1282062455.18","",""

"CHAN_END","1282062462.966418","Julie Bryant","12565553333","12565553333",
   "","101","101","LocalSets","SIP/0000FFFF0003-00000011","","","3","",
   "1282062455.18","1282062455.18","",""

"LINKEDID_END","1282062462.966441","Julie Bryant","12565553333",
   "12565553333","","101","101","LocalSets","SIP/0000FFFF0003-00000011",
   "","","3","","1282062455.18","1282062455.18","",""
In this final example, a transfer will be executed.
The call is started by calling a phone via extension 102. That call is then transferred to
another phone at extension 101.
Here is the relevant dialplan:
exten => 101,1,Dial(SIP/0000FFFF0001)
exten => 102,1,Dial(SIP/0000FFFF0002)
Here are the CEL events logged as a result of this call scenario:
"CHAN_START","1282062488.028200","Julie Bryant","12565553333","","","",
   "102","LocalSets","SIP/0000FFFF0003-00000013","","","3","",
   "1282062488.20","1282062488.20","",""

"APP_START","1282062488.028464","Julie Bryant","12565553333","12565553333",
   "","102","102","LocalSets","SIP/0000FFFF0003-00000013","Dial",
   "SIP/0000FFFF0002","3","","1282062488.20","1282062488.20","",""

"CHAN_START","1282062488.028762","Brooke Brown","12565552222","","","",
   "s","LocalSets","SIP/0000FFFF0002-00000014","","","3","","1282062488.21",
   "1282062488.20","",""

"ANSWER","1282062492.565759","","102","12565552222","","","102","LocalSets",
   "SIP/0000FFFF0002-00000014","AppDial","(Outgoing Line)","3","",
   "1282062488.21","1282062488.20","",""

"ANSWER","1282062492.565973","Julie Bryant","12565553333","12565553333","",
   "102","102","LocalSets","SIP/0000FFFF0003-00000013","Dial",
   "SIP/0000FFFF0002","3","","1282062488.20","1282062488.20","",""

"BRIDGE_START","1282062492.566001","Julie Bryant","12565553333",
   "12565553333","","102","102","LocalSets","SIP/0000FFFF0003-00000013",
   "Dial","SIP/0000FFFF0002","3","","1282062488.20","1282062488.20","",""

"CHAN_START","1282062497.940687","","","","","","s","LocalSets",
   "AsyncGoto/SIP/0000FFFF0002-00000014","","","3","","1282062497.22",
   "1282062488.20","",""

"BLINDTRANSFER","1282062497.940925","Julie Bryant","12565553333","12565553333","",
   "102","102","LocalSets","SIP/0000FFFF0003-00000013","Dial","SIP/0000FFFF0002",
   "3","","1282062488.20","1282062488.20",
   "AsyncGoto/SIP/0000FFFF0002-00000014<ZOMBIE>",""

"BRIDGE_END","1282062497.940961","Julie Bryant","12565553333","12565553333","",
   "102","102","LocalSets","SIP/0000FFFF0003-00000013","Dial",
   "SIP/0000FFFF0002","3","","1282062488.20","1282062488.20","",""

"APP_START","1282062497.941021","","102","12565552222","","","101","LocalSets",
   "SIP/0000FFFF0002-00000014","Dial","SIP/0000FFFF0001","3","",
   "1282062497.22","1282062488.20","",""

"CHAN_START","1282062497.941207","Candice Yant","12565551111","","","","s",
   "LocalSets","SIP/0000FFFF0001-00000015","","","3","","1282062497.23",
   "1282062488.20","",""

"HANGUP","1282062497.941361","","","","","","","LocalSets",
   "AsyncGoto/SIP/0000FFFF0002-00000014<ZOMBIE>","AppDial",
   "(Outgoing Line)","3","","1282062488.21","1282062488.20","",""

"CHAN_END","1282062497.941380","","","","","","","LocalSets",
   "AsyncGoto/SIP/0000FFFF0002-00000014<ZOMBIE>","AppDial","(Outgoing Line)",
   "3","","1282062488.21","1282062488.20","",""

"APP_END","1282062497.941415","Julie Bryant","12565553333","12565553333","",
   "102","102","LocalSets","SIP/0000FFFF0003-00000013","Dial",
   "SIP/0000FFFF0002","3","","1282062488.20","1282062488.20","",""

"HANGUP","1282062497.941453","Julie Bryant","12565553333","12565553333",
   "","102","102","LocalSets","SIP/0000FFFF0003-00000013","","","3","",
   "1282062488.20","1282062488.20","",""

"CHAN_END","1282062497.941474","Julie Bryant","12565553333","12565553333",
   "","102","102","LocalSets","SIP/0000FFFF0003-00000013","","","3","",
   "1282062488.20","1282062488.20","",""

"ANSWER","1282062500.559578","","101","12565551111","","","101","LocalSets",
   "SIP/0000FFFF0001-00000015","AppDial","(Outgoing Line)","3","",
   "1282062497.23","1282062488.20","",""

"BRIDGE_START","1282062500.559720","","102","12565552222","","","101","LocalSets",
   "SIP/0000FFFF0002-00000014","Dial","SIP/0000FFFF0001","3","","1282062497.22",
   "1282062488.20","",""

"BRIDGE_END","1282062512.742600","","102","12565552222","","","101","LocalSets",
   "SIP/0000FFFF0002-00000014","Dial","SIP/0000FFFF0001","3","","1282062497.22",
   "1282062488.20","",""

"HANGUP","1282062512.743006","","101","12565551111","","","","LocalSets",
   "SIP/0000FFFF0001-00000015","AppDial","(Outgoing Line)","3","","1282062497.23",
   "1282062488.20","",""

"CHAN_END","1282062512.743211","","101","12565551111","","","","LocalSets",
   "SIP/0000FFFF0001-00000015","AppDial","(Outgoing Line)","3","","1282062497.23",
   "1282062488.20","",""

"APP_END","1282062512.743286","","102","12565552222","","","101","LocalSets",
   "SIP/0000FFFF0002-00000014","Dial","SIP/0000FFFF0001","3","","1282062497.22",
   "1282062488.20","",""

"HANGUP","1282062512.743346","","102","12565552222","","","101","LocalSets",
   "SIP/0000FFFF0002-00000014","","","3","","1282062497.22","1282062488.20",
   "",""

"CHAN_END","1282062512.743371","","102","12565552222","","","101","LocalSets",
   "SIP/0000FFFF0002-00000014","","","3","","1282062497.22","1282062488.20",
   "",""

"LINKEDID_END","1282062512.743391","","102","12565552222","","","101",
   "LocalSets","SIP/0000FFFF0002-00000014","","","3","","1282062497.22",
   "1282062488.20","",""
The Simple Network Management Protocol (SNMP) is a
standardized protocol for network management. It is very commonly used
and implemented across many applications and network devices. Platforms
such as OpenNMS,[173] an open source network management platform, use SNMP
(among other things). Asterisk supports SNMP through the res_snmp module. This section discusses the
installation and configuration of res_snmp, as well as how it can be utilized by
a platform like OpenNMS.
By default, Asterisk will not compile the SNMP development module, since a dependency needs to be satisfied first.
In CentOS, you simply need to install the net-snmp-devel package:
$ sudo yum install net-snmp-develSee the upcoming section Recompiling Asterisk with the res_snmp module for a description of how to recompile Asterisk with SNMP support.
Under Ubuntu, the following package needs to be installed:
$ sudo apt-get install snmp libsnmp-dev snmpdTip
Both the snmp and snmpd packages need to be installed explicitly on Ubuntu, as they are not dependencies of the SNMP development libraries, like they are on CentOS. The snmp package installs SNMP tools like snmpwalk that we’ll need, and the snmpd package installs the SNMP daemon.
See the next section for a description of how to recompile Asterisk with SNMP support.
Once you’ve satisfied the dependencies for SNMP, you can recompile Asterisk with SNMP support:
$cd ~/src/asterisk-complete/asterisk/1.8/$./configure$make menuselect# verify that res_snmp is selected under Resource Modules $sudo make install
You then need to copy the sample config file over to the /etc/asterisk folder:
$ sudo cp ~/src/asterisk-complete/asterisk/1.8/configs/res_snmp.conf.sample
/etc/asterisk/res_snmp.conf
We’ll talk about configuring this file for use with OpenNMS in the next section.
The OpenNMS project provides an open-source network management platform that has Asterisk support built right in. There are a few steps that must be taken to enable this support, though. In this section we’ll take you through what you need to do to get your Asterisk server talking to OpenNMS.
The OpenNMS wiki has detailed instructions for installing OpenNMS, which you can find at http://opennms.org/wiki/Installation:Yum.
Warning
OpenNMS should normally not be installed on your Asterisk server. You will want to designate a separate machine as your OpenNMS server.
Since the OpenNMS wiki provides all the required instructions, we’ll leave it to the experts to lead you through the first part of the installation. Once you’ve installed OpenNMS, come back here and we’ll take you through how to configure it to work with Asterisk.
The instructions for installing OpenNMS on the wiki use SNMPv2c, which is not a secure method of abstracting data from the SNMP protocol. Since we want to build a secure system, our instructions will show you how to enable SNMPv3 support.[174]
However, because SNMPv3 can be a bit of an unwieldy beast, and because you may not wish to enable SNMPv3 for some reason (e.g., if your version of SNMP was not compiled with OpenSSL support), we will provide instructions for configuring the SNMP daemon for both SNMPv2c and SNMPv3.
It tends to be easier to configure the system for SNMPv2c first and then update it to SNMPv3, as the steps to get SNMPv3 set up properly are more complex.
In the /etc/asterisk/res_snmp.conf file that you’ve copied over from your source directory, there are two lines you must uncomment:
[general]
;subagent=yes
;enabled=yes
Modify the res_snmp.conf file so both the SNMP client and the subagent are enabled:
[general]
subagent=yes
enabled=yes
After modifying this file, you will need to reload the res_snmp.so module in order for the changes to take effect:
*CLI> module unload res_snmp.so
Unloaded res_snmp.so
 Unloading [Sub]Agent Module
  == Terminating SubAgent
*CLI> module load res_snmp.so
Loaded res_snmp.so
  == Parsing '/etc/asterisk/res_snmp.conf':   == Found
 Loading [Sub]Agent Module
 Loaded res_snmp.so => (SNMP [Sub]Agent for Asterisk)
  == Starting SubAgent
Now you can modify the /etc/snmp/snmpd.conf file for SNMP on the host machine. Rename the current example configuration file and create a new snmpd.conf file:
$cd /etc/snmp$sudo mv snmpd.conf snmpd.sample
The first thing to do is to add the permissions control to the file. We suggest you read the /etc/snmpd/snmp.sample file that you just renamed to get a better idea of how the permissions are being set up. Then, add the following to your snmpd.conf file:
$ sudo cat > snmpd.conf

com2sec notConfigUser  default       public

group   notConfigGroup v1           notConfigUser
group   notConfigGroup v2c           notConfigUser

view all    included  .1
view system included  .iso.org.dod.internet.mgmt.mib-2.system

access  notConfigGroup ""      any       noauth    exact  all    none none

syslocation Caledon, ON
syscontact Leif Madsen [email protected]

Ctrl+D
Tip
The syslocation and syscontact lines are not necessary,
but they can make it easier to identify a particular server if
you’re monitoring several nodes.
Now we need to enable the AgentX subagent support so information about our Asterisk system can be found:
$ sudo cat >> snmpd.conf

master agentx
agentXSocket /var/agentx/master
agentXPerms 0660 0775 nobody root

sysObjectID .1.3.6.1.4.1.22736.1

Ctrl+D
By adding the master agentx line and the agentX options, we’ve enabled Asterisk to
communicate with the SNMP daemon. The agentXPerms option is stating that
Asterisk is running as root. If
your Asterisk system is running in a different group, change
root to the group that Asterisk
is running as.
Just below the AgentX configuration,
we added the sysObjectID option.
The purpose of adding the sysObjectID string is so OpenNMS will know
that this host system is running Asterisk, allowing it to
dynamically grab additional graphing information.
Once you’ve performed these configuration steps, you need to restart the SNMP daemon:
$sudo /etc/init.d/snmpd restart
To verify that the information can be polled correctly, utilize the snmpwalk application:
$ snmpwalk -On -v2c -c public 127.0.0.1 .1.3.6.1.4.1.22736You should get several lines of information flowing across your screen if your configuration is correct, much like the following:
.1.3.6.1.4.1.22736.1.5.4.1.4.3 = INTEGER: 2
.1.3.6.1.4.1.22736.1.5.4.1.4.4 = INTEGER: 2
.1.3.6.1.4.1.22736.1.5.4.1.4.5 = INTEGER: 1
.1.3.6.1.4.1.22736.1.5.4.1.4.6 = INTEGER: 1
.1.3.6.1.4.1.22736.1.5.4.1.5.1 = INTEGER: 1
...etc
At this point your host system should be ready for OpenNMS to connect and gather the information it needs. Proceed by adding a node to the system and filling in the appropriate information. After a period of time, OpenNMS will poll the host system and have access to the Asterisk statistics. You should be able to click on Resource Graphs after selecting the node you created and see a selection of graphs available, such as SIP, DAHDI, Local, etc.
Enabling SNMPv3 allows you to securely connect and transmit data from the SNMP daemon to the SNMP client. This may not be necessary in a local environment, especially if the client and the daemon are running on the same machine. However, when traversing public networks it is important to secure this data.
First, you need to stop the SNMP daemon, using the init script or the service command:
$ sudo /etc/init.d/snmpd stopAfter stopping the daemon, you need to add the initial user to the /var/net-snmp/snmpd.conf file. This file is dynamic in nature and should only be modified when the SNMP daemon has been stopped.
You need to create a bootstrap user that you will be able to use to create the administration user in the next step. Add the following line to the /var/net-snmp/snmpd.conf file:
createUser initial MD5 setup_passphrase DES
Note
We’re modifying the snmpd.conf file we created in Editing /etc/snmp/snmpd.conf to work with your OpenNMS server.
After adding it, save the file and exit. Next, you need to add permissions to the /etc/snmp/snmpd.conf file. Add the following line to give the initial user read/write permissions:
rwuser initial
After making these modifications, you can restart the SNMP daemon:
$ sudo /etc/init.d/snmpd startStarting snmpd: [ OK ]
Tip
If you don’t see the [ OK ] part after Starting snmpd:, you have likely made
a mistake somewhere. Stop the daemon and try again.
Using your initial user, you now need
to create a user for OpenNMS to connect to. You’ll do this with
the snmpusm[175] application. Execute the following command, which will
clone the opennmsUser user from
the initial user. We configured
the password setup_passphrase for
the authentication and privacy settings when we added the initial user to the /var/net-snmp/snmpd.conf file:
$sudo snmpusm -v3 -u initial -n "" -l authPriv -a MD5 -A setup_passphrase -x DES -X setup_passphrase localhost create opennmsUser initial
User successfully created.
Now
change the passphrase for the opennmsUser with the following
command:
$sudo snmpusm -v 3 -u initial -n "" -l authPriv -a MD5 -A setup_passphrase -x DES -X setup_passphrase -Ca -Cx localhost passwd setup_passphrase0p3nNMSv3opennmsUser
SNMPv3 Key(s) successfully changed.
Warning
The password we’ve assigned to the opennmsUser, 0p3nNMSv3, is intended solely as an
example, and should definitely not be used. Change it to something
else that is secure.
You can now test to make sure you’re getting results from your user by utilizing the snmpwalk application:
$sudo snmpwalk -v 3 -u opennmsUser -n "" -l authPriv -a MD5 -A 0p3nNMSv3 -x DES -X 0p3nNMSv3 localhost ifTable
IF-MIB::ifIndex.1 = INTEGER: 1
IF-MIB::ifIndex.2 = INTEGER: 2
IF-MIB::ifIndex.3 = INTEGER: 3
IF-MIB::ifDescr.1 = STRING: lo
IF-MIB::ifDescr.2 = STRING: eth0
IF-MIB::ifDescr.3 = STRING: sit0
Now that you have data being returned, lock down the /etc/snmp/snmpd.conf file to make sure
only the opennmsUser can read
data from the SNMP daemon.
The file will look quite similar to
the one in the previous section, for configuring SNMPv2c. We’ve
commented out the lines you no longer need with the hash symbol
(#) and added new group and access lines to control access to the SNMP
daemon:
com2sec notConfigUser  default       public

#group   notConfigGroup v1            notConfigUser
#group   notConfigGroup v2c           notConfigUser
group   notConfigGroup usm           opennmsUser

#view    systemview    included   .1.3.6.1.2.1.1
#view    systemview    included   .1.3.6.1.2.1.25.1.1
view    all           included   .1

#access  notConfigGroup ""      any       noauth    exact  all    none none
access  notConfigGroup ""       usm       priv      exact  all    none none


syslocation Caledon, ON
syscontact Leif Madsen [email protected]


#rwuser initial

master agentx
agentXSocket /var/agentx/master
agentXPerms 0660 0775 nobody root

sysObjectID .1.3.6.1.4.1.22736.1
Note
You’ll also notice we’ve
commented out the rwuser
initial line as we no longer need to permit full
read/write access to the SNMP daemon. Permitting read/write
access to the initial user
is only necessary when making changes using the snmpusm
application.
On the group line, we’ve
configured the system to use usm
(the User-based Security Model) and permitted the opennmsUser to connect. We control how it
can connect with the access line,
where we’ve enabled access via the notConfigGroup using usm and the priv model, which makes sure we connect
using both authentication and privacy settings. These in turn make
sure that we authenticate securely and transmit data encrypted.
After modifying the /etc/snmp/snmpd.conf file, restart the SNMP daemon one last time:
$sudo /etc/init.d/snmpd restart
Then verify that you can still access data via snmpwalk:
$sudo snmpwalk -v 3 -u opennmsUser -n "" -l authPriv -a MD5 -A 0p3nNMSv3 -x DES -X 0p3nNMSv3 localhost ifTable
and that Asterisk is still able to connect via AgentX with snmpwalk:
$sudo snmpwalk -v 3 -u opennmsUser -n "" -l authPriv -a MD5 -A 0p3nNMSv3 -x DES -X 0p3nNMSv3 localhost .1.3.6.1.4.1.22736
If all goes well, you should get lots of lines back, including:
SNMPv2-SMI::enterprises.22736.1.5.4.1.2.1 = STRING: "SIP"
SNMPv2-SMI::enterprises.22736.1.5.4.1.2.2 = STRING: "IAX2"
SNMPv2-SMI::enterprises.22736.1.5.4.1.2.3 = STRING: "Bridge"
SNMPv2-SMI::enterprises.22736.1.5.4.1.2.4 = STRING: "MulticastRTP"
SNMPv2-SMI::enterprises.22736.1.5.4.1.2.5 = STRING: "DAHDI"
SNMPv2-SMI::enterprises.22736.1.5.4.1.2.6 = STRING: "Local"
SNMPv2-SMI::enterprises.22736.1.5.4.1.3.1 = STRING: "Session Initiation Protocol(SIP)"
SNMPv2-SMI::enterprises.22736.1.5.4.1.3.2 = STRING: "Inter Asterisk eXchange Driver"
SNMPv2-SMI::enterprises.22736.1.5.4.1.3.3 = STRING: "Bridge Interaction Channel"
SNMPv2-SMI::enterprises.22736.1.5.4.1.3.4 = STRING: "Multicast RTP Paging Channel"
SNMPv2-SMI::enterprises.22736.1.5.4.1.3.5 = STRING: "DAHDI Telephony Driver"
SNMPv2-SMI::enterprises.22736.1.5.4.1.3.6 = STRING: "Local Proxy Channel Driver"
If you don’t get data returned right away, it could be because the Asterisk res_snmp.so module has not reconnected to the SNMP daemon. You can force this either by restarting Asterisk, or by unloading and reloading the res_snmp.so module from the Asterisk CLI.
Once you’ve installed
OpenNMS and configured Asterisk with the res_snmp module, you can use OpenNMS to monitor your
Asterisk server. You can
configure what statistics are monitored, as well as what notifications
you would like to receive based on those statistics. Exploring the
capabilities of OpenNMS is left as an exercise for the reader.
However, we have included a few graphs to demonstrate some of the
basic information you can collect from an Asterisk server. These
graphs come from an Asterisk
server that is not very heavily loaded, but they still give a good
indication of what you might see.
Figure 24-1 contains a graph of how many channels were active in Asterisk at different times.
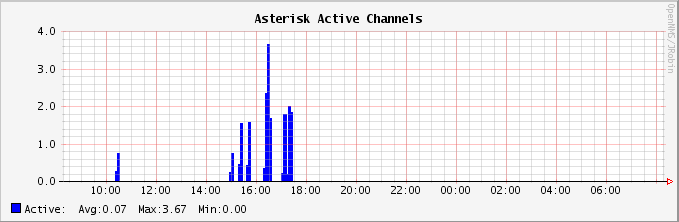
Figure 24-2 shows a graph of active channels of a specific type. In this case, we’re looking at how many DAHDI channels are active on the system. Monitoring DAHDI channels is particularly interesting, since DAHDI channels are generally mapped to physical resources, and a predefined number of channels are available. It would be very useful to monitor DAHDI channel utilization and get notified when usage passes a particular threshold, as this might be a signal that additional capacity needs to be added.

Finally, Figure 24-3 shows network interface utilization. As you can see, there were spikes in the traffic flowing into and out of the system when SIP calls were in progress.

Asterisk is very good at allowing you to keep track of many different facets of its operation, from simple call detail records to full debugging of the running code. These various mechanisms will help you in your efforts to manage your Asterisk PBX, and they represent one of the ways in which Asterisk is vastly superior to most (if not all) traditional PBXs.
[170] Which will normally be found at /etc/syslog.conf.
[171] And rsyslog, syslog-ng, and what-all-else.
[172] If you submit a patch to add any of these events to the code and reference this footnote, Russell will send you a free Asterisk t-shirt. Footnote bribery!
[173] OpenNMS is certainly not the only platform that could be used
with the res_snmp module.
However, we chose to discuss it here for a number of reasons. First,
OpenNMS is a very good network management platform that has
Asterisk-specific integration. Second, it’s open source and 100%
free. Lastly, Jeff Gehlbach of OpenNMS has contributed to the
development of Asterisk, most notably making significant
improvements to the SNMP support. He was also nice enough to help us
get all of this stuff working so that we could document it.
[174] Additionally, you can find a blog post on enabling SNMPv3 for OpenNMS at http://www.opennms.org/wiki/SNMPv3_protocol_configuration.
[175] USM means User-based Security Model.