
I long to accomplish great and noble tasks, but it is my chief duty to accomplish humble tasks as though they were great and noble. The world is moved along, not only by the mighty shoves of its heroes, but also by the aggregate of the tiny pushes of each honest worker.
In this chapter we’re going to walk through the installation of Asterisk from the source code. Many people shy away from this method, claiming that it is too difficult and time-consuming. Our goal here is to demonstrate that installing Asterisk from source is not actually that difficult to do. More importantly, we want to provide you with the best Asterisk platform on which to learn.
In this book we will be helping you build a functioning Asterisk system from scratch. In this chapter you will build a base platform for your Asterisk system. Given that we are installing from source, there is potentially a lot of variation in how you can do this. The process we discuss here is one that we’ve used for many years, and following it will provide you with a suitable foundation for Asterisk.
As part of this process we will also explain installation of some of the software dependencies on the Linux platform that will be needed for topics covered later in this book (such as database integration). We will show instructions for installing Asterisk on both CentOS (a Red Hat–based distribution) and Ubuntu (a Debian-based distribution), which we believe covers the vast majority of Linux distributions being installed today. We’ll try to keep the instructions general enough that they should be useful on any distribution of your choice.[17]
We have chosen to install on CentOS and Ubuntu because they are the most popular options, but Asterisk is generally distribution-agnostic. Asterisk will even install on Solaris, BSD, or OS X[18] if you like. We won’t be covering them in this book, though, as Asterisk is most heavily developed on the Linux platform.
Some commands you see in this chapter will be split into separate rows, each labeled for the distribution on which the command should be performed. Commands for which distributions are not specified are for common commands that can be run on both distributions.
If you just want the nitty-gritty on how to get Asterisk up and running quickly, perform the following at the shell prompt. We encourage you to read through the entire chapter at least once, though, in order to better understand the full process.[20]
The instructions provided here assume you’ve already installed either CentOS or Ubuntu using the steps outlined in Distribution Installation.
Synchronize time and install the NTP (Network Time Protocol) daemon:
CentOS yum install -y ntp && ntpdate pool.ntp.org && chkconfig ntpdon && service ntpd startCentOS 64-bit yum install -y ntp && ntpdate pool.ntp.org && chkconfig ntpdon && service ntpd startUbuntu sudo apt-get install ntpNote
Some additional configuration of text files is required on Ubuntu. See Enable NTP for accurate system time.
On CentOS, add a new system user:
Note
See Adding a system user for specific information.
Create your directory structure:
$
mkdir -p ~/src/asterisk-complete/asterisk$cd ~/src/asterisk-complete/asteriskGet the latest source code via Subversion:
$
svn co http://svn.asterisk.org/svn/asterisk/branches/1.8Or alternatively, you could check out a specific tag:
$
svn co http://svn.asterisk.org/svn/asterisk/tags/1.8.1Build and install the software:
$
cd ~/src/asterisk-complete/asterisk/1.8/$./configure$make$sudo make install$sudo make configInstall additional sound prompts from menuselect:
$
cd ~/src/asterisk-complete/asterisk/1.8/$make menuselect$sudo make installModify the file permissions of the directories Asterisk was installed to:
$sudo chown -R asteriskpbx:asteriskpbx /usr/lib/asterisk/$sudo chown -R asteriskpbx:asteriskpbx /var/lib/asterisk/$sudo chown -R asteriskpbx:asteriskpbx /var/spool/asterisk/$sudo chown -R asteriskpbx:asteriskpbx /var/log/asterisk/$sudo chown -R asteriskpbx:asteriskpbx /var/run/asterisk/$sudo chown asteriskpbx:asteriskpbx /usr/sbin/asterisk$
sudo vim /etc/selinux/configChange the value of
SELINUXfromenforcingtodisabled, then reboot.Create the /etc/asterisk/ directory and copy the indications.conf sample file into it:
$
sudo mkdir -p /etc/asterisk$sudo chown asteriskpbx:asteriskpbx /etc/asterisk$cd /etc/asterisk/$cp ~/src/asterisk-complete/asterisk/1.8/configs/indications.conf.sample ./indications.confCopy the sample asterisk.conf file into /etc/asterisk and change
runuserandrungroupto have values ofasteriskpbx:$
cp ~/src/asterisk-complete/asterisk/1.8/configs/asterisk.conf.sample /etc/asterisk/asterisk.conf$
vim /etc/asterisk/asterisk.confSee indications.conf and asterisk.conf for more information.
Create the modules.conf file. Enable loading of modules automatically, and disable extra modules:
$
cat >> /etc/asterisk/modules.conf ; The modules.conf file, used to define which modules Asterisk should load (or ; not load). ; [modules] autoload=yes ; Resource modules currently not needed noload => res_speech.so noload => res_phoneprov.so noload => res_ael_share.so noload => res_clialiases.so noload => res_adsi.so ; PBX modules currently not needed noload => pbx_ael.so noload => pbx_dundi.so ; Channel modules currently not needed noload => chan_oss.so noload => chan_mgcp.so noload => chan_skinny.so noload => chan_phone.so noload => chan_agent.so noload => chan_unistim.so noload => chan_alsa.so ; Application modules currently not needed noload => app_nbscat.so noload => app_amd.so noload => app_minivm.so noload => app_zapateller.so noload => app_ices.so noload => app_sendtext.so noload => app_speech_utils.so noload => app_mp3.so noload => app_flash.so noload => app_getcpeid.so noload => app_setcallerid.so noload => app_adsiprog.so noload => app_forkcdr.so noload => app_sms.so noload => app_morsecode.so noload => app_followme.so noload => app_url.so noload => app_alarmreceiver.so noload => app_disa.so noload => app_dahdiras.so noload => app_senddtmf.so noload => app_sayunixtime.so noload => app_test.so noload => app_externalivr.so noload => app_image.so noload => app_dictate.so noload => app_festival.soCtrl+D$
cat >> musiconhold.conf; musiconhold.conf [default] mode=files directory=mohCtrl+DSave your changes and your module configuration is done. Your system is ready to configure your dialplan and channels.
Because Asterisk relies so heavily on having priority access to the CPU, it is essential that you install Asterisk onto a server without any graphical interface, such as the X Windowing system (Gnome, KDE, etc.). Both CentOS and Ubuntu ship a GUI-free distribution designed for server usage. We will cover instructions for both distributions.
CentOS means “Community Enterprise Operating System,” and it is based on Red Hat Enterprise Linux (RHEL). For more information about what CentOS is and its history, see http://www.centos.org.
You will need to download an ISO from the CentOS website, located at http://mirror.centos.org/centos/5/isos/. Select either the i386 or x86_64 directory for 32-bit or 64-bit hardware, respectively. You will then be presented with a list of mirrors that appear to be close to you physically. Choose one of the mirrors, and you will be presented with a list of files to download. Likely you will want the first available selection, which is the first ISO file of a set. You will only need the first ISO file of the set as we’ll be installing additional software with yum.
Once you’ve downloaded the ISO file, burn it to a CD or DVD and start the installation process. If you’re installing into a virtual machine (which we don’t recommend for production use,[21] but can be a great way to test out Asterisk), you should be able to mount the ISO file directly and install from there.
Upon booting from the CD, type linux text and then press Enter.[22]
At this point the text installation interface will start. You will be asked whether you want to test the media. These instructions assume you’ve already done so, and therefore can skip that step.
CentOS will then welcome you to the installation. Press Enter to continue.
Choose your language and make a keyboard selection.[23] If you’re in North America, you will probably just select the defaults.
If you’ve previously formatted your hard drive, you will be asked to initialize the drive, which will erase all data. Select Yes.
The installer will ask if you want to remove the existing partitioning scheme and create a new one. Select Remove all partitions on selected drives and create default layout. If a more appropriate option exists, select that instead. In the drive window, verify that the correct disk drive is selected. (Pressing Tab will cycle through the selections on the screen.) Once the drive window is selected, you can scroll up and down (presuming you have multiple drives) and select which hard drive you wish to install to. Toggle the selections by pressing space bar. Verify that the correct drive is selected, press Tab until the OK button is highlighted, and press Enter.
A message confirming that you want to remove all Linux partitions and create the new partition scheme will be presented. Select Yes.
You will be asked to review the partitioning layout. Feel free to modify the partition scheme if you prefer something different (see the following sidebar for some advice on this); however, the default answer No is fine for light production use where storage requirements will be low.[24]
A message will appear asking if you’d like to configure the eth0 network interface on your system. Select Yes. Be sure the Activate on boot and Enable IPv4 support options are enabled, then select OK.
If your network provides automatic IP provisioning via DHCP, you can just select OK. Otherwise, select Manual address configuration, enter the appropriate information, and then select OK.
Next, you’ll be asked to provide a hostname. You can either allow the DHCP server to provide one for you (if your network assigns hostnames automatically) or enter one manually, then select OK.
You will be presented with a list of time zones. Highlight your local time zone and select OK.
At this point, you will be asked for a root password. Enter a secure password and type it again to confirm. After entering your secure password, select OK.
Next up will be the package selection. Several packages that you don’t need to install (and that require additional ISO files you probably haven’t downloaded) are selected by default. Deselect all options in the list using the space bar, then select the Customize software selection option. Once you’ve done that, select OK.
You will then be presented with the Package Group Selection screen. Scroll through the whole list, deselecting each item. If any packages are selected, you’ll be prompted for additional CDs that you have not downloaded. We’ll be installing additional packages with the yum application after the operating system is installed. Once you’ve deselected all packages, select OK.
A dependency check will then be performed and a confirmation that installation is ready to begin will be presented. Select OK to start the installation. The filesystem will then be formatted, the installation image transferred to the hard drive, and installation of the system packages performed. Upon installation, you will be asked to reboot. Remove any media in the drives and select the Reboot button.
Once you’ve rebooted your system, you need to run the yum update command to make sure you have the latest base packages. To do this, log in using the username root and the password you created during installation. Once logged in, run the following:
# yum updateIs this ok [y/N]: yWhen prompted to install the latest packages, press y and wait for the packages to update. If you’re asked to accept a GPG key, press y. When complete, reboot the system as it is likely the kernel will have been updated[25]:
# rebootNote
If you’re running CentOS Server 64-bit, you’ll need to remove all the 32-bit libraries manually. Once you’ve rebooted, or just prior to reboot, run the following command:
# yum remove *.i386 -yThis will remove all the 32-bit libraries on your 64-bit system, which can otherwise cause conflicts and issues when compiling Asterisk and other software.
Congratulations! You’ve successfully installed and updated the base CentOS system.
Keeping accurate time is essential on your Asterisk system, both for maintaining accurate call detail records and for synchronization with your other programs. You don’t want the times of your voicemail notifications to be off by 10 or 20 minutes, as this can lead to confusion and panic from those who might think their voicemail notifications are taking took too long to be delivered. The ntpd command can be used to ensure that the time on your Asterisk server remains in sync with the rest of the world:
#yum install ntp... Is this ok [y/N]:y... #ntpdate pool.ntp.org#chkconfig ntpd on#service ntpd start
The defaults shipped with CentOS are sufficient to synchronize the time and keep the machine’s time in sync with the rest of the world.
The Ubuntu server install process asks you to add a system user other than root, but CentOS does not. In order to be consistent in the book and to be more secure, we’re going to add another system user and provide it sudo access.[26] To add the new user, execute the adduser command:
#adduser asteriskpbx#passwd asteriskpbxChanging password for user asteriskpbx. New UNIX password: Retype new UNIX password:
Now we need to provide the asteriskpbx user sudo access. We do this by modifying the sudoers file with the visudo command. You’ll need to install visudo the first time you use it:
# yum install sudoWith the sudo-related applications and file installed, we can modify the sudoers file. Execute the visudo command and look for the lines shown below:
# visudo
## Allows people in group wheel to run all commands
%wheel ALL=(ALL) ALLWith the %wheel line uncommented as shown in our
example, save the file by pressing Esc, then typing :wq and pressing Enter. Now open the /etc/group file in your favorite editor
(nano is easy to use) and find the line that
starts with the word wheel.
Modify it like so:
wheel:x:10:root,asteriskpbx
Save
the file, log out from root by typing exit, and log in as the
asteriskpbx user you created. Test your
sudo access by running the
following command:
$ sudo ls /root/
[sudo] password for asteriskpbx:After typing your password, you should get the output of the /root/ directory. If you don’t, go back and verify the steps to make sure you didn’t skip or mistype anything. The rest of the instructions in this chapter will assume that you’re the asteriskpbx user and that you have sudo access.
One last thing needs to done, which
will allow you to enter commands without having to enter the full
path. By default only root has /sbin/ and /usr/sbin/ in the default system PATH, but we’ll add it to our
asteriskpbx user as well since we’ll be running
many applications located in those directories.
Start by opening the hidden file
.bash_profile located within
the asteriskpbx home directory with an editor.
We’re then going to append :/usr/sbin:/sbin to the end of the line
starting with PATH:
$vim ~/.bash_profilePATH=$PATH:$HOME/bin:/usr/sbin:/sbin
As previously, save the file by
pressing Esc and then typing
:wq and pressing Enter.
With the operating system installed, you’re ready to install the dependencies required for Asterisk. The next section deals with Ubuntu, so you can skip ahead to the section Software Dependencies, which provides an in-depth review of the installation process. Alternatively, if you’ve already reviewed the information in that section, you may want to refer back to the Installation Cheat Sheet for a high-level review of how to install Asterisk.
Ubuntu Server is a popular Linux distribution loosely based on Debian. There is also a popular desktop version of the software. The Ubuntu Server package contains no GUI and is ideal for Asterisk installations.
To get the latest version of Ubuntu Server,[27] visit http://www.ubuntu.com and select the Server tab at the top of the page. You will be provided with a page that contains information about Ubuntu Server Edition. Clicking the orange Download button in the upper-right corner will take you to a page where you can select either the 32-bit or 64-bit version of Ubuntu Server. After selecting one of the options, you can press the Start download button.
Once you’ve downloaded the ISO file, burn it to a CD and start the installation process. If you’re installing into a virtual machine (which we don’t recommend for production use, but can be a great way to test out Asterisk), you should be able to mount the ISO file directly and install from there.
Upon booting from the CD, you will be presented with a screen where you can select your language of choice. By default English is the selected language, and after a timeout period, it will be automatically selected. After selecting your language, press Enter.
The next screen will give you several options, the first of which is Install Ubuntu Server. Select it by pressing Enter.
You will then be asked which language to use for the installation (yes, this is slightly redundant). Select your language of choice (the default is English), and press Enter.
You will be presented with a list of countries. Once you’ve found your country and highlighted it, press Enter.
You will then be asked if you would like to use the keyboard layout detector. If you know which keyboard type you have, you can select No and then pick it from a list of formats.
If you are utilizing the keyboard layout detector, you will be prompted to press a series of keys. If you use the keyboard detector and it does not detect your keyboard correctly (typical when installing into a virtual machine via a remote console), you can go back and select from a list manually.
Once you’ve picked your keyboard, the installation will continue by attempting to set up your network automatically. If all goes well, you will be prompted to enter a hostname for your system. You can pick anything you want here, unless your network requires your system to a have a specific hostname. Input it now and then press Enter.
The installer will attempt to contact a Network Time Protocol (NTP) server to synchronize your clock. Ubuntu will then try to autodetect your time zone and present you with its choice. If correct, select Yes, otherwise, select No and you’ll be presented with a list of time zones to select from. Select your time zone, or select from the worldwide list if your time zone is not shown. Once you’ve selected your time zone, press Enter to continue.
The installer will then ask you some questions about partitioning your system. Typically the default is fine, which is to use the guided system, utilizing the entire disk, and to set up the Logical Volume Manager (LVM). Press Enter once you’ve made your selection. Then you’ll be asked which partition to install to, which likely is the only one on your system. Press Enter to continue, at which point you’ll be asked to confirm the changes to the partition table. Select Yes and press Enter to continue.
You will now be asked how much space to use (the default value will be to use the entire disk). Press Enter once you’ve entered and confirmed the amount of space you want to use. The installer will then request one last confirmation before making the changes to the disk. Select Yes to write the changes to disk. The installer will now format the hard disk, write the partitioning scheme to disk, copy the files, and perform the file installation.
When the file installation is complete, you’ll be asked to enter the Full name of the new user, from which a username will be generated. The system will suggest a username, but you are free to change the username to whatever you like.
After entering your username, you’ll be asked to supply a password, and then asked to confirm the password you’ve entered. Ubuntu does a good job of providing a secure system by not providing direct access to root, but rather using the sudo application, which allows you to run commands as root without being the root user. Enter a username,[28] such as asteriskpbx, and a secure password to continue. You’ll use these to log into the system once the installer ends. The installer will then ask you if you want to encrypt your home directory. This is not necessary and will add CPU overhead.
Note
The rest of the installation instructions will assume that asteriskpbx was chosen as the username.
If your system is behind a web proxy, enter the proxy information now. If you’re not behind a proxy, or don’t know if you are, simply press Enter.
You will then be asked if you want to install updates automatically. The default is to perform no automatic updates, which is what we recommend. Should a system reboot occur, an update to the kernel will render Asterisk nonstartable until you recompile it[29] (which won’t make you popular). It is better practice to identify updates on a regular basis and perform them manually in a controlled manner. Normally, you would want to advise your users of the expected downtime and schedule the downtime to happen after business hours (or while a redundant system is running). Select No automatic updates and press Enter.
Since we’ll be installing our dependencies with apt-get, we only need to select one package during the install: OpenSSH server. SSH is essential if you wish to perform remote work on the system. However, if your local policy states that your server needs to be managed directly, you may not want to install the OpenSSH server.
Warning
Pressing the Enter key will accept the current selections and move on with the install. You need to use space bar to toggle your selections.
After you’ve selected OpenSSH server, press Enter.
If this is the only operating system on the machine (which it likely is), Ubuntu will give you the option to install the GRUB bootloader on your system. It provides this prompt in order to give you the option of skipping the GRUB installation, as it will modify the master boot record (MBR) on your system. If there is another operating system it has failed to detect that has information loaded into the MBR, it’s nice to be able to skip modifying it. If this is the only operating system installed on your server, select Yes.
When the system has finished the install, you’ll be asked to remove any media in the drives and to reboot the system by selecting Continue, at which point the installation will be complete and the system will reboot.
Now that we’ve completed installing Ubuntu Server, we need to perform a system update with apt-get to make sure we have the latest packages installed. You’ll be presented with a login prompt where you’ll log in with the username and password you created in the installer (e.g., asteriskpbx). Once logged in, run the following command:
$sudo apt-get update[sudo] password for asteriskpbx: ... Reading package lists... Done$sudo apt-get upgradeReading state information... Done ... Do you want to continue [Y/n]?y
Press Enter when prompted to continue, at which point the latest package updates will be installed. When complete, reboot the system for the changes to take effect as the kernel has probably been updated.
$ sudo rebootCongratulations! You’ve successfully installed and updated the base Ubuntu Server system.
Keeping accurate time is essential on your Asterisk system, both for maintaining accurate call detail records as well as for synchronization with your other programs. You don’t want the times of your voicemail notifications to be off by 10 or 20 minutes, as this can lead to confusion and panic from those who might think their voicemail notification took too long to be delivered:
$ sudo apt-get install ntpThe default on Ubuntu is to run a time sync server without ever changing the time on your own machine. This won’t work for our needs, so we’ll need to change the configuration file slightly. Because of this, we need to guide you through using a command line editor. The nano editor is already installed on your Ubuntu machine and is remarkably easy to use[30]:
$ sudo nano /etc/ntp.confYour terminal will switch to full-screen output.
Use your arrow keys to move down to the section that looks like
# By default, exchange time with everybody, but don't allow configuration. restrict -4 default kod notrap nomodify nopeer noquery restrict -6 default kod notrap nomodify nopeer noquery
Add two new lines after this section, to allow ntpd to synchronize your time with the outside world, such that the above section now looks like
# By default, exchange time with everybody, but don't allow configuration.
restrict -4 default kod notrap nomodify nopeer noquery
restrict -6 default kod notrap nomodify nopeer noquery
restrict -4 127.0.0.1
restrict -6 ::1That’s everything we need to change, so exit the editor by pressing Ctrl+X. When prompted whether to save the modifications, press Y; nano will additionally ask you for the filename. Just hit Enter to confirm the default /etc/ntp.conf.
$ sudo /etc/init.d/ntp restartWith the operating system installed, you’re ready to install the dependencies required for Asterisk. The next section provides an in-depth review of the installation process. If you’ve already reviewed the information in Software Dependencies, you may want to refer back to Installation Cheat Sheet for a high-level review of how to install Asterisk.
The first thing you need to do once you’ve completed the installation of your operating system is to install the software dependencies required by Asterisk. The commands listed in Table 3-1 have been split into two columns, for Ubuntu Server and CentOS Server. These packages will allow you to build a basic Asterisk system, along with DAHDI and LibPRI. Not every module will be available at compile time with these dependencies; only the most commonly used modules will be built. If additional dependencies are required for other modules used later in the book, instructions will be provided as necessary.
Warning
Please be aware that the dependency information on CentOS 64-bit does not take into account that 32-bit libraries should not be installed. If such libraries are installed, you will end up with additional packages that use disk space and can cause conflicts if the system attempts to compile against a 32-bit library instead of its 64-bit counterpart. In order to resolve this problem, add .x86_64 to the end of each package name when installing it. So, for example, instead of executing yum install ncurses-devel, you will execute yum install ncurses-devel.x86_64. This is not necessary on a 32-bit platform.
These packages will get you most of what you’ll need to get started with installing Asterisk, DAHDI, and LibPRI. Note that you will also require the software dependencies for each package that we indicate needs to be installed. These will be resolved automatically for you when you use either yum or apt-get.
We have also included the OpenSSL development libraries, which are not strictly necessary to compile Asterisk, but are good to have: they enable key support and other encryption functionality.
We have installed vim as our editor, but you can choose anything you want, such as nano, joe, or emacs.
Asterisk contains a script that will install the dependencies for all features in Asterisk. At this time it is complete for Ubuntu but does not list all required packages for CentOS. Once you have downloaded Asterisk using the instructions in Downloading What You Need, use the following commands if you would like to run it:
$cd ~/src/asterisk-complete/asterisk/1.8$sudo ./contrib/scripts/install_prereq install$sudo ./contrib/scripts/install_prereq install-unpackaged
There are several methods of getting Asterisk: via the Subversion code repository, via wget from the downloads site, or via a package-management system such as apt-get or yum. We’re only going to cover the first two methods, since we’re interested in building the latest version of Asterisk from source. Typically, package-management systems will have versions that are older than those available from Subversion or the downloads site, and we want to make sure we have the most recent fixes available to us, so we tend to avoid them.
Tip
The official packages from Digium do tend to stay up to date. There are currently packages for CentOS/RHEL available at http://www.asterisk.org/downloads/yum.
Before we start getting the source files, let’s create a directory structure to house the downloaded code. We’re going to create the directory structure within the home directory for the asteriskpbx user on the system. Once everything is built, it will be installed with the sudo command. We’ll then go back and change the permissions and ownership of the installed files in order to build a secure system. To begin, issue the following command:
$mkdir -p ~/src/asterisk-complete/asterisk
Now that we’ve created a directory structure to hold everything, let’s get the source code. Choose one of the following two methods to get your files:
Subversion is a version control system that is used by developers to track changes to code over a period of time. Each time the code is modified, it must first be checked out of the repository; then it must be checked back in, at which point the changes are logged. Thus, if a change creates a regression, the developers can go back to that change and remove it if necessary. This is a powerful and robust system for development work. It also happens to be useful for Asterisk administrators seeking to retrieve the software. To download the source code to the latest version of Asterisk 1.8, use these commands:
$cd ~/src/asterisk-complete/asterisk$svn co http://svn.asterisk.org/svn/asterisk/branches/1.8
You can now skip directly to How to Install It.
To obtain the latest released versions of DAHDI, LibPRI, and Asterisk using the wget application, issue the following commands:
$cd ~/src/asterisk-complete/asterisk$wget http://downloads.asterisk.org/pub/telephony/asterisk/asterisk-1.8-current.tar.gz$tar zxvf asterisk-1.8-current.tar.gz
The next step is to compile and install the software, so onward to the next section.
With the source files downloaded you can compile the software and install it. The order for installing is:
Installing in this order ensures that any dependencies for DAHDI and Asterisk are installed prior to running the configuration scripts, which will subsequently ensure that any modules dependent on LibPRI or DAHDI will be built.
LibPRI is a library that adds support for ISDN (PRI and BRI). The use of LibPRI is optional, but since it takes very little time to install, doesn’t interfere with anything, and will come in handy if you ever want to add cards to a system at a later point, we recommend that you install it now.
Check out the latest version of LibPRI and compile it like so:
$cd ~/src/asterisk-complete/$mkdir libpri$cd libpri/$svn co http://svn.asterisk.org/svn/libpri/tags/1.4.<your version number>$cd 1.4.<your version number>$make$sudo make install
Note
You can also download the source via wget from http://downloads.asterisk.org/pub/telephony/libpri/.
With LibPRI installed, we can now install DAHDI.
The Digium Asterisk Hardware Device
Interface, or DAHDI (formerly known as Zaptel), is the
software Asterisk uses to interface with telephony hardware. We
recommend that you install it even if you have no hardware installed,
because DAHDI is a dependency required for building the timing module
res_timing_dahdi and is used for
Asterisk dialplan applications
such as MeetMe().
Another dependency is required for installing DAHDI, and that is the kernel source. It is important that the kernel version being used match exactly that of the kernel source being installed. You can use uname -a to verify the currently running kernel version:
The use of uname -r surrounded by backticks (`) is for filling in the currently running
kernel version so the appropriate package is installed.
The following commands show how to install DAHDI-linux-complete 2.4.0+2.4.0. There may be a newer version available by the time you are reading this, so check downloads.asterisk.org first. If there is a newer version available, just replace the version number in the commands:
$cd ~/src/asterisk-complete/$mkdir dahdi$cd dahdi/$svn co http://svn.asterisk.org/svn/dahdi/linux-complete/tags/$2.4.0+2.4.0cd$2.4.0+2.4.0make$sudo make install$sudo make config
Warning
You will need to have Internet access when running the make all command, as it will attempt to download the latest hardware firmware from the Digium servers.
After installing DAHDI, we can move on to installing Asterisk.
Note
You can also download the source via wget from http://downloads.asterisk.org/pub/telephony/dahdi-linux-complete/.
With both DAHDI and LibPRI installed, we can now install Asterisk:
$cd ~/src/asterisk-complete/asterisk/1.8$./configure$make$sudo make install$sudo make config
With the files now installed in their default locations, we need to modify the permissions of the directories and their contents.
Note
There is an additional step that is not strictly required, but is quite common (and arguably important): the make menuselect command, which provides a graphical interface that allows detailed selection of which modules and features will be compiled. We will discuss this in make menuselect.
In order to run our system more securely, we’ll be installing Asterisk and then running it as the asteriskpbx user. After installing the files into their default locations, we need to change the file permissions to match those of the user we’re going to be running as. Execute the following commands after running make install (which we did previously):
$sudo chown -R asteriskpbx:asteriskpbx /usr/lib/asterisk/$sudo chown -R asteriskpbx:asteriskpbx /var/lib/asterisk/$sudo chown -R asteriskpbx:asteriskpbx /var/spool/asterisk/$sudo chown -R asteriskpbx:asteriskpbx /var/log/asterisk/$sudo chown -R asteriskpbx:asteriskpbx /var/run/asterisk$sudo chown asteriskpbx:asteriskpbx /usr/sbin/asterisk
In order to use MeetMe() and
DAHDI with Asterisk as non-root, you must change the /etc/udev/rules.d/dahdi.rules so that the
OWNER and GROUP fields match the non-root user
Asterisk will be running as. In this case, we’re using the
asteriskpbx user.
Change the last line of the dahdi.rules file to the following:
SUBSYSTEM=="dahdi", OWNER="asteriskpbx", GROUP="asteriskpbx", MODE="0660"
With that out of the way, we can move on to performing the base configuration that should be done after all installations.
Now that we’ve got Asterisk installed, we can get our system up and running. The purpose here is to get Asterisk loaded up and ready to go, as it isn’t doing anything useful yet. These are the steps that all system administrators will need to start out with when installing a new system. If the commands that need to be run differ on CentOS and Ubuntu, you will see a table with rows labeled for each distribution; otherwise, you will see a single command that should be run regardless of which Linux distribution you have chosen.
Note
This section applies only to CentOS users, so if you’re using Ubuntu, you can skip to the next section.
In CentOS, the Security-Enhanced Linux (SELinux) system is enabled by default, and it often gets in the way of Asterisk. Sometimes the issues are quite subtle, and at least one of the authors has spent a good number of hours debugging issues in Asterisk that turned out to be resolved by disabling SELinux. There are many articles on the Internet that describe the correct configuration of SELinux, but we’re going to disable it for the sake of simplicity.
Note
While disabling SELinux is not the ideal situation, the configuration of SELinux is beyond the scope of this book, and frankly, we just don’t have enough experience with it to configure it correctly.
To temporarily switch off SELinux, perhaps in order to verify whether an issue you’re having is being caused by SELinux, run the following command as root:
$ sudo echo 0 > /selinux/enforceYou can reenable SELinux by doing the same thing, but replacing the 0 with a 1:
$ sudo echo 1 > /selinux/enforceTo disable SELinux permanently, modify the /etc/selinux/config file:
$cd /etc/selinux/$sudo vim config
Change the SELINUX option from enforcing to disabled.
Note
Alternatively, you can change the
value of enforcing to permissive, which simply logs the errors
instead of enforcing the policy.
When you’re done modifying the configuration file, you’ll have the following:
# This file controls the state of SELinux on the system.
# SELINUX= can take one of these three values:
# enforcing - SELinux security policy is enforced.
# permissive - SELinux prints warnings instead of enforcing.
# disabled - SELinux is fully disabled.
SELINUX=disabled
# SELINUXTYPE= type of policy in use. Possible values are:
# targeted - Only targeted network daemons are protected.
# strict - Full SELinux protection.
SELINUXTYPE=targeted
# SETLOCALDEFS= Check local definition changes
SETLOCALDEFS=0Since you can’t disable SELinux without rebooting, you’ll need to do that now:
$ sudo rebootIn order to get Asterisk up and running cleanly, we need to create some configuration files. We could potentially install the sample files that come with Asterisk (by executing the make samples command in our Asterisk source) and then modify those files to suit our needs, but the make samples command installs many sample files, most of them for modules that you will never use. We want to limit which modules we are loading, and we also believe that it’s easier to understand Asterisk configuration if you build your config files from scratch, so we’re going to create our own minimal set of configuration files.[34]
The first thing we need to do (assuming it does not already exist) is create the /etc/asterisk/ directory where our configuration files will live:
$sudo mkdir /etc/asterisk/$sudo chown asteriskpbx:asteriskpbx /etc/asterisk/
Warning
Running make samples on a system that already has configuration files will overwrite the existing files.
We’re now going to step through all the files that are required to get a simple Asterisk system up and running.
The first file needed is indications.conf, a file that contains information about how to detect different telephony tones for different countries. There is a perfectly good sample file that we can use in the Asterisk source, so let’s copy it into our /etc/asterisk/ directory:
$ cp ~/src/asterisk-complete/asterisk/1.8/configs/indications.conf.sample
/etc/asterisk/indications.confBecause we’re running Asterisk as non-root, we need to tell Asterisk which user to run as. This is done with the asterisk.conf file. We can copy a sample version of it from the Asterisk source to /etc/asterisk:
$ cp ~/src/asterisk-complete/asterisk/1.8/configs/asterisk.conf.sample
/etc/asterisk/asterisk.confThe asterisk.conf file contains many options
that we won’t go over here (they are covered in asterisk.conf), but
we do need to make an adjustment. Near the end of the [options] section, there are two options
we need to enable: runuser and
rungroup.
Open the asterisk.conf file with an editor such as
nano or vim: Uncomment the runuser and rungroup lines, and modify them so that
they each contain asteriskpbx as the
assigned value. Open the /etc/asterisk/asterisk.conf file with
vim:
$ vim /etc/asterisk/asterisk.confThen modify the file by uncommenting the two lines starting
with runuser and rungroup and modifying the value to
asteriskpbx
runuser=asteriskpbx
rungroup=asteriskpbx
We now have all the configuration files required to start a very minimal version of Asterisk.[36] Give it a shot by starting Asterisk up in the foreground:
$ /usr/sbin/asterisk -cvvvTip
We are specifying the full path to
the asterisk binary, but if you
modify your PATH system
variable to include the /usr/sbin/ directory you don’t need to
specify the full path. See Adding a system user
for information about modifying the $PATH environment variable.
Asterisk will start successfully without any errors or warnings (although it does warn you that some files are missing), and present to you the Asterisk command-line interface (CLI). At this point there are no modules, minimal core functionality, and no channel modules with which to communicate, but Asterisk is up and running.
Executing the module show command at the Asterisk CLI shows that there are no external modules loaded:
*CLI> module showModule Description Use Count 0 modules loaded
We’ve done this simply to demonstrate that Asterisk can be run in a very minimal state, and doesn’t require the dozens of modules that a default install will enable. Let’s stop Asterisk with the core stop now CLI command:
*CLI> core stop nowSo, we’ve managed to get Asterisk running, but it’s not able to do anything useful for us yet. To tell Asterisk what modules we expect it to load, we’ll need a modules.conf file.
Create the file modules.conf in your /etc/asterisk/ directory with the following command (replace the >> with > if you instead want to overwrite an existing file):
$ cat >> /etc/asterisk/modules.confType (or paste) the following lines, and press Ctrl+D on a new line when you’re finished:
; The modules.conf file, used to define which modules Asterisk should load (or
; not load).
;
[modules]
autoload=yes
The autoload=yes line will tell Asterisk to
automatically load all modules located in the /usr/lib/asterisk/modules/ directory. If
you wanted to, you could leave the file like this, and Asterisk
would simply load any modules it found in the
modules folder.
With your new modules.conf file in place, starting Asterisk will cause a whole slew of modules to be loaded. You can verify this by starting Asterisk and running the module show command:
$asterisk -c*CLI>module show
Module                         Description                              Use Count
res_speech.so                  Generic Speech Recognition API           0
res_monitor.so                 Call Monitoring Resource                 0
...
func_math.so                   Mathematical dialplan function           0
171 modules loaded
We now have many modules loaded, and
many additional dialplan applications and functions at our disposal.
We don’t need all these resources loaded, though, so let’s filter
out some of the more obscure modules that we don’t need at the
moment. Modify your modules.conf file to contain the
following noload lines, which
will tell Asterisk to skip loading the identified modules:
; Resource modules
noload => res_speech.so
noload => res_phoneprov.so
noload => res_ael_share.so
noload => res_clialiases.so
noload => res_adsi.so

; PBX modules
noload => pbx_ael.so
noload => pbx_dundi.so

; Channel modules
noload => chan_oss.so
noload => chan_mgcp.so
noload => chan_skinny.so
noload => chan_phone.so
noload => chan_agent.so
noload => chan_unistim.so
noload => chan_alsa.so

; Application modules
noload => app_nbscat.so
noload => app_amd.so
noload => app_minivm.so
noload => app_zapateller.so
noload => app_ices.so
noload => app_sendtext.so
noload => app_speech_utils.so
noload => app_mp3.so
noload => app_flash.so
noload => app_getcpeid.so
noload => app_setcallerid.so
noload => app_adsiprog.so
noload => app_forkcdr.so
noload => app_sms.so
noload => app_morsecode.so
noload => app_followme.so
noload => app_url.so
noload => app_alarmreceiver.so
noload => app_disa.so
noload => app_dahdiras.so
noload => app_senddtmf.so
noload => app_sayunixtime.so
noload => app_test.so
noload => app_externalivr.so
noload => app_image.so
noload => app_dictate.so
noload => app_festival.so
There are, of course, other modules that you could remove, and others that you may find extremely useful, so feel free to tweak this file as you wish. Ideally, you should be loading only the modules that you need for the system you are running. The examples in this book assume that your modules.conf file looks like our example here.
Additional information about the modules.conf file can be found in the section modules.conf.
The musiconhold.conf file defines the classes for music on hold in your Asterisk system. By defining different classes, you can specify different hold music to be used in various situations, such as different announcements to be played while holding in a queue, or different hold music if you have multiple PBXs hosted on the same system. For now, we’ll just create a default music on hold class so that we have at a minimum some hold music when placing callers on hold:
$cd /etc/asterisk/$cat >> musiconhold.conf
; musiconhold.conf
[default]
mode=files
directory=moh

Ctrl+D
We’ve created a musiconhold.conf file and defined our
[default] hold music class. We’re
also assuming you installed the hold music from the menuselect system; by default there is at least one music on hold
package installed, so unless you disabled it, you should have music
in at least one format.
Additional information about musiconhold.conf can be found in the section musiconhold.conf.
menuselect is a text-based menu system in Asterisk used to configure which modules to compile and install. The modules are what give Asterisk its power and functionality. New modules are constantly being created.
In the installation sections, we conveniently skipped over using the menuselect system in order to keep the instructions simple and straightforward. However, it is important enough that we have given menuselect its own section.
In addition to specifying which modules to install, menuselect also allows you to set flags that can aid in debugging issues (see Chapter 2), set optimization flags, choose different sound prompt files and formats, and do various other nifty things.
We would need a whole chapter in order to fully explore menuselect, and for the most part you won’t need to make many changes to it. However, the following example will give you an idea of how menuselect works, and is recommend for any installation.
By default Asterisk only installs the core sound prompt files, and only in GSM format. Also, the three OpSound music on hold files available for download are only selected in .wav format.[37]
We’re going to want extra sound prompts installed instead of just the default core sound prompts, and in a better-sounding format than GSM. We can do this with the menuselect system by running make menuselect in the Asterisk source directory. Before exploring that, though, let’s talk about the different menuselect interfaces.
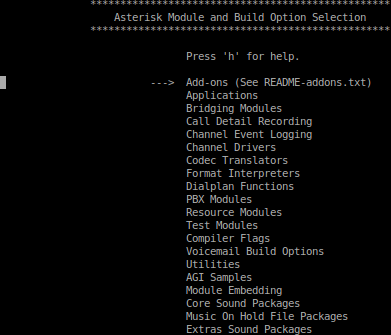
There are two interfaces available for menuselect: curses and newt. If the
libnewt libraries are installed,
you will get the blue and red interface shown in Figure 3-1. Otherwise, by default menuselect will use the curses (black and
white) interface shown in Figure 3-2.
Tip
The minimum screen size for the curses interface is 80x27, which means it may not load if you’re using the default terminal size for a simple distribution installation. This is not a problem when you’re using SSH to reach the server remotely, as typically your terminal can be resized, but if you’re working at the terminal directly you may need to have screen buffers installed to enable a higher resolution, which is not recommended for a system running Asterisk. The solution is to use the newt-based menuselect system.

Run the following commands to start menuselect:
$cd ~/src/asterisk-complete/asterisk/1.8.$<your version>/make menuselect
You will be presented with a screen such as that in Figure 3-1 or Figure 3-2. You can use the arrow keys on your keyboard to move up and down. The right arrow key will take you into a submenu, and the left arrow key will take you back. You can use the space bar or Enter key to select and deselect modules. Pressing the q key will quit without saving, while the x key will save your selections and then quit.
Once you’ve started menuselect, scroll down to Core Sound Packages and press the right arrow key (or Enter) to open the menu. You will be
presented with a list of available options. These options represent
the core sound files in various languages and formats. By default,
the only set of files selected is CORE-SOUNDS-EN-GSM, which is the
English-language Core Sounds package in GSM format.
Select CORE-SOUNDS-EN-WAV and CORE-SOUNDS-EN-ULAW (or ALAW if you’re outside of North America or
Japan[39]), and any other sound files that may be applicable in
your network.
Note
The reason we have multiple formats for the same files is that Asterisk can play back the appropriate format depending on which codec is negotiated by an endpoint. This can lower the CPU load on a system significantly.
After selecting the appropriate sound
files, press the left arrow key to
go back to the main menu. Then scroll down two lines to the Extra Sound Packages menu and press the
right arrow key (or Enter). You will notice that by default
there are no packages selected. As with the core sound files, select
the appropriate language and format to be installed. A good option
is probably to install the English sound files in the WAV, ULAW, and ALAW formats.
Once you’ve completed selecting the sound files, press the x key to save and exit menuselect. You then need to install your new prompts by downloading them from the Asterisk downloads site. This is done simply by running make install again:
$sudo make install$sudo chown -R asteriskpbx:asteriskpbx /var/lib/asterisk/sounds/
The files will be downloaded, extracted, and installed into the appropriate location (/var/lib/asterisk/sounds/<language>/ by default). Your Asterisk server will need to have a working Internet connection in order to retrieve the files.
Administrators often build tools when performing installations on several machines, and Asterisk is no exception. If you need to install Asterisk onto several machines, you may wish to build a set of scripts to help automate this process. The menuselect system contains command-line options that you can use to enable or disable the modules that are built and installed by Asterisk.
If you are starting with a fresh checkout of Asterisk, you must first execute the configure script in order to determine what dependencies are installed on the system. Then you need to build the menuselect application and run the make menuselect-tree command to build the initial tree structure:
$cd ~/src/asterisk-complete/asterisk/1.8.$<your version>/./configure$cd menuselect$make menuselect$cd ..$make menuselect-treeGenerating input for menuselect ...
For details about the options available, run menuselect/menuselect --help from the top level of your Asterisk source directory. You will be returned output like the following:
Usage: menuselect/menuselect [--enable <option>] [--disable <option>]
   [--enable-category <category>] [--enable-all]
   [--disable-category <category>] [--disable-all] [...]
   [<config-file> [...]]
Usage: menuselect/menuselect { --check-deps | --list-options
   | --list-category <category> | --category-list | --help }
   [<config-file> [...]]
The options displayed can then be used to control which modules are installed via the menuselect application. For example, if you wanted to disable all modules and install a base system (which wouldn’t be of much use) you could use the command:
$ menuselect/menuselect --disable-all menuselect.makeoptsIf
you then look at the menuselect.makeopts file, you will see a
large amount of text that displays all the modules and categories
that have been disabled. Let’s say you now want to enable the SIP
channel and the Dial()
application. Enabling those modules can be done with the following
command, but before doing that look at the current menuselect.makeopts (after disabling all
the modules) and locate app_dial
in the MENUSELECT_APPS category
and chan_sip in the MENUSELECT_CHANNELS category. After
executing the following command, look at the menuselect.makeopts file again, and you
will see that those modules are no longer listed:
$ menuselect/menuselect --disable-all --enable chan_sip
--enable app_dial menuselect.makeopts
Tip
The modules listed in the menuselect.makeopts file are those that will not be built—modules that are not listed will be built when the make application is executed.
You can then build the menuselect.makeopts file in any way you want by utilizing the other commands, which will allow you to build custom installation scripts for your system using any scripting language you prefer.
If this is your first installation, you can skip ahead to the section Base Configuration. If you’re in the process of updating your system, however, there are a couple of things you should be aware of.
Note
When we say updating your system, that is quite different from upgrading your system. Updating your system is the process of installing new minor versions of the same branch. For example, if your system is running Asterisk 1.8.2 and you need to upgrade to the latest bug fix version for the 1.8 branch, which was version 1.8.3, you’d be updating your system to 1.8.3. In contrast, we use the term upgrade to refer to changes between Asterisk branches (major version number increases). So, for example, an upgrade would be going from Asterisk 1.4.34 to Asterisk 1.8.0.
When performing an update, you follow the same instructions outlined in the section How to Install It.
Tip
Additionally, if you’ve checked out a new directory for this version of Asterisk (versus running svn up on a checked-out branch), and previously used menuselect to tweak the modules to be compiled, you can copy the menuselect.makeopts file from one directory to another prior to running ./configure. By copying menuselect.makeopts from the old version to the new version, you save the step of having to (de)select all your modules again.
The basic steps are:
$cd ~/src/asterisk-complete/asterisk/1.8.$<your version number>/./configure$make$make install
Tip
You don’t need to run sudo make install because we’ve already set the directory ownership to the asteriskpbx user. You should be able to install new files directly into the appropriate directories.
Upon installation, however, you may get a message like the following:
 WARNING WARNING WARNING

 Your Asterisk modules directory, located at
 /usr/lib/asterisk/modules
 contains modules that were not installed by this
 version of Asterisk. Please ensure that these
 modules are compatible with this version before
 attempting to run Asterisk.

    chan_mgcp.so
    chan_oss.so
    chan_phone.so
    chan_skinny.so
    chan_skype.so
    codec_g729a.so
    res_skypeforasterisk.so

 WARNING WARNING WARNING
This warning message is indicating that modules installed in the /usr/lib/asterisk/modules/ directory are not compatible with the version you’ve just installed. This most often occurs when you have installed modules in one version of Asterisk, and then installed a new version of Asterisk without compiling those modules (as the installation process will overwrite any modules that existed previously, replacing them with their upgraded versions).
To get around the warning message, you
can clear out the /usr/lib/asterisk/modules/ directory prior to
running make install. There is a caveat here,
though: if you’ve installed third-party modules, such as commercial
modules from Digium (including chan_skype, codec_g729a, etc.), you will need to reinstall
those if you’ve cleared out your modules directory.
It is recommended that you keep a directory with your third-party modules in it that you can reinstall from upon update of your Asterisk system. So, for example, you might create the ~/src/asterisk-complete/thirdparty/1.8 directory as follows:
$cd ~/src/asterisk-complete/$mkdir thirdparty/$mkdir thirdparty/1.8/
Downloading third-party modules into this directory allows you to easily reinstall those modules when you upgrade. Just follow the installation instructions for your module, many of which will be as simple as rerunning make install from the modules source directory or copying the precompiled binary to the /usr/lib/asterisk/modules/ directory.
In this section we’re going to cover some common issues you may run into while compiling Asterisk, DAHDI, or LibPRI. Most of the issues you’ll run into have to do with missing dependencies. If that is the case, please review Software Dependencies to make sure you’ve installed everything you need.
Note
Any time you install additional packages, you will need to run the ./configure script in your Asterisk source in order for the new package to be detected.
This message means you have not installed the wget application, which is required for you to download packages from the Asterisk downloads site, for Asterisk to download sound files, or for DAHDI to download firmware for hardware.
This means that the Asterisk configure script is unable to find your C compiler, which typically means you have not yet installed one. Be sure to install the gcc package for your system.
This means that the Asterisk configure script is unable to find your C compiler, which typically means you have not yet installed one. Be sure to install the gcc package for your system.
This error is presented by the Asterisk configure script when you have not installed the GCC C++ preprocessor.
This error is encountered when you have not installed the make application, which is required to build Asterisk.
You will encounter this error when the XML parser libraries are not installed. These are required by Asterisk 1.8 and later, since console documentation (e.g., when you run core show application dial on the Asterisk CLI) is generated from XML.
This error happens when you don’t have
the ncurses development library
installed, which is required by menuselect and for other console output in
Asterisk.
Upgrading Asterisk between major versions, such as from 1.2 to 1.4 or from 1.6.2 to 1.8 is akin to upgrading an operating system. Once a phone switch is in production, it is terribly disruptive for that system to be unavailable for nearly any length of time, and the upgrade of that phone system needs to be well thought-out, planned, and tested as much as possible prior to deployment. And because every deployment is different, it is difficult, if not impossible, for us to walk you through a real system upgrade. However, we can certainly point you in the right direction for the information you require in order to perform such an upgrade, thereby giving you the tools you need to be successful.
A production Asterisk system should never be upgraded between major versions without first deploying it into a development environment where the existing configuration files can be tested and reviewed against new features and syntax changes between versions. For example, it may be that your dialplan relies on a deprecated command and should be updated to use a new command that contains more functionality, has a better code base, and will be updated on a more regular basis. Commands that are deprecated are typically left in the code for backward-compatibility, but issues reported about these deprecated commands will be given lower priority than issues to do with the newer preferred methods.
There exist two files that should be read prior to any system upgrade: CHANGES and UPGRADE.txt, which are shipped with the Asterisk source code. These files contain details on changes to syntax and other things to be aware of when upgrading between major versions. The files are broken into different sections that reference things such as dialplan syntax changes, channel driver syntax changes, functionality changes, and deprecation of functionality, with suggestions that you update your configuration files to use the new methods.
Another thing to consider when performing an upgrade is whether you really need to perform the upgrade in the first place. If you’re using a long-term support (LTS)[40] version of Asterisk and that version is happily working along for you, perhaps there is no reason to upgrade your existing production system. An alternative to upgrading the entire system is simply to add functionality to your system by running two versions simultaneously on separate systems. By running separate boxes, you can access the functionality added to a later version of Asterisk without having to disrupt your existing production system. You can then perform the migration more gradually, rather than doing a complete system upgrade instantly.
Two parts of Asterisk should be thoroughly tested when performing an upgrade between major versions: the Asterisk Manager Interface (AMI) and the Asterisk Gateway Interface (AGI).
These two parts of Asterisk rely on testing your code to make sure any cleanup of syntax changes in either the AMI or the AGI, or added functionality, does not interfere with your existing code. By performing a code audit on what your program is expecting to send or receive against what actually happens, you can save yourself a headache down the road.
The testing of call detail records (CDRs) is also quite important, especially if they are relied upon for billing. The entire CDR structure is really designed for simple call flows, but it is often employed in complex call flows, and when someone reports an issue to the tracker and it is fixed, it can sometimes have an effect on others who are relying on the same functionality for different purposes. Asterisk 1.8 now includes channel event logging (CEL), which is a system designed to get around some of the limitations of CDR in more complex call flows (such as those that involve transfers, etc.). More information about CEL is available in CEL (Channel Event Logging).
Upgrading Asterisk can be a successful endeavor as long as sufficient planning and testing are carried out prior to the full rollout. In some cases migrating to a separate physical machine on which you’ve performed testing is preferred, as it can give you a system to roll back to in case of some failure that can’t be resolved immediately. It’s the planning, and particularly having a backup plan, that is the most important aspect of an Asterisk upgrade.
In this chapter we looked at how to install an operating system (one of Ubuntu or CentOS) and Asterisk itself. We did this securely by installing via sudo and running Asterisk as the non-root user asteriskpbx. We are well on our way to building a functional Asterisk system that will serve us well. In the following chapters we will explore how to connect devices to our Asterisk system in order to start placing calls internally and how to connect Asterisk to outside services in order to place phone calls to endpoints connected to the PSTN and accept calls from those endpoints.
[17] If you are using another distribution, we’re willing to bet you are quite comfortable with Linux and should have no trouble installing Asterisk.
[18] Leif calls this “Oh-Eh-Sex,” but Jim thinks it should be pronounced “OS Ten.” We wasted several precious minutes arguing about this.
[19] After you read our book, of course.
[20] Once you have experience with several Asterisk installations, you’ll agree that it’s a quick and painless process. Nevertheless, this chapter may make the process look complex. This is simply because we have an obligation to ensure you are provided with all the information you need to accomplish a successful install.
[21] Actually, some people have great success running Asterisk inside virtual machines. It does depend what you’re planning on using it for though, as you’ll have limited access to hardware, for example.
[22] You should test the media the first time you are using that particular CD/DVD.
[23] Bear in mind that Asterisk is developed using the US keyboard and language, and we’re not aware of any testing having been done on anything other than US English.
[24] Due to the ever-increasing size of hard drives, capacity is becoming less of a problem. A system with a 1 terabyte drive can store somewhere in the range of 2 million minutes of telephony-quality recordings.
[25] This reboot step is essential prior to installing Asterisk.
[26] sudo is an application that allows a user to execute commands as another user, such as root, or the superuser.
[27] Of course, projects can change their websites whenever they want. Hopefully the instructions we’ve provided here are accurate enough to help guide you through the site even in the event of changes.
[28] Ubuntu has reserved the username asterisk internally.
[29] While we say Asterisk here, specifically it is DAHDI that is the problem. DAHDI is a set of Linux kernel modules used with Asterisk.
[30] If you’re already familiar with another editor, go ahead and use it. The nano editor has been selected for its ease of use and its handy on-screen instructions. We even know a developer at Digium who uses it while writing code for Asterisk, though most people tend to use more complex editors such as emacs or vim.
[31] Strictly speaking, if you are not going to be using any ISDN connections (BRI and PRI), you can install Asterisk without LibPRI. However, we are going to install it for the sake of completeness.
[32] This package contains the kernel drivers to allow
Asterisk to connect to traditional PSTN circuits. It is also
required for the MeetMe()
conferencing application. Again, we will install this for
completeness.
[33] If you don’t install this, none of the examples in this book will work, but it could still make a great bathroom reader. Just sayin’.
[34] If your /etc/asterisk/ folder has files in it already, move those files to another directory, or delete them if you are sure you don’t need what is there.
[35] ~/src/asterisk-complete/asterisk/asterisk-1.8.<your version>/
[36] So minimal, in fact, that it’s completely useless at this point. But we digress.
[37] A good way to put the final touches on your new system is to install some appropriate sound files to be used as music on hold. There are only three songs installed by default, and callers will quickly tire of listening to the same three songs over and over again. We’ll discuss this more in musiconhold.conf.
[38] Which we will cover in Chapter 16, along with many other cool things.
[39] If you want to understand all about mu-law and A-law, you can read the section Logarithmic companding. All you need to know here is that outside of North America and Japan, A-law is used.
[40] More information about Asterisk releases and their support schedule is available at https://wiki.asterisk.org/wiki/display/AST/Asterisk+Versions.