
15 Automating deployment: CodeDeploy, CloudFormation, and Packer
About 20 years ago, we rented our first virtual machine. Our goal was to deploy WordPress, a content management system. To do so, we logged in to the machine using SSH, downloaded WordPress, installed the scripting language PHP and the web server Apache, edited the configuration files, and started the web server.
To this day, the following steps for deploying software—whether open source, proprietary, or homegrown—have remained the same:
These activities are also summarized under the term configuration management. The two main reasons for why automating deployments is a must-have in the cloud follow:
-
To ensure high availability and scalability, you need to configure an Auto Scaling group to launch EC2 instances automatically. A new machine could spin up at any time, so deploying changes manually is not an option.
-
Manual changes are error prone and expensive to reproduce. Automating increases reliability and reduces the costs per deployment.
From what we have learned from our consulting clients, organizations that implement automated deployments have a higher chance of success in the cloud.
In this chapter, you will learn how to automate the deployment of an application. We want to introduce three approaches with different pros and cons, so that you can pick the solution that best fits your situation. We use the following three options and will provide an overview that helps you make a decision at the end of the chapter:
-
AWS CloudFormation, Auto Scaling groups, and user data to perform a rolling update
-
Bundling an application into a customized AMI for immutable deployments with Packer by HashiCorp
Let’s look at an example to see how this process might play out. Imagine you are the organizer of a local AWS meetup, and you want to provide a service allowing the community members to edit documents collaboratively. Therefore, you decided to deploy Etherpad, a web application, on EC2. The architecture, described next, is straightforward and illustrated in figure 15.1:
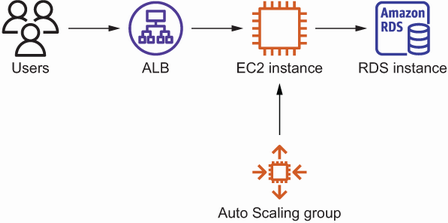
Figure 15.1 Etherpad infrastructure: ALB, EC2 instance, Auto Scaling group, and RDS database instance
Unfortunately, Etherpad does not support clustering, which means it is not possible to run it on more than one machine in parallel.
You are sold on the idea of automating deployments and are looking for the right tool for the job. The first option might sound familiar to you. We are using a solution that applies changes with the help of agents installed on the virtual machines.
15.1 In-place deployment with AWS CodeDeploy
You have two main reasons for performing in-place deployments. First, the speed of the deployment matters. Second, your application persists state on the virtual machine, so you try to avoid replacing running machines. So, for example, if you are running a database-like system that persists data on disk, the in-place deployment approach is a good fit.
The purpose of AWS CodeDeploy is to automate deployments on EC2, Fargate, and Lambda. Even on-premises machines are supported. The fully managed deployment service is free for EC2, Fargate, and Lambda and costs $0.02 per on-premises machine update. Figure 15.2 shows how CodeDeploy works for EC2 instances, as described here:
-
An engineer uploads a zip archive, including deployment instructions and the binaries or source code.
-
An engineer creates a deployment by choosing the revision and target instances.
-
An agent running on the EC2 instances pulls deployment tasks from CodeDeploy.
-
The agent executes the instructions specified in the deployment artifact and copies the binaries or source code.

This approach is called in-place deployment. The EC2 instances keep running while the agent rolls out the change. We want to introduce the following important components of CodeDeploy before we proceed:
-
Application—Specifies a name and the compute platform (EC2/on-premises, ECS, or Lambda)
-
Deployment group—Points to the targets (an Auto Scaling group in our example)
How do you deploy the web application Etherpad with CodeDeploy? Start with setting up the infrastructure consisting of an Application Load Balancer, an Auto Scaling group, and an RDS database instance. We prepared a CloudFormation template to do just this. As usual, you’ll find the code in the book’s code repository on GitHub: https://github.com/AWSinAction/code3. The CloudFormation template for the WordPress example is located in /chapter15/codedeploy.yaml.
Use the following command to create a CloudFormation stack based on the template. The command will exit after the stack has been created successfully:
aws cloudformation deploy --stack-name etherpad-codedeploy
➥ --template-file chapter15/codedeploy.yaml --capabilities CAPABILITY_IAM
Besides creating an Application Load Balancer, an Auto Scaling group, and an RDS database instance, the CloudFormation template also creates the following resources required to deploy Etherpad with CodeDeploy:
-
CodeDeploy deployment group—Points to the Auto Scaling group
-
Parameter—Stores the database endpoint in the Systems Manager Parameter Store
The next listing shows a deeper look into the resources specified in the CloudFormation template /chapter15/codedeploy.yaml.
Listing 15.1 The CodeDeploy application and deployment group
# [...]
ArtifactBucket:                                                  ①
  Type: 'AWS::S3::Bucket'
  Properties: {}
Application:                                                     ②
  Type: 'AWS::CodeDeploy::Application'
  Properties:
    ApplicationName: 'etherpad-codedeploy'
    ComputePlatform: 'Server'
DeploymentGroup:                                                 ③
  Type: 'AWS::CodeDeploy::DeploymentGroup'
  Properties:
    ApplicationName: !Ref Application
    DeploymentGroupName: 'etherpad-codedeploy'
    AutoScalingGroups:                                           ④
    - !Ref AutoScalingGroup
    DeploymentConfigName: 'CodeDeployDefault.AllAtOnce'          ⑤
    LoadBalancerInfo:                                            ⑥
      TargetGroupInfoList:
      - Name: !GetAtt LoadBalancerTargetGroup.TargetGroupName
    ServiceRoleArn: !GetAtt CodeDeployRole.Arn                   ⑦
CodeDeployRole:                                                  ⑧
  Type: 'AWS::IAM::Role'
  Properties:
    AssumeRolePolicyDocument:
      Version: '2012-10-17'
      Statement:
      - Effect: Allow
        Principal:
          Service: 'codedeploy.amazonaws.com'
        Action: 'sts:AssumeRole'
    ManagedPolicyArns:
    - 'arn:aws:iam::aws:policy/service-role/AWSCodeDeployRole'
DatabaseHostParameter:                                           ⑨
  Type: 'AWS::SSM::Parameter'
  Properties:
    Name: '/etherpad-codedeploy/database_host'
    Type: 'String'
    Value: !GetAtt 'Database.Endpoint.Address'
# [...]
① The S3 bucket to store the deployment artifacts
② The CodeDeploy application—a collection of deployment groups and revisions
③ The CodeDeploy deployment group specifies the targets for a deployment.
④ The deployment group points to the Auto Scaling group.
⑤ Because only one EC2 instance is running, deploys to all instances at once
⑥ Considers the load balancer’s target group when performing deployments
⑦ The IAM role to use for deployments
⑧ The IAM role grants access to autoscaling, load balancing, and other services that are relevant for a deployment.
⑨ Stores the database hostname in the Systems Manager’s Parameter Store
By default, CodeDeploy comes with the deployment configurations defined in table 15.1.
Table 15.1 The predefined deployment configurations for CodeDeploy
On top of that, CodeDeploy allows you to define your own deployment configurations, such as deploying to 25% of the targets at a time.
After you have deployed and prepared the infrastructure for Etherpad and CodeDeploy, it is about time to create the first deployment. Before you do so, you need to gather some information. Use the following command to get the outputs from the CloudFormation stack named etherpad-codedeploy:
In our case, the output looks like this:
[
  {
    "OutputKey": "ArtifactBucket",
    "OutputValue": "etherpad-codedeploy-artifactbucket-12vah1x44tpg7",   ①
    "Description": "Name of the artifact bucket"
  },
  {
    "OutputKey": "URL",
    "OutputValue": "http://ether-LoadB-...us-east-1.elb.amazonaws.com",  ②
    "Description": "The URL of the Etherpad application"
  }
]
① Copies the name of the S3 bucket used to store the deployment artifacts
② Opens the URL in your browser to access Etherpad
Note the ArtifactBucket output. You will need the name of the S3 bucket in the following step. Also, open the URL output in your browser. The ALB shows an error page, because you haven’t deployed the application yet.
Creating a deployment artifact, also called a revision, is the next step. To do so, you need to create a zip file containing the source code, the scripts, and a configuration file. You’ll find an example to deploy Etherpad in the book’s code repository on GitHub: https://github.com/AWSinAction/code3 at /chapter15/etherpad-lite-1.8.17.zip. We encourage you to unzip the file to take a closer look at its contents.
The deployment instruction file needed for CodeDeploy is called an AppSpec file: appspec.yml. The following listing explains the AppSpec file that we prepared to deploy Etherpad.
Listing 15.2 The AppSpec file used to deploy Etherpad with the help of CodeDeploy
version: 0.0                            ①
os: linux                               ②
files:                                  ③
- source: .
  destination: /etherpad
hooks:                                  ④
  BeforeInstall:                        ⑤
  - location: hook_before_install.sh
    timeout: 60
  AfterInstall:                         ⑥
  - location: hook_after_install.sh
    timeout: 60
  ApplicationStart:                     ⑦
  - location: hook_application_start.sh
    timeout: 180
    runas: ec2-user
  ValidateService:                      ⑧
  - location: hook_validate_service.sh
    timeout: 300
    runas: ec2-user
① Odd but true: the latest version of the App Spec file format is 0.0.
② CodeDeploy supports Linux and Windows.
③ Copies all files from the archive to /etherpad
④ Hooks allow you to run scripts during the deployment process.
⑤ Triggered before CodeDeploy copies the source files
⑥ Triggered after CodeDeploy copies the source files
⑦ Triggered to start the application
⑧ Triggered to validate the service after starting the application
Now let’s inspect the contents of the hook_after_install.sh script in the next listing.
Listing 15.3 Executing the script after the install step
#!/bin/bash -ex

TOKEN=`curl -X PUT "http://169.254.169.254/
➥ latest/api/token"                                              ①
➥ -H "X-aws-ec2-metadata-token-ttl-seconds: 60"`
AZ=`curl -H "X-aws-ec2-metadata-token: $TOKEN" -v                 ②
➥ http://169.254.169.254/latest/meta-data/placement/availability-zone`
REGION=${AZ::-1}                                                  ③
DATABASE_HOST=$(aws ssm get-parameter --region ${REGION}          ④
➥ --name "/etherpad-codedeploy/database_host"
➥ --query "Parameter.Value" --output text)

chown -R ec2-user:ec2-user /etherpad/                             ⑤
cd /etherpad/
rm -fR node_modules/                                              ⑥
echo "                                                            ⑦
{
"title": "Etherpad",
"dbType": "mysql",
"dbSettings": {
"host": "${DATABASE_HOST}",
"port": "3306",
"database": "etherpad",
"user": "etherpad",
"password": "etherpad"
},
"exposeVersion": true
}
" > settings.json
① Gets a token to access the EC2 metadata service
② Fetches the availability zone of the EC2 instance from the metadata service
③ Removes the last character of the availability zone to get the region
④ Fetches the database host name from the Systems Manager Parameter Store
⑤ Makes sure all files belong to ec2-user instead of root
⑥ Cleans up the Node.js modules used by Etherpad
⑦ Generates the settings.json file for Etherpad containing the database host
Next, create a zip file containing the Etherpad source code as well as the appspec.yml file. As mentioned before, we have already prepared the zip file for you. All you have to do is upload it to S3 by executing the following command. Make sure to replace $BucketName with the artifact bucket name:
Now you are ready to deploy Etherpad. Use the following command to create a deployment. Don’t forget to replace $BucketName with the name of your artifact bucket:
aws deploy create-deployment --application-name etherpad-codedeploy
➥ --deployment-group-name etherpad-codedeploy
➥ --revision "revisionType=S3,
➥ s3Location={bucket=$BucketName,
➥ key=etherpad-lite-1.8.17.zip,bundleType=zip}"
Use the AWS Management Console or the following command to check whether the deployment succeeded. Replace $DeploymentId with the deployment ID printed to the console from the previous command:
Reload or open the URL of your Etherpad application and create a new pad. Click the settings icon to check the current version of Etherpad. The version is c85ab49, which is the latest Git commit ID for version 1.8.17.
Next, imagine you want to update to version 1.8.18 of Etherpad to roll out a fix for a security problem. The first step is to upload the revision. Don’t forget to replace $BucketName with the name of your artifact bucket:
Afterward, create another deployment to roll out version 1.8.18 with the following command:
$ aws deploy create-deployment --application-name etherpad-codedeploy
➥ --deployment-group-name etherpad-codedeploy
➥ --revision "revisionType=S3,
➥ s3Location={bucket=$BucketName,
➥ key=etherpad-lite-1.8.18.zip,bundleType=zip}"
Again, use the AWS Management Console or the following command to check progress, as shown next. Replace $DeploymentId with the deployment ID printed to the console from the previous command:
After the deployment is successful, reload the Etherpad web application. Check the version, which should be 4b96ff6 after the update. Congratulations—you have successfully deployed Etherpad with the help of CodeDeploy.
|
|
By the way, CodeDeploy will also make sure that the latest revision is deployed to any EC2 instances launched by the Auto Scaling group, such as if the health check failed and the Auto Scaling group replaced the failed EC2 instance.
Speed is an important advantage of in-place deployments with CodeDeploy. However, applying changes to long-running virtual machines, also called snowflake servers, is risky. A deployment might fail on a machine because of a change applied weeks before. It is difficult to reproduce the exact state of a machine.
That’s why we prefer a different approach. To roll out a new revision, instead of modifying a running machine, spin up a new virtual machine. By doing so, each deployment starts from the same state, which increases reliability. You will learn how to implement a rolling update of EC2 instances with the help of CloudFormation in the following section.
15.2 Rolling update with AWS CloudFormation and user data
CloudFormation is the Infrastructure as Code tool designed to manage AWS resources in an automated way. In addition, you can also use CloudFormation to orchestrate a rolling update of EC2 instances in an Auto Scaling group.
In contrast to an in-place update, a rolling update does not cause any downtime for the users. We use this approach whenever the virtual machines are disposable, meaning whenever our application does not persist any data on a local disk or in memory. For example, we use CloudFormation and user data to deploy WordPress, Jenkins, or a homegrown worker to crawl websites.
Back to our previous example: let’s deploy Etherpad on EC2 with the help of CloudFormation. Figure 15.3 explains the process, which is laid out here:
-
The engineer initiates an update of the CloudFormation stack.
-
CloudFormation orchestrates a rolling update of the EC2 instance launched by the Auto Scaling group.
-
The Auto Scaling group launches a new EC2 instance based on the updated launch template, which includes a deployment script.
-
The script fetches the source code from GitHub, creates a settings file, and starts the application.

To get started, deploy a CloudFormation stack based on the template we prepared to deploy Etherpad, as shown next. You’ll find the CloudFormation template /chapter15/ cloudformation.yaml in the book’s code repository on GitHub https://github.com/AWSinAction/code3:
aws cloudformation deploy --stack-name etherpad-cloudformation
➥ --template-file chapter15/cloudformation.yaml
➥ --parameter-overrides EtherpadVersion=1.8.17
➥ --capabilities CAPABILITY_IAM
It will take about 10 minutes until the CloudFormation stack has been created and the command returns. Afterward, use the following command to get the URL of Etherpad:
aws cloudformation describe-stacks --stack-name etherpad-cloudformation
➥ --query "Stacks[0].Outputs[0].OutputValue" --output text
Open the URL in your browser, and create a pad. Click the settings icon to check the current version of Etherpad as you did in the previous section. The version is c85ab49, which is the latest Git commit ID for version 1.8.17.
Great, but how did we deploy Etherpad to the EC2 instance? The following listing shows the CloudFormation template chapter15/cloudformation.yaml and answers this question.
Listing 15.4 Adding a bash script to the user data
# [...]
LaunchTemplate:                                                   ①
  Type: 'AWS::EC2::LaunchTemplate'
  Properties:
    LaunchTemplateData:
      # [...]
      ImageId: !FindInMap [RegionMap,
➥ !Ref 'AWS::Region', AMI]                                       ②
      InstanceType: 't2.micro'                                    ③
      UserData:                                                   ④
        'Fn::Base64': !Sub |
          #!/bin/bash -ex                                         ⑤
          trap '/opt/aws/bin/cfn-signal -e 1 --stack ${AWS::StackName}
➥ --resource AutoScalingGroup --region ${AWS::Region}' ERR       ⑥

          # Install nodejs and git
          curl -fsSL https:/ /rpm.nodesource.com/setup_14.x | bash -
          yum install -y nodejs git

          # Fetch, configure, and start Etherpad as non-root user
          su ec2-user -c '
          cd /home/ec2-user/
          git clone --depth 1 --branch ${EtherpadVersion}
➥ https:/ /github.com/AWSinAction/etherpad-lite.git               ⑦
          cd etherpad-lite/
          echo "
          {
            "title": "Etherpad",
            "dbType": "mysql",
            "dbSettings": {
              "host": "${Database.Endpoint.Address}",
              "port": "3306",
              "database": "etherpad",
              "user": "etherpad",
              "password": "etherpad"
            },
            "exposeVersion": true
          }
          " > settings.json                                       ⑧
          ./src/bin/run.sh &'                                     ⑨

          /opt/aws/bin/cfn-signal -e 0 --stack ${AWS::StackName}
➥ --resource AutoScalingGroup --region ${AWS::Region}            ⑩
# [...]
① The Auto Scaling group uses the launch template as a blueprint when launching EC2 instances.
② Picks the Amazon Linux 2 AMI dependent on the current region
③ Selects the instance type applicable for the Free Tier
④ Here is where the magic happens: the user data defined here is accessible by the EC2 instance during runtime.
⑤ The operating system will execute this bash script at the end of the boot process.
⑥ If any step fails, the script will abort and notify CloudFormation by calling cfn-signal.
⑦ Fetches Etherpad from the GitHub repository
⑧ Creates a settings file for Etherpad containing the database host name
⑩ Notifies CloudFormation about a successful deployment
Let’s repeat how this deployment works:
-
The launch template specifies a script to add to the user data when launching an EC2 instance.
-
The Auto Scaling group launches an EC2 instance based on the Amazon Linux 2 image.
-
At the end of the boot process, the EC2 instance executes the bash script fetched from user data.
In summary, user data is a way to inject a script into the boot process of an EC2 instance—a simple but powerful concept. Note that by default the script is executed only during the first boot of the instance, so don’t rely on the script to start services.
So far, we have deployed Etherpad on EC2 by injecting a bash script into the boot process with the help of user data. But how do we perform a rolling update to update Etherpad from version 1.8.17 to 1.8.18? See the next listing for details.
Listing 15.5 Updating the Auto Scaling group or the referenced launch template
AutoScalingGroup:                                  ①
  Type: 'AWS::AutoScaling::AutoScalingGroup'
  Properties:
    TargetGroupARNs:
    - !Ref LoadBalancerTargetGroup
    LaunchTemplate:                                ②
      LaunchTemplateId: !Ref LaunchTemplate
      Version: !GetAtt 'LaunchTemplate.LatestVersionNumber'
    MinSize: '1'                                   ③
    MaxSize: '2'                                   ④
    HealthCheckGracePeriod: 300
    HealthCheckType: ELB
    VPCZoneIdentifier:
    - !Ref SubnetA
    - !Ref SubnetB
    Tags:
    - PropagateAtLaunch: true
      Value: etherpad
      Key: Name
  CreationPolicy:
    ResourceSignal:
      Timeout: PT10M
  UpdatePolicy:                                    ⑤
    AutoScalingRollingUpdate:                      ⑥
      PauseTime: PT10M                             ⑦
      WaitOnResourceSignals: true                  ⑧
      MinInstancesInService: 1                     ⑨
① The resource defines the Auto Scaling group.
② References the launch template we saw earlier
③ Etherpad does not support clustering; therefore, we are launching a single machine.
④ To enable zero-downtime deployments, we must launch a second machine during the deployment process.
⑤ The update policy specifies the behavior of CloudFormation in case of changes to the launch template.
⑥ That’s where the magic happens: the configuration of the rolling update.
⑦ The Auto Scaling group awaits a success signal from launching the EC2 instance within 10 minutes (see cfn-signal in user data script).
⑧ The Auto Scaling group waits for a signal from the EC2 instance.
⑨ Makes sure the instance is up and running during the update to ensure zero downtime deployment
Let’s make the update from version 1.8.17 to 1.8.18 happen. Execute the following command to update the CloudFormation stack. You might want to open the AWS Management Console and watch the running EC2 instances. CloudFormation will spin up a new EC2 instance. As soon as the new EC2 instance is ready, CloudFormation will terminate the old one:
$ aws cloudformation deploy --stack-name etherpad-cloudformation
➥ --template-file cloudformation.yaml
➥ --parameter-overrides EtherpadVersion=1.8.18
➥ --capabilities CAPABILITY_IAM
After updating the CloudFormation stack, reload the Etherpad web application. Check the version, which should be 4b96ff6.
Congratulations! You have deployed a new version of Etherpad without any downtime for the users. Also, you learned how to use user data to bootstrap an EC2 instance in an automated way.
|
|
One flaw with launching an EC2 instance from a base image like Amazon Linux 2 and using a user data script to deploy an application is reliability. Many things can and will go wrong when executing the deployment script. For example, GitHub could be down, so the EC2 instance cannot download Etherpad’s source code. The same is true for other repositories, for example, the RPM repository used to install Node.js.
You will learn how to mitigate this risk in the next section by building AMIs, including everything that is needed to start Etherpad without any external dependencies. As an added benefit, this approach allows you to spin up an EC2 instance faster, because the boot process does not include deployment steps.
15.3 Deploying customized AMIs created by Packer
In this section, we present using customized Amazon Machine Images (AMIs), also called immutable servers. An immutable server starts from an image and is ready to go. To deploy a change, a new image is created, and the old server is replaced by a new one based on the new image.
Because a new image is needed for every change, it is advisable to automate the process of creating it. Usually, we stick to the tools AWS provides. However, we cannot recommend the EC2 Image Builder offered by AWS because it is complicated to use and doesn’t seem to be designed to build images when you own the source code. Instead, we recommend Packer, a tool provided by HashiCorp, which is very easy to use. Figure 15.4 illustrates how Packer works, as described here:

To use Packer, you need to define a template. You’ll find the Packer template to build an AMI for Etherpad at chapter15/etherpad.pkr.hcl in the book’s code repository on GitHub at https://github.com/AWSinAction/code3. The template starts with configuring Packer and the required plugins, as shown next.
Listing 15.6 The Packer template to build an Etherpad AMI, part 1
packer {
  required_plugins {
    amazon = {
      version = ">= 0.0.2"
      source  = "github.com/hashicorp/amazon"
    }
  }
}
Next, you need to define a source AMI as well as the details for the EC2 instance, which Packer will launch to build the AMI. By default, Packer uses SSH to connect to the EC2 instance. We are using the Systems Manager for increased security and usability instead.
Listing 15.7 The Packer template to build an Etherpad AMI, part 2
source "amazon-ebs" "etherpad" {
  ami_name = "awsinaction-etherpad-{{timestamp}}"   ①
  tags = {
    Name = "awsinaction-etherpad"
  }
  instance_type = "t2.micro"                        ②
  region        = "us-east-1"                       ③
  source_ami_filter {                               ④
    filters = {
      name = "amzn2-ami-hvm-2.0.*-x86_64-gp2"       ⑤
      root-device-type    = "ebs"
      virtualization-type = "hvm"
    }
    most_recent = true                              ⑥
    owners      = ["137112412989"]                  ⑦
  }
  ssh_username         = "ec2-user"
  ssh_interface        = "session_manager"          ⑧
  communicator         = "ssh"
  iam_instance_profile = "ec2-ssm-core"             ⑨
  ami_groups = ["all"]
  ami_regions = ["us-east-1"]                       ⑩
}
① Specifies the name for the new AMI adding {{timestamp}} to ensure uniqueness
② The instance type for the temporary build instance
③ The region used to build the AMI
④ The source filter defines the base AMI from which to start.
⑤ Searches for Amazon Linux 2 images; the * represents all versions.
⑥ Picks the latest version of the Amazon Linux 2 images
⑦ Filters only AMIs owned by Amazon; the AWS account 137112412989 belongs to Amazon.
⑧ Tells Packer to use the Session Manager instead of plain SSH to connect with the temporary build instance
⑨ Attaches the IAM instance profile ec2-ssm-core, which is required for the Session Manager
⑩ Adds regions to distribute the AMI worldwide
The last part of the Packer template is shown in the next listing. In the build step, a shell provisioner is used to execute commands on the temporary build instance.
Listing 15.8 The Packer template to build an Etherpad AMI, part 3
build {
  name    = "awsinaction-etherpad"
  sources = [
    "source.amazon-ebs.etherpad"                        ①
  ]

  provisioner "shell" {                                 ②
    inline = [
      "curl -fsSL https:/ /rpm.nodesource.com/setup_14.x
➥ | sudo bash -",                                      ③
      "sudo yum install -y nodejs git",                 ④
      "sudo mkdir /opt/etherpad-lite",
      "sudo chown -R ec2-user:ec2-user /opt/etherpad-lite",
      "cd /opt",
      "git clone --depth 1 --branch 1.8.17 https:/ /github.com/
➥ AWSinAction/etherpad-lite.git",                      ⑤
      "cd etherpad-lite",
      "./src/bin/installDeps.sh",                       ⑥
    ]
  }
}
① References the source; see listing 15.7.
② The shell provisioner executes a script on the temporary build instance.
③ Adds a YUM repository for Node.js
⑤ Fetches Etherpad from GitHub
⑥ Installs Etherpad dependencies
Before you proceed, make sure to install Packer on your local machine. The following commands install Packer on MacOS with brew:
You can also get the binaries from https://packer.io/downloads.html. Check out http://mng.bz/Zp8a for detailed instructions.
After you have installed Packer successfully, use the following command to initialize the tool:
Next, build an AMI with Etherpad preinstalled like this:
Watch Packer spinning up an EC2 instance, executing the provisioner shell script, stopping the EC2 instance, creating an AMI, and terminating the EC2 instance. At the end of the process, Packer will output the AMI ID, which is ami-06beed8fa64e7cb68 in the following example:
==> Builds finished. The artifacts of successful builds are:
--> awsinaction-etherpad.amazon-ebs.etherpad: AMIs were created:
us-east-1: ami-06beed8fa64e7cb68
Note the AMI ID because you will need it to deploy Etherpad on AWS soon. As shown in figure 15.5, we are using a similar approach to roll out Etherpad as we did in the previous section. The Auto Scaling group orchestrates a rolling update. But instead of using a user data script to deploy Etherpad, the Auto Scaling group provisions EC2 instances based on the AMI with Etherpad preinstalled.

Figure 15.5 Rolling out an AMI with Etherpad preinstalled, built by Packer with the help of CloudFormation
Use the following command to create the CloudFormation stack to roll out the Etherpad AMI. Replace $AMI with the AMI ID from Packer’s output:
$ aws cloudformation deploy --stack-name etherpad-packer
➥ --template-file packer.yaml
➥ --parameter-overrides AMI=$AMI
➥ --capabilities CAPABILITY_IAM
It will take CloudFormation about 10 minutes to provision all the resources. After that, the command will return. Next, use the following command to get the URL to access the Etherpad application:
aws cloudformation describe-stacks --stack-name etherpad-packer
➥ --query "Stacks[0].Outputs[0].OutputValue" --output text
Open the URL of your Etherpad application and create a new pad. Click the settings icon to check the current version of Etherpad as shown in the following listing. The version is c85ab49, which is the latest Git commit ID for version 1.8.17.
The CloudFormation template to deploy the Etherpad AMI built by Packer is very similar to that in the previous section, except a parameter allows you to hand over the ID of your Etherpad AMI. You’ll find the Packer template to build an AMI for Etherpad at chapter15/packer.yaml in the book’s code repository on GitHub at https://github.com/AWSinAction/code3.
Listing 15.9 Handing over the AMI ID to the CloudFormation template
# [...]
Parameters:
  AMI:                                                          ①
    Type: 'AWS::EC2::Image::Id'
    Description: 'The AMI ID'
Resources:
  # [...]
  LaunchTemplate:
    Type: 'AWS::EC2::LaunchTemplate'
    Properties:
      # [...]
      LaunchTemplateData:
        ImageId: !Ref AMI                                       ②
        UserData:                                               ③
          'Fn::Base64': !Sub |
            #!/bin/bash -ex
            trap '/opt/aws/bin/cfn-signal -e 1 --stack ${AWS::StackName}
➥ --resource AutoScalingGroup --region ${AWS::Region}' ERR
            cd /opt/etherpad-lite/
            echo "
            {
              "title": "Etherpad",
              "dbType": "mysql",
              "dbSettings": {
                "host": "${Database.Endpoint.Address}",
                "port": "3306",
                "database": "etherpad",
                "user": "etherpad",
                "password": "etherpad"
              },
              "exposeVersion": true
            }
            " > settings.json                                   ④
            /opt/etherpad-lite/src/bin/fastRun.sh &             ⑤
            /opt/aws/bin/cfn-signal -e 0 --stack ${AWS::StackName}
➥ --resource AutoScalingGroup --region ${AWS::Region}
# [...]
① The parameter to set the AMI
② The launch template references the AMI parameter.
③ Wait what? We are still using user data to inject a script into the boot process of the EC2 instance?
④ Yes, but only to create a settings file, which requires the database host name; this is not known when creating the AMI ...
⑤ ... and to start the Etherpad application.
There is only one important part missing: the Auto Scaling group. The following listing explains the details.
Listing 15.10 Orchestrating rolling updates with the Auto Scaling group
# [...]
AutoScalingGroup:                                 ①
  Type: 'AWS::AutoScaling::AutoScalingGroup'
  Properties:
    TargetGroupARNs:
    - !Ref LoadBalancerTargetGroup
    LaunchTemplate:                               ②
      LaunchTemplateId: !Ref LaunchTemplate
      Version: !GetAtt 'LaunchTemplate.LatestVersionNumber'
    MinSize: 1                                    ③
    MaxSize: 2                                    ④
    HealthCheckGracePeriod: 300
    HealthCheckType: ELB
    VPCZoneIdentifier:
    - !Ref SubnetA
    - !Ref SubnetB
    Tags:
    - PropagateAtLaunch: true
      Value: etherpad
      Key: Name
  CreationPolicy:
    ResourceSignal:
      Timeout: PT10M
  UpdatePolicy:
    AutoScalingRollingUpdate:                     ⑤
      PauseTime: PT10M                            ⑥
      WaitOnResourceSignals: true                 ⑦
      MinInstancesInService: 1                    ⑧
# [...]
① The Auto Scaling group ensures that an EC2 instance is running and is replaced in case of failure.
② References the launch template explained in listing 15.9
③ Starts a single machine, because Etherpad cannot run on multiple machines in parallel
④ During a rolling update, the Auto Scaling group launches a new machine before terminating the old one; therefore, we need to set the maximum size to 2.
⑤ The update policy configures the rolling update.
⑥ The Auto Scaling group will wait 10 minutes for a new EC2 instance signal success with cfn-signal.
⑦ Enabling waiting for a signal from the EC2 instance during a rolling update
⑧ Indicates zero-downtime deployments by ensuring that at least one instance is running during a deployment
To deploy a new version, you need to build a new AMI with Packer and update the CloudFormation stack with the new AMI ID. Before you do, update the Packer template chapter15/etherpad.pkr.hcl and replace Etherpad version 1.8.17 with 1.8.18, as shown next:
$ packer build chapter15/etherpad.pkr.hcl
$ aws cloudformation deploy --stack-name etherpad-packer
➥ --template-file chapter15/packer.yaml
➥ --parameter-overrides AMI=$AMI
➥ --capabilities CAPABILITY_IAM
Hurray! You have deployed Etherpad on immutable servers launched from an image built by Packer. This approach is very reliable and allows you to deploy without any downtime. After updating the CloudFormation stack, reload the Etherpad web application. Check the version, which should be 4b96ff6.
|
|
15.3.1 Tips and tricks for Packer and CloudFormation
Finally, we want to share the following tips and tricks for deploying an application of your choice with the help of Packer and CloudFormation:
-
Launch an EC2 instance based on Amazon Linux 2 or the distribution you want to build on.
-
Go through the steps necessary to get the application up and running manually.
-
Run
packerbuild, and launch an instance based on the AMI for testing. -
Roll out the AMI with CloudFormation and an Auto Scaling group.
-
Use a user data script for dynamic configuration, as shown in our example.
In case you are looking for a way to ship your own source code, check out the file provisioner (see https://www.packer.io/docs/provisioners/file), which allows you to upload local files when building AMIs with Packer.
15.4 Comparing approaches
In this last section, we will compare the three different options to deploy applications on EC2 that you have learned about while reading through this chapter. We discussed the following three different methods to deploy applications on EC2 instances in this chapter:
-
AWS CodeDeploy—Uses an agent running on the virtual machines to perform in-place deployments
-
AWS CloudFormation with user data—Spins up new machines, which will execute a deployment script at the end of the boot process
-
Packer by HashiCorp—Enables you to bundle the application into an AMI and launch immutable servers
All three options allow zero-downtime deployments, which is a game changer because it allows you to roll out changes without having to ask for a maintenance window in advance. The introduced tools also support deploying changes to a fleet of virtual machines gradually. But the approaches also have differences, as shown in table 15.2.
Table 15.2 Differences between CodeDeploy, CloudFormation and user data, and Packer
We use all three options and choose the approach that best fits a particular scenario.
Summary
-
AWS CodeDeploy is designed to automate deployments on EC2, Fargate, and Lambda. Even on-premises machines are supported.
-
AWS CloudFormation is actually an Infrastructure as Code tool but comes with features to orchestrate rolling updates of EC2 instances as well.
-
By configuring user data for an EC2 instance, you are able to inject a script that the machine will execute at the end of the boot process.
-
Packer by HashiCorp is a tool to automate the process of creating Amazon Machine Images (AMIs).
-
An immutable server is a server that you do not change after launch. Instead, to deploy changes you replace the old machine with a new one. This approach lowers the risk of side effects caused by former changes or third-party outages.