3 Using virtual machines: EC2
- Launching a virtual machine with Linux
- Controlling a virtual machine remotely via the Session Manager
- Monitoring and debugging a virtual machine
- Saving costs for virtual machines
It’s impressive what you can achieve with the computing power of the smartphone in your pocket or the laptop in your bag. But if your task requires massive computing power or high network traffic, or needs to run reliably 24/7, a virtual machine is a better fit. With a virtual machine, you get access to a slice of a physical machine located in a data center. On AWS, virtual machines are offered by the service called Elastic Compute Cloud (EC2).
In this chapter, you will learn how to launch and manage a virtual machine on AWS. Also, we will show you how to connect to a virtual machine to install or configure applications. On top of that, you will learn how to monitor a virtual machine. Last but not least, we will introduce the different pricing options of the Elastic Compute Cloud (EC2) to make sure you get the most computing power for your money.
3.1 Exploring a virtual machine
A virtual machine (VM) runs on a physical machine isolated from other virtual machines by the hypervisor; it consists of CPUs, memory, networking interfaces, and storage. The physical machine is called the host machine, and the VMs running on it are called guests. A hypervisor is responsible for isolating the guests from each other and for scheduling requests to the hardware by providing a virtual hardware platform to the guest system. Figure 3.1 shows these layers of virtualization.

Typical use cases for a virtual machine follow:
-
Operating an enterprise application, such as an ERP (enterprise resource planning) application
-
Transforming or analyzing data, such as encoding video files
3.1.1 Launching a virtual machine
In the following example, you will launch a virtual machine to run a tool called LinkChecker that checks a website for broken links. Checking for links resulting in “404 Not Found” errors improves the usability and SEO score of your website. You could run LinkChecker on your local machine as well, but an EC2 instance in Amazon’s data center offers more compute and networking capacities. As shown here, it takes only a few clicks to launch a virtual machine, which AWS calls an EC2 instance:
-
Open the AWS Management Console at https://console.aws.amazon.com.
-
Make sure you’re in the N. Virginia (US East) region (see figure 3.2), because we optimized our examples for this region.
-
Click Launch Instance to start the wizard for launching a virtual machine, as shown in figure 3.2.

A form will appear, guiding you through the following details needed to create a virtual machine:
To make it easy to find your virtual machine later, it is recommended you assign a name to it. That’s especially important when other people have access to the same AWS account. Figure 3.3 shows the details.

Selecting the operating system
Next, you need to choose an operating system (OS). In AWS, the OS comes bundled with preinstalled software for your virtual machine; this bundle is called an Amazon Machine Image (AMI). Select Amazon Linux 2 AMI (HVM), as shown in figure 3.4.
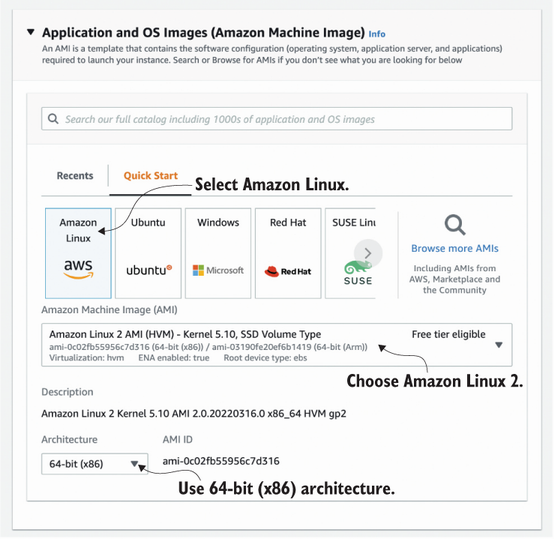
The AMI is the basis for your virtual machine starts. AMIs are offered by AWS, third-party providers, and by the community. AWS offers the Amazon Linux AMI, which is based on Red Hat Enterprise Linux and optimized for use with EC2. You’ll also find popular Linux distributions and AMIs with Microsoft Windows Server as well as more AMIs with preinstalled third-party software in the AWS Marketplace.
When choosing an AMI, start by thinking about the requirements of the application you want to run on the VM. Your knowledge and experience with a specific operating system are other important factors when deciding which AMI to start with. It’s also important that you trust the AMI’s publisher. We prefer working with Amazon Linux, because it’s maintained and optimized by AWS.

Choosing the size of your virtual machine
It’s now time to choose the computing power needed for your virtual machine. AWS classifies computing power into instance types. An instance type primarily describes the number of virtual CPUs and the amount of memory.
Table 3.1 shows examples of instance types for different use cases. The prices represent the actual prices in USD for a Linux VM in the US East (N. Virginia) region, as recorded April 5, 2022.
Table 3.1 Examples of instance families and instance types
Instance families are optimized for different kinds of use cases, as described next:
-
T family—Cheap, moderate baseline performance with the ability to burst to higher performance for short periods of time
-
M family—General purpose, with a balanced ration of CPU and memory
-
R family—Memory optimized, with more memory than CPU power compared to the M family
-
X family—Extensive capacity with a focus on memory, up to 1952 GB memory and 128 virtual cores
-
P, G, and CG family—Accelerated computing based on GPUs (graphics processing units)
-
F family—Accelerated computing based on FPGAs (field-programmable gate arrays)
Additional instance families are available for niche workloads like high-performance computing, in-memory databases, MacOS workloads, and more. See https://aws.amazon.com/ec2/instance-types/ for a full list of instance types and families.
Our experience indicates that you’ll overestimate the resource requirements for your applications. We recommend that you try to start your application with a smaller instance type than you think you need at first—you can change the instance family and type later if needed.
-
The instance family is called
t. It groups small, cheap virtual machines with low-baseline CPU performance but the ability to burst significantly over baseline CPU performance for a short time. -
The size is micro, indicating that the EC2 instance is very small.

Computer hardware is getting faster and more specialized, so AWS is constantly introducing new instance types and families. Some of them are improvements of existing instance families, and others are focused on specific workloads. For example, the instance family R6i, introduced in November 2021, provides instances for memory-intensive workloads and replaces the R5 instance types.
One of the smallest and cheapest VMs will be enough for your first experiments. Choose the instance type t2.micro, as shown in figure 3.5, which is eligible for the Free Tier.

You might have already heard about Apple switching from Intel processors to ARM processors. The reason for this is that custom-built ARM processors achieve higher performance with lower energy consumption. This is, of course, exciting not only for laptops but also for servers in the data center.
AWS offers machines based on custom-built ARM processors called Graviton as well. As a customer, you will notice similar performance at lower costs. However, you need to make sure that the software you want to run is compiled for the ARM64 architecture. We migrated workloads from EC2 instances with Intel processors to virtual machines with ARM processors a few times already, typically within one to four hours. We would have liked to use Graviton instances for the third edition of this book, but, unfortunately, these were not yet part of the Free Tier at that time. We highly recommend you check out the following Graviton instance types offered by AWS:
Configuring the key pair for login
As an administrator of a Linux machine, you used a username and password or username and a public/private key pair to authenticate yourself in the past. By default, AWS uses a username and a key pair for authentication. That’s why the next section of the wizard asks you about defining a key pair for the EC2 instance you are going to launch. We try to avoid this approach, because it works only for a single user, and it is not possible to change the key pair externally after launching an EC2 instance.
Therefore, we recommend a different approach to authenticate to an EC2 instance that we will introduce shortly. There is no need to configure the key pair now, so please select Proceed without a Key Pair, as shown in figure 3.6.

Defining network and firewall settings
In the next section of the setup process, you can configure the network and firewall settings for the EC2 instance. The default settings are fine for now. You will learn more about networking on AWS in chapter 5. The only thing you should change is to deselect the Allow SSH Traffic option. As promised before, you will learn about a new approach to connect to EC2 instances that does not require inbound SSH connectivity. With the configuration shown in figure 3.7, the firewall does not allow any incoming connections at all.

Next, attach some storage to your virtual machine for the root filesystem. It is fine to keep the defaults and attach a volume with 8 GB of type gp2, which consists of network-attached SSDs, as illustrated in figure 3.8.

Last but not least, you need to configure an advanced detail for the EC2 instance you are going to launch: an IAM role. You will learn more about IAM in chapter 5. For now, all you need to know is that an IAM role grants processes running on the virtual machine access to other AWS services. This is needed because you will use AWS services called Systems Manager and EC2 Instance Connect to establish an SSH connection with your virtual machine later.
Before you proceed configuring your EC2 instance, you need to create an IAM role. To do so open https://console.aws.amazon.com/iam/ in a new tab in your browser and do the following:

Add permissions to the IAM role by filtering and selecting the policies named AmazonSSMManagedInstanceCore, as demonstrated in figure 3.10. Doing so is required so that the Systems Manager agent running on the EC2 instance, which you will use to connect to the EC2 instance later, works properly. Afterward, proceed to the next step.

To create the IAM role, type the name ec2-ssm-core—please use this exact name because later chapters depend on it—and a description, as shown in figure 3.11. After doing so, click the Create Role button at the bottom of the page.

Switch back to the EC2 browser tab. We have a lot to configure in the Advanced Details section. Keep the default setting for everything except the IAM instance profile. Click the Reload button next to the dropdown list and select the IAM instance profile named ec2-ssm-core (see figure 3.12).

You are now ready to launch your virtual machine. To do so, just click the Launch Instance button, as illustrated in figure 3.13.

Mark this day on your calendar: you’ve just launched your first EC2 instance. Many more will follow!
3.1.2 Connecting to your virtual machine
To be able to do something with the running virtual machines, you have to log in next. After connecting to your E2 instance, you will install and run LinkChecker to check a website for broken links. Of course, this exercise is just an example. When you get administrator access to the virtual machine, you have full control and are able to install the application and configure the operating system as needed.
You will learn how to connect to an EC2 instance by using the AWS Systems Manager Session Manager. The advantages of this approach follow:
-
You do not need to configure key pairs upfront but use temporary key pairs instead.
-
You don’t need to allow inbound SSH or RDP connectivity, which limits the attack surface.
Using AWS Systems Manager Session Manager comes with the following requirements:
-
Works with virtual machines based on Amazon Linux 2, CentOS, Oracle Linux, Red Hat Enterprise Linux, SUSE Linux Enterprise Server, macOS, and Windows Server.
-
Requires the SSM agent, which is preinstalled on Amazon Linux 2, macOS >10.14, SUSE Linux Enterprise Server 12/15, Ubuntu Server >16.04, and Windows Server 2008–2012/2016/2019/2022.
-
Requires an IAM role that grants permissions to the AWS Systems Manager service; see the previous section.
The following instructions guide you through the steps necessary to connect to the EC2 instance you launched in the previous section, which fulfills all of the following requirements:
-
Choose Instances from the subnavigation options of the EC2 service, in case you are not looking at the list of EC2 instances already, as shown in figure 3.14.


After a few seconds, a terminal appears in your browser window, as shown in figure 3.16.

You are now ready to enter the first commands into the terminal of your virtual machine.
3.1.3 Installing and running software manually
Back to our example: you launched a virtual machine to run LinkChecker to find broken links on a website. First, you need to install LinkChecker. Also, the tool requires a Python runtime environment.
In general, Amazon Linux 2 comes with the package manager yum, which allows you to install additional software. Besides that, Amazon Linux 2 comes with an extras library, covering additional software packages. Run the following command to install Python 3.8. Press y when prompted to acknowledge the changes:
Next, execute the following command to install the LinkChecker tool, which allows you to find broken links on a website:
Now you’re ready to check for links pointing to websites that no longer exist. To do so, choose a website and run the following command. The -r option limits the recursion level that the tool will crawl through:
The output of checking the links looks something like this:
[...]
URL        `/images/2022/02/terminal.png'
Name       `Connect to your EC2 instance using SSH the modern way'
Parent URL https:/ /cloudonaut.io, line 379, col 1165
Real URL   https:/ /cloudonaut.io/images/2022/02/terminal.png
Check time 2.959 seconds
Size       0B
Result     Error: 404 Not Found
10 threads active,     5 links queued,   72 links in  87 URLs checked, ...
 1 thread active,      0 links queued,   86 links in  87 URLs checked, ...

Statistics:
Downloaded: 66.01KB.
Content types: 26 image, 29 text, 0 video, 0 audio, 3 application, ...
URL lengths: min=21, max=160, avg=56.

That's it. 87 links in 87 URLs checked. 0 warnings found. 1 error found.
Stopped checking at 2022-04-04 09:02:55+000 (22 seconds)
[...]
Depending on the number of web pages, the crawler may need some time to check all of them for broken links. At the end, it lists the broken links and gives you the chance to find and fix them.
3.2 Monitoring and debugging a virtual machine
If you need to find the reason for an error or determine why your application isn’t behaving as you expect, it’s important to have access to tools that can help with monitoring and debugging. AWS provides tools that let you monitor and debug your virtual machines. One approach is to examine the virtual machine’s logs.
3.2.1 Showing logs from a virtual machine
If you need to find out what your virtual machine was doing during and after startup, you have a simple solution. AWS allows you to see the EC2 instance’s logs with the help of the Management Console (the web interface you use to start and stop virtual machines). Follow these steps to open your VM’s logs:
-
Go to EC2 in the AWS Management Console: https://console.aws.amazon.com/ec2/.
-
Open the list of all virtual machines by selecting Instances from the subnavigation options.
-
Select the running virtual machine by clicking the row in the table.
-
In the Actions menu, select Monitor and Troubleshoot > Get System Log.
-
A screen showing the system logs from your VM that would normally be displayed on a physical monitor during startup, as shown in figure 3.17, appears.

The log contains all log messages that would be displayed on the monitor of your machine if you were running it on-premises. Watch for any log messages stating that an error occurred during startup. If the error message is not obvious, you should contact the vendor of the AMI or AWS Support, or post your question to the official AWS community at https://repost.aws.
This is a simple and efficient way to access your system logs without needing an SSH connection. Note that it will take several minutes for a log message to appear in the log viewer.
3.2.2 Monitoring the load of a virtual machine
AWS can help you answer another question: is your virtual machine close to its maximum capacity? Follow these steps to open the EC2 instance’s metrics:
-
Go to EC2 in the AWS Management Console: https://console.aws.amazon.com/ec2/.
-
Open the list of all virtual machines by choosing Instances from the subnavigation options.
-
Select the running virtual machine by clicking the row in the table.
-
Click the three dots at the upper-right corner of the Network in (Bytes) metric and choose Enlarge.
You’ll see a graph that shows the virtual machine’s use of incoming networking traffic, similar to figure 3.18, with metrics for CPU, network, and disk usage. As AWS is looking at your VM from the outside, there is no metric indicating the memory usage. You can publish a memory metric yourself, if needed. The metrics are updated every five minutes if you use basic monitoring, or every minute if you enable detailed monitoring of your virtual machine, which costs extra.

Figure 3.18 Gaining insight into a virtual machine’s incoming network traffic with the CloudWatch metric
Checking the metrics of your EC2 instance is helpful when debugging performance problems. You will also learn how to increase or decrease your infrastructure based on these metrics in chapter 17.
Metrics and logs help you monitor and debug your virtual machines. Both tools can help ensure that you’re providing high-quality services in a cost-efficient manner. Look at “Monitor Amazon EC2” in the AWS documentation at http://mng.bz/xMqg for more detailed information about monitoring your virtual machines.
3.3 Shutting down a virtual machine
To avoid incurring charges, you should always turn off virtual machines when you’re not using them. You can use the following four actions to control a virtual machine’s state:
-
Start—You can always start a stopped virtual machine. If you want to create a completely new machine, you’ll need to launch another virtual machine.
-
Stop—You can always stop a running virtual machine. A stopped virtual machine doesn’t incur charges, except for attached resources like network-attached storage. A stopped virtual machine can be started again but likely on a different host. If you’re using network-attached storage, your data persists.
-
Reboot—Have you tried turning off your virtual machine, then turning it on again? If you need to reboot your virtual machine, this action is what you want. You won’t lose any persistent data when rebooting a virtual machine because it stays on the same host.
-
Terminate—Terminating a virtual machine means deleting it. You can’t start a virtual machine that you’ve terminated. The virtual machine is deleted, usually together with its dependencies, like network-attached storage and public and private IP addresses. A terminated virtual machine doesn’t incur charges.
Warning The difference between stopping and terminating a virtual machine is important. You can start a stopped virtual machine. This isn’t possible with a terminated virtual machine. If you terminate a virtual machine, you delete it.
Figure 3.19 illustrates the difference between stopping and terminating an EC2 instance, with the help of a flowchart.

Stopping or terminating unused virtual machines saves costs and prevents you from being surprised by an unexpected bill from AWS. You may want to stop or terminate unused virtual machines when the following situations arise:
-
You have launched virtual machines to implement a proof of concept. After finishing the project, the virtual machines are no longer needed. Therefore, you can terminate them.
-
You are using a virtual machine to test a web application. Because no one else uses the virtual machine, you can stop it before you knock off work and start it back up again the following day.
-
One of your customers canceled their contract. After backing up the relevant data, you can terminate the virtual machines that had been used for your former customer.
After you terminate a virtual machine, it’s no longer available and eventually disappears from the list of virtual machines.
|
|
3.4 Changing the size of a virtual machine
It is always possible to change the size of a virtual machine. This is one of the advantages of using the cloud, and it gives you the ability to scale vertically. If you need more computing power, increase the size of the EC2 instance, or vice versa.
In this section, you’ll learn how to change the size of a running virtual machine. To begin, follow these steps to start a small virtual machine:
-
Go to EC2 in the AWS Management Console: https://console.aws.amazon.com/ec2/.
-
Select the IAM instance profile
ec2-ssm-coreunder Advanced Details.
You’ve now started an EC2 instance of type t2.micro. This is one of the smallest virtual machines available on AWS.
Use the Session Manager to connect to the instance as demonstrated in the previous section, and execute cat /proc/cpuinfo and free -m to see information about the machine’s capabilities. The output should look similar to this:
$ cat /proc/cpuinfo
processor       : 0
vendor_id       : GenuineIntel
cpu family      : 6
model           : 63
model name      : Intel(R) Xeon(R) CPU E5-2676 v3 @ 2.40GHz
stepping        : 2
microcode       : 0x46
cpu MHz         : 2399.915
cache size      : 30720 KB
[...]
$ free -m
         total    used    free    shared    buff/cache    available
Mem:       965      93     379         0           492          739
Swap:        0       0       0
Your virtual machine provides a single CPU core and 965 MB of memory. If your application is having performance problems, increasing the instance size can solve this. Use your machine’s metrics as described in section 3.2 to find out whether you are running out of CPU or networking capacity. Would your application benefit from additional memory? If so, increasing the instance size will improve the application’s performance as well.
If you need more CPUs, more memory, or more networking capacity, you can choose from many other sizes. You can even change the virtual machine’s instance family and generation. To increase the size of your VM, you first need to stop it as follows:
-
Go to EC2 in the AWS Management Console: https://console.aws.amazon.com/ec2/.
-
Click Instances in the submenu to jump to an overview of your virtual machines.
Warning Starting a virtual machine with instance type m5.large incurs charges. Go to http://aws.amazon.com/ec2/pricing if you want to see the current on-demand hourly price for an m5.large virtual machine.
After waiting for the virtual machine to stop, you can change the instance type as follows:

You’ve now changed the size of your virtual machine and are ready to start it again. To do so, select your EC2 instance and click Start Instance under Instance State. Your VM will start with more CPUs, more memory, and increased networking capabilities.
Use the Session Manager to connect to your EC2 instance, and execute cat /proc/cpuinfo and free -m to see information about its CPU and memory again. The output should look similar to this:
$ cat /proc/cpuinfo
processor       : 0
vendor_id       : GenuineIntel
cpu family      : 6
model           : 85
model name      : Intel(R) Xeon(R) Platinum 8259CL CPU @ 2.50GHz
stepping        : 7
microcode       : 0x500320a
cpu MHz         : 3117.531
cache size      : 36608 KB
[...]

processor       : 1
vendor_id       : GenuineIntel
cpu family      : 6
model           : 85
model name      : Intel(R) Xeon(R) Platinum 8259CL CPU @ 2.50GHz
stepping        : 7
microcode       : 0x500320a
cpu MHz         : 3100.884
cache size      : 36608 KB
[...]

$ free -m
         total    used    free    shared    buff/cache    available
Mem:      7737     108    7427         0           202         7406
Swap:        0       0       0
Your virtual machine can use two CPU cores and offers 7,737 MB of memory, compared to a single CPU core and 965 MB of memory before you increased the VM’s size.
|
|
3.5 Starting a virtual machine in another data center
AWS offers data centers all over the world. Take the following criteria into account when deciding which region to choose for your cloud infrastructure:
-
Latency—Which region offers the shortest distance between your users and your infrastructure?
-
Compliance—Are you allowed to store and process data in that country?
-
Service availability—AWS does not offer all services in all regions. Are the services you are planning to use available in the region? Check out the service availability region table at https://aws.amazon.com/about-aws/global-infrastructure/regional-product-services/ or https://awsservices.info.
-
Costs—Service costs vary by region. Which region is the most cost-effective region for your infrastructure?
Let’s assume you have customers not just in the United States but in Australia as well. At the moment you are operating EC2 instances only in N. Virginia (US). Customers from Australia complain about long loading times when accessing your website. To make your Australian customers happy, you decide to launch an additional VM in Australia.
Changing a data center is simple. The Management Console always shows the current data center you’re working in on the right side of the main navigation menu. So far, you’ve worked in the data centers located in N. Virginia (US), called us-east-1. To change the data center, click N. Virginia and select Asia Pacific (Sydney) from the menu. Figure 3.21 shows how to jump to the data center in Sydney, also called ap-southeast-2.

Figure 3.21 Changing the data center’s location from N. Virginia to Sydney in the Management Console
AWS groups its data centers into these regions:
You can specify the region for most AWS services. The regions are independent of each other; data isn’t transferred between regions. Typically, a region is a collection of three or more data centers located in the same area. Those data centers are well connected to each other and offer the ability to build a highly available infrastructure, as you’ll discover later in this book. Some AWS services—like IAM, where you created the ec2-ssm-core role, or the CDN and the Domain Name System (DNS) service—act globally on top of these regions and even on top of some additional data centers.
Next, start a virtual machine in a data center in Sydney following these steps:
-
Go to EC2 in the AWS Management Console: https://console.aws.amazon.com/ec2/.
-
Select the IAM instance profile
ec2-ssm-coreunder Advanced Details.
You did it! Your virtual machine is now running in a data center in Sydney. Let’s proceed with installing a web server on it. To do so, you have to connect to your virtual machine via Session Manager as you did in the previous sections.
Use the following commands to install and start an Apache web server on your virtual machine:
Next, start the web server and make sure it will get started whenever the machine starts automatically.
To access the default website served by Apache, you need to know the public IPv4 address of your EC2 instance. Get this information by selecting your virtual machine and looking into the details via the Management Console. You can also execute the following command in the terminal of your EC2 instance:
Open http://$PublicIp in your browser. Don’t forget to replace $PublicIp with the public IPv4 address of your EC2 instance, for example, http://52.54.202.9. A demo website appears.
The public IPv4 address assigned to your EC2 instance is subject to change. For example, when you stop and start your instance, AWS assigns a new public IPv4 address. Therefore, you will learn how to attach a fixed public IP address to the virtual machine in the following section.
3.6 Allocating a public IP address
You’ve already launched some virtual machines while reading this book. Each VM was connected to a public IP address automatically. But every time you launched or stopped a VM, the public IP address changed. If you want to host an application under a fixed IP address, this won’t work. AWS offers a service called Elastic IPs for allocating fixed public IP addresses.
Using a fixed public IP address is useful, in case clients aren’t able to resolve a DNS name, a firewall rule based on IP addresses is required, or you don’t want to update DNS records to avoid the delay until all clients resolve to the new IP address. Therefore, allocate a public IP address and associate with your EC2 instance named sydney as follows:
-
Choose Elastic IPs from the submenu. You’ll see an overview of public IP addresses allocated by you.
-
Allocate a public IP address by clicking Allocate Elastic IP Address, as shown in figure 3.22.
-
Select Amazon’s Pool of IPv4 Addresses, and click the Allocate button, as shown in figure 3.23.
-
To associate the Elastic IP with your EC2 instance, select the public IP address you just allocated, click the Actions button, and select Associate Elastic IP Address.
-
Select the resource type Instance, and select your EC2 instance named
sydneyfrom the dropdown list, as shown in figure 3.24.


Hurray! Your virtual machine is now accessible through the public IP address you allocated at the beginning of this section. Point your browser to this IP address, and you should see the placeholder page as you did in section 3.5.
Allocating a static public IP address can be useful if you want to make sure the endpoint to your application doesn’t change, even if you have to replace the virtual machine behind the scenes. For example, assume that virtual machine A is running and has an associated Elastic IP. The following steps let you replace the virtual machine with a new one without changing the public IP address:
-
Start a new virtual machine B to replace the running virtual machine A.
-
Install and start applications as well as all dependencies on virtual machine B.
-
Disassociate the Elastic IP from virtual machine A, and associate it with virtual machine B.
Requests using the Elastic IP address will now be routed to virtual machine B, with a short interruption while moving the Elastic IP. You can also connect multiple public IP addresses with a virtual machine by using multiple network interfaces, as described in the next section. This method can be useful if you need to host different applications running on the same port, or if you want to use a unique fixed public IP address for different websites.
Warning IPv4 addresses are scarce. To prevent stockpiling Elastic IP addresses, AWS will charge you for Elastic IP addresses that aren’t associated with a virtual machine. You’ll clean up the allocated IP address at the end of the next section.
3.7 Adding an additional network interface to a virtual machine
In addition to managing public IP addresses, you can control your virtual machine’s network interfaces. It is possible to add multiple network interfaces to a VM and control the private and public IP addresses associated with those network interfaces. Here are some typical use cases for EC2 instances with multiple network interfaces:
-
Your web server needs to answer requests by using multiple TLS/SSL certificates, and you can’t use the Server Name Indication (SNI) extension due to legacy clients.
-
You want to create a management network separated from the application network, and, therefore, your EC2 instance needs to be accessible from two networks. Figure 3.25 illustrates an example.
-
Your application requires or recommends the use of multiple network interfaces (e.g., network and security appliances).

In the next procedure, you will use an additional network interface to connect a second public IP address to your EC2 instance. Follow these steps to create an additional networking interface for your virtual machine:
-
Select Network Interfaces from the submenu. The default network interface of your virtual machine is shown in the list. Note the subnet ID of this network interface.
-
Enter 2nd interface as the description, as shown in figure 3.26.

After the new network interface’s state changes to Available, you can attach it to your virtual machine. Select the new 2nd interface network interface, and select Attach from the Actions menu. A dialog opens like the one shown in figure 3.27. Choose the only available Instance ID, and click Attach.

You’ve attached an additional networking interface to your virtual machine. Next, you’ll associate an additional public IP address to the additional networking interface. To do so, note the network interface ID of the 2nd interface shown in the overview--eni-0865886f80fcc31a9 in our example—and follow these steps:
-
Click Allocate Elastic IP Address as you did in section 3.6.
-
Select the newly created public IP address, and select Associate Elastic IP Address from the Actions menu.
-
Select Network Interface as the resource type, as shown in figure 3.28.
-
Select the only available private IP of your network interface.

Your virtual machine is now reachable under two different public IP addresses. This enables you to serve two different websites, depending on the public IP address. You need to configure the web server to answer requests depending on the public IP address. Use the Session Manager to connect to your EC2 instance named sydney and execute ifconfig in the terminal, which will output the network configuration of your virtual machine, shown here:
$ ifconfig
eth0: flags=4163<UP,BROADCAST,RUNNING,MULTICAST>  mtu 9001
   inet 172.31.33.219  netmask 255.255.240.0  broadcast 172.31.47.255   ①
   inet6 fe80::495:5fff:fea6:abde  prefixlen 64  scopeid 0x20<link>
   ether 06:95:5f:a6:ab:de  txqueuelen 1000  (Ethernet)
   RX packets 68382  bytes 80442006 (76.7 MiB)
   RX errors 0  dropped 0  overruns 0  frame 0
   TX packets 35228  bytes 4219870 (4.0 MiB)
   TX errors 0  dropped 0 overruns 0  carrier 0  collisions 0

eth1: flags=4163<UP,BROADCAST,RUNNING,MULTICAST>  mtu 9001
   inet 172.31.47.158  netmask 255.255.240.0  broadcast 172.31.47.255   ②
   inet6 fe80::4a2:8fff:feea:bbba  prefixlen 64  scopeid 0x20<link>
   ether 06:a2:8f:ea:bb:ba  txqueuelen 1000  (Ethernet)
   RX packets 22  bytes 1641 (1.6 KiB)
   RX errors 0  dropped 0  overruns 0  frame 0
   TX packets 33  bytes 2971 (2.9 KiB)
   TX errors 0  dropped 0 overruns 0  carrier 0  collisions 0
 [...]
① The primary network interface uses the private IP address 172.31.33.219.
② The secondary network interface uses the private IP address 172.31.47.158.
Each network interface is connected to a private and a public IP address. You’ll need to configure the web server to deliver different websites, depending on the IP address. Your virtual machine doesn’t know anything about its public IP address, but you can distinguish the requests based on the private IP addresses.
First you need two websites. Run the following commands on your virtual machine in Sydney via the Session Manager to download two simple placeholder websites:
$ sudo -s
$ mkdir /var/www/html/a
$ wget -P /var/www/html/a
➥ https:/ /raw.githubusercontent.com/AWSinAction/code3/main/chapter03
➥ /a/index.html
$ mkdir /var/www/html/b
$ wget -P /var/www/html/b
➥ https:/ /raw.githubusercontent.com/AWSinAction/code3/main/chapter03
➥ /b/index.html
Next, you need to configure the web server to deliver the websites, depending on which IP address is called. To do so, add a file named a.conf under /etc/httpd/conf.d. The following example uses the editor nano:
Copy and paste the following file content. Change the IP address from 172.31.x.x to the IP address from the ifconfig output for the networking interface eth0:
Press CTRL + X and select y to save the file.
Repeat the same process for a configuration file named b.conf under /etc/httpd/ conf.d with the following content. Change the IP address from 172.31.y.y to the IP address from the ifconfig output for the networking interface eth1:
To activate the new web server configuration, execute systemctl restart httpd.
Next, go to the Elastic IP overview in the Management Console. Copy both public IP addresses, and open them with your web browser. You should get the answer “Hello A!” or “Hello B!,” depending on the public IP address you’re calling. Thus, you can deliver two different websites, depending on which public IP address the user is calling. Congrats—you’re finished!
Note You switched to the AWS region in Sydney earlier. Now you need to switch back to the region US East (N. Virginia). You can do so by selecting US East (N. Virginia) from the region chooser in the main navigation menu of the Management Console.
|
|
3.8 Optimizing costs for virtual machines
Usually you launch virtual machines on demand in the cloud to gain maximum flexibility. AWS calls them on-demand instances, because you can start and stop VMs on demand, whenever you like, and you’re billed for every second or hour the machine is running.
Besides stopping or downsizing EC2 instances, you have two options to reduce costs: Spot Instances and Savings Plans. Both help to reduce costs but decrease your flexibility. With a Spot Instance, you take advantage of unused capacity in an AWS data center. A Spot Instance comes with a discount of up to 90% compared to on-demand instances. However, AWS might terminate a Spot Instance at anytime when the resources are needed for someone else, so this type of instance is for stateless and fault-tolerant workloads only. With Savings Plans, you commit to a certain amount of resource consumption for one or three years and get a discount in turn. Therefore, Savings Plans are a good fit if you are running workloads with planning security. Table 3.2 summarizes the differences between the pricing options.
Table 3.2 Differences between on-demand instances, Savings Plans, and Spot Instances
|
Dynamic workloads (e.g., for a news site) or proof of concept |
Predictable and static workloads (e.g., for a business application) |
Batch workloads (e.g., for data analytics, media encoding, etc.) |
3.8.1 Commit to usage, get a discount
AWS offers the following two types of Savings Plans for EC2:
-
Compute Savings Plans do not apply only to EC2 but also to Fargate (Container) and Lambda (Serverless) as well.
When purchasing a Compute Savings Plan, you need to specify the following details:
For example, when committing to $1 per hour for one year and paying $8,760.00 upfront, you will get an m5.large EC2 instance at a discount of 31% in US East (N. Virginia). As you might have guessed already, the discount between on-demand and Savings Plans differs based on term, payment option, and even region. Find more details at https://aws.amazon.com/savingsplans/compute-pricing/.
An EC2 Instance Savings Plan applies to EC2 instances only. Therefore, it does not provide the flexibility to migrate a workload from virtual machines (EC2) to containers (Fargate). However, EC2 Instance Savings Plans offer a higher discount compared to Compute Savings Plans.
When purchasing an EC2 Instance Savings Plan, you need to specify the following details:
So the Savings Plan applies only to EC2 instances of a certain instance family in a certain region. Note that you are able to modify the instance family of a Savings Plan later, if needed.
Let’s look at the earlier example again. When committing to $1 per hour for one year of m5 instances running in us-east-1 and paying $8,760.00 upfront, you will get an m5.large EC2 instance at a discount of 42% in US East (N. Virginia). Compare that to the 31% discount when purchasing a Compute Savings Plan instead.
Warning Buying a reservation will incur costs for one or three years. That’s why we did not add an example for this section.
Think of Savings Plans as a way to optimize your AWS bill. Buying a Savings Plan does not have any effect on your running EC2 instances. Also, an on-demand instance gets billed under the conditions of a Savings Plan automatically. There is no need to restart or modify an EC2 instance.
In summary, we highly recommend purchasing Savings Plans for workloads, where predicting the resource consumption for the next year is possible. It is worth noting that it is not necessary to cover 100% of your usage with Savings Plans. Reducing costs is also possible by committing to a smaller fraction of your workload.
3.8.2 Taking advantage of spare compute capacity
AWS is operating data centers at large scale, which results in spare capacity because it has to build and provision data centers and machines in advance to be able to fulfill future needs for on-demand capacity. But spare capacity does not generate revenue. That’s why AWS tries to reduce spare capacity within its data centers. One way of doing so is offering Spot Instances.
Here is the deal. With Spot Instances, you get a significant discount on the on-demand price without the need to commit to using capacity in advance. In turn, a Spot Instance will start only when AWS decides that there is enough spare capacity available. In addition, a Spot Instance might be terminated by AWS at any time on short notice.
For example, when writing this on April 8, 2022, the price for an m5.large Spot Instance in US East (N. Virginia) is $0.039 per hour. That’s a discount of about 60% compared to the $0.096 on-demand price. The spot price for EC2 instances used to be very volatile. Nowadays, it changes much more slowly.
But who is crazy enough to use virtual machines that might be terminated by AWS at any time with notice of only two minutes before the machine gets interrupted? Here are a few scenarios:
-
Scanning objects stored on S3 for viruses and malware, by processing tasks stored in a queue
-
Converting media files into different formats, where the process orchestrator will restart failed jobs automatically
-
Processing parts of the requests for a web application, when the system is designed for fault tolerance
On top of that, we use Spot Instances for test systems where dealing with short outages is worth the cost savings.
As discussed in the previous section, using Savings Plans does not require any changes to your EC2 instances. But to use Spot Instances, you have to launch new EC2 instances and also plan for interrupted virtual machines.
Next, you will launch your first spot instance as follows:
-
Go to EC2 in the AWS Management Console: https://console.aws.amazon.com/ ec2/.
-
Select Manually Configure Launch Parameters, as shown in figure 3.29.
-
Select the IAM instance profile
ec2-ssm-coreto be able to connect to the Spot Instance using the Session Manager. -
Set the total target capacity to one instance, as demonstrated in figure 3.30.
-
Chose Manually Select Instance Types, as shown in figure 3.31.
-
Empty the list of prepopulated instance types by selecting all instance types and clicking the Delete button.
-
Click the Add Instance Types button and select
t2.microfrom the list. -
Choose the allocation strategy Capacity Optimized to increase the availability of a spot instance, as shown in figure 3.32.
-
Two items appear in the list of spot requests. Wait until both the instance and fleet request reach status
Fulfilled, as shown in figure 3.33. -
Select Instances from the subnavigation options. The list of EC2 instances includes your first Spot Instance.


The Spot Instance is ready for your workload. But be aware that AWS might terminate the Spot Instance at any time to free capacity for other workloads. AWS notifies you two minutes before terminating a Spot Instance.
One way to get notified about an interruption is to ask the EC2 metadata service about planned instance actions. Use the Session Manager to connect with your EC2 instance and execute the following command to send an HTTP request to the EC2 metadata service, which is accessible only from your virtual machine. Most likely, the HTTP request will result in a 404 error, which is a good sign, because that means AWS did not mark your Spot Instance for termination:
$ curl http://169.254.169.254/latest/meta-data/spot/instance-action
<?xml version="1.0" encoding="iso-8859-1"?><!DOCTYPE html PUBLIC "-//W3C//DTD XHTML 1.0 Transitional//EN"
        "http://www .w3.org/TR/xhtml1/DTD/xhtml1-transitional.dtd">
<html xmlns="http://www .w3.org/1999/xhtml" xml:lang="en" lang="en">
 <head>
  <title>404 - Not Found</title>
 </head>
 <body>
  <h1>404 - Not Found</h1>
 </body>
</html>
sh-4.2$
If the HTTP request results into something like that shown in the following snippet, your instance will be terminated within two minutes:
In summary, Spot Instances help AWS to reduce spare capacity in their data centers and save us costs. However, you need to make sure that your application tolerates interruptions of Spot Instances, which might cause increased engineering effort.
|
|
Summary
-
When launching a virtual machine on AWS, you chose between a wide variety of operating systems: Amazon Linux, Ubuntu, Windows, and many more.
-
Modifying the size of a virtual machine is simple: stop the virtual machine, modify the instance type—which defines the number of CPUs as well as the amount of memory and storage—and start the virtual machine.
-
Using logs and metrics can help you to monitor and debug your virtual machine.
-
AWS offers data centers all over the world. Starting VMs in Sydney, Australia, works the same as starting a machine in northern Virginia.
-
Choose a data center by considering network latency, legal requirements, and costs, as well as available features.
-
Allocating and associating a public IP address to your virtual machine gives you the flexibility to replace a VM without changing the public IP address.
-
Committing to a certain compute usage for one or three years reduces the cost of virtual machines through buying Savings Plans.
-
Use spare capacity at significant discount but with the risk of AWS terminating your virtual machine in case the capacity is needed elsewhere.