
4 Programming your infrastructure: The command line, SDKs, and CloudFormation
- Starting a virtual machine with the command-line interface (CLI)
- Starting a virtual machine with JavaScript SDK for Node.js
- Understanding the idea of infrastructure as code
- Using CloudFormation to start a virtual machine
Imagine that we want to provide room lighting as a service. To switch off the lights in a room using software, we need a hardware device like a relay connected to the light circuit. This hardware device must have some kind of interface that lets us send commands via software. With a relay and an interface, we can offer room lighting as a service.
To run a virtual machine, we need a lot of hardware and software—power supply, networking gear, host machine, operating system, virtualization layer, and much more. Luckily, AWS runs the hardware and software for us. Even better, we can control all of that with software. AWS provides an application programming interface (API) that we can use to control every part of AWS with HTTPS requests. In the end, you can write software that spins up VMs on AWS as well as in-memory caches, data warehouses, and much more.
Calling the HTTP API is a low level task and requires a lot of repetitive work, like authentication, data (de)serialization, and so on. That’s why AWS offers tools on top of the HTTP API that are easier to use. Those tools follow:
-
Command-line interface (CLI)—Use the CLI to call the AWS API from your terminal.
-
Software development kit (SDK)—SDKs, available for most programming languages, make it easy to call the AWS API from your programming language of choice.
-
AWS CloudFormation—Templates are used to describe the state of the infrastructure. AWS CloudFormation translates these templates into API calls.
On AWS, you control everything via an API. You interact with AWS by making calls to the REST API using the HTTPS protocol, as figure 4.1 illustrates. Everything is available through the API. You can start a virtual machine with a single API call, create 1 TB of storage, or start a Hadoop cluster over the API. By everything, we really mean everything. You’ll need some time to understand the consequences. By the time you finish this book, you’ll ask why the world wasn’t always this easy.

Let’s look at how the API works. Imagine you uploaded a few files to the object store S3 (you will learn about S3 in chapter 7). Now you want to list all the files in the S3 object store to check whether the upload was successful. Using the raw HTTP API, you send a GET request to the API endpoint using the following HTTP protocol:
① HTTP method GET, HTTP resource /, using HTTP protocol version 1.1
② Specifies the host name; keep in mind that TCP/IP knows only about IP addresses and ports.
③ Authentication information (details omitted)
The HTTP response will look like this:
HTTP/1.1 200 OK                             ①
 x-amz-id-2: [...]
 x-amz-request-id: [...]
 Date: Mon, 09 Feb 2015 10:32:16 GMT        ②
 Content-Type: application/xml              ③

 <?xml version="1.0" encoding="UTF-8"?>     ④
 <ListBucketResult xmlns="http://s3.amazonaws.com/doc/2006-03-01/">
 [...]
 </ListBucketResult>
① Using HTTP protocol version 1.1; status code 200 signals a success.
② An HTTP header shows when the response was generated.
③ The response body is an XML document.
④ The response body starts here.
Calling the API directly using plain HTTPS requests is inconvenient. The easy way to talk to AWS is by using the CLI or SDKs, as you’ll learn in this chapter. The API, however, is the foundation of all these tools.
4.1 Automation and the DevOps movement
The DevOps movement aims to bring software development and operations together. This usually is accomplished in one of two ways:
-
Using mixed teams with members from both operations and development. Developers become responsible for operational tasks like being on call. Operators are involved from the beginning of the software development cycle, which helps make the software easier to operate.
-
Introducing a new role that closes the gap between developers and operators. This role communicates a lot with both developers and operators and cares about all topics that touch both worlds.
The goal is to develop and deliver software to the customer rapidly without negatively affecting quality. Communication and collaboration between development and operations are, therefore, necessary.
The trend toward automation has helped DevOps culture bloom, because it codifies the cooperation between development and operations. You can do multiple deployments per day only if you automate the whole process. If you commit changes to the repository, the source code is automatically built and tested against your automated tests. If the build passes the tests, it’s automatically installed in your testing environment, which triggers some acceptance tests. After those tests have passed, the change is propagated into production. But this isn’t the end of the process: now you need to carefully monitor your system and analyze the logs in real time to ensure that the change was successful.
If your infrastructure is automated, you can spawn a new system for every change introduced to the code repository and run the acceptance tests isolated from other changes that were pushed to the repository at the same time. Whenever a change is made to the code, a new system is created (virtual machine, databases, networks, and so on) to run the change in isolation.
4.1.1 Why should you automate?
Why should you automate instead of using the graphical AWS Management Console? A script or a blueprint can be reused and will save you time in the long run. You can build new infrastructures quickly with ready-to-use modules from your former projects, or automate tasks that you will have to do regularly. Automating your infrastructure also enhances your software development process, for example, by using a deployment pipeline.
Another benefit is that a script or blueprint is the most detailed documentation you can imagine (even a computer understands it). If you want to reproduce on Monday what you did last Friday, a script is worth its weight in gold. If you’re sick and a coworker needs to take care of your tasks, they will appreciate your blueprints.
You’re now going to install and configure the CLI. After that, you can get your hands dirty and start scripting. The AWS CLI is one tool for automating AWS. Read on to learn how it works.
4.2 Using the command-line interface
The AWS CLI is a convenient way to interact with AWS from your terminal. It runs on Linux, macOS, and Windows and provides a unified interface for all AWS services. Unless otherwise specified, the output is by default in JSON format.
4.2.1 Installing the CLI
How you proceed depends on your OS. If you’re having difficulty installing the CLI, consult http://mng.bz/AVng for a detailed description of many installation options.
In your terminal, execute the following commands:
$ curl "https:/ /awscli.amazonaws.com/awscli-exe-linux-x86_64.zip"
➥ -o "awscliv2.zip"
$ unzip awscliv2.zip
$ sudo ./aws/install
Verify your AWS CLI installation by running aws --version in your terminal. The version should be at least 2.4.0.
In your terminal, execute the following commands:
$ curl "https:/ /awscli.amazonaws.com/awscli-exe-linux-aarch64.zip"
➥ -o "awscliv2.zip"
$ unzip awscliv2.zip
$ sudo ./aws/install
Verify your AWS CLI installation by running aws --version in your terminal. The version should be at least 2.4.0.
The following steps guide you through installing the AWS CLI on macOS using the installer:
-
Download the AWS CLI installer at https://awscli.amazonaws.com/AWSCLIV2.pkg.
-
Run the downloaded installer, and install the CLI by going through the installation wizard for all users.
-
Verify your AWS CLI installation by running
aws--versionin your terminal. The version should be at least 2.4.0.
The following steps guide you through installing the AWS CLI on Windows using the MSI Installer:
-
Download the AWS CLI installer at https://awscli.amazonaws.com/AWSCLIV2.msi.
-
Run the downloaded installer, and install the CLI by going through the installation wizard.
-
Run PowerShell as administrator by searching for “PowerShell” in the Start menu and choosing Run as Administrator from its context menu.
-
Type
Set-ExecutionPolicyUnrestrictedinto PowerShell, and press Enter to execute the command. This allows you to execute the unsigned PowerShell scripts from our examples. -
Close the PowerShell window; you no longer need to work as administrator.
-
Verify whether the CLI is working by executing
aws--versionin PowerShell. The version should be at least 2.4.0.
Warning Setting the PowerShell execution policy to Unrestricted allows you to run unsigned scripts. There is a risk of running malicious scripts. Use it to run the scripts provided in our examples only. Check about Execution Policies (http://mng.bz/1MK1) to learn more.
4.2.2 Configuring the CLI
To use the CLI, you need to authenticate. Until now, you’ve been using the root AWS account. This account can do everything, good and bad. It’s strongly recommended that you not use the AWS root account (you’ll learn more about security in chapter 5), so let’s create a new user. To create a new user, use the following steps, which are illustrated in figure 4.2:
-
Open the AWS Management Console at https://console.aws.amazon.com.

A page opens as shown in figure 4.3; select Users at the left.

Follow these steps to create a user:

In the next step, you have to define the permissions for the new user, as shown in figure 4.5:

No tags are needed (you learned about tags in chapter 2), so click the Next: Review button.
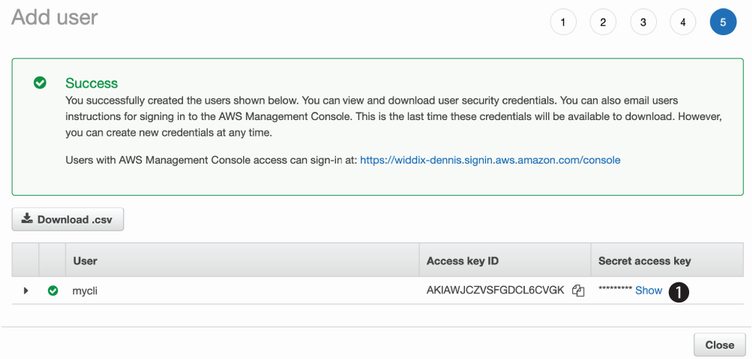
The review page sums up what you have configured. Click the Create User button to save. Finally, you will see the page shown in figure 4.6. Click the Show link to display the secret value. You now need to copy the credentials to your CLI configuration. Read on to learn how this works.
Warning Treat the access key ID and secret access key as top secret. Anyone who gets access to these credentials will have administrator access to your AWS account.
Open the terminal on your computer (PowerShell on Windows or a shell on Linux and macOS; not the AWS Management Console), and run aws configure. You’re asked for the next four pieces of information:
-
AWS access key ID—Copy and paste this value from the Access key ID column (your browser window).
-
AWS secret access key—Copy and paste this value from the Secret access key column (your browser window).
In the end, the terminal should look similar to this:
$ aws configure
 AWS Access Key ID [None]:  AKIAIRUR3YLPOSVD7ZCA   ①
 AWS Secret Access Key [None]:
➥ SSKIng7jkAKERpcT3YphX4cD87sBYgWVw2enqBj7        ②
 Default region name [None]: us-east-1
 Default output format [None]: json
① Your value will be different! Copy it from your browser window.
② Your value will be different! Copy it from your browser window.
The CLI is now configured to authenticate as the user mycli. Switch back to the browser window, and click Close to finish the user-creation wizard.
It’s time to test whether the CLI works. Switch to the terminal window, and enter aws ec2 describe-regions to get a list of all available regions, as shown here:
$ aws ec2 describe-regions
{
  "Regions": [
    {
      "Endpoint": "ec2.eu-north-1.amazonaws.com",
      "RegionName": "eu-north-1",
      "OptInStatus": "opt-in-not-required"
    },
    [...]
    {
      "Endpoint": "ec2.us-west-2.amazonaws.com",
      "RegionName": "us-west-2",
      "OptInStatus": "opt-in-not-required"
    }
  ]
}
It works! You can now begin to use the CLI.
4.2.3 Using the CLI
Suppose you want to get a list of all running EC2 instances of type t2.micro so you can see what is running in your AWS account. Execute the following command in your terminal:
$ aws ec2 describe-instances --filters "Name=instance-type,Values=t2.micro"
{
  "Reservations": []     ①
}
① The list is empty because you haven’t created an EC2 instance.
To use the AWS CLI, you need to specify a service and an action. In the previous example, the service is ec2 and the action is describe-instances. You can add options with --name value as follows:
One important feature of the CLI is the help keyword. You can get help at the following three levels of detail:
-
aws<service>help—Shows all actions available for a certain service -
aws<service><action>help—Shows all options available for the particular service action
4.2.4 Automating with the CLI
Sometimes you need temporary computing power, like a Linux machine to test something. To do this, you can write a script that creates a virtual machine for you. The script will run on your local computer and does the following:
$ ./virtualmachine.sh
waiting for i-08f21510e8c4f4441 ...         ①
i-08f21510e8c4f4441 is up and running
connect to the instance using Session Manager
https:/ /console.aws.amazon.com/systems-manager/ses[...]441
Press [Enter] key to terminate i-08f21510e8c4f4441 ...
terminating i-08f21510e8c4f4441 ...         ②
done.
Your virtual machine runs until you press the Enter key. When you press Enter, the virtual machine is terminated. The CLI solution solves the following use cases:
Depending on your OS, you’ll use either Bash (Linux and macOS) or PowerShell (Windows) to script.
One important feature of the CLI needs explanation before you can begin. The --query option uses JMESPath syntax, which is a query language for JSON, to extract data from the result. Doing this can be useful because usually you need only a specific field from the result. The following CLI command gets a list of all AMIs in JSON format:
$ aws ec2 describe-images --filters
➥  "Name=name,Values=amzn2-ami-hvm-2.0.202*-x86_64-gp2"     ①
{
  "Images": [
    {
      "ImageId": "ami-0ce1e3f77cd41957e",
      "State": "available"
      [...]
    },
    [...]
    {
      "ImageId": "ami-08754599965c30981",
      "State": "available"
    }
  ]
}
① The filter returns only Amazon Linux 2 images for AMD/Intel.
The output is overwhelming. To start an EC2 instance, you need the ImageId without all the other information. With JMESPath, you can extract just that information, like so:
$ aws ec2 describe-images --filters
➥ "Name=name,Values=amzn2-ami-hvm-2.0.202*-x86_64-gp2"
➥ --query "Images[0].ImageId"        ①
"ami-146e2a7c"
① Returns the first image ID from the list
The output is wrapped in quotes. This is caused by the default setting of the AWS CLI to output all data in JSON format and JSON strings are enclosed in quotes. To change that, use the --output text option as follows to format the output as multiple lines of tab-separated string values. This setting can be useful to pass the output to a text processor, like grep, sed, or awk:
$ aws ec2 describe-images --filters
➥ "Name=name,Values=amzn2-ami-hvm-2.0.202*-x86_64-gp2"
➥ --query "Images[0].ImageId" --output text         ①
ami-146e2a7c
① Sets the output format to plain text
With this short introduction to JMESPath, you’re well equipped to extract the data you need.
Linux and macOS can interpret Bash scripts, whereas Windows prefers PowerShell scripts. So, we’ve created two versions of the same script.
You can find the following listing in /chapter04/virtualmachine.sh in the book’s code folder. You can run it either by copying and pasting each line into your terminal or by executing the entire script via the following:
① Ensures that the script is executable (only required once)
Listing 4.1 Creating and terminating a virtual machine from the CLI (Bash)
#!/bin/bash -e                                                   ①
AMIID="$(aws ec2 describe-images --filters                      ②
➥ "Name=name,Values=amzn2-ami-hvm-2.0.202*-x86_64-gp2"
➥ --query "Images[0].ImageId" --output text)"
VPCID="$(aws ec2 describe-vpcs --filter "Name=isDefault,
➥ Values=true"                                                 ③
➥ --query "Vpcs[0].VpcId" --output text)"
SUBNETID="$(aws ec2 describe-subnets --filters                  ④
➥ "Name=vpc-id, Values=$VPCID" --query "Subnets[0].SubnetId"
➥ --output text)"
INSTANCEID="$(aws ec2 run-instances --image-id "$AMIID"         ⑤
➥ --instance-type t2.micro --subnet-id "$SUBNETID"
➥ --iam-instance-profile "Name=ec2-ssm-core"
➥ --query "Instances[0].InstanceId" --output text)"
echo "waiting for $INSTANCEID ..."
aws ec2 wait instance-running --instance-ids "$INSTANCEID"       ⑥
echo "$INSTANCEID is up and running"
echo "connect to the instance using Session Manager"
echo "https:/ /console.aws.amazon.com/systems-manager/
➥ session-manager/$INSTANCEID"
read -r -p "Press [Enter] key to terminate $INSTANCEID ..."
aws ec2 terminate-instances --instance-ids
➥ "$INSTANCEID" > /dev/null                                     ⑦
echo "terminating $INSTANCEID ..."
aws ec2 wait instance-terminated --instance-ids
➥ "$INSTANCEID"                                                 ⑧
echo "done."
① -e makes Bash abort if a command fails.
② Gets the ID of Amazon Linux AMI
⑤ Creates and start the virtual machine
⑥ Waits until the virtual machine is started
⑦ Terminates the virtual machine
⑧ Waits until the virtual machine is terminated
|
|
You can find the following listing in /chapter04/virtualmachine.ps1 in the book’s code folder. Right-click the virtualmachine.ps1 file, and select Run with PowerShell to execute the script.
Listing 4.2 Creating and terminating a virtual machine from the CLI (PowerShell)
$ErrorActionPreference = "Stop"                                  ①

$AMIID=aws ec2 describe-images --filters                        ②
➥ "Name=name,Values=amzn2-ami-hvm-2.0.202*-x86_64-gp2"
➥ --query "Images[0].ImageId" --output text
$VPCID=aws ec2 describe-vpcs --filter                            ③
➥ "Name=isDefault, Values=true"
➥ --query "Vpcs[0].VpcId" --output text
$SUBNETID=aws ec2 describe-subnets                              ④
➥ --filters "Name=vpc-id, Values=$VPCID" --query "Subnets[0].SubnetId"
➥ --output text
$INSTANCEID=aws ec2 run-instances --image-id $AMIID             ⑤
➥ --instance-type t2.micro --subnet-id $SUBNETID
➥ --iam-instance-profile "Name=ec2-ssm-core"
➥ --query "Instances[0].InstanceId" --output text
Write-Host "waiting for $INSTANCEID ..."
aws ec2 wait instance-running --instance-ids $INSTANCEID         ⑥
Write-Host "$INSTANCEID is up and running"
Write-Host "connect to the instance using Session Manager"
Write-Host "https:/ /console.aws.amazon.com/systems-manager
➥ /session-manager/$INSTANCEID"
Write-Host "Press [Enter] key to terminate $INSTANCEID ..."
Read-Host
aws ec2 terminate-instances --instance-ids $INSTANCEID           ⑦
Write-Host "terminating $INSTANCEID ..."
aws ec2 wait instance-terminated --instance-ids $INSTANCEID      ⑧
Write-Host "done."
② Gets the ID of Amazon Linux AMI
⑤ Creates and starts the virtual machine
⑥ Waits until the virtual machine is started
⑦ Terminates the virtual machine
⑧ Waits until the virtual machine is terminated
|
|
The limitations of the CLI solution follow:
Next, learn how to improve the CLI solution using the AWS SDK.
4.3 Programming with the SDK
AWS offers SDKs for the following programming languages and platforms:
An AWS SDK is a convenient way to make calls to the AWS API from your favorite programming language. The SDK takes care of things like authentication, retry on error, HTTPS communication, and XML or JSON (de)serialization. You’re free to choose the SDK for your favorite language, but in this book, most examples are written in JavaScript and run in the Node.js runtime environment.
To understand how the AWS SDK for Node.js (JavaScript) works, let’s create a Node.js (JavaScript) application that controls EC2 instances via the AWS SDK. The name of the application is Node Control Center for AWS or nodecc for short.
4.3.1 Controlling virtual machines with SDK: nodecc
The Node Control Center for AWS (nodecc) is for managing multiple temporary EC2 instances using a text UI written in JavaScript. nodecc offers the following features:
Figure 4.7 shows what nodecc looks like.

Figure 4.7 nodecc: Start screen
You can find the nodecc application at /chapter04/nodecc/ in the book’s code folder. Switch to that directory, and run npm install in your terminal to install all needed dependencies. To start nodecc, run node index.js. You can always go back by pressing the left arrow key. You can quit the application by pressing Esc or q. The SDK uses the same settings you created for the CLI, so you’re using the mycli user when running nodecc.
4.3.2 How nodecc creates a virtual machine
Before you can do anything with nodecc, you need at least one virtual machine. To start a virtual machine, choose the AMI you want, as figure 4.8 shows.

Figure 4.8 nodecc: Creating a virtual machine (step 1 of 2)
The code shown in the next listing, which fetches the list of the available AMIs, is located at lib/listAMIs.js.
Listing 4.3 Fetching the list of available AMIs: /lib/listAMIs.js
const AWS = require('aws-sdk');                    ①
const ec2 = new AWS.EC2({region: 'us-east-1'});    ②

module.exports = (cb) => {                         ③
  ec2.describeImages({                             ④
    Filters: [{
      Name: 'name',
      Values: ['amzn2-ami-hvm-2.0.202*-x86_64-gp2']
    }]
  }, (err, data) => {
    if (err) {                                     ⑤
      cb(err);
    } else {                                       ⑥
      const amiIds = data.Images.map(image => image.ImageId);
      const descriptions = data.Images.map(image => image.Description);
      cb(null, {amiIds: amiIds, descriptions: descriptions});
    }
  });
};
① require is used to load modules.
③ module.exports makes this function available to users of the listAMIs module.
⑤ In case of failure, err is set.
⑥ Otherwise, data contains all AMIs.
The code is structured in such a way that each action is implemented in the lib folder. The next step to create a virtual machine is to choose which subnet the virtual machine should be started in. You haven’t learned about subnets yet, so for now, select one randomly; see figure 4.9.

Figure 4.9 nodecc: Creating a virtual machine (step 2 of 2)
The corresponding script, shown in the next listing, is located at lib/listSubnets.js.
Listing 4.4 Fetching the list of available default subnets: /lib/listSubnets.js
const AWS = /* ... */;
const ec2 = /* ... */;

module.exports = (cb) => {
  ec2.describeVpcs({                       ①
    Filters: [{                            ②
      Name: 'isDefault',
      Values: ['true']
    }]
  }, (err, data) => {
    if (err) {
      cb(err);
    } else {
      const vpcId = data.Vpcs[0].VpcId;    ③
      ec2.describeSubnets({                ④
        Filters: [{                        ⑤
          Name: 'vpc-id',
          Values: [vpcId]
        }]
      }, (err, data) => {
        if (err) {
          cb(err);
        } else {
          const subnetIds = data.Subnets.map(subnet => subnet.SubnetId);
          cb(null, subnetIds);
        }
      });
    }
  });
};
② The filter selects default VPCs only.
③ There can be only one default VPC.
⑤ The filter selects subnets from the default VPC only.
After you select the subnet, the virtual machine is created by lib/createVM.js, and you see a starting screen, as shown in the following listing.
Listing 4.5 Launching an EC2 instance: /lib/createVM.js
module.exports = (amiId, subnetId, cb) => {
  ec2.runInstances({                  ①
    IamInstanceProfile: {             ②
      Name: 'ec2-ssm-core'
    },
    ImageId: amiId,                   ③
    MinCount: 1,                      ④
    MaxCount: 1,                      ④
    InstanceType: 't2.micro',         ⑤
    SubnetId: subnetId                ⑥
  }, cb);
};
① API call to launch an EC2 instance
② The IAM role and instance profile ec2-ssm-core was created in chapter 3.
⑤ ...of type t2.micro to stay in the Free Tier
Now it’s time to find out some details of the newly created virtual machine. Use the left arrow key to switch to the navigation section.
4.3.3 How nodecc lists virtual machines and shows virtual machine details
One important use case that nodecc must support is showing the details of a VM that you can use to connect via the Session Manager. Because nodecc handles multiple virtual machines, the first step is to select a VM, as shown in figure 4.10.

Look at lib/listVMs.js, shown in the next listing, to see how a list of virtual machines can be retrieved with the AWS SDK.
Listing 4.6 Listing EC2 instances: /lib/listVMs.js
module.exports = (cb) => {
  ec2.describeInstances({             ①
    Filters: [{                       ②
      Name: 'instance-state-name',
      Values: ['pending', 'running']
    }],
    MaxResults: 10                    ③
  }, (err, data) => {
    if (err) {
      cb(err);
    } else {
      const instanceIds = data.Reservations
        .map(r => r.Instances.map(i => i.InstanceId))
        .flat();
      cb(null, instanceIds);
    }
  });
};
① API call to list EC2 instances
② The filter selects starting and running instances only.
After you select the VM, you can display its details; see figure 4.11. You could use the LaunchTime to find old EC2 instances. You can also connect to an instance using the Session Manager. Press the left arrow key to switch back to the navigation section.

4.3.4 How nodecc terminates a virtual machine
To terminate a virtual machine, you first have to select it. To list the virtual machines, use lib/listVMs.js again. After you select the VM, lib/terminateVM.js takes care of termination, as shown in the following code snippet.
Listing 4.7 Terminating an EC2 instance: /lib/terminateVM.js
module.exports = (instanceId, cb) => {
  ec2.terminateInstances({             ①
    InstanceIds: [instanceId]          ②
  }, cb);
};
① API call to list EC2 instances
② Passes the selected instance ID
That’s nodecc: a text UI program for controlling temporary EC2 instances. Take some time to think about what you could create by using your favorite language and the AWS SDK. Chances are high that you might come up with a new business idea!
|
|
The hard parts about using the SDK follow:
-
The SDK (or, better, Node.js) follows an imperative approach. You provide all instructions, step by step, in the right order, to get the job done.
-
You have to deal with dependencies (e.g., wait for the instance to be running before connecting to it).
-
There is no easy way to update the instances that are running with new settings (e.g., change the instance type).
It’s time to enter a new world by leaving the imperative world and entering the declarative world.
4.4 Infrastructure as Code
Infrastructure as Code is the idea of using a high-level programming language to control infrastructures. Infrastructure can be any AWS resource, like a network topology, a load balancer, a DNS entry, and so on. In software development, tools like automated tests, code repositories, and build servers increase the quality of software engineering. If your infrastructure is defined as code, then you can apply these types of software development tools to your infrastructure and improve its quality.
Warning Don’t mix up the terms Infrastructure as Code and Infrastructure as a Service (IaaS)! IaaS means renting virtual machines, storage, and network with a pay-per-use pricing model.
4.4.1 Inventing an infrastructure language: JIML
For the purposes of learning the concepts behind Infrastructure as Code, let’s invent a new language to describe infrastructure: JSON Infrastructure Markup Language (JIML). Figure 4.12 shows the infrastructure that will be created in the end.

The infrastructure consists of the following:
To reduce problems with syntax, let’s say JIML is based on JSON. The following JIML code creates the infrastructure shown in figure 4.12. The $ indicates a reference to an ID.
Listing 4.8 Infrastructure description in JIML
{
   "region": "us-east-1",
   "resources": [{
     "type": "loadbalancer",     ①
     "id": "LB",
     "config": {
       "virtualmachines": 2,     ②
       "virtualmachine": {       ③
         "cpu": 2,
         "ram": 4,
         "os": "ubuntu"
       }
     },
     "waitFor": "$DB"            ④
   }, {
     "type": "cdn",
     "id": "CDN",                ⑤
     "config": {
       "defaultSource": "$LB",
       "sources": [{
         "path": "/static/*",
         "source": "$BUCKET"
       }]
     }
   }, {
     "type": "database",
     "id": "DB",                 ⑥
     "config": {
       "password": "***",
       "engine": "MySQL"
     }
   }, {
     "type": "dns",              ⑦
     "config": {
       "from": "www.mydomain.com",
       "to": "$CDN"
     }
   }, {
     "type": "bucket",           ⑧
     "id": "BUCKET"
   }]
 }
③ VMs are Ubuntu Linux (4 GB memory, 2 cores).
④ LB can be created only if the database is ready.
⑤ A CDN is used that caches requests to the LB or fetches static assets (images, CSS files, ...) from a bucket.
⑥ Data is stored within a MySQL database.
⑦ A DNS entry points to the CDN.
⑧ A bucket is used to store static assets (images, CSS files, ...).
How can we turn this JSON into AWS API calls?
-
The JIML tool creates a dependency graph by connecting the resources with their dependencies.
-
The JIML tool traverses the dependency graph from the bottom (leaves) to the top (root) and a linear flow of commands. The commands are expressed in a pseudo language.
-
The commands in pseudo language are translated into AWS API calls by the JIML runtime.
The AWS API calls have to be made based on the resources defined in the blueprint. In particular, you must send the AWS API calls in the correct order. Let’s look at the dependency graph created by the JIML tool, shown in figure 4.13.

You traverse the dependency graph in figure 4.13 from bottom to top and from left to right. The nodes at the bottom have no children and therefore no dependencies: DB, VM, and bucket.
The LB node depends on the DB node and the two VM nodes. The CDN node depends on the LB and the bucket node. Finally, the DNS node depends on the CDN node.
The JIML tool turns the dependency graph into a linear flow of commands using pseudo language, as shown in the next listing. The pseudo language represents the steps needed to create all the resources in the correct order. The nodes are easy to create because they have no dependencies, so they’re created first.
Listing 4.9 Linear flow of commands in pseudo language
$DB = database create {"password": "***",          ①
➥ "engine": "MySQL"}
$VM1 = virtualmachine create {"cpu": 2, "ram": 4,  ②
➥ "os": "ubuntu"}
$VM2 = virtualmachine create {"cpu": 2, "ram": 4,
➥ "os": "ubuntu"}
$BUCKET = bucket create {}                         ③

await [$DB, $VM1, $VM2]                            ④
$LB = loadbalancer create {"virtualmachines":      ⑤
➥ [$VM1, $VM2]}

await [$LB, $BUCKET]
$CDN = cdn create {...}                            ⑥

await $CDN
$DNS = dns create {...}                            ⑦

await $DNS
We’ll skip the last step—translating the commands from the pseudo language into AWS API calls. You’ve already learned everything you need to know about infrastructure as code: it’s all about dependencies. Let’s apply those newly learned ideas in practice.
4.5 Using AWS CloudFormation to start a virtual machine
In the previous section, we created JIML to introduce the concept of infrastructure as code. Luckily, AWS already offers a tool that does much better than our JIML: AWS CloudFormation.
Note When using CloudFormation, what we have been referring to as a blueprint so far is actually referred to as a CloudFormation template.
A template is a description of your infrastructure, written in JSON or YAML, that can be interpreted by CloudFormation. The idea of describing something rather than listing the necessary actions is called a declarative approach. Declarative means you tell CloudFormation how your infrastructure should look. You aren’t telling CloudFormation what actions are needed to create that infrastructure, and you don’t specify the sequence in which the actions need to be executed. The benefits of CloudFormation follow:
-
It’s a consistent way to describe infrastructure on AWS. If you use scripts to create your infrastructure, everyone will solve the same problem differently. This is a hurdle for new developers and operators trying to understand what the code is doing. CloudFormation templates provide a clear language for defining infrastructure.
-
It handles dependencies. Ever tried to register a web server with a load balancer that wasn’t yet available? When you first start trying to automate infrastructure creation, you’ll miss a lot of dependencies. Trust us: never try to set up complex infrastructure using scripts. You’ll end up in dependency hell!
-
It’s reproducible. Is your test environment an exact copy of your production environment? Using CloudFormation, you can create two identical infrastructures. It is also possible to apply changes to both the test and production environment.
-
It’s customizable. You can insert custom parameters into CloudFormation to customize your templates as you wish.
-
It’s testable. If you can create your architecture from a template, it’s testable. Just start a new infrastructure, run your tests, and shut it down again.
-
It’s updatable. CloudFormation supports updates to your infrastructure. It will figure out the parts of the template that have changed and apply those changes as smoothly as possible to your infrastructure.
-
It minimizes human failure. CloudFormation doesn’t get tired—even at 3 a.m.
-
It’s the documentation for your infrastructure. A CloudFormation template is a JSON or YAML document. You can treat it as code and use a version control system like Git to keep track of the changes.
-
It’s free. Using CloudFormation comes at no additional charge. If you subscribe to an AWS support plan, you also get support for CloudFormation.
We think CloudFormation is the most powerful tool available for managing infrastructure on AWS.
4.5.1 Anatomy of a CloudFormation template
A basic CloudFormation template consists of the following five parts:
-
Format version—The latest template format version is 2010-09-09, and this is currently the only valid value. Specify this version; the default is to use the latest version, which will cause problems if new versions are introduced in the future.
-
Parameters—Parameters are used to customize a template with values, for example, domain name, customer ID, and database password.
-
Resources—A resource is the smallest block you can describe. Examples are a virtual machine, a load balancer, or an Elastic IP address.
-
Outputs—An output is comparable to a parameter, but the other way around. An output returns details about a resource created by the template, for example, the public name of an EC2 instance.
A basic template looks like the following listing.
Listing 4.10 CloudFormation template structure
---                                                 ①
AWSTemplateFormatVersion: '2010-09-09'              ②
Description: 'CloudFormation template structure'    ③
Parameters:
  # [...]                                           ④
Resources
  # [...]                                           ⑤
Outputs:
  # [...]                                           ⑥
③ What is this template about?
Let’s take a closer look at parameters, resources, and outputs.
Format version and description
The only valid AWSTemplateFormatVersion value at the moment is 2010-09-09. Always specify the format version. If you don’t, CloudFormation will use whatever version is the latest one. As mentioned earlier, this means if a new format version is introduced in the future, you’ll end up using the wrong format and get into serious trouble.
Description isn’t mandatory, but we encourage you to take some time to document what the template is about. A meaningful description will help you in the future to remember what the template is for. It will also help your coworkers.
A parameter has at least a name and a type. We encourage you to add a description as well, as shown in the next listing.
Listing 4.11 CloudFormation parameter structure
① You can choose the name of the parameter.
② This parameter represents a number.
③ Description of the parameter
Valid types are listed in table 4.1.
Table 4.1 CloudFormation parameter types
In addition to using the Type and Description properties, you can enhance a parameter with the properties listed in table 4.2.
Table 4.2 CloudFormation parameter properties
A parameter section of a CloudFormation template could look like this:
Parameters:
   KeyName:
     Description: 'Key Pair name'
     Type: 'AWS::EC2::KeyPair::KeyName'   ①
   NumberOfVirtualMachines:
     Description: 'How many virtual machine do you like?'
     Type: Number
     Default: 1                           ②
     MinValue: 1
     MaxValue: 5                          ③
   WordPressVersion:
     Description: 'Which version of WordPress do you want?'
     Type: String
     AllowedValues: ['4.1.1', '4.0.1']    ④
① Only key-pair names are allowed.
② The default is one virtual machine.
③ Prevents massive costs with an upper bound
④ Restricted to certain versions
Now you should have a better feel for parameters. If you want to know everything about them, see the documentation at http://mng.bz/ZpB5, or follow along in the book and learn by doing.
A resource has at least a name, a type, and some properties, as shown in the next listing.
Listing 4.12 CloudFormation resources structure
① Name or logical ID of the resource that you can choose
② The resource of type AWS::EC2::Instances defines a virtual machine.
③ Properties needed for the type of resource
When defining resources, you need to know about the type and that type’s properties. In this book, you’ll get to know a lot of resource types and their respective properties. An example of a single EC2 instance appears in the following code snippet.
Listing 4.13 CloudFormation EC2 instance resource
Resources:
  VM:                              ①
    Type: 'AWS::EC2::Instance'     ②
    Properties:
      ImageId: 'ami-6057e21a'      ③
      InstanceType: 't2.micro'     ④
      SecurityGroupIds:            ⑤
      - 'sg-123456'
      SubnetId: 'subnet-123456'    ⑤
① Name or logical ID of the resource that you can choose
② The resource of type AWS::EC2::Instances defines a virtual machine.
③ The AMI defines the operating system of the vm.
④ The instance type defines the number of vCPUs, memory, and more.
⑤ You’ll learn about this in chapter 5.
Now you’ve described the virtual machine, but how can you output its public name?
A CloudFormation template’s output includes at least a name (like parameters and resources) and a value, but we encourage you to add a description as well, as illustrated in the next listing. You can use outputs to pass data from within your template to the outside.
Listing 4.14 CloudFormation outputs structure
① Name of the output that you can choose
Static outputs like this one aren’t very useful. You’ll mostly use values that reference the name of a resource or an attribute of a resource, like its public name. If you see !Ref NameOfSomething, think of it as a placeholder for what is referenced by the name. A !GetAtt 'NameOfSomething.AttributeOfSomething', shown in the next code, is similar to a ref but you select a specific attribute of the referenced resource.
Listing 4.15 CloudFormation outputs example
Outputs:
  ID:
    Value: !Ref Server                            ①
    Description: 'ID of the EC2 instance'
  PublicName:
    Value: !GetAtt 'Server.PublicDnsName'         ②
    Description: 'Public name of the EC2 instance'
② Gets the attribute PublicDnsName of the EC2 instance
You’ll get to know the most important attributes of !GetAtt while reading this book.
Now that we’ve taken a brief look at the core parts of a CloudFormation template, it’s time to make one of your own.
4.5.2 Creating your first template
How do you create a CloudFormation template? Different options are available, as shown here:
-
Start with a template from a public repository that offers a default implementation, and adapt it to your needs.
AWS and its partners offer CloudFormation templates for deploying popular solutions: AWS Partner Solutions at https://aws.amazon.com/quickstart/. Furthermore, we have open sourced the templates we are using in our day-to-day work on GitHub: https://github.com/widdix/aws-cf-templates.
Suppose you’ve been asked to provide a VM for a developer team. After a few months, the team realizes the VM needs more CPU power, because the usage pattern has changed. You can handle that request with the CLI and the SDK, but before the instance type can be changed, you must stop the EC2 instance. The process follows:
A declarative approach like that used by CloudFormation is simpler: just change the InstanceType property and update the template. InstanceType can be passed to the template via a parameter, as shown in the next listing. That’s it! You can begin creating the template.
Listing 4.16 A template to create an EC2 instance with CloudFormation
---
AWSTemplateFormatVersion: '2010-09-09'
Description: 'AWS in Action: chapter 4'
Parameters:
  VPC:                                               ①
    Type: 'AWS::EC2::VPC::Id'
  Subnet:                                            ①
    Type: 'AWS::EC2::Subnet::Id'
  InstanceType:                                      ②
    Description: 'Select one of the possible instance types'
    Type: String
    Default: 't2.micro'
    AllowedValues: ['t2.micro', 't2.small', 't2.medium']
Resources:
  SecurityGroup:                                     ①
    Type: 'AWS::EC2::SecurityGroup'
    Properties:
      # [...]
  VM:                                                ③
    Type: 'AWS::EC2::Instance'
    Properties:
      ImageId: 'ami-061ac2e015473fbe2'
      InstanceType: !Ref InstanceType
      IamInstanceProfile: 'ec2-ssm-core'
      SecurityGroupIds: [!Ref SecurityGroup]         ④
      SubnetId: !Ref Subnet
Outputs:
  InstanceId:                                        ⑤
    Value: !Ref VM
    Description: 'Instance id (connect via Session Manager)'
① You’ll learn about this in chapter 5.
② The user defines the instance type.
③ Defines a minimal EC2 instance
④ By referencing the security group, an implicit dependency is declared.
⑤ Returns the ID of the EC2 instance
You can find the full code for the template at /chapter04/virtualmachine.yaml in the book’s code folder. Please don’t worry about VPC, subnets, and security groups at the moment; you’ll get to know them in chapter 5.
If you create an infrastructure from a template, CloudFormation calls it a stack. You can think of template versus stack much like class versus object. The template exists only once, whereas many stacks can be created from the same template. The following steps will guide you through creating your stack:
-
Open the AWS Management Console at https://console.aws.amazon.com.

Figure 4.14 shows the empty list of CloudFormation stacks.
-
Click Create Stack and select With New Resources (Standard) to start a four-step wizard.
-
Select Amazon S3 URL as your template source, and enter the value https://s3.amazonaws.com/awsinaction-code3/chapter04/virtualmachine.yaml, as shown in figure 4.15.

In the second step, you define the stack name and parameters. Give the stack a name like myvm, and fill out the parameter values as follows:
-
Subnet—Select the first value in the drop-down list. You’ll learn about subnets later. -
VPC—Select the first value in the drop-down list. You’ll learn about VPCs later.
Figure 4.16 shows the second step. Click Next after you’ve chosen a value for the stack name and every parameter, to proceed with the next step.

In the third step, you can define optional tags for the stack and advanced configuration. You can skip this step at this point in the book, because you will not use any advanced features for now. All resources created by the stack will be tagged by CloudFormation by default. Click Next to go to the last step.
The fourth step displays a summary of the stack. At the bottom of the page, you are asked to Acknowledge the Creation of IAM Resources as figure 4.17 shows. You can safely allow CloudFormation to create IAM resources for now. You will learn more about them in chapter 5.

Click Create Stack. CloudFormation now starts to create the stack. If the process is successful, you’ll see the screen shown in figure 4.18. As long as status is CREATE_IN_ PROGRESS, you need to be patient and click the reload button from time to time. When the status is CREATE_COMPLETE, click the Outputs tab to see the ID of the EC2 instance. Double-check the instance type in the EC2 Management Console.

Your stack is now created. But that’s not the end of the story. CloudFormation supports updating and deleting stacks as well.
4.5.3 Updating infrastructure using CloudFormation
It’s time to test whether we can modify the instance type. Click the Update button. The wizard that starts is similar to the one you used during stack creation. Figure 4.19 shows the first step of the wizard. Select Use Current Template, and proceed with the next step by clicking the Next button.

In step 2, you need to change the InstanceType parameter value: choose t2.small to double or t2.medium to quadruple the computing power of your EC2 instance.
Warning Starting a virtual machine with instance type t2.small or t2.medium will incur charges. See https://aws.amazon.com/ec2/pricing/ to find out the current hourly price.
Step 3 is about sophisticated options during the update of the stack. You don’t need any of these features now, so skip the step by clicking Next. Step 4 is a summary; acknowledge the creation of IAM resources and click Update Stack. The stack now has the status UPDATE_IN_PROGRESS. If you are quickly jumping to the EC2 Management Console, you can see the instance to be stopped and started again with the new instance type. After a few minutes, the status should change to UPDATE_COMPLETE.
When you changed the parameter, CloudFormation figured out what needed to be done to achieve the end result. That’s the power of a declarative approach: you say what the end result should look like, not how the end result should be achieved.
|
|
Summary
-
Use the CLI, one of the SDKs, or CloudFormation to automate your infrastructure on AWS.
-
Infrastructure as Code describes the approach of programming the creation and modification of your infrastructure, including virtual machines, networking, storage, and more.
-
You can use the CLI to automate complex processes in AWS with scripts (Bash and PowerShell).
-
You can use SDKs for nine programming languages and platforms to embed AWS into your applications and create applications like nodecc.
-
CloudFormation uses a declarative approach in JSON or YAML: you define only the end state of your infrastructure, and CloudFormation figures out how this state can be achieved. The major parts of a CloudFormation template are parameters, resources, and outputs.