
Chapter 7. Exporting Strategies

Give your clients the earliest delivery consistent with quality—whatever the inconvenience to us.
—Arthur C. Nielsen
Once upon a time everyone delivered tapes to their clients. And they put two copies of the tape (usually Betacam or U-Matic tapes) on the shelf for archive. Then file-based HD cameras came along, making it possible to edit without ever owning a deck and renting decks only when absolutely needed. But those rentals became less and less frequent.
Now, it’s common to spec out editorial suites without any tape-based acquisition, distribution, or archival. In other words, tape output for 99 percent of us is gone. We’re expected to deliver files and be an expert in what our clients need (and want), even though they don’t always have the knowledge to communicate these needs.
This chapter provides a basic primer on understanding architectures (buckets) that hold video and the codecs (math) that are used to compress files. Not every codec under the sun is covered—just the most common ones. Also discussed are the most common outputs, including a huge final output for storage, as well as a smaller MP4 h.264 file that is ideal for distribution.
I’ll explain how Adobe Premiere Pro compresses video for output via the Media Export command, and I’ll cover how to get video out as fast as possible (which is great for client approval copies) along with building our own presets.
Included with Creative Cloud is Adobe Media Encoder (Figure 7.1). It’s the backend tool that Adobe Premiere Pro uses when it encodes video. It’s a multipurpose encoder and has some great time-saving features, including the ability to queue video from Adobe Premiere Pro to efficiently batch video at a convenient time (or in the background). Adobe Media Encoder also can watch specific folders, permitting you to automate encoding.

Let’s get started by getting a primer (or just a refresh) of what architectures and codecs actually mean.
Understanding Architectures and Codecs
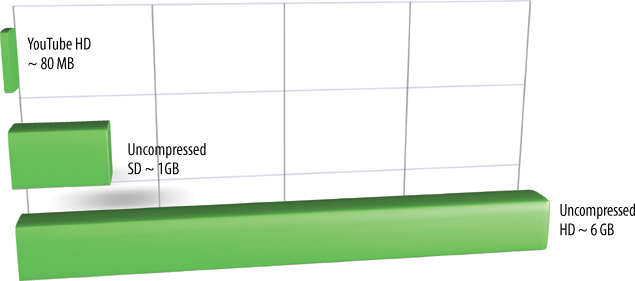
Video can come in many different buckets (architectures), such as XDCam, AVCHD, QuickTime, and more. The architecture of video, such as QuickTime, is separate from the type of compression (the math) of video, such as h.264. But why do you even need to compress video? Well, because uncompressed standard definition (SD) video requires around 1 GB a minute. Uncompressed high definition (HD) video is about 6 GB a minute or over a half a terabyte for a feature length video (Figure 7.2).
The problem with all video compression is the same; it’s a lossy compression. Information is discarded like a JPEG file, unlike a lossless compression like a ZIP file. The reason is that these techniques take advantage of the fact that the human eye can “miss” information and the picture looks the same, and partially because you need to be able to decode video in real time or else you wouldn’t be able to play it back!
One of the most consistent frustrations in dealing with clients is getting them to identify exactly what it is they want (Figure 7.3). But it’s not their fault. They’re not media professionals (despite their insistence that they know what they’re doing!). The job of handling video requires that editors have expertise in the area of deliverables! The only assumption you can make is that clients understand that you’re shooting high definition video, either of the 1920 x 1080 variety, called 1080, or the 1280 x 720 variety, called 720 (and don’t expect them to know the difference between 1080 and 720).

It’s not uncommon to hear a client say:
![]() I’d like a video (and nothing more specific than that).
I’d like a video (and nothing more specific than that).
![]() I need a QuickTime file.
I need a QuickTime file.
![]() I want it to work on the iPad.
I want it to work on the iPad.
![]() I’d like it to work on every device out there.
I’d like it to work on every device out there.
![]() I want to put it on the Internet.
I want to put it on the Internet.
None of these statements works for professional content creators. We need to know more in every case. Let’s take a second look at that same list of requests.
![]() I’d like a video (and nothing more specific than that). It’s crucial to find out what clients want and how they intend to play back the video. Knowing that they’d like to play it back from a Blu-ray player requires you to know a minimum of how to use Adobe Encore (and how to install it because it’s not directly part of Adobe Creative Cloud), which can produce Blu-ray Discs and DVD and interactive Flash menus plus video.
I’d like a video (and nothing more specific than that). It’s crucial to find out what clients want and how they intend to play back the video. Knowing that they’d like to play it back from a Blu-ray player requires you to know a minimum of how to use Adobe Encore (and how to install it because it’s not directly part of Adobe Creative Cloud), which can produce Blu-ray Discs and DVD and interactive Flash menus plus video.
![]() I need a QuickTime file. Although this statement describes that the client wants a file using the MOV Apple QuickTime architecture, it doesn’t specify which flavor (codec) the client needs. There are some 30 plus standard codecs that are in the default QuickTime installation. Which one does your client need? Odds are it’s h.264, which has become the defacto distribution codec.
I need a QuickTime file. Although this statement describes that the client wants a file using the MOV Apple QuickTime architecture, it doesn’t specify which flavor (codec) the client needs. There are some 30 plus standard codecs that are in the default QuickTime installation. Which one does your client need? Odds are it’s h.264, which has become the defacto distribution codec.
![]() I want it to work on the iPad. The iPad has a very limited set of video formats that work on it; luckily, the presets in Adobe Premiere Pro account specifically for the iPad along with numerous other devices, including Android, TiVo, and the Nook.
I want it to work on the iPad. The iPad has a very limited set of video formats that work on it; luckily, the presets in Adobe Premiere Pro account specifically for the iPad along with numerous other devices, including Android, TiVo, and the Nook.
![]() I’d like it to work on every device out there. Sadly, this is impossible. This would require building an infinite set of files to accommodate everything from a cellphone from five years ago to some brand new device, neither of which you own, making it difficult to test. This statement usually means you’ll need to provide two or three files that cover most of the devices out there.
I’d like it to work on every device out there. Sadly, this is impossible. This would require building an infinite set of files to accommodate everything from a cellphone from five years ago to some brand new device, neither of which you own, making it difficult to test. This statement usually means you’ll need to provide two or three files that cover most of the devices out there.
![]() I want to put it on the Internet. Normally, this means I’d like to use YouTube, Vimeo, Brightcove, or another hosting service. It’s OK to build a larger file and deal with a long upload because the hosting services generally recompress the footage again. It’s less likely (but possible) that the video will be put on your client’s website, which will likely mean a file with higher compression (to be sensitive to the client’s webhost/data delivery capabilities).
I want to put it on the Internet. Normally, this means I’d like to use YouTube, Vimeo, Brightcove, or another hosting service. It’s OK to build a larger file and deal with a long upload because the hosting services generally recompress the footage again. It’s less likely (but possible) that the video will be put on your client’s website, which will likely mean a file with higher compression (to be sensitive to the client’s webhost/data delivery capabilities).
Common Buckets
As mentioned earlier, video can be held in a number of different architectures. It may be easier to think of these architectures as buckets because they contain the video and audio along with other information, such as copyright, timecode, and subtitles (Figure 7.4). Not every bucket can carry every type of video or metadata. Some of them are more flexible than others.

![]() Notes
Notes
There isn’t great communication between Adobe Premiere Pro and QuickTime. It’s important to know your frame size and frame rate, because you may have to input these values manually.
![]() Notes
Notes
MP4 does not necessarily mean h.264. MP4 could also be a “flavor” of video meant for older hardware. h.264 can be inside any of these buckets (files)—QuickTime, MP4, AVI, or Flash.
A set of common buckets include:
![]() QuickTime. Created by Apple, this is arguably the most flexible architecture. Its greatest advantage is that it has become the most common way to move video between different applications when Dynamic Link (which is restricted to certain Adobe products) isn’t available. With its large variety of codecs and metadata, it works well for both archival and distribution needs.
QuickTime. Created by Apple, this is arguably the most flexible architecture. Its greatest advantage is that it has become the most common way to move video between different applications when Dynamic Link (which is restricted to certain Adobe products) isn’t available. With its large variety of codecs and metadata, it works well for both archival and distribution needs.
![]() MPEG-4. The fourth revision from the Motion Picture Experts Group (MPEG) can contain over 30 different types of data, including two different video codecs, audio, subtitles, and timecode. MP4 was created to be an improvement on MPEG-2. It’s more scalable (from small handheld devices through HD and beyond) at a cost of complexity: It needs more processing power to encode/decode quickly.
MPEG-4. The fourth revision from the Motion Picture Experts Group (MPEG) can contain over 30 different types of data, including two different video codecs, audio, subtitles, and timecode. MP4 was created to be an improvement on MPEG-2. It’s more scalable (from small handheld devices through HD and beyond) at a cost of complexity: It needs more processing power to encode/decode quickly.
![]() Flash. This key architecture allows video to be contained but has a full-fledged interactive design engine (via Adobe Flash CC) along with a programming language.
Flash. This key architecture allows video to be contained but has a full-fledged interactive design engine (via Adobe Flash CC) along with a programming language.
![]() MXF. The Materials eXchange Format is a SMPTE standard that can contain several different codecs of video and audio along with timecode and other useful metadata. It’s a very common architecture for file-based cameras from groups like Panasonic and Sony.
MXF. The Materials eXchange Format is a SMPTE standard that can contain several different codecs of video and audio along with timecode and other useful metadata. It’s a very common architecture for file-based cameras from groups like Panasonic and Sony.
![]() AVI. Audio Video Interleaved is a Microsoft architecture and hasn’t been developed in the last five years. At this time, it’s best to avoid creating new media in this bucket if possible (although you may be given AVI assets, which Adobe Premiere Pro reads just fine).
AVI. Audio Video Interleaved is a Microsoft architecture and hasn’t been developed in the last five years. At this time, it’s best to avoid creating new media in this bucket if possible (although you may be given AVI assets, which Adobe Premiere Pro reads just fine).
Common Codecs
The word codec is short for compressor/decompressor (Figure 7.5). As mentioned earlier, it’s crucial that you compress your video, if nothing else, to reduce the file size compared to the unwieldy uncompressed video.

Codecs usually are one of three types:
![]() Camera based. These codecs are most often used by camera manufacturers. The goal of the codec is to find a balance between compressing the video for quality versus size on a storage card. XDCam and DVCPro are two camera-based codecs. Generally, the compression math merely compresses a single frame, similar to making a JPEG image; information is lost, but the files are still fairly large. A codec that compresses frames individually is called an I-Frame (IntraFrame) codec.
Camera based. These codecs are most often used by camera manufacturers. The goal of the codec is to find a balance between compressing the video for quality versus size on a storage card. XDCam and DVCPro are two camera-based codecs. Generally, the compression math merely compresses a single frame, similar to making a JPEG image; information is lost, but the files are still fairly large. A codec that compresses frames individually is called an I-Frame (IntraFrame) codec.
![]() Post/Archival based. These codecs are used either for interchange between different postproduction tools or archival uses. The goal here is to preserve quality and possibly carry an alpha (transparency) channel. Avid DNxHD and Apple ProRes are examples of postproduction codecs. Usually, these are I-Frame codecs.
Post/Archival based. These codecs are used either for interchange between different postproduction tools or archival uses. The goal here is to preserve quality and possibly carry an alpha (transparency) channel. Avid DNxHD and Apple ProRes are examples of postproduction codecs. Usually, these are I-Frame codecs.
![]() Distribution based. Ideally, the goal of distribution codecs is to make the video as small as possible, making it easier to transfer, either over the Internet or over a cable, such as USB. H.264 is a very common distribution codec and is used heavily on mobile devices. Distribution codecs often use a very aggressive type of compression, temporally. Instead of each frame being compressed individually, groups of pictures (GOPs)—usually about 12–15 frames long—are compressed together. The first frame has all the information; the rest of the frames have only the changes since the same full frame. When this series of pictures is 12 frames or longer, it’s often referred to as a Long GOP codec.
Distribution based. Ideally, the goal of distribution codecs is to make the video as small as possible, making it easier to transfer, either over the Internet or over a cable, such as USB. H.264 is a very common distribution codec and is used heavily on mobile devices. Distribution codecs often use a very aggressive type of compression, temporally. Instead of each frame being compressed individually, groups of pictures (GOPs)—usually about 12–15 frames long—are compressed together. The first frame has all the information; the rest of the frames have only the changes since the same full frame. When this series of pictures is 12 frames or longer, it’s often referred to as a Long GOP codec.
Some codecs may have hybrid uses; for example, XDCam is used for cameras and may be asked for as a distribution output for a playout server for air.
Here is a basic list of codecs you should be aware of:
![]() h.264. This codec can be in several different architectures, including QuickTime, AVI, F4V (flash), and MPEG-4 (MP4, M4v). Although this codec is the best choice for mobile devices (distribution), it’s also found on some cameras.
h.264. This codec can be in several different architectures, including QuickTime, AVI, F4V (flash), and MPEG-4 (MP4, M4v). Although this codec is the best choice for mobile devices (distribution), it’s also found on some cameras.
![]() XDCam. This codec from Sony is most often found in several different types of cameras in the MXF architecture. These types of MXF files are called OP1a, meaning that all the pieces (video, audio, metadata) compose a single file rather than being split up into multiple files.
XDCam. This codec from Sony is most often found in several different types of cameras in the MXF architecture. These types of MXF files are called OP1a, meaning that all the pieces (video, audio, metadata) compose a single file rather than being split up into multiple files.
![]() DVCPro. This Panasonic codec ranges from SD as DVCPro 25 (which you may be familiar with because it was also used in mini-DV), DVCPro 50, or DVCPro HD. These codecs are often found on Panasonic cameras that shoot on P2 cards.
DVCPro. This Panasonic codec ranges from SD as DVCPro 25 (which you may be familiar with because it was also used in mini-DV), DVCPro 50, or DVCPro HD. These codecs are often found on Panasonic cameras that shoot on P2 cards.
![]() AVC IntraFrame. This codec is an implementation of h.264 by Panasonic, with better quality (at the same data rate) than DVCPro. These codecs can be found on P2 cards.
AVC IntraFrame. This codec is an implementation of h.264 by Panasonic, with better quality (at the same data rate) than DVCPro. These codecs can be found on P2 cards.
![]() DNxHD. This post codec family from Avid was recently added in Adobe Premiere Pro with the CC release. Prior to this you could find it only as a QuickTime implementation. Now it is available in the same architecture in which it’s used by Avid—MXF. This codec is the postproduction codec of choice because it’s included with Adobe Premiere Pro and is cross platform. There are different data rates depending on need.
DNxHD. This post codec family from Avid was recently added in Adobe Premiere Pro with the CC release. Prior to this you could find it only as a QuickTime implementation. Now it is available in the same architecture in which it’s used by Avid—MXF. This codec is the postproduction codec of choice because it’s included with Adobe Premiere Pro and is cross platform. There are different data rates depending on need.
![]() Animation. This post codec has traditionally been used in After Effects to generate video that has an alpha (transparency) channel, making it easy to generate a lower thirds with transparency and providing flexibility in editorial. It’s used less and less because of Dynamic Linking with After Effects and because DNxHD (and Apple’s ProRes) can be set up to support an alpha channel.
Animation. This post codec has traditionally been used in After Effects to generate video that has an alpha (transparency) channel, making it easy to generate a lower thirds with transparency and providing flexibility in editorial. It’s used less and less because of Dynamic Linking with After Effects and because DNxHD (and Apple’s ProRes) can be set up to support an alpha channel.
![]() ProRes. This family of codecs from Apple is very similar to DNxHD; there are various versions at different data rates. Only ProRes 4444 supports an alpha channel.
ProRes. This family of codecs from Apple is very similar to DNxHD; there are various versions at different data rates. Only ProRes 4444 supports an alpha channel.
![]() Close-Up: Data Rates and Codecs
Close-Up: Data Rates and Codecs
Getting Output Right
Before outputting your sequence, it’s best to do a little preparation to get it right. The idea is to stay organized and avoid confusion. Duplicating your sequence, watermarking (optional), and separating outputs from your current sequence go a long way to keeping your sanity.
There’s nothing better than fielding a call from clients asking a question about the file they’re looking at and being able to call up that exact sequence quickly.
![]() Tip
Tip
Here is a quick time-saver: By changing the name of the sequence to reflect the output, the file that Adobe Premiere Pro/Adobe Media Encoder creates automatically gets that name!
Duplicate Your Sequence
Duplicate your sequence and name it as explicitly as you can (Figure 7.6). There is no such thing as being too specific.
Suggested information should include the minimum of:
![]() Type of output (final, story approval, rough cut, etc.)
Type of output (final, story approval, rough cut, etc.)
![]() Name of production organization (this would be your company)
Name of production organization (this would be your company)
![]() Date of generation
Date of generation
![]() Client name
Client name
Clip Name and Timecode
It can be advantageous to add extra information to your clips, particularly, naming individual clips and adding timecode information during the review process.
Two Mercury Accelerated effects are available in the Video category of the effects: Clip Name and Timeline:
![]() Clip Name. For this effect to work, it must be added to every effect. Clients can then tell you the exact name of a clip that they have comments about.
Clip Name. For this effect to work, it must be added to every effect. Clients can then tell you the exact name of a clip that they have comments about.
![]() Timecode. This effect can be added either on a nest (like watermarking; see the next section) or on a clip-by-clip basis. When it’s placed on a clip, make sure that it shows the original timecode form the source clip.
Timecode. This effect can be added either on a nest (like watermarking; see the next section) or on a clip-by-clip basis. When it’s placed on a clip, make sure that it shows the original timecode form the source clip.
Watermarking
Professional editors watermark their sequences (Figure 7.7). It eliminates clients’ confusion of what they’re looking at (the most current version) and the reason they’re looking at video (rough cut, final approval, etc.). And most important, clients don’t get a copy without having paid their final bill!

Some compression software has the ability to watermark with a filter. But Adobe Media Encoder doesn’t have this ability. As a workaround, you can nest your sequence, and then layer any watermarking (such as a logo or a title) on the nested sequence.
The easiest method of nesting a sequence is basically to drop one sequence into another. Here are more detailed steps:
1. Find the sequence you want to watermark.
2. Create a new sequence, or faster yet, drag your sequence to the New Sequence button at the bottom of the project window. Name it appropriately and add the word watermarked to the sequence name. Open the sequence.
3. Drag your sequence from step 1 into the Timeline. The color of the sequence on the Timeline should be forest, also commonly referred to as green.
4. On V2, add the logo/title of your choice. Drag the title or logo across the entire nested sequence (Figure 7.8). Consider lowering the opacity.

Figure 7.8 Your original sequence doesn’t have to be nested, but nesting makes it easier to handle as a single unit.
Watermarking Redux
While writing this book Adobe Premiere Pro was updated. Starting with Adobe Premiere Pro CC 7.1 (late 2013 update) Adobe expanded the features of the Effects tab, making the creation of a watermarked nested sequence discussed in the preceding section less necessary.
It’s still the best way to create completely custom watermarking, but the new method probably covers the most common needs for most users.
See the section “Effects” later in this chapter to learn how to add the following types of information for output (Figure 7.9):
![]() Image Overlay. Such as logos.
Image Overlay. Such as logos.
![]() Name Overlay. Such as your company’s name or other crucial identifying information (such as “for rough cut approval only”)
Name Overlay. Such as your company’s name or other crucial identifying information (such as “for rough cut approval only”)
![]() Timecode Overlay. Crucial for client communications of concerns
Timecode Overlay. Crucial for client communications of concerns
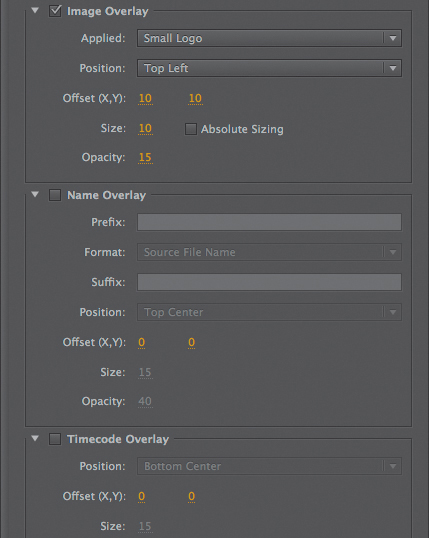
The advantage of using the Effects tab for output is that the information is quick and easy to add to the footage and can be saved to a setting.
The only downside of utilizing this technique is that you can’t see the finished information unless you manually open the outputted file.
![]() Tip
Tip
Don’t worry about how adding Bars & Tone (or other elements) can affect the output file size. In the Export Media dialog, it’s possible to specify the output range and intentionally include or remove this section by selecting the In and Out point on the Timeline of only the material you want to output.
Use an Output Bin
Being organized isn’t accidental, and very few people are organized naturally. In this respect, you are your own worst enemy. If you don’t organize and stay organized, you’ll only be penalizing yourself, often at a time of need—when you’re trying to identify exactly what you delivered to a client.
To stay organized, you should create a bin called Outputs (Figure 7.10).

Figure 7.10 An Output bin specifies exactly what you gave a client. Some projects can have multiple Output bins.
Then when a client calls asking to talk about a specific file you’ve generated, if you’ve named it explicitly, you’ll have an easier time finding it.
All of your duplicate sequences should be stored in your Output bin(s). Optionally, you can create one or more bins inside your Output bin to group exports. This is particularly helpful if you have to do multiple language or other versioning of output.
Build a Bars & Tone ID Sequence
Every output sequence should have Bars & Tone along with appropriate Title cards, countdown, and other common identifiers for output.
![]() Tip
Tip
In the ID sequence example, the Bars/Tone/Slate Timeline is exactly one minute in length. When adding it to an existing sequence, it’s advisable to back up the start time of the sequence to 23:59:00;00 via the Start Time menu (right-click the name of the sequence on the Timeline tab).
A “best practice” is to build this as a separate sequence and nest it, adding it to your existing Timeline. It’s common to make this sequence one minute in length, and it should include:
![]() Bars & Tone for at least five seconds. Choose File > New > Bars & Tone. Unique to Bars & Tone, you can type in a timecode, set an Out point (O), and set any duration you like.
Bars & Tone for at least five seconds. Choose File > New > Bars & Tone. Unique to Bars & Tone, you can type in a timecode, set an Out point (O), and set any duration you like.
![]() A slate of important information, such as client name, your production company, and any other necessary information, such as job numbers and output date.
A slate of important information, such as client name, your production company, and any other necessary information, such as job numbers and output date.
![]() A countdown (File > New > Universal Counting Leader) that needs to end on the frame before 1;00;00. The one that Adobe Premiere Pro can automatically build lasts 11 seconds, so it’s best to put it at the 49;00;00 mark.
A countdown (File > New > Universal Counting Leader) that needs to end on the frame before 1;00;00. The one that Adobe Premiere Pro can automatically build lasts 11 seconds, so it’s best to put it at the 49;00;00 mark.
Including all this information results in a Timeline that looks like the one shown in Figure 7.11.

By putting this ID sequence at the beginning of your sequence for output, your output will be set up professionally, and with the Bars & Tone, others looking at the video will have the ability to measure and calibrate their systems.
Common Outputs
At a minimum, output needs at least two files: one to archive and one to deliver to clients. However, there are times when you may need to create three, five, or a dozen (or more!) files for clients. You might output a version for archive (MXF, DNxHD), a version for the client’s iPad (MP4, h.264), a version for Vimeo (720 MP4, h.264), and a version for DVD (SD MPEG2).
The two most useful output files include a master “final” output that can be used for archival needs. If in the future other compression needs to be done, it can be done from this “digital master.”
The other file is for generic devices (such as Android and iOS) and can be used for upload as well.
The Export Media Dialog
To speed along the series of outputs you’ll make, it’s a good idea to get a quick overview of some of the features of the Export Media dialog. It is divided into five sections: Preview, Range, Presets, Adjustments, and Fine-tuning (Figure 7.12).
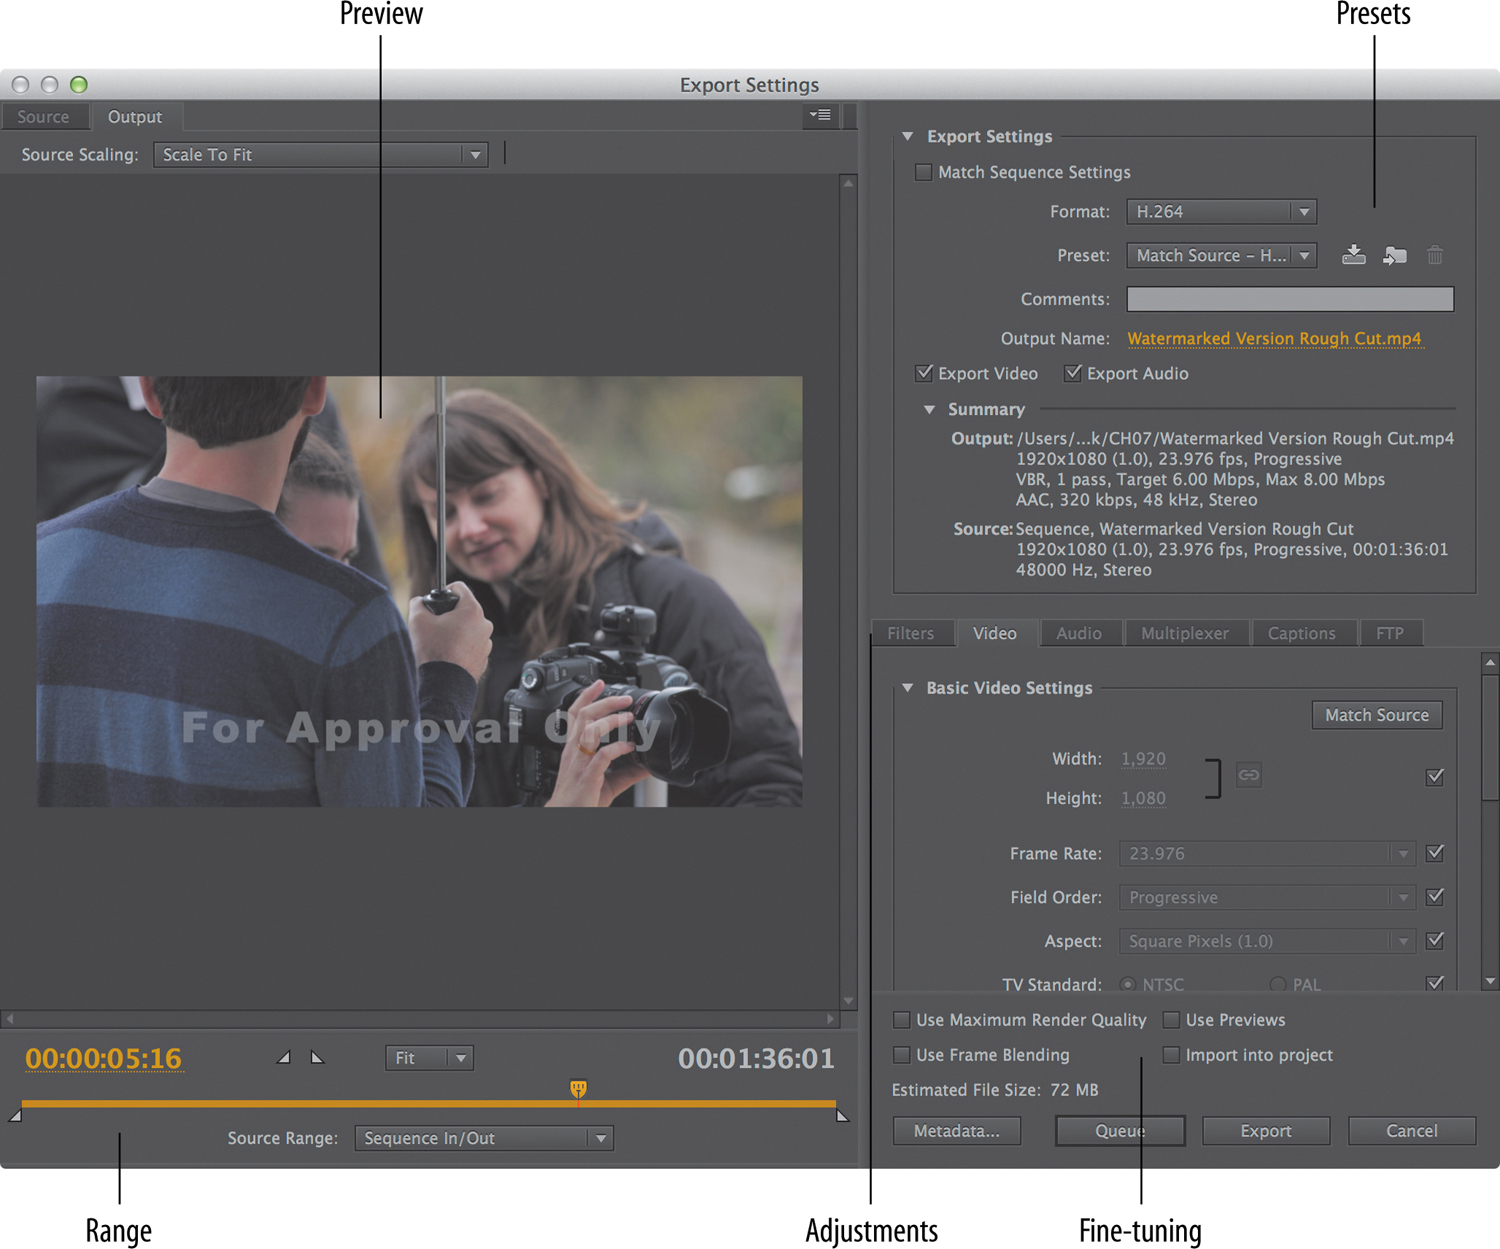
Preview
In the Preview section at the top are two tabs: Source and Output.
The Source tab information is what Adobe Premiere Pro passes off to the compression engine (Adobe Media Encoder), whereas the Output tab information is what the compression engine returns before the file is encoded.
The Source tab gives you the ability to crop output (Figure 7.13). Generally, it’s frowned upon to crop your output because there is no pan and scan ability on this tab (you should have done that on your Timeline). Rather, you can use the crop value to crop out black bars from your video. There’s no reason to compress black bars; it’s merely wasteful for compression (you’d actually have to compress the black areas!).
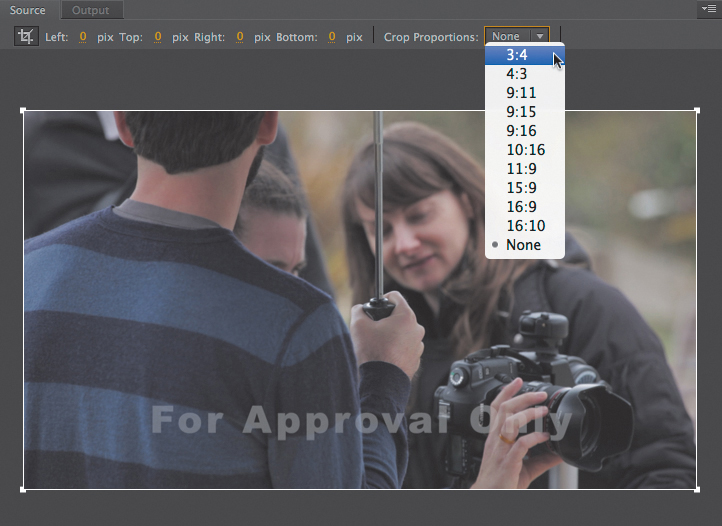
Figure 7.13 Although cropping is used infrequently, if needed, make sure you match the proportions for your video.
The Output tab (Figure 7.14) shows the results of any adjustment (such as the Gaussian Blur filter) or any cropping/size changes you make. The main item to look for on this tab is the Source Scaling menu. The choices tell you what happens if you change the scale of the video or crop. Scale to fit is likely the best choice in most situations.

![]() Tip
Tip
If you set an In point on the Timeline before you choose Export Media, the custom range will already be active.
Range
The ability to set the range for part of the video is overlooked by many users. It’s possible to use unique In and Out points, customizing which part of the video is outputted/compressed (Figure 7.15).

Common good practices include adding Bars & Tone along with title slates for output. See the earlier section “Build a Bars & Tone ID Sequence.” Setting a custom range permits the sequence to always be treated as a whole, yet allow for selective output (for example, with or without the Bars & Tone).
Presets
Presets are the heart of the Export Media dialog. Selecting a Format and a Preset dictates what will be output. The Summary section provides a quick overview of what will be made and the destination path of where the outputted file will end up (Figure 7.16).

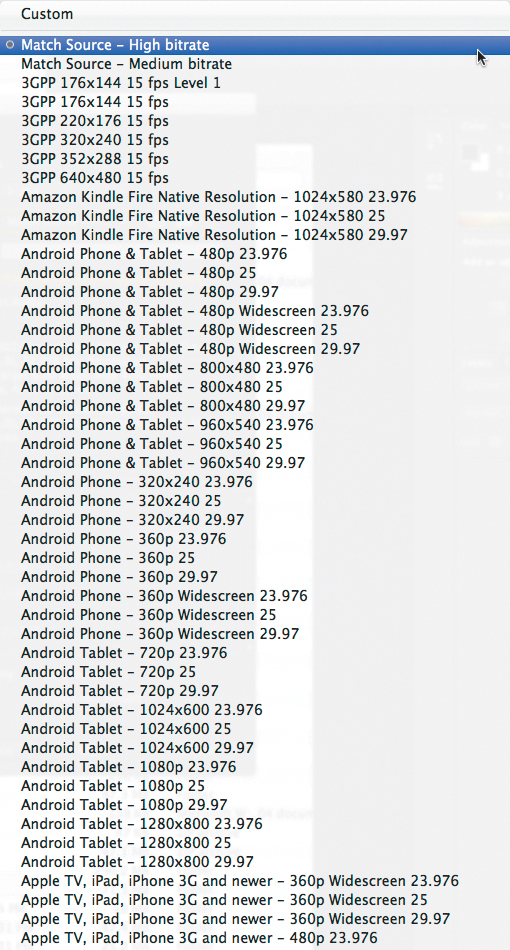
Adobe has been very comprehensive by including over 450 different output possibilities (not including the ones you build!).
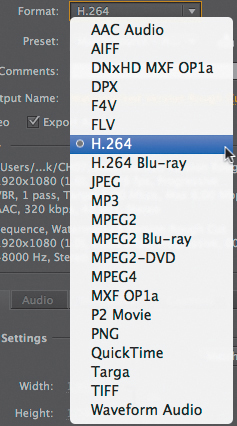
From the Format drop-down menu (Figure 7.17) you can choose a file type (such as QuickTime, h.264, or MPEG-2). Then choose a preset from the Preset drop-down menu (Figure 7.18), which will vary based on the format you chose.
![]() Notes
Notes
Selecting the Match Sequence Settings check box causes Adobe Premiere Pro to match the codec that was used for Previews (render files). Using existing Previews creates a faster output at the cost of quality.
Optionally, you can save adjustments made in the adjustment tabs (discussed next) for reuse.
![]() Tip
Tip
If you adjust anything in a preset, save a new preset and always fill out the comments.
Adjustments
The adjustment tabs allow you to manipulate the output; the most important tab is the Video tab (Figure 7.19). On the Video tab you’re be able to make any sort of codec adjustments you like, such as sizing, data rate, and color depth (not every adjustment is available for every codec).

Also worth mentioning are the abilities to embed closed-captioning information or to directly FTP video to a server.
Filtering
The initial Adobe Premiere Pro 7.0 release (and earlier releases) permitted only a Gaussian blur to be applied to video.
Starting in version 7.1 (the late 2013 release), the Effects tab becomes far more useful, allowing you to add valuable information for client reviews and other outputs.
Ideally, for client output (Figure 7.20), you should add your logo, a name overlay that dictates the exact filename, and the timecode, so clients can tell you at what points they have notes or comments for refining your cut.

Each overlay has three common adjustments: Size (or scale), a generalized screen placement along with X,Y coordinates for fine-tuning, and an Opacity adjustment.
Let’s look at each overlay in greater detail:
![]() Image Overlay. The Image Overlay (Figure 7.21) brings up a dialog that allows you to select any image file on your system. Commonly, the image will be your logo and will be set fairly small with at least a 50 percent Opacity.
Image Overlay. The Image Overlay (Figure 7.21) brings up a dialog that allows you to select any image file on your system. Commonly, the image will be your logo and will be set fairly small with at least a 50 percent Opacity.
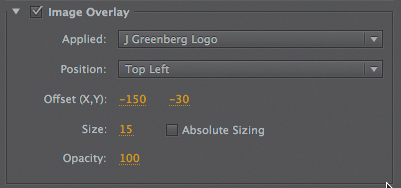
Figure 7.21 In this case, a file named J Greenberg Logo has been selected, set to the top left, offset 150 pixels to the left and 30 pixels upward at 100 percent opacity.
![]() Name Overlay. For Name Overlay you’d place a text overlay based on the sequence name (Figure 7.22); for example: “Temp Sound for Picture approval.” Instead of using the sequence name, a better choice is to use the output filename from the Format menu as a verification that the client is looking at the right file. Additionally, you could add a prefix or suffix, such as “Confidential.”
Name Overlay. For Name Overlay you’d place a text overlay based on the sequence name (Figure 7.22); for example: “Temp Sound for Picture approval.” Instead of using the sequence name, a better choice is to use the output filename from the Format menu as a verification that the client is looking at the right file. Additionally, you could add a prefix or suffix, such as “Confidential.”
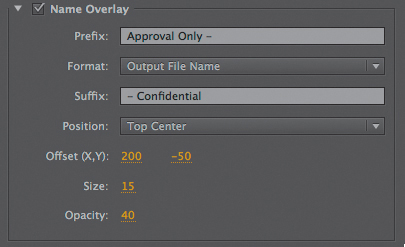
Figure 7.22 Added as an overlay, is the output filename (Main Sequence Rough Cut) is the prefix “Approval Only –” and the suffix “– Confidential.” This has been visually offset in such a way to remain visually appealing on screen, but out of the way.
![]() Timecode Overlay. Adding timecode (Figure 7.23) to the output makes it simple for clients to communicate exactly which frame they’re looking at.
Timecode Overlay. Adding timecode (Figure 7.23) to the output makes it simple for clients to communicate exactly which frame they’re looking at.

Figure 7.23 The Timecode Overlay is positioned at the bottom of the output. Using the timecode is the best way for a client to provide precise feedback.
Fine-tuning
At the bottom of the Export Media dialog are several check boxes for fine-tuning that can affect final quality (Figure 7.24) and rendering time if used incorrectly:
![]() Use Maximum Render Quality. Select this option only if you’re doing loads of size conversion with different frame sizes (scaling standard definition up to high definition). Using this option increases render times.
Use Maximum Render Quality. Select this option only if you’re doing loads of size conversion with different frame sizes (scaling standard definition up to high definition). Using this option increases render times.
![]() Use Frame Blending. It’s best to use this option only when you’re outputting a different frame rate than the actual sequence. This check box blends frames together. Plug-ins like Twixtor exist solely for higher-quality retime adjustments.
Use Frame Blending. It’s best to use this option only when you’re outputting a different frame rate than the actual sequence. This check box blends frames together. Plug-ins like Twixtor exist solely for higher-quality retime adjustments.
![]() Use Previews. See the sidebar “Adobe Premiere Pro, Preview Files, and Accelerating Output” about the advantages and disadvantages of using the Preview Files that can be created.
Use Previews. See the sidebar “Adobe Premiere Pro, Preview Files, and Accelerating Output” about the advantages and disadvantages of using the Preview Files that can be created.
![]() Import into project. By selecting this option, the media you created is automatically imported back into the project.
Import into project. By selecting this option, the media you created is automatically imported back into the project.
Optionally, a Metadata button allows you to add metadata, such as copyright information, to your output videos.
Final Output
When you’re finished editing, you should create a storage version of your sequence to put on a shelf (on two separate hard drives or on an LTO [a type of tape backup]) for permanent storage.
Although it is possible and valuable to back up all your files for future changes, it’s laborious to have to grab all the assets associated with the project just to create a new output.
So which architecture and which codec will provide the easiest recall and general use? The solution is one of two choices: QuickTime and a Post codec or the new MXF output with the DNxHD codec.
Best Choice? QuickTime and a Post Codec
QuickTime is currently the most common media architecture for postproduction. It works with almost every editorial, compression, and compositing system. Creating a QuickTime file and keeping it for future needs is a very safe choice.
And only a postproduction codec should be used—one that adds minimal compression while having a larger data rate—regardless of camera codecs used. Whichever codec you choose, you’ll need to build a custom output that matches your sequence’s frame size and frame rate.
![]() Close-Up: Adobe Premiere Pro, Preview Files, and Accelerating Output
Close-Up: Adobe Premiere Pro, Preview Files, and Accelerating Output
![]() DV
DV
![]() DVCProHD
DVCProHD
![]() Long Gop 0p1a (XDCam)
Long Gop 0p1a (XDCam)
![]() AVCIntraframe (MXF)
AVCIntraframe (MXF)
![]() DNxHD (MXF) Op1a
DNxHD (MXF) Op1a
![]() ProRes (QuickTime)
ProRes (QuickTime)
![]() DNxHD (QuickTime)
DNxHD (QuickTime)
Common Post codecs available as of June 2013 include:
![]() Avid DNxHD. To get this working in Adobe Premiere Pro, you’ll need to download and install the DNxHD QuickTime codecs. Depending on which frame rate you’re working with, you’ll get different DNxHD choices. The safest choice is to choose a large data rate (such as 145, 175, or 220—large meaning less compressed) for your footage. Choose a 10-bit version if your footage was generated from a camera that shot in 10 bits or higher. Uncompressed is always a possibility, but that will result in building a gigantic file.
Avid DNxHD. To get this working in Adobe Premiere Pro, you’ll need to download and install the DNxHD QuickTime codecs. Depending on which frame rate you’re working with, you’ll get different DNxHD choices. The safest choice is to choose a large data rate (such as 145, 175, or 220—large meaning less compressed) for your footage. Choose a 10-bit version if your footage was generated from a camera that shot in 10 bits or higher. Uncompressed is always a possibility, but that will result in building a gigantic file.
![]() Apple ProRes. Sadly, ProRes is read-only on a Windows machine, meaning it’s not truly a cross-platform codec. On a Macintosh, you have to own at least one of Apple’s Professional Video Applications to be able to compress to this format. In most cases ProRes 422 (running at 145 mb/s) or ProRes HQ (running at 220mb/s) makes the best choice.
Apple ProRes. Sadly, ProRes is read-only on a Windows machine, meaning it’s not truly a cross-platform codec. On a Macintosh, you have to own at least one of Apple’s Professional Video Applications to be able to compress to this format. In most cases ProRes 422 (running at 145 mb/s) or ProRes HQ (running at 220mb/s) makes the best choice.
![]() Third-party codecs. GoPro Cineform, Lagarith, and others are third-party codecs. Just be aware that you’ll need to own and install these on any machine along with QuickTime for playback. All these codecs work in Adobe Premiere Pro.
Third-party codecs. GoPro Cineform, Lagarith, and others are third-party codecs. Just be aware that you’ll need to own and install these on any machine along with QuickTime for playback. All these codecs work in Adobe Premiere Pro.
![]() Notes
Notes
We’ve chosen DNxHD for this book, because it’s cross platform and Adobe has licensed a form of it (in an MXF architecture). One place that DNxHD cannot be used (at this time) is for footage that is larger than HD sizes. For these, although we’d like to recommend Apple ProRes (Mac specific) or GoPro Cineform (extra purchase), there isn’t an easy compressed format that works cross platform.
An example of a DNxHD QuickTime build for an archival file
Let’s walk through building a sequence for an archival file. My main sequence (1080p, 23.98) has been duplicated and renamed to reflect its use (which is for archiving).
The system being used already has the DNxHD codecs from Avid installed (available from http://avid.force.com/pkb/articles/en_US/download/Avid-QuickTimeCodecs-LE-2-3-8). Alternatively, on a Macintosh, Apple’s ProRes could be an substitute choice, but DNxHD is cross platform. The following example will not work without the DNxHD codec installed.
1. With the sequence selected, choose File > Export > Media.
2. From the Format menu, choose QuickTime, which leaves you with a very short list of prebuilt settings (Figure 7.26).

Because you’ll have to build our own, the best choice is to always start off as close as possible to what you need. The starting point could be any of the HD choices (1080 25p is closest to 1080p 23.98) for this sequence. I chose the Watermarked Version Rough Cut from the project.
3. On the Video tab, adjust the codec, and check the frame size and frame rate.
Adjusting the codec to Avid DNxHD causes the Codec Settings button to become active (Figure 7.27).

Figure 7.27 Some codecs, such as DNxHD, will not allow any adjustments directly in Adobe Premiere Pro. You’ll need to click the Codec Settings button.
4. Click the Codec Settings button to yield the Configuration dialog.
5. For Color Levels, the best choice is 709. This is a flag that dictates how other software interprets the Luma levels. The 709 option means that the outputted file is using the full HD gamut.
6. For Alpha, choose whether or not you want there to be an alpha channel (you probably don’t want this). In After Effects you would choose to have an alpha channel, but in editorial it is less likely.
7. Choose the appropriate DNxHD resolution with the goal of matching your footage. In this case, it’s 1080p, the frame rate is 23.98, 175 (megabits per second, the least compressed of the choices), and 8 bit (because the video was shot with an 8 bit camera).
With the codec set correctly (Figure 7.28), you then need to match the settings on the Video tab.

Figure 7.28 These setting are correct for this sequence. Your sequence settings will dictate your choices.
8. Leave the Quality slider where it is because moving it will make no difference.
9. Make sure the Width and the Height are set to 1920 x 1080, the Frame Rate is 23.976, the Field Order is Progressive, and the Aspect is Square Pixels (1.0). Figure 7.29 shows the correct settings that match the sequence.

Figure 7.29 QuickTime requires you to match any codec adjustments made in the codec dialog a second time in Adobe Premiere Pro.
10. Save this preset. Because the Codec Settings and the Video tab match the sequence, it’s likely you’ll reuse it often.
11. Click the icon to the right of the Preset setting (Figure 7.30) to name the setting.

It’s valuable to add as much information to the setting as possible. In this case, I named it Archival DNxHD 175 1080p 23.98 709 color space. Add any comments as you see fit.
12. Click Export.
![]() Tip
Tip
You can generally leave Render at Maximum Depth deselected unless you’re working in a 10 bit or higher format, such as the RED Camera, Black Magic Cinema Camera, or Alexa Camera. Because these cameras shoot higher than 10 bit, it’s best to choose the highest values to preserve as much of the color information as possible.
New in Creative Cloud: MXF DNxHD OP1a
MXF DNxHD OP1a is new in the Creative Cloud release of Adobe Premiere Pro. Adobe specifically heard the complaint from users that there was a lack of a postproduction, cross-platform SMPTE standards and licensed a way to output as such.
The sole warning about generating these files is to check which other tools in your chain need to be able to read them. Although the Adobe CC products can read these files, third-party tools are not guaranteed to do so. Also, because MXF DNxHD OP1a is a new choice, it’s recommended that you test your existing needs before adopting it.
![]() Tip
Tip
Although Adobe Premiere Pro can’t export custom settings, Adobe Media Encoder can! Open the Adobe Media Encoder to save settings to put on other systems.
An example of a DNxHD archival build (MXF)
The MXF version of DNxHD is quite a bit easier to build than a QuickTime output, because Adobe has built a preset for your needs.
1. Choose File > Export > Media, and then choose DNxHD MXF OP1a.
2. From the Preset menu, choose DNX 220 1080p 23.98. If you’re working with 10-bit video, choose DNX 220x (Figure 7.31).

h.264 Distribution Outputs
When it comes to distribution, aggressive choices can be made in compression. Should you sacrifice file quality for speed of output? Will the client have the codecs necessary for playback (no post production codecs here!)?
The goal is always to get a file out that is ideal for the target use, such as embedding in Microsoft PowerPoint. And the most frequent output file right now is h.264 in an MP4 architecture.
![]() Tip
Tip
Generally, it’s best to Queue your work and later start Adobe Media Encoder and perform the compression there. Adobe Media Encoder can compress in the background, leaving you free to continue editing. If you click the Export button, it’ll tie up Adobe Premiere Pro.
h.264 is fantastic for mobile devices and uploading to online hosting, and the smaller sizes can deliver decent quality output. These files have adjustable data rates (bitrates). By making the data rate larger, you’ll get a larger file and generally a higher quality file. But that doesn’t mean that choice is necessarily right for you!
![]() Notes
Notes
Making sure you’re clear about what deliverables your client needs first and testing that you can output correctly will solve 99 percent of the headaches that usually accompany deliverables.
Here are two instances in which h.264 should not be used:
![]() DVDs. MPEG-2 files are the only type of video that works on a DVD (this is different for Blu-ray where h.264 is fine.)
DVDs. MPEG-2 files are the only type of video that works on a DVD (this is different for Blu-ray where h.264 is fine.)
![]() Playout servers. These devices have specific needs; feeding them the wrong architecture or codec will not work. They vary through multiple formats, such as MPEG-2 Transport streams, P2 DVCPro files, XDCam OP1a MXF files, and so on.
Playout servers. These devices have specific needs; feeding them the wrong architecture or codec will not work. They vary through multiple formats, such as MPEG-2 Transport streams, P2 DVCPro files, XDCam OP1a MXF files, and so on.
Getting Video Out Fast (CBR h.264)
When you’re working with a client in the room, it’s a great idea to be able to export a file that is small, yet can be output quickly. But you have to be willing to sacrifice quality—meaning the resulting file may look crunchy/have artifacts—to improve speed of output.
As an example, let’s work with an MP4 h.264 output and give it an “OK” data rate, but the crucial part is choosing a constant bit rate (CBR) with no analysis versus a variable bit rate (VBR) that takes longer to render because of the analysis needed. This setting will be the fastest encode based on your system specs.
In this example, the output will source from a 1080p 23.98 sequence.
Select and duplicate the sequence you intend to output, and add watermarking or other elements as you see fit.
Now, let’s create a quick CBR output for a client.
1. Choose File > Export > Media.
2. Choose h.264 from the Format drop-down menu.
3. Choose Match Source – High bitrate to provide a good starting point.
4. On the Video tab, scroll down to the Bitrate Settings. Change the setting from VBR 1-pass to CBR. Change the Bitrate to 20, effectively tripling how much data is given to the picture. This will triple the file size compared to the original setting but still produce a small file with no analysis needed.
5. Select Use Previews. If you’ve been rendering your previews, you’ll get an even faster output.
6. Optionally, save this preset as CBR Client review for faster recall in the future.
Figure 7.32 shows a finished version.

A Multipurpose h.264
It’s time-consuming to build multiple similar outputs, especially when by making the right choices one output could serve multiple uses.
The panacea of a single file output is impossible because there are too many different devices currently on the market. But what if you could design an output to target a large majority of these devices? It might be worth sacrificing a little quality (nothing bigger than 720) for your output. And what if the same file could be used for upload to sites like YouTube and Vimeo? And what if the same file could also be embedded in PowerPoint (post 2008)?
Then you’d have one file that could handle multiple uses—a truly flexible choice.
Adjusting settings
So, to build an h.264 output, you want a file that matches the following criteria:
![]() MP4 h.264. This will embed in PowerPoint, cross platform.
MP4 h.264. This will embed in PowerPoint, cross platform.
![]() 1280 x 720. Yes, it’s a compromise but only if you’re shooting 1080. By scaling the footage downward, it’s still high definition and will look decent on computer screens, tablets, and phones.
1280 x 720. Yes, it’s a compromise but only if you’re shooting 1080. By scaling the footage downward, it’s still high definition and will look decent on computer screens, tablets, and phones.
![]() Maximum hardware compatibility. See the Note on h.264 Profile + Levels.
Maximum hardware compatibility. See the Note on h.264 Profile + Levels.
![]() Frame rate. It’s crucial that you match your frame rate.
Frame rate. It’s crucial that you match your frame rate.
![]() Compression. You know the file will possibly be recompressed by an online host. The data rate that most hosts use for 720 content is around 4–5 mb/s. So, it’s best to at least double that to provide some room for the recompression.
Compression. You know the file will possibly be recompressed by an online host. The data rate that most hosts use for 720 content is around 4–5 mb/s. So, it’s best to at least double that to provide some room for the recompression.
![]() Highest quality. You want to do whatever calculations are necessary for the highest quality file. A VBR 2-pass file will take longer to render but provides the best compression.
Highest quality. You want to do whatever calculations are necessary for the highest quality file. A VBR 2-pass file will take longer to render but provides the best compression.
![]() Notes
Notes
Although there is a category called MPEG-4 in Adobe Premiere Pro, it’s really the combination of architecture plus codec optimized for older mobile devices. MP4 formats that utilize the h.264 codec are found under the h.264 format.
![]() Notes
Notes
The Profile + Level choices on the Video encoding tab are shortcuts for hardware maximums—size, data rate, and more. This information is much easier to check as a reference than having to spell out the specifications for every device. Level 3.2 is the lowest level that supports 720 video.
To create a multipurpose setting, follow these steps.
1. Choose File > Export > Media.
2. Choose h.264 from the Format menu.
3. Choose Match Source, High bitrate. Yes, you could dial in a closer match, but this list is full of presets!
4. Deselect Profile, deselect Level, and set level to 3.2. By doing so, you need to reset the scale to 1280 x 720 (and unlock the chain next to the sizing); the frame rate changes. Change your frame rate to match your sequence settings.
5. Change the frame rate back to 23.976.
6. Change the bitrate to VBR-2 pass. Let’s favor quality!
7. Take the Target bitrate up to 10 mb/s. Change the Maximum to 14 to permit the bitrate to vary as needed, giving more data for complex frames (fast motion and lots of detail) by stealing data from simpler ones (talking heads). If you were using a 1080 preset, you’d take the Target to 15 mb/s and the Maximum to 20.
8. Change the Key Frame distance to 120 to force a full frame every five seconds.
9. Save this preset. Name it Multipurpose 720 23.976 (or whichever frame rate you chose).
![]() Notes
Notes
VBR compression is aggressive; not every frame has all the information. For this reason there are two numbers: the average and the amount to vary. Some frames only have the changes since the last full frame. This keyframe setting requires less full frames and allows the codec to vary more—leading to more efficient compression at the cost of complexity and taking longer to compress and decompress.
Figure 7.33 shows a finished version of the preset.
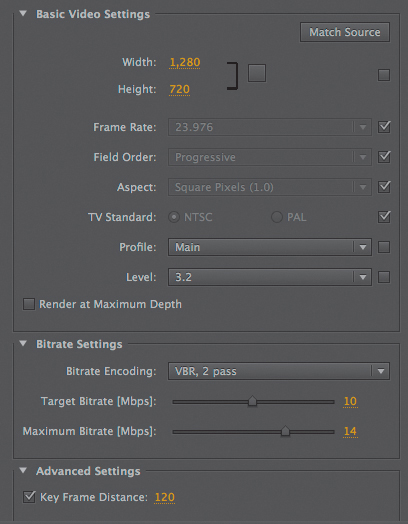
Figure 7.33 This HD preset works in many different places—on computers, all iOS devices, many android devices, and in Microsoft PowerPoint.
Smart Compression Tips
Infinite sets of adjustments can be made in Adobe Premiere Pro. Just take a look at all the ones it ships with! Because it’d be impossible to cover all of them in a book, much less a chapter, the following list of suggestions might provide some guidance:
![]() Avoid creating from scratch. Always start from a setting near to what you’re trying to build.
Avoid creating from scratch. Always start from a setting near to what you’re trying to build.
![]() Keep h.264 as MP4 files. Although other architectures can contain h.264, MP4 ends up being the most flexible container.
Keep h.264 as MP4 files. Although other architectures can contain h.264, MP4 ends up being the most flexible container.
![]() Avoid large bitrates when possible. Larger data rates (bitrate) mean larger files.
Avoid large bitrates when possible. Larger data rates (bitrate) mean larger files.
![]() Choose CBR for speed. VBR builds better-looking compression at the expense of time.
Choose CBR for speed. VBR builds better-looking compression at the expense of time.
![]() Use short ranges for testing. A short Source Range can be used for easy testing. Compress 30 to 60 seconds of a file to check the output rather than the entire piece. Is it the quality that you want? Many tests can be done quickly when you utilize this feature.
Use short ranges for testing. A short Source Range can be used for easy testing. Compress 30 to 60 seconds of a file to check the output rather than the entire piece. Is it the quality that you want? Many tests can be done quickly when you utilize this feature.
![]() Always check specifications. If the file is meant to play back on a hardware device, it has specifications. Pay attention to them.
Always check specifications. If the file is meant to play back on a hardware device, it has specifications. Pay attention to them.
Outputting a Still Frame
Although you haven’t really used Adobe Premiere Pro’s flexible Export outputs, it may be necessary to be able to output individual stills quickly. Often, DVD menus, website stills, or product design art for packaging need high-quality stills. In SD, the screen size is too small at 720 x 480, but in HD you can get a large enough still that will print decently at around 2 megapixels—not fantastic, but usable.
![]() Notes
Notes
To export a still, you can also use the Export Media dialog. The choices are the same as in the Export Frame dialog: DPX, JPEG, PNG, and TIF. Just be sure to deselect Export as Sequence, or you’ll have thousands of stills.
Exporting a still is straightforward. You can click the Export Frame button (Figure 7.34) on the bottom of both the Source and Program monitors, or press Shift+E.
The dialog (Figure 7.35) that appears permits you to choose the type of still you want. Here’s a quick list of the ideal uses of the different file types:
![]() DPX. The Digital Picture Exchange format is an uncompressed file, but it’s optimized for other postproduction tools, such as Adobe SpeedGrade.
DPX. The Digital Picture Exchange format is an uncompressed file, but it’s optimized for other postproduction tools, such as Adobe SpeedGrade.
![]() JPEG. The Joint Photograph Expert Group format is compressed, meaning it’s great for transmission over the Internet and email but is less decent for print or other postproduction uses. With JPEG you have no ability to adjust the compression.
JPEG. The Joint Photograph Expert Group format is compressed, meaning it’s great for transmission over the Internet and email but is less decent for print or other postproduction uses. With JPEG you have no ability to adjust the compression.
![]() PNG. The Portable Network Graphic format, like JPEG, is compressed but less compressed than JPEG. It’s advantage is that it can carry an alpha channel (JPEG cannot).
PNG. The Portable Network Graphic format, like JPEG, is compressed but less compressed than JPEG. It’s advantage is that it can carry an alpha channel (JPEG cannot).
![]() Targa. Targa is an uncompressed format and is often used in 3D modeling software.
Targa. Targa is an uncompressed format and is often used in 3D modeling software.
![]() TIFF. The Tagged Image Foto Format is uncompressed (but other software like Adobe Photoshop can output compressed versions). It’s ideal for print and other photographic uses.
TIFF. The Tagged Image Foto Format is uncompressed (but other software like Adobe Photoshop can output compressed versions). It’s ideal for print and other photographic uses.

Multiple Stills
There is no easy automated way to obtain multiple stills from Adobe Premiere Pro. But at least the task can be performed faster using a four-step method.
1. Add markers to any frames you want to export. The keyboard shortcut is M for marker.
2. When all the frames are marked, go to the beginning of your sequence. Press Shift+M to move to the next Marker.
3. Press Shift+E to export the still. Choose your destination drive and format.
4. Press Return. (This often-missed, common shortcut is like clicking the OK button.)
Then all you need to do is repeat the preceding steps for each still. Press Shift+M for the next marker, press Shift+E for the next export, and then press the Return key. Adobe Premiere Pro increments each still as filename.Still001, filename.Still002, and so on.
Queue Button
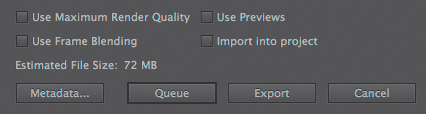
In the Export Media dialog, the Queue button may very well be the most important button, which is why it defaults to selected (Figure 7.36.)
How you choose to work is a question of time management; you have three choices available:
![]() Click the Export button. Adobe Premiere Pro will tie up all of your resources and compress your file utilizing Adobe Media Encoder in the background (headless). Just walk away from your system and let it do its job.
Click the Export button. Adobe Premiere Pro will tie up all of your resources and compress your file utilizing Adobe Media Encoder in the background (headless). Just walk away from your system and let it do its job.
![]() Click the Queue button and keep working. This passes your sequence plus settings to Adobe Media Encoder (which launches in the background). If you start the compression in Adobe Media Encoder, you can compress in the background while you continue to do other work. This workflow is slightly slower than clicking the Export button but frees up Adobe Premiere Pro to do other tasks.
Click the Queue button and keep working. This passes your sequence plus settings to Adobe Media Encoder (which launches in the background). If you start the compression in Adobe Media Encoder, you can compress in the background while you continue to do other work. This workflow is slightly slower than clicking the Export button but frees up Adobe Premiere Pro to do other tasks.
![]() Click the Queue button plus batch encoding. This passes your sequence plus settings to Adobe Media Encoder. You can continue to work or make other adjustments in Adobe Media Encoder, such as render multiple outputs. This option allows you to continue working and choose when to compress multiple files (batch) during downtime, such as at the end of day.
Click the Queue button plus batch encoding. This passes your sequence plus settings to Adobe Media Encoder. You can continue to work or make other adjustments in Adobe Media Encoder, such as render multiple outputs. This option allows you to continue working and choose when to compress multiple files (batch) during downtime, such as at the end of day.
If you want to build custom transcode settings for Adobe Prelude, you build them in Adobe Media Encoder.
When should you use each option? If the client is in the room, click Export. If the client is coming later in the day, click Queue and keep working. If there are two or more compression jobs that need to be taken care of, click Queue and batch encode.
Adobe Media Encoder
Adobe Premiere Pro really doesn’t do any of your compression. It’s done by Adobe Media Encoder. When you click the Export button in Adobe Premiere Pro, it launches a “headless” version of Adobe Media Encoder.
You can also launch Adobe Media Encoder independently of Adobe Premiere Pro. Aside from compression, it has some additional workflow capabilities, including powerful watch folders. Watch folders monitor a specific folder on your drives (preferably a media drive) for content and then compress that content (and possibly upload it) automatically.
Custom settings created in Adobe Media Encoder are shared by Adobe Premiere Pro and Adobe Prelude.
Overview of Adobe Media Encoder
Adobe Media Encoder has four panels devoted to compression (Figure 7.37 on the next page): Queue, Presets, Encoding, and Watch Folders.

A source in the Queue (or Watch Folder) gets compressed by a setting chosen from the Preset Browser. During compression the status column changes to a progress gauge until the compression is complete. While the source is being compressed, the Encoding panel shows the progress of the compression.
To start compression, click the green Play button in the upper-right corner of the Queue window.
Queue
The Queue panel begins the compression process. Adobe Media Encoder can compress three types of sources:
![]() Video media, such as QuickTime files. Choose File > Add Source. Alternatively, you can press Command+I (Ctrl+I).
Video media, such as QuickTime files. Choose File > Add Source. Alternatively, you can press Command+I (Ctrl+I).
![]() Sequences from Adobe Premiere Pro. The most common way that sequences appear in the compression queue is by clicking the Queue button in Adobe Premiere Pro. The menu choice has the ability to import a sequence from a closed project.
Sequences from Adobe Premiere Pro. The most common way that sequences appear in the compression queue is by clicking the Queue button in Adobe Premiere Pro. The menu choice has the ability to import a sequence from a closed project.
![]() Compositions from Adobe After Effects. Although After Effects can generate its own outputs, doing so in Adobe Media Encoder permits easier building of multiple outputs—and as a bonus, in the background.
Compositions from Adobe After Effects. Although After Effects can generate its own outputs, doing so in Adobe Media Encoder permits easier building of multiple outputs—and as a bonus, in the background.
![]() Tip
Tip
Make sure you have an explicit naming system in place. Opening a project and deciding which file you need among Sequence 01, Sequence 02, or Sequence 03 is difficult (or impossible). By having named the sequences (or After Effect compositions) meaningfully, using Adobe Media Encoder will be easier.
You read the Queue horizontally. For example, in Figure 7.38 a source, Watermarked Version Rough Cut, will be compressed in the format DNxHD MXF OP1a using the codec DNX 220 1080p23.976 to the Output file Watermarked Version Rough Cut.mp4.

Multiple outputs
When a source entry has multiple outputs, multiple files will be compressed simultaneously. Each source entry will be compressed one after the next until all are finished or one fails and has an error.
![]() Tip
Tip
It’s possible to right-click on a source and reset its status, making it easy to perform the compression a second time and make quick changes to try to improve the compression.
To add an output, click on the source, and choose File > Add Output (or click the Add Output button; Figure 7.39).

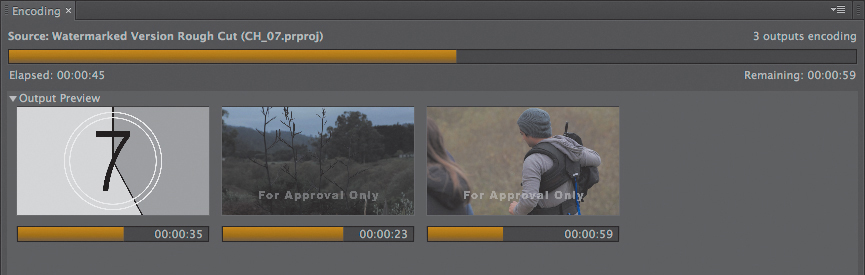
Encoding
During an encode, the Output Preview area (Figure 7.40) shows each output thumbnail while it’s compressing. The thumbnail displays the elapsed time, the remaining time, and a preview of the compression.
![]() Tip
Tip
When an encode is finished, whether it fails or succeeds, double-clicking on the Status (such as complete or failed) reveals the log information of that particular encode.
Preset Browser
In the Preset Browser are some 450 plus presets (Figure 7.41) that cover broadcast needs, phones, tablets, readers, and optical media, among others.

With so many presets, it’s easy to become overwhelmed by the sheer number and variety of choices. The fastest way to find a preset is to type the intended end use into the search box.
Even with all of these choices, note that many were designed for an average need. Therefore, many presets could be refined further, perhaps by lowering the data rate (for smaller files) or increasing the data rate (for larger files). Selecting any preset and clicking the Settings button reveals the Settings dialog where you can make adjustments. See the section “Mastering Presets and Settings” later in the chapter.
Watch Folders
The Watch Folders panel (Figure 7.42) is conceptually identical to the Queue panel.

In the Queue panel, compression occurs on a source, such as a sequence. In the Watch Folders panel, compression occurs by looking inside a folder on your storage drive for media (such as QuickTime files).
Watch folders are the cornerstone to automation, because they allow the monitoring and compression of anything that gets added to a folder with zero user input.
Mastering Presets and Settings
Presets (made up of different settings) are the heart of Adobe Media Encoder. These are similar to the choices in Adobe Premiere Pro but are listed a little differently. Rather than by architecture, they are listed by usage, such as for a device.
![]() Notes
Notes
Don’t bother double-clicking the preset. Double-clicking doesn’t open it.
It’s not enough to just be able to find and use presets; it’s important to be able to adjust them for your particular needs.
For example, the DVD presets generally do a fine job until you want to author more than 100 minutes of video on a single-sided DVD-5. At that point, the data rate must be lowered to produce a file small enough to fit on the DVD.
Managing Presets
What makes one preset different from another? What sort of switches and adjustments are available? Adjusting the presets is what provides nuanced control in compression. Building your own and grouping common presets can make the handling and management of the presets easier to work with.
Being able to organize (Figure 7.43) presets makes it easy to find a specific setting for output.
Figure 7.43 From left to right the icons in the Preset Browser include Add a Preset, Remove a Preset, Add a Group, Edit Settings, Import and Export.
Viewing created presets
Hovering over a preset shows a summary of what the preset does. This is a quick way to see the comments about a preset (a deeper description of what the preset is for).
To actually see the controls for adjusting a preset, with a preset selected, either click the Settings button at the top or right-click and choose Preset Settings.
Exporting/Importing
Just like backing up projects, you should save any custom presets you create for future needs and to use on other systems that have Adobe Media Encoder installed. It’s common in multiple editor facilities to copy (export/import) these presets to everyone’s systems.
To export settings, select the settings you want to send out and click the Export Settings icon (the folder with an arrow on the right side).
To import settings, select the settings you want on the Adobe Media Encoder copy you’re working with and click the Import Settings icon (the folder with the arrow on the left side). You’ll get the chance to browse to the location of previously saved settings.
![]() Tip
Tip
Build a group before you import presets. With a custom group selected, Adobe Media Encoder will import directly to the group.
Creating a group (custom folder)
As you make and adjust more and more presets, it’s valuable to group them together in a folder so you don’t have to search for them constantly. Here are a few useful groupings:
![]() Common outputs. If it’s probable for you to always output the same outputs, there’s no need to search all the presets. Having the common presets that you use grouped together lessens the likelihood of making a mistake.
Common outputs. If it’s probable for you to always output the same outputs, there’s no need to search all the presets. Having the common presets that you use grouped together lessens the likelihood of making a mistake.
![]() Client based. If you’re handcrafting each compression, it pays to group the custom presets, making it fast and easy to rebuild what worked most efficiently.
Client based. If you’re handcrafting each compression, it pays to group the custom presets, making it fast and easy to rebuild what worked most efficiently.
![]() Output type. Organize your presets by type, such as h.264, MPEG-2, Archival, and Device. Building a small subset of the numerous outputs provided, again, makes finding the most useful presets easy.
Output type. Organize your presets by type, such as h.264, MPEG-2, Archival, and Device. Building a small subset of the numerous outputs provided, again, makes finding the most useful presets easy.
Creating an alias
Aliases are just pointers; they behave exactly like they do in your operating system. In Windows they’re called shortcuts and in OS X they’re called aliases.
If you’re duplicating a preset just to have it live in two spots (such as in the h.264 group that is included by default and the common output group that you build), it makes more sense to use an alias.
A good rule of thumb is to duplicate a preset if you want to make changes to it, but create an alias if you want the same preset to live in two places.
Understanding Presets
When you’re examining presets, it’s easy to get overwhelmed. The Preset Settings dialog is almost identical to the Export Settings dialog in Adobe Premiere Pro (Figure 7.44).
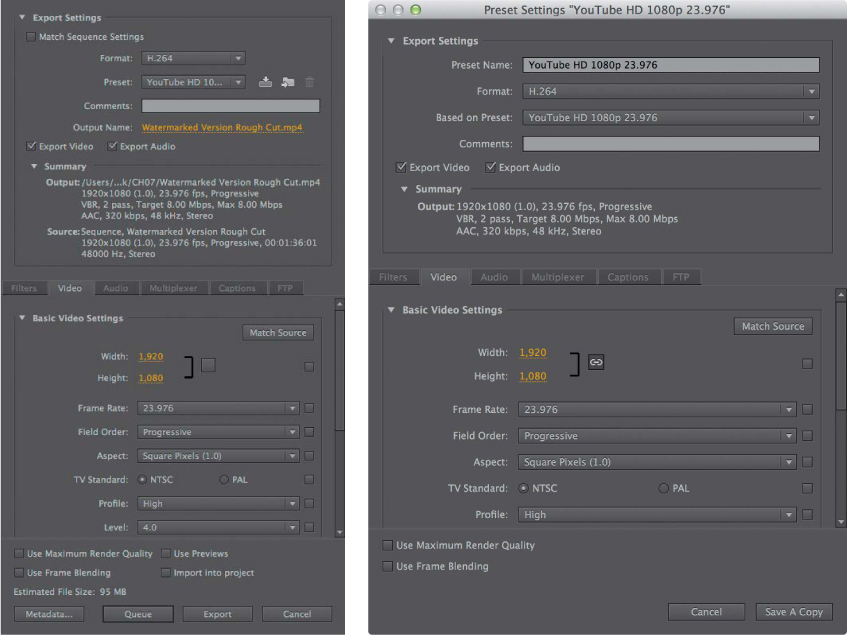
Figure 7.44 The Adobe Premiere Pro Export Settings dialog (left) compared to the Adobe Media Encoder Preset Settings dialog. They are the same, but in two different applications.
The same five tabs exist in the Export Media dialog: Filters, Video, Audio, Captions, and FTP.
See the section “The Export Media Dialog” earlier in this chapter for details about the options.
More Custom Settings
Three settings were created earlier in this chapter: an Archival QT DNxHD output, a CBR Client Review, and a Multipurpose h.264. In this section, you’ll build several more settings to show you the flexibility of Adobe Media Encoder.
![]() Tip
Tip
DVD-5 quick formula: 560/number of minutes = data rate with Dolby audio
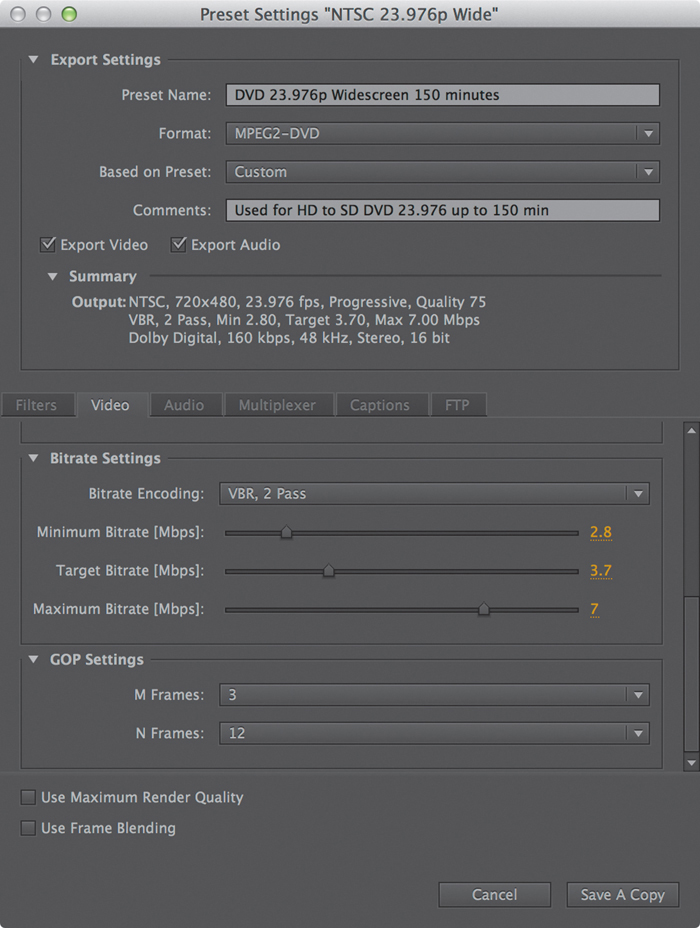
Building a preset for two hours on a DVD
Because DVDs have fixed sizes (DVD-5 = 4.3 GB, DVD-9 = 8.6 GB), you need to lower the data rate to accommodate more footage.
The Adobe preset you’ll build for taking footage to a DVD needs to be limited in time to approximately 90 minutes.
By lowering the data rate value, you can store more footage on the DVD (resulting in more compression). The adjustments shown in Figure 7.45 allow a DVD-5 to store 150 minutes of content.
1. Open the NTSC (or PAL if your standard is PAL) widescreen setting.
2. On the Video tab, adjust the Target Bitrate to 3.7 to compress the video more aggressively.
3. Adjust the Bitrate encoding to VBR, 2 Pass. As you get more aggressive, more analysis should occur.
4. On the Audio tab, change the Audio format from PCM to Dolby Digital, which is a type of compressed, high-quality audio (see the Tip that gives you the DVD-5 formula).
5. Adjust the Bitrate to 160.
6. Save this preset as a copy called DVD 23.976p Widescreen 150 minutes.
Building a custom preset for Flash self-hosting
Flash video is still heavily used on the web, and although there are some great presets for it, there could be one more.
The biggest hassle in hosting your own material is finding a mix of decent quality versus data demands. There are two sets of HD settings in Adobe Media Encoder, a set of 1080 and a set of 720, which match shooting sizes.
Currently, most end users’ monitors are less than 1920 x 1080. So what if you choose a custom size that is larger than SD footage (and therefore HD) with a lower data rate demand than HD, meaning easier hosting? The web (where Flash content is viewed) doesn’t have any standards; for example, there is a 1024 x 576 preset that does not match any broadcast standard. A more efficient scale is exactly half of 1920 x 1080 – 960 x 545 (Figure 7.46). Because you’ve reduced the picture into a quarter of the information, you can do the same for the data rate.
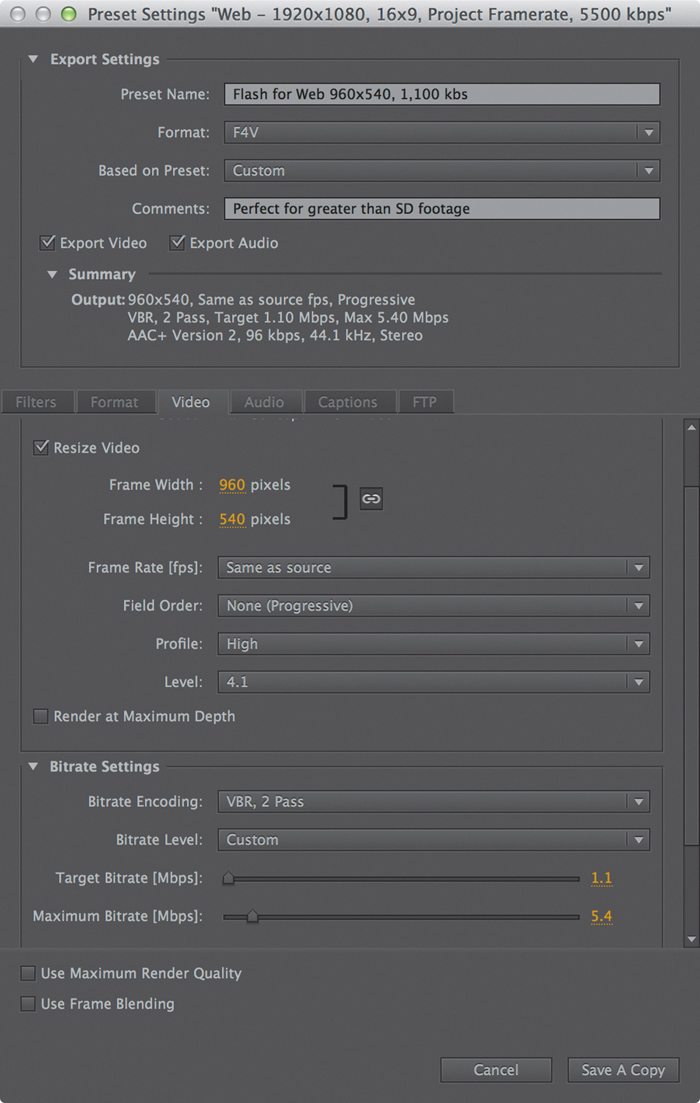
Looking at the original data rate of 5,500 kilobits per second, you can reduce that number to 1,100 kb/s.
1. Under the Flash preset is a setting called Web – 1920x1080, 16x9, Project Framerate, 5500kbs. Open the F4V version of this setting (F4V is h.264 in a Flash architecture).
2. Change the width and height to 960 x 540.
3. Change the Bitrate to 1.1 Megabits per second.
4. If output is going on a Flash streaming server, the bitrate encoding must be set to CBR. Otherwise, use VBR 1-pass for higher quality.
5. Change the level to 3.2 to provide maximal compatibility for the h.264 file with hardware devices at this size.
6. Save a copy as Flash for Web 960x545, 1,100 kbs.
7. Optionally, add FTP information to automatically upload it to a web server.
Building a custom preset for online hosting
Nearly identical to the preceding preset would be an h.264 preset that is a decent size for self-hosting. Generally, for self-hosting, a data rate around 1 mb/s works for all but the slowest connections. Yes, there are advantages to using services like YouTube and Vimeo, but they both recompress uploads.
You’ll use the YouTube preset that matches the frame rate and then reset the size and data rate. In this case, it’ll be the 1080p 23.976 setting (Figure 7.47).
1. Choose Web Video > Youtube settings, find the Youtube HD 1080p 23.976 setting, and open the setting.
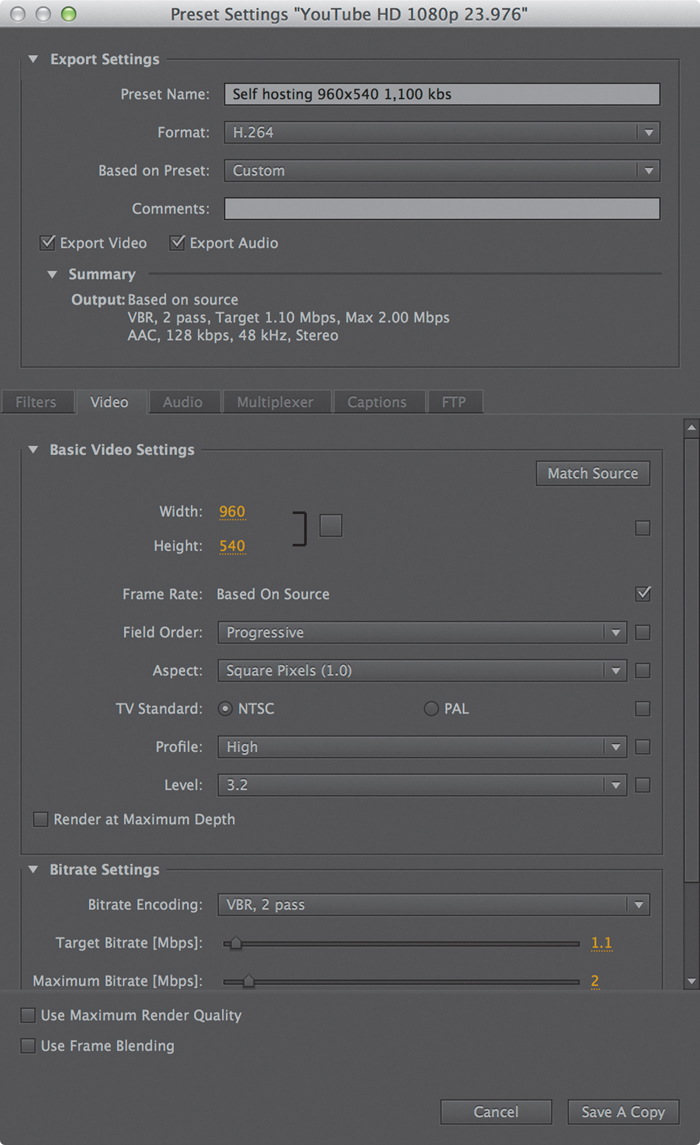
Figure 7.47 This preset works great on all but the largest screens; it’s a good trade-off between size and demands for self-hosting.
2. On the Video Tab, change the Level to 3.2. This is the lowest level (and therefore higher compatibility) that supports your needs.
3. Unlock the chain for Width and Height, and set the values to 960 x 540.
4. Change the Frame Rate to match your footage by selecting the check box to Match Source.
5. Make sure the Bitrate encoding is set to VBR, 2 pass.
6. Adjust the Target Bitrate to 1.1 and adjust the Maximum to 2. This permits the bitrate to actually “vary” from the target value.
7. On the Audio tab, change the Bitrate setting to 128 to make the audio even smaller and still sound decent.
8. Save a copy as Self hosting 960x545 1,100 kbs.
9. Optionally, add FTP information to automatically upload it to a web server.
Automating Adobe Media Encoder
Adobe Media Encoder helps your workflow even further by automating repetitive tasks. From simple preference adjustments to the use of watch folders, automation is the key to making your life more efficient!
Preference Adjustments
Well-designed preferences should be perfect for novices. Advanced users usually need to tweak a couple of areas to improve the user experience. You’ll do some tweaking in the following sections.
Turning on the Automatic Encoding preference
In the General category is a option to “Start queue automatically when idle for 2.0 minutes.” This is off by default, but turning it on allows you to click the Queue button in Adobe Premiere Pro, and after two minutes (Figure 7.48), Adobe Media Encoder will automatically start encoding.
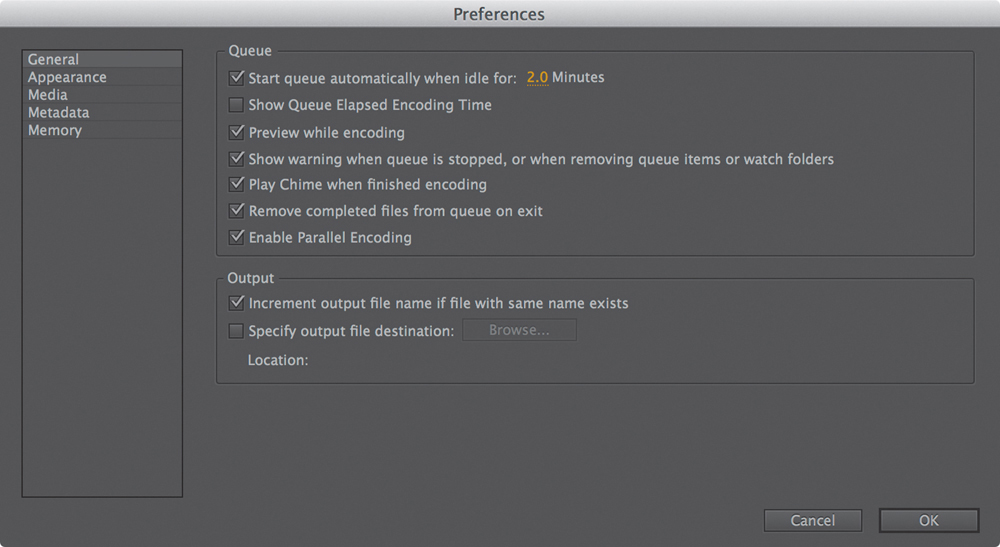
You might want to increase this number to give yourself more time to either make adjustments in Adobe Media Encoder or to cancel the job (in case you make a mistake). I set this number to 10 minutes.
Specify Output File Destination
By default, Adobe Media Encoder saves the encoded file next to the original. By selecting Specify Output File Destination, all encoding files can be saved to another destination, such as to an encode folder (Figure 7.49) somewhere on your system.
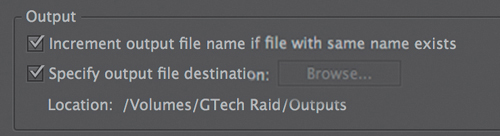
Figure 7.49 It’s best to choose an obvious location on your media drives; you can still override this on an individual file basis.
Turning on this preference doesn’t work well for everyone. Using this preference should infer that it’s twice as important to make sure you use a good naming system because encoded files from different projects will all end up at the specified location.
![]() Notes
Notes
Although it’s possible to add metadata to a file, particularly copyright information, some formats cannot embed this metadata and instead use sidecar files. Because sidecar files may or may not travel with the video, it’s worth adding essential information directly to the video as a title.
Appearance
Because all the Adobe CC tools ship with the same dark gray interface, it’s possible to accidentally make an adjustment in the wrong application when multiple Adobe applications are open. Consider making the appearance of Adobe Media Encoder very bright to remind yourself that you’re outputting files.
Metadata
Although it’s possible and even advisable to add metadata to files, only software that reads XMP (eXtensible Metadata Platform) can read this information (all of the Adobe tools can read metadata). When you work with file types that cannot embed metadata, the Adobe tools will add sidecar files, which are files that exist to the “side” of the actual file.
Inputting metadata in Adobe Media Encoder’s Preferences adds it to every output. If you want to add it to selective outputs, add the metadata in Adobe Premiere Pro instead.
Building a Watch Folder
Watch folders are OS level folders that are monitored by Adobe Media Encoder. When content is added into these folders, it is automatically encoded.
Using the Watch Folder functionality (Figure 7.50) is nearly identical to using the Queue except that instead of the source being media (a sequence, clip, or Adobe After Effects comp), it’s the contents of a folder.
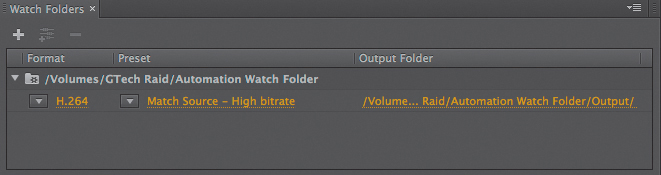
The watch folder automatically creates two subfolders:
![]() Source. After encoding, the source files will be moved to this folder.
Source. After encoding, the source files will be moved to this folder.
![]() Output. After encoding, the newly created outputs will be moved to this folder.
Output. After encoding, the newly created outputs will be moved to this folder.
![]() Close-Up: Installing Adobe Encore
Close-Up: Installing Adobe Encore
1. Install Adobe Premiere Pro CS 6. You need to install the old version to get Adobe Encore because it has no trial version.
2. (Optional) Mac users: From the Adobe Premiere Pro folder, choose Uninstall Adobe Premiere Pro CS6.
3. (Optional) Windows users: Choose Control Panels > Programs > Programs and features > Uninstall Adobe Premiere Pro.
4. Deselect Encore (only Adobe Premiere Pro CS6 will be uninstalled).
5. Launch Encore. Via the Help menu, choose Update Encore.
MP3s for Transcription
An example of a common use for a watch folder would be for MP3 of raw interviews.
Getting transcription done by a service requires an MP3 file of just the audio. By building a watch folder with a prebuilt MP3 setting, it’s quick and easy to dump all the interviews from a shoot into the watch folder and quickly have a series of MP3s that you could send to a transcription service.
1. Create a folder at the desktop level called Interviews to be transcribed.
2. In Adobe Media Encoder, click the plus icon on the Watch Folder panel and navigate to the folder “Interviews to be transcribed.”
3. Change the Format drop-down menu to MP3. The specific setting of MP3 128 is fine for this use.
4. Any files added to the folder “Interviews to be transcribed” will automatically be encoded to MP3 files, ready to send off to a transcriptionist.