
10. Working with Tables
What You’ll Do
Enter and Edit Text in a Table
Create Table Headers and Footers
Adjust Tables in the Text Frame
Introduction
There are times when typing a paragraph will not do your text justice. Creating a bulleted or numbered list might better show your information. Another way to organize items in a document is with a table. A table is an object that is inserted into the document that displays text in rows and columns. You can set up your table with existing or imported text, or create a blank table and enter in new text. Once created, you can adjust the cells (where the text is contained in the rows and columns). You can also adjust the table to insert or delete rows, columns or individual cells, or change the alignment of text or graphics in cells.
In InDesign, a table is placed in a text frame, which might be larger or smaller than the table. You can drag the corner of the text frame to adjust the frame. If the text frame is smaller than the table, an overflow symbol appears in the bottom right corner. The overflow symbol works the same for tables as it does for normal text. When a table overflows, you can repeat the first (header) and last (footer) rows of a table when it appears in a different text frame on the same or different page. The information you enter in the header and footer automatically appears in the repeated headers and footers.
When you create a table, InDesign automatically creates strokes around cells to format it. You can remove or customize the strokes or add fills by using the Strokes and Fills tab on the Cell Options dialog box. If that is not enough, you can apply a border to the table. If you want to take formatting to the next level, you can add an alternating pattern to rows or columns to make it easier to read information in a table.
Creating Tables
A table organizes your information into rows and columns. The intersection of a row and column is called a cell. You can create a blank table, and then enter text, or make a table from existing text separated by paragraphs, tabs, or commas. The first row in the table is good for column headings, whereas the leftmost column is good for row labels. Knowing how to select the rows and columns of a table is also essential to working with the table itself. If you want create a table within a table, you can create nested tables. If you decide a particular table is not really necessary after all, you can convert it to text.
Create a New Table
![]() Click to place the insertion point in a text box where you want to create a new table.
Click to place the insertion point in a text box where you want to create a new table.
♦ To insert a table within a table, click to place the new table insertion point in a table cell.
![]() Click the Table menu, and then click Insert Table.
Click the Table menu, and then click Insert Table.
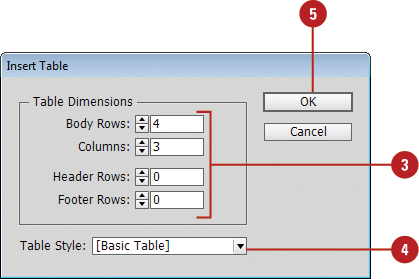
![]() Specify the following dimensions:
Specify the following dimensions:
♦ Body Rows. Enter a number to specify the number of rows you want in the table.
♦ Columns. Enter a number to specify the number of columns you want in the table.
♦ Header Rows. Enter a number to set the number of header rows at the top of the table.
♦ Footer Rows. Enter a number to set the number of footer rows at the bottom of the table.
![]() Click the Table Style list arrow, and then select a table style.
Click the Table Style list arrow, and then select a table style.
![]() Click OK.
Click OK.

Did You Know?
You can delete a table. Click inside the table you want to delete, click the Table menu, point to Delete, and then click Table.
![]() Click the Table menu, and then click Convert Text to Table.
Click the Table menu, and then click Convert Text to Table.
![]() Click the Column Separator list arrow, and then select a separator: Tab, Comma, or Paragraph.
Click the Column Separator list arrow, and then select a separator: Tab, Comma, or Paragraph.
![]() Click the Row Separator list arrow, and then select a separator: Tab, Comma, or Paragraph.
Click the Row Separator list arrow, and then select a separator: Tab, Comma, or Paragraph.
![]() Enter a Column number to set the number of columns in the table.
Enter a Column number to set the number of columns in the table.
![]() Click the Table Style list arrow, and then select a table style.
Click the Table Style list arrow, and then select a table style.
![]() Click OK.
Click OK.

Convert a Table into Text
![]() Click to place the insertion point inside any cell in the table.
Click to place the insertion point inside any cell in the table.

![]() Click the Table menu, and then click Convert Table to Text.
Click the Table menu, and then click Convert Table to Text.
![]() Click the Column Separator list arrow, and then select a separator: Tab, Comma, or Paragraph.
Click the Column Separator list arrow, and then select a separator: Tab, Comma, or Paragraph.
![]() Click the Row Separator list arrow, and then select a separator: Tab, Comma, or Paragraph.
Click the Row Separator list arrow, and then select a separator: Tab, Comma, or Paragraph.
![]() Click OK.
Click OK.

Importing Text into Tables
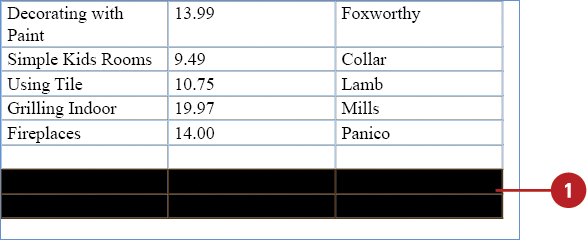
In addition to creating a table from text in an InDesign document, you can copy tabbed text from other programs and paste it into a table in your document. If you have a table in Microsoft Word or a spreadsheet in Microsoft Excel that you want to use in a document, you can import the table by using the Place command on the File menu. During the import process, you can specify import options to place the information you want in the way you want. A red dot inside a table cell indicates there is overflow text.
Import Text into a Table
![]() Open the program where you want to copy text for a table.
Open the program where you want to copy text for a table.
♦ You can also copy text from another table to paste into an InDesign table.
![]() Select and copy text that has tab separators.
Select and copy text that has tab separators.

![]() Switch back to InDesign.
Switch back to InDesign.
![]() Select the cells in the table where you want to paste text.
Select the cells in the table where you want to paste text.
![]() Click the Edit menu, and then click Paste.
Click the Edit menu, and then click Paste.

The text appears in the selected cells. Any additional text appears in new cells.
Did You Know?
You can import a graphic into a table cell. Click to place the insertion point in the cell where you want the graphic, click the File menu, click Place, select the graphic file, and then click OK. The graphic is linked to the document in the table cell. You can use the Links panel to update or relink the graphic. See Chapter 5, “Placing and Working with Graphics” for details.
You can adjust table options. Click inside the table, click the Table menu, point to Table Options, click Table Setup, specify the options you want, and then click OK.
![]() Navigate to the location with the file you want to import.
Navigate to the location with the file you want to import.
![]() Select the file you want to place.
Select the file you want to place.
![]() Select the Show Import Options check box to select import options.
Select the Show Import Options check box to select import options.
![]() Click Open.
Click Open.

![]() Specify the following options:
Specify the following options:
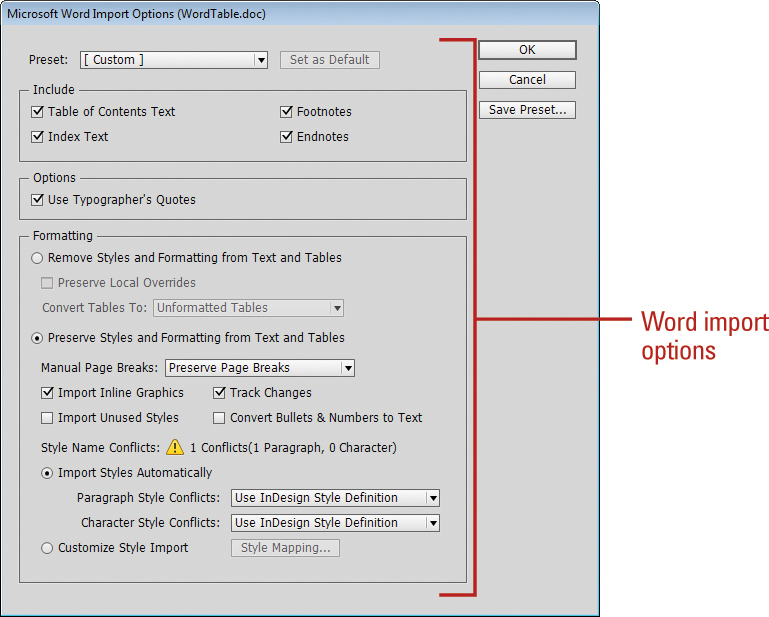
♦ For Word. Select options from the Microsoft Word Import Options dialog box.
♦ Preset and Include. Select an import preset and select check boxes to include Word elements.
♦ Formatting. Select formatting options to Remove or Preserve Styles and Formatting from Text and Tables, or Import Styles Automatically.
♦ For Excel. Select options from the Microsoft Excel Import Options dialog box.
♦ Sheet, View, and Cell Range. Select an Excel sheet, view, and cell range. You can also import hidden cells not saved in view.
♦ Formatting. Select formatting options for table, style, cell alignment, the number of decimal places to use, and typographer’s quotes.
![]() Click OK.
Click OK.

Entering and Editing Text in a Table
Once you create your table, you enter text into cells just as you would in a paragraph, except in a table, pressing Tab moves you from cell to cell. As you type in a cell, text wraps to the next line, and the height of a row expands as you enter text that extends beyond the column width. Before you can edit text directly in a table, you need to know how to select the rows and columns of a table. If you want to focus solely on table text, you can use the Story Editor, which displays text in sequential columns and rows for easy editing.
Enter Text and Navigate a Table
![]() The insertion point shows where text that you type will appear in a table. After you type text in a cell:
The insertion point shows where text that you type will appear in a table. After you type text in a cell:
♦ Press Enter (Win) or Return (Mac) to start a new paragraph within that cell.
♦ Press Tab or Shift+Tab to move the insertion point to the next or previous cell (or to the first cell in the next or last row).
♦ Press the arrow keys or click in a cell to move the insertion point to a new location.

Select Table Elements
Refer to this table for methods of selecting table elements, including:
♦ The entire table
♦ One or more rows and columns
♦ One or more cells
Selecting Table Elements

Did You Know?
You can delete contents within a cell. Select the contents of the cell you want to delete, and then press Delete.
![]() Drag the pointer to highlight the text, or click in the document to place the insertion point where you want to make a change.
Drag the pointer to highlight the text, or click in the document to place the insertion point where you want to make a change.

![]() Perform one of the following editing commands:
Perform one of the following editing commands:
♦ To replace text, type your text.
♦ To delete text, press the Backspace key or the Delete key.
♦ Drag the selection to the new location.
Edit Table Elements in the Story Editor
![]() Click in the table you want to edit using Story Editor.
Click in the table you want to edit using Story Editor.
![]() Click the Edit menu, and then click Edit in Story Editor.
Click the Edit menu, and then click Edit in Story Editor.
![]() Drag the pointer to highlight the text, or click in the document to place the insertion point where you want to make a change.
Drag the pointer to highlight the text, or click in the document to place the insertion point where you want to make a change.
![]() Perform one of the following editing commands:
Perform one of the following editing commands:
♦ To replace text, type your text.
♦ To delete text, press the Backspace key or the Delete key.
♦ Drag the selection to the new location.
![]() Click the Close button.
Click the Close button.

Modifying a Table
As you begin to work on a table, you might need to modify table contents by using options available on the Control and Table panels and Table menu. You can modify the table’s structure by adding more rows, columns, or cells to accommodate new text, graphics, or other tables. The table realigns as needed to accommodate the new structure. When you insert rows or columns, the existing rows shift down and the existing columns shift right. Similarly, when you delete unnecessary rows or columns from a table, the table automatically realigns.
Modify Tables Using the Control or Table Panels
![]() Select the cells, rows, or columns you want to modify.
Select the cells, rows, or columns you want to modify.
The Control panel displays options for the current selection.

![]() Select the Table panel.
Select the Table panel.


![]() Use the following Control and Table panel options:
Use the following Control and Table panel options:
♦ Number of Rows or Columns. Specify a number.
♦ Row Height or Column Width. Specify a number.
♦ Align Top, Center, Bottom, and Justify. Click a button.
♦ Rotate 0°, 90°, 180°, 270°. Click a button.
♦ Cell Inset Top, Bottom, Right or Left. Specify a number for spacing between cell edge and cell contents.
Additional Control panel options include:
♦ Merge and Unmerge. Click a button to combine or uncombine cells.
♦ Stroke Weight. Enter a line thickness.
♦ Stroke Style. Select a line style.
♦ Proxy Cell Line Preview. Select which lines to which you want to apply settings.
Timesaver
Drag the last row or column, and then press Alt (Win) or Option (Mac) as you drag to insert new rows or columns.
![]() Drag to select the number of rows or columns you want to insert.
Drag to select the number of rows or columns you want to insert.
![]() Click the Table menu, point to Insert, and then click Rows or Columns.
Click the Table menu, point to Insert, and then click Rows or Columns.
![]() Specify the number of rows or columns, and then select an option for the position.
Specify the number of rows or columns, and then select an option for the position.
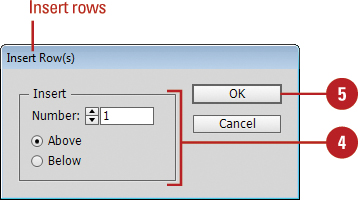
![]() Click OK.
Click OK.

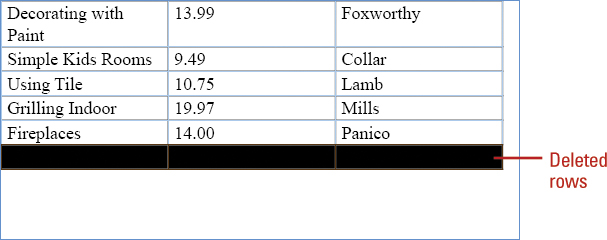
Delete Rows and Columns
![]() Select the rows or columns you want to delete.
Select the rows or columns you want to delete.
![]() Click the Table menu, point to Delete, and then click Row or Column.
Click the Table menu, point to Delete, and then click Row or Column.
Adjusting Table Rows and Columns
After you insert and delete rows and columns in a table, you can adjust them to any size you want. If you want to create evenly sized rows and columns, you can use the Distribute Rows Evenly or Distribute Columns Evenly command to quickly do the job. If you want custom sizes, you can drag the row or column borders to the size you want or set exact sizing in the Rows and Columns tab in the Cell Options dialog box. Sometimes a long table doesn’t fit in a text frame. You can also set cell options to keep rows together.
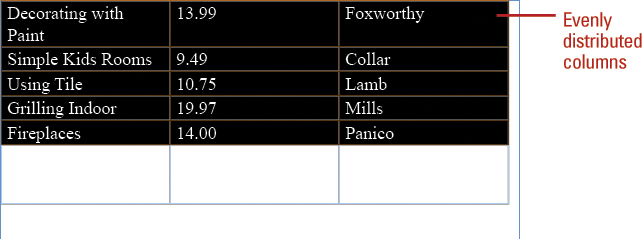
Distribute Row or Column Spacing Evenly
![]() Specify the content position of the rightmost column or bottommost row that you want to use as the model for the row or column spacing.
Specify the content position of the rightmost column or bottommost row that you want to use as the model for the row or column spacing.
![]() Select the columns or rows in which you want the content distributed to match the model row or column.
Select the columns or rows in which you want the content distributed to match the model row or column.

![]() Click the Table menu, and then click Distribute Rows Evenly or Distribute Columns Evenly.
Click the Table menu, and then click Distribute Rows Evenly or Distribute Columns Evenly.
Adjust Row Heights and Column Widths
♦ Adjust Rows. Point to a row border (cursor changes to a double-arrow), and then drag to adjust the height of the row.
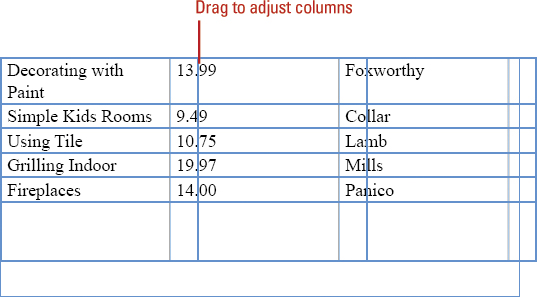
♦ Adjust All Rows. Point to the bottom row border (cursor changes to a double-arrow), and then drag to adjust the height of all rows.
♦ Adjust Columns. Point to a column border (cursor changes to a double-arrow), and then drag to adjust the width of the column.
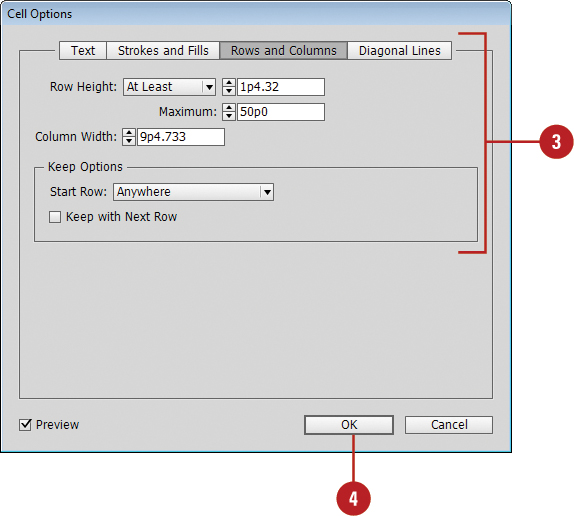
Adjust Row and Column Options
![]() Select the cells you want to adjust.
Select the cells you want to adjust.
![]() Click the Table menu, point to Cell Options, and then click Rows and Columns.
Click the Table menu, point to Cell Options, and then click Rows and Columns.
![]() Specify the following row and column options.
Specify the following row and column options.
♦ Row Height. Enter a row height value for the At Least or Exactly option.
♦ Column Width. Enter a column width.
♦ Start Row. Select an option to control when and how the rows of a table break across text frames.
♦ Keep with Next Row. Select to keep the selected row with the one following it across text frames.
![]() Click OK.
Click OK.
Adjusting Table Cells
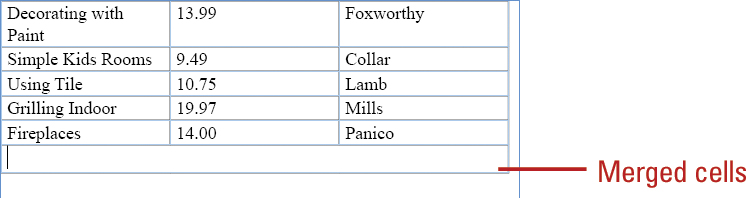
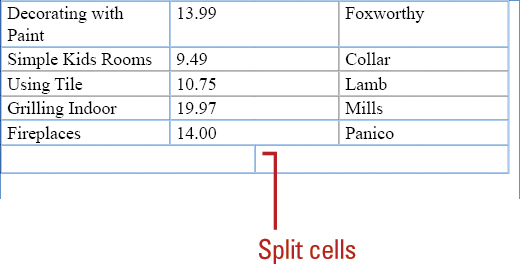
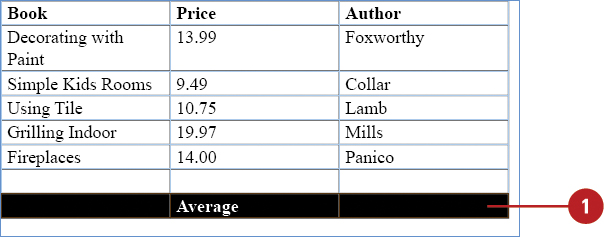
Often, there is more to modifying a table than adding or deleting rows or columns; you need to make cells just the right size to accommodate the text or graphics you are entering in the table. For example, a title in the first row of a table might be longer than the first cell in that row. To spread the title across the top of the table, you can merge (combine) the cells to form one long cell. Sometimes, to indicate a division in a topic, you need to split (or divide) a cell into two. You can also split one table into two at any row. Moreover, you can modify the width of any column and height of any row to better present your data.
Merge Table Cells
![]() Select the two or more cells you want to merge into a single cell.
Select the two or more cells you want to merge into a single cell.
![]() Drag to select the number of rows you want to insert.
Drag to select the number of rows you want to insert.

![]() Click the Table menu, and then click Merge Cells.
Click the Table menu, and then click Merge Cells.
![]() To unmerge table cells, click in the single merged cell, click the Table menu, and then click Unmerge Cells.
To unmerge table cells, click in the single merged cell, click the Table menu, and then click Unmerge Cells.
Split Table Cells
![]() Click the cell you want to split into two cells.
Click the cell you want to split into two cells.

![]() Click the Table menu, and then click Split Cell Horizontally or Split Cell Vertically.
Click the Table menu, and then click Split Cell Horizontally or Split Cell Vertically.
Aligning Content in Table Cells
After you enter or insert text and graphics into cells in a table, you can adjust the spacing of the content to position it where you want in a cell. You can control how text is positioned vertically or horizontally in the cell as well as the text baseline. A graphic appears in a table as an inline graphic, so you can adjust its position like you would text. If the graphic is larger than the cell, you can set the Clip Content to Cell option to crop the image to the cell boundaries.
Adjust the Spacing of Text and Graphics in a Cell
![]() Select the cells you want to adjust.
Select the cells you want to adjust.
![]() Click the Table menu, point to Cell Options, and then click Text.
Click the Table menu, point to Cell Options, and then click Text.
![]() Select the Preview check box to view your results in the document window.
Select the Preview check box to view your results in the document window.
![]() Specify any of the following options:
Specify any of the following options:
♦ Cell Insets. Enter the spacing sizes for the top, bottom, left and right inside areas of the cell.
♦ Vertical Justification. Specify an alignment position for vertical text in the cell.
♦ Paragraph. Enter an amount for the space between the lines or paragraphs in the cell.
♦ First Baseline. Specify an option to control where the first text baseline appears in the cell.
♦ Clipping for Graphics. Select the Clip Contents to Cell check box to restrain the graphic content to the size of the cell. Deselect it to allow the graphic to appear outside of cell boundaries.
♦ Text Rotation. Specify a rotation angle for the contents of the cell.
![]() Click OK.
Click OK.

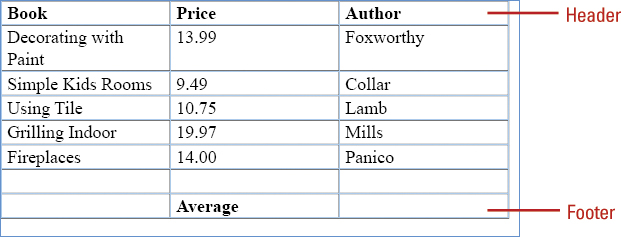
Creating Table Headers and Footers
Table headers are the first row in a table and footers are the last row. Sometimes a long table doesn’t fit in a text frame. You can repeat the first and last rows of a table when they appear in a different text frame on the same or a different page. The information you enter in the header and footer automatically appears in the repeated headers and footers. If you already have text in the table that you want to use as a header or footer, you can convert the rows into a table header or footer. On the flip side, you can also convert header or footer rows into normal rows.
Insert a Header or Footer in a Table
![]() Click in the table you want to add a header or footer.
Click in the table you want to add a header or footer.
![]() Click the Table menu, point to Table Options, and then click Headers and Footers.
Click the Table menu, point to Table Options, and then click Headers and Footers.
![]() Select the Preview check box to view your results in the document window.
Select the Preview check box to view your results in the document window.
![]() Enter a Header Rows value to set a number for header rows.
Enter a Header Rows value to set a number for header rows.
♦ To disable header rows, set the value to zero.
![]() Enter a Footer Rows value to set a number for footer rows.
Enter a Footer Rows value to set a number for footer rows.
♦ To disable footer rows, set the value to zero.
![]() Click the Repeat Header or Repeat Footer list arrow, and then specify a repeat option.
Click the Repeat Header or Repeat Footer list arrow, and then specify a repeat option.
♦ Every Text Column. Repeat everywhere in the table.
♦ Once Per Frame. Repeat only once in the same frame.
♦ Once Per Page. Repeat only once in the same page.
![]() Select the Skip First or Skip Last check box to display the header or footer only after the first or last use.
Select the Skip First or Skip Last check box to display the header or footer only after the first or last use.
![]() Click OK.
Click OK.

Convert Cells into a Table Header or Footer
![]() Select the rows that you want to convert into a header or footer.
Select the rows that you want to convert into a header or footer.
![]() Click the Table menu, point to Convert Rows, and then click To Header or To Footer.
Click the Table menu, point to Convert Rows, and then click To Header or To Footer.
If you already have text in a header or footer, the new header or footer text is added to the bottom (for a header) or top (for a footer) of the existing cells.
Convert a Header or Footer into Cells
![]() Select the header or footer row that you want to convert into normal body rows of table cells.
Select the header or footer row that you want to convert into normal body rows of table cells.
![]() Click the Table menu, point to Convert Rows, and then click To Body.
Click the Table menu, point to Convert Rows, and then click To Body.
Did You Know?
You can use menu commands to edit headers or footers. Click in the table you want to edit, click the Table menu, and then click Edit Header or Edit Footer. The first header or footer cell is selected and ready for edits. You can also click in the header or footer cell to edit it.
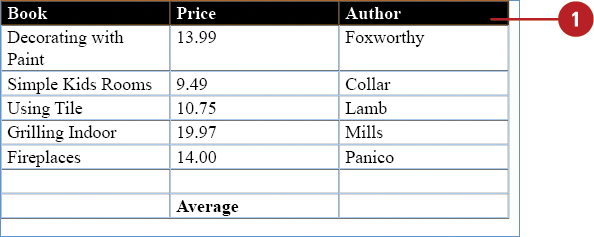
Adding Strokes and Fills
When you create a table, InDesign automatically creates strokes around cells. You can remove or customize the strokes, and even add custom fills by using the Strokes and Fills tab on the Cell Options dialog box. In the dialog box, you select cell lines in a proxy preview to specify to which actual lines in the cell you want to apply formatting. When you mix and match stroke colors and styles in a table, you also need to specify stroke drawing order to determine how the table should be drawn. After you apply formatting once, you don’t need to reselect the proxy preview lines the next time you want to apply formatting changes to the same cells.
Set Stroke Drawing Order
![]() Select the cells in the table you want to format.
Select the cells in the table you want to format.
![]() Click the Table menu, point to Table Options, and then click Table Setup.
Click the Table menu, point to Table Options, and then click Table Setup.
![]() Select the Preview check box to view your results in the document window.
Select the Preview check box to view your results in the document window.
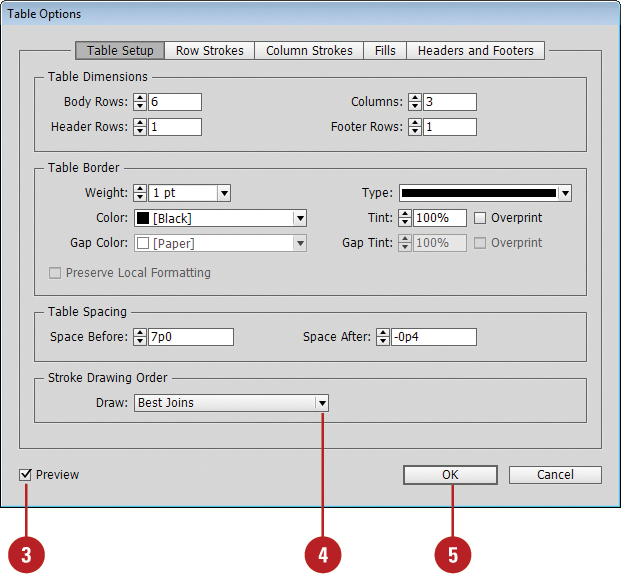
![]() Click the Draw list arrow, and then select a stroke drawing order option:
Click the Draw list arrow, and then select a stroke drawing order option:
♦ Best Joins. Allows InDesign to choose the best way to display strokes.
♦ Row Strokes in Front. Displays the strokes from rows in front of strokes from columns.
♦ Column Strokes in Front. Displays strokes from columns in front of strokes from rows.
♦ InDesign 2.0 Compatibility. Uses a combination of Best Joins for the table border and Row Strokes for interior cells.
![]() Click OK.
Click OK.
![]() Click the Table menu, point to Cell Options, and then click Strokes and Fills.
Click the Table menu, point to Cell Options, and then click Strokes and Fills.
![]() Select the Preview check box to view your results in the document window.
Select the Preview check box to view your results in the document window.
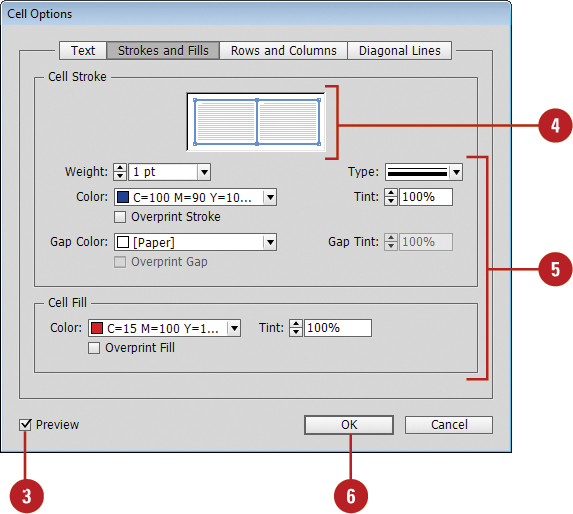
![]() Click the lines in the cell proxy preview to select (they will turn blue) the edges that you want to format.
Click the lines in the cell proxy preview to select (they will turn blue) the edges that you want to format.
![]() Specify the following Cell Stroke and Fill options:
Specify the following Cell Stroke and Fill options:
♦ Weight. Enter a value to set the thickness of the stroke.
♦ Type. Specify a style for the stroke.
♦ Color and Tint. Specify a color and tint for the stroke. Select the Overprint Stroke check box to apply it.
♦ Gap Color and Tint. If you selected a stroke type with dashes or dots, specify a gap color (for the space between the lines) and tint for the stroke. Select the Overprint Gap check box to apply it.
♦ Color and Tint for Fill. Specify a color and tint for the fill. Select the Overprint Fill check box to apply it.
![]() Click OK.
Click OK.

Alternating Fills and Strokes
Alternating rows or columns with a color or a pattern can make it easier to read information in a table. With this thought in mind, InDesign allows you to format a table with repeating alternating fills and strokes. The alternating fills and strokes remain in place until you change the alternating option to None. If you insert or delete a row or column, the alternating pattern reapplies to the table. You can create alternating patterns with fills in a table and strokes in a row or column.
Alternate Fills in Table Cells
![]() Click in the table to which you want to add alternating fills.
Click in the table to which you want to add alternating fills.
![]() Click the Table menu, point to Table Options, and then click Alternating Fills.
Click the Table menu, point to Table Options, and then click Alternating Fills.
![]() Select the Preview check box to view your results in the document window.
Select the Preview check box to view your results in the document window.
![]() Click the Alternating Pattern list arrow, and then select a pattern option.
Click the Alternating Pattern list arrow, and then select a pattern option.
![]() Specify the following options on the left for the first set of columns or rows, and on the right for the second set of columns or rows:
Specify the following options on the left for the first set of columns or rows, and on the right for the second set of columns or rows:
♦ First or Next. Enter a value to set the number of rows in the alternating pattern.
♦ Color and Tint. Specify a color and tint for the fill. Select the Overprint check box to apply it.
♦ Skip First or Skip Last. Enter a value to omit the number of rows or columns at the start or end of the alternating fills.
♦ Preserve Local Formatting. Select to use the cell formatting instead of the border formatting. Deselect to use the border formatting.
![]() Click OK.
Click OK.


Alternate Strokes for Rows or Columns in Table Cells
![]() Click in the table to which you want to add alternating fills.
Click in the table to which you want to add alternating fills.
![]() Click the Table menu, point to Table Options, and then click Alternating Row Strokes or Alternating Column Strokes.
Click the Table menu, point to Table Options, and then click Alternating Row Strokes or Alternating Column Strokes.
![]() Select the Preview check box to view your results in the document window.
Select the Preview check box to view your results in the document window.
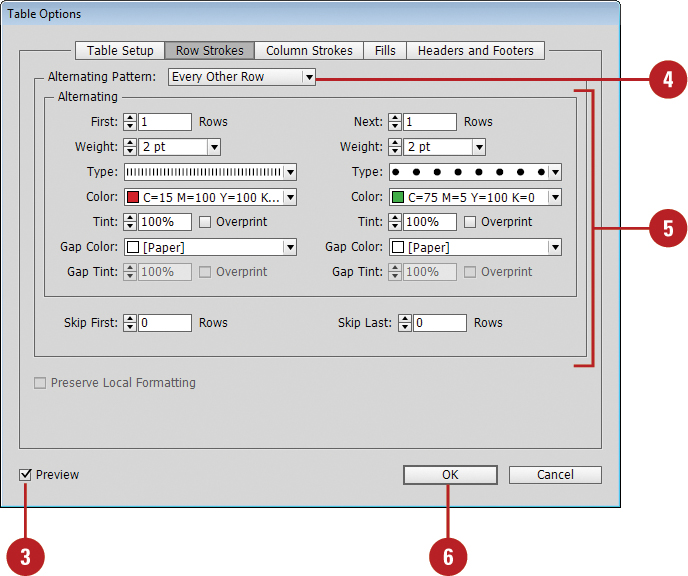
![]() Click the Alternating Pattern list arrow, and then select a pattern option.
Click the Alternating Pattern list arrow, and then select a pattern option.
![]() Specify the following options on the left for the first set of columns or rows, and on the right for the second set of columns or rows:
Specify the following options on the left for the first set of columns or rows, and on the right for the second set of columns or rows:
♦ First or Next. Enter a value to set the number of rows in the alternating pattern.
♦ Weight. Enter a value to set the thickness of the stroke.
♦ Type. Specify a style for the stroke.
♦ Color and Tint. Specify a color and tint for the stroke. Select the Overprint check box to apply it.
♦ Gap Color and Tint. If you selected a stroke type with dashes or dots, specify a gap color (for the space between the lines) and tint for the stroke. Select the Overprint check box to apply it.
♦ Skip First or Skip Last. Enter a value to omit the number of rows or columns at the start or end of the alternating strokes.
![]() Click OK.
Click OK.

Adding Diagonal Lines in Cells
Diagonal lines or X’s in a table cell can be an effective formatting tool to indicate no data is available or the data in the cell needs to reviewed or changed. You can use the Diagonal Lines tab in the Cell Options dialog box to quickly add a diagonal line to one cell or a range of cells in a table. You can specify the color, weight (width), and style you want. Even after you add a diagonal line to a cell, you can still add information to it and specify which item appears in front.
Add Diagonal Lines in Cells
![]() Select the cells in the table to which you want to add diagonal lines.
Select the cells in the table to which you want to add diagonal lines.
![]() Click the Table menu, point to Cell Options, and then click Diagonal Lines.
Click the Table menu, point to Cell Options, and then click Diagonal Lines.
![]() Select the Preview check box to view your results in the document window.
Select the Preview check box to view your results in the document window.
![]() Click a button to select the type of diagonal line you want to apply.
Click a button to select the type of diagonal line you want to apply.
![]() Specify the following Line Stroke options:
Specify the following Line Stroke options:
♦ Weight. Enter a value to set the thickness of the line.
♦ Type. Specify a style for the line.
♦ Color and Tint. Specify a color and tint for the line. Select the Overprint Stroke check box to apply it.
♦ Gap Color and Tint. If you selected a line type with dashes or dots, specify a gap color (for the space between the lines) and tint for the line. Select the Overprint Gap check box to apply it.
♦ Draw. Specify how you want to show the line: Content in Front or Diagonal in Front.
![]() Click OK.
Click OK.


Adding a Border to a Table
A border is the line around a table. A border is a good way to add definition to the outside of a table and make it stand out. You can use the Table Setup tab in the Table Options dialog box to to quickly add a border and specify the color, weight (width), and style you want. If you applied a stroke to a cell that is also a border edge, you can select an option to preserve the formatting already applied to the cell.
Add a Border to a Table
![]() Click in the table to which you want to add a border.
Click in the table to which you want to add a border.
![]() Click the Table menu, point to Table Options, and then click Table Setup.
Click the Table menu, point to Table Options, and then click Table Setup.
![]() Select the Preview check box to view your results in the document window.
Select the Preview check box to view your results in the document window.
![]() Specify the following Table Border options:
Specify the following Table Border options:
♦ Weight. Enter a value to set the thickness of the border line.
♦ Type. Specify a style for the border line.
♦ Color and Tint. Specify a color and tint for the border line. Select the Overprint check box to apply it.
♦ Gap Color and Tint. If you selected a border type with dashes or dots, specify a gap color (for the space between the lines) and tint for the border line. Select the Overprint check box to apply it.
♦ Preserve Local Formatting. Select to use the cell formatting instead of the border formatting. Deselect to use the border formatting.
![]() Click OK.
Click OK.


Adjusting Tables in the Text Frame
A table is placed in a text frame, which might be larger or smaller than the table. You can drag the corner of the text frame to adjust the frame. If the text frame is smaller than the table, an overflow symbol appears in the bottom right corner. The overflow symbol works the same for tables as it does for normal text. You can adjust the space around the table in the text frame by setting options in the Table Setup tab in the Table Options dialog box.
Set Spacing Around a Table
![]() Click to place the insertion point somewhere in the table.
Click to place the insertion point somewhere in the table.
![]() Click the Table menu, point to Table Options, and then click Table Setup.
Click the Table menu, point to Table Options, and then click Table Setup.
![]() Select the Preview check box to view your results in the document window.
Select the Preview check box to view your results in the document window.
![]() Specify the following Table Spacing options:
Specify the following Table Spacing options:
♦ Space Before. Enter a value to set the distance that appears before the table.
♦ Space After. Enter a value to set the distance that appears after the table.
![]() Click OK.
Click OK.

