
Chapter 9: CRUD, Transactions, and Locking
In this chapter, we'll cover a must-know mix of fundamental notions about CRUD operations, transactions, and locking. These three topics are heavily exploited in almost any database application. In a common scenario, an application has a significant number of CRUD operations that are executed in explicitly demarcated logical transactions and, in certain cases, they also need to explicitly control the concurrent access to data to prevent race conditions, lost updates, and other SQL phenomena (or SQL anomalies).
In this chapter, we will cover the following topics:
- CRUD
- Navigating (updatable) records
- Transactions
- Locking
Let's get started!
Technical requirements
The code for this chapter can be found on GitHub at https://github.com/PacktPublishing/jOOQ-Masterclass/tree/master/Chapter09.
CRUD
Besides the awesome DSL-fluent API for expressing complex SQL, jOOQ can be used to express everyday SQL operations as well. These are known as CRUD operations (Create (INSERT), Read (SELECT), Update (UPDATE), and Delete (DELETE)), and jOOQ facilitates them via a dedicated API that involves UpdatableRecord types. In other words, the jOOQ Code Generator generates a UpdatableRecord (a record that can be fetched and stored again in the database) for each table that has a primary key (not just a simple unique key!). Tables without a primary key (org.jooq.TableRecord) are rightly considered non-updatable by jOOQ. You can easily recognize a jOOQ UpdatableRecord because it has to extend the UpdatableRecordImpl class (simply inspect your generated records from jooq.generated.tables.records). Next, jOOQ exposes a CRUD API that allows you to operate directly on these updatable records instead of writing DSL-fluent queries (which fits better for complex queries that involve more than one table).
If you need a quick reminder about jOOQ records, please check out Chapter 3, jOOQ Core Concepts.
Important Note
The jOOQ CRUD API fits like a glove for normalized databases, so for tables that have primary keys (simple or composed) or unique lifespans, a primary key is inserted only once into a table. Once it's been inserted, it cannot be changed or re-inserted after being deleted.
However, as you know, jOOQ tries to greet you in any case you have, so if you need updatable primary keys, then rely on Settings.updatablePrimaryKeys().
The jOOQ CRUD API facilitates several operations, including insert (insert()), update (update()), delete (delete()), merge (merge()) and the handy store (store()). Besides these operations, we have the well-known selectFrom(), which is useful for reading (SELECT) from a single table directly into a Result of updatable records.
However, before we look at several CRUD examples, is important to know about a set of methods that can influence the behavior of updatable records and CRUD operations. These methods are attach(), detach(), original(), changed(), reset(), and refresh().
Attaching/detaching updatable records
Roughly, jOOQ updatable records are just Java objects that can live independently of the database and can be manipulated in memory. So long as an updatable record doesn't need to interact with the database, it can remain in the detached state. In this state, the updatable record doesn't hold any reference to the database or to the connection that created it. However, before interacting with the database (insert, delete, update, and so on), an updatable record must be attached to a valid Configuration that, among other things, has the coordinates to connect to the database that this updatable record will interact with. After an updatable record has been attached, it will remain like this for as long as the corresponding Configuration lives or until it is explicitly detached by calling detach().
When we fetch updatable records from the database, jOOQ will automatically attach them to the currently used Configuration and implicitly to the involved database connection. This connection may be used internally for subsequent interactions with the fetched updatable records with the database.
Important Note
To be precise, jOOQ doesn't hold references to a JDBC Connection but to ConnectionProvider from Configuration. In terms of transactions or connection pooling, this might be relevant. For instance, if we are using a Spring TransactionAwareDataSourceProxy, an attached record can be fetched in one transaction and stored in another transparently.
Consider the following read operation:
SaleRecord sr = ctx.selectFrom(SALE)
.where(SALE.SALE_ID.eq(1L)).fetchSingle();
The sr record was automatically attached by jOOQ to the Configuration part of ctx. Next, we can successfully execute other operations that interact with the database, such as sr.update(), sr.delete(), and so on.
Now, let's consider a brand-new record that's been created by the client, as follows:
SaleRecord srNew = new SaleRecord(...);
Such records are not automatically attached to any existent Configuration. They haven't been fetched from the database, so jOOQ will justifiably expect that you'll explicitly/manually attach them to a Configuration whenever this is necessary (for instance, before calling sr.insert()). This can be done by explicitly calling the DSLContext.attach() or UpdatableRecord.attach() methods, as follows:
ctx.attach(srNew);
srNew.attach(ctx.configuration());
However, to avoid the attach() explicit call, we can rely on the DSLContext.newRecord() alternative. Since DSLContext contains the Configuration part, jOOQ will do the attachment automatically. So, here, you should use the following code snippet (if you want to populate the record from a POJO, then use the newRecord(Table<R> table, Object o) flavor):
SaleRecord srNew = ctx.newRecord(SALE);
srNew.setFiscalYear(…);
…
Once srNew has been attached, we can execute operations that interact with the database. Attempting to execute such operations on a detached updatable record will lead to an exception that states org.jooq.exception.DetachedException: Cannot execute query. No Connection configured.
An updatable record can be explicitly detached with UpdatableRecord.detach():
srNew.detach(); // equivalent to srNew.attach(null);
While an updatable record is serializable, the underlying Connection (or DataSource) of Configuration is non-serializable. Nevertheless, you don't have to detach records before serialization. The internals of DefaultConfiguration ensure that anything that isn't Serializable (for instance, DefaultConnectionProvider) isn't serialized. Re-attaching will still be necessary after de-serialization, though. Support for serialization on jOOQ radar will eventually be deprecated: https://github.com/jOOQ/jOOQ/issues/2359.
From this, don't conclude that serializing/de-serializing records is a day-to-day task. Most of the time, records are used to populate views (for instance, via Thymeleaf) or they are exported as CSV, JSON, HTML, and so on via jOOQ support, as you'll see in the next chapter. None of these actions requires an explicit detach.
What's an original (updatable) record?
Every (updatable) record holds a reference to its current values and its original values.
If the record was fetched from the database, then the fetched values represent the original and the current values at the same time. Next, the current values can be modified in memory, while the original values remain in place. For example, let's assume that the following query fetches the SALE.FISCAL_YEAR field, which is 2005 and that, after fetching it, we set it to 2002:
SaleRecord sr = ctx.selectFrom(SALE)
.where(SALE.SALE_ID.eq(1L)).fetchSingle();
// or, a little bit more concise
SaleRecord sr = ctx.fetchSingle(SALE, SALE.SALE_ID.eq(1L));
sr.setFiscalYear(2002);
At this point, the original value of the fiscal year is 2005 and the current value is 2002. After inserting/updating a record, the current values that have been inserted/updated become the original values. For instance, after updating sr, the original value of the fiscal year becomes 2002, just like the current value. This way, sr mirrors the latest state of the database. So, after an update, the original values reflect only what has been sent to the database by default. Trigger-generated values are not fetched back by default. For that to work, Settings.returnAllOnUpdatableRecord() is required.
In the case of a new record, the original values are always null and remain like this until the record is inserted or updated.
Whenever we need the original values, we can call Record.original(). Without arguments, the original() method returns a brand-new record that's been populated with the original values. If sr is attached when calling original(), then srOriginal is attached as well; otherwise, it is detached:
SaleRecord srOriginal = sr.original();
By specifying an argument as a Field, Name, String, or integer (index), we can extract the original value of a certain field. Here is a type-safe and a non-type-safe approach:
int fiscalYear = sr.original(SALE.FISCAL_YEAR);
int fiscalYear = (int) sr.original("fiscal_year");Having the current and original values of a record in your hands can be useful for making decisions after comparing these values between them or with other values, for creating side-by-side views of original data and current data, and so on. In the bundled code, called OriginalRecords (available for MySQL), you can see an example of rendering a side-by-side view for a PRODUCT via Thymeleaf. The relevant Thymeleaf code is as follows:
<tr>
<td> Product Buy Price:</td>
<td th:text = "${product.original('buy_price')}"/></td> </tr>
<tr>
<td> Product MSRP:</td>
<td th:text = "${product.original('msrp')}"/></td> </tr>
You'll see something similar to the following:

Figure 9.1 – Side-by-side view
Next, let's focus on marking (updatable) records as changed/unchanged.
Marking (updatable) records as changed/unchanged
A record whose original values are exactly the same as the current values is considered unchanged. By calling the Record.changed() flag method, we can find out if a record is considered as changed or unchanged by jOOQ. For instance, a record that has been fetched from the database and never modified is unchanged:
SaleRecord sr = ctx.selectFrom(SALE)
.where(SALE.SALE_ID.eq(1L)).fetchSingle();
sr.changed(); // false
sr.setFiscalYear(2005);
sr.changed(); // true
Even if we set the same fiscal year that was fetched from the database (2005), this record is marked as changed. On the other hand, a brand-new record is considered changed:
SaleRecord sr = new SaleRecord(null, 2021, 453.2, 1504L, ...);
sr.changed(); // true
SaleRecord sr = new SaleRecord();
sr.setFiscalYear(2021);
sr.setSale(4500.25);
...
sr.changed(); // true
Notice that changed() operates at the field level since it's a BitSet that's the same length as the number of record fields. In other words, each field of a record has the changed() flag method. All we have to do is pass the field as an argument of changed() as a Field, Name, String, or int (representing the index):
boolean changed = sr.changed(SALE.FISCAL_YEAR);
boolean changed = sr.changed("fiscal_year");Whenever we attempt to insert or update a record, jOOQ inspects the changed flags to determine which fields should be part of the generated query. This is great, because by rendering only the changed fields, jOOQ allows default values (specified via CREATE TABLE DDL statements) to be set for the omitted fields. If none of the fields were changed then jOOQ can prevent an insert/update from being executed (we'll cover this in more detail later in this chapter).
However, we can enforce/suppress the execution of such statements by explicitly turning on (or off) the changed flag. We can do so by marking all the fields as changed/unchanged:
sr.changed(true/false);
We can also do the same by marking only certain fields:
sr.changed(SALE.FISCAL_YEAR, true/false);
sr.changed("fiscal_year", true/false);Pay attention to how you juggle these flags since is quite easy to mess things up and render some unfortunate DML statements. Next, let's talk about resetting records.
Resetting an (updatable) record
By resetting a record, we reset all the current values to the original values and all the changed flags to false. This can be accomplished without interacting with the database. We can reset all the fields by using Record.reset():
sr.reset();
We can reset only certain fields by using reset(Field/Name/String/int):
sr.reset(SALE.FISCAL_YEAR);
sr.reset("fiscal_year");You'll see this method at work in the forthcoming sections. Finally, let's talk about how to refresh a record.
Refreshing an updatable record
By refreshing an updatable record, we synchronize the record's original values with the database's latest state, and we revert the current values in case they had been set. Practically, UpdatableRecord.refresh() is materialized in a SELECT round trip that loads the data in the original values of the record and sets all the changed flags to false. Refreshing all the fields of the record can be done as follows:
sr.refresh();
You can partially refresh the updatable record using refresh(Field<?>... fields) or refresh(Collection<? extends Field<?>> fields):
sr.refresh(SALE.FISCAL_YEAR, SALE.SALE_);
In this case, SELECT is rendered to fetch only the specified fields. As you'll see shortly, this refresh() method is quite useful when mixed with optimistic locking.
You can find these examples in SimpleCRUDRecords (available for MySQL and PostgreSQL). Next, let's talk about inserting updatable records.
Inserting updatable records
Just a quick note to be sure that this section is not misunderstood: insert() can be called on any TableRecord, not just the UpdatableRecord ones; no primary key is necessary for insert().
Now, inserting updatable records can be done via UpdatableRecord.insert() and its overloads. Typically, we insert brand-new records or records that have been loaded from POJOs (for instance, via the from(POJO) or newRecord(Table<R> table, Object o) methods) that are considered and treated by jOOQ as new records. Here is a simple and classical example of creating and inserting an updatable record:
SaleRecord sr = ctx.newRecord(SALE);
sr.setFiscalYear(2021);
...
sr.insert();
However, if you create it like so, then you need to explicitly call attach():
SaleRecord sr = new SaleRecord();
sr.setFiscalYear(2021);
...
ctx.attach(sr);
sr.insert();
jOOQ generates and executes the INSERT statement. Moreover, by default, jOOQ tries to load any generated keys (the IDENTITY/SEQUENCE values, which are supported by most databases) from the database and turn them back into records that conform to the following note.
Important Note
The JDBC getGeneratedKeys() approach is only used when there's no better approach. In Db2, Firebird, MariaDB, Oracle, PostgreSQL, and, soon, H2, there is native RETURNING or <data change delta table> support that favors single round trips. Sometimes, if getGeneratedKeys() isn't supported, or only poorly, then an extra round trip may be needed with an extra SELECT statement. This is particularly true for many dialects when Settings.returnAllOnUpdatableRecord() is active.
So, calling sr.getSaleId() after INSERT will return the database-generated primary key.
Sometimes, you just need to re-insert the data that's contained in an updatable record. By default, since the record is unchanged after being inserted (changed() returns false), executing another insert() renders an INSERT of defaults (INSERT INTO sale VALUES (default, default, ...)). If the CREATE TABLE DDL doesn't provide default values for all the rendered defaults, then this will result in an error; that is, Field 'foo' doesn't have a default value. But, as you can see in the bundled code, this behavior can be controlled via withInsertUnchangedRecords(false). Setting this flag to false will suppress any attempt to execute an INSERT of defaults.
To insert the same data without creating a new record, you can manually mark the record fields as changed (notice that we mark the primary key as unchanged, so it is omitted from the generated INSERT to avoid a duplicate key error):
sr.changed(true);
sr.changed(SALE.SALE_ID, false);
sr.insert();
Of course, if you want to re-insert only certain fields, then mark only those fields as changed. On the other hand, if you want to re-insert the data and create a new record as well, then rely on the UpdatableRecord.copy() method. The copy() method is quite handy because it duplicates this record in memory, marks all fields as changed, and doesn't copy the primary key or any other main unique key:
SaleRecord srCopy = sr.copy();
srCopy.insert();
// or, shortly
sr.copy().insert();
More examples, including inserting without returning the generated primary key and inserting and returning all fields, can be found in the bundled code, SimpleCRUDRecords (available for MySQL and PostgreSQL). Next, let's focus on updating records.
Updating updatable records (this sounds funny)
Typically, an updatable record is fetched from the database and is changed in memory. Subsequently, these changes are propagated to the database by calling UpdatableRecord.update() or its flavors, which allows us to nominate the fields that should be updated. Let's fetch a record and change it:
SaleRecord sr = ctx.selectFrom(SALE)
.where(SALE.SALE_ID.eq(1L)).fetchSingle();
sr.setFiscalYear(2000);
sr.setSale(1111.25);
If we print sr at the console, then the result will look similar to the following:

Figure 9.2 – Displaying the modified record on the console
Notice that fiscal_year and sale are marked with an asterisk (*) by jOOQ. This asterisk highlights the fields that have been changed and that will participate in the following UPDATE:
sr.update();
The rendered SQL in MySQL dialect is as follows (the rendered UPDATE relies on the primary key):
UPDATE `classicmodels`.`sale`
SET `classicmodels`.`sale`.`fiscal_year` = 2000,
`classicmodels`.`sale`.`sale` = 1111.25
WHERE `classicmodels`.`sale`.`sale_id` = 1
By default, updating a record that is already up to date has no effect. Of course, if you rely on changed() to mark all/some fields as changed, then you force jOOQ to execute the corresponding UPDATE. You can practice forcing an update via Settings.withUpdateUnchangedRecords(UpdateUnchangedRecords) in the bundled code.
Deleting updatable records
A fetched updatable record can be deleted via UpdatableRecord.delete():
SaleRecord sr = ctx.selectFrom(SALE)
.where(SALE.SALE_ID.eq(5L)).fetchSingle();
sr.delete();
// MySQL rendered SQL
DELETE FROM `classicmodels`.`sale` WHERE `classicmodels`
.`sale`.`sale_id` = 5
As you can see, the rendered DELETE relies on the primary key (or main unique key). After deletion, all the fields of the deleted record are automatically marked as changed, so you can easily insert it again by calling insert().
Merging updatable records
Whenever we want to execute a MERGE statement for an updatable record (brand new or fetched from the database), we can call UpdatableRecord.merge(). In this case, jOOQ renders an INSERT ... ON DUPLICATE KEY UPDATE (this is emulated, depending on the used dialect), so it delegates the task of choosing between INSERT and UPDATE to the database. Here is an example:
SaleRecord srNew = ctx.newRecord(SALE);
srNew.setFiscalYear(2000);
...
srNew.merge();
In this case, srNew will be inserted. Here is another example:
SaleRecord srFetched = ctx.selectFrom(SALE)
.where(SALE.SALE_ID.eq(1L)).fetchSingle();
srFetched.setFiscalYear(2005);
...
srFetched.merge();
Here, srFetched will be updated based on the primary key. Practically, jOOQ will render an SQL that updates the row, regardless of which (unique) key value is already present.
Storing updatable records
Storing an updatable record can be done by calling the UpdatableRecord.store() method. This method results in an INSERT or an UPDATE, depending on the primary key's state. The decision of rendering an INSERT or an UPDATE is made by jOOQ, not by the database, as in the case of MERGE.
Typically, calling store() for new updatable records results in an INSERT:
SaleRecord srNew = ctx.newRecord(SALE);
srNew.setFiscalYear(2000);
...
srNew.store(); // jOOQ render an INSERT
If the updatable record was fetched from the database and its primary key was not changed, then jOOQ will render an UPDATE:
SaleRecord srFetched = ctx.selectFrom(SALE)
.where(SALE.SALE_ID.eq(5L)).fetchSingle();
srFetched.setFiscalYear(2005);
srFetched.changed(SALE.SALE_, true);
...
srFetched.store(); // jOOQ render an UPDATE
If the updatable record was fetched from the database and its primary key was changed, then jOOQ will render an INSERT:
srFetched.setSaleId(…);
srFetched.store(); // jOOQ render an INSERT
However, we can still force an UPDATE of the primary key via withUpdatablePrimaryKeys(true):
DSLContext derivedCtx = ctx.configuration().derive(
new Settings().withUpdatablePrimaryKeys(true)).dsl();
SaleRecord sr = derivedCtx.selectFrom(SALE)
.where(SALE.SALE_ID.eq(7L)).fetchSingle();
sr.setSaleId(...);
sr.store(); // jOOQ render an UPDATE of primary key
However, as Lukas Eder shared: "I think it's worth mentioning that updating primary keys is very much against all principles of normalization. It was introduced for those cases where users have very good reasons to do so, and those reasons are very rare (usually data migrations or fixing broken data, but even then, they're probably more likely to use SQL statements than updatable records)."
You can see these examples in SimpleCRUDRecords (available for MySQL and PostgreSQL).
On the other hand, if you prefer to work with POJOs and jOOQ's DAO, then you'll like to check out the examples from SimpleDaoCRUDRecords (available for MySQL and PostgreSQL). These examples relies on DAO's insert(), update(), delete(), and merge(). Moreover, you'll see the withReturnRecordToPojo() setting at work. Next, let's focus on using updatable records in web applications.
Using updatable records in HTTP conversations
jOOQ's updatable records can be used in web applications or, in other words, in conversations that span across requests over the stateless HTTP protocol. Next, we'll develop several Spring Boot samples that are meant to highlight what we've learned so far.
Using insert(), update(), and delete()
Let's try to build a Spring Boot sample application that uses updatable records and insert(), update(), and delete(). While relying on the Spring MVC design pattern, let's consider the following scenario: our main goal is to provide a list of all bank transactions (BANK_TRANSACTION) that belong to the same payment (PAYMENT) of a certain customer. The user should be able to insert a new bank transaction and delete or modify an existing one.
Listing all bank transactions
The page that displays the bank transactions should look as follows (transactions.html):
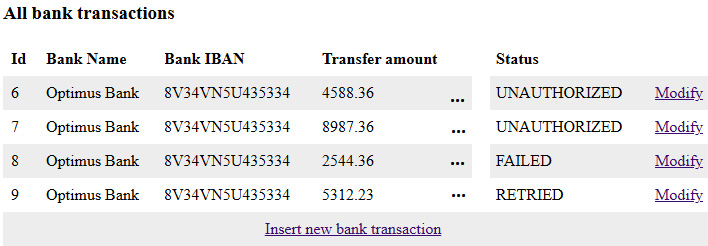
Figure 9.3 – All bank transactions of a certain payment
Let's start from the controller endpoint, which should be accessed to produce the output shown in the preceding screenshot:
@GetMapping("/transactions")public String loadAllBankTransactionOfCertainPayment(
SessionStatus sessionStatus, Model model) {sessionStatus.setComplete();
model.addAttribute(ALL_BANK_TRANSACTION_ATTR,
classicModelsService
.loadAllBankTransactionOfCertainPayment());
return "transactions";
}
In the highlighted code, we call the service that's responsible for accessing the repository that executes the query for fetching all the transactions for a certain payment. This query is quite simple (of course, in reality, you won't hardcode the values of CUSTOMER_NUMBER and CHECK_NUMBER – these can represent something such as the login payment credentials):
public Result<BankTransactionRecord>
fetchAllBankTransactionOfCertainPayment() {return ctx.selectFrom(BANK_TRANSACTION)
.where(BANK_TRANSACTION.CUSTOMER_NUMBER.eq(333L)
.and(BANK_TRANSACTION.CHECK_NUMBER.eq("NF959653"))).fetch();
}
Next, the fetched Result<BankTransactionRecord> is returned in the controller endpoint listed previously and stored in the model (Spring Boot's Model) as a request attribute named all (ALL_BANK_TRANSACTION_ATTR = "all"). To render the page that's returned from this controller endpoint (transactions.html) we can rely on the popular Thymeleaf template engine (of course, you can use any other template engine):
<tr th:each="t : ${all}"> <td><span th:text="${t.transactionId}">ID</span></td> <td><span th:text="${t.bankName}">Bank Name</span></td>...
<td><span th:text="${t.status}">Status</span></td> </tr>
From the returned page (transactions.html), we can choose to insert a new transaction or modify an existing one.
Inserting a new bank transaction
Inserting a new bank transaction can be done by rendering the link like so:
<a href="/newbanktransaction">Insert new bank transaction</a>
This link reaches a controller endpoint that looks like this:
@GetMapping("/newbanktransaction")public String newBankTransaction(Model model) {model.addAttribute(NEW_BANK_TRANSACTION_ATTR,
new BankTransactionRecord());
return "newtransaction";
}
So, this controller endpoint creates a new BankTransactionRecord that is stored in the model via the NEW_BANK_TRANSACTION_ATTR request attribute. The returned page, newtransaction.html, is rendered like so:

Figure 9.4 – Creating a new bank transaction
Pressing the Save button triggers a POST request that reaches the following controller endpoint (/new):
@PostMapping("/new")public String newBankTransaction(
@ModelAttribute BankTransactionRecord btr,
RedirectAttributes redirectAttributes) {classicModelsService.newBankTransaction(btr);
redirectAttributes.addFlashAttribute(
INSERT_DELETE_OR_UPDATE_BANK_TRANSACTION_ATTR, btr);
return "redirect:success";
}
So, Spring Boot populates the btr record with the submitted data, and we insert it into the database (before inserting it, in the service method (not listed here), we associate this new transaction with the corresponding payment via btr.setCustomerNumber() and btr.setCheckNumber()):
@Transactional
public int newBankTransaction(BankTransactionRecord btr) {ctx.attach(btr);
return btr.insert();
}
Since this is a new bank transaction, we must attach it before inserting it.
Updating a bank transaction
Let's consider that updating a bank transaction implies a four-step wizard. In the case of simple wizards, we can use a single <form/> that is submitted at the last step of the wizard. However, in the case of dynamic wizards, we must use one <form/> per panel since we must submit the data at each step to decide which is going to be the next panel and what it will contain. So, in such cases, we must implement a long HTTP conversation that's capable of storing the user data while navigating back and forth between the panels. Commonly, this is done by storing data via the client's HTTP session.
Let's keep it as simple as possible and assume that the four-step wizard looks as follows:

Figure 9.5 – Four-step wizard
Before entering this wizard, we must click on the Modify link that corresponds to the bank transaction that we plan to edit. This will hit the following controller endpoint while sending the transaction ID:
@GetMapping("/editbankname/{id}")public String loadBankTransaction(
@PathVariable(name = "id") Long id, Model model) {model.addAttribute(BANK_TRANSACTION_ATTR,
classicModelsService.loadBankTransaction(id));
return "redirect:/editbankname";
}
BankTransactionRecord can be fetched via the following repository method:
public BankTransactionRecord fetchBankTransaction(Long id) {return ctx.selectFrom(BANK_TRANSACTION)
.where(BANK_TRANSACTION.TRANSACTION_ID.eq(id))
.fetchSingle();
}
Since this is the transaction that should live across our wizard panels, we must store it in the model via the session attribute, BANK_TRANSACTION_ATTR = "bt". Next, we must return the first panel of the wizard.
Edit bank name
Once we've edited the bank name, we must click on Next to submit the data. This reaches the following controller endpoint:
@PostMapping("/name")public String editBankName(
@ModelAttribute(BANK_TRANSACTION_ATTR)
BankTransactionRecord btr) {return "redirect:editbankiban";
}
Here, we just allow Spring Boot to synchronize the btr session record with the submitted data. Next, we must return the second panel.
Edit IBAN
Once we've edited the bank name, we must edit the IBAN and click Next (we can also click Back and edit the bank name again). After editing the IBAN, the submitted data hits the controller endpoint:
@PostMapping("/iban")public String editBankIban(
@ModelAttribute(BANK_TRANSACTION_ATTR)
BankTransactionRecord btr) {return "redirect:editcardtype";
}
Again, we allow Spring Boot to synchronize the btr session record with the submitted data. Next, we must return the third panel.
Edit the card type
Once we've edited the bank's IBAN, we must choose the card type and click Next (we can also click Back and edit the bank IBAN again). After choosing the card type, the submitted data hits the controller endpoint:
@PostMapping("/cardtype")public String editCardType(
@ModelAttribute(BANK_TRANSACTION_ATTR)
BankTransactionRecord btr) {return "redirect:editbanktransfer";
}
Again, we allow Spring Boot to synchronize the btr session record with the submitted data. Next, we must return the last panel.
Edit the transferred amount
Finally, we must edit the transferred amount and submit it to the controller endpoint:
@PostMapping("/transfer")public String updateBankTransfer(
@ModelAttribute(BANK_TRANSACTION_ATTR)
BankTransactionRecord btr, SessionStatus sessionStatus,
RedirectAttributes redirectAttributes) {classicModelsService.updateBankTransaction(btr);
redirectAttributes.addFlashAttribute(
INSERT_DELETE_OR_UPDATE_BANK_TRANSACTION_ATTR, btr);
sessionStatus.setComplete();
return "redirect:success";
}
The UPDATE method is used in a repository method, as follows:
@Transactional
public int updateBankTransaction(BankTransactionRecord btr) {return btr.update();
}
Finally, we must clean up the HTTP session to remove the updatable record.
Resetting the wizard data
It is a common feature of any wizard to provide a Reset button for reverting the data from the current panel or from the entire wizard to the latest saved data. Our Reset button is relying on jOOQ's reset() method to reset the wizard (all three panels):
@GetMapping("/reset/{page}")public String reset(
@PathVariable(name = "page") String page, Model model) { if (model.containsAttribute(BANK_TRANSACTION_ATTR)) {((BankTransactionRecord) model.getAttribute(
BANK_TRANSACTION_ATTR)).reset();
}
return "redirect:/" + page;
}
Of course, you can use reset(Field/Name/String/int) to implement a reset per panel feature. Finally, let's delete a bank transaction.
Deleting a bank transaction
As shown in Figure 9.5, each panel of our wizard contains a Delete button, which allows us to delete this bank transaction. The code for its controller endpoint is as follows:
@GetMapping("/delete")public String deleteBankTransaction(
SessionStatus sessionStatus, Model model,
RedirectAttributes redirectAttributes) {...
BankTransactionRecord btr = (BankTransactionRecord)
model.getAttribute(BANK_TRANSACTION_ATTR);
classicModelsService.deleteBankTransaction(btr);
sessionStatus.setComplete();
...
}
And the DELETE is rendered by a call of delete() in the following repository method:
@Transactional
public int deleteBankTransaction(BankTransactionRecord btr) {return btr.delete();
}
The complete code is called CRUDRecords. If you prefer to use POJOs and jOOQ's DAO, then check out DaoCRUDRecords and the REST version (for Postman, ARC, and so on), which is called DaoCRUDRESTRecords. These three applications are available for MySQL. For brevity, we skipped any validation and error handling code.
Using merge() versus store()
Let's consider the following scenario: we have loaded and displayed the payments (PAYMENT) of a certain customer (for instance, PAYMENT.CUSTOMER_NUMBER.eq(103L)). The user should be able to insert new payments for this customer or update the amount of an existing payment. To solve this task, we have two approaches that are almost the same. These are shown in the following screenshot:
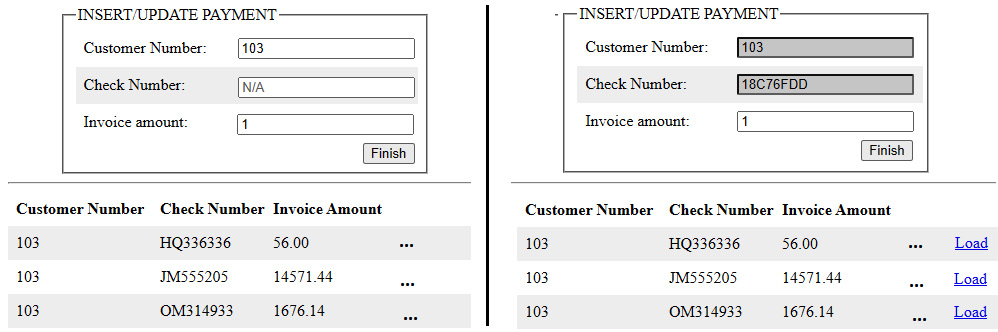
Figure 9.6 – Insert/update payment
Regarding the design on the left-hand side, to insert a new payment, we can simply type a new (unique) Check Number (for instance, received via SMS) and the corresponding Invoice Amount. To update the Invoice Amount of an existing payment, we must type its current Check Number from the bottom table (for instance, to update the second payment from the table, we must type the Check Number JM555205).
Regarding the right-hand side design, to insert a new payment, we just type the Invoice Amount; the Check Number is auto-generated and pre-filled by the application. However, to update the Invoice Amount of an existing payment, we must load the payment first via the corresponding Load link in the bottom table. This will fetch the corresponding payment from the database so that we can type in the new amount value and update it.
Implementing the left-hand side design via merge()
Let's focus on the left-hand side design. After the user submits the payment form, Spring Boot creates a new PaymentRecord and populates it with the submitted data. Next, based on the submitted Check Number, we must determine if this is a new payment or an update of an existing payment to execute an INSERT or an UPDATE. So, it is time for merge() to do its job and render an SQL that delegates the task of choosing between INSERT and UPDATE to the database:
@PostMapping("/merge")public String mergePayment(PaymentRecord pr) {classicModelsService.mergePayment(pr);
return "redirect:payments";
}
@Transactional
public int mergePayment(PaymentRecord pr) {ctx.attach(pr);
return pr.merge();
}
That's all the important code! Notice that, before merging, we need to attach the relevant PaymentRecord. Remember that Spring Boot has created this record, so it is not attached to any Configuration.
Check out the complete application for this code, which is called MergeRecords. If you prefer to use POJOs and jOOQ's DAO, then check out DaoMergeRecords. Both applications are available for MySQL.
Implementing the right-hand side design via store()
If we wish to implement the right-hand side design, then we must start by preparing a brand-new PaymentRecord (for instance, we must generate the Check Number) and storing it via an HTTP session attribute (PAYMENT_ATTR). This PaymentRecord is returned to the user. However, if the user wants to update the Invoice Amount of an existing payment, then they have the option to click on the corresponding Load link in the bottom table. The following query can be used to fetch the relevant RecordPayment:
public PaymentRecord fetchPayment(Long nr, String ch) {return ctx.selectFrom(PAYMENT)
.where(row(PAYMENT.CUSTOMER_NUMBER, PAYMENT.CHECK_NUMBER)
.eq(row(nr, ch)))
.fetchSingle();
}
The fetched PaymentRecord overrides the one from the HTTP session and is returned to the user. When the user submits the data, Spring Boot synchronizes the PaymentRecord value that's stored in PAYMENT_ATTR (which can be the new PaymentRecord or the fetched PaymentRecord) with the submitted data. This time, we can let jOOQ choose between INSERT and UPDATE via store() since this method distinguishes between a new PaymentRecord and a fetched PaymentRecord and acts accordingly:
@PostMapping("/store")public String storePayment(SessionStatus sessionStatus,
@ModelAttribute(PAYMENT_ATTR) PaymentRecord pr) {pr.setCachingDate(LocalDateTime.now());
classicModelsService.storePayment(pr);
sessionStatus.setComplete();
return "redirect:payments";
}
@Transactional
public int storePayment(PaymentRecord pr) {ctx.attach(pr);
return pr.store();
}
The application that uses store() is named StoreRecords (available for MySQL). Now, let's move on and talk about navigating (updatable) records.
Navigating (updatable) records
jOOQ exposes several navigation methods that can be used for attached (updatable) records only (TableRecord and UpdatableRecord). To use these methods, please consider the following note.
Important Note
While these methods are very convenient/appealing, they are also a big N+1 risk. UpdatableRecord is great for CRUD, but if you aren't using CRUD, then you shouldn't use UpdatableRecord. It's better to project only the columns you need and try to use joins or other SQL utilities to fetch data from multiple tables.
These methods navigate based on the foreign key references. For instance, with an attached DepartmentRecord, we can navigate its parent (OFFICE) via fetchParent(ForeignKey<R, O> key), as shown in the following example:
public OfficeRecord fetchOfficeOfDepartment(
DepartmentRecord dr) {return dr.fetchParent(Keys.DEPARTMENT_OFFICE_FK);
// or, Keys.DEPARTMENT_OFFICE_FK.fetchParent(dr);
}
The Keys.DEPARTMENT_OFFICE_FK foreign key was generated by the jOOQ Code Generator based on our CREATE TABLE DDL. In terms of MySQL dialect, jOOQ renders the following SQL:
SELECT
`classicmodels`.`office`.`office_code`,
...
`classicmodels`.`office`.`location`
FROM
`classicmodels`.`office`
WHERE
`classicmodels`.`office`.`office_code` in (?)
You can also fetch Table<OfficeRecord> via parent():
Table<OfficeRecord> tor =
dr.parent(Keys.DEPARTMENT_OFFICE_FK);
Table<OfficeRecord> tor =
Keys.DEPARTMENT_OFFICE_FK.parent(dr);
Next, with an attached OfficeRecord, we can fetch the employees (EMPLOYEE) via fetchChildren(ForeignKey<O,R> key), as follows:
public Result<EmployeeRecord>
fetchEmployeesOfOffice(OfficeRecord or) {return or.fetchChildren(Keys.EMPLOYEE_OFFICE_FK);
// or, Keys.EMPLOYEE_OFFICE_FK.fetchChildren(or);
}
This time, the SQL that's rendered for the MySQL dialect is as follows:
SELECT
`classicmodels`.`employee`.`employee_number`,
...
`classicmodels`.`employee`.`monthly_bonus`
FROM
`classicmodels`.`employee`
WHERE
`classicmodels`.`employee`.`office_code` in (?)
You can also fetch Table<OfficeRecord> via children() (using children() is often preferable to fetchChildren() because it encourages writing queries rather than navigating UpdatableRecord directly):
Table<EmployeeRecord> ter =
or.children(Keys.EMPLOYEE_OFFICE_FK);
Table<EmployeeRecord> ter =
Keys.EMPLOYEE_OFFICE_FK.children(or);
Next, we can reuse fetchChildren() to fetch the customers (CUSTOMER) of a certain employee (EmployeeRecord). This will result in every CustomerRecord of that EmployeeRecord. Finally, with an attached CustomerRecord, we can fetch its details (CUSTOMERDETAIL) via fetchChild(ForeignKey<O, R> key), as follows:
public CustomerdetailRecord
fetchCustomerdetailOfCustomer(CustomerRecord cr) {return cr.fetchChild(Keys.CUSTOMERDETAIL_CUSTOMER_FK);
}
The rendered SQL for the MySQL dialect is as follows:
SELECT
`classicmodels`.`customerdetail`.`customer_number`,
...
`classicmodels`.`customerdetail`.`country`
FROM
`classicmodels`.`customerdetail`
WHERE
`classicmodels`.`customerdetail`.`customer_number` in (?)
In the bundled code (NavigationRecords, which is available for MySQL), you can see all these methods collaborating to obtain something similar to the following:

Figure 9.7 – Navigating between records
These methods are also quite handy for looping the parent/children of a record and taking some action. Here is an example of using fetchParent() to fetch the EmployeeRecord details of each SaleRecord that has less than 2,000 sales:
for (SaleRecord sale : ctx.fetch(SALE, SALE.SALE_.lt(2000d))){ if ("Sales Rep".equals(sale.fetchParent( Keys.SALE_EMPLOYEE_FK).getJobTitle())) {sale.delete();
}
}
In the previous example, each call of fetchParent() executes a separate SELECT, which is far away from being a good choice. However, an interesting method that's helpful in this case is fetchParents(), which can fetch all the parents of a list of records in a single SELECT. This means that we can rewrite the previous query like so:
List<SaleRecord> sales
= ctx.fetch(SALE, SALE.SALE_.lt(2000d));
List<EmployeeRecord> employees
= Keys.SALE_EMPLOYEE_FK.fetchParents(sales);
for (SaleRecord sale : sales) { for (EmployeeRecord employee : employees) {if (Objects.equals(sale.getEmployeeNumber(),
employee.getEmployeeNumber()) && "Sales Rep".equals(
employee.getJobTitle())) {sale.delete();
break;
}
}
}
If you need Table<EmployeeRecord>, then use parents():
Table<EmployeeRecord> employeesTable
= Keys.SALE_EMPLOYEE_FK.parents(sales);
Important Note
Note that these kinds of loops are really bad from a performance perspective!
If there's no business logic in the client, it should be a single DELETE statement with a semi-join (for instance, an IN predicate). So, don't take these loop examples at face value. I know that this approach feels easier but I strongly recommend avoiding it. Don't implement such loops all over the application and then complain about jOOQ being slow, just like when people complain about Hibernate being slow when these navigational loops are simply wrong.
The only reason why anyone should ever process data row by row is that each row requires very complex business logic that can't be expressed in SQL or otherwise pushed into the database. People get this wrong in all languages, including PL/SQL. They loop over rows because it's convenient and they prefer 3GLs over SQL-the-4GL, and then they run queries on a row-by-row basis because they can. So, to justify the previous loops, we need to at least add some businessLogicHere(saleRecord) method calls to hint at the row-by-row approach being necessary in this particular case.
You can find these examples in NavigationParentsRecords (available for MySQL). Next, let's focus on using explicit transactions and jOOQ queries.
Transactions
Among other benefits, transactions give us the ACID properties. We can distinguish between read-only and read-write transactions, different isolation levels, different propagation strategies, and so on. While Spring Boot supports a comprehensive transactional API (Spring TX) that's commonly used via @Transactional and TransactionTemplate, jOOQ comes with a simple transaction API (and an org.jooq.TransactionProvider SPI) that fits perfectly in the context of fluent style.
The following diagram highlights the main implementations of this SPI:
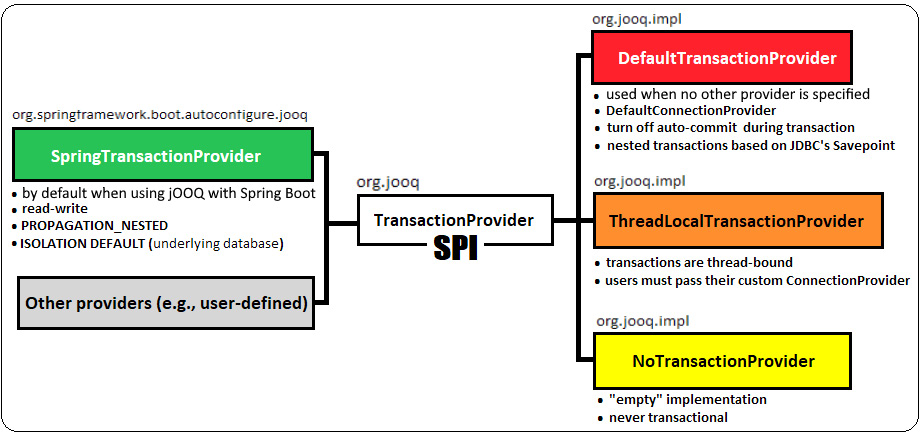
Figure 9.8 – jOOQ transaction providers
Starting with jOOQ 3.17 we have support for transactions in R2DBC as well. So, jOOQ 3.17 come with support for reactive transactions.
Mainly, the jOOQ API for blocking transactions can be used like so:
ctx.transaction(configuration -> {DSL.using(configuration)...
// or, configuration.dsl()...
}
var result = ctx.transactionResult(configuration -> {return DSL.using(configuration)...
// or, return configuration.dsl()...
}
Here, we have transaction(TransactionalRunnable), which returns void and transactionResult(TransactionalCallable) for returning a result. The former wraps the transactional code in jOOQ's org.jooq.TransactionalRunnable functional interface, while the latter wraps the transactional code in jOOQ's org.jooq.TransactionalCallable functional interface.
Important Note
Pay attention to the fact that, inside a jOOQ transaction, you must use DSLContext that's been obtained from the given (derived) configuration, not ctx (the injected DSLContext).
SpringTransactionProvider
In terms of Spring Boot's context, jOOQ delegates the task of handling the transactions (begin, commit, and rollback) to SpringTransactionProvider, an implementation of the org.jooq.TransactionProvider SPI that's meant to allow Spring Transaction to be used with JOOQ. By default, you'll get a read-write transaction with no name (null) whose propagation is set to PROPAGATION_NESTED, and the isolation level is set to the default isolation level of the underlying database; that is, ISOLATION_DEFAULT.
If you ever want to decouple SpringTransactionProvider (for instance, to avoid potential incompatibilities between Spring Boot and jOOQ), then use the following code:
// affects ctx
ctx.configuration().set((TransactionProvider) null);
// create derived DSLContext
ctx.configuration().derive((TransactionProvider) null).dsl();
Once you've decoupled SpringTransactionProvider, jOOQ will execute the transaction via the jOOQ's DefaultTransactionProvider and DefaultConnectionProvider with auto-commit mode set to false (if it was true before the transaction, then jOOQ will restore it after the transaction). DefaultTransactionProvider supports nested transactions that have been implemented via JDBC's java.sql.Savepoint. In Chapter 18, jOOQ SPI (Providers and Listeners), you'll learn how to implement a TransactionProvider, but for now, let's look at some examples of jOOQ transactions. Let's start from a simple transaction that highlights the commit/rollback:
ctx.transaction(configuration -> {DSL.using(configuration).delete(SALE)
.where(SALE.SALE_ID.eq(1L)).execute();
DSL.using(configuration).insertInto(TOKEN)
.set(TOKEN.SALE_ID, 1L).set(TOKEN.AMOUNT, 1000d)
.execute();
// at this point transaction should commit, but the error
// caused by the previous INSERT will lead to rollback
});
If you want to handle/prevent rollbacks, then you can wrap the transactional code in a try-catch block and act as you consider; if you want to do some work (for instance, do some cleanup work) and roll back, then just throw the exception at the end of the catch block. Otherwise, by catching RuntimeException, we can prevent a rollback from occurring if something went wrong while executing the SQL statements from jOOQ:
ctx.transaction(configuration -> { try {// same DMLs as in the previous example
} catch (RuntimeException e) { System.out.println("I've decided that this error doesn't require rollback ...");
}
});
jOOQ nested transactions look like Matrioska dolls. We nest the transactional code by nesting calls of transaction()/transactionResult(). Here, the transactions will be automatically demarcated by jOOQ with savepoints. Of course, no one is prevented from extracting these lambdas into methods and composing them as higher-order functions, just like you can compose Spring-annotated transactional methods.
Here is an example of nesting two jOOQ transactions:
public void nestedJOOQTransaction() { ctx.transaction(outer -> { DSL.using(outer).delete(SALE) // or, outer.dsl()
.where(SALE.SALE_ID.eq(2L)).execute();
// savepoint created
DSL.using(outer).transaction(inner -> {DSL.using(inner).insertInto(TOKEN) // or, inner.dsl()
.set(TOKEN.SALE_ID, 1L)
.set(TOKEN.AMOUNT, 1000d).execute();
});
});
}
By default, if something goes wrong in one of the transactions, then the subsequent transactions (inner transactions) will not be executed and all the outer transactions will be rolled back. But sometimes, we may want to roll back only the current transaction and not affect the outer transactions, as shown in the following example:
ctx.transaction(outer -> { try {DSL.using(outer).delete(SALE)
.where(SALE.SALE_ID.eq(1L)).execute();
// savepoint created
try {DSL.using(outer)
.transaction(inner -> {DSL.using(inner).insertInto(TOKEN)
.set(TOKEN.SALE_ID, 1L)
.set(TOKEN.AMOUNT, 1000d).execute();
});
} catch (RuntimeException e) { throw e; } } catch (RuntimeException e) { System.out.println("I've decided that this error doesn't require rollback of the outer transaction ...");
// throw e; // rollback
}
});
You can check out these examples in JOOQTransaction (available for MySQL).
ThreadLocalTransactionProvider
Another jOOQ built-in transaction provider is ThreadLocalTransactionProvider. This provider implements thread-bound transaction semantics. In other words, a transaction and its associated Connection will never leave the thread that started the transaction.
An important requirement of ThreadLocalTransactionProvider is that we must pass a custom ConnectionProvider implementation directly to this provider instead of passing it to Configuration. We can write our own CustomProvider or rely on a jOOQ built-one such as MockConnectionProvider (for tests), DefaultConnectionProvider, DataSourceConnectionProvider, or NoConnectionProvider.
For instance, if we choose DataSourceConnectionProvider, then, in a Spring Boot application, we can use a DataSource (for instance, HikariDataSource) that has already been prepared by Spring Boot, as follows:
@Configuration
public class JooqConfig {@Bean
@ConditionalOnMissingBean(org.jooq.Configuration.class)
public DefaultConfiguration jooqConfiguration(
JooqProperties properties, DataSource ds) {final DefaultConfiguration defaultConfig =
new DefaultConfiguration();
final ConnectionProvider cp =
new DataSourceConnectionProvider(ds);
defaultConfig
.set(properties.determineSqlDialect(ds))
.set(new ThreadLocalTransactionProvider(cp, true));
/* or, as a derived configuration
final org.jooq.Configuration derivedConfig = defaultConfig
.derive(properties.determineSqlDialect(ds))
.derive(new ThreadLocalTransactionProvider(cp, true));
*/
return defaultConfig;
}
}
Alternatively, if you are using Spring Boot 2.5.0+, then you can profit from the DefaultConfigurationCustomizer functional interface. This interface defines a method called customize(DefaultConfiguration configuration), which is a handy way to customize jOOQ's DefaultConfiguration:
@Configuration
public class JooqConfig
implements DefaultConfigurationCustomizer {private final DataSource ds;
public JooqConfig(DataSource ds) {this.ds = ds;
}
@Override
public void customize(DefaultConfiguration configuration) {configuration.set(new ThreadLocalTransactionProvider(
new DataSourceConnectionProvider(ds), true));
}
}
Done! Now, we can inject the DSLContext information that's been built by Spring Boot based on our Configuration and take advantage of thread-bound transaction semantics, which is usually exactly what Spring uses. You can check out an example by looking at ThreadLocalTransactionProvider{1,2}, which is available for MySQL.
Next, let's talk about jOOQ asynchronous transactions.
jOOQ asynchronous transactions
While transaction() and transactionResult() are synchronous, jOOQ also has transactionAsync() and transactionResultAsync(), which can be used to shape asynchronous transactions. Here are two asynchronous transactions that act independently of each other – they run in concurrent threads. The first one commits, while the second one rolls back:
// this transaction commits
@Async
public CompletableFuture<Integer>
executeFirstJOOQTransaction() { return ctx.transactionResultAsync(configuration -> {int result = 0;
result += DSL.using(configuration).insertInto(TOKEN)
.set(TOKEN.SALE_ID, 1L).set(TOKEN.AMOUNT, 500d)
.execute();
result += DSL.using(configuration).insertInto(TOKEN)
.set(TOKEN.SALE_ID, 1L).set(TOKEN.AMOUNT, 1000d)
.execute();
return result;
}).toCompletableFuture();
}
// this transaction is roll backed
@Async
public CompletableFuture<Integer>
executeSecondJOOQTransaction() { return ctx.transactionResultAsync(configuration -> {int result = 0;
result += DSL.using(configuration).delete(SALE)
.where(SALE.SALE_ID.eq(2L)).execute();
result += DSL.using(configuration).insertInto(TOKEN)
.set(TOKEN.SALE_ID, 2L).set(TOKEN.AMOUNT, 1000d)
.execute();
return result;
}).toCompletableFuture();
}
If you don't want to rely on the default Executor (ForkJoinPool.commonPool()), then use transactionAsync(Executor exctr, TransactionalRunnable tr) or transactionResultAsync(Executor exctr, TransactionalCallable<T> tc), respectively. But unlike what CompletableFuture does, jOOQ will remember Executor in its CompletionStage implementation so that it doesn't have to be provided on every ensuing asynchronous call.
However, asynchronous transactions work very badly with Spring, which usually assumes thread-bound transactions. Go to https://github.com/spring-projects/spring-boot/issues/24049 to see a discussion about this.
Check out the complete code in JOOQTransactionAsync (available for MySQL). Next, let's look at some examples of using/choosing @Transactional or the jOOQ transaction API.
@Transactional versus the jOOQ transaction API
Right off the bat, I wish to enforce an important note (most of you probably already know and respect these statements, but a quick reminder is always welcome).
Important Note
A non-transactional-context refers to a context with no explicit transaction boundaries, not to a context with no physical database transaction. All database statements are executed in the context of a physical database transaction.
Without specifying the explicit boundaries of the transaction (via @Transactional, TransactionTemplate, the jOOQ transaction API, and so on), jOOQ may use a different database connection for each statement. Whether or not jOOQ uses a different connection per statement is defined by ConnectionProvider. This statement is true for DataSourceConnectionProvider (and even then, it depends on DataSource) but false for DefaultConnectionProvider. In the worst-case scenario, this means that the statements that define a logical transaction don't benefit from ACID and they are prone to lead to race condition bugs and SQL phenomena. Each statement is executed in a separate transaction (auto-commit mode), which may result in a high database connection acquisition request rate, which is not good! On medium/large applications, reducing the database connection acquisition request rate next to short transactions will sustain performance since your application will be ready to face high traffic (a high number of concurrent requests).
Never combine @Transactional/TransactionTemplate and the jOOQ transaction API to solve a task in common (the same is true for Java/Jakarta EE transactions, of course). This may lead to unexpected behaviors. So long as Spring transactions and jOOQ transactions are not interleaved, it is safe to use them in the same application.
The best way to use Spring transactions only consists of annotating your repository/service class with @Transactional(readOnly=true) and explicitly setting @Transactional only on methods that should be allowed to execute write statements. However, if the same repository/service uses jOOQ transactions as well, then you should explicitly annotate each method, not the class itself. This way, you avoid inheriting @Transactional(readOnly=true) in methods that explicitly use jOOQ transactions.
Now, let's consider several examples that are meant to reveal the best practices for using transactions. Let's start with the following snippet of code:
public void fetchWithNoTransaction() {ctx.selectFrom(SALE).fetchAny();
ctx.selectFrom(TOKEN).fetchAny();
}
This method runs in a non-transactional context and executes two read statements. Each read is executed by the database in a separate physical transaction that requires a separate database connection. Keep in mind that this may not be true, depending on ConnectionProvider. Relying on @Transactional(readOnly=true) is much better:
@Transactional(readOnly=true)
public void fetchWithTransaction() {ctx.selectFrom(SALE).fetchAny();
ctx.selectFrom(TOKEN).fetchAny();
}
This time, a single database connection and a single transaction are used. readOnly come with a bunch of advantages, including that your team members cannot accidentally add write statements (such attempt result in an error), read-only transactions can be optimized at the database level (this is database vendor-specific), you must explicitly set the transaction isolation level as expected, and so on.
Moreover, having no transaction and setting auto-commit to true only makes sense if you execute a single read-only SQL statement, but it doesn't lead to any significant benefit. Therefore, even in such cases, it's better to rely on explicit (declarative) transactions.
However, if you consider that the readOnly=true flag isn't needed, then the following code can be executed in a jOOQ transaction as well (by default, this is a read-write transaction):
public void fetchWithTransaction() { ctx.transaction(configuration -> {DSL.using(configuration).selectFrom(SALE).fetchAny();
DSL.using(configuration).selectFrom(TOKEN).fetchAny();
// Implicit commit executed here
});
}
Notice that, exactly like Spring's TransactionTemplate (which can be used as well), the jOOQ transaction can strictly demarcate the transactional code. In other words, the @Transactional annotation acquires the database connection and starts the transaction immediately when entering the method. Then, it commits the transaction at the end of the method. This means that the potentially non-transactional code of a @Transactional method (the code that shapes business logic that doesn't need to run in a transaction) still runs inside the current transaction, which can lead to a long-running transaction. On the other hand, jOOQ transactions (just like TransactionTemplate) allow us to isolate and orchestrate the transactional code to run in transactions and the rest of the code outside of transactions. Let's look at a scenario where using a jOOQ transaction (or TransactionTemplate) is a better choice than using @Transactional:
@Transactional
public void fetchAndStreamWithTransactional() {ctx.update(EMPLOYEE).set(EMPLOYEE.SALARY,
EMPLOYEE.SALARY.plus(1000)).execute();
ctx.selectFrom(EMPLOYEE)
.fetch() // jOOQ fetches the whole result set into memory
// via the connection opened by @Transactional
.stream()// stream over the in-memory result set
// (database connection is active)
.map() // ... more time-consuming pipeline operations
// holds the transaction open
.forEach(System.out::println);
}
In this case, jOOQ fetches the whole result set into memory via the connection that's been opened by @Transactional. This means that the streaming operations (for instance, map()) don't need transactions, but Spring will close this transaction at the end of the method. This can result in a potentially long-running transaction. While we can avoid this issue by splitting the code into separate methods, we can also rely on a jOOQ transaction (or TransactionTemplate):
public void fetchAndStreamWithJOOQTransaction() {Result<EmployeeRecord> result =
ctx.transactionResult(configuration -> {DSL.using(configuration).update(EMPLOYEE)
.set(EMPLOYEE.SALARY, EMPLOYEE.SALARY.plus(1000))
.execute();
return DSL.using(configuration).selectFrom(EMPLOYEE)
.fetch();
});
result.stream() // stream over the in-memory result set
// (database connection is closed)
.map() // ... more time-consuming pipeline
// operations, but the transaction is closed
.forEach(System.out::println);
}
This is much better because we've removed the streaming operations from the transaction.
In terms of executing one or more DML operations in a method, it should be annotated with @Transactional, explicitly use the jOOQ transaction API, or use TransactionTemplate to demarcate the transactional code. Otherwise, Spring Boot will report an SQLException: Connection is read-only. Queries leading to data modification are not allowed. You can see such an example next to the previous examples in SpringBootTransactional (available for MySQL).
It is a well-known shortcoming of Spring transactions that @Transactional is ignored if it is added to a private, protected, or package-protected method or to a method that's been defined in the same class as where it is invoked. By default, @Transactional only works on public methods that should be added to classes and are different from where they are invoked. However, this issue can easily be avoided by using the jOOQ transaction API or TransactionTemplate, which don't suffer from these issues. You can explore some examples by looking at the JOOQTransactionNotIgnored application (available for MySQL).
A strong argument for choosing the Spring transactions for our jOOQ queries is that we can benefit from Spring transactions' isolation levels and propagation strategies. In the bundled code, you can find a suite of seven applications – one for each of the seven propagation levels supported by Spring transactions – that exemplifies the usage of jOOQ queries and Spring transaction propagations. These applications are called Propagation{Foo} and are available for MySQL.
In conclusion, jOOQ queries can be used in the following circumstances:
- Only with Spring transactions (you can take advantage of Spring transactions' features at full capacity)
- Only with jOOQ transactions (in the context of Spring Boot, you'll get read-write, nested transactions that rely on the database's isolation level)
- By combining them without interleaving Spring with jOOQ transactions to accomplish common tasks (in other words, once you open a Spring transaction, ensure that any subsequent inner transaction is a Spring one as well. If you open a jOOQ transaction, then ensure that any subsequent inner transaction is a jOOQ one.)
Hooking reactive transactions
As mentioned earlier, starting with jOOQ 3.17, we can take advantage of reactive transactions or transactions in R2DBC. Reactive transactions are easy to use via Publisher, as they have the same semantics as JDBC’s blocking APIs Here is an example of how to write a nested reactive transaction:
Flux<?> flux = Flux.from(
ctx.transactionPublisher(outer -> Flux.from(
DSL.using(outer).delete(SALE) // or, outer.dsl()
.where(SALE.SALE_ID.eq(2L)))
.thenMany(Flux.from(
DSL.using(outer).transactionPublisher( // or, outer.dsl()
inner -> Flux.from(
DSL.using(inner).insertInto(TOKEN) // or, inner.dsl()
.set(TOKEN.SALE_ID, 1L)
.set(TOKEN.AMOUNT, 1000d)
)))
)));
flux.subscribe();
Being in Spring Boot, this example relies on Project Reactor (https://projectreactor.io/), but you can use any other reactive library. More examples are available in the bundled code for MySQL, jOOQReactiveTransaction.
Locking
Locking is used to orchestrate concurrent access to data to prevent race condition threads, deadlocks, lost updates, and other SQL phenomena.
Among the most popular locking mechanisms, we have optimistic and pessimistic locking. As you'll see shortly, jOOQ supports both of them for CRUD operations. So, let's start with optimistic locking.
Optimistic locking overview
Optimistic locking is commonly related to the lost updates SQL phenomena, so let's quickly overview this anomaly.
A lost update is a popular anomaly that can seriously affect data integrity. A transaction reads a record and uses this information to make business decisions (for instance, decisions that may lead to that record being modified) without being aware that, in the meantime, a concurrent transaction has modified that record and committed it. When the first transaction commits, it is unaware of the lost update. This may cause data integrity issues (for example, the inventory can report a negative value, a certain payment can be lost, and so on).
Consider the scenario shown in the following diagram:
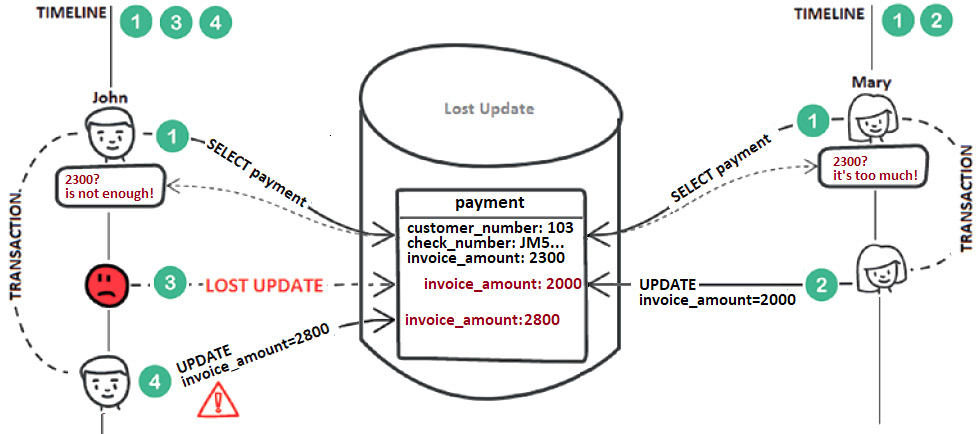
Figure 9.9 – Lost update phenomena
If we take this scenario step-by-step, then the following occurs:
- John and Mary fetch the invoice amount (2,300) of the same payment.
- Mary considers that the current invoice amount is too much, so she updates the amount from 2,300 to 2,000.
- John's transaction is not aware of Mary's update.
- John considers that the current invoice amount is not enough, so he updates the amount to 2,800, without being aware of Mary's decision.
This anomaly affects the Read Committed isolation level and can be avoided by setting the Repeatable Read or Serializable isolation level. For the Repeatable Read isolation level without Multi-Version Concurrency Control (MVCC), the database uses shared locks to reject other transactions' attempts to modify an already fetched record.
However, in the presence of MVCC databases, there is no need for locks since we can use the application-level optimistic locking mechanism. Typically, application-level optimistic locking starts by adding an integer field (typically named version) to the corresponding table(s). By default, this field is 0, and each UPDATE attempts to increment it by 1, as shown in the following diagram (this is also known as versioned optimistic locking):
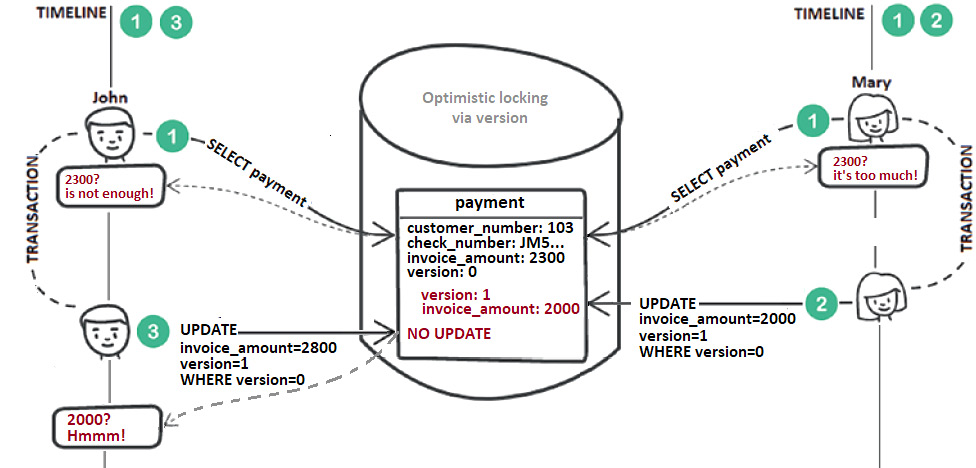
Figure 9.10 – Versioned optimistic locking (via numeric field)
This time, John is aware of Mary's decision, so he can make further decisions based on this information. In application-level optimistic locking, the application is responsible for handling the version field. The application should set the version value and append the proper WHERE clause to the executed UPDATE/DELETE to check the version value against the database. Moreover, if no UPDATE/DELETE has happened because WHERE version=? failed, then the application is responsible for signaling this behavior, meaning that the corresponding transaction contains stale data. Commonly, it does this by throwing a meaningful exception. As you'll see next, jOOQ aligns with this behavior.
With long conversations that span several (HTTP) requests, besides the application-level optimistic locking mechanism, you must keep the old data snapshots (for instance, jOOQ updatable records). In web applications, they can be stored in the HTTP session.
jOOQ optimistic locking
By default, the jOOQ optimistic locking mechanism for CRUD operations is disabled. It can be enabled via the withExecuteWithOptimisticLocking() setting, as shown here:
@Configuration
public class JooqSetting {@Bean
public Settings jooqSettings() {return new Settings()
.withExecuteWithOptimisticLocking(true);
}
}
Of course, you can toggle this setting locally by using a derived Configuration as well.
jOOQ optimistic locking via SELECT … FOR UPDATE
At this point, without further settings, jOOQ will intercept any CRUD UPDATE/DELETE (executed explicitly via update()/delete() or generated via merge()/store()), and will attempt to determine if the record contains stale data. For this, jOOQ acquires a database-exclusive read/write lock for the involved data via SELECT … FOR UPDATE, which is practically done via pessimistic locking. Next, jOOQ compares the fetched data with the data to be updated/deleted. Practically, the fetched data is compared against the original values of the record to be updated/deleted. If the record data is not stale, then jOOQ executes UPDATE/DELETE against the database; otherwise, it will throw a specific org.jooq.exception.DataChangedException.
For instance, before updating the amount of a payment (PAYMENT.INVOICE_AMOUNT), jOOQ will execute the following SELECT (MySQL dialect):
SELECT
`classicmodels`.`payment`.`customer_number`,
...
FROM `classicmodels`.`payment` WHERE
(`classicmodels`.`payment`.`customer_number` = ? AND
`classicmodels`.`payment`.`check_number` = ?) FOR UPDATE
It's quite easy to enable this type of optimistic locking, but it has two main shortcomings: it uses exclusive locks and is applied to all CRUD DELETE/UPDATE, which means it's also applied to all tables.
However, jOOQ also supports optimistic locking via the TIMESTAMP or VERSION fields. This kind of implementation is more popular, so let's look at this next.
jOOQ optimistic locking via the TIMESTAMP/VERSION fields
We already know from the previous section that jOOQ optimistic locking is enabled via the withExecuteWithOptimisticLocking(true) flag. Next, we must add a field of the TIMESTAMP type (for TIMESTAMP optimistic locking) or the INT type (for VERSION optimistic locking) for the corresponding table(s). For instance, let's add the PAYMENT table (for the MySQL dialect):
CREATE TABLE `payment` (
`customer_number` Bigint NOT NULL,
`check_number` Varchar(50) NOT NULL,
...
`version` INT NOT NULL DEFAULT 0,
`modified` TIMESTAMP NOT NULL DEFAULT NOW(),
CONSTRAINT `payment_pk`
PRIMARY KEY (`customer_number`,`check_number`),
...
) ENGINE=InnoDB DEFAULT CHARSET=latin1;
Of course, you don't have to add both of them! Decide what type of optimistic locking you need and add the corresponding field. Next, we must inform the jOOQ Code Generator about the fact that these fields should be used for optimistic locking. We can do so programmatically or declaratively. For Maven applications, you can do this via <recordVersionFields/> or recordTimestampFields/>, respectively:
<database>
<!-- numeric column for versioned optimistic locking -->
<recordVersionFields>version</recordVersionFields>
<!-- timestamp column for versioned optimistic locking -->
<recordTimestampFields>modified</recordTimestampFields>
</database>
For Gradle, please look at the bundled code.
At this point, jOOQ optimistic locking based on the TIMESTAMP/VERSION fields is ready to be used. Two jOOQ flags are useful for controlling (enable/disable) optimistic locking based on the TIMESTAMP/VERSION fields. These two flags are set to true by default (withUpdateRecordVersion() and withUpdateRecordTimestamp()), so you don't have to enable them explicitly. However, you can use them to disable this type of optimistic locking.
Nevertheless, at this point, there is an important aspect that you should be aware of. So far, jOOQ uses optimistic locking based on the TIMESTAMP/VERSION fields for any record of the PaymentRecord type, that is updated/deleted, but it still employees SELECT … FOR UPDATE for the rest of the records that execute CRUD UPDATE/DELETE statements. If this is not what you need, then you can explicitly enable the jOOQ flag setting (disabled by default); that is, withExecuteWithOptimisticLockingExcludeUnversioned(). For instance, you can instruct jOOQ to use only optimistic locking based on the TIMESTAMP/VERSION fields, like this:
@Bean // VERSION field (numeric)
public Settings jooqSettings() {return new Settings()
.withUpdateRecordVersion(true) // it can be omitted
.withExecuteWithOptimisticLocking(true)
.withExecuteWithOptimisticLockingExcludeUnversioned(true);
}
@Bean // TIMESTAMP field (timestamp)
public Settings jooqSettings() {return new Settings()
.withUpdateRecordTimestamp(true) // it can be omitted
.withExecuteWithOptimisticLocking(true)
.withExecuteWithOptimisticLockingExcludeUnversioned(true);
}
So, if we group all these settings into a logical diagram, we can obtain something:

Figure 9.11 – jOOQ optimistic locking settings
If you can choose between versions and timestamps, then go for versions. jOOQ has to support timestamps too if a legacy system uses them, or for quick wins, but with timestamps, there's always the risk of a lack of precision. For instance, when two updates happen in a very short time, the timestamps may still be the same. This can't happen with versions.
Next, let's try to apply the jOOQ optimist locking based on the VERSION field to the StoreRecords application (the application that's available for MySQL that uses store() was created in the Using merge() versus store() section).
Let's look at some code
I assume that you are already familiar with the StoreRecords code that shapes the following scenario: we must load and display the payments (PAYMENT) of a certain customer (for instance, PAYMENT.CUSTOMER_NUMBER.eq(103L)). The user should be able to insert new payments for this customer or update the amount of an existing payment via a user interface, as shown in the following screenshot:

Figure 9.12 – INSERT/UPDATE PAYMENT
Behind the scenes, we use store():
@Transactional
public int storePayment(PaymentRecord pr) {ctx.attach(pr);
return pr.store();
}
Here, if two concurrent transactions update the same payment, then our code is prone to the lost updates anomaly, so we must engage in optimistic locking.
So far, we've already added the version field to PAYMENT:
CREATE TABLE `payment` (
...
`version` INT NOT NULL DEFAULT 0,
...
}
We have also added the settings for enabling jOOQ optimistic locking based on the VERSION field, so we have set the following:
<database>
<recordVersionFields>version</recordVersionFields>
</database>
We have also set the following:
@Bean
public Settings jooqSettings() {return new Settings()
.withExecuteWithOptimisticLocking(true)
.withExecuteWithOptimisticLockingExcludeUnversioned(true);
}
So far, so good! From the perspective of optimistic locking, the interesting part starts when we call the store() method. If we attempt to store a new PaymentRecord, then store() will produce an INSERT statement that is not affected by optimistic locking. However, if this PaymentRecord needs to be updated, then optimistic locking will enrich the WHERE clause of the generated UPDATE (the same goes for DELETE) with an explicit check of the version number, as shown in the following MySQL UPDATE:
UPDATE
`classicmodels`.`payment`
SET
`classicmodels`.`payment`.`invoice_amount` = ?,
`classicmodels`.`payment`.`version` = ?
WHERE
(
`classicmodels`.`payment`.`customer_number` = ?
and `classicmodels`.`payment`.`check_number` = ?
and `classicmodels`.`payment`.`version` = ?
)
If the version number from the database doesn't match the version number from the WHERE clause, then this record contains stale data (another transaction has modified this data). This will lead to a jOOQ DataChangedException that can be handled in our controller endpoint, as shown here:
@PostMapping("/store")public String storePayment(SessionStatus sessionStatus,
RedirectAttributes redirectAttributes,
@ModelAttribute(PAYMENT_ATTR) PaymentRecord pr,
BindingResult bindingResult) { if (!bindingResult.hasErrors()) { try {classicModelsService.storePayment(pr);
sessionStatus.setComplete();
} catch (org.jooq.exception.DataChangedException e) { bindingResult.reject("", "Another user updated the data.");
}
}
if (bindingResult.hasErrors()) {redirectAttributes.addFlashAttribute(
BINDING_RESULT, bindingResult);
}
return "redirect:payments";
}
So, if DataChangedException occurs, then we must add a global error in BindingResult that contains the message Another user updated the data. This message will be rendered via Thymeleaf next to a button labeled Refresh, as shown in the following screenshot:
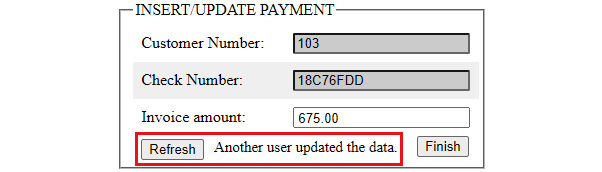
Figure 9.13 – Signaling stale data to the user
Remember jOOQ's refresh() method? This is the perfect place to highlight its usability because the user should see the latest state of the record. This is the perfect job for refresh(). In this case, the reset() method doesn't help since reset() restores the record to its in-memory original values, which is a different thing. So, let's use refresh() to execute a SELECT that will fetch the latest state of this PaymentRecord:
@GetMapping(value = "/refresh")
public String refreshPayment(Model model) { if (model.containsAttribute(PAYMENT_ATTR)) {classicModelsService.refreshPayment(
(PaymentRecord) model.getAttribute(PAYMENT_ATTR));
}
return "redirect:payments";
}
public void refreshPayment(PaymentRecord pr) {pr.refresh();
}
After refreshing, the user sees the data that was updated earlier by the concurrent transaction and can decide whether they wish to continue with their update. To reproduce this scenario, follow these steps:
- Launch two browsers (mainly, two users or HTTP sessions).
- In both, use the Load link to fetch the same payment.
- For user A, update the invoice amount and click Finish. This should successfully update the payment.
- For user B, update the invoice amount and click Finish. Since user A already updated this payment, you should see the message shown in the preceding screenshot.
- Click Refresh. Now, you should see the invoice amount that was set by user A.
- For user B, try to update again. This time, it will work as expected.
In a conclusion, if an explicit UPDATE/DELETE or UPDATE resulted from calling store(), jOOQ VERSION/TIMESTAMP optimistic locking will enrich the WHERE clause of the generated UPDATE/DELETE with an explicit check of the numeric values of timestamp fields. In the case of calling merge(), an explicit INSERT or UPDATE is rendered, depending on whether the numeric/timestamp values are present or not in the record.
The complete code for this example can be found in OLVersionStoreRecords. The alternative, which is for using a TIMESTAMP field, can be found in OLTimestampStoreRecords. Finally, the SELECT … FOR UPDATE solution can be found in OLPLStoreRecords. All of them are available for MySQL.
Retrying a failed transaction
Let's consider that our scenario gets updated. If a transaction didn't update a payment with an invoice amount larger than the current amount, then this transaction should be retried without user interaction (so, in this case, we don't care about the lost updates). Otherwise, the user should see the current amount and perform the update from the interface (there will be no Refresh button since the refresh should be done automatically).
But how can we retry a failed transaction from the application? In Spring Boot, this is equivalent to executing the failed @Transactional storePayment(PaymentRecord pr) method again, which can be done via Spring Retry. Once you've added Spring Retry (see the bundled code), you must adjust the storePayment(PaymentRecord pr) method, as shown here:
@Transactional
@Retryable(
value = org.jooq.exception.DataChangedException.class,
maxAttempts = 2, backoff = @Backoff(delay = 100))
public int storePayment(PaymentRecord pr) {int stored = 0;
try {ctx.attach(pr);
stored = pr.store();
} catch (org.jooq.exception.DataChangedException e) {BigDecimal invoiceAmount = pr.getInvoiceAmount();
pr.refresh();
if (invoiceAmount.doubleValue() >
pr.getInvoiceAmount().doubleValue()) {pr.setInvoiceAmount(invoiceAmount);
throw e;
}
throw new OptimisticLockingRetryFailed(e.getMessage());
}
return stored;
}
So, this time, we catch DataChangedException and analyze the current value of the invoice amount against the refreshed record (the latest state from the database). If the current amount is larger than the fetched amount, then we set it in place of the fetched amount and throw the caught DataChangedException. This will trigger the Spring Retry mechanism, will should retry this transaction. Otherwise, we must throw a custom OptimisticLockingRetryFailed exception, which will lead to an explicit message for the user. You can practice this example in OLRetryVersionStoreRecords (available for MySQL).
Pessimistic locking overview
Pessimistic locking is about locking rows (or cells) via exclusive/shared locks until the transaction that acquired these locks finishes its tasks. Depending on the lock's strength, other transactions may partially interact with these rows/cells or they will have to abort or wait for the resource to become available (lock-free). From the well-known SELECT … FOR UPDATE (exclusive read/write lock for rows (record lock)) and SELECT … FOR UPDATE OF (exclusive read/write locks for cells specific to Oracle) to SELECT … FOR UPDATE NOWAIT and SELECT … FOR UPDATE WAIT n (also specific to Oracle), to the more relaxed SELECT ... FOR UPDATE SKIP LOCKED, SELECT … FOR SHARE, and PostgreSQL-specific SELECT … FOR NO KEY UPDATE and SELECT … FOR KEY SHARE, jOOQ supports them all.
jOOQ pessimistic locking
As we mentioned in the Pessimistic locking overview section, jOOQ supports a significant number of locks of the SELECT … FOR FOO type. For instance, we can explicitly call SELECT … FOR UPDATE via forUpdate():
ctx.selectFrom(PRODUCTLINE)
.where(PRODUCTLINE.PRODUCT_LINE.eq("Classic Cars")).forUpdate()
.fetchSingle();
If transaction A executes this statement, then it locks the corresponding rows. The other transaction, transaction B, must wait for transaction A to release this exclusive lock before performing its tasks on the same resource. Check out this scenario in the ForUpdate application (available for MySQL) – pay attention that this application results in an exception: MySQLTransactionRollbackException: Lock wait timeout exceeded; try restarting transaction. Also, check out ForUpdateForeignKey (available for PostgreSQL) – this example highlights the effect of FOR UPDATE on foreign keys that's caused by the fact this lock affects the referenced rows from other tables as well, not just the rows from the current table.
So, remaining in the same context, SELECT … FOR UPDATE locks all the selected rows across all the involved tables (listed in the FROM clause, joined, and so on). If table X and table Y are involved in such a case, then SELECT … FOR UPDATE locks the rows of both tables, even if transaction A affects only rows from table X. On the other hand, transaction B needs to acquire locks from table Y, but it cannot do so until transaction A releases the locks on tables X and Y.
For such scenarios, Oracle has SELECT … FOR UPDATE OF, which allows us to nominate the columns that should be locked. In this case, Oracle only acquires locks on the rows of the table(s) that have the column name listed in FOR UPDATE OF. For instance, the following statements only lock rows from PRODUCTLINE, even if the PRODUCT table is also involved:
ctx.select(PRODUCTLINE.PRODUCT_LINE, PRODUCTLINE.CODE,
PRODUCT.PRODUCT_LINE, PRODUCT.PRODUCT_NAME,
PRODUCT.PRODUCT_SCALE)
.from(PRODUCTLINE).join(PRODUCT).onKey()
// lock only rows from PRODUCTLINE
.forUpdate().of(PRODUCTLINE.PRODUCT_LINE, PRODUCTLINE.CODE)
.fetch();
Since the PRODUCT table isn't locked, another statement can obtain locks on its rows:
ctx.select(PRODUCTLINE.PRODUCT_LINE, PRODUCTLINE.CODE,
PRODUCT.PRODUCT_LINE, PRODUCT.PRODUCT_NAME,
PRODUCT.PRODUCT_SCALE)
.from(PRODUCTLINE).join(PRODUCT).onKey()
// lock only rows from PRODUCT
.forUpdate().of(PRODUCT.PRODUCT_NAME)
.fetch();
If we remove .of(PRODUCT.PRODUCT_NAME), then this statement will attempt to lock rows from PRODUCTLINE as well, so it will have to wait for the lock to release on that table. You can check out this example by going to the ForUpdateOf application (available for Oracle).
If a transaction were to acquire a lock or fail immediately, then we should use SELECT … FOR UPDATE NOWAIT:
ctx.selectFrom(PRODUCT)
.forUpdate()
.noWait() // acquire the lock or fails immediately
.fetch();
However, if the transaction needs to wait for a fixed amount of time, then we must rely on the SELECT … FOR UPDATE WAIT n lock (Oracle), where n is the time to wait, given in seconds:
ctx.selectFrom(PRODUCT)
.forUpdate()
.wait(15)
.fetch();
You can check out an example in ForUpdateWait (available for Oracle). As you'll see, transaction A acquires a lock immediately, while transaction B waits for a certain amount of time before acquiring a lock on the same resource. If this time expires before transaction A releases the lock, then you'll get an error stating ORA-30006: resource busy; acquire with WAIT timeout expired.
Let's consider the following scenario: to provide a high-quality description of products, we have reviewers that analyze each product and write a proper description. Since this is a concurrent process on the PRODUCT table, the challenge consists of coordinating the reviewers so that they don't review the same product at the same time. To pick a product for review, the reviewer should skip the products that have already been reviewed (PRODUCT.PRODUCT_DESCRIPTION.eq("PENDING")) and the products that are currently in review. This is what we call a concurrent table-based queue (also known as job queues or batch queues).
This is a job for SKIP LOCKED. This SQL option is available in many databases (Oracle, MySQL 8, PostgreSQL 9.5, and so on) and it instructs the database to skip the locked rows and to lock the rows that have not been locked previously:
Result<ProductRecord> products = ctx.selectFrom(PRODUCT)
.where(PRODUCT.PRODUCT_DESCRIPTION.eq("PENDING")).orderBy(PRODUCT.PRODUCT_ID).limit(3)
.forUpdate()
.skipLocked()
.fetch();
If transaction A executes this statement, then it may lock the PENDING products with IDs 1, 2, and 3. While transaction A holds this lock, transaction B executes the same statement and will lock the PENDING products with IDs 4, 5, and 6. You can see this scenario in ForUpdateSkipLocked (available for MySQL).
A weaker form of SELECT … FOR UPDATE is the SELECT … FOR SHARE query. This ensures referential integrity when inserting child records for a parent. For instance, transaction A executes the following:
SaleRecord sr = ctx.selectFrom(SALE)
.where(SALE.SALE_ID.eq(2L))
.forShare()
.fetchSingle();
ctx.insertInto(TOKEN)
.set(TOKEN.SALE_ID, sr.getSaleId())
.set(TOKEN.AMOUNT, 1200.5)
.execute();
However, transaction B cannot UPDATE if transaction A holds the SHARE lock:
ctx.update(SALE)
.set(SALE.SALE_, SALE.SALE_.plus(1000))
.where(SALE.SALE_ID.eq(2L))
.execute();
Also, transaction C cannot DELETE:
ctx.delete(SALE)
.where(SALE.SALE_ID.eq(2L))
.execute();
You can check out this example in ForShare (available for PostgreSQL).
Starting with version 9.3, PostgreSQL supports two more locking clauses: SELECT … FOR NO KEY UPDATE and SELECT … FOR KEY SHARE. The former acts similarly to the FOR UPDATE locking clause but it does not block SELECT … FOR KEY SHARE. For instance, transaction A uses SELECT … FOR NO KEY UPDATE:
SaleRecord sr = ctx.selectFrom(SALE)
.where(SALE.SALE_ID.eq(2L))
.forNoKeyUpdate()
.fetchSingle();
ctx.insertInto(TOKEN)
.set(TOKEN.SALE_ID, sr.getSaleId())
.set(TOKEN.AMOUNT, 1200.5)
.execute();
Even if transaction A holds a lock on this resource, transaction B can acquire a SELECT … FOR KEY SHARE:
ctx.selectFrom(SALE)
.where(SALE.SALE_ID.eq(2L))
.forKeyShare()
.fetchSingle();
However, transaction C cannot acquire a SELECT … FOR SHARE on this resource if transaction A doesn't release its lock:
ctx.selectFrom(SALE)
.where(SALE.SALE_ID.eq(2L))
.forShare()
.fetchSingle();
You can check out this example in ForNoKeyUpdate (available for PostgreSQL).
Finally, SELECT … FOR KEY SHARE is the weakest lock. For instance, transaction A acquires the following type of lock:
SaleRecord sr = ctx.selectFrom(SALE)
.where(SALE.SALE_ID.eq(2L))
.forKeyShare()
.fetchSingle();
ctx.insertInto(TOKEN)
.set(TOKEN.SALE_ID, sr.getSaleId())
.set(TOKEN.AMOUNT, 1200.5)
.execute();
While transaction A holds this lock, transaction B can perform updates if it doesn't attempt to update SALE_ID:
ctx.update(SALE)
.set(SALE.SALE_, SALE.SALE_.plus(1000))
.where(SALE.SALE_ID.eq(2L))
.execute();
Transaction B will have to wait for transaction A to release the lock since it attempts to update SALE_ID:
ctx.update(SALE)
.set(SALE.SALE_ID, SALE.SALE_ID.plus(50))
.where(SALE.SALE_ID.eq(2L))
.execute();
Finally, transaction C cannot DELETE if transaction A holds the KEY SHARE lock:
ctx.delete(SALE)
.where(SALE.SALE_ID.eq(2L))
.execute();
You can see this example in ForNoKeyUpdate (available for PostgreSQL).
Deadlocks
Deadlocks are not specific to databases – they can occur in any scenario involving a concurrency environment (concurrency control) and they mainly define a situation when two processes cannot advance because they are waiting for each other to finish (release the lock). In the case of a database, a classical deadlock can be represented like so:

Figure 9.14 – A classical case of a deadlock
Here, we have two transactions that don't use explicit locks (the database itself relies on locks since it detects whether a transaction has attempted to modify data). Transaction A has acquired a lock on the SALE resource, and it doesn't release it until it manages to acquire another lock on the ORDER resource, which is currently locked by transaction B. At the same time, transaction B holds a lock on the ORDER resource, and it doesn't release it until it manages to acquire a lock on the SALE resource, which is currently locked by transaction A. You can see this scenario exemplified in Deadlock (available for MySQL).
However, using explicit locks doesn't mean that deadlocks cannot happen anymore. For instance, in DeadlockShare (available for MySQL), you can see explicit usage of SELECT … FOR SHARE that causes a deadlock. It is very important to understand what each type of lock does and what other locks are permitted (if any) while a certain lock is present. The following table covers the common locks:

Figure 9.15 – Lock acquisition permissions
Databases automatically scan transactions to discover deadlocks (or the so-called lock-wait cycles). When a deadlock occurs, the database attempts to fix it by aborting one of the transactions. This releases the lock and allows the other transaction to progress. In this context, always rely on NOWAIT or explicit short timeouts to avoid deadlocks. While the database can recover after a deadlock, it can only do so after the timeout (if any). So, a long timeout means keeping a database connection busy for a long time, and this is a performance penalty. Moreover, locking too much data may affect scalability.
Summary
I'm glad that you've come this far and that we've managed to cover the three main topics of this chapter – CRUD, transactions, and locking. At this point, you should be familiar with jOOQ UpdatableRecords and how they work in the context of CRUD operations. Among other things, we've learnt about cool stuff such as the must-know attach()/detach(), the handy original() and reset(), and the fancy store() and refresh() operations. After that, we learned how to handle transactions in the context of Spring Boot and jOOQ APIs before tackling optimistic and pessimistic locking in jOOQ.
In the next chapter, we'll learn how to batching, bulking and loading files into the database via jOOQ. We'll also do single-thread and multi-thread batching.