
Chapter 18. Media: images and sounds
|
This chapter covers |
|
|
So far, our focus on iPhone programming has mainly been on text. Sure, we’ve displayed the occasional UIImage, such as the mountain drawing in the last chapter, but we’ve only considered the simplest means for doing so.
The iPhone offers an experience that’s potentially much richer and more engaging. A camera, a microphone, a complete photos library, and a speaker are just some of the utilities built into the iPhone. In this chapter, we’re going to look at these features as part of a general exploration of media. We’ll provide deep coverage on images, some information on the iPhone’s media player, and a basic look at playing sounds on the iPhone.
More complex questions are beyond the scope of this chapter. We’re saving the topic of image editing for the next chapter, when we look at the iPhone’s graphic libraries. For more complex sound work, we’ll offer pointers to Apple’s extensive tutorials on the topic.
18.1. An introduction to images
We’ve already touched upon using images a few times, beginning in chapter 12 where we included an image in one of our earliest SDK examples. We’ve always created a UIImageView in Interface Builder, attached it to a filename, and not worried about the details.
We’re now ready to consider the details. We’ll look at some of the options you have available when you dive into Xcode, rather than depending upon Interface Builder’s higher-level abstractions.
When you look more closely, you’ll discover that using images is a two-step process. First, you load data into a UIImage, and then you make use of that UIImage via some other means. There are two major ways to make use of UIImages, as shown in figure 18.1.
Figure 18.1. Images can be shown in UIImageViews or in UIViews.

We’re going to explore the simpler methods of displaying images, using UIImageView, in this section, and in section 18.2 we’ll examine the more complex means available for drawing images onto the back layer of a UIView.
18.1.1. Loading a UIImage
The UIImage class offers seven different ways to create an instance of an image. The four factory methods are probably the easiest to use, and they’re the ones we’ve listed in table 18.1. There are also some equivalent init methods that you can use if you prefer.
Table 18.1. Factory methods for creating a UIImage
|
Factory method |
Summary |
|---|---|
|
imageNamed: |
Creates a UIImage based on a file in the main bundle |
|
imageWithCGImage: |
Creates a UIImage from a Quartz 2D object; this is the same as initWithCGImage: |
|
imageWithContentsOfFile: |
Creates a UIImage from a complete file path that you specify, as discussed in chapter 16; this is the same as initWithContentsOfFile: |
|
imageWithData: |
Creates a UIImage from NSData; this is the same as initWithData: |
The image data can be of several file types, including BMP, CUR, GIF, JPEG, PNG, and TIFF. In this book, we’ve used mostly JPEGs (because they’re small) and PNGs (because they look good and are accelerated on the iPhone hardware). You can also create a UIImage from a Quartz 2D object; this is the iPhone’s fundamental graphics package, which we’re going to talk about more in the next chapter. There’s one suggested restriction when you’re creating UIImages: the images shouldn’t be larger than 1024x1024.
Once you import an image into your program, you can display it. If you’re going to stay entirely within the simple methods of the UIKit, you’ll want to use the UIImageView class to display the image.
18.1.2. Drawing a UIImageView
We’ve already used the UIImageView in our programs when displaying pictures. We’re now ready to talk about the details of how it works.
There are two ways to initialize a UIImageView. First, you can use the initWith-Image: method, which allows you to pass a UIImage, as follows:
UIImage *myImage1 = [UIImage imageNamed:@"sproul1.jpg"];
UIImageView *myImageView =
   [[UIImageView alloc] initWithImage:myImage1];
[self.view addSubview:myImageView];
Alternatively, you can use a plain initWithFrame: method and modify the object’s properties by hand. Table 18.2 shows a few of the properties and methods that you’re most likely to use when doing more extensive work with a UIImageView.
Table 18.2. A few properties and methods of note for UIImageView
|
Method or property |
Type |
Summary |
|---|---|---|
|
animationDuration |
Property |
Specifies how often an animation cycles |
|
animationImages |
Property |
Identifies an NSArray of images to load into the UIImageView |
|
animationRepeatCount |
Property |
Specifies how many times to run an animation cycle |
|
image |
Property |
Identifies a single image to load into a UIImageView |
|
startAnimating |
Method |
Starts the animation |
|
stopAnimating |
Method |
Stops the animation |
To load a normal image, you could use the image property, but there’s usually little reason to use it rather than the initWithImage: method—unless you’re dynamically changing your image. If you want to create a set of images to animate, it’s useful to take advantage of the other UIImageView methods and properties.
You can load an array of images into a UIImageView, declare how fast and how often they should animate, and start and stop them as you see fit. A simple example of this is shown in listing 18.1.
Listing 18.1. UIImageView allows for animated images

Taking advantage of UIImageView’s animation capability is one of the main reasons that you might want to load images by hand rather than do it through Interface Builder.
18.1.3. Modifying an image in the UIKit
Now you’ve seen how to create images and load them into image views programmatically. Surely, the next thing to do is to start modifying them.
Unfortunately, you have only limited capability to do so while working with UIImageView. You can make some changes, based on simple manipulations of the view. For example, if you resize your UIImageView, it’ll automatically resize the picture it contains. Likewise, you can decide where to draw your UIImageView by setting its frame to something other than the whole screen. You can even layer multiple images by using multiple UIImageViews.
This all starts to get unwieldy pretty quickly, though, and you can’t do anything fancier, like transforming your images or modifying how they stack through blending or alpha transparency options. To do that sort of work (and to start stacking graphics, not just views) you need to learn about Core Graphics.
UIImage offers some simple ways to access Core Graphics functionality that doesn’t require going out to the Core Graphics framework (or learning about contexts or the other complexities that underlie its use). We’re going to talk about those briefly here, but, for the most part, Core Graphics will wait for the next chapter, which concentrates on the entire Quartz 2D graphics engine.
18.2. Drawing simple images with Core Graphics
Although it doesn’t give access to the entire Core Graphics library of transformations and other complexities, the UIImage class does include five simple methods that take advantage of the way Core Graphics works. They’re described in table 18.3.
Table 18.3. Instance methods for drawing a UIImage
|
Summary |
|
|---|---|
|
drawAsPatternInRect: |
Draws the image inside the rectangle, unscaled, but tiled as necessary |
|
drawAtPoint: |
Draws the complete unscaled image with the CGPoint as the top-left corner |
|
drawAtPoint:blendMode:alpha: |
A more complex form of drawAtPoint: |
|
drawInRect: |
Draws the complete image inside the CGRect, scaled appropriately |
|
drawInRect:blendMode:alpha: |
A more complex form of drawInRect: |
The trick is that these methods cannot be used as part of viewDidLoad: or whatever other method you usually use to load up your objects. That’s because they depend upon a graphical context to work. We’re going to talk about contexts more in the next chapter, but a graphical context is a destination that you’re drawing to, like a window, a PDF file, or a printer.
On the iPhone, UIViews automatically create a graphical context as part of their CALayer, which is a Core Animation layer associated with each UIView. You can access this layer by writing a drawRect: method for the UIView (or rather, for a new subclass that you’ve created). You’d usually have to capture a special context variable to do this type of work, but the UIView methods take care of this for you, to keep things simple.
Listing 18.2 shows how to collage together a few pictures using this method.
Listing 18.2. A UIView’s drawRect: allows you to use lower-level draw commands
- (void)drawRect:(CGRect)rect {

   UIImage *myImage1 = [UIImage imageNamed:@"sproul1.jpg"];
   UIImage *myImage2 = [UIImage imageNamed:@"sproul2.jpg"];
   UIImage *myImage3 = [UIImage imageNamed:@"sproul3.jpg"];

   [myImage1 drawAtPoint:CGPointMake(0,0) blendMode:kCGBlendModeNormal
      alpha:.5];
   [myImage2 drawInRect:CGRectMake(10, 10, 140, 210)];
   [myImage3 drawInRect:CGRectMake(170, 240, 140, 210)];
}
Note that the drawAtPoint: method gives you access to more complex possibilities, such as blending your pictures (using Photoshop-like options such as color dodge and hard light) and making them partially transparent. Here you’re using a normal blend, but only 50 percent transparency (hence the use of the drawAtPoint: method). The rest of the code is standard enough. The simplicity of using these singular draw commands rather than going to the effort of creating multiple UIImageView objects speaks for itself (and it’s presumably more efficient too).
There’s still a lot that we can’t do until we delve fully into the iPhone’s Core Graphics framework, but for now we’ve got some control, which should be sufficient for most of your common media needs. If you need more control, skip right ahead to the next chapter.
We’ve talked lots about images, and we’ve presumed so far that you’re loading them from your project’s bundle. But what if you want to let a user select photographs? That’s the topic of our next section.
18.3. Accessing photos
You can use the SDK to access pictures from an iPhone’s photo library or its camera roll. You can also allow a user to take new photos. This is all done with the UIImage-PickerController, another modal controller that manages a fairly complex graphical interface without much effort on your part. Figure 18.2 shows what it looks like.
Figure 18.2. The image picker is another preprogrammed controller for your use.

18.3.1. Using the image picker
The UIImagePickerController is loaded up by creating the object, setting a few variables, and presenting it as a modal view controller. By default, the image picker controller will allow users to access (and optionally edit) the pictures in their photo library:
UIImagePickerController *myImagePicker =
   [[UIImagePickerController alloc] init];
myImagePicker.delegate = self;
myImagePicker.allowsImageEditing = NO;
[self presentModalViewController:myImagePicker animated:YES];
Once you’ve created your image picker controller, you need to have its delegate respond to two methods: imagePickerController:didFinishPickingImage:edit-ingInfo: and imagePickerControllerDidCancel:. For the first method, you should dismiss the modal view controller and respond appropriately to the user’s picture selection, and for the second, you only need to dismiss the controller.
Overall, the image picker controller is easy to use because you’re mainly reacting to a picture that was selected. We’ve got a complete example of its use in the next section.
18.3.2. Taking photos
As we noted earlier, the UIImagePickerController has three possible sources, represented by these constants:
- UIImagePickerControllerSourceTypePhotoLibrary, a picture from the photo library
- UIImagePickerControllerSourceTypeSavedPhotosAlbum, a picture from the camera roll
- UIImagePickerControllerSourceTypeCamera, new picture taken by the camera
You should always make sure that the source is available before you launch an image picker controller, although this is most important for the camera. You can confirm that the source exists with the isSourceTypeAvailable: class method:
if ([UIImagePickerController
   isSourceTypeAvailable:UIImagePickerControllerSourceTypeCamera]) {
Once you’ve verified the existence of a source, you can tell the image picker to use it with the sourceType property. For example, to use the camera, do the following:
myImagePicker.sourceType = UIImagePickerControllerSourceTypeCamera;
Note that pictures taken in a program only go to that program. If you want them to go into the photo album, your program will have to save them there (as we’ll discuss momentarily).
In our experience, the camera is a bit of a resource hog. We had it grind to a halt a few times during testing. More than anything else, this means that you need to think about saving your program’s state when using the camera, because it could cause you to run out of memory.
We’ll have an example of using the camera in our example in section 18.4.
18.3.3. Saving to the photo album
You may wish to save a new photograph to the photo album, or you may wish to place a graphic created by your program there. In either case, you use the UIImageWriteToSavedPhotosAlbum function. It has four variables: the first lists the image, and the other three reference an optional asynchronous notification function to call when the save has been completed. Usually you’ll call the function like this:
UIImageWriteToSavedPhotosAlbum(yourImage,nil,nil,nil);
If you instead want to take advantage of the asynchronous notification, take a look at the UIKit function reference, which is where this function is hidden away, or look at our example in the next chapter.
You can use this function (and a bit of trickery) to save the CALayer of a UIView to your photo album, which, for example, will allow you to save those draw commands that you wrote straight to the CALayer earlier. This once more depends upon graphical contexts, which we’ll explain in the next chapter, but here’s how to do it:
UIGraphicsBeginImageContext(myView.bounds.size);
[myView.layer renderInContext:UIGraphicsGetCurrentContext()];
UIImage *collageImage = UIGraphicsGetImageFromCurrentImageContext();
UIGraphicsEndImageContext();
UIImageWriteToSavedPhotosAlbum(collageImage,nil,nil,nil);
In order for this to work correctly, you must link in the Quartz Core framework.
With all of the fundamentals of images now covered, we’re ready to put them together in our “big” example for this chapter, which is a program that collages together multiple pictures, first selecting them with a UIImagePickerController, then allowing them to be moved about with a UIImageView, and finally drawing them to a CALayer that can be saved.
18.4. Collage: an image example
The collage program depends on three objects. The collageViewController, as usual, does most of the work. It writes out to a collageView object, which exists mainly as a CALayer to be written upon. Finally, you’ll have a tempImageView object that allows the user to position an image after it’s been selected but before it’s permanently placed.
18.4.1. The collage view controller
The collage view controller is built on a few Interface Builder objects: the view controller itself; a toolbar called myTools, which will be filled over the course of the program; and the collageView UIView class, which exists as its own class file and is referred to in the program as self.view. You’ll also need to add the Quartz Core framework to your project as you’ll use that save-picture trick that we just discussed.
Listing 18.3 shows the complete view controller, which is the most extensive file in this program.
Listing 18.3. A view controller manages most of the collage’s tasks


Although long, this code is simple to follow in bite-sized chunks. It starts off with viewDidLoad:, which sets up the UIToolBar ![]() . We’ve long lauded Interface Builder, but we’ve also said that it might not be sufficient when you’re creating more dynamic
projects. That’s the case here. You can’t efficiently fill the UIToolBar in Interface Builder because you’re going to be changing it based on the program’s state. You’re placing buttons on the toolbar
that call three methods: choosePic:, takePic: (when a camera’s available), and savePic:.
. We’ve long lauded Interface Builder, but we’ve also said that it might not be sufficient when you’re creating more dynamic
projects. That’s the case here. You can’t efficiently fill the UIToolBar in Interface Builder because you’re going to be changing it based on the program’s state. You’re placing buttons on the toolbar
that call three methods: choosePic:, takePic: (when a camera’s available), and savePic:.
choosePic: ![]() and takePic:
and takePic: ![]() are similar methods. Each calls up the image picker controller, but the first one accesses the photo library and the second
one lets the user take a new picture. The wonder of these modal controllers is that you don’t have to do a thing between the
time when you create the picker to the point where your user either selects a picture or cancels.
are similar methods. Each calls up the image picker controller, but the first one accesses the photo library and the second
one lets the user take a new picture. The wonder of these modal controllers is that you don’t have to do a thing between the
time when you create the picker to the point where your user either selects a picture or cancels.
When the user selects a picture, imagePickerControl:didFinishPickingImage:editingInfo will be called ![]() , returning control to your program. Here you do four things:
, returning control to your program. Here you do four things:
- Dismiss the modal view controller.
- Look at the picture you’ve been handed and resize it to fill a quarter or less of the screen.
- Instantiate the image as a tempImageView object, which is a subclass of UIImageView.
- Change the toolbar so that there’s a Done button available, along with a slider.
At this point, the user will be able to do three things:
- Use UITouches to move the image view (which is covered in the tempImageView class, because that’s where the touches go, as we saw in chapter 14).
- Use the slider to change the size of the picture.
- Click Done to accept the image size and location.
The end results of what can be produced are shown in figure 18.3.
Figure 18.3. The collager in use displays many photos simultaneously.

Note that if the user instead canceled the image picker, your imagePickerControllerDidCancel: method would correctly shut down the modal controller ![]() .
.
The UISlider was hooked up to the rescalePic: method ![]() . It redraws the frame of the UIImageView, which automatically resizes the picture inside. Meanwhile, the Done button activates the finishPic: method
. It redraws the frame of the UIImageView, which automatically resizes the picture inside. Meanwhile, the Done button activates the finishPic: method ![]() . This sends a special addPic:at: message to the collageView, which is where the CALayer drawing is done, and which we’ll return to momentarily. finishPic: also dismisses the UISlider and the tempImageView and resets the toolbar to its original setup.
. This sends a special addPic:at: message to the collageView, which is where the CALayer drawing is done, and which we’ll return to momentarily. finishPic: also dismisses the UISlider and the tempImageView and resets the toolbar to its original setup.
That original toolbar had one more button that we haven’t covered yet: Save. It activates the savePic: method ![]() , which saves a CALayer to the photo library. Note that this method temporarily hides toolbar in the process. Because the toolbar is a subview of
the UIView, it’d get included in the picture if you didn’t do this.
, which saves a CALayer to the photo library. Note that this method temporarily hides toolbar in the process. Because the toolbar is a subview of
the UIView, it’d get included in the picture if you didn’t do this.
The last method, scaleImage: ![]() , is the utility that sets each image to fill about a quarter of the screen.
, is the utility that sets each image to fill about a quarter of the screen.
This code has two dangling parts: the methods in the tempImageView, which allow a user to move the UIImageView, and the methods in the collageView, which later draw the image into a CALayer.
18.4.2. The collage temporary image view
The tempImageView class only has one purpose: to intercept UITouches that indicate that the user wants to move the new image to a different part of the collage. This simple code is shown in listing 18.4.
Listing 18.4. A temporary image can be moved about by touches
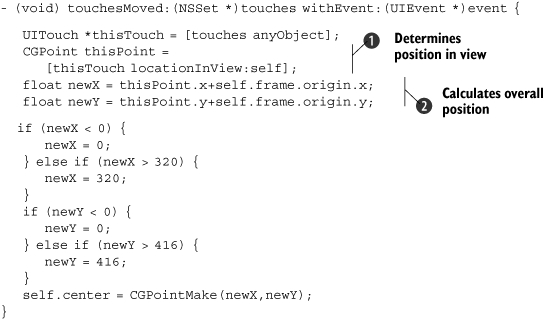
This is similar to the touch code that you wrote in chapter 14, and it isn’t worthy of a lot of additional commentary. Recall that locationInView: ![]() gives a CGPoint internal to the view’s coordinate system and needs to be converted
gives a CGPoint internal to the view’s coordinate system and needs to be converted ![]() into the global coordinate system of the application.
into the global coordinate system of the application.
In testing, we discovered that when run on an iPhone (but not in the iPhone Simulator) the result could sometimes be out of bounds, so you need to double-check your coordinates before you move the temporary image view.
18.4.3. The collage view
Last up, we have the collageView itself, which is the background UIView that needs to respond to the addPic:at: message and draw onto the CALayer with drawRect:. The code to do this is shown in listing 18.5.
Listing 18.5. A background view manages the low-level drawing once an image is set
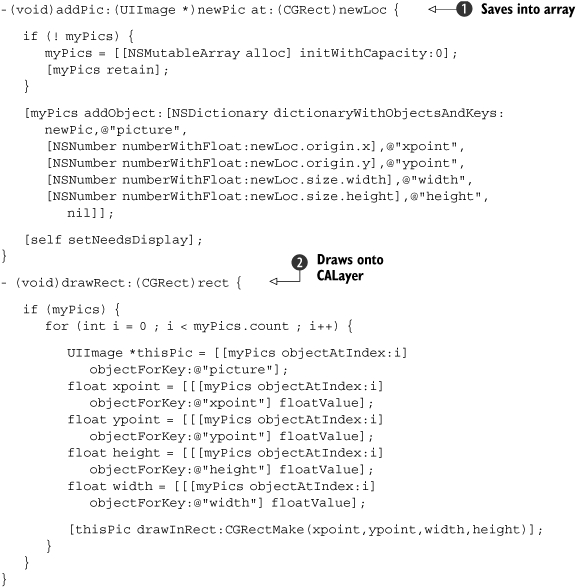
This code is broken into two parts. The addPic:at: method ![]() saves its information into an instance variable, adding a myPics dictionary to the NSMutableArray. Note that you have to convert values into NSNumbers so that you can place them in the dictionary. This method then calls setNeedsDisplay on the view. You should never call drawRect: directly. Instead, when you want it to be executed, call the setNeedsDisplay method, and everything else will be done for you.
saves its information into an instance variable, adding a myPics dictionary to the NSMutableArray. Note that you have to convert values into NSNumbers so that you can place them in the dictionary. This method then calls setNeedsDisplay on the view. You should never call drawRect: directly. Instead, when you want it to be executed, call the setNeedsDisplay method, and everything else will be done for you.
drawRect: gets called shortly afterward ![]() . It reads through the whole NSMutableArray, breaks it apart, and draws each image onto the CALayer using the techniques we learned earlier.
. It reads through the whole NSMutableArray, breaks it apart, and draws each image onto the CALayer using the techniques we learned earlier.
We haven’t shown the few header files and the unchanged app delegate, but this is everything important needed to write a complete collage program.
18.4.4. Expanding on this example
This was one of our longer examples, but it could still bear some expansion to turn it into a fully featured application.
First, it’s a little unfriendly with memory. It’d probably be better to maintain references to filenames, rather than keeping the UIImages around. In addition, the NSArray that the CALayer is drawn from should be saved out to a file, so that it wouldn’t get lost if memory is low. But the program as it exists should work fine.
The program could be made more usable. An option to crop the pictures would be nice, but it would probably require access to Core Graphics functions. An option to move pictures around after they’ve been locked in would be relatively simple: you could test for touches in the collageView, and read backward through the NSArray to find which object the user was touching. Reinstantiating it as a UIImageView would then be simple.
In any case, you’ve seen how all of these pictorial fundamentals work together, so we’re now ready to move on to the next major types of media: audio and video.
18.5. Using the Media Player framework
Audio and video both allow for considerably more complexity than images. Fortunately, there’s a high-level framework that gives you access to both of them: the Media Player. If you don’t need the audio or video to be tightly integrated into the rest of your application, it’s a pretty good choice—it often works well for video, but it’s a somewhat more questionable choice for audio.
The Media Player framework includes two classes: MPMoviePlayerController and MPVolumeView. They manage a full-page audio or video player that doesn’t give you a lot of control over the specifics of how it works, but it does give you easy access to audio or video files.
To use either of these media player classes, you should add the Media Player framework and the MediaPlayer/MediaPlayer.h header file to your project.
18.5.1. The media player class
In order to use the media player itself, you need to init an MPMoviePlayerController object with the URL string for the file that you’ll be calling up. This may be any .mp3, .mp4, .mov, or .3gp file or anything else supported by the iPhone. You can either start it playing immediately (which will cause the iPhone’s wheels to spin for a bit, while it gets ready) or you can wait until you’ve received a notification that the file has loaded.
There are three notifications that you may wish to pay attention to when using the media player, as described in table 18.4.
Table 18.4. Notifications that tell you what the media player is doing
|
Notification |
Summary |
|---|---|
|
MPMoviePlayerContentPreloadDidFinishNotification |
File has loaded |
|
MPMoviePlayerPlaybackDidFinishNotification |
Playback was completed |
|
MPMoviePlayerScalingModeDidChangeNotification |
Scaling mode for player changed |
Invoking the Media Player
Listing 18.6 displays a simple invocation of the player. This program’s construction begins in Interface Builder with a UITextField (for the input of a URL), a UILabel (for reporting status and errors), and a UIActivityIndicatorView (to show activity during a load). It depends on the notifications to keep track of how the media player is doing.
Listing 18.6. A simple invocation of the media player

Your project starts off simply enough by setting up your UITextField. This involves setting the Return key ![]() and writing its main delegate method, textFieldShould-Return:
and writing its main delegate method, textFieldShould-Return: ![]() , as you’ve done several times before.
, as you’ve done several times before.
It’s the text field that really kicks things off. When text data is entered, the choose-File: method is called ![]() , which is what loads up the player. You assume you’re passed a URL (which we’ve used because of its simplicity, though we’ll
talk about local files momentarily), turn it into an NSURL, and then create the player
, which is what loads up the player. You assume you’re passed a URL (which we’ve used because of its simplicity, though we’ll
talk about local files momentarily), turn it into an NSURL, and then create the player ![]() . There are a small number of properties that you can then set to specify how the player works
. There are a small number of properties that you can then set to specify how the player works ![]() , all of which are listed in the class reference. You link into the player’s notifications using the procedure you’ve seen
before
, all of which are listed in the class reference. You link into the player’s notifications using the procedure you’ve seen
before ![]() . It’s always good to let the user know that you’re processing things, so the last few lines update some status info and start
an activity indicator going
. It’s always good to let the user know that you’re processing things, so the last few lines update some status info and start
an activity indicator going ![]() .
.
Once the file has been loaded, your movieDidLoad: method is notified ![]() . It cleans up your updating info and then starts the player playing. Like the modal view controllers we’ve seen in previous
chapters, the media player takes over at this point, and you don’t have to worry about anything until its additional notifications
come back. In this case, when it’s finished
. It cleans up your updating info and then starts the player playing. Like the modal view controllers we’ve seen in previous
chapters, the media player takes over at this point, and you don’t have to worry about anything until its additional notifications
come back. In this case, when it’s finished ![]() , you do some final cleanup.
, you do some final cleanup.
Loading from a File
If you prefer to load from a file rather than from the internet, you can include media files as part of your bundle. You create a path to those local files using the methods that we discussed in chapter 16, and you create your NSURL with the fileURLWith-Path: factory method:
NSString *paths = [[NSBundle mainBundle] resourcePath];
NSString *mediaFile = [paths
   stringByAppendingPathComponent:@"yourfile.mp4"];
NSURL *mediaURL = [NSURL fileURLWithPath:mediaFile isDirectory:NO];
At the time of this writing, loading files is considerably more reliable than loading from the internet. Music files occasionally break for no reason when loaded from the internet, and streaming video doesn’t appear to work at all. We expect these problems to be corrected soon, possibly by the time this book is published.
There’s only one other bit of functionality that the media player supports: you can allow users to set the volume outside of the player itself.
18.5.2. The volume view
You can allow user adjustment of the volume by calling up the MPVolumeView item, which is done like this:
myVolume = [[MPVolumeView alloc]
   initWithFrame:CGRectMake(200, 100, 100, 200)];
[myVolume sizeToFit];
[self.view addSubview:myVolume];
You don’t need to do any backend work; when the user changes volume control, the system volume will change immediately. If you prefer an alternative method, there are three general functions that can be used to call up a volume alert. They’re listed in table 18.5.
Table 18.5. Setting volume with alerts
|
Function |
Summary |
|---|---|
|
MPVolumeSettingsAlertShow |
Shows a volume alert |
|
MPVolumeSettingsAlertHide |
Hides a volume alert |
|
MPVolumeSettingsAlertIsVisible |
Returns a Boolean to show the status of the volume alert |
Note that these are functions, not methods. They’re not tied to any class, but rather are generally available once you’ve loaded the Media Player framework.
Warning
At the time of this writing, the volume controls do not work in the iPhone Simulator.
18.5.3. Better integrating the media player
The biggest problem with the media player is that it calls up a stand-alone screen. As a result, it’s difficult to use it to integrate music or video directly into your program.
For music, the problem is relatively unsolvable at this time. As shown in figure 18.4, when music plays, the screen is taken over by a large QuickTime logo. We hope that future versions of the SDK will give you the option to define a background for when sounds are playing (or better, allow you to remain within your normal views, thus truly integrating the media player’s audio capability).
Figure 18.4. The media player doesn’t integrate music well.

For playing videos, the biggest problem is the controls, because you don’t want users to manipulate the video if you’re using it as a cut scene. You can resolve this by setting the MPMoviePlayerController’s movieControlMode property to MPMovieControlModeVolumeOnly (which only allows use of the volume control) or MPMovieControlModeHidden (which doesn’t allow users to access any controls).
Given this ability to hide the movie controls, the media player should be all you ever require to display video, but it continues to come up short for audio use, forcing you to seek alternatives. Unfortunately, there are no high-level frameworks for playing audio, so you’ll have to do quite a bit of work to get things going. A lot of these specifics lie beyond the scope of this book because of their complexity, but we’re going to get you started with the simplest methods for dealing with audio outside of the media player.
18.6. Playing sounds manually
It’s not entirely correct to say that there’s no high-level framework for iPhone audio. There is, and it’s called Celestial. Unfortunately, Celestial is one of many “private frameworks” on the iPhone, which means that it’s being used internally at Apple but hasn’t been made available to external developers. We’ve opted in this book not to talk about the “jailbreak” methods that you can use to access private frameworks, as they’re likely to change at any time, and using them could make your program exceedingly vulnerable to OS upgrades. Instead, we need to fall back to the frameworks officially provided by Apple.
And there are a lot of them! The iPhone’s Core Audio system contains over a half-dozen frameworks that give you access to audio files at a low level. These include Audio Queue Services, Audio File Stream Services, Audio File Services, OpenAL, Audio Session Services, and more. For an in-depth look at all this, refer to the “Audio & Video” section of the Apple reference library, beginning with “Getting Started with Audio & Video” and “Core Audio Overview.”
These frameworks are all old enough that they haven’t been pulled out of Core Foundation, so you’re going to have to fall back on the lessons that you’ve learned from your occasional forays into those older programming styles.
We’re only going to graze the surface of audio. We’ll provide some examples of how to play simple sounds and vibrate the iPhone, but for the more complex Audio Queue Services, we’re going to outline the process and point you to Apple’s extensive tutorials on the subject.
18.6.1. Playing simple sounds
System Sound Services is a C interface that lets you play simple sounds and vibrate your iPhone. It’s part of the Audio Toolbox framework and is declared in AudioToolbox/AudioServices.h.
This interface can only be used to play short audio files of 30 seconds or less in .aif, .caf, or .wav formats. To use System Sound Services, you create a system sound ID from a file, optionally create a callback for when the sound is done playing, and launch it. Table 18.6 shows the major functions.
Table 18.6. Major functions of the System Sound Services
|
Function |
Arguments |
Summary |
|---|---|---|
|
AudioServicesCreateSystemSoundID |
URL, &SSID |
Creates a sound from a URL |
|
AudioServicesDisposeSystemSoundID |
SSID |
Removes a sound when done |
|
AudioServicesAddSystemSoundCompletion |
SSID, run loop, run loop mode, routine, data |
Registers a callback for sound play completion |
|
AudioServicesRemoveSystemSoundCompletion |
SSID |
Removes a callback when done |
|
AudioServicesPlaySystemSound |
SSID |
Plays a sound |
There are some additional functions that deal with system sound properties; they can be found in the System Sound Services reference. Listing 18.7 shows how to use the most important functions.
Listing 18.7. The Audio Toolbox supports the playing of short audio
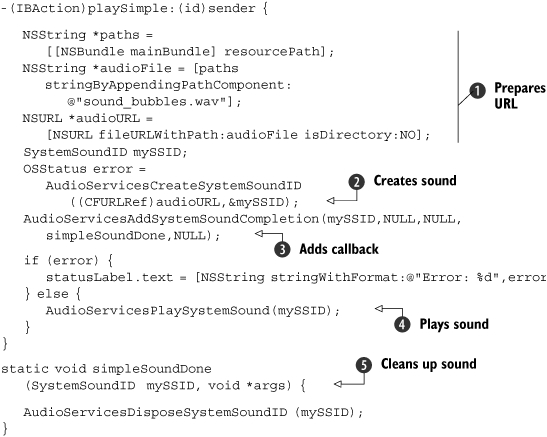
As with the media player, you start out the System Sound Services interface by building a path to your file (using the lessons
learned in chapter 16) and then turning that into a URL ![]() . Once you’ve done that, you can create your system sound
. Once you’ve done that, you can create your system sound ![]() , which requires bridging your NSURL * to a CFURLRef and handing off a pointer to a system sound ID.
, which requires bridging your NSURL * to a CFURLRef and handing off a pointer to a system sound ID.
Adding a callback function is optional ![]() , but if you want something to happen when your sound is done playing, this is how you do it.
, but if you want something to happen when your sound is done playing, this is how you do it.
Once you have your system sound ID, playing it is simple ![]() , but you should check that the system sound ID was created correctly, as we do here.
, but you should check that the system sound ID was created correctly, as we do here.
As usual, you should clean up your memory when you’re done. That’s what the callback function in this example does ![]() .
.
18.6.2. Vibrating the iPhone
There’s another cool little feature that’s implicit in the System Sound Services interface: you can use it to vibrate the user’s iPhone. This is done by handing off a predefined system sound ID, as shown in listing 18.8.
Listing 18.8. Vibrating the iPhone requires one line of code
-(IBAction)playVibrate:(id)sender {

   AudioServicesPlaySystemSound(kSystemSoundID_Vibrate);
}
For an audio system that’s at times difficult to use, this is simplicity itself. Unfortunately, we’ve now covered all of the easy work with audio.
Before we close out, we’re going to outline what it takes to play an audio file that doesn’t meet the requirements of the System Sound Services interface—either because it’s too long or it’s of a different file type.
18.6.3. Playing complex sounds
If you need to do something fancier than playing a short 30-second sound, you’ll need to fall back on Audio Queue Services. This will allow you to play longer sounds, play sounds of other types than the narrow set of audio types supported by System Sound Services, and even record sounds. Apple provides two excellent sets of tutorial code on Audio Queue Services, which you can copy for your own use, so we haven’t duplicated them here. The “Apple Queue Services Programming Guide” provides a thorough example of how to write a player in a procedural C-oriented environment. The “SpeakHere” sample code shows how to perform a similar task using primarily object-oriented Objective-C code. The player appears in the AudioPlayer.m file.
In order to clarify Apple’s sample code, table 18.7 outlines the standard steps that you’ll need to follow in order to play complex sounds. It depends upon a few core ideas:
- An audio file ID is similar to the system sound ID that you encountered in the previous section; it points to the audio contents of a file.
- An audio queue contains a number of buffers—usually at least three. These buffers are filled one at a time with audio content, usually from a file, and then are dispatched to a player, which is typically a speaker.
- Audio queue buffers are the individual units of sound being passed through the queue. Each one has a user-set size. You’ll enqueue the buffers as you fill them with data; they’ll later be played by the queue.
- An audio queue callback is a special function that gets called to deal with an audio queue. The callback occurs when the data is being pulled into the audio queue. It needs to fill up buffers, and then enqueue them.
- A custom audio structure is a user-created structure that contains all of the data the callback needs to know about the state of the audio file and the state of the queue. It’s handed off to the callback as part of the function call.
Table 18.7. Steps for playing from an audio queue
|
Step |
Description |
|---|---|
|
1. Link in frameworks. |
Link in the Audio Toolbox framework and the AudioToolbox/AudioQueue.h file. |
|
2. Prepare an audio file. |
Create a URL reference to your audio file. Call AudioFileCreateWithURL to return an AudioID. |
|
3. Create an audio queue. |
Use AudioQueueNewOutput to prepare your queue. Add three or more buffers to your queue. Each time, run AudioQueueAllocateBuffer to set its size and then your callback function. |
|
Define the structure that you’ll use to pass all the queue and audio data to your callback function. |
|
|
5. Write callback function. |
Write your callback function to read data from your audio file into a buffer, and then enqueue the buffer. Playback will happen automatically once the data is in the queue. |
|
6. Start playback. |
Begin playback with AudioQueueStart. |
|
7. End playback. |
Once the audio file has been emptied, the callback function should end the playback. This is done with AudioFileClose and AudioQueueStop. |
Figure 18.5 depicts most of these concepts graphically.
Figure 18.5. A pipeline moves audio from an input device to its output for playback.

With those definitions in hand, you should be able to parse Apple’s code. Table 18.7 outlines the necessary steps.
A lot of the rigmarole of the audio queues comes from its setup, which consists of steps 2–5 in table 18.7. Once you have those in place, you should have a good, repeatable methodology for playing audio with audio queues. As we said, Apple offers some complete examples of this code, which we could only duplicate here.
Once you’ve got an audio queue in place, you can use a variety of functions to operate it, as outlined in table 18.8.
Table 18.8. The main functions used to control an audio queue
|
Function |
Summary |
|---|---|
|
AudioQueuePrime |
Prepares a queue for immediate use (optional) |
|
AudioQueueStart |
Begins playback (or recording) |
|
AudioQueuePause |
Pauses playback (or recording); restart it with AudioQueueStart |
|
AudioQueueFlush |
Ensures all buffers are emptied after the last one is enqueued (optional) |
|
AudioQueueStop |
Calls AudioQueueReset and then ends playback (or recording) |
|
AudioQueueReset |
Removes buffers from queue and resets to default state |
Though we’ve concentrated on playback here, recording is much the same. A microphone will place data into an audio queue. All of the insertion of data into buffers is automatically dealt with. You then need to write a callback function for the backend that takes data out of a buffer, writes it to your file (or other output device), and adds the buffer back to the end of the queue, where it will eventually be filled with data again.
18.6.4. Other audio frameworks
Our focus on the System Sound Services framework and our quick summary of the Audio Queue Services framework represent just the tip of the iceberg for iPhone sounds. If you’re serious about sounds, you’ll also want to look at OpenAL, an API that allows for sound positioning.
Much more info on codecs, plug-ins, audio graphs, and the like can be found in the “Core Audio Overview” that we’ve already mentioned.
18.7. Summary
Dealing with media on the iPhone is a huge topic that probably could fill a book on its own. Fortunately, there are relatively easy (if limited) ways to utilize each major sort of media. For images, you can use UIImageView, for videos you can use MPMoviePlayer, and for sounds you can use System Sound Services.
If you want to go further, you’ll have to dig into deeper levels of the iPhone OS. There isn’t much else you can do with video, but for audio you can use more complex packages like Audio Queue Services or OpenAL. For images, you can do more complex work with Quartz 2D, which is the topic of our next chapter.