
Chapter 19. Graphics: Quartz, Core Animation, and OpenGL
|
This chapter covers |
|
|
As we saw in the last chapter, creating and displaying images often isn’t enough. In games and other more complex programs, you’ll also want to manipulate those images in various ways at runtime. The iPhone OS offers two major ways to do this.
The first is through Quartz 2D, a two-dimensional drawing library that allows for complex line drawings, much as Canvas did on the web. It’s also the heart of the Core Graphics frameworks. We already touched upon Quartz in the previous chapter, when we drew images straight to the CALayer of a UIView; it’ll be the focus of the majority of this chapter. Quartz also supports Core Animation functions, which we’ll address somewhat more briefly.
The second major way to manipulate images is through the OpenGL ES API. This cross-platform API, originally developed by Silicon Graphics, could be the topic of its own book, so we’ll just show you how to get started with it.
But most of this chapter is going to be about Quartz, a topic that we’re going to dive into immediately.
19.1. An introduction to Quartz 2D
Quartz 2D is a two-dimensional drawing library that’s tightly integrated into the iPhone OS. It works well with all the relevant iPhone frameworks, including Core Animation, OpenGL ES, and the UIKit.
Fundamentally, Quartz’s drawings depend upon three core ideas: context, paths, and state, each of which will be the topic of a future section.
- Context is a description of where the graphics are being written to, as defined by a CGContextRef. You’ll usually be writing to a UIView or to a bitmap.
- Layers are a little less important for this overview, but they’re where Quartz drawing occurs. They can be stacked one on top of another, creating a complex result. When working with the iPhone, you’ll often only have a single layer associated with each of your UIKit objects.
- Paths are what you’ll typically be drawing within Quartz. These are collections of lines and arcs that are drawn in advance, and then are “painted” to the screen by either stroking or filling the path in question (or, possibly, by clipping it).
- State saves the values of transformations, clipping paths, fill and stroke settings, alpha values, other blending modes, text characteristics, and more. The current state can be stored with CGContextSaveGState and restored with CGContextRestoreGState, allowing for easy switching among complex drawing setups.
Quartz is built on the older Core Foundation framework that we’ve met a few times over the course of this part of the book. This means that you’ll need to use older styles of variables to integrate with Cocoa Touch using toll-free bridging, and to respect Core Foundation’s memory-management techniques. Take a look at the “Using Core Foundation” sidebar in chapter 16 if you need a refresher on these topics.
If you need more information on any Quartz topic, your should reference the “Quartz 2D Programming Guide” at Apple’s developer website. It’s a fine introduction to Quartz, though not as focused on the iPhone as you’d probably like, a deficiency that we’ll correct in this chapter.
Using Quartz requires little special setup. It can be easily integrated into any template and any project that you want. Just be sure to include the Core Graphics framework and the CoreGraphics/CoreGraphics.h include file before you get started.
With that said, we’re ready to dive into our first major Quartz topic: the context.
19.2. The Quartz context
A graphical context is a description of where Quartz will be writing to. This could include a printer, a PDF file, a window, or a bitmap image. On the iPhone, you’re only likely to make use of two of these possibilities.
Most frequently, you’ll work with the graphical context that is automatically associated with the CALayer (Core Animation layer) of each UIView. That means that you can use Quartz to draw to most UIKit objects. To do so, you override the drawRect: method and, inside the object in question, you use UIGraphicsGetCurrentContext to retrieve the current context.
You might alternatively create a bitmap context in order to create or modify an image that you’ll use elsewhere in your program. You do this by using the UIGraphicsBeginImageContext and UIGraphicsEndImageContext functions.
Warning: inverse coordinate system ahead
By now, you should be familiar with the standard iPhone coordinate system. It has the origin at the top left of the screen, with the main axes running to the right and down. Quartz’s default coordinate system is inverted, with the origin at the bottom left of the screen and the main axes running right and up.
This won’t usually be a problem. The Cocoa Touch methods that you’ll be using to create and write to graphical contexts will usually transform Quartz’s default coordinates so that they look like iPhone coordinates to you.
Once in a while, though, you’ll run into a situation where you’ll draw to a UI-derived context and find your content flipped upside down (and in the wrong position). This is a result of accessing Quartz in a way that hasn’t been transformed.
As of this writing, we’re aware of two situations where you’ll have to correct Quartz’s coordinate system by yourself, even when using one of the UI-derived contexts: if you import images using the native Quartz functions (as opposed to the UIImage methods that we saw in the last chapter), and if you write text. We’ll talk about each of these when we get to them.
Personally, we consider these coordinate inversions bugs, and it’s our expectation that they’ll eventually be corrected, perhaps even by the time this book is published.
If you create a context without using Cocoa Touch, expect everything to be inverted. This is something that we don’t expect to change in the future.
There are a variety of Core Graphics functions that can be used to access other sorts of contexts—types that you won’t usually use on an iPhone. The functions required to capture a PDF context are one such example. These have two deficits that you should be aware of: they depend more heavily on the Core Foundation frameworks and they use Quartz’s inverted coordinate system.
One thing to note about graphical contexts is that they’re created in a stack: when you create a new context, it’s pushed on top of a stack, and when you’re done with it, it’s popped off. This means that if you create a new bitmap context, it’ll be placed on top of any existing context, such as the one associated with your UIView, and will stay there until you’re done with the bitmap.
Table 19.1 lists these context-related functions, including both the standard UI context functions and the older Core Graphics function that you’re most likely to use—for PDFs.
Table 19.1. Methods for graphical context creation
|
Function |
Arguments |
Summary |
|---|---|---|
|
UIGraphicsGetCurrentContext |
(none) |
Returns current context, which is usually the context of the current UIKit object, but could also be a context that you created by hand |
|
UIGraphicsBeginImageContext |
CGSize |
Creates a bitmap context |
|
UIGraphicsEndImageContext |
(none) |
Pops a bitmap context off the stack |
|
UIGraphicsGetImageFromCurrentImageContext |
(none) |
Returns a bitmap as a UIImage *; used with a bitmap context only |
|
CGPDFContextCreate |
CGDataConsumerRef, CGRect, CGDictionaryRef |
Creates a PDF context |
We won’t be covering PDFs in this book, but we’re going to look at how to use each of the UIKit context styles, starting with the UIView.
19.2.1. Drawing to a UIView
In chapter 18, we offered an introductory example of how to write to a UIView graphical context using the drawRect: method. That example was somewhat simplified because the UIKit draw image commands mostly hide the idea of graphical contexts from you. They automatically write to the current context, which inside drawRect: is the context related to the UIView. For most other functions, you’ll need to do a bit more work: retrieving the graphical context and passing that context along to any drawing commands that you use.
Listing 19.1 shows how to draw a simple abstract face using this technique.
Listing 19.1. A few arcs drawn inside an existing context
- (void)drawRect:(CGRect)rect {

   CGContextRef ctx = UIGraphicsGetCurrentContext();

   CGContextBeginPath(ctx);
   CGContextAddArc(ctx,110,50,30,0,2*M_PI,1);
   CGContextAddArc(ctx,210,50,30,0,2*M_PI,1);
   CGContextAddArc(ctx,160,110,15,0,2*M_PI,1);
   CGContextAddArc(ctx,160,210,25,0,2*M_PI,1);
   CGContextFillPath(ctx);
}
This example is fairly simple. You create a UIView subclass, and then you go to its drawRect: method. Once there, you capture the current context and use it to do whatever Quartz 2D drawing you desire.
The function calls won’t be familiar to you, but they’re calls to draw a bunch of circles; we’ll discuss them in the next section. As shown in figure 19.1, the art ends up looking oddly abstract, which shows how Quartz draws continuous paths. You see lines connecting one circle to the next, as if the pencil never comes off the page, a topic we’ll talk about more in the next section.
Figure 19.1. The iPhone does abstract art.

Leaving aside those specifics for a moment, this shows one of the two ways that you can use all of the Quartz functions described in this chapter: by painting a UIView. And remember that a UIView can be almost any UIKit object, due to inheritance.
Drawing to a UIView allows for on-screen picture creation, but you can also draw pictures without displaying them immediately. That’s done with a bitmap.
19.2.2. Drawing to a bitmap
The main reason to create a bitmap rather than draw directly to a view is to use your graphic several times in your program—perhaps all at the same time. For example, Apple offers a sample program that draws the periodic table by creating a standard bitmap that’s used for all the elements, and then repeating it. You might similarly create billiard balls using bitmaps if you were programming a billiards game. In chapter 17, we could have used Quartz to create the red dots that we used in our gravity and altitude programs as bitmaps, so that we didn’t have to separately create them outside of the program.
The process of creating a bitmap and turning it into a UIImage is relatively simple. You create a graphical context, draw in that context, save the context to an image, and close the context. Listing 19.2 shows how to create a red dot image like the one you used in earlier programs.
Listing 19.2. A new context created to hold an image

Again, this example is simple. You could do this work anywhere you wanted, but we’ve elected to use the viewDidLoad setup method. To start the process, you create an image context, which is to say a bitmap ![]() , and you immediately retrieve that context’s variable for use
, and you immediately retrieve that context’s variable for use ![]() . Following that, you do whatever drawing work you want. When you’re done, you turn the bitmap into a UIImage
. Following that, you do whatever drawing work you want. When you’re done, you turn the bitmap into a UIImage ![]() and close out your context
and close out your context ![]() . You can then manipulate the image as you see fit; here it was turned into a UIImageView.
. You can then manipulate the image as you see fit; here it was turned into a UIImageView.
You now know two ways to use contexts in the Quartz environment. With that in hand, you’re ready to dive straight into what Quartz can do, starting with paths, which will be the foundation of most Quartz work.
19.3. Drawing paths
The path is what Quartz will be drawing. If you’re familiar with Canvas, this will look familiar, because both libraries use the same drawing paradigm. A path is a set of lines, arcs, and curves that are all placed continuously within a graphical context. You only “paint” a path when it’s complete, at which point you can choose to either fill it or stroke it.
Many of the functions required to define and draw paths are listed in table 19.2.
Table 19.2. A variety of simple drawing functions that allow for vector-based graphics
|
Function |
Arguments |
Summary |
|---|---|---|
|
CGContextBeginPath |
context |
Creates a new path. |
|
CGContextAddArc |
context, x, y, radius, startangle, endangle, clockwise |
Creates an arc, with the angles defined in radians. A line will be drawn to the start point if there are previous entries in the path, and from the end point if there are additional entries. The more complex functions CGContextAddArcToPoint, CGContextAddCurveTo-Point, and CGContextAddQuadCurveTo-Point allow for the creation of tangential arcs, Bezier curves, and quadratic Bezier curves. |
|
CGContextAddEllipseInRect |
context, CGRect |
Creates an ellipse that fits inside the rectangle. |
|
context, x, y |
Creates a line from the current point to the designated end point. The more complex CGContextAddLines function allows the addition of an array of lines. |
|
|
CGContextAddRect |
context, CGRect |
Creates a rectangle. The more complex CGContextAddRects function adds a series of rectangles. |
|
CGContextMoveToPoint |
context, x, y |
Moves to the point without drawing. |
CGContextMoveToPoint is the one function that deserves some additional discussion. As you’ll recall, we said that a path was a continuous series of lines and arcs that you draw without picking the pen up off the paper. But there is a way to pick the pen up, and that’s with the CGContextMoveToPoint function, which is vital when you want to draw unconnected objects as part of a single path.
For example, to avoid drawing a line between the first two circles in listing 19.1, you’d use the following code:
CGContextAddArc(ctx,110,50,30,0,2*M_PI,1);
CGContextMoveToPoint(ctx, 240, 50);
CGContextAddArc(ctx,210,50,30,0,2*M_PI,1);
After drawing the first circle, you move your virtual pencil to the point where you’ll begin drawing the arc of the second circle, which is 240, 50.
The rest of the functions are largely self-explanatory. We already saw the arc commands in some of our earlier examples, and the others work in similar ways. For more information on the more complex functions, take a look at the CGContext class reference. If you’re unfamiliar with Bezier and quadratic curves, take a look at our explanation of the nearly identical Canvas functions in chapter 6 (section 6.2.2; particularly figure 6.4, which depicts what both sorts of curves look like).
We’re going to move on from these simple drawing commands to the question of what you do once you have a path. There are several options, beginning with the simple possibility of closing it and drawing it.
19.3.1. Finishing a path
As we’ve already noted, the path functions define the points and lines that make up a drawing. When you’ve got that in hand, you have to do something with it. There are three main choices: stroke the path, fill the path, or turn it into a clipping path. These functions are all listed in table 19.3.
Table 19.3. Functions for finishing a path
|
Function |
Arguments |
Summary |
|---|---|---|
|
CGContextClosePath |
context |
Draws a line from the end point of your path to the start point, and then closes it. This is an optional final command that’s usually used when you’re stroking a path. |
|
CGContextFillPath |
context |
Closes your path automatically, and paints it by filling it in. CGContextEOFillPath is an alternative that does the filling in a slightly different way. |
|
CGContextStrokePath |
context |
Paints your path by stroking it. |
|
CGContextClip |
context |
Turns the current path into a clipping path. |
You’ll usually either stroke (outline) a path or fill it when you’re done. We used a fill in each of our previous examples, but a stroke could have been substituted; the difference is that our circles wouldn’t have been filled in.
A clipping path is a bit more complex, in that you don’t draw something on the screen. Instead, you define an area, which corresponds to the area inside the path that you’d have filled in, and you only show later drawings that appear inside that clipping path. We’ll talk about clipping paths more, and show an example, when we get to graphical states. For now, note that you create them from paths.
19.3.2. Creating reusable paths
So far, you’ve created paths by drawing them directly to a context, be it a UIView or a bitmap. But it’s also possible to create reusable paths that you can quickly and easily apply later. This has many of the same advantages as creating a bitmap: you get reusability and multiplicity. Reusable paths will probably be particularly useful in animations and programs where you use the same graphic on multiple pages.
To create reusable paths, you use the CGPath commands rather than the CGCon-text commands. There are equivalents to many of the simple CGContext functions, as shown in table 19.4.
Table 19.4. CGPath commands and their CGContext equivalents
|
CGPath Function |
CGContext Function |
|---|---|
|
CGPathCreateMutable |
CGContextBeginPath |
|
CGPathAddArc |
CGContextAddArc |
|
CGPathAddEllipseInRect |
CGContextAddEllipseInRect |
|
CGPathAddLineToPoint |
CGContextAddLineToPoint |
|
CGPathAddRect |
CGContextAddRect |
|
CGPathMoveToPoint |
CGContextMoveToPoint |
|
CGPathCloseSubpath |
CGContextClosePath |
When you’re working with reusable paths, you first use the CGPathCreateMutable function to create a CGPathRef, and then you use CGPath commands to add lines or arcs to that CGPathRef. Your reusable path can include multiple, discrete subpaths that don’t have to connect to each other. You can end one subpath and start another with the CGPathCloseSubpath function.
Note that there are no painting functions associated with the reusable paths. That’s because they’re storage devices. In order to use one, you add it onto a normal path with the CGContextAddPath function, which draws your stored path to your graphical context, where it’ll abide by the normal rules.
Listing 19.3 shows how to use a mutable path to replace the CGContext commands that we previously used in listing 19.1 to draw an abstract face. A more realistic example would probably hold on to the path for use elsewhere; we released it here to remind you of how Core Foundation memory management works.
Listing 19.3. A drawing with CGPath
- (void)drawRect:(CGRect)rect {

   CGMutablePathRef myPath = CGPathCreateMutable();
   CGPathAddArc(myPath,NULL,110,50,30,0,2*M_PI,1);
   CGPathMoveToPoint(myPath,NULL, 240, 50);
   CGPathAddArc(myPath,NULL,210,50,30,0,2*M_PI,1);
   CGPathAddArc(myPath,NULL,160,110,15,0,2*M_PI,1);
   CGPathAddArc(myPath,NULL,160,210,25,0,2*M_PI,1);

   CGContextRef ctx = UIGraphicsGetCurrentContext();
   CGContextBeginPath(ctx);
   CGContextAddPath(ctx,myPath);
   CGContextStrokePath(ctx);

   CFRelease(myPath);
}
Of note here is the NULL that’s constantly being sent as a second argument to the CGPath commands. This argument is intended to be a CGAffineTransform variable. It allows you to apply a transformation to the element being drawn, which is something we’ll discuss shortly.
Now that we’ve looked at two different ways to create complex paths, we’re going to take a step back and look at how to draw much simpler objects in a simpler way.
19.3.3. Drawing rectangles
Drawing paths takes some work, but if you want to draw a rectangle, Quartz makes it easy. All you have to do is use one of a few functions listed in table 19.5. These functions take care of the path creation, drawing, and painting for you in a single step.
Table 19.5. Specific functions allow you to draw rectangles
|
Function |
Arguments |
Summary |
|---|---|---|
|
CGContextClearRect |
context, CGRect |
Erases a rectangle. |
|
CGContextFillRect |
context, CGRect |
Draws a filled rectangle. The more complex variant CGContextFillRects allows you to fill a whole array of rectangles. |
|
CGContextStrokeRect |
context, CGRect |
Draws a stroked rectangle. |
|
CGContextStrokeRectWithWidth |
context, CGRect, width |
Draws a stroked rectangle, with the stroke being the designated width. |
The CGContextClearRect function can be particularly useful for erasing a window when you’re ready to draw something new to it. Now that we’ve told you how to draw objects in the simplest way possible, we’re ready to move on and start talking about how to draw objects in more complex ways—by modifying state.
19.4. Setting the graphic state
The graphic state is how Quartz will be drawing. It includes a variety of information such as what colors are being used for fills or strokes, which clipping paths constrain the current drawing path, what transformations are being applied to the drawing, and a number of other less important variables.
State is maintained in a stack. You can save a state at any time; it doesn’t change how things are being drawn, but it does push that current state onto the top of a stack for later retrieval. Later, you can restore a state, which pops the top state off the stack, putting things back to how they were before the last save. We’ve mentioned these functions before, but we’ve also listed them here in table 19.6.
Table 19.6. State-related functions that help define how you draw
|
Function |
Arguments |
Summary |
|---|---|---|
|
CGContextSaveGState |
context |
Pushes state onto a stack |
|
CGContextRestoreGState |
context |
Pops state off of a stack |
As we’ve already noted, there are a lot of things that you can store in graphic state. We’re going to cover many of them here, starting with colors.
19.4.1. Setting colors
In Quartz, you select colors by setting the fill color, the stroke color, or both in the current graphical state. Once you’ve done this, any fill or stroke commands following the color commands will appear in the appropriate colors. Note that color is irrelevant while you are drawing the individual elements of a path—the color commands apply only to the painting of the complete path at the end.
You can select colors from a variety of color spaces, which are different ways to choose colors. They include RGB (red-green-blue), RGBA (red-green-blue-alpha), CMYK (cyan-magenta-yellow-black), and CGColor (the underlying Core Graphics color model). On the iPhone, you’ll usually want to either use the RGBA color space or use a command that lets you select a color using standard UIKit methods. Table 19.7 lists the four most relevant of these functions.
Table 19.7. The most important of numerous coloring functions
|
Arguments |
Summary |
|
|---|---|---|
|
CGContextSetRGBFillColor |
context, red, green, blue, alpha |
Sets the fill to the RGBA value |
|
CGContextSetRGBStrokeColor |
context, red, green, blue, alpha |
Sets the stroke to the RGBA value |
|
CGContextSetFillColorWithColor |
context, CGColor |
Sets the fill to the CGColor |
|
CGContextSetStrokeColorWithColor |
context, CGColor |
Sets the stroke to the CGColor |
The two RGB functions allow you to set a color using values from 0 to 1 for each of red, green, blue, and alpha transparency (opacity). We saw an example of this in listing 19.2:
CGContextSetRGBFillColor(ctx, 1, 0, 0, 1);
The last two functions in table 19.7 allow you to set the color using any CGColor, and you’ll understand how useful that is when you realize that you can read a CGColor property from any UIColor you create:
CGContextSetFillColorWithColor(ctx, [[UIColor redColor] CGColor]);
Given that you’re already familiar and comfortable with the UIColors, we expect that this latter function will be a popular one.
Having now covered the main ways to apply colors to your graphic state, we’re ready to move on to the next topic: how to change how you draw through graphical state transformations.
19.4.2. Making transformations
Transformations modify how you draw to your graphical context. They do this by changing the grid upon which you’re drawing by moving its origin, rotating, or resizing.
Why would you want to do these transformations?
- They can be useful for drawing photographs (or other images), because the transformations allow you to scale or rotate the picture.
- They can make it a lot easier to do certain types of mathematical drawing. For example, it’s probably easier to draw a symmetric mathematical construct if you’ve got your origin in the center of the screen rather than up at the top left corner.
- They can allow you to flip your screen if you end up in a context (or using a function) with an inverse coordinate system.
CTM Transformations
The simplest way to apply a transformation is to use one of the functions that modify the current transformation matrix (CTM), which is a matrix that’s applied to all drawing done in your current graphical state. These functions are described in table 19.8.
Table 19.8. CTM transformation functions that allow you to change how you draw
|
Arguments |
Summary |
|
|---|---|---|
|
CGContextRotateCTM |
context, radian rotation |
Rotates the grid |
|
CGContextScaleCTM |
context, x-scale, y-scale |
Scales the grid |
|
CGContextTranslateCTM |
context, x-change, y-change |
Moves the origin |
There are two gotchas that you should watch for.
First, note that the ordering of translations is somewhat pickier than the order of color commands. You need to start your transformation before you add the relevant lines to your path, and you need to maintain it until after you paint that path.
Second, although these transformations can be applied in any sequence, order matters. Following are two transformation commands that could be applied together:
CGContextTranslateCTM(ctx, 100, 100);
CGContextRotateCTM(ctx, .25*M_PI);
These functions move a drawing 100 to the right and 100 down and rotate it by 45 degrees. Figure 19.2 shows the untransformed picture (which we’ve seen before), the results if these commands are applied with the translation before the rotation, and the results if they’re applied in the opposite order.
Figure 19.2. As these variant transformations show, order matters. The left picture is untransformed; the middle one is translated and then rotated; and the right one is rotated and then translated.
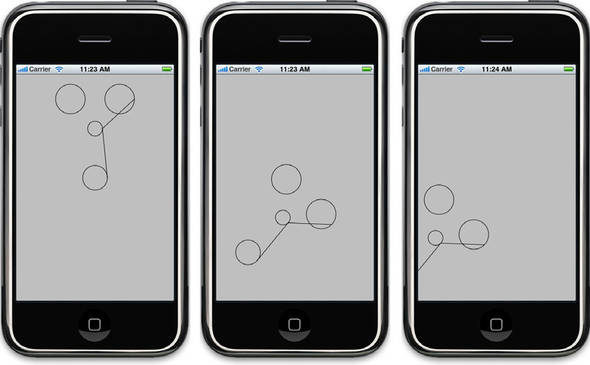
Clearly, you need to be careful and think about ordering when you’re applying CTM transformations.
But CTM transformations aren’t the only way to change your drawing space.
Affine Transformations
Just as you can create a reusable path and then apply that to the context with the CGContextAddPath function, you can also create a reusable transformation matrix (using the affine transformation functions) and then apply that to the context with the CGContextConcatCTM function. This is managed by a set of six core functions, listed in table 19.9. Half of them create a new matrix, applying a transformation at the same time, and the other half apply a transformation to an existing matrix. The last function is the one that applies an affine transformation to your current graphical state.
Table 19.9. Affine transformations for creating reusable transforms
|
Function |
Arguments |
Summary |
|---|---|---|
|
CGAffineMakeRotation |
radian rotation |
Makes an array with the rotation |
|
CGAffineMakeScale |
x-scale, y-scale |
Makes an array with the scale |
|
CGAffineMakeTranslation |
x-change, y-change |
Makes an array with the translation |
|
CGAffineTransformRotate |
array, radian rotation |
Rotates the array |
|
CGAffineTransformScale |
array, x-scale, y-scale |
Scales the array |
|
CGAffineTransformTranslate |
array, x-change, y-change |
Translates the array |
|
CGContextConcatCTM |
context, array |
Applies the transformation |
The following code applies a rotation followed by a translation using a reusable affine matrix:
CGAffineTransform myAffine = CGAffineTransformMakeRotation(.25*M_PI);
CGAffineTransformTranslate(myAffine, 100, 100);
CGContextConcatCTM(ctx, myAffine);
Besides being able to create reusable affine transformations, you can also modify the transforms at a much lower level. Any affine transformation is constructed from a 3x3 matrix that is then multiplied across the individual vectors of your path using matrix multiplication. If you have specific needs, you can use the CGAffineTransformMake function to create a matrix by hand. Using it looks like this:
CGAffineTransform flip = CGAffineTransformMake(1,0,0,-1,0,0);
Information on how the matrix works and on some other functions can be found in the CGAffine reference.
The next sort of state you might want to change is one that makes fairly large-scale changes to your drawings: the clipping path.
19.4.3. Setting clipping paths
We already spoke about clipping paths in section 19.3. You create a path as usual, but then you clip it, rather than filling it or stroking it. Anything that you paint on the screen afterward (within that graphical state) will only appear if it’s inside the clipping path.
For example, the following code causes later painting to only appear inside a large circle centered on the iPhone screen:
CGContextBeginPath(ctx);
CGContextAddArc(ctx,160,240,160,0,2*M_PI,1);
CGContextClip(ctx);
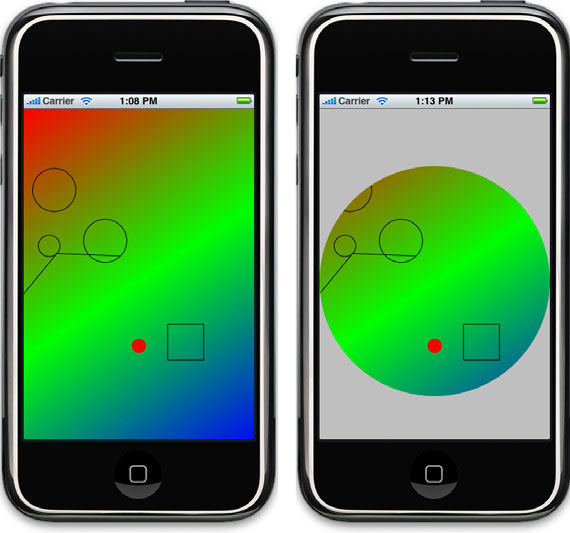
Figure 19.3 shows what a full-screen image might look like before the clipping occurred, and then after.
Figure 19.3. An example of a clipping path in use. The unclipped image is on the left, and the clipped image is on the right.
As with most of these Quartz functions, there are some opportunities for subtleties when using clipping paths. The CGContext reference offers a few additional functions for creating and modifying clipping paths.
So far we’ve discussed all the big-picture options for modifying your graphic state. There are many smaller things you can do too.
19.4.4. Other settings
There are a wide variety of additional settings that can be used as part of the graphic state. Table 19.10 lists many of the most interesting ones.
Table 19.10. A selection of other ways to change state
|
Arguments |
Summary |
|
|---|---|---|
|
CGContextSetAlpha |
context, alpha |
Sets alpha transparency |
|
CGContextSetBlendMode |
context, CGBlendMode |
Sets blending to one of almost 30 values, which specify how objects laid on top of each other interact with each other |
|
CGContextSetFlatness |
context, flatness |
Defines the accuracy of curves |
|
CGContextSetLineCap |
context, CGLineCap |
Defines how to draw the end of a line |
|
CGContextSetLineDash |
context, phase, lengths array, count |
Describes how to draw dashes along a stroke |
|
CGContextSetLineJoin |
context, CGLineJoin |
Defines how lines come together |
|
CGContextSetLineWidth |
context, width |
Describes the width of a stroke |
|
CGContextSetShadow |
context, CGSize, blur |
Sets a shadow behind all drawings |
|
CGContextSetShadowWithColor |
context, CGSize, blur, color |
Sets a colored shadow behind all drawings |
A number of more complex state changes can also be found in the CGContext class reference, but we’ve described the ones you’re most likely to use in the course of an average program.
We’re drawing to a close on the topic of graphical state, so let’s step back for a moment and look at how graphical state works.
19.4.5. Managing the state
When you use any of the various functions that modify the graphical state, you’re changing how you paint inside your current graphical context. The functions change the colors you’re using, they transform your underlying grid, they clip the area you’re allowed to paint within, or they make various smaller changes.
You can constantly reset these variables as your needs change, but this can get annoying. That’s why you’ll want to use the stack of states. It allows you to make a whole bunch of changes to state and then revert to a previous setup that you were happy with. We’ve already shown the two functions that do this in table 19.6.
Remember to save the state before you make a big change, such as adding a clipping path or running a whole bunch of graphical state functions. Then restore the state when you’re done with that. If you want, you can even be clever and slowly build up a whole set of states in your stack, and move back through them appropriately.
You should now understand the three most important elements of drawing with Quartz: contexts, which specify where to draw; paths, which specify what to draw; and graphical states, which specify how to draw. There are numerous more advanced things you can do in Quartz, and although we’re not going to get to all of them, the next section covers the most interesting ones.
19.5. Advanced drawing in Quartz
Quartz has a number of advanced capabilities that go beyond simple line drawings. In this section we’re going to look at using gradients, images, and words.
19.5.1. Drawing gradients
Gradients are a core part of SDK design, because they’re a clearly evident aspect of the standard user interface. Unfortunately there’s no UIKit level class for creating gradients; instead, you have to fall back on Quartz.
There are two ways to create gradients inside Quartz: using a CGShadingRef object or a CGGradientRef object. As is often the case in Core Foundation functions, the difference is in complexity. CGGradientRef allows you to draw pretty simple gradients, and CGShadingRef requires you to define a CGFunctionRef object to precisely calculate how the colors in the gradient are displayed. As you’ve probably guessed, we’re going to talk about CGGradientRef here and point you to the Apple class references for CGShadingRef.
Table 19.11 shows the important functions required to draw gradients with CGGradientRef.
Table 19.11. CGColorSpace, CGGradient, and CGContext functions for drawing gradients
|
Function |
Arguments |
Summary |
|---|---|---|
|
CGColorSpaceCreateWithName |
color space constant |
Creates a color space by name |
|
CGGradientCreateWithColors |
color space, color array, location array |
Creates a gradient using pregenerated colors |
|
CGGradientCreateWithColorComponents |
color space, color components array, location array, color count |
Creates a gradient with an array of color parts |
|
CGContextDrawLinearGradient |
context, gradient, start CGPoint, end CGPoint, options |
Draws a linear gradient |
|
context, gradient, start center, start radius, end center, end radius, options |
Draws a radial gradient |
|
|
CGColorSpaceRelease |
color space |
Frees up a color space object |
|
CGGradientRelease |
gradient |
Frees up a gradient object |
Drawing a gradient is a four-step process:
1.
Define your color space, which will usually be kCGColorSpaceGenericRGB for the iPhone.
2.
Define your gradient by listing colors and where they appear in the gradient, from 0 to 1. There are two ways to do this. You can hand off an array of CGColors (which might be useful if you want to generate them using UIColors) or you can hand off a longer array that defines the colors using another method, such as RGBA.
3.
Draw your gradient as a linear gradient (going from point to point) or a radial gradient (going from the center to the edge of a circle).
4.
Free up your memory.
Listing 19.4 shows all the steps required to draw a three-color linear gradient that spans the entire iPhone screen.
Listing 19.4. Drawing a three-color linear gradient
CGColorSpaceRef myColorSpace =
   CGColorSpaceCreateWithName(kCGColorSpaceGenericRGB);
CGFloat components[12] = {1,0,0,1,
   0,1,0,1,
   0,0,1,1};
CGFloat locations[3] = {0,.5,1};

CGGradientRef myGradient =
   CGGradientCreateWithColorComponents(myColorSpace,
      components, locations, (size_t)3);
CGContextDrawLinearGradient(ctx, myGradient, CGPointMake(0,0),
   CGPointMake(320,480), (CGGradientDrawingOptions)NULL);

CGColorSpaceRelease(myColorSpace);
CGGradientRelease(myGradient);
This code steps through the steps we just listed, defining the color space, creating the parts of the gradient, drawing it, and cleaning up after it. As usual, you can find some more info on gradients in the CGGradient reference. For now, though, we’re ready to move on to the next advanced category of Quartz work: images.
19.5.2. Drawing images
In the last chapter, we saw one way to work with images, using methods that largely hid the specifics of graphical contexts from you as a programmer. Now that you’re fully immersed in Quartz, you can choose to use the Core Graphic functions instead.
The Image Functions
There are two major Core Graphic functions for drawing, listed in table 19.12.
Table 19.12. A few image functions in Quartz
|
Function |
Arguments |
Summary |
|---|---|---|
|
CGContextDrawImage |
context, CGRect, image |
Draws an image scaled to fit the rectangle |
|
CGContextDrawTiledImage |
context, CGRect, image |
Draws an image scaled to fit the rectangle but filling the current clip region |
These functions both require a CGImageRef, but remember that you can use the CGImage property of a UIImage to produce one. Alternatively, you can use the commands described in the CGImage reference, which offer more precise functionality, to create a new CGImage. Our suggestion is to go with what you know, which means using the UIKit methods, unless they can’t do what you need.
There’s one big gotcha to using the Quartz-related image-drawing functions: at the time of this writing, they produce a flipped image because they use Quartz’s native coordinate system internally. We’ll show you how to fix that momentarily.
Drawing on a Bitmap
Often you’ll want to turn an image into a bitmap and modify it before displaying it on the screen, most frequently so that you can make multiple uses of the image. We’re going to offer a quick example of crossing out a picture here.
Part of what’s unique about this example is that you can do all your drawing work without ever showing the image to the user (unlike if you were drawing on a UIView), thus opening up the possibility of many image-editing functions. When you do decide to display your newly saved image, you’ll see results like the image in figure 19.4.
Figure 19.4. You can change a UIImage without showing it to the user.

The code needed to accomplish this simple crossing-out is shown in listing 19.5.
Listing 19.5. Using bitmaps to edit images

The process of modifying an image involves relatively few steps. You start off by creating your bitmap context ![]() . Next, you apply any transformations that you want to use for the picture
. Next, you apply any transformations that you want to use for the picture ![]() . If you want to rotate or scale the original picture, here’s where you do it. Likewise, you could use a combination of translations
and the context size to easily crop an image. In this example, you flip the picture over by applying a rotation and a translation,
to account for the fact that CGContextDrawImage produces an inverted picture. (We’ll see an alternative way to do this in our next example.)
. If you want to rotate or scale the original picture, here’s where you do it. Likewise, you could use a combination of translations
and the context size to easily crop an image. In this example, you flip the picture over by applying a rotation and a translation,
to account for the fact that CGContextDrawImage produces an inverted picture. (We’ll see an alternative way to do this in our next example.)
When your transformations are done, you can draw your image ![]() , and then draw whatever you want on top of it
, and then draw whatever you want on top of it ![]() (or modify it in some other way). Finally, you save the new picture
(or modify it in some other way). Finally, you save the new picture ![]() .
.
We’ll return to the idea of drawing on pictures in section 19.6 (though we’ll do it in a much more interactive way), but in the meantime we’re ready to draw words.
19.5.3. Drawing words
Unlike Canvas, Quartz does support drawing words on top of your pictures. The functions required are pretty intricate, though, and we generally suggest using UILabel or other UIKit objects, and placing them on top of your Quartz objects. But if you need words inside Quartz (either because you’re interweaving your words with other Quartz content or because you’re adding words to a picture), you’ll need to make use of the CGContext text options.
The majority of the text-related functions modify the graphical state, as described in table 19.13. The last two functions in the table draw your text.
Table 19.13. A variety of functions for drawing text in Quartz
|
Function |
Arguments |
Summary |
|---|---|---|
|
CGContextSelectFont |
context, font name, size, text encoding |
Sets a font for the graphical state |
|
CGContextSetTextDrawingMode |
context, CGTextDrawingMode |
Defines how to draw text in the graphical state |
|
context, affine transform |
Places a transformation matrix in the graphical state for drawing only text |
|
|
CGContextSetSetPosition |
context, x, y |
Sets where to draw in the graphical state |
|
CGContextShowText |
context, string, length |
Draws the text at the current position |
|
CGContextShowTextAtPoint |
context, x, y, string, length |
Draws the text at the specified position |
You can find several other text-related functions in the CGContext reference. Most notably, if you need more control over your fonts (and particularly if you want to link up to UIFonts), you should use CGContextSetFont and CGContextSetFontSize instead of the CGContextSelectFont function that’s noted here—but keep in mind that you can’t use CGContextShowTextAtPoint when you set your font in this alternative way.
Listing 19.6 shows a simple example of printing text in Quartz.
Listing 19.6. Outputting text in Quartz
CGContextSelectFont (ctx, "Helvetica",20,kCGEncodingMacRoman);
CGContextSetTextDrawingMode(ctx, kCGTextFill);
CGAffineTransform flip = CGAffineTransformMake(1,0,0,-1,0,0);
CGContextSetTextMatrix(ctx, flip);
CGContextShowTextAtPoint(ctx, 20, 85, "A Quartz Example", 16);
The only thing of note here is the creation of the affine transformation matrix, flip. We’ve already pointed out that the text-drawing functions don’t use the iPhone coordinate system at present. Instead, they’re still stored in an inverted manner, so you need to flip them over to use them correctly. (We hope that this changes in some future release of the iPhone OS.)
The affine transformation shown here describes the matrix using the CGAffineTransformMake function. It effectively does the same thing as our two-part transformation in listing 19.5. In our view, it’s a bit simpler, but less clear.
That’s only the basics of using text, but it should be enough to get you started when you need to draw within Quartz.
19.5.4. What we didn’t cover
Quartz 2D is a fully featured drawing and painting language that we can only briefly touch on in this chapter. Among the other topics that you might want to research if you’re going to do more advanced work with Quartz are patterns, transparency layers, layer drawing, and PDF creation. As we’ve mentioned previously, Apple’s “Quartz 2D Programming Guide” is an excellent introduction to these topics.
We’re not quite done with Quartz yet. Before we finish up this chapter, we’re going to put together a more fully featured example combining some of the Quartz lessons from this chapter with some of the photographic work we covered in chapter 18.
19.6. Drawing on a picture: an example
To put together the lessons we’ve covered, you’re going to create a program that allows a user to load up a picture, draw on it, and then save the results. Figure 19.5 shows our intended result.
Figure 19.5. Photodraw can place drawings on pictures.

As usual, you’ll start in Interface Builder, but you only have two simple things to do here:
- Create a UIButtonBar with a single action-type button (which is one of the standard styles you can select for a button).
- Link the existing UIView to a new drawView class (which should be a UIView subclass).
Once you get into Xcode, the programming will look a lot like the collage program in the last chapter, but with some nuances related to your greater understanding of Quartz.
You’ll be doing your coding in two parts. The overall structure of the program will go in photodrawViewController.m and the drawing specifics will go in drawView.m.
19.6.1. The photodraw view controller
The view controller manages an image selector as well as several toolbar buttons, including the “action” button that you created in Interface Builder and Save and Cancel buttons that will appear later on. The code is shown in listing 19.7. We’ve omitted some of the view controller’s overall structure and focused on the code that’s involved when the user pushes the action button and activates choosePic:.
Listing 19.7. The important bits of a view controller for a photodraw program
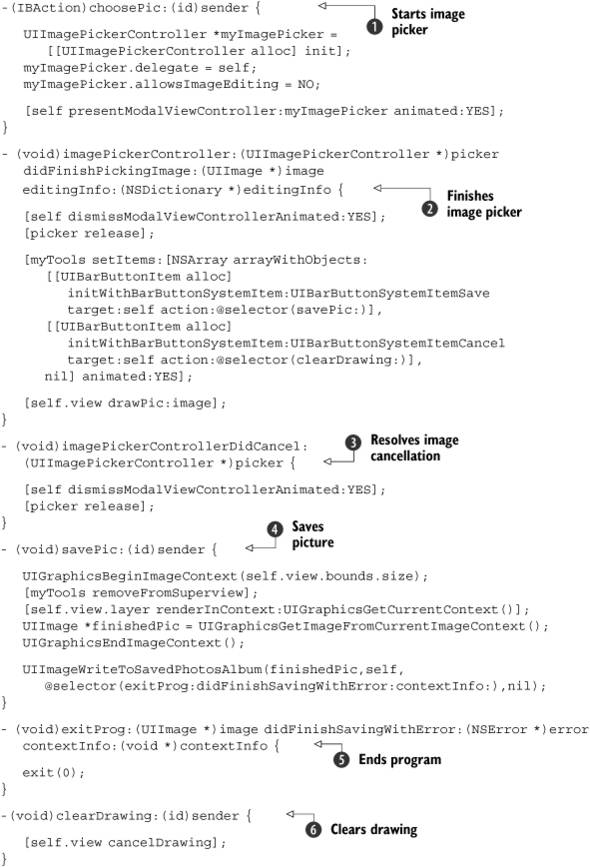
This is a pretty simple snippet of code because it shows the view controller acting as a traffic cop, accepting input from controls and sending off messages to other objects, which is pretty much the definition of what a view controller should do.
For once, you don’t have any setup in viewDidLoad:. Instead, the toolbar created in Interface Builder will initiate your program’s actions. At startup, the user has only one
choice, to click the action button and start the image picker ![]() . When the picker returns, you modify the UIButtonBar to now give options for Save and Cancel, and then you send the picture off to drawView to be dealt with
. When the picker returns, you modify the UIButtonBar to now give options for Save and Cancel, and then you send the picture off to drawView to be dealt with ![]() . Alternatively, you clear the image picker away if the user canceled it
. Alternatively, you clear the image picker away if the user canceled it ![]() .
.
The save picture routine works the same way as the one you wrote in the collage program ![]() . The only difference is that this one includes a callback, which ends the program after the saving is done
. The only difference is that this one includes a callback, which ends the program after the saving is done ![]() . The clear drawing method
. The clear drawing method ![]() , meanwhile, makes a call to the drawView object again.
, meanwhile, makes a call to the drawView object again.
To learn what’s done with the initial picture, how drawing occurs, and what happens when the drawing is cleared, we need to look at this program’s other major class.
19.6.2. The photodraw view
As we saw in the previous section, the view controller hands off three responsibilities to the view: displaying a picture, responding to touch events, and clearing the drawing. We’re going to step through these functions one at a time.
Listing 19.8 shows what’s done when a user picks an image.
Listing 19.8. Preparing a picture for drawing
-(void)drawPic:(UIImage *)thisPic {

  myPic = thisPic;
  [myPic retain];
  [self setNeedsDisplay];
}
This routine is simple: it saves the picture to an instance variable and then alerts the UIView that its CALayer must be drawn.
We are going to save the CALayer’s drawRect: method for last, so we’ll look now at how the drawView class interprets touch events. This is shown in listing 19.9.
Listing 19.9. Recording touch events

The overall concept here is pretty simple. You maintain an NSMutableArray called myDrawing as an instance variable. Within that, you create a number of NSMutableArray subarrays, each of which contains an individual path. You set up a new subarray when a touch starts ![]() and then add the current point when the touch moves
and then add the current point when the touch moves ![]() or ends
or ends ![]() . The result is an array that contains a complete listing of all touches. But once again, we’re going to have to wait a bit
to see how that’s drawn.
. The result is an array that contains a complete listing of all touches. But once again, we’re going to have to wait a bit
to see how that’s drawn.
It’s notable that we tell drawView to draw (via the setNeedsDisplay method) both when a touch moves and when it ends. That’s because whenever the touch moves, you want to provide instant gratification by drawing what the user has sketched out so far. When the touch ends, you do the same thing.
Listing 19.10 shows the method that clears all current drawings. Its functionality is pretty obvious now that we know that the list of drawings is held as an array.
Listing 19.10. Clearing drawings
-(void)cancelDrawing {

   [myDrawing removeAllObjects];
   [self setNeedsDisplay];
}
At this point, your drawView object is maintaining two different instance variables: myPic contains the current picture and myDrawing contains an array of paths. Putting them together into a coherent whole just requires using some of the Quartz functions that we’ve discussed in the last two chapters. The results are shown in listing 19.11.
Listing 19.11. Drawing from user-created variables

The main bulk of this method is spent iterating through the information that you saved in other methods. There are five Quartz
functions that do the drawing work. First, you draw the selected image. We’ve gone back to using the UIKit methods from the last chapter ![]() , so that your image doesn’t end up upside-down. Then, you start working through the myDrawing array. Each subarray results in your program beginning a new path
, so that your image doesn’t end up upside-down. Then, you start working through the myDrawing array. Each subarray results in your program beginning a new path ![]() and moving to the start
and moving to the start ![]() . As you move through the array, you add lines
. As you move through the array, you add lines ![]() . Finally, when a subarray is complete, you stroke the path
. Finally, when a subarray is complete, you stroke the path ![]() .
.
The result allows for drawing simple lines on a picture, which can then be saved, as we saw back in the view controller.
But is it possible to do more with this example? As usual, the answer is Yes.
19.6.3. Expanding on the example
If you wanted to expand this example into a more complete application, there are several routes you could take.
The first and most obvious expansion would be to select a color before drawing a line. The hard part here would be to create a color picker, though you could make a stand-alone class that you could then reuse elsewhere. With that in hand, it would be simple to add a color variable to your line arrays, probably by always saving it as the 0 element of a subarray.
The program might also benefit from a more sophisticated line-drawing algorithm that tosses out nearby points and smoothes the lines into curves, removing some of the sharp edges that show up in the current program.
In any case, that ends our look at Quartz 2D. There’s lots more you can learn, but you should have the foundation that you need to move forward.
There are two other ways that you can draw using the SDK: Core Animation and OpenGL. We don’t have the space in this introductory book to give full-length attention to either, but we’ll at least introduce them and show you where to go for more information, beginning with Core Animation.
19.7. An introduction to Core Animation
Core Animation is a fundamental technology on the iPhone. It’s what manages all the nifty scrolls, pivots, zoom-ins, zoom-outs, and other bits of animation that make up the iPhone user interface. As you’ve already seen, many UIKit classes give you an option to use animation or not, usually by having an animated: argument as part of a method.
Core Animation is also tightly integrated with Quartz. As you’ve seen, each UIView is linked up to a graphical layer called the CALayer, which is the Core Animation layer. Though you’ve just used it to depict simple graphics and images so far, you can also use it to manage more complex changes.
But you don’t have to use Quartz at all to create animations. There’s a CALayer behind every UIView, and because almost everything on the iPhone is built on a UIView, you can animate your existing UIViews, possibly including pictures that you’ve loaded into UIImageViews. For example, figure 19.6 shows how you could use Core Animation to show an approaching plane, by moving its UIImageView and turning it opaque as it approaches.
Figure 19.6. A jet approaches, thanks to Core Animation.

This is the example that we’re going to show later in this section, using two different means to create the animation.
19.7.1. The fundamentals of Core Animation
When we speak of animation using Core Animation, what we’re talking about is changing the properties of the CALayer and then smoothly animating those property changes. The CALayer class reference lists which properties can be animated; they include anchorPoint, backgroundColor, opacity, position, transform, and several others. This means that you can use Core Animation to animate the position of an object, its color, its transparency, and also its CGAffine transformations.
Before we get further into Core Animation, we want to talk about its fundamentals—those terms and ideas that you’ll meet throughout this section:
- Layer— This is where animation occurs. You always have one CALayer hooked up to every UIView, accessible via the layer property. You can call up additional layers with a [CALayer layer] class message and then add them to your existing CALayer with the addSublayer: method. Adding layers in this way will result in inverted coordinate systems. Each layer can be individually animated, allowing for complex interactions between numerous animated properties. On the iPhone, you might find it as easy to create a more complex animation by creating multiple UIKit objects (most likely multiple UIImageViews) and animating each one.
- Implicit animation— This is the simplest type of animation. You tell the UIView that it should animate, and then you change properties.
- Explicit animation— This is an animation created with CABasicAnimation that allows you to more explicitly define how the property change animates.
- Key frame animation— This is an even more explicit type of animation, where you define not only the start and end of the animation, but also some of the frames in between.
You can also create much more complex animations, such as redefining how implicit animations work, collecting animations into transactions, and building complex animation layer hierarchies. For more information, look at the “Core Animation Programming Guide” and the “Core Animation Cookbook,” both available from Apple.
19.7.2. Getting started with Core Animation
To use Core Animation, make sure that you add Quartz Core, the framework required for animation, to your project. You’ll also want to include QuartzCore/QuartzCore.h, the main header file for Core Animation.
With that done, you’re now ready to try out the two simplest types of animation: a simple implicit animation and an explicit animation.
19.7.3. Drawing a simple implicit animation
Implicit animations are the simplest type of animation, because they just require starting an animation block and then changing CALayer-level properties. Listing 19.12 shows a simple example of this, involving a UIImageView called plane that contains a clipart picture of a plane. The image starts out at the top-left corner of the screen with 25 percent opacity and moves downward while growing more opaque.
Listing 19.12. A simple implicit animation
[UIView beginAnimations:nil context:NULL];
CGAffineTransform moveTransform
   = CGAffineTransformMakeTranslation(200, 200);
[plane.layer setAffineTransform:moveTransform];
plane.layer.opacity = 1;
[UIView commitAnimations];
Between them, beginAnimations:context: and commitAnimations define an animation block.
Within the block, you set two properties to animate. setAffineTransform: is a special CALayer method that allows the setting of its transform property using an affine transform matrix, which you’re already familiar with; opacity is a more obvious property.
As soon as you close out the block, the animation begins. Your plane will move and grow more distinct. That’s all there is to it!
But sometimes an implicit animation won’t give you as much control as you want. That’s where explicit animations come in.
19.7.4. Drawing a simple explicit animation
When you’re working with explicit animations, instead of defining a bunch of changes to a CALayer and executing them all, you define animations one by one using the CABasicAnimation class. Each of these animations can have its own value for duration, repeatCount, and numerous other properties. You then apply each animation to a layer separately, using the addAnimation:forKey: method.
Listing 19.13 executes an animation similar to the one shown in listing 19.12, but with more control.
Listing 19.13. A simple explicit animation
CABasicAnimation *opAnim = [CABasicAnimation
   animationWithKeyPath:@"opacity"];
opAnim.duration = 3.0;
opAnim.fromValue = [NSNumber numberWithFloat:.25];
opAnim.toValue= [NSNumber numberWithFloat:1.0];
opAnim.cumulative = YES;
opAnim.repeatCount = 2;
[plane.layer addAnimation:opAnim forKey:@"animateOpacity"];

CGAffineTransform moveTransform
   = CGAffineTransformMakeTranslation(200, 200);
CABasicAnimation *moveAnim = [CABasicAnimation
   animationWithKeyPath:@"transform"];
moveAnim.duration = 6.0;
moveAnim.toValue= [NSValue valueWithCATransform3D:
   CATransform3DMakeAffineTransform(moveTransform)];
[plane.layer addAnimation:moveAnim forKey:@"animateTransform"];
This example is definitely longer than our implicit animation example, but you get to define the two animations with separate durations, which is the first step to creating a more beautiful and better-controlled animation. Note that you also make use of yet another way to change an affine transform matrix into a Transform3D matrix of the type used by Core Animation: the CATransform3DMakeAffineTransform function.
The code does include a bit of a kludge: to keep the plane opaque through the last 3 seconds, it keeps counting opacity up cumulatively, making it climb from 1.0 to 1.75 the second time through. A better solution would be to have created three key frames for opacity: .25 at 0 seconds, 1.00 at 3 seconds, and 1.00 at 6 seconds. That’s why you might want to use a key-frame animation of the sort we alluded to at the start of this section, rather than a basic animation.
These simple methods for using Core Animation can take you far. Look through the CALayer class reference for everything that you’re allowed to animate. For more details, read though the two Apple guides we pointed out.
Before we leave graphics entirely behind, there’s one other toolkit that we want to briefly touch on: OpenGL.
19.8. An introduction to OpenGL
OpenGL is SGI’s standardized 2D and 3D graphical drawing language. The iPhone more specifically uses OpenGL ES, or OpenGL for Embedded Systems, which features a reduced API for use on devices like mobile phones. For full information on using OpenGL, you should pick up a book on the topic or read Apple’s “OpenGL ES Framework Reference,” which links to the most important documents available from Apple. We’re going to cover some of the general information you’ll need to access OpenGL through the iPhone OS.
The iPhone manages OpenGL through EAGL, a class that interfaces between the iPhone’s views and OpenGL’s drawing functions. It allows for the writing of OpenGL functions onto an EAGLView, which is the CAEAGL layer of a UIView, showing the same layer-based paradigm we met when using Core Animation.
To simplify your programming of OpenGL projects, Xcode supplies a standard template to use, which sets up all the OpenGL defaults for you. It’s the OpenGL ES Application template, the only Xcode template that we have yet to examine. This template includes all the basic setup of OpenGL, which is pretty extensive. That includes the setup of a timer, the creation of frame buffers, and the code needed to draw something. To do basic OpenGL programming, all you have to do is write your code into the drawView method of the EAGLView class.
Rather than giving a completely insufficient overview of this enormous library, we’ll instead point you toward a few bits of sample code. The OpenGL template comes complete with a rotating square as an example. There are also three OpenGL samples currently available from Apple: GLGravity shows simple OpenGL rendering related to accelerometer output, GLSprite demonstrates texturing, and GLPaint explores another way to allow finger painting.
These examples should be sufficient to get you started if you already have a strong basis in OpenGL and need to see how it’s integrated into the iPhone.
19.9. Summary
Graphics are one of the most important elements for making your iPhone projects look great. Not only does the iPhone OS support high-quality graphics, but it also gives you a wide variety of options, depending on the needs of your program.
Quartz 2D will be your main workhorse for most graphical programs. If you’re already familiar with the Canvas library for the web, you’ll see that Quartz is quite similar. You’ll be able to draw paths and use many graphical state variables to modify exactly how that path is painted. This chapter includes a pretty extensive look at Quartz.
Core Animation is an expansion to Quartz that was created for the iPhone. You’ve already seen it integrated into numerous programs native to the iPhone, and now you can use it yourself. Core Animation is built around the idea of automated animations: you tell it the endpoints, and Core Animation fills in the rest for you. Again this is much as you may have seen on the web, with the WebKit’s various styles of implicit and explicit animation. This chapter covers the basics of how to use the simpler forms of Core Animation.
OpenGL is a whole new graphics library that has been imported into the iPhone, much as SQLite is a third-party library that Apple made available to iPhone users. The difference here is that Apple has made OpenGL easier to use, thanks to the creation of the EAGL framework. Though this chapter suggests how to get started with OpenGL, the topic is large enough that you’ll need to pick up a book on OpenGL to fully explore the topic.
With graphics covered, there’s one last topic that we need to complete our SDK toolkit: the internet. How do you access the net and how do you make use of various protocols that will allow you access to the ever-growing social network of the web? That’s the topic of our last chapter, bringing this book full circle.