
Chapter 13. Creating basic view controllers
|
This chapter covers |
|
|
In the last two chapters, we’ve offered a hands-on look at the two core tools used to program using the SDK: Xcode and Interface Builder. In the process, we haven’t strayed far from the most fundamental building block of the SDK, the view, whether it be a UILabel, a UIWebView, or a UIImageView.
Ultimately, the view is only part of the story. As we mentioned when we looked at the iPhone OS, views are usually connected to view controllers, which manage events and otherwise take the controller role in the MVC model. We’re now ready to begin a three-part exploration of what that all means.
In this chapter, we’re going to look at basic view controllers that manage a single page of text. With that basis, we can look at events and actions in chapter 14, correctly integrating them into the MVC model. Finally, in chapter 15, we’re going to return to the topic of view controllers to look at advanced classes that can be used to connect up several pages of text.
Over the course of our two view controller chapters (13 and 15), we’re going to offer code samples that are a bit more skeletal than usual. That’s because we want to provide you with the fundamental, reusable code that you’ll need to use the controllers on your own. So, consider chapters 13 and 15 more of a reference—though a critical one. We’ll be making real-world use of the controllers in the rest of this book, including when we look at events and actions in chapter 14.
13.1. The view controller family
When we first talked about view controllers in chapter 10, we mentioned that they come in several flavors. These run from the bare bones UIViewController, which is primarily useful for managing autorotation and for taking the appropriate role in the MVC model, to the more organized UITableViewController, on to a few different controllers that allow navigation across multiple pages.
All of these view controllers—and their related views—are listed in table 13.1.
Table 13.1. There are a variety of view controllers, giving you considerable control over how navigation occurs in your program
As we’ve already noted, we’ll be discussing these view controllers in two different chapters. Here we’re going to look at the single-page view controllers: UIViewController and UITableViewController. In chapter 15, we’re going to look at the multi-page view controllers: UITabBarController, UINavigationController, and the flipside controller. This is a clear functional split: the single-page controllers exist primarily to support the controller role of the MVC model, whereas the multipage controllers exist primarily to support navigation, and may even delegate MVC work to a simpler view controller lying below them. (As for the modal controllers, we’ll get to them when we cover the appropriate topics in chapters 16 and 18.)
Though we’ve programmed without view controllers to date, they’re an important part of SDK programming. You could write an SDK program without them, but every SDK program should include them, even if you use a bare-bones view controller to manage the rotation of the iPhone screen.
13.2. The bare view controller
The plain view controller is simple to embed inside your program. By why would you want to use a view controller? That’s going to be one of the topics that we’re going to cover here. Over the course of this section, we’ll look at how view controllers fit into the view hierarchy, how you create them, how you expand them, and how you make active use of them. Let’s get started with the most basic anatomical look at the view controller.
13.2.1. The anatomy of a view controller
A view controller is a UIViewController object that sits immediately above a view (of any sort). It, in turn, sits below some other object as part of the tree that ultimately goes back to an application’s main window. This is shown in figure 13.1.
Figure 13.1. A bare view controller shows view-controlling at its simplest: it sits below one object and above another.

When we move on to advanced view controllers, in chapter 15, we’ll see that the use of a bare view controller can grow more complex. Bare view controllers will often sit beneath advanced view controllers, to take care of the individual pages that the advanced view controller allows navigation among.
Looking at the iPhone OS’s class hierarchy, we can see that the UIViewController is a direct descendent of NSObject. That means that it doesn’t get any of the functionality of UIResponder or UIView, which you find in most other UIKit objects. It’s also the parent object of all the other view controllers we’ll be discussing. Practically, this means that the lessons learned here also apply to all the other controllers.
But learning about how a view controller works leaves out one vital component: how do you create it?
13.2.2. Creating a view controller
The easiest way to incorporate a plain view controller into your project is to select a different template when you create it. The View-Based Application template should probably be your default template for programming from here on out, because it comes with a view controller built in.
As usual, the template’s work is primarily done through Interface Builder. Once you create a new project (which we’ve called “viewex” for the purpose of this example) you can verify this by looking up the view controller’s IBOutlet command in the program’s app delegate header file:
IBOutlet viewexViewController *viewController;
The app delegate’s source code file further shows us that the view controller’s view has already been hooked up to the main window:
[window addSubview:viewController.view];
This view is a standard UIView that’s created as part of the template. Though a view controller only has one view, that view may have a variety of subviews, spreading out into a hierarchy. We’re going to show you how to add a single object beneath the view in a moment, and we’re going to make more complete use of it in the next chapter. But before we get there, we want to step back and look at how you could create a view controller by hand, if you needed to.
Creating another view controller is simple. First, in Interface Builder, drag a View Controller from the Library to your xib document window. Alternatively, in Xcode, you can alloc and init an object from the UIViewController class.
Note
Increasingly, we’re going to assume that you’re doing work through Interface Builder and using appropriate templates, but the same methods for object creation that we learned in the last couple of chapters remain available for all objects.
Second, note that the previous IBOutlet command shows that the controller isn’t instantiated directly from the UIViewController class, but rather from its own subclass, which has its own set of files (viewexViewController.{h|m}), named after our example project’s name. This is standard operating procedure.
Because we want a view controller to do event management, we’ll often need to modify some of the controller’s standard event methods, so we require our own subclass. To start, our view controller class files are mostly blank, but Xcode helpfully highlights a number of standard view controller methods that we might want to modify.
Once you’ve finished creating a bare view controller, you’re mostly ready to go, but there’s some slight opportunity to modify the view controller for your specific program, and that’s what we’re going to cover next.
13.2.3. Building up a view controller interface
In order to correctly use a view controller, you need to build your view objects as sub-views of the view controller, rather than subviews of your main window or whatever else lies above it. This is easy in both Xcode and Interface Builder.
The Xcode Solution
The view controller class file gives you access to a pair of methods that can be used to set up your view controller’s views. If the view controller’s view is linked to an .xib file, you should use viewDidLoad, which will do additional work after the .xib is done loading; if it isn’t created from inside Interface Builder (IB), you should instead use loadView.
Before you do any of this, your view controller will always start off with a standard UIView as its one subview. But by using these methods, you can instead create view controller’s view as you see fit, even creating a whole hierarchy of subviews if you so desire.
Listing 13.1 shows how you could add a simple UILabel to your view controller using viewDidLoad. We’ve chosen a humongous font that gets automatically sized down so that later we can show off how rotation and resizing work.
Listing 13.1. You can add views to an IB-created view controller inside viewDidLoad

The self.view line is the only one of particular note ![]() . It connects your label object as a subview of the view controller’s UIView.
. It connects your label object as a subview of the view controller’s UIView.
This example is also noteworthy because it’s the first time you’ve definitively moved outside of your app delegate for object creation. You could have done this object creation over in the app delegate, but that’s often sloppy programming. Now that you’ve got view controllers, you’ll increasingly be doing most of your work in those class files. This not only better abstracts your object creation, but it also kicks off your support of the MVC model, because you’ve now got controllers instantiating the views they manage. Watch for a lot more of this in the future. We’re also going to briefly return to the viewDidLoad and loadView methods when we talk about the bigger picture of the view controller life cycle, shortly.
The Interface Builder Solution
In the last chapter, we noted that view controllers often have their own .xib files, allowing you to have one .xib file for each page of content. That’s exactly what’s going on in the program you created from the View-Based Application template. At creation, the template contains two .xib files, MainWindow.xib and viewexViewController.xib.
The MainWindow.xib file contains a view controller and a window. It also contains the all-important link to the second .xib file. If you click the view controller’s Attribute tab, it’ll helpfully show you that the controller’s content is drawn from viewexViewController(.xib). This is shown in figure 13.2.
Figure 13.2. To hook up a new .xib file to a view controller, enter its name in the view controller’s attributes under NIB Name.

Now that you understand the hierarchy of .xib files that’s been set up, how do you make use of them? In order to create an object as a subview of the view controller, you need to place it inside the .xib file that the view controller manages—in this case viewexViewController.xib. So, to add a UILabel to your view controller, you call up the viewexViewController.xib file and then drag a label to the main display window, which should represent the existing view. Afterward, you can muck with the label’s specifics in the inspector window, as usual.
Practically, there’s nothing more you need to do to set up your basic view controller, but there are still a few runtime fundamentals to consider.
13.2.4. Using your view controller
If you’ve chosen to use a standard view controller, it should be because you’re only managing one page of content, not a hierarchy of pages. In this situation, you don’t need your view controller to do a lot, but your view controller is still important for three things, all related to event management:
- It should act as the hub for controlling its view and subviews, following the MVC model. To do this, it needs easy access to object names from its hierarchy.
- It should control the rotation of its view, which will also require resizing the view in rational ways. Similarly, it should report back on the orientation of the iPhone if queried.
- It should deal with life-cycle events related to its view.
We’ve split these main requirements up into six topics, which we’ll cover in turn.
Putting the MVC Model to Use
Though we’ve talked about the Model-View-Controller (MVC) architectural pattern, you haven’t yet put it to real use. To date, it’s instead been a sort of abstract methodology for writing programs. But now that you’re ready to use view controllers, you can start making use of MVC as a real-world ideal for programming.
As you’ll recall, under MVC, the model is your back-end data and the view is your front-end user interface. The controller is what sits in between, accepting user input and modifying both of the other entities. The view controller should take the role of the controller in the MVC, as the name suggests. We’re going to get into this more in the next chapter, but we can say confidently that event and action control will happen through the view controller.
We can say this confidently because we’re pretty much going to be forced into using MVC. A view controller will automatically be set up to access and modify various elements of views that sit under it. For example, the view controller has a title property that is intended to be a human-readable name for the page it runs. In chapter 15, we’ll learn that tab bars and navigation bars automatically pick up that information for their own use. In addition, we’ll often see view controllers automatically linked up to delegate and datasource properties, so that they can respond to the appropriate protocols for their subviews.
So, when you start seeing view controllers telling other objects what to do, look at it from the MVC lens. You should also think about MVC, yourself, as you start to program more complex projects using view controllers.
Finding Related Items
If a view controller is going to act as a controller, it needs to have easy access to the objects that lay both above and below it in the view hierarchy. For this purpose, the view controller contains a number of properties that can be used to find other items that are connected to it. They’re listed in table 13.2.
Table 13.2. When you start connecting a view controller up to other things, you can use its properties to quickly access references to those other objects.
|
Property |
Summary |
|---|---|
|
modalViewController |
Reference to a temporary view controller, such as the Address Book and photo roll controllers that we discuss in chapter 16 and 18. |
|
navigationController |
Reference to a parent of the navigation controller type. |
|
parentViewController |
Reference to the immediate parent view controller, or nil if there is no view controller nesting. |
|
tabBarController |
Reference to a parent of the tab bar controller type. |
|
tabBarItem |
Reference to a tab bar item related to this particular view. |
|
view |
Reference to the controller’s managed view. The view’s subviews property may be used to dig further down in the hierarchy. |
These properties will primarily be useful when we move on to advanced view controllers, because they’re more likely to link multiple view controllers together. We’re mentioning them here because they’re related to the idea of MVC and because they’re UIViewController properties that will be inherited by all other types of controllers.
For now, we’re going to leave these MVC-related properties aside and get into some of the more practical things you can immediately do with a view controller, starting with managing view rotation.
Rotating Views
Telling your views to rotate is simple. In your view controller class file, you’ll find a method called shouldAutorotateToInterfaceOrientation:. In order to make your application correctly rotate, all you need to do is set that function to return the Boolean YES, as shown in listing 13.2.
Listing 13.2. Enabling autorotation in a view controller
- (BOOL)shouldAutorotateToInterfaceOrientation:
        (UIInterfaceOrientation)interfaceOrientation {
    return YES;
}
At this point, if you compile your program, you’ll find that when you rotate your iPhone, the label shifts accordingly. Even better, because you set its font size to vary based on the amount of space it has, it gets larger when placed horizontally. This is a simple application of modifying your content based on the iPhone’s orientation.
There is one additional thing that you should consider when rotating your views: whether they will resize to account for the different dimensions of the new screen.
Resizing Views
When you change your iPhone’s orientation from portrait to landscape, you’re changing the amount of space for displaying content—the device goes from 320x480 to 480x320. As we saw, when you rotated your label, it automatically resized, but this doesn’t happen without some work.
A UIView (not the controller!) contains two properties that affect how resizing occurs. The autoresizesSubviews property is a Boolean that determines whether autoresizing occurs or not. By default it’s set to YES, which is why things worked correctly in the first view controller example. If you instead set it to NO, your view would stay the exact same size when a rotation occurs. In this case, your label would stay 320 pixels wide despite now being on a 480-pixel wide screen.
Once you’ve set autoresizesSubviews, which says that resizing will occur, your view will look at its autoresizingMask property to decide how it should work. The autoresizingMask property is a bitmask that you can set with the different constants listed in table 13.3.
Table 13.3. autoresizingMask properties allow you to control how your views resize.
|
Constant |
Summary |
|---|---|
|
UIViewAutoresizingNone |
No resizing |
|
UIViewAutoresizingFlexibleHeight |
Height resizing allowed |
|
UIViewAutoresizingFlexibleWidth |
Width resizing allowed |
|
UIViewAutoresizingFlexibleLeftMargin |
Width resizing allowed to left |
|
UIViewAutoresizingFlexibleRightMargin |
Width resizing allowed to right |
|
UIViewAutoresizingFlexibleBottomMargin |
Height resizing allowed to bottom |
|
UIViewAutoresizingFlexibleTopMargin |
Height resizing allowed to top |
If you wanted to modify how your label resized from within Xcode, you could do so by adding the following two lines to viewDidLoad:
myLabel.autoresizesSubviews = YES;
myLabel.autoresizingMask = UIViewAutoresizingFlexibleHeight |
    UIViewAutoresizingFlexibleWidth;
Note again that these resizing properties apply to a view, not to the view controller. You could apply them to any view that you’ve seen to date. There has been little need for them before you started rotating things.
Modifying the way resizing works is even easier from within Interface Builder. If you recall, the Resize tab of the inspector window contains an Auto-sizing section, as shown in figure 13.3.
Figure 13.3. Interface Builder will graphically depict exactly what autoresizing looks like.

You can click six different arrows that correspond to the six resizing constants other than None. Highlighting an individual arrow turns that type of resizing on. The graphic to the right of these arrows serves as a nice guide to how resizing will work.
Checking Orientation
Now that you’ve got an application that can rotate at will, you may occasionally want to know what orientation a user’s iPhone is sitting in. This is done by querying the interfaceOrientation view controller property. It will be set to one of four constants, as shown in table 13.4.
Table 13.4. The view controller’s interfaceOrientation property tells you the current orientation of an iPhone.
|
Constant |
Summary |
|---|---|
|
UIInterfaceOrientationPortrait |
iPhone is vertical, right side up |
|
UIInterfaceOrientationPortraitUpsideDown |
iPhone is vertical, upside down |
|
UIInterfaceOrientationLandscapeLeft |
iPhone is horizontal, tilted left |
|
UIInterfaceOrientationLandscapeRight |
iPhone is horizontal, tilted right |
You don’t have to have a view controller to look this information up. A view controller’s data is kept in tune with orientation values found in the UIDevice object—a useful object that also contains other device information, like your system version. We’ll talk about it a bit in chapter 17.
Monitoring the Life Cycle
We’ve covered the major topics of loading, rotating, and resizing views within a view controller. With that under our belt, we can now look at the life-cycle events that might relate to these topics.
We saw life-cycle events in chapter 10, where we examined methods that alerted us to the creation and destruction of the application itself, and some individual views. Given that one of the purposes of a controller is to manage events, it shouldn’t be a surprise that the UIViewController has several life-cycle methods of its own, as shown in table 13.5.
Table 13.5. You can use the view controller’s event handler methods to monitor and manipulate the creation and destruction of its views.
|
Method |
Summary |
|---|---|
|
loadView |
Creates the view controller’s view if it is not loaded from an .xib file |
|
viewDidLoad |
Alerts you that a view has finished loading; this is the place to put extra startup code if loading from an .xib file |
|
viewWillAppear: |
Runs just before the view loads |
|
viewWillDisappear: |
Runs just before a view disappears—because it’s dismissed or covered |
|
willRotateToInterfaceOrientation:duration: |
Runs when rotation begins |
|
didRotateToInterfaceOrientation: |
Runs when rotation ends |
We’ve already met loadView and viewDidLoad, which are run as part of the view controller’s setup routine and which we used to add extra subviews. The viewWillAppear: message is sent afterward. The rest of the messages are sent at the appropriate times, as views disappear and rotation occurs.
Any of these methods could be overwritten to provide the specific functionality that you want when each message is sent.
Other View Methods and Properties
The view controller object contains a number of additional methods that can be used to control exactly how rotation works, including controlling its animation and what header and footer bars slide in and out. These are beyond the scope of our introduction to view controllers, but information about them can be found in the UIViewController class reference.
That’s our look at the bare view controller. You now know not only how to create your first view controller, but also how to use the fundamental methods and properties that you’ll find in every view controller. But the other types of view controller also have special possibilities all their own. We’re going to look at these, starting with the one other view controller that’s intended to control a single page of data: the table view controller.
13.3. The table view controller
Like the plain view controller, the table view controller manages a single page. Unlike the plain view controller, it does so in a structured manner.
Our discussion of the table view controller is going to mirror the discussion we just completed of the bare view controller. We’re going to examine its place in the view hierarchy, and then we’re going to see how to create it, modify it, and use it at runtime.
Let’s get started with this new view controller’s anatomy.
13.3.1. The anatomy of a table view controller
The table view controller’s setup is slightly more complex than that of the bare view controller. A UITableViewController controls a UITableView, which is an object that contains some number of UITableView-Cell objects arranged in a single column. This is shown in figure 13.4.
Figure 13.4. A table view controller controls a table view and its collection of cells.

By default, the controller is both the delegate and the data source of the UITableView. As we’ve previously discussed, these properties help a view hand off events and actions to its controller. The responsibilities for each of these control types is defined by a specific protocol: UITableViewDelegate declares which messages the table view controller must respond to, and UITableViewDataSource details how it must provide the table view with content. You can look up these protocols in the same library that you’ve been using for class references.
Of all of the view controllers, the table view controller is the trickiest to create on its own, for reasons that we’ll see momentarily.
13.3.2. Creating a table view controller
None of the Xcode templates support a plain table view. That’s because a table view is usually linked up with a navigation controller, as we’ll see in chapter 15. If you want to create a plain table view controller, you’ll need to do so by hand, starting with the Window-Based Application template. Table 13.6 shows the entire process.
Table 13.6. Creating a table view controller is simple, but it involves several steps.
|
Step |
Description |
|---|---|
|
1. Create a new project. |
Open a Window-Based Application. |
|
2. Create a table view? controller. |
In Xcode, create a new file containing a subclass of UITableView-Controller; we’ve chosen RootViewController for our new ?class name. Import your new header into your app delegate. In Interface Builder, drag a Table View Controller to your nib display window. Change the class of your controller to your new Xcode subclass in the Identity tab of the inspector window. |
|
3. Link your Interface? Builder object. |
In Xcode, create an IBOutlet for your Interface Builder object in the app delegate header file. In Interface Builder, link an outlet from your table view controller to the IBOutlet in the app delegate object using the Connections tab of the inspector window. |
|
4. Connect your controller. |
Link the controller’s view to your main window. |
The project-creation, object-creation, and object-linking steps pretty much follow the lessons that you’ve already learned. You have to create the subclass for the table view controller because the class file is where you define what the table view contains; we’ll cover this in more depth shortly.
Note that you use two of the more “advanced” Interface Builder techniques that you learned in chapter 12: first linking in a new class (by changing the Identity tab) and then creating a new connection from it to your app delegate (via the Connections tab). As a result, there ends up being two connections from Interface Builder to Xcode. On the one hand, the Interface Builder-created table view controller depends on your RootViewController files for its own methods; on the other hand, your app delegate file links to the controller (and eventually to the methods) via its outlet. This two-part connection to Interface Builder is very common, and you should make sure you understand it before moving on.
As usual, you could have elected to create this object solely in Xcode, by using an alloc-init command:
UITableViewController *myTable = [[RootViewController alloc]
    initWithStyle:UITableViewStylePlain];
Listing 13.3 finishes off the table-creation process, showing the simple code you’ll use to link in the table’s view in step 5 of the process.
Listing 13.3. After the warm up, creating a table view controller takes a few lines of code
- (void)applicationDidFinishLaunching:(UIApplication *)application {
    [window addSubview:myTable.view];
    [window makeKeyAndVisible];
}
Note that you link up your table view controller’s view—not the controller itself—to your window. We’ve seen in the past that view controllers come with automatically created views. Here, the view is a table view.
If you want to see how that table view works, you can now go back into Interface Builder and click the table view to get its details. As shown in figure 13.5, it’s already got connections created for its dataSource and delegate properties.
Figure 13.5. A look at the connections automatically created for a controller’s table view.

At this point, you could compile your program, but the result would be pretty boring; consisting only of an empty list. Next you need to fill that table with content.
13.3.3. Building up a table interface
As the data source, the controller needs to provide the view with its content. This is why you created a subclass for your table view controller and why every one of your table view controllers should have its own subclass: each will need to fill in its data in a different way.
We’ve already mentioned that the UITableViewDataSource protocol declares the methods that your table view controller should be paying attention to in order to correctly act as the data source. The main work of filling in a table is done by the tableView:cellForRowAtIndexPath: method. When passed a row number, this method should return the UITableViewCell for that row of your table.
Before you can get to that method, though, you’ll need to do some work. First, you must define the content that will fill your table. Then, you must define how large the table will be. Only afterward can you fill in the table using the tableView:cellForRowAtIndexPath: method.
Besides these major table view elements, we’ll also cover two optional variants that can change how a table looks: accessory views and sections.
Creating the Content
There are numerous SDK objects that you could use to create a list of data your table should contain. In the future, we’ll talk about SQLite databases and pulling RSS data off the internet. For now we’re going to stay with the SDK’s simpler objects. The most obvious are NSArray, which produces a static indexed array; NSMutableArray, which creates a dynamic indexed array; and NSDictionary, which defines an associative array.
For this example of table view content creation, we have elected to create an NSArray containing an NSDictionary that itself contains color names and UIColor values. As you can probably already guess, you’re going to fill this skeletal table view example out with something like the color selector that you wrote back when we were learning iUI in chapter 5. The code required to create your content array is shown in listing 13.4.
Listing 13.4. An array of selective arrays is perfect for table creation
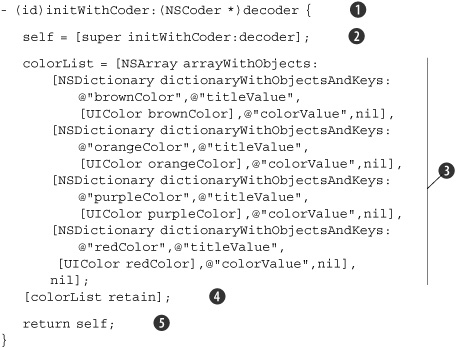
This sort of setup should be done as part of an initialization method. Note that you’ll be using initWithCoder: ![]() , which is the required init method if you’re working with an Interface Builder object (and it’s an alternative to the view
controller’s viewDidLoad method). Any initWithCoder: method should call its parent
, which is the required init method if you’re working with an Interface Builder object (and it’s an alternative to the view
controller’s viewDidLoad method). Any initWithCoder: method should call its parent ![]() and return itself
and return itself ![]() , like a normal init.
, like a normal init.
The array and dictionary creations are pretty simple ![]() . The Apple class references contain complete information on how to create and manipulate these objects, but, in short, you
can create an NSArray as a listing of objects ending in a nil, and you can create an NSDictionary using pairs of values and keys, ending in a nil. Here, you’re creating an array containing four dictionaries, each of which will fill one line of your table.
. The Apple class references contain complete information on how to create and manipulate these objects, but, in short, you
can create an NSArray as a listing of objects ending in a nil, and you can create an NSDictionary using pairs of values and keys, ending in a nil. Here, you’re creating an array containing four dictionaries, each of which will fill one line of your table.
You also have to think a bit about memory management here. Because your array was created with a class factory method, it’s
going to get released when it goes out of scope. In order to use this array elsewhere in your class, you not only need to
have defined it in your header file, but you also need to send it a retain message to keep it around ![]() . You’ll release it in your dealloc method, elsewhere in the class files.
. You’ll release it in your dealloc method, elsewhere in the class files.
Building your Table Cells
Once you’ve got a data backend set up for your table, you need to edit three methods in your table view controller file: two that define the table and one that fills it, as shown in listing 13.5. We’ll explain each of these in turn.
Listing 13.5. Three methods control how your table is created and runs

All of these methods should appear by default in the table view controller subclass that you created, but you may need to make changes to some of them to accommodate the specifics of your table.
The first method is numberOfSectionsInTableView: ![]() . Tables can optionally include multiple sections, each of which has its own index of rows, and each of which can have a header
and a footer. For this first example, you’re creating a table with one section, but we’re going to look at multiple sections
before we finish this chapter.
. Tables can optionally include multiple sections, each of which has its own index of rows, and each of which can have a header
and a footer. For this first example, you’re creating a table with one section, but we’re going to look at multiple sections
before we finish this chapter.
The second method, tableView:numberOfRowsInSection: ![]() , reports the number of rows in this section. Here you’ll return the size of the array that you created. Note that you ignore
the section variable because you only have one.
, reports the number of rows in this section. Here you’ll return the size of the array that you created. Note that you ignore
the section variable because you only have one.
The third method, tableView:cellForRowAtIndexPath: ![]() , takes the table set up by the previous two methods and fills its cells one at a time. Though this chunk of code looks intimidating,
most of it will be sitting there waiting for you the first time you work with a table. In particular, the creation of UITableViewCell will be built in. All you need to do is set the values of the cell before it’s returned. Here you use your NSDictionary to set the text color
, takes the table set up by the previous two methods and fills its cells one at a time. Though this chunk of code looks intimidating,
most of it will be sitting there waiting for you the first time you work with a table. In particular, the creation of UITableViewCell will be built in. All you need to do is set the values of the cell before it’s returned. Here you use your NSDictionary to set the text color ![]() and the text content
and the text content ![]() of the cell. Also note that this is your first use of the NSIndexPath data class. It encapsulates information on rows and sections.
of the cell. Also note that this is your first use of the NSIndexPath data class. It encapsulates information on rows and sections.
You may want to change more things than text content and color. Table 13.7 lists all of the cell features that you might want to muck with at this point.
Table 13.7. You can modify your table cells in a variety of ways.
|
Property |
Summary |
|---|---|
|
font |
Sets the cell text’s font using UIFont |
|
lineBreakMode |
Sets how the cell’s text wraps using UILineBreakMode |
|
Sets the content of a cell to an NSString |
|
|
textAlignment |
Sets the alignment of cell’s text using the UITextAlignment constant |
|
textColor |
Sets the color of the cell’s text using UIColor |
|
selectedTextColor |
Sets the color of selected text using UIColor |
|
Image |
Sets the content of a cell to a UIImage |
|
selectedImage |
Sets the content of a selected cell to UIImage |
Using all of these properties, you can make each table cell look entirely unique, depending on the needs of your program.
Adding Accessory Views
Though we didn’t in our color selector example, you can optionally set accessories on cells. Accessories are special elements that appear to the right of each list item. Most frequently, you’ll set accessories using an accessoryType constant that has four possible values, as shown in table 13.8.
Table 13.8. A cell accessory gives additional information.
|
Constant |
Summary |
|---|---|
|
UITableViewCellAccessoryNone |
No accessory |
|
UITableViewCellAccessoryDisclosureIndicator |
A normal chevron: |
|
UITableViewCellAccessoryDetailDisclosureButton |
A chevron in a blue button: |
|
UITableViewCellAccessoryCheckmark |
A checkmark: |
An accessory can be set as a property of a cell:
cell.accessoryType = UITableViewCellAccessoryDetailDisclosureButton;
The normal chevron is usually used with a navigation controller, the blue chevron is typically used for configuration, and the checkmark indicates selection.
There is also an accessoryView property, which lets you undertake the more complex task of creating an entirely new view to the right of each list item. You create a view and then set the accessoryView to that view:
cell.accessoryView = [[myView alloc] init];
There’s an example of this in chapter 16, where you’ll be working with preference tables.
Adding Sections
Our example showed how to display a single section worth of cells, but it would be trivial to rewrite the functions to each offer different outputs for different sections within the table. Because of Objective-C’s ease of accessing nested objects, you could prepare for this by nesting an array for each section inside a larger array:
masterColorList = [NSArray arrayWithObjects:colorList,otherColorList,nil];
Then you’d return the count from this uber-array for the numberOfSections: method:
return masterColorList.count;
You’d similarly return a subcount of one of the subarrays for the tableView:numberOfRows: method:
return [[masterColorList objectAtIndex:section] count];
Finally, you’d pull out content from the appropriate subarray when filling in your cells using the same type of nested messaging.
Once you’re working with sections, you can also think about creating headers and footers for each section. Figure 13.6 shows what the revised application would look like so far, including two different sections, each of which has its own section header.
Figure 13.6. Section headers can improve the usability of table views.

How do you create those section headers? As with all of the methods we’ve seen that fill in table views, the section header messages and properties show up in the UITableViewDataSource protocol reference.
In order to create section headers, you write a tableView:titleForHeaderInSection: method. As you’d expect, it renders a header for each individual section.
An example of its use is shown in listing 13.6, though you could probably have done something fancier instead, such as building the section names directly into your array.
Listing 13.6. To set a section header, define the return in the appropriate method
- (NSString *)tableView:(UITableView *)tableView
      titleForHeaderInSection:(NSInteger)section {
    if (section == 0) {
         return @"SDK Colors";
    } else if (section == 1) {
         return @"RGB Colors";
    }
    return 0;
}
You can similarly set footers, and otherwise manipulate sections according to the protocol reference.
There’s still more to the table view controller. Not only do you have to work with data when you’re setting it up, you also have to do so when it’s in active use, which usually occurs when your user selects individual cells.
13.3.4. Using your table view controller
We’re not going to dwell too much on the more dynamic possibilities of the UITableViewController here. For the most part, you’ll either use it to hold relatively static data (as we do here) or you’ll use it to interact with a navigation controller (as we’ll see in chapter 15). But before we finish up with table view controllers, we’re going to look at one other fundamental: selection.
Selected Cells
If you try out the sample “tableex” application that you’ve been building throughout section 13.3, you’ll see that individual elements in a table view can be selected.
In table 13.7 we’ve already seen that there are some properties that apply explicitly to selected cells. For example, the following maintains the color of your text when it’s selected, rather than changing it to white, as per the default:
cell.selectedTextColor =
    [[[masterColorList objectAtIndex:indexPath.section]
        objectAtIndex:indexPath.row] objectForKey:@"colorValue"];
As with the rest of the cell definitions, you’d put this line of code in tableView:cell-ForRowAtIndexPath:. You should also note that this is another example of using nested arrays to provide section- and row-specific information for a table list.
The tableView:didSelectRowAtIndexPath: method is the most important for dealing with selections. This method appears in the UITableViewDelegate protocol and tells you when a row has been selected. The message includes an index path, which, as we’ve already seen, contains both a row and a section number.
Listing 13.7 shows a simple example of how you might use this method to checkmark items in your list.
Listing 13.7. We can see when table cells are selected and act accordingly
- (void)tableView:(UITableView *)tableView
    didSelectRowAtIndexPath:(NSIndexPath *)indexPath {

    [[tableView cellForRowAtIndexPath:indexPath]
        setAccessoryType:UITableViewCellAccessoryCheckmark];

}
You are able to easily retrieve the selected cell by using the index path, and then you use that information to set the accessory value. We’ll make more use of cell selection in chapter 15, when we talk about navigation controllers.
Other Table Methods and Properties
In the class reference, you’ll also find information on how you can edit, delete, and insert cells, scroll your table view, and otherwise actively use it.
13.4. Summary
View controllers are the most important building blocks of the SDK that we had not yet seen. As was explained in this chapter, they sit atop views of all sorts and control how those views work. Even in this chapter’s simple examples, we saw some real-world examples of this control, as our view controllers managed rotation, filled tables, and reacted to selections.
Now that we’re getting into user interaction, we’re ready to examine how it works in a bit more depth, and that’s the focus of our next chapter. We’ll examine the underpinnings of user interaction: events and actions.