
Once we have created an Android app, we may want to be able to upload it to Google Play for the users to download. This is no small task as there are many things that we can do to improve user reach and acceptance.
One of the first things we can do to get our app ready for the store is to ensure that we have all the textual translations ready for all the regions that we are going to release to:
- We can specify our default resources in the
values/strings.xmlresource file. For example, if the English language is the default language, our resource file would contain:<resources> <string name="message">English Text</string> <string name="popup">English Popup</string> </resources>
- We can provide a French translation in the
values-fr/strings.xmlresource directory:<resources> <string name="message">Texte Français</string> <string name="popup">Popup Français</string> </resources>
- This can then be used in the layout files:
<Button android:text="@string/message" />
- Alternatively, we can access the string from the code:
var text = Resources.GetString(Resource.String.popup);
Another way to enhance the experience on the wide variety of devices is to provide different image resources for the different screen resolutions and sizes:
- If our app icon is 72 x 72 pixels for high-density screens, we would store this in the
drawable-hdpiresource folder. - Then, to provide a scaled image for very high resolution devices, we would store the scaled up icon of 180 x 180 pixels in the
drawable-xxhdpiresource folder. - In a similar fashion, we can provide alternate layouts depending on the screen size. For a phone, we could store the layout in the
layoutor thelayout-sw320dpresource folders. - And for the tablets, we might store the alternate layout in the
layout-600dpresource folder.
Although there are many other ways to improve the experience for different devices and users, we will only look at one more. We will make use of the Android Support Libraries to bring the modern styles, such as the material design, and functionality, such as toolbars, from the latest version of Android down to the older versions:
- The first thing that we must do is install the Xamarin Support Library v7 AppCompat NuGet or Component into our app.
- Then, we set the Minimum Android version to the older 2.3 and the Target Android version to the latest available, which is currently 5.0:

The Target and Minimum Android version options
- Once the library is installed, we can make use of the various support types, such as
AppCompatActivity, and apply theTheme.AppCompatthemes:[Activity(Theme = "@style/Theme.AppCompat.Light")] public class MainActivity : AppCompatActivity { }
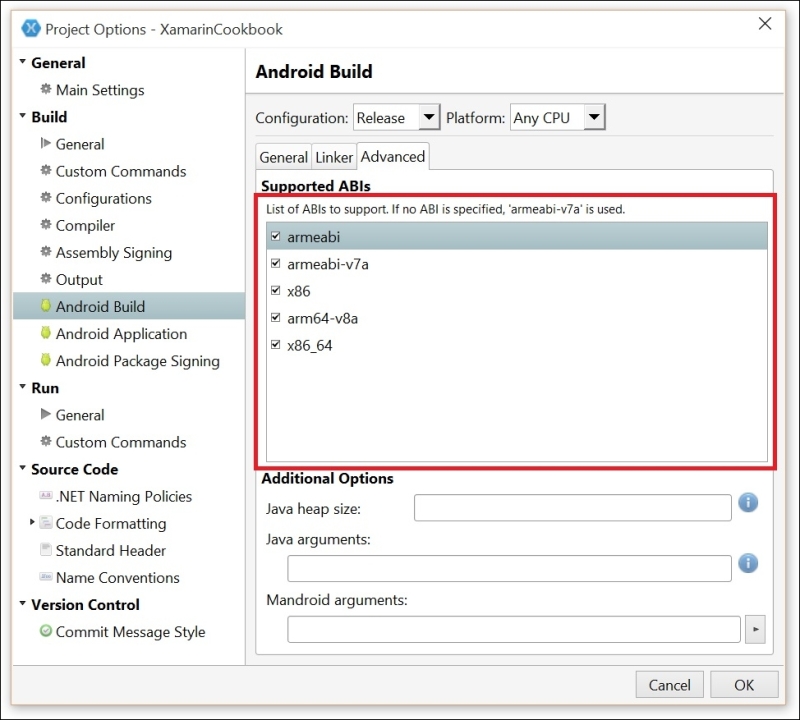
Besides the Android versions, the language differences and the varying screen resolutions, we also need to consider the different hardware architectures of the various devices. There are a few different CPU architectures available, ranging from the older ARMv6 to the new ARMv8 to the Intel x86. As we do not know which users have which devices, we need to support as many as possible:
- To ensure that our app runs on all of these different architectures, we specify that the compiler produce binaries for all the available ABIs:
The supported Android ABI options
The next area to look at is the app packaging and the code itself. What we want to do here is to remove all the unnecessary, or debug-only, code as well as get the package ready for building in the Release configuration:
- If we are making use of the
[UsesFeature]attributes, we should remove any unnecessary[UsesFeature]attributes from our code. - Similarly, we remove all the unnecessary permissions. If we are using these attributes in code, we ensure that there are no unnecessary
[UsesPermission]attributes. - If we are using the project options to edit the
AndroidManifest.xmlfile, we ensure that we uncheck the unnecessary permission items:
Specify the required permissions
As this app will be running on many devices that run many other apps, we don't want to waste CPU resources filling up the log file with all our debug information. We can now start removing the various debug logging:
- We can start off by removing any unnecessary logging methods, such as
Log.DebugorConsole.WriteLine:Log.Debug("TAG", "message"); Console.WriteLine("message"); - Alternatively, we can use the
Debug.WriteLine()methods, which are only included at compile time when building in the debug configuration:Debug.WriteLine("message"); - Another way to do this is by simply wrapping chunks of code in preprocessor directives with the
DEBUGconditional. This prevents the compiler from including this code when building in the release configuration:#if DEBUG WriteOutLogging(); #endif
As the code is now mostly clean and ready for release, we can turn off the debugging permissions on the final app. We do this as it is possible to gain full access to the Java process and execute arbitrary code in the context of the application, if this debug state is not disabled:
- One way to do this from the code using the
[Application]assembly attribute:#if DEBUG [assembly: Application(Debuggable = true)] #else [assembly: Application(Debuggable = false)] #endif
- Alternatively, we can add the
android:debuggableattribute to the<application>element in theAndroidManifest.xmlfile:<application android:debuggable="false">
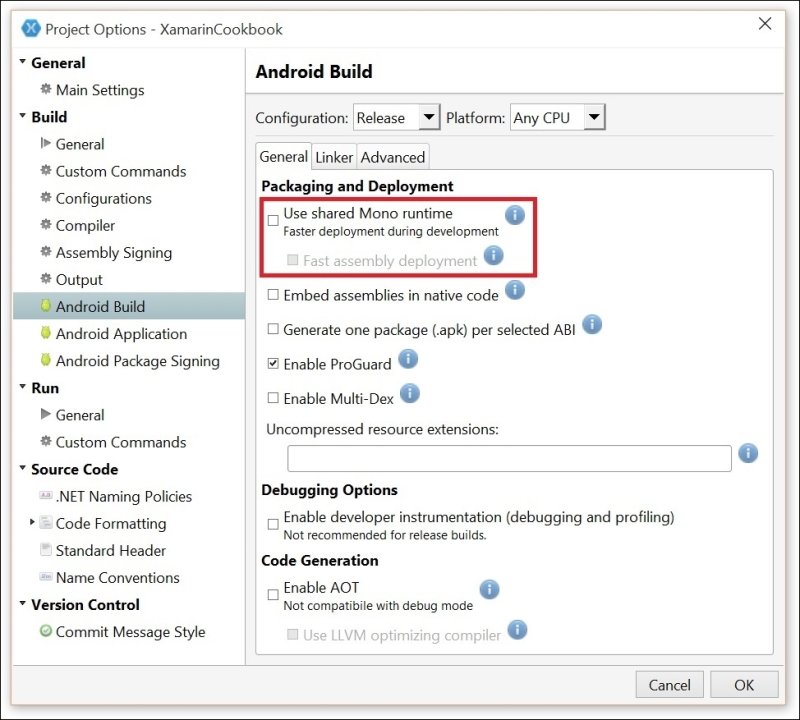
- Finally, we need to specify that the app do not use the shared Mono runtime with the app, as it will not exist on the user's device:
Don't use the shared Mono runtime package
When releasing an app to the store, we want to be able to reach the widest possible audience. One of the things we can do is to make sure that we have created localized translations of the interface resources in the app. Often, this does not require any code changes, but makes the experience more delightful for users in other countries.
In order to do this, we need to ensure that we have extracted all the strings from the layout and code into a resource file for each culture. Android automatically selects the correct resource file depending on the device language that the user has set. We must ensure that there is a default resource for all resources so that Android can fall back to the default value if we miss a resource translation.
To make use of a string resource in the layout files, we replace the actual string value with a reference to the string resource. To access the resources from the code, we use the GetString() method on the Resources property of the Context instance.
In a very similar manner to strings, we can localize images and most other resource types. To create the localized resources, we add a suffix to the resource folders; for example, to localize strings to French, we use the values-fr resource folder. To localize images to Japanese, we use the drawable-ja resource folder.
Just like we can localize resources for different languages, we can customize resources based on the screen resolution or size. We do this so that we can provide higher resolution images for devices with higher resolution displays, or so that we can provide larger images for devices with more screen estate.
Instead of adding the language code as a suffix to the resource folders, we add the display resource qualifiers. There are a few ways we can do this; one way is based on the screen density. Some values are low, high, or extra-extra-high. The resource folders for images at these densities would be drawable-ldpi, drawable-hdpi, and drawable-xxhdpi, respectively. Another way we can do this is by screen size, using the width of the smallest screen dimension. For small devices, such as phones, we would place the layout resources in the layout-sw320dp attribute, and for a 7-inch tablet, we would use the layout-sw600dp resource folder.
One of the first resources that we must always create multiple resolutions of is the launcher icon. This is the first thing that the user sees, and it represents the entire app. A good launcher icon provides a good first impression. In the following table are the common icon dimensions and relative resolutions:
|
Density Name |
Resource Qualifier |
Approximate DPI |
Size Multiplier |
Pixel Size |
|---|---|---|---|---|
|
Low |
ldpi |
~120dpi |
0.75x |
36x36 |
|
Medium |
mdpi |
~160dpi |
1.0x |
48x48 |
|
High |
hdpi |
~240dpi |
1.5x |
72x72 |
|
Extra High |
xhdpi |
~320dpi |
2.0x |
96x96 |
|
Extra Extra High |
xxhdpi |
~480dpi |
3.0x |
180x180 |
|
Extra Extra Extra High |
xxxhdpi |
~640dpi |
4.0x |
192x192 |
The xxxhdpi qualifier only applies to launcher icons, and is not necessary for other images such as toolbar icons or app graphics.
Another area in which we can make the app more enjoyable to use is the overall theme or style. Each version of Android received a theme update, and they usually look nicer each time. Not all users will be running the latest Android version on their device, and not all devices will receive the latest updates. In order to ensure that our app always looks the best on all devices, we can make use of the Android Support Libraries.
After installing the Xamarin Support Library v7 AppCompat Component or NuGet into our app, we will get the libraries required to be able to use the latest styles on both the latest Android version as well as the older versions.
We let Android know what version to use as the base for the styles by setting the target Android version to be the latest available, and the minimum Android version to be the lowest we want to support. Android will then bring the functionality and features from the target version of Android to the minimum Android version.
Then, to use the features in the older Android versions, we need to ensure that we are using the types from the support libraries instead of the default types. For example, instead of inheriting from the Activity type, we inherit from the AppCompatActivity type. And, for themes, we apply or inherit from the Theme.AppCompat variants instead of the default Theme variants.
Not only do we want to support older versions of Android, but we also want to support the various hardware configurations. The two main variations are the x86 and the ARM CPU architectures. The ARM architectures also have several variations from the older ARMv6 to the new 64-bit ARMv8.
To support the widest variety of device hardware, we ensure that we select all the desired ABI options for the app. This does increase the total size of the package by about 1.5 MB per ABI option, but this means that the app will run on almost all hardware configurations. The size increase is a result of the native Mono runtime being included for each ABI option. However, the actual managed assemblies are only included once.
Now that we have support for many devices and many device configurations, we must clean up any unnecessary requirements. The first thing to do is to remove all the unnecessary permissions and feature requirements. This is done by removing the [UsesPermission] and [UsesFeature] attributes that we do not require. We should also ensure that we have not included any unnecessary <uses-permission> or <uses-feature> elements in the AndroidManifest.xml file.
We should also remove all the debug logging from our app. Logging consumes CPU resources and can be detrimental to our app's performance. However, we should not remove any logging that we will need to debug errors or exceptions that may occur once we have released our app. Although we want to remove as much debug logging as possible, we still need to be able to solve problems when our users experience them.
There are a few ways to remove the unnecessary debug logging, the simplest being the removal of any Log.Debug or Console.WriteLine statements. If we want to keep these logging in our code for when we are developing further, we can use the Debug.WriteLine() method instead. When the compiler encounters these methods, it will automatically remove them when building in the release configuration. As these statements are removed entirely, any evaluations that happen as part of the statement will also be removed. Another way to remove statements when building for release is to wrap them with the #if DEBUG preprocessor directives. This allows us to remove entire blocks of code at compile time.
The debugging of an app is performed with the use of the Java Debug Wire Protocol (JDWP), which communicates with a JVM. While JDWP is important during development, it can pose a security risk for the released app. Thus, we must always disable debugging for released apps. We do this by setting the Debuggable property to false on the [Application] attribute in our code, or we can set the android:debuggable attribute to false on the <application> element in the AndroidManifest.xml file.
When developing apps with Xamarin.Android, we want the process of building and deploying to the device to be as quick as possible. As copying and installing a package on a device is a relatively slow operation, we want the package size to be as small as possible. One way to do this is to use the linker, but this is also very slow.
Instead, the app is broken into the Shared Runtime package, the shared platform and our app package. The Shared Runtime package contains the Mono runtime and BCL, the shared platform contains the Android APIs, and our app package just contains the libraries referenced by our project. The Shared Runtime and Shared Platform packages are only copied once to the device, but our app assemblies are updated each time we build and deploy.
As a result, the app package will not include the runtime and Android APIs, but are installed separately. However, as we will not have these packages installed on the users' devices, we need to specify that it should be included with our app by unchecking the Use shared Mono runtime checkbox in the project options.