Chapter 5
XPath Espresso
In This Chapter
![]() Understanding XPath’s role in XSLT
Understanding XPath’s role in XSLT
![]() Creating XPath location steps
Creating XPath location steps
![]() Defining node relationships with axes
Defining node relationships with axes
![]() Matching nodes with node tests
Matching nodes with node tests
![]() Filtering node sets with predicates
Filtering node sets with predicates
![]() Creating absolute location steps
Creating absolute location steps
M y guess is that XPath is the espresso drinker of the X-Team. It’s the high-energy workman that tirelessly treads through XML documents all hours of the day and night looking for those pesky nodes. Geez, with all that effort, it needs a good shot of espresso just to keep going!
Besides, XPath has another tie-in with coffee: Creating XPath expressions reminds me of ordering a drink at Starbucks. XPath is the one X-Teamer built from the ground up to decipher confusing instructions like: “I’d like a venti, triple shot, wet cappuccino with nonfat milk and a dash of cinnamon.” This process of taking a specific request and going in and returning the right set of nodes (or cappuccinos) is what XPath is all about.
XPath, The X-Team’s Commando
XPath is the language used by XSLT to describe how to locate nodes in a source XML document. Think of XPath as the spy or commando who is charged with going into foreign soil, picking out the requested information, and returning it to the XSLT homeland. Every template rule contains one of these XPath commando units that has a mission something like: “Go into the source tree and traverse each node. As you do so, look for a state parent that has city children. Bring each of the nodes that match back to me in this handy sack for further processing.”
Unlike most languages, XPath has a vocabulary that is extremely targeted. Be it English, French, or Russian, any natural language spoken in the world has a rich, verbose vocabulary. Programming languages, like C or Java, are much more constrained, but you still can use these languages to create programs that have thousands or even millions of lines of code. In contrast, XPath’s expressions are almost always placed on a single line.

The primary use of XPath is to create location paths, which are instructions that specify what nodes to bring back to the template rule. More precisely, a location path is an XPath expression that is made up of a series of steps called location steps. A location path’s return value is always a node set.
Dancing the Location Step
People using XSLT have their own dance called the Location Step. Ready? 1-2-3 . . . 1-2-3 . . . Well, even if you don’t have happy feet, you can learn how to do this boogie. A location step is the basic unit that you use when creating XPath expressions and is central to everything done with XSLT. Each location step consists of an axis, a node test, and an optional predicate:
![]() The axis spells out the relationship of the nodes to be selected to the current node being processed.
The axis spells out the relationship of the nodes to be selected to the current node being processed.
![]() The node test identifies the particular nodes that the axis selected and that meet certain conditions.
The node test identifies the particular nodes that the axis selected and that meet certain conditions.
![]() A predicate is an optional filter that sifts out some of the nodes returned by the axis and node test parts.
A predicate is an optional filter that sifts out some of the nodes returned by the axis and node test parts.
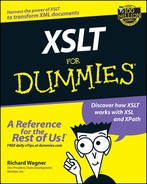
A location step takes the following form: axis::nodetest[predicate]. Figure 5-1 shows the XPath triumvirate.
|
Figure 5-1: Parts of a location step. |

|

Steppin’ through a funnel
You can think of a location step as a sifter (see Figure 5-2). For each source tree node encountered, the XSLT processor runs it through a location step. Starting at the topmost part of the sifter, the processor selects only those nodes that meet the axis specifications, throwing all others out before getting to the node test. In the middle section of the sifter, this node set is then further qualified against the criteria set by the node test. For all the remaining nodes of the set, they go through one final screen at the bottom of the sifter if a predicate is defined. What comes out at the bottom of the sifter is the end result of the location step.
For example, consider the following location step:
child::book[@id]
When a source tree is processed, for each node, the XSLT processor first uses the child:: axis and returns all the current node’s children as a node set. Next, the processor uses the book node test and returns just the child nodes that are book element nodes. Finally, from this smaller node set, it then uses the @id predicate to filter out all book elements that do not have an id attribute defined.
Steppin’ up to a location path
As I mentioned earlier in this chapter, a location path consists of one or more location steps. If more than one location step is specified, then a / is used to separate each step. For example, part/chapter is a location path with two location steps (part and chapter). These two steps form a sequence that is examined from left to right, indicating that the second step is a child of the first. So, in this example, the chapter element is a child of the part element.
|
Figure 5-2: Location step as a funnel. |

|
Defining Relationships with Axes
The axis part of a location step is all about defining relationships between the current node and the nodes that you wish to select. There are 13 possible axes, which are listed in Table 5-1. Some of these axes can be abbreviated; these abbreviations are shown in the Shortened Syntax column.
| Axis | Relationship to Current Node | Shortened Syntax |
|---|---|---|
| child | Children of current node. | (no axis present |
| denotes child axis) | ||
| self | Current node. | self::node() = . |
| parent | Parent of the current node. | parent:: |
| (always a single node) | node() = .. | |
| attribute | All attributes of the current node. | @ |
| descendant | Children of current node, | |
| plus the children’s children, | ||
| and so on down the tree. | ||
| ancestor | Parent of the current node, | |
| plus the parent’s parent, | ||
| and so on up to and including | ||
| the root node. | ||
| following-sibling | Siblings after the current node | |
| in the tree. | ||
| preceding-sibling | Siblings before the current node | |
| in the tree. | ||
| following | All nodes after the current node | |
| in the tree. | ||
| preceding | All nodes before the current node | |
| in the tree. | ||
| namespace | All namespace nodes of | |
| the current node. | ||
| descendant-or-self | Current node and all | descendant- |
| its descendant nodes. | or-self:: | |
| node() = // | ||
| ancestor-or-self | Current node and all | |
| its ancestor nodes. |
In addition to defining relationships, the axis also specifies the direction from the current node that the processor walks the tree to gather up nodes. Normally, tree walking goes top-to-bottom, left-to-right, much like you read a page in this book. However, certain axes — ancestor, ancestor-or-self, preceding, and preceding-sibling — travel in reverse order. (When working with attribute and namespace axes, the nodes are always unordered.)
For example, when processing a match pattern with a descendant axis, the XSLT processor starts with the first descendant defined in the source tree encountered and works its way downward until it reaches the last descendant for the current node. Or, when evaluating a preceding axis, the processor starts with the node just before the current node and works its way to the top of the document tree in reverse order. This directionality becomes important when you start thinking about the position of nodes within the node set that the axis returns. (I discuss node set positions later in this chapter.)
Child axis
Of the 13 available axes, the child axis is certainly the most common among them. It is used to select all the child nodes of the current node. The children are ordered based on the sequence in the document tree, as shown in Figure 5-3.
|
Figure 5-3: Nodes selected by the child axis. |

|
For example, consider the following XML document shown in Listing 5-1, which is an XMLized version of this book’s table of contents.
Listing 5-1: xsltfordummies-toc.xml
<!-- xsltfordummies-toc.xml -->
<book title=”XSLT For Dummies”>
<isbn>3651-6</isbn>
<introduction/>
<part number=”I” name =”Getting Started With XSLT”>
<chapter number=”1”>
<title>Introducing The X-Team</title>
<summary>Introduce core XML/XSLT concepts</summary>
</chapter>
<chapter number=”2”>
<title>Writing Your First XSLT Stylesheet</title>
<summary>Getting feet wet with a simple, practical example of transforming</summary>
</chapter>
</part>
<part number=”II” name =”Becoming An XSLT Transformer”>
<chapter number=”3”>
<title>Transforming With Style (Stylesheets, that is)</title>
<summary>Cover topics related to top level “domain”: the XSL Stylesheet</summary>
</chapter>
<chapter number=”4”>
<title>Templates Rule!</title>
<summary>Cover the second level domain: templates</summary>
</chapter>
<chapter number=”5”>
<title>XPath Espresso</title>
<summary>Focus on the third level domain: XPath Expressions</summary>
</chapter>
<chapter number=”6”>
<title>We Want Results!</title>
<summary>Provide practical examples to apply what was learned in Chapter 3-5</summary>
</chapter>
</part>
<part number=”III” name =”Prime Time XSLT”>
<chapter number=”7”>
<title>Adding Programming Logic Isn’t Just For Propheads</title>
<summary>Add logic to template rules</summary>
</chapter>
<chapter number=”8”>
<title>Variables in XSLT: A Breed Apart</title>
<summary>Add variables/parameters to template rules</summary>
</chapter>
<chapter number=”9”>
<title>Tweaking The Results To Get What You Want</title>
<summary>Perform advanced data-related output options</summary>
</chapter>
<chapter number=”10”>
<title>To HTML And Beyond!</title>
<summary>Output to HTML and other formats</summary>
</chapter>
<chapter number=”11”>
<title>Xpath Data Types and Functions</title>
<summary>Cover practical examples of using built-in functions</summary>
</chapter>
</part>
<part number=”IV” name =”Extreme XSLT”>
<chapter number=”12”>
<title>Combining XSLT Stylesheets</title>
<summary>Using import and include</summary>
</chapter>
<chapter number=”13”>
<title>”Gimme Some Space” And Other Output Issues</title>
<summary>Perform advanced output options</summary>
</chapter>
<chapter number=”14”>
<title>Keys and Cross-Referencing</title>
<summary>Covers key and id usage</summary>
</chapter>
<chapter number=”15”>
<title>Namespaces Revisited</title>
<summary>More about namespaces</summary>
</chapter>
<chapter number=”16”>
<title>Extending XSLT</title>
<summary>Extensions for additional customization and power</summary>
</chapter>
<chapter number=”17”>
<title>Debugging XSLT Transformations</title>
<summary></summary>
</chapter>
</part>
<part number=”V” name =”Part of Tens”>
<chapter number=”18”>
<title> Ten Most Confusing Things About XSLT </title>
</chapter>
<chapter number=”19”>
<title>Ten All-Pro XSLT Resources On The Web</title>
</chapter>
<chapter number=”20”>
<title>Ten XSLT Processors Available Online</title>
</chapter>
</part>
<appendix number=”A” name=”Glossary”/>
</book>
Suppose you wanted to output a quick list of the book chapters. To do so, you could set up a template rule like this:
<xsl:template match=”child::chapter”>
<xsl:apply-templates select=”child::title”/>
</xsl:template>
Using the child axis as the starting point, the match pattern for the template looks for all chapter nodes that are children of the current node. For the returning node set, the template uses the xsl:apply-templates instruction, but does so by defining a select attribute to narrow the output to the child title elements of the returning node set. The output is:
Introducing The X-Team
Writing Your First XSLT Stylesheet
Transforming With Style (Stylesheets, That Is)
Templates Rule!
XPath Espresso
We Want Results!
Adding Programming Logic Isn’t Just For Propheads
Variables in XSLT: A Breed Apart
Tweaking The Results To Get What You Want
To HTML and Beyond!
XPath Data Types and Functions
Combining XSLT Stylesheets
Gimme Some Space and Other Output Issues
Keys and Cross-Referencing
Namespaces Revisited
Extending XSLT
Debugging XSLT Transformations
Ten Most Confusing Things About XSLT
Ten All-Pro XSLT Resources On The Web
Ten XSLT Processors Available Online

You may find this fact surprising, but all the examples you have seen so far in this book have used the child axis. So why have you not seen child:: before now? That is because child is the default axis for a location step, so that if you do not explicitly define an axis value, the child axis becomes the implicit axis. Therefore, if I drop child:: from the template, I get an identical result:
<xsl:template match=”chapter”>
<xsl:apply-templates select=”title”/>
</xsl:template>
Attribute axis
The second most common axis type is attribute. The attribute axis selects all attributes of the current node. Like child::, attribute:: has a shorter alternative, the @ symbol. Therefore, the following two are equivalent:
<xsl:value-of select=”attribute::id”/>
and
<xsl:value-of select=”@id”/>
Suppose, for example, you want to output a list of the book parts from the XML document shown in Listing 5-1. To do so, you set up a template rule like this:
<xsl:template match=”part”>
Part <xsl:value-of select=”@number”/>: <xsl:value-of select=”@name”/>
</xsl:template>
Using the child axis as the starting point, the match pattern for the template looks for all part nodes that are children of the current node. The template uses xsl:value-of elements to output the number and name attributes of all returned part nodes as strings. The output is:
Part I: Getting Started With XSLT
Part II: Becoming An XSLT Transformer
Part III: Prime Time XSLT
Part IV: Extreme XSLT
Part V: Part of Tens
XPath axes abbreviations
If you’re like me and routinely frequent Starbucks, I suspect you too picked up the coffee lingo from the baristas. I have a favorite drink I order nearly every time I go to my local shop. I first start off by saying, “I’d like a grande café mocha with half of the chocolate syrup, nonfat milk, and extra whipped cream.” But over time, I learned barista-speak. Now I say, “I want a grande light, nonfat, extra whipped mocha.” Both are a mouthful, but the second one is quicker rolling off the tongue.
In the same way, XPath has some abbreviated ways to write axes values that make it quicker to write XPath expressions. These include:
child:: axis doesn’t need to be explicitly defined, so you can leave it off.
attribute:: can be shortened to @.
self::node() is abbreviated to . (single period).
parent::node() is shortened to .. (double period).
/descendant-or-self::node()/ is reduced to //.
Parent axis
The parent axis specifies the parent of the current node (see Figure 5-4). Unlike most of the other axes, parent always refers to a single node, because a node never has two nodes as its immediate parent.
|
Figure 5-4: Node selected by the parent axis. |

|
The parent axis is commonly abbreviated as .. (double periods) when it is used in combination with the node test node(). (I don’t want to get ahead of myself because I talk about node tests in the next part of the chapter, but understanding this point can help you as you find out about axes.) node() is a node test that matches any node whatever kind it is. So, parent::node() means, “Don’t worry about its node type; just give me the parent of the current node.” (Similarly, child::node() selects all the children of the current node no matter their node type.)
To illustrate the parent axis in action, suppose you want to transform xsltfordummies-toc.xml (shown in Listing 5-1) into a result document that looks like the following:
Chapter 1, “Introducing The X-Team”, is in Part I
Chapter 2, “Writing Your First XSLT Stylesheet”, is in Part I
Chapter 3, “Transforming With Style (Stylesheets, That Is)”, is in Part II
Chapter 4, “Templates Rule!”, is in Part II
Chapter 5, “XPath Espresso”, is in Part II
Chapter 6, “We Want Results!”, is in Part II
Chapter 7, “Adding Programming Logic Isn’t Just For Propheads”, is in Part III
Chapter 8, “Variables in XSLT: A Breed Apart”, is in Part III
Chapter 9, “Tweaking The Results To Get What You Want”, is in Part III
Chapter 10, “To HTML and Beyond!”, is in Part III
Chapter 11, “XPath Data Types and Functions”, is in Part III
Chapter 12, “Combining XSLT Stylesheets”, is in Part IV
Chapter 13, “Gimme Some Space and Other Output Issues”, is in Part IV
Chapter 14, “Keys And Cross-Referencing”, is in Part IV
Chapter 15, “Namespaces Revisited”, is in Part IV
Chapter 16, “Extending XSLT”, is in Part IV
Chapter 17, “Debugging XSLT Transformations”, is in Part IV
Chapter 18, “Ten Most Confusing Things About XSLT “, is in Part V
Chapter 19, “Ten All-Pro XSLT Resources On The Web”, is in Part V
Chapter 20, “Ten XSLT Processors Available Online”, is in Part V
To get this output, you can create a template rule that looks like this:
<xsl:template match=”chapter”>
Chapter <xsl:value-of select=”@number”/>, “<xsl:value-of select=”title”/>”, is in Part <xsl:value-of select=”../@number”/>
</xsl:template>
This template rule returns the chapter elements using match=”chapter”. Inside the template, literal text is mixed with the following three xsl:value-of elements to get the resulting text:
![]() <xsl:value-of select=”@number”/> returns the number attribute for the chapter element.
<xsl:value-of select=”@number”/> returns the number attribute for the chapter element.
![]() <xsl:value-of select=”title”/> returns the title child of the chapter element. (Yes, you can write it child::title.)
<xsl:value-of select=”title”/> returns the title child of the chapter element. (Yes, you can write it child::title.)
![]() <xsl:value-of select=”../@number”/> first points to the parent of the chapter element (which is always the part element) and then returns the parent’s number attribute with @number. The / is used to express the hierarchical relationship between the part element and its child number attribute.
<xsl:value-of select=”../@number”/> first points to the parent of the chapter element (which is always the part element) and then returns the parent’s number attribute with @number. The / is used to express the hierarchical relationship between the part element and its child number attribute.
Self axis
You use the self axis to select the current node, as shown in Figure 5-5.
When used with the node() node test, self::node() is abbreviated as . (a single period), which in effect says, “Return the current node.” For example, from Listing 5-1, to get the value of the introduction element and output it to a string, you can create a template rule like the following:
<xsl:template match=”isbn”>
<xsl:value-of select=”.”/>
</xsl:template>
The match pattern returns the isbn element and the select=”.” uses the returned node itself in the xsl:value-of conversion. The end result is:
3651-6
|
Figure 5-5: Node selected by the self axis. |

|
Preceding-sibling and following-sibling axes
The preceding-sibling and following-sibling axes are used to select sibling nodes that come either before or after the current node (see Figures 5-6 and 5-7). Although the terms themselves are singular, preceding-sibling and following-sibling select all sibling nodes in the direction that is specified, not just the next or previous sibling.
|
Figure 5-6: Nodes selected by the preceding-sibling axis. |

|
|
Figure 5-7: Nodes selected by the following-sibling axis. |

|
For example, consider the following XML snippet:
<part number=”II” name =”Becoming An XSLT Transformer”>
<chapter number=”3”>
<title>Transforming With Style (Stylesheets, that is)</title>
</chapter>
<chapter number=”4”>
<title>Templates Rule!</title>
</chapter>
<chapter number=”5”>
<title>XPath Espresso</title>
</chapter>
<chapter number=”6”>
<title>We Want Results!</title>
</chapter>
</part>
Suppose your context node is the <chapter number=”5”> element and you want to get the value of the title element under <chapter number=”6”>. To do so, you start out by using following-sibling::chapter to get the next siblings and then a second location step that retrieves the title element children:
<xsl:template match=”chapter[@number=’5’]”>
<xsl:value-of select=”following-sibling::chapter/title”/>
</xsl:template>
See the section, “Using Predicates to Get Specific,” later in the chapter for a more detailed example of preceding-sibling and following-sibling.
Preceding and following axes
The preceding and following axes have a broader focus than do preceding-sibling and following-sibling. They return all the nodes, regardless of their hierarchy level, in the specified direction. preceding selects all the nodes before the current node on the tree, and following selects all the nodes after the current node. Figures 5-8 and 5-9 show these axes and their direction.
|
Figure 5-8: Nodes selected by the preceding axis. |

|
|
Figure 5-9: Nodes selected by the following axis. |

|
Descendant and descendant-or-self axes
The descendant axis selects all the nodes under the current node, whether they are children, grandchildren, great-grandchildren, and so on (see Figure 5-10). The descendant-or-self axis selects both the current node and all its descendants (see Figure 5-11). The descendant-or-self axis can be useful when you’re uncertain of the number of levels between two nodes or if you simply want to bypass the intermediate levels.
|
Figure 5-10: Nodes selected by the descendant axis. |

|
|
Figure 5-11: Nodes selected by the descendant-or-self axis. |

|
Ancestor and ancestor-or-self axes
The ancestor axis selects all the ancestors of the current node, and the ancestor-or-self axis selects both the current node plus all its ancestors. See Figures 5-12 and 5-13. Both axes are useful when you know a node is the current node or is above the current node in the document tree, but are not certain where.
|
Figure 5-12: Nodes selected by the ancestor axis. |

|
|
Figure 5-13: Nodes selected by the ancestor-or-self axis. |

|
Namespace axis
The namespace axis selects all namespaces relevant for the current node.
Matching Nodes with Node Tests
The centerpiece of the location step is the node test. The axis is given a value if you don’t define one, and the predicate is optional. The node test, however, must be part of every single location step you create. The node test looks at the node set given to it by the axis and says, “I want the nodes with this name or this type.”
The most common node tests look for a match based on an element name. For example, the following XSLT snippet was used earlier in the chapter to return the chapter titles to the output tree:
<xsl:template match=”title”>
<xsl:apply-templates/>
</xsl:template>
This node test, which should look fairly commonplace to you by now, says, “I want all the title elements from the node set given to me by the child axis.”
In addition to using element names as the node test, you can also use several other node tests, as shown in Table 5-2.
| Node Test | Description |
|---|---|
| elementname | Matches <elementname> element nodes |
| * | Matches all nodes of the principal node |
| type (for example, child::* returns all | |
| child element nodes and attribute::* | |
| returns all attribute nodes) | |
| node() | Matches all nodes, regardless of their type |
| text() | Matches all text nodes |
| comment() | Matches all comment nodes |
| namespace: elementname | Matches <elementname> element nodes |
| in the defined namespace | |
| namespace:* | Matches all element nodes in the defined |
| namespace | |
| processing-instruction() | Matches processing instructions |
| processing-instruction | Matches processing instructions with the |
| (‘target’) | specified target <?target ...?> |
Given that there are multiple types of nodes, you may be wondering how the processor knows that title from the preceding match pattern is referring to an element node rather than some other type. The reason is that every axis has a principal node typ e (or default node type). Most of the axes have a principal node type of an element, but there are a couple of exceptions: attribute axis has a principal node type of attribute and namespace axis has a principal node type of namespace. So, in the preceding example, because child — the implicit axis for title — has a principal node type of element, the processor knows that the match pattern is referring to an element node named title.
Using Predicates to Get Specific
The final part of the location step is the predicate, which can be optionally defined. If you use a predicate, it separates the wheat from the chaff in the resulting node set — keeping the wheat for the result tree and throwing away the chaff. After the processor evaluates the predicate, which is an XPath expression, the processor converts the result into a Boolean (true or false) value. Those nodes with a true value are included in the result tree, and those with a false value are not.
For example, using xsltfordummies-toc.xml (see Listing 5-1), suppose you wanted to output just the contents of Part V of the book in your result tree. Using a predicate, you define the template rule’s match pattern as part[@number=’V’], which tells the processor to return all the part elements that have a number attribute with the value of V. This template rule then returns only the specific part element you want. However, you also need to create an empty template rule to override the built-in template rule for the other part nodes:
<xsl:template match=”part[@number=’V’]”>
Part V includes:
<xsl:apply-templates/>
</xsl:template>
<xsl:template match=”isbn”/>
<xsl:template match=”part”/>
The end result is:
Part V includes:
Ten Most Confusing Things About XSLT
Ten All-Pro XSLT Resources On The Web
Ten Free XSLT Processors You Can Download
You can also use built-in XPath functions inside predicates. I talk about these in Chapter 11, but I use the not() built-in function here to give you a flavor for how you can use them. The not() function returns the opposite value of the XPath expression inside it. So, whereas the location step book[@id] is used to return all book elements that have an id attribute, book[not(@id)] returns all book elements that do not have an id attribute. Applying this principle to a full example, consider the following:
<xsl:template match=”chapter”>
Chapter <xsl:apply-templates select=”@number”/> : Summary provided
</xsl:template>
<xsl:template match=”chapter[not(summary)]”>
Chapter <xsl:apply-templates select=”@number”/> : No summary provided
</xsl:template>
This set of template rules formats the output differently based on whether or not the chapter element has a child summary element. Because Chapters 18 to 20 are the only ones that don’t have a summary, the output looks like:
Chapter 1 : Summary provided
Chapter 2 : Summary provided
Chapter 3 : Summary provided
Chapter 4 : Summary provided
Chapter 5 : Summary provided
Chapter 6 : Summary provided
Chapter 7 : Summary provided
Chapter 8 : Summary provided
Chapter 9 : Summary provided
Chapter 10 : Summary provided
Chapter 11 : Summary provided
Chapter 12 : Summary provided
Chapter 13 : Summary provided
Chapter 14 : Summary provided
Chapter 15 : Summary provided
Chapter 16 : Summary provided
Chapter 17 : Summary provided
Chapter 18 : No summary provided
Chapter 19 : No summary provided
Chapter 20 : No summary provided
You can also use predicates to select a specific node based on its position in the node set. For example, if you want to select the first chapter child of the current node, you can use the position() built-in function:
chapter[position()=1]
As a shortcut, you can simply leave off the function name and just specify a position value:
chapter[1]
When the processor sees a numeric value by itself in the predicate, it implicitly adds the position()=.
Or to select the last chapter child, use another built-in function, last():
chapter[last()]
As you work with positions in a node set, the order of the returning nodes becomes very important. So, when you use the reverse order axes (ancestor, ancestor-or-self, preceding, and preceding-sibling), remember that [1] selects the first node in reverse order. For example, consider the following XML snippet:
<part number=”II” name =”Becoming An XSLT Transformer”>
<chapter number=”3”>
<title>Transforming With Style (Stylesheets, that is)</title>
</chapter>
<chapter number=”4”>
<title>Templates Rule!</title>
</chapter>
<chapter number=”5”>
<title>XPath Espresso</title>
</chapter>
<chapter number=”6”>
<title>We Want Results!</title>
</chapter>
</part>
With <chapter number=”4”> element as the current node, preceding-sibling returns the <chapter number=”3”> and following-sibling returns a node set with <chapter number=”5”> and <chapter number=”6”> elements.
Using this snippet as the source, suppose you want to output the title of each chapter along with the titles of the previous and next chapter. The template rule is defined as follows:
<xsl:template match=”chapter”>
Previous: <xsl:value-of select=”preceding-sibling::chapter[1]/title”/>
Current: <xsl:apply-templates select=”title”/>
Next: <xsl:value-of select=”following-sibling::chapter[1]/title”/>
</xsl:template>
The template rule uses chapter as the location step to return all chapter elements for the template. Following the literal text Previous:, I use an xsl:value-of instruction to convert the result of select to a string. The preceding-sibling::chapter[1] step finds the first sibling that occurred before it on the source tree. The value of its child title element is then used by xsl:value-of. For the next chapter, I use following-sibling and apply the same logic as before. The end result is:
Previous:
Current: Transforming With Style (Stylesheets, that is)
Next: Templates Rule!
Previous: Transforming With Style (Stylesheets, that is)
Current: Templates Rule!
Next: XPath Espresso
Previous: Templates Rule!
Current: XPath Espresso
Next: We Want Results!
Previous: XPath Espresso
Current: We Want Results!
Next:
Take a Walk on the Absolute Side
If you work with directories and files on your computer, you’re probably familiar with the concept of relative and absolute paths. For example, suppose I am in the c:WindowsSystem32 directory and want to open up a file named espresso.txt in c:Lattes. If I used a relative path, I would type the following to get to the file:
....Lattesespresso.txt
Or to use an absolute path, I would use:
C:Lattesespresso.txt
Like directory/file structures, location paths can either be relative or absolute. A relative location path is defined by the axis relation to the current node. Each of the preceding examples in this chapter is relative. In contrast, an absolute location path starts at the root node and then has specified steps to descend the tree to the desired axis. A / character, meaning “start at the root,” is always placed at the start of an absolute location path. For example, to get the content of the introduction element from Listing 5-1, I can use the following absolute path:
<xsl:template match=”/book/introduction”>
<xsl:apply-templates/>
</xsl:template>
The match pattern starts with / to denote an absolute path and then looks for a book element node just under the root node with an introduction element node as its child. If found, the node set is applied using xsl:apply-templates.
An absolute path is also used when you want to specifically work with the root node. To demonstrate, suppose I want to surround all the contents of my xsltfordummies-toc.xml document (including the document element) with a new element called dummies. The following template rule does the trick:
<xsl:template match=”/”>
<dummies genre=”technology”>
<xsl:copy-of select=”.”/>
</dummies>
</xsl:template>
The match pattern of / selects the root node for the template and adds literal text before and after the result of the xsl:copy-of instruction.
Putting It All Together
The following bulleted lists give you a sampling of the various relative and absolute location paths I’ve talked about in this chapter.
Axis examples
![]() chapter or child::chapter selects the chapter element children of the current node.
chapter or child::chapter selects the chapter element children of the current node.
![]() @name or attribute::name selects all the name attributes of the current node.
@name or attribute::name selects all the name attributes of the current node.
![]() .. or parent::node() selects the parent of the current node.
.. or parent::node() selects the parent of the current node.
![]() . or self::node() selects the current node, regardless of its type.
. or self::node() selects the current node, regardless of its type.
![]() self::chapter selects the current node if it is a chapter element.
self::chapter selects the current node if it is a chapter element.
![]() decendant::chapter selects all the chapter descendants of the current node.
decendant::chapter selects all the chapter descendants of the current node.
![]() descendant-or-self::page selects all the page element descendants of the current node and, if the current node is a page element, then include it as well.
descendant-or-self::page selects all the page element descendants of the current node and, if the current node is a page element, then include it as well.
![]() ancestor::page selects all the page element ancestors of the current node.
ancestor::page selects all the page element ancestors of the current node.
![]() ancestor-or-self::page selects all the page element ancestors of the current node and, if the current node is a page element, then include it as well.
ancestor-or-self::page selects all the page element ancestors of the current node and, if the current node is a page element, then include it as well.
![]() chapter/descendant::page selects the page descendants of the chapter element children of the current node.
chapter/descendant::page selects the page descendants of the chapter element children of the current node.
Node test examples
![]() * or child::* selects all the element children of the current node.
* or child::* selects all the element children of the current node.
![]() @* or attribute::* selects all the attributes of the current node.
@* or attribute::* selects all the attributes of the current node.
![]() text() or child::text() selects all the text node children of the current node.
text() or child::text() selects all the text node children of the current node.
![]() node() or child::node() selects all the node children of the current node.
node() or child::node() selects all the node children of the current node.
![]() */page selects all the page grandchildren of the current node.
*/page selects all the page grandchildren of the current node.
Predicate examples
![]() chapter[1] or chapter[position()=1] selects the first chapter element child of the current node.
chapter[1] or chapter[position()=1] selects the first chapter element child of the current node.
![]() chapter[last()] selects the last chapter element child of the current node.
chapter[last()] selects the last chapter element child of the current node.
![]() following-sibling::chapter[1] selects the next chapter element sibling of the current node.
following-sibling::chapter[1] selects the next chapter element sibling of the current node.
![]() preceding-sibling::chapter[1] selects the previous chapter element sibling of the current node.
preceding-sibling::chapter[1] selects the previous chapter element sibling of the current node.
![]() chapter[@level] selects all the chapter element children of the current node that have a level attribute defined.
chapter[@level] selects all the chapter element children of the current node that have a level attribute defined.
![]() chapter[not(@level)] selects all the chapter element children of the current node that don’t have a level attribute defined.
chapter[not(@level)] selects all the chapter element children of the current node that don’t have a level attribute defined.
![]() chapter[@level=’advanced’] selects all the chapter element children of the current node that have a level attribute with a value of advanced.
chapter[@level=’advanced’] selects all the chapter element children of the current node that have a level attribute with a value of advanced.
![]() chapter[summary] selects all the chapter element children of the current node that have one or more summary element children.
chapter[summary] selects all the chapter element children of the current node that have one or more summary element children.
![]() chapter[2][@level] selects the second chapter element child of the current node if it has a level attribute defined.
chapter[2][@level] selects the second chapter element child of the current node if it has a level attribute defined.
![]() chapter[@level][2] selects the second chapter element child of the current node that has a level attribute defined.
chapter[@level][2] selects the second chapter element child of the current node that has a level attribute defined.
Absolute path examples
![]() / selects the root node.
/ selects the root node.
![]() /descendant::chapter selects all the chapter elements in the same document as the current node.
/descendant::chapter selects all the chapter elements in the same document as the current node.
![]() /descendant::summary[12] selects the 12th summary element in the document.
/descendant::summary[12] selects the 12th summary element in the document.