
When Things Go Wrong
Even the best-thought-out program can have unexpected issues. Some are easy to track down; others can drive you crazy trying to figure out what is going wrong. Again, you might be tempted to blame the robot as being faulty, but 99.99 percent of the time, that is not the case. The robot is doing exactly what it is told to do by your program.
Sometimes just slowing down and “walking” through your code will help you find the solution. People tend to get upset or anxious about the program not working right, and then they have a hard time focusing. This is a good time to step back from the code and try to look at it from a different perspective—look at it as if you have never seen the code before. This may seem hard to do when you’re at an event with time constraints, but rushing and being in a panic isn’t going to fix the issue for you.
Look at each block in your code, talk out loud as a group about what the block is doing, and include the details. Things such as motor port assignments and sensor locations are important, so include them as you talk.
Doing a code walk through as a group can be helpful as well. During this process, find a whiteboard, large paper, or chalkboard someplace where you can write out the code and what logic is being executed. Writing it down as you go along can help you focus on what is happing in the program, and it can help you highlight any possible unexpected conditions.
Also, keep in mind the “state” of your values, sensors, and motors. The state refers to the current position or value. When doing your code walk-through, highlight the state of the different values with the logic flow.
It helps to bring in another team member who isn’t as familiar with the code as you are, to look at the code with a fresh set of eyes. Often you are so close to the code that you miss the obvious problems that someone else could help you find. This is called a Code Review and is a process used in Software Engineering. Sometimes your solution to the problem might spring up when you talk to someone else, just because you are explaining your code.
Being able to see the values that the program is evaluating can be very helpful, since you may be assuming that a particular value is something different than what the program is really seeing.
Built into the NXT firmware is the View submenu (Figure 4-1), which allows you to do a quick test of your data values from each of your sensors and motors. The values seen in the view menu are the values being returned at real time by the sensors and inputs on the NXT brick. The View menu is helpful in not only debugging values; it can also help when you’re coding and need to know ranges of values to expect in your code.
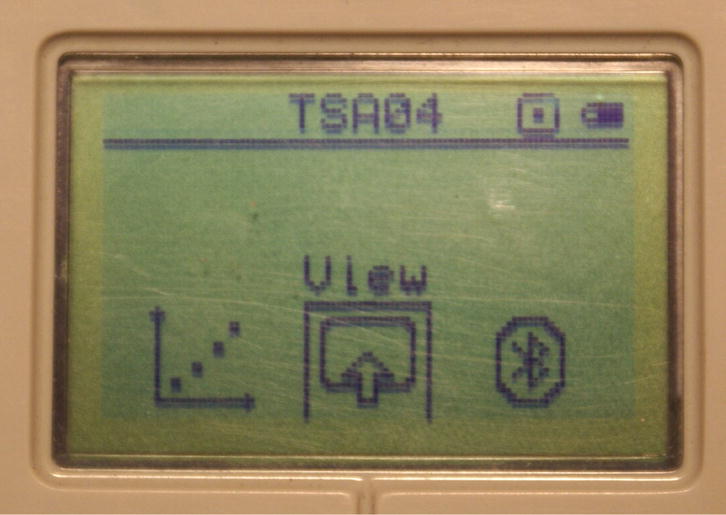
Figure 4-1. NXT View Submenu
To view the values of a sensor or motor, simply find the icon that corresponds to the type of sensor you wish to test. You can view only one sensor or motor at a time (Figure 4-2).
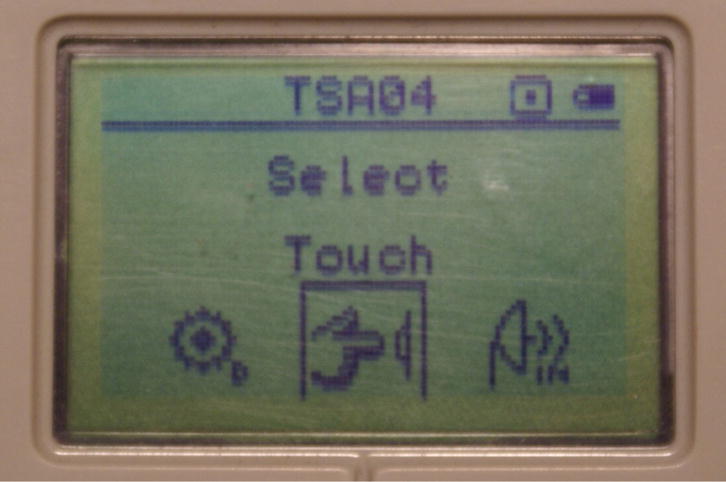
Figure 4-2. NXT View Touch Sensor selection
Next you need to select the port that the sensor or motor is using to connect to the NXT (Figure 4-3).
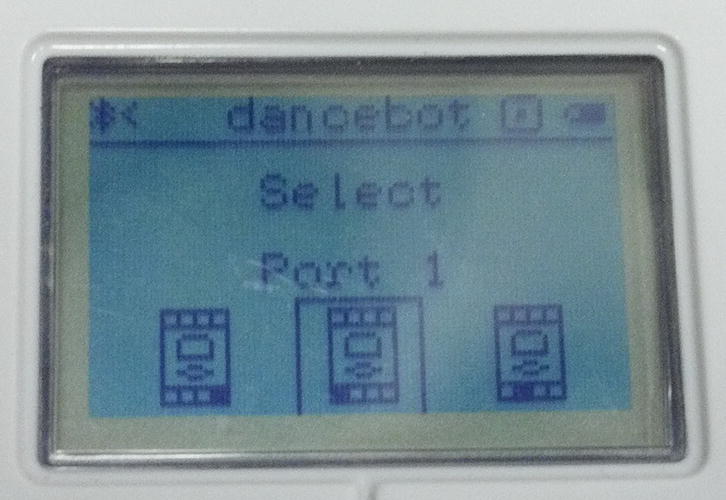
Figure 4-3. NXT View port selection
The data from the sensor will now appear on the screen (Figure 4-4). This is a good way to see different light sensor values or to check the rotation values coming from a motor.
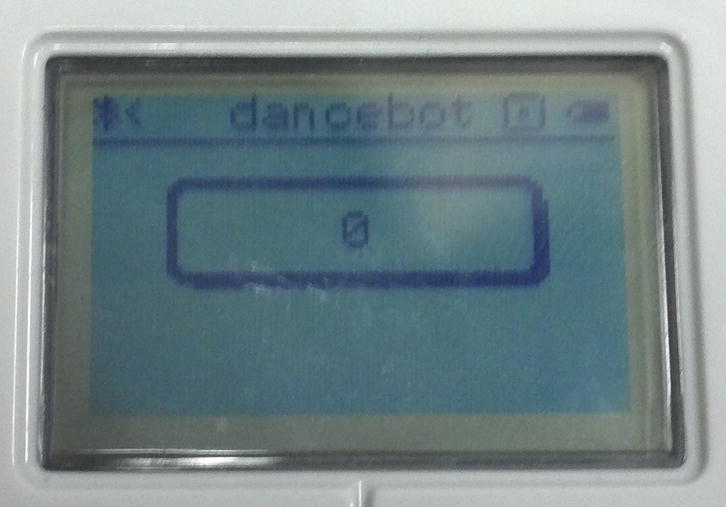
Figure 4-4. NXT View Submenu value display
The NXT View menu is helpful, but it doesn’t always give you the help you need when trying to debug values in your program. For this, it’s helpful to have some custom Debugging My Blocks handy. These blocks may seem simple and small, but having them condensed into a single My Block is very helpful.
The DisplayNumber My Block (Figure 4-5) is very helpful in displaying values of sensors while the program is running. Often you may anticipate a particular data value to be coming from a particular sensor but you find, by actually viewing the data while the program runs, that it is completely different from what you expected.
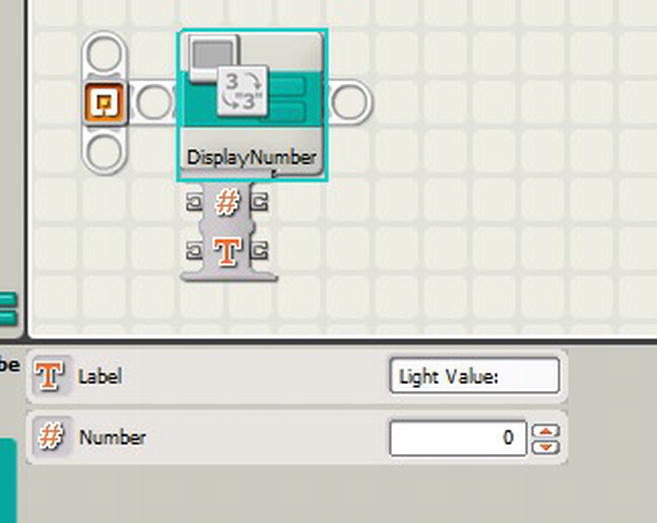
Figure 4-5. DisplayNumber My Block
In Figure 4-6, you can see the code that makes up the DisplayNumber My Block. Notice that it has two input values—one number and one text value. The text value will be a label for the value that is going to be displayed. For example, if you want to display the value of a light sensor, the label value would be something like “Light Value:”.
The number value is the numeric data coming from the particular sensor you wish to see. Sensors such as light and ultrasonic are good candidates for such values; the rotation of a motor would work as well.
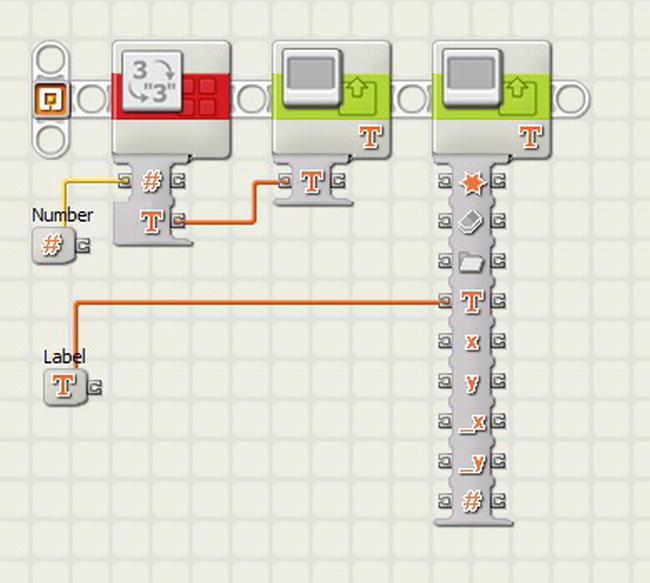
Figure 4-6. Code that makes up the DisplayNumber My Block
Figure 4-7 shows the DisplayNumber My Block being used in a program to display the light value coming from a light sensor on Port 3.
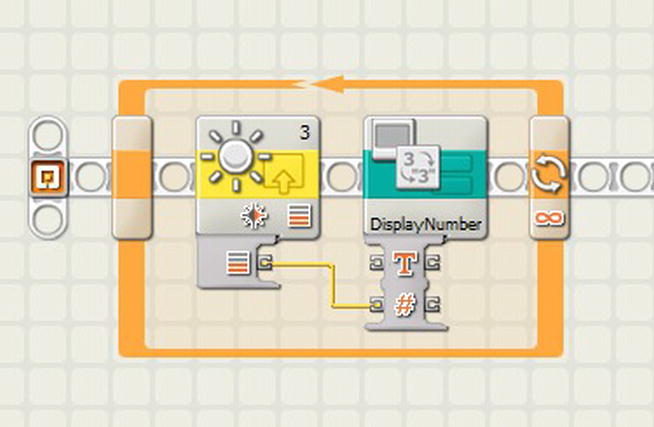
Figure 4-7. DisplayNumber My Block included in code
While the NXT View menu can only show only the value of one sensor at a time, the DisplayNumber My Block could be modified to include multiple values—for example, if your robot has two light sensors available and you want to compare the values at the same time. Figure 4-8 shows the DisplayNumber block modified to show multiple numeric values, and Figure 4-9 shows the block being used in code to display the values of the Light Sensors on Port 1 and Port 2.
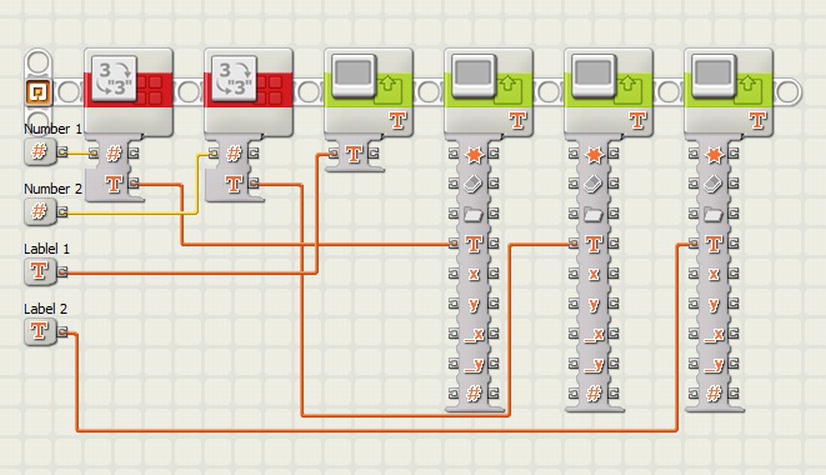
Figure 4-8. DisplayNumber My Block that allows for two numeric values
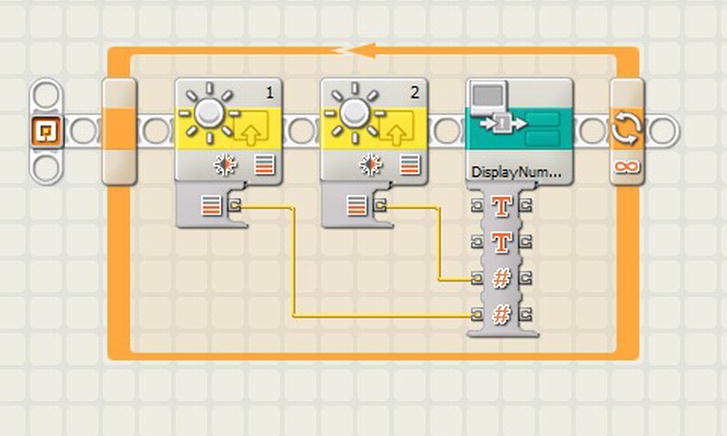
Figure 4-9. DisplayNumber My Block being used to display two Light sensor values
Note The light value you see with the NXT View menu is the uncalibrated value. To see the calibrated value, you need to use a block such as the DisplayNumber My Block. In Chapter 8, light-sensor calibration will be covered in detail.
Visual clues, such as displaying of values, can be very important when debugging a program; audio tones can be helpful as well. Often when your robot is running on the game field, you are not able to see the display screen on the NXT, so having audio clues can be helpful.
By using a My Block such as the SoundTone in strategic locations within your code, you can use your ears to understand where the robot is in the logic flow of the code. You can see the simple code found inside the SoundTone My Block in Figure 4-10. Even though the SoundTone block contains only a single sound block, having it in My Block allows you to reuse it without having to adjust a new sound block each time.
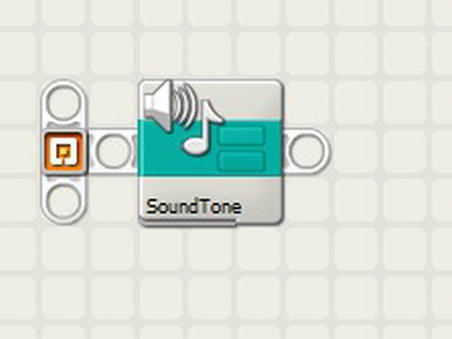
Figure 4-10. SoundTone My Block code
In the program shown in Figure 4-11, notice that the SoundTone My Block is used whenever the robot’s light sensor passes a black line; the robot is supposed to stop at the third black line detected. Place the SoundTone My Block after the Wait block on the sequence bar to hear a tone each time the robot passes a line. Listen for the tones, and you can verify that the robot is recognizing lines as intended.
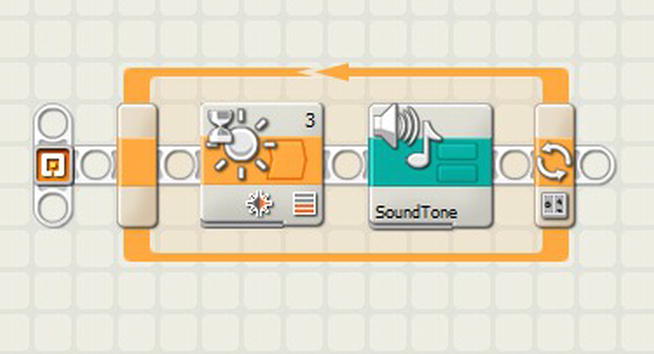
Figure 4-11. SoundTone My Block used in a line-detection program
The trick with counting black lines when you cross over them is that you have to read the beginning edge of the line as well as the ending edge to know that you have completely crossed the line. Once you have found both the beginning and the ending edge, you can add the line to your count.
In the same program, you could use both the SoundTone and the DisplayNumber block to add some extra help. The SoundTone would play at each line, but the DisplayNumber My Block could show the current count value on the NXT display screen, as seen in Figure 4-12.
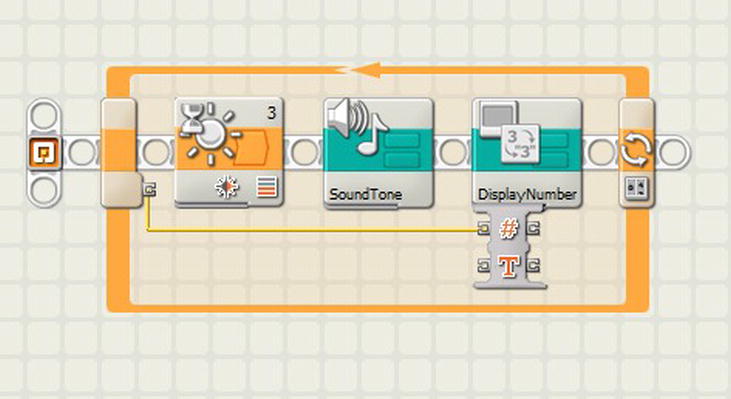
Figure 4-12. DisplayNumber block added to the code
Large programs can be very intimidating when you are trying to follow the flow and track down where things are not working as expected. As you learned in Chapter 3, My Blocks are a great way to contain code into logical sections.
If you look at the program in Figure 4-13, you will notice that it’s a lot of code. Trying to follow and debug this program would be difficult.

Figure 4-13. Long NXT-G program
Now look at the same program broken up into logical My Blocks. The blocks are named in such a way that it’s easy to know what each part of the program is supposed to do, making it self-documenting code. For example, there are blocks named: GrabBlocks, FollowLineToDropSpot, Pivot90, and DropBlocks (Figure 4-14). Even though none of these My Blocks will be reused, it still is a great use of My Blocks.
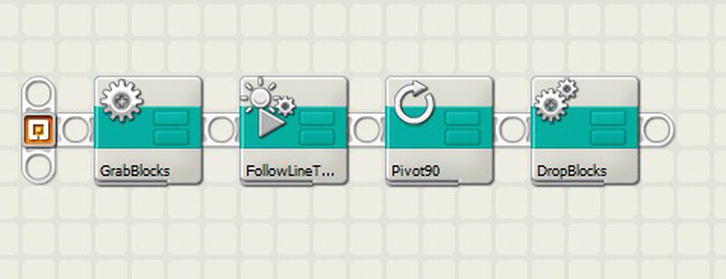
Figure 4-14. Code broken up into My Blocks
With the code broken into the smaller My Blocks, you can now test each part of the program separate from the others. Each My Block can be run as an individual program, allowing you to better isolate the logic and track down where things are not performing as you desire.
Often you may find yourself stuck when trying to find out why your code is not acting as you expect. There are some common conditions in NXT-G that can trip up a team. It’s always a good idea to review these items when debugging a program.
Your program may seem as if it has come to a stop, while in reality it’s still running, waiting for a particular task to complete. One common instance of this happening is when a Move or Motor block has been set for a particular distance. Say you have a Move block that is supposed to rotate a motor for 90 degrees, but something is blocking it from making a full motion. The blocking object could be the robot chassis or something on the field. Either way, the motor is only able to rotate, say, 80 degrees before becoming blocked. In this case, the NXT-G program will not continue on to the next block until the Move block is completed, and the Move block cannot complete because it still needs to rotate the motor another 10 degrees.
When you visually watch the robot run the program, it may appear that the robot has come to this Move block and just stopped working, while in truth it’s waiting to complete the block. Check for these kinds of conditions if you feel your program has stopped unexpectedly. You may need to adjust the Move block’s rotation distance or remove what is blocking the motor from completing its rotation.
One of the simplest things that catches people off guard when debugging is having incorrect port numbers set on their blocks. Often a team will be positive that its light sensor is connected to Port 1, but later, after much review, it will find that in fact, the light sensor is connected to Port 3. When multiple team members are working on a robot, it’s easy for a wire to get reconnected to a different port. No matter how sure you are of a sensor’s port connection, double check it.
Another common oversight can be the duration values set for Move or Motor blocks. If a robot is going too far, make sure that the duration is not set to Unlimited. Or, if the robot is not moving as far as you expected, check rotations versus degrees as the unit settings on the duration. It’s easy to overlook these settings when using the Move and Motor blocks.
Another thing to take into account is the actual environment in which the robot is performing. Keep an eye out for layout or environmental factors that may make your robot work fine at your home practice field but then act differently at the completion site.
Note Lighting differences can play a big part in how the program responds. In Chapter 8, you will learn how to calibrate your light sensors to handle changes in lighting between venues.
Changing the light conditions in your practice area can be a good test to help avoid issues when you arrive at a competition event. Run the robot in the dark (or with very low room lighting). Then introduce some natural sunlight onto the game field. Many robot events are held in rooms such as school cafeterias which have lots of windows that allow natural sunlight to hit the tables. This can cause dark shadows that may affect your robot’s program, or rather the program’s interpretation of what the light sensor is “seeing” as the robot moves about the field. You can even go so far as to bring in different types of lights, such as shop lights, or shine flashlights onto the field, all to vary the lighting values on the game field to see whether that variation has any effect on your robot’s performance.
Also look at things such as the field conditions; you may have a nice smooth field mat on your practice table but find that the mats at the competition are rippled or not aligned the same as yours against the two-by-four edges of the playing field. With proper programing, your robot should be able to adjust for these differences. Often the use of sensors to help a robot determine where it is on the field can help avoid issues associated with using just the rotation sensor as a navigation tool. You could test for field condition problems by adding some irregularities to your game field map. You can purposely put some wrinkles in the mat, or just shift it a bit out of being square with the table. If your robot’s program can adjust for such issues, you will be better prepared for the unexpected in a competition event.
Summary
When your code is not acting as desired, the best approach is to try to think how the robot is “thinking.” Analyze the logic and the values that are being presented to the program. Many times if you simplify things and get an understanding of the values coming into your program, you’ll quickly find what is causing the issues.
Also take into account physical and environmental factors. When your robot is acting differently than it did at your practice location, take the time to survey the field and the location to see if you can identify anything that is different from what you’re used to practicing with. Check the lighting. Check the alignment of the mat. Check for wrinkles. Look for physical factors that might affect your robot’s operation.