
9 Installing and Getting Familiar with Virtual Machine Manager 2008
This chapter covers the installation and setup of the Virtual Machine Manager (VMM) 2008 program. It includes the preparation of the server that will host the VMM server components, and the installation of the VMM server, the VMM server Administrator console, the self-service portal, and the VMM local agent.
This chapter covers the installation of the VMM 2008 Administrator console on a separate server for centralized management, and examines this basic administrative interface and the various configuration components available.
Understanding the Components of VMM 2008
Four basic components make up VMM 2008, as shown in Figure 9.1:
![]() The VMM 2008 server
The VMM 2008 server
![]() The Administrator console
The Administrator console
![]() The self-service portal
The self-service portal
![]() The local agent
The local agent
The VMM 2008 Server
The VMM 2008 server component consists of the VMM management service, the VMM database, and VMM library.
The Virtual Machine Manager service, or VMMService, provides the services necessary to run VMM. It communicates with and stores its configuration in the SQL database. The VMM library share is a simple NTFS share that houses the objects that make up a virtual machine (VM)—hardware profiles, guest OS profiles, templates, virtual hard disks (VHDs), CD-ROM images (ISOs), and so on.
FIGURE 9.1 The basic components of VMM 2008.

Among other things, the VMM server monitors VM and host health and moves VMs, if necessary, between host servers.
The Administrator Console
The Administrator console is a Microsoft Management Console (MMC) that provides an administrative interface to the VMM 2008 server. VMM administrators can manage all VMs and the VMM organizational settings using this console, whereas VMM delegated administrators can manage only the VMs that have been delegated to them.
Even though the administrator console is very easy to use, it offers complete management of the virtual environment, including creating, managing, and deploying VMs and VLANs; managing host servers; configuring user roles; and so forth. It is built upon Windows PowerShell.
The Self-Service Portal
The VMM 2008 self-service portal provides a web-based interface that allows self-service users to provision VMs from the library. It also allows self-service users to store VMs in the library if they have sufficient rights. The most common use of the self-service portal is to provide an environment for developers and testers to use. Multiple types of self-service user roles can be provisioned by the VMM administrator to facilitate the deployment of VMs in the virtual environment.
The Local Agent
The local agent is the agent software that allows VMM 2008 to monitor and manage Windows 2008 Hyper-V host servers. It can be installed remotely using the VMM Administrator console or manually via the VMM 2008 CD. Administrators of host servers in the perimeter (demilitarized zone, DMZ) network must install the local agent manually using the VMM 2008 CD, so that VMM 2008 can manage the host servers.
Preparing the Server for VMM 2008
Decisions should be made about how VMM 2008 will be deployed. Will VMM be installed on a single server or across multiple servers in the enterprise? Will VMM use SQL Server Express, an existing SQL server, or a new one for its configuration database?
In addition, several software and hardware prerequisites must be met before VMM 2008 can be installed on the VMM server.
Single-or Multiple-Server Deployments
VMM 2008 can be deployed on a single server that hosts the VMM server, SQL database, and Administrator console, or these components can be deployed across separate single-purpose servers. The decision about how to deploy VMM 2008 in the enterprise depends on the physical and virtual environment and, to a lesser degree, the administration of these environments.
The computer where VMM 2008 is installed must be joined to an Active Directory Domain Services (AD DS) domain. All host servers must also be joined to domains in AD DS. A host can be in a different domain from the VMM server’s domain and can be in a trusted or a nontrusted domain.
For hosts in perimeter (DMZ) networks, a VMM agent must be installed locally on that host, the firewalls must be configured, and then the host is added to VMM.
Single-Server Deployment
A single-server deployment is often used in small environments where physical resources are tight and the virtual environment is small.
In this type of deployment, a single server hosts the VMM server, SQL database (usually using SQL Express), the Administrator console, and possibly even the self-service portal. It works well when the VM environment (both the VMM server and host servers) doesn’t span a wide area network (WAN).
Multiple-Server Deployment
A multiple-server deployment is usually used in larger, high-performance VMM environments or where the virtual environment spans WANs. VMM performance is improved by installing the different components on separate servers and placing these servers closest to the resources they access the most.
Typically, this involves using a dedicated (or at least separate) SQL database server and placing VMM libraries close to the host servers where the VMs will be deployed.
Often, the Administrator console is installed on separate servers or workstations to facilitate administration. The self-service console may also be deployed on its own server or on another underutilized server. It may even be virtualized itself.
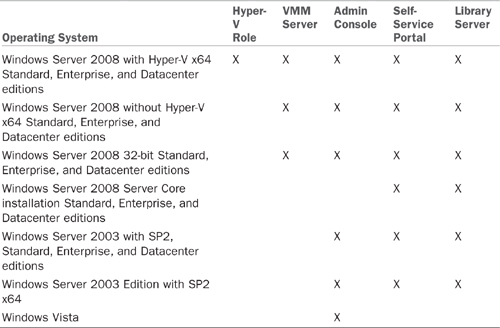
Supported Operating Systems for VMM Components
Each VMM component is supported to run on different operating systems. The information in Table 9.1 will help the administrator select the proper operating system, depending on the organization’s needs.
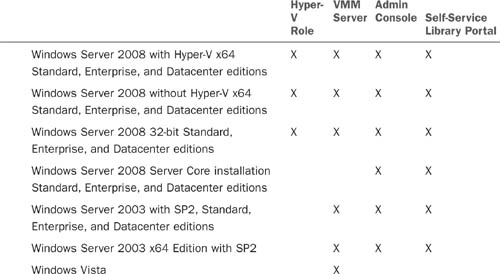
Table 9.1 SQL Server Express SP2 System Requirements
Prerequisite Software
VMM 2008 requires the following software to be installed before installing the VMM server component:
![]() Windows Server 2008 x64—Standard, Enterprise, or Datacenter editions.
Windows Server 2008 x64—Standard, Enterprise, or Datacenter editions.
![]() Windows PowerShell 1.0—This software is included in Windows Server 2008 as an optional feature. If this software has not been installed or removed, the Setup Wizard automatically adds it.
Windows PowerShell 1.0—This software is included in Windows Server 2008 as an optional feature. If this software has not been installed or removed, the Setup Wizard automatically adds it.
![]() Windows Remote Management (WinRM)—This software is included in Windows Server 2008. The WinRM service is configured to start automatically, by default. If the WinRM service is stopped, the Setup Wizard starts the service.
Windows Remote Management (WinRM)—This software is included in Windows Server 2008. The WinRM service is configured to start automatically, by default. If the WinRM service is stopped, the Setup Wizard starts the service.
![]() Microsoft .Net Framework 3.0—This software is included in Windows Server 2008 as an optional feature. If this software has not been installed or removed, the Setup Wizard automatically adds it.
Microsoft .Net Framework 3.0—This software is included in Windows Server 2008 as an optional feature. If this software has not been installed or removed, the Setup Wizard automatically adds it.
![]() Windows Automated Installation Kit (Windows AIK) 1.1—If this software has not been installed previously, the Setup Wizard automatically installs it.
Windows Automated Installation Kit (Windows AIK) 1.1—If this software has not been installed previously, the Setup Wizard automatically installs it.
Windows Internet Information Services (IIS) 6.0 components must be installed before installing the self-service portal. For Windows Server 2003, the Windows Server IIS 6.0 component must be added too.
To install the self-service portal on Windows Server 2008, the administrator must add the Web Server (IIS) role and then install the following server role services:
![]() IIS 6 Metabase Compatibility
IIS 6 Metabase Compatibility
![]() IIS 6 WMI Compatibility
IIS 6 WMI Compatibility
VMM Database Considerations
The VMM 2008 server component uses a SQL database to store and read VMM host server and guest VM configuration. VMM uses the database to correlate the individual VM objects (hardware profiles, guest OS profiles, VHDs, and so forth) into a complete VM management solution.
The SQL database can be configured on SQL Express, an existing SQL server, or on a dedicated SQL server.
SQL Server Express Installation
VMM 2008 includes an optional SQL Express installation on the VMM 2008 setup CD. SQL Express is a free version of SQL 2005 that is targeted for smaller deployments of 150 VMs or fewer.
Some technical restrictions make it unsuitable for large deployments:
![]() It has a 4GB database limit (excluding log files).
It has a 4GB database limit (excluding log files).
![]() It can use only one processor, even in multiple processor configurations.
It can use only one processor, even in multiple processor configurations.
![]() It can use only up to 1GB of RAM.
It can use only up to 1GB of RAM.
![]() VMM reporting is not available.
VMM reporting is not available.
![]() The SQL Server agent service is excluded.
The SQL Server agent service is excluded.
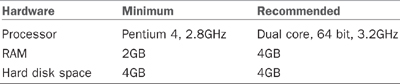
Table 9.2 identifies the minimum and recommended hardware requirements for a SQL Express SP2 server.
Table 9.2 SQL Server Express SP2 System Requirements
SQL Server Express is SQL Express installation included on the VMM 2008 installation CD and will be installed automatically during setup if the administrator chooses to use it.
Using an Existing SQL Server 2005 Installation
VMM 2008 can create a new database on an existing SQL 2005 SP2 database server. This can save additional hardware costs if the server is currently underutilized.
Make sure that the SQL 2005 server has adequate capacity and resources to host the VMM database. It should be at least dual core with 4GB RAM and 150GB free space for the new VMM database.
Using a New SQL Server 2005 Installation
VMM 2008 will operate best with a dedicated SQL 2005 SP2 database server. VMM stores and reads a great deal of data in its operational database and will perform at its peak on a suitable SQL server without resource contention. By appropriately sizing the SQL 2005 server, the organization can count on smooth and quick database operations.
Table 9.3 identifies the minimum and recommended hardware requirements for the SQL 2005 SP2 server.
Table 9.3 SQL 2005 SP2 System Requirements

If the decision is made to use SQL Server 2005 SP2, the server should be installed, running, and available before you install VMM 2008.
SQL Reporting Considerations
The administrator should be careful to install the correct version of SQL 2005, depending on the organization’s reporting needs.
Table 9.4 shows the reporting capabilities of each version of SQL 2005.
Table 9.4 SQL 2005 Reporting Capabilities

VMM 2008 Installation
Each VMM component (server, Administrator console, self-service portal, library, and local agent) can be installed on the same or different servers, depending on the organization’s needs.
The following example depicts installing the VMM server component on a Windows Server 2008 x64 Standard Edition member server. SQL Express Edition will be installed, and the VMM library will be hosted on the same server.
Installing VMM Server and the SQL Server Express Database on Windows Server 2008
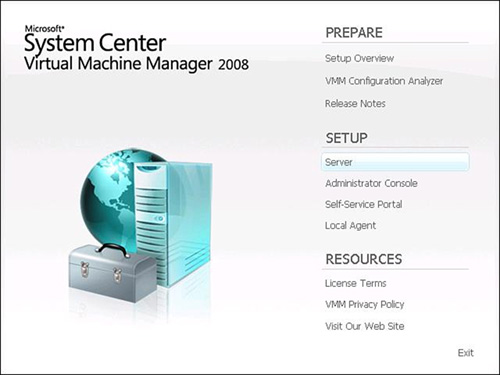
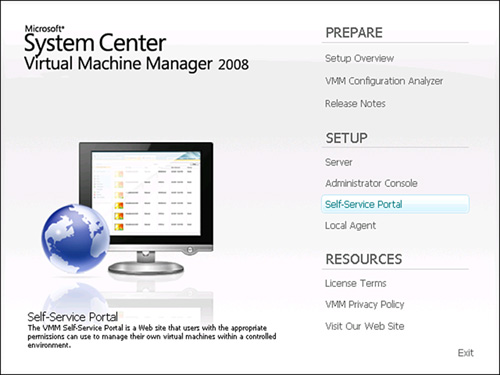
Begin by inserting the VMM 2008 media in the server. Setup will run and display the options for installation, as shown in Figure 9.2.
FIGURE 9.2 The VMM Setup menu.
Click Server from the Setup menu. The setup program will copy files needed during setup to the server and will prepare the Setup Wizard to run.
Read the license terms. If you agree, select to accept the agreement to install VMM server.
If Microsoft Update has not been configured on the VMM server, the Setup Wizard will recommend enabling it. Microsoft Update offers security and important updates for both Windows and VMM 2008. Make the appropriate selection and click Next.
The next screen offers to join the Customer Experience Improvement Program (CEIP). This program is used by Microsoft to help improve the quality, reliability, and performance of Microsoft products and services; however, some anonymous data may be transmitted to Microsoft. Make the appropriate selection and click Next.
Next, enter the product registration information. Here you enter your username and company. Click Next.
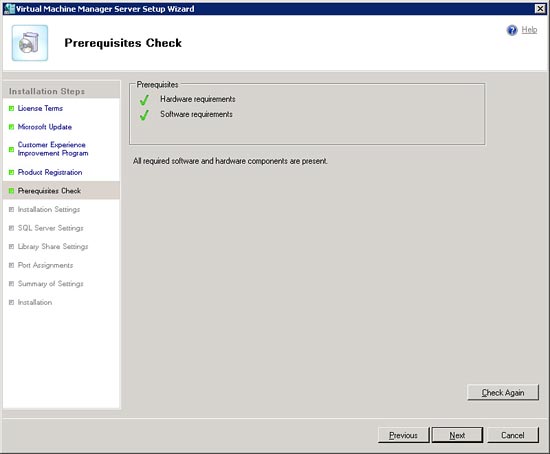
The Prerequisite Checker runs to check that the software required by VMM server is installed on the server, as shown in Figure 9.3. If the server fails the Prerequisite Checker, the Setup Wizard tells you what you need to fix it. When it runs successfully, click Next.
FIGURE 9.3 The Prerequisite Checker.
In the Installation Settings window, select the path where the VMM program files will be installed. The default path is C:Program FilesMicrosoft System Center Virtual Machine Manager 2008. Change the path if necessary and click Next.
The SQL Server Settings screen, shown in Figure 9.4, is where the administrator selects the database to use. The default selection is to install the VMM database on an existing SQL Server 2005 computer. If this option is chosen, the administrator must supply the following information:
FIGURE 9.4 SQL Server settings.
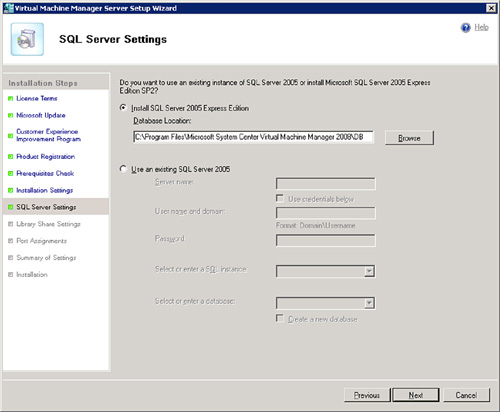
![]() SQL server name
SQL server name
![]() Username and domain
Username and domain
![]() Password
Password
![]() SQL instance (new or existing)
SQL instance (new or existing)
![]() SQL database (new or existing)
SQL database (new or existing)
If the administrator chooses to use SQL Server 2005 Express Edition, select the path where the database will be installed. The default location, as shown in Figure 9.4, is C:Program FilesMicrosoft System Center Virtual Machine Manager 2008DB. Click Next to continue.
The Library Share Settings screen allows the administrator to specify the default share for the VMM library. This is the network share that holds resources available for creating VMs.
The default library share name is MSSCVMM Library, and VMM will default to creating a new library share on the VMM server in C:ProgramDataVirtual Machine Manager Library Files. Change this path if necessary.
The alternative setting is to use an existing library share. The administrator may choose to do this if there is an existing VMM library on another server or Windows cluster. Click Next to continue.
FIGURE 9.5 Port Assignments screen.
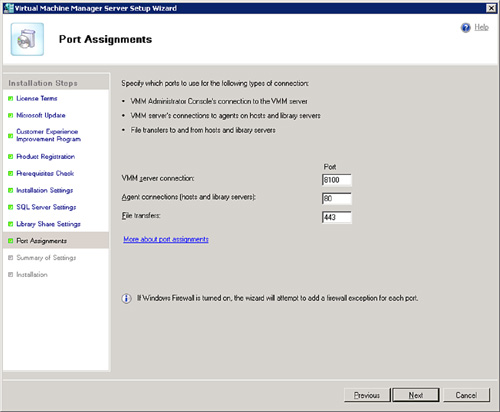
The Port Assignments screen, shown in Figure 9.5, allows the administrator to specify which ports to use for connections.
The default port assignments are as follows:
![]() VMM Server Connection: 8100
VMM Server Connection: 8100
![]() Agent Connections: 80
Agent Connections: 80
![]() File Transfers: 443
File Transfers: 443
The final screen in the Setup Wizard is the Summary of Settings. Here, the administrator can review the settings that were chosen in the Setup Wizard.
Review the settings and click Previous to go back or Install to perform the VMM server installation. Setup will install the prerequisites if necessary, and install the VMM server component. The installation may take several minutes, depending on the options that were selected.
If an error occurs during installation, click the Error tab on the Installation window to review the error and take appropriate action.
After the VMM server component is installed, two new services are installed and started. The VMMService is the heart of the VMM server, and the VMM agent service provides management services for VMM.
Besides Windows PowerShell 1.0 and the Microsoft Windows Automated Installation Kit, which are both prerequisites for VMM server, nothing is added to the Windows Start menu. To interact with the VMM server, the administrator must install the VMM Administrator console.
Installing the VMM Administrator Console
The VMM Administrator console can be installed on Windows Server 2008 (except Server Core), Windows Server 2003 SP2, Windows XP SP2, or Windows Vista.
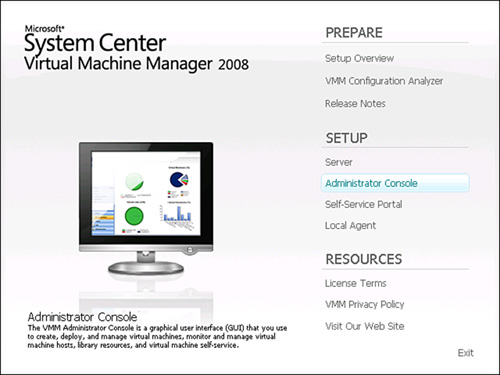
Begin by inserting the VMM 2008 media in the server. Setup will run and display the menu for installation. Click Administrator Console under Setup, as shown in Figure 9.6. The setup program will copy files needed during setup to the server and will prepare the Setup Wizard to run.
FIGURE 9.6 Selecting the Administrator Console in Setup.
Read the license terms carefully. The license agreement must be accepted to install the VMM Administrator console. Click Next.
If Microsoft Update has not been configured on the VMM server, the Setup Wizard will recommend enabling it. Microsoft Update offers security and important updates for both Windows and VMM 2008. Make the appropriate selection and click Next.
The next screen offers to join the Customer Experience Improvement Program (CEIP). If the Administrator console is being used to connect to a VMM server that is already participating in the CEIP, the administrator console will automatically be enrolled in the CEIP. Click Next to continue.
The Prerequisite Checker will run to check that the software required by the VMM Administrator console is installed on the computer. If the computer fails the Prerequisite Checker, the Setup Wizard will tell you what you need to do to fix it. When it runs successfully, click Next.
In the Installation Settings window, select the path where the VMM program files will be installed. The default path is C:Program FilesMicrosoft System Center Virtual Machine Manager 2008. Change the path if necessary and click Next.
The Configuration Settings window allows the administrator to configure the port that the VMM Administrator console will use to connect to the VMM server. The default port is 8100. Accept or change the default port and click Next.
The final screen in the Setup Wizard is the Summary of Settings, shown in Figure 9.7. It allows the administrator to review the settings that were chosen in the Setup Wizard.
FIGURE 9.7 Summary of Settings screen.
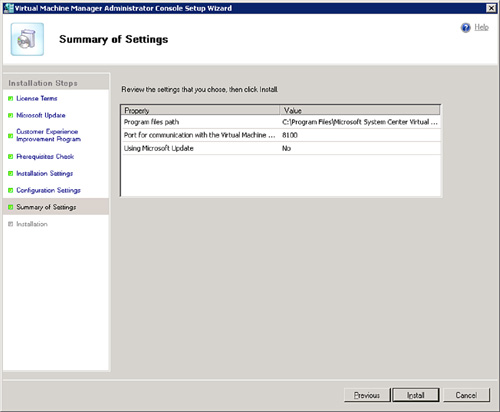
Review the settings and click Previous to go back or Install to perform the VMM Administrator console installation. Setup will install the prerequisites if necessary, and install the VMM administrator console component. The installation may take several minutes, depending on the options that were selected.
If an error occurs during installation, click the Error tab on the Installation window to review the error and take appropriate action.
When the installation completes, the Setup Wizard will offer to create a shortcut on the desktop to the VMM Administrator console, and you can optionally open it when the wizard closes. There is also a link to check for the latest VMM updates from Microsoft.
Installing the Self-Service Portal
The VMM self-service portal can be installed on all versions of Windows Server 2008 (including Server Core) and all versions of Windows Server 2003 SP2.
The self-service portal requires IIS 6.0 or specific IIS 6.0 components, depending on the operating system the self-service portal is installed on. For Windows Server 2003, install the Windows IIS 6.0 component. For Windows Server 2008, add the Web Server (IIS) role and the IIS 6 Metabase Compatibility and IIS 6 WMI Compatibility server role services. Make sure that these prerequisites are met before installing the self-service portal.
Begin by inserting the VMM 2008 media in the server. Setup will run and display the menu for installation. Click Self-Service Portal under Setup, as shown in Figure 9.8. The setup program will copy files needed during setup to the server and will prepare the Setup Wizard to run.
FIGURE 9.8 Selecting the Self-Service Portal in Setup.
Read the license terms carefully. The license agreement must be accepted to install the VMM self-service portal. Click Next.
If Microsoft Update has not been configured on the VMM server, the Setup Wizard will recommend enabling it. Microsoft Update offers security and important updates for both Windows and VMM 2008. Make the appropriate selection and click Next.
The Prerequisite Checker will run to check that the software required by the VMM self-service portal is installed on the computer. If the computer fails the Prerequisite Checker, the Setup Wizard will tell you what you need to do to fix it. When it runs successfully, click Next.
In the Installation Settings window, select the path where the VMM program files will be installed. The default path is C:Program FilesMicrosoft System Center Virtual Machine Manager 2008. Change the path if necessary and click Next.
The Web Server Settings screen, shown in Figure 9.9, allows the administrator to specify the VMM server that the self-service portal will connect to. The default port it will use to communicate with the VMM server is TCP port 8100. Set a new port or leave the default.
FIGURE 9.9 Web Server Settings screen.
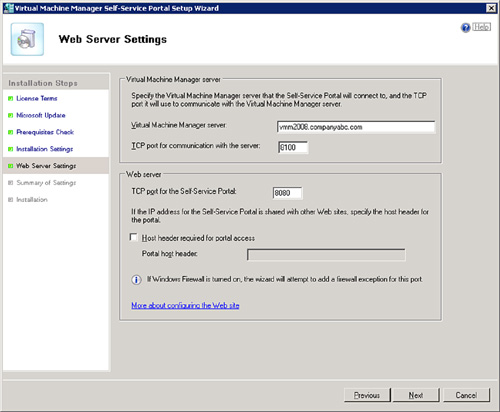
Here the administrator can also specify the TCP port for the self-service portal and whether to use a host header for portal access.
If the Windows firewall is turned on, the Setup Wizard will attempt to add a firewall exception for the web server port.
Click Next to continue.
The final screen in the Setup Wizard is the Summary of Settings. It allows the administrator to review the settings that were chosen in the Setup Wizard.
Review the settings and click Previous to go back or Install to perform the VMM self-service portal installation. Setup will install the prerequisites if necessary, and install the VMM self-service portal component.
Installation of the Local Agent
The VMM local agent must be installed on every Microsoft Hyper-V and Virtual Server host computer that will be managed by VMM 2008.
VMM 2008 can “push” the local agent to hosts that are members of the same domain that the VMM 2008 server belongs to using the VMM administrator console. The administrator must install the VMM local agent manually on workgroup servers in the perimeter network (DMZ) to be managed by VMM 2008.
To manually install the VMM local agent, insert the VMM 2008 media in the server to manage. Setup will run and display the menu for installation. Click Local Agent under Setup. The setup program will copy files needed during setup to the server and will prepare the Setup Wizard to run.
Read the license terms carefully. The license agreement must be accepted to install the VMM local agent. Click Next.
In the Destination Folder window, accept or change the path where the VMM program files will be installed. The default path is C:Program FilesMicrosoft System Center Virtual Machine Manager 2008. Click Next.
The Configuration Settings screen, shown in Figure 9.10, allows the administrator to configure the ports that VMM server will use to communicate to this host and the port the host will use to transfer files between the VMM server and host computers. Accept the default port of 80 for VMM server communication and 443 for file transfers, or change them and click Next.
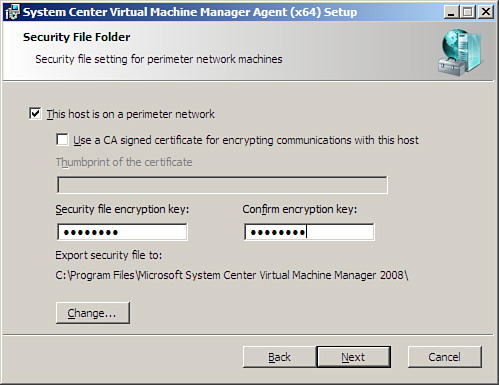
The Security File Folder screen, shown in Figure 9.11, is used to configure a security file that will allow the VMM server to communicate and manage a nondomain host server in a perimeter network. Select the check box for This Host Is in a Perimeter Network and enter and confirm an encryption key. A security file will be placed in the C:Program FilesMicrosoft System Center Virtual Machine Manager 2008 folder that will be imported into the managing VMM server. Click Next.
In the Host Network Name screen, select how the VMM server will contact the host. You can choose either hostname or IP address. Enter the appropriate information and click Next.
Finally, click Install to install the VMM local agent software. A new VMM agent service will be installed and started on the host server. Click Finish to complete the installation.
FIGURE 9.10 Configuration Settings screen.

FIGURE 9.11 Security File Folder screen.
Understanding the VMM Administrator Console
The VMM Administrator console is the primary management interface for VMM 2008, host server, and VM management. It is an MMC application that runs on top of Windows PowerShell. The VMM command shell has more than 60 commandlets (cmdlets) that are specific to VMM 2008.
This section covers the basic functions of the Administrator console.
Overview of the Administrator Console
The Administrator console, shown in Figure 9.12, consists of the view buttons on the lower left, the view area above the view buttons, the Results pane in the top middle, the Detail pane below the Results pane, and the Actions pane on the right.
FIGURE 9.12 The VMM Administrator console.

The most common actions performed using the Administrator console include the following:
![]() Adding Hosts
Adding Hosts
![]() Creating host groups
Creating host groups
![]() Managing hosts
Managing hosts
![]() Managing host clusters
Managing host clusters
![]() Configuring the VMM library
Configuring the VMM library
![]() Creating VMs
Creating VMs
![]() Deploying and migrating VMs
Deploying and migrating VMs
![]() Managing VMs
Managing VMs
![]() Configuring the self-service portal
Configuring the self-service portal
![]() Monitoring and reporting
Monitoring and reporting
![]() Administering and managing roles
Administering and managing roles
Adding hosts
Hosts must be added to the VMM server to manage them from the VMM Administrator console. This section describes how to add hosts, both domain members and perimeter workgroup servers, to the VMM Administrator console.
Open the VMM Administrator console using the shortcut on the Windows desktop or via the Start menu under Microsoft System Center, Virtual Machine Manager 2008, Virtual Machine Manager Administrator Console.
A Connect to Server window may open, prompting for the VMM server to connect to. Enter the server name and connection port (the default is port 8100) using the format VMMserver:port.
You may choose to always open a connection to this server by selecting the Make This Server My Default check box. Doing so prevents this connection window from displaying when the Administrator console is run.
Go to the Hosts view by clicking the Hosts button, then select All hosts. The Hosts managed by this VMM server will display in the Results pane. Selecting any host in the Results pane will display the details about that host in the Details pane.
To add a new host, select Add Hosts from the Actions pane or click the Actions menu, Virtual Machine Manager, Add Hosts. The Add Hosts Wizard will run.
In the Select Host Location screen, select one of the following options. The option chosen will alter the subsequent prompts in the Add Hosts Wizard.
![]() Windows Domain Joined Host—If the host to add is a member of a Windows Active Directory domain, select this option and enter the credentials for a domain account with administrative rights on the host. Click Next to continue.
Windows Domain Joined Host—If the host to add is a member of a Windows Active Directory domain, select this option and enter the credentials for a domain account with administrative rights on the host. Click Next to continue.
On the Select Servers screen, enter the host server name and click Add or click the Host Server Name button to search for hosts. Enter a search term and click Search. Select one or more servers and click Add. Click OK to close the search window when finished. Click Next to continue.
The administrator can also limit the scope of the search to servers with Virtual Server or Hyper-V already installed.
On the Configuration Settings screen, select the host group to add the host servers to. If any of the hosts are currently being managed by another VMM server, select the Reassociate Agent with Virtual Machine Manager Server check box. This will reassociate the local agent on the host to be managed by this VMM server.
On the Virtual Machine Paths screen, specify one or more default paths for storing the VMs deployed on these hosts. Here, you also can specify whether to enable remote connections to these hosts and which port to use. The default remote connection port is 5900. Click Next to continue.
Review the Summary screen and, if everything looks fine, click Add Hosts to add the hosts to the VMM server and the administrator console.
The administrator can also click the View Script button to view, copy, or edit the VMM command shell that performs the same task in a script that is done in the graphical user interface.
After the hosts have been added using the Add Hosts Wizard, the VMM server will install the VMM local agent and the Hyper-V role on the hosts if it is not already installed. Then it will add the hosts to the Administrator console.
![]() Windows Perimeter Network Host—This option guides you through adding perimeter hosts to the VMM Administrator console. Click Next.
Windows Perimeter Network Host—This option guides you through adding perimeter hosts to the VMM Administrator console. Click Next.
For a host that is on a perimeter network, you must install the VMM local agent manually on the host before you can add the host to VMM.
On the Select a Host screen, enter the hostname or IP address, encryption key, and security file path. The encryption key was entered when the perimeter host installed the VMM local agent. The security key is located in the C:Program FilesMicrosoft System Center Virtual Machine Manager 2008 folder on the perimeter host. Copy it to the local computer and use this path for the security file. Add the hosts and click Next.
On the Configuration Settings screen, select the host group to add the host server(s) to. If any of the hosts are currently being managed by another VMM server, select the Reassociate Agent with Virtual Machine Manager Server check box. This will reassociate the local agent on the host to be managed by this VMM server.
On the Virtual Machine Paths screen, specify one or more default paths for storing the VMs deployed on these hosts. Here, you also can specify whether to enable remote connections to these hosts and which port to use. The default remote connection port is 5900. Click Next to continue.
Review the Summary screen and, if everything looks fine, click Add Hosts to add the hosts to the VMM server and the Administrator console.
The administrator can also click the View Script button to view, copy, or edit the VMM command shell that performs the same task in a script that is done in the graphical user interface.
After the hosts have been added using the Add Hosts Wizard, the VMM server will add the hosts to the Administrator console.
![]() Other Host—This option allows the administrator to add non-Windows–based hosts, such as VMware ESX hosts, to the VMM server. Enter the username and password used to connect to the other host and click Next.
Other Host—This option allows the administrator to add non-Windows–based hosts, such as VMware ESX hosts, to the VMM server. Enter the username and password used to connect to the other host and click Next.
On the Select Hosts screen, enter the hostname or IP address of the host server to add, select the virtualization manager from the drop-down list, and select the host group to add the hosts to. Click Add and repeat for other hosts, if necessary. Click Next to continue.
Review the Summary screen and, if everything looks fine, click Add Hosts to add the hosts to the VMM server and the Administrator console.
After the hosts have been added using the Add Hosts Wizard, the VMM server will add the hosts to the Administrator console.
Creating Host Groups
Host groups allow the administrator to group together collections of similar hosts, such as perimeter hosts, domain hosts, or account servers.
Open the VMM Administrator console using the shortcut on the Windows desktop or via the Start menu under Microsoft System Center, Virtual Machine Manager 2008, Virtual Machine Manager Administrator Console.
A Connect to Server window may open, prompting for the VMM server to connect to. Enter the server name and connection port (the default is port 8100) using the format VMMserver:port.
You may choose to always open a connection to this server by selecting the Make This Server My Default check box. Doing so prevents this connection window from displaying when the Administrator console is run.
Go to the Hosts view by clicking the Hosts button, and then select All Hosts. The hosts managed by this VMM server will display in the Results pane.
To add a new host group, select New Host Group from the Actions pane or click the Actions menu, All Hosts, New Host Group. A new host group will appear under All Hosts in the Hosts view. Rename the group as required.
Host groups can be moved or deleted using the Actions pane from the Hosts view.
Managing Hosts
Hosts can be managed from the Hosts view in the Administrator console. Select the appropriate host group or All Hosts to view all hosts.
Open the VMM Administrator console using the shortcut on the Windows desktop or via the Start menu under Microsoft System Center, Virtual Machine Manager 2008, Virtual Machine Manager Administrator Console.
A Connect to Server window may open, prompting for the VMM server to connect to. Enter the server name and connection port (the default is port 8100) using the format VMMserver:port.
You may choose to always open a connection to this server by selecting the “Make this server my default” checkbox. Doing so prevents this connection window from displaying when the Administrator console is run.
Go to the Hosts view by clicking the Hosts button, and then select All Hosts. The hosts managed by this VMM server will display in the Results pane.
Right-click the host to manage and a choice of actions is presented. The administrator can move the host to a host group, refresh the host in the Details pane, remove the host from the VMM server, or access the host properties.
The Properties page allows the administrator to view or configure the host summary, host status, VM status, hardware reserves (for example, CPU and RAM), hardware, networking, VM placement path, remote connections, security settings, and more. The details for each of these settings are beyond the scope of this chapter; suffice to say that many more options are available to configure than are available in the standard Windows Server 2008 Hyper-V management console.
Managing Host Clusters
Host clusters are Windows cluster or VMware ESX cluster hosts that provide high availability and fault tolerance. The actions for host clusters allow the administrator to move a Hyper-V host cluster to a different host group, delete a host cluster from VMM, monitor host clusters, and modify the host cluster properties.
Open the VMM Administrator console using the shortcut on the Windows desktop or via the Start menu under Microsoft System Center, Virtual Machine Manager 2008, Virtual Machine Manager Administrator Console.
A Connect to Server window may open, prompting for the VMM server to connect to. Enter the server name and connection port (the default is port 8100) using the format VMMserver:port.
You may choose to always open a connection to this server by selecting the Make This Server My Default check box. Doing so prevents this connection window from displaying when the Administrator console is run.
Go to the Hosts view by clicking the Hosts button, and then select All Hosts. The hosts managed by this VMM server will display in the Results pane.
Select the host cluster to manage in the Results pane. The actions available for managing the host cluster are listed in the Actions pane.
When Failover Cluster Node Management is used in Windows Server 2008 to add a node to a VMM-managed host cluster, the new node is discovered and added to the cluster. It will display in the Hosts view with a status of Pending Addition. Select Add Pending Hosts to add the host in VMM.
VMM 2008 also detects when a node is removed from a VMM-managed host cluster using Failover Cluster Node Management MMC. VMM sets the Clustered property of the node to False and begins managing the host as a regular, nonclustered host. VMM marks the node as Pending Removal. Select Remove to remove the host from VMM.
Configuring the VMM Library
The VMM library is a Windows share that hosts the resources used by VMM to create VMs. The library contains files contains files (VHDs, ISOs, and so on). The VMM database stores hardware profiles, guest OS profiles, and templates.
Select the appropriate host group or All Hosts to view all hosts.
Open the VMM Administrator console using the shortcut on the Windows desktop or via the Start menu under Microsoft System Center, Virtual Machine Manager 2008, Virtual Machine Manager Administrator Console.
A Connect to Server window may open, prompting for the VMM server to connect to. Enter the server name and connection port (the default is port 8100) using the format VMMserver:port.
You may choose to always open a connection to this server by selecting the Make This Server My Default check box. Doing so prevents this connection window from displaying when the Administrator console is run.
Go to the Library view by clicking the Library button, and then select the Library Server in the View pane. The library contents will display in the Results pane.
Additional VMM libraries can be added to the Administrator console by clicking the Add Library Server action in the Actions pane. A library can be removed by right-clicking the library and selecting Remove.
If Windows PowerShell scripts are stored in the VMM library, they can be viewed, edited, and removed. The administrator can run the scripts in Library view.
Entire VMs can be stored in VMM library. From here they can be cloned, deployed, and removed. VMware VMs stored in the library can be converted to a VMM virtual machine. The VMware VM’s configuration files must be stored in the library to convert them.
VMM libraries can be stored on Windows clusters to increase the availability and fault tolerance of the library resources.
Creating VMs
The administrator can use VMM 2008 to create VMs. This is similar to creating VMs using the Windows Server 2008 Hyper-V management console, described in Chapter 6, “Managing, Administering, and Maintaining a Hyper-V Host Server,” but includes many more features and options. This process is covered in detail in Chapter 11, “Using Virtual Machine Manager 2008 for Provisioning.”
Deploying and Migrating VMs
One of the most impressive capabilities of VMM 2008 is deploying and migrating VMs. This process is covered in detail in Chapter 10, “Creating Guest Images from Existing Production and Virtual Systems.”
Managing VMs
VMs managed by VMM 2008 can be fully managed within the VMM Administrator console.
Open the VMM Administrator console using the shortcut on the Windows desktop or via the Start menu under Microsoft System Center, Virtual Machine Manager 2008, Virtual Machine Manager Administrator Console.
A Connect to Server window may open, prompting for the VMM server to connect to. Enter the server name and connection port (the default is port 8100) using the format VMMserver:port.
You may choose to always open a connection to this server by selecting the Make This Server My Default check box. Doing so prevents this connection window from displaying when the Administrator console is run.
Go to the Virtual Machine view by clicking the Virtual Machine button, and then select the host in the View pane. The VMs hosted on that host will display in the Results pane.
The administrator can start, pause, stop, save the state, shut down, or connect to any managed VM. Other actions include migrating the VM, creating and managing check-points, repairing the VM, installing guest services, cloning the VM, storing it in a VMM library, removing the VM, and configuring its properties.
The details for each of these settings are beyond the scope of this chapter; suffice to say, many more options are available to configure than are available in the standard Windows Server 2008 Hyper-V management console.
Monitoring and Reporting
VMM 2008 has advance monitoring and reporting capabilities. VMM operates using jobs, which can be managed. Advanced reporting capabilities are achieved when using System Center Operations Manager 2007 (SCOM 2007) and the Server Virtualization Management Pack. The reports generated by SCOM can be opened directly in the Reporting view of the VMM Administrator console.
Jobs can be managed from the Jobs view in the Administrator console. In the Results pane, the administrator can view all the jobs run by VMM. Running jobs can be canceled by right-clicking the job and selecting Cancel.
If a job fails, it can usually be restarted by right-clicking the job and choosing Restart. The job will begin again where the operation failed.
Administering and Managing Roles
The entire VM infrastructure can be administered from the VMM Administrator console or by using the VMM command console. VMM administration includes managing user roles, managing agents on managed servers, adding non-Microsoft virtualization managers to VMM, and configuring VMM settings.
Open the VMM Administrator console using the shortcut on the Windows desktop or via the Start menu under Microsoft System Center, Virtual Machine Manager 2008, Virtual Machine Manager Administrator Console.
A Connect to Server window may open, prompting for the VMM server to connect to. Enter the server name and connection port (the default is port 8100) using the format VMMserver:port.
You may choose to always open a connection to this server by selecting the Make This Server My Default check box. Doing so prevents this connection window from displaying when the Administrator console is run.
Go to the Administration view by clicking the Administration button, and then select the administrative operation in the View pane.
The General settings allow the administrator to configure global settings in VMM, such as CEIP settings, the database connection, library settings, placement settings, remote control, and the self-service administrator email address.
Managed Computers returns a list of the hosts managed by this VMM server, their status, version, and role.
Networking allows the administrator to configure a static range of MAC addresses VMM should use when creating new virtual network devices.
User Roles allows the administrator to manage user roles and create new user roles, such as delegated administrator groups and self-service users. Each of these roles can be scoped to a particular set of VMs, libraries, and so on. Self-service users can be permitted to perform only certain actions, as configured by the VMM administrator.
The VMM Administrator role cannot be scoped or reduced in functionality.
The System Center setting provides a way for the administrator to configure SCOM reporting and the SCOM connection to enable PRO functionality. Physical Resource Optimization (PRO) provides workload- and application-aware resource optimization for Hyper-V host clusters.
Virtualization Managers displays the name, status, version, managed hosts, and managed VMs of non-Windows virtualization managers.
Summary
Microsoft Virtual Machine Manager 2008 provides an easy installation process that installs its own prerequisite software. Only a few steps must be run on Windows Server 2008 computers before installing VMM 2008.
The Administrator console, although simple and easy to use, is full featured and offers myriad choices for deploying and managing the virtual infrastructure. Its ability to manage both Hyper-V and non-Windows hosts and VMs brings unparalleled management opportunities to organizations. It offers the fine degree of granularity needed in today’s virtual environments.
Best Practices
The following are best practices from this chapter:
![]() Make sure the system that VMM 2008 will be installed on is connected to the domain that hosts your Hyper-V host servers.
Make sure the system that VMM 2008 will be installed on is connected to the domain that hosts your Hyper-V host servers.
![]() Use a single-server deployment for VMM 2008 and SQL 2005 for a relatively simple environment; split the roles for a large enterprise environment.
Use a single-server deployment for VMM 2008 and SQL 2005 for a relatively simple environment; split the roles for a large enterprise environment.
![]() Unless your server configuration requires configuration variations that differ from the standard requirements for VMM 2008 (for example, PowerShell 1.0, .NET Framework 3.0), just let the installation script install the add-on components for you.
Unless your server configuration requires configuration variations that differ from the standard requirements for VMM 2008 (for example, PowerShell 1.0, .NET Framework 3.0), just let the installation script install the add-on components for you.
![]() Install VMM 2008 on a Windows 2008 or a Windows 2003 SP2 or later system.
Install VMM 2008 on a Windows 2008 or a Windows 2003 SP2 or later system.
![]() Choose the Make This Server My Default when launching VMM 2008 so that you won’t have to be prompted again to select the VMM 2008 host server you are working from.
Choose the Make This Server My Default when launching VMM 2008 so that you won’t have to be prompted again to select the VMM 2008 host server you are working from.
![]() To provide better security and simplified access to only host servers running Hyper-V, limit the scope of the search for virtual servers that can be administered by the Hyper-V or the VMM 2008 consoles.
To provide better security and simplified access to only host servers running Hyper-V, limit the scope of the search for virtual servers that can be administered by the Hyper-V or the VMM 2008 consoles.
![]() Create other roles beyond the VMM administrator so that you can have a more granular set of roles for administration, because the VMM Administrator role cannot be scoped or reduced in functionality.
Create other roles beyond the VMM administrator so that you can have a more granular set of roles for administration, because the VMM Administrator role cannot be scoped or reduced in functionality.