
6 Managing, Administering, and Maintaining a Hyper-V Host Server
IN THIS CHAPTER
![]() Becoming Familiar with the Hyper-V Administrative Console
Becoming Familiar with the Hyper-V Administrative Console
![]() Managing Windows Server 2008 Remotely
Managing Windows Server 2008 Remotely
![]() Managing Host Server, Virtual Switch, and Disk Settings
Managing Host Server, Virtual Switch, and Disk Settings
![]() Using Common Practices for Securing and Managing a Hyper-V Host Server
Using Common Practices for Securing and Managing a Hyper-V Host Server
![]() Keeping Up with Service Packs and Updates
Keeping Up with Service Packs and Updates
![]() Backing up the Hyper-V Host and Guests
Backing up the Hyper-V Host and Guests
![]() Managing Backups Using the Command-Line Utility Wbadmin.exe
Managing Backups Using the Command-Line Utility Wbadmin.exe
Hyper-V host systems are the heart of an IT infrastructure that supports several other virtual guest sessions running on the hosts. These host servers need to be managed and maintained to keep businesses application running optimally. Hyper-V host server management and maintenance help maximize investment in infrastructure and productivity. It also keep the IT infrastructure running effectively and efficiently to boost availability and reliability of the guest sessions.
Windows Server 2008 and Hyper-V bring many new tools and features to help keep the servers managed and maintained. These tools include the Hyper-V Administration console and Windows 2008 Server Manager that provide improved configuration and better auditing of servers through the isolation of roles and features. In addition, they provide better remote management and a slew of other capabilities.
Server management entails many different tasks, including administering and supervising servers based on functional roles, proactively monitoring the network environment, keeping track of activity, and implementing solid change-control practices. These management functions for Windows 2008 and Hyper-V can be performed both locally and remotely.
As system workloads, capacities, and usage change in the environment, Hyper-V host systems and guest sessions need to be maintained so that they operate as efficiently as possible. Without such maintenance, the systems become more susceptible to causing slower response times and decreased reliability. Efforts to maintain those systems should be made periodically to avoid any inefficiency. This chapter covers best practices to maintain and manage a Windows 2008 environment.
Becoming Familiar with the Hyper-V Administration Console
After Hyper-V has been installed on a Windows 2008 host server, the Hyper-V Administration console is added to the Administrative Tools on the server. The Hyper-V Administration console has several configuration options and settings available to be configured that can be applied to a single guest session or applied to all guest sessions on the server.
Launching the Hyper-V Administration Console
To open the Hyper-V Administration console, there are two ways to access the configuration options. One way is to the use the Server Manager tool and administer the host server through Server Manager. The other option is to launch the freestanding Microsoft Management Console (MMC) to perform administrative tasks for the host system.
The functions and settings between the Server Manager console and the standalone MMC application are the same. Administrators who manage several server roles tend to use the Server Manager console because they have access to more than just the Virtualization role to manage. They can also manage DNS, Terminal Services, Network Policy Server, and other roles that might apply to their job. For those who do nothing but administer Windows virtualization systems, they might choose the freestanding Hyper-V Administration console application for administering and managing just Windows virtual server systems.
Using the Server Manager Tool to Manage Hyper-V Systems
For administrators who want to manage their Hyper-V systems from a centralized console, the Server Manager tool provides a common administrative interface for all the server roles installed on a particular system. To start the Server Manager tool to view and edit Hyper-V settings, complete the following steps:
1. Click Start and then click Run.
2. In the Run dialog box, enter ServerManager.msc, and click OK. This will start the Server Manager application if it is not already running on the system.
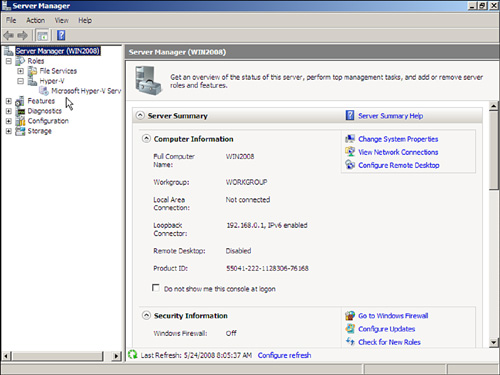
3. Expand the Roles section of the tree by clicking the plus sign (+).
4. Expand the Hyper-V branch of the tree, and expand the Virtualization Services branch of the tree, as shown in Figure 6.1.
FIGURE 6.1 Windows 2008 Server Manager console.
Using the Hyper-V MMC Tool to Manage Hyper-V Systems
Administrators who want to manage their Hyper-V systems from a dedicated console just for Hyper-V administration should use the Hyper-V Administration tool. To start the Hyper-V Administration tool, follow these steps:
1. Click Start, All Programs, Administrative Tools, and then choose Hyper-V Manager for the tool to launch.
2. Click Microsoft Hyper-V Servers to see the virtual servers to which you are connected.
3. Click the name of one of the virtual servers listed to see the virtual machines and actions available for the confirmation of the server system. By default, the Hyper-V MMC will have the local virtual server system listed, as shown in Figure 6.2.
FIGURE 6.2 Hyper-V Manager console.

If you want to run the Hyper-V Manager from a command line, you can enter the following:
c:Program FilesHyper-Vvmconnect.exe
You can also launch the Hyper-V Manager and note a specific Hyper-V host server you want to manage from the command line plus start monitoring a specific guest session by entering the following:
c:Program FilesHyper-Vvmconnect.exe {hostname} “Guest Name”
In this case, {hostname} is the name of the Hyper-V host, and “Guest Name” (within quotes) is the name of the guest session you want to launch to monitor.
Connecting to a Different Virtual Server System
If you want to administer or manage a different virtual server system, you need to log on and connect to another server. To connect to a different virtual server, complete these steps:
1. From within the Hyper-V Manager console, click the Microsoft Hyper-V Servers option in the leftmost pane.
2. Select Action, Connect to Server.
3. Select Another Computer and either enter the name of the server and click OK or click Browse to search Active Directory for the name of the server you want to remotely monitor and administer.
4. When the server appears in the Hyper-V Manager Console, click to select the server to see the actions available for administering and managing that server.
Managing Windows Server 2008 Remotely
Windows 2008’s built-in feature set allows it to be easily managed remotely. This capability eases administration time, expenses, and energy by allowing administrators to manage systems from remote locations, instead of having to be physically at the system. For organizations that deploy Hyper-V on Server Core that has no graphical user interface (GUI) to install the Hyper-V Manager tool, the administration must be done remotely. Remote administration in this section covers both the process of remotely accessing a full Hyper-V host server to take control of the Hyper-V host servers console session and the process of remotely accessing a Hyper-V host server that does not have the administration tools installed on the local host system.
Remote Server Administration Tools
The remote server administration tools in Windows Server 2008 include a number of tools to manage Windows 2008 remotely. This set of tools replaced the Adminpack.msi set of tools that shipped with earlier versions of Windows.
There are different tools for the roles (see Table 6.1) and for the features (see Table 6.2).
TABLE 6.1 Remote Server Administration Tools for Roles
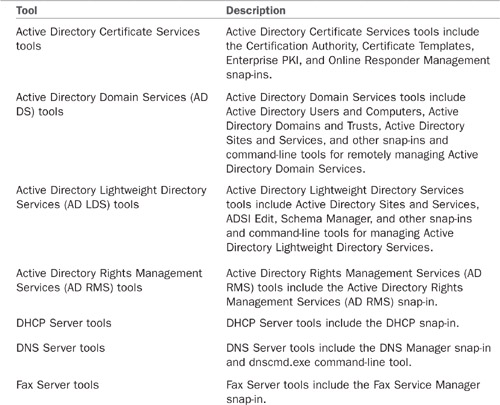
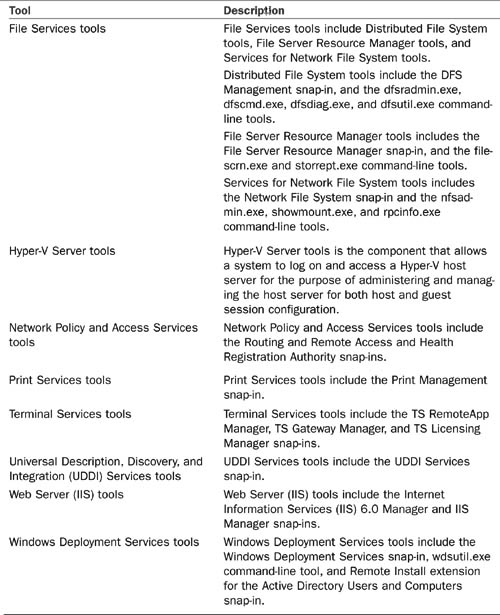
TABLE 6.2 Remote Server Administration Tools for Features
The tools are installed as a feature. You can install all the tools or only the specific ones that you need. Even if the Hyper-V Server role is not installed on a server system, you can still install the Hyper-V Server tool to remotely manage a remote Hyper-V host. This allows an administrator to load up the various administrative tools on a single system and manage several different host systems from a central location.
To install the remote server administration tools, follow these steps:
1. Launch Server Manager.
2. Select the Features folder.
3. Click the Add Features link.
4. Locate the Remote Server Administration Tools feature.
5. Select the desired tools (such as the Hyper-V tools), as shown in Figure 6.3.
FIGURE 6.3 Installing the Hyper-V tools.

6. Click Next to accept the selected tools.
7. Click Install to install the selected tools.
8. Click Close to exit the wizard.
9. Close the Server Manager window.
After the tools are installed, you can manage remote computers by selecting the Connect to Another Computer command from the Action menu. This tool can be used to remotely administer a Hyper-V host even if the Hyper-V does not have the administrative tools loaded on the system itself, such as in the case of a Hyper-V host running on Windows 2008 Server Core.
Remote Desktop
A common method to remotely access a host system has been to use Windows Terminal Services, which effectively enables an administrator to take control of the keyboard and mouse of a remote system and perform tasks just as if the administrator were on the remote system. Unlike running the Remote Server Administration tool that enables an administrator to manage a host system that may not have the Administration tool on the host server itself (for example, Server Core), Terminal Services takes control of the host system and thus all administration tools need to be on the host system being accessed.
With Windows Server 2008, although Microsoft still provides Terminal Services as a add-in to the server for remote access, they have enhanced Remote Desktop on server systems for remote administration and management. Instead of installing the full Terminal Services server role that is intended to provide many users access to a single host server for thin client application and desktop virtualization, the Remote Desktop uses the same security and technology, but is focused at allowing an administrator to take control of the console of the host system. This drastically minimizes the overhead of the host system because it does not need a licensing server to track guest session connections, and it doesn’t need to load up application publishing components or gateway components. Remote Desktop merely enables an administrator to remotely take control of the console of a host system.
To install Remote Desktop on a host server, complete the following steps:
1. Launch Server Manager.
2. Click the Server Manager (hostname) in the leftmost pane
3. In the Server Summary section under Computer Information in the rightmost pane, there is a Configure Remote Desktop option on the far right of the screen. Click that option.
4. On the System Properties page that displays, click the Remote tab.
5. Choose the Allow Connections Only from Computers Running Remote Desktop with Network Level Authentication (More Secure), as shown in Figure 6.4.
6. You will get a warning that notes that a Firewall exception will need to be enabled on the server to allow remote access to this host system. Click OK.
7. Click OK when prompted. The server is now configured for remote desktop access.
FIGURE 6.4 Enabling Remote Desktop on a host system.

In step 5, you could choose to Allow Connections from Computers Running Any Version Of Remote Desktop (Less Secure). This option allows the use of the Remote Desktop Connection (RDC) earlier than version 6.0, which is the RDC software that came by default with Windows 2000, Windows 2003, and Windows XP. Because you are accessing a host server in your network environment, however, and you can likely control what RDC client software you, as the administrator, can choose to use, it is recommended to use the latest RDC client (version 6.1 or later).
The latest RDC client provides a significantly higher level of security for remote connection. Windows Vista SP1 and Windows Server 2008 come with the latest RDC client, and older versions can be easily upgraded to the latest release by going to www.microsoft.com/downloads. When there, search for “Remote Desktop Connection” to download and install the most current version of the client. With the latest RDC client installed, choose to use the “more secure” network-level authentication method of connecting to the host server.
To access the host server from a remote system, you need to run the RDC client software. This software is the same application used to remotely access a Windows Terminal Services system. The location of the RDC software varies from system to system based on the operating system that you are running. In general, you can launch the RDC as follows:
1. Click Start, All Programs, Accessories and choose Remote Desktop Connection.
FIGURE 6.5 Using the RDC application
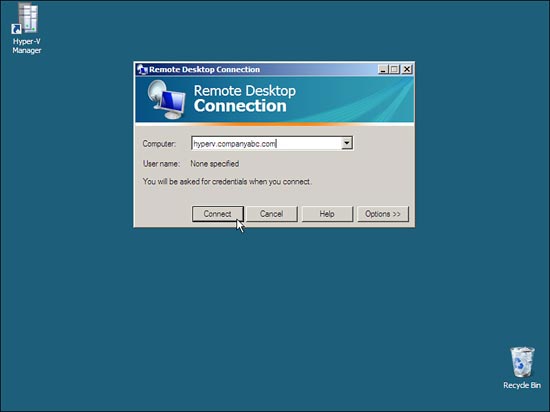
2. Enter the name of the host server you want to remotely access, similar to what is shown in Figure 6.5.
3. Click Connect to access the host server.
4. When prompted for your credentials, enter a valid logon name and password that you would normally use to log on to the remote host system from the system’s console screen. (If the host is connected to a domain, for the username, enter the domain and username, such as [email protected].) Enter the password for the account and click OK.
Once logged on to the host server, you can do whatever you would normally do on a host system, such as administer the system, change system settings, and even restart the system.
Be careful what you do on the remote system. If you “shut down” the system and no one is there to power the system back up, you will need to physically go to the system and power it back on.
When you are done remotely administering the system, you can just click Start, Log Off, and that will log you out of the system and terminate your remote session (yet keep the server operational and running).
Windows Remote Management
Windows Remote Management (WinRM) enables an administrator to run command lines remotely on a target server. When WinRM is used to execute the command remotely, the command executes on the target server, and the output of the command is piped to the local server. This allows administrators to see the output of those commands.
The commands run securely, because the WinRM requires authentication and also encrypts the network traffic in both directions.
WinRM is both a service and a command-line interface for remote and local management of servers. The service implements the WS-Management protocol on Windows 2008. WS-Management protocol is a standard web services protocol for management of software and hardware remotely.
In Windows 2008, the WinRM service establishes a listener on the HTTP and HTTPS ports. It can coexist with IIS and share the ports, but uses the /wsman URL to avoid conflicts. The IIS role does not have to be installed for this to work.
The WinRM service must be configured to allow remote management of the target server, and the Windows Firewall must be configured to allow WinRM traffic inbound. The WinRM service can be configured through GPO or via the WinRM command line. To have the WinRM service listen on port 80 for all IP addresses on the server and to configure the Windows Firewall, execute the following commands on the target server:
1. Select Start, Run.
2. Enter the command winrm quickconfig.
3. Click OK to run the command.
4. Read the output from WinRM. Answer y to the prompt that asks, “Make These Changes [y/n]?.”
Now the target server is ready to accept commands. For example, suppose an administrator is logged on to a server win2008.companyabc.com and needs to remotely execute a command on remote Hyper-V host server HyperV-01.companyabc.com. These steps assume that WinRM has been configured and the firewall rule has been enabled. Use the following steps to remotely execute the command:
1. Open a command prompt on the server win2008.
2. Enter the command winrs –r:http://hyperV-01.companyabc.com ipconfig /all.
The output of the command will be shown on the local server (win2008)—in this case, the IP configuration of the target server (hyperv-01).
This proves particularly useful when executing a command or a set of commands on numerous servers. You no longer have to log on to a remote host server using Terminal Services or the like for each server. Instead, if you want to run a command, you can execute the command remotely using a command line or even include the command in a batch file against a series of target servers.
Managing Host Server, Virtual Switch, and Disk Settings
In the Hyper-V Manager console, a number of critical configuration options are important to understand. These configuration settings and options relate to virtual network switch settings, host server configuration settings, and management of guest session disk images. These options enable you to compress or expand disk image files or create virtual local area networks (VLANs) to better optimize communications between guest sessions or from guest sessions to the physical network backbone.
Configuring Host Server Settings
Basic settings in the Hyper-V Manager console enable you to set default host server settings, such as default path of where guest image files are stored, how guest sessions are administered, and the keyboard command used to switch keyboard and mouse control between a guest session and a host session.
FIGURE 6.6 Hyper-V Settings options.
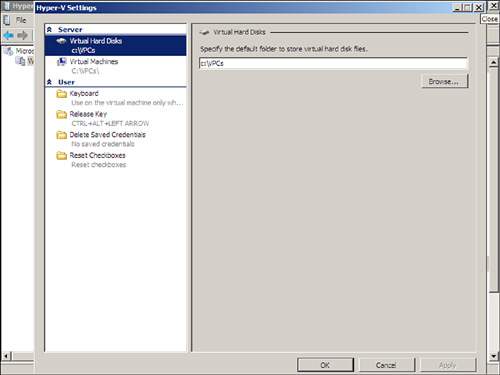
Regardless of whether you have chosen to use Server Manager or the Hyper-V Manager tool, or whether you are accessing the host server on the system itself or remotely, the configuration options and settings are the same. When you click the virtual server system you want to administer, action settings become available. You have the Actions menu on the right side of the console screen, and the Action menu option at the top of the screen exposes the same list of configuration options.
These action settings enable you to configure the host server settings for the system you have chosen to administer. When you click Hyper-V Server Settings from the Action menu, you see a screen similar to the one shown in Figure 6.6.
The settings you can modify in the Hyper-V Settings page are as follows:
![]() Virtual Hard Disks—This option enables you to set the drive path for the location where virtual hard disks (VHDs) are stored. This might be on the local C: drive of the server system or an external storage area network (SAN) or storage system.
Virtual Hard Disks—This option enables you to set the drive path for the location where virtual hard disks (VHDs) are stored. This might be on the local C: drive of the server system or an external storage area network (SAN) or storage system.
![]() Virtual Machines—This option enables you to set the drive path for the location where virtual machine snapshots are stored. Snapshots are incremental image files that store the content of the image at a point where you take a snapshot of an image. At a point in time when you want to roll back to the state of the image when you took the snapshot, these image files have the data needed to roll back the guest session.
Virtual Machines—This option enables you to set the drive path for the location where virtual machine snapshots are stored. Snapshots are incremental image files that store the content of the image at a point where you take a snapshot of an image. At a point in time when you want to roll back to the state of the image when you took the snapshot, these image files have the data needed to roll back the guest session.
Although you are given only a single directory name for the storage of VHDs and virtual machine snapshot images, the data for each guest session and snapshot is named differently, and Hyper-V has the ability of acknowledging the different image files and snapshots stored in these folders.
![]() Keyboard—This option sets a preference whether key commands are by default recognized by the physical host server, or whether the key commands are to be recognized by the virtual guest session. As an example, if you press Ctrl-Esc, are you going to pop up the Start menu of the host or the Start menu of the guest session? If you choose Use on the Physical Computer, Ctrl+Esc will pop up the Start menu on the physical host server. If you choose Use on the Virtual Machine, Ctrl+Esc will pop up the Start menu on the virtual guest session you are managing. If you choose Use on the Virtual Machine Only When Running Full-Screen, Ctrl+Esc will pop up the Start menu if you are running the guest management console in full screen.
Keyboard—This option sets a preference whether key commands are by default recognized by the physical host server, or whether the key commands are to be recognized by the virtual guest session. As an example, if you press Ctrl-Esc, are you going to pop up the Start menu of the host or the Start menu of the guest session? If you choose Use on the Physical Computer, Ctrl+Esc will pop up the Start menu on the physical host server. If you choose Use on the Virtual Machine, Ctrl+Esc will pop up the Start menu on the virtual guest session you are managing. If you choose Use on the Virtual Machine Only When Running Full-Screen, Ctrl+Esc will pop up the Start menu if you are running the guest management console in full screen.
![]() Release Key—When you manage a virtual guest session, all keyboard and mouse control is passed to the guest session. To switch keyboard and mouse control back to the host server, by default the key sequence that releases the guest session back to host console is Ctrl+Alt+left arrow. The Remote Control/Release Key option allows for the selection of other key combinations.
Release Key—When you manage a virtual guest session, all keyboard and mouse control is passed to the guest session. To switch keyboard and mouse control back to the host server, by default the key sequence that releases the guest session back to host console is Ctrl+Alt+left arrow. The Remote Control/Release Key option allows for the selection of other key combinations.
If you installed the Windows Integration tools on the guest session, keyboard and mouse control seamlessly passes between the guest and host depending on whether your mouse is clicking the guest session or if you move the mouse outside the guest session and click it somewhere outside the guest session to let control pass back to the host. You typically will not need to do the Ctrl+Alt+left arrow after the Integration tools have been installed.
![]() Delete Saved Credentials—Because the access from a host server to a guest session for administration is done through an encrypted Secure Sockets Layer (SSL) session, each guest session maintains security during logon by forcing the entry of credentials to access different guest sessions. These credentials can be stored so that administrators do not need to enter their credentials to access a guest session. This option allows an administrator to delete (or flush) saved credentials so that anyone at the console who needs to access a guest session must enter credentials to do so.
Delete Saved Credentials—Because the access from a host server to a guest session for administration is done through an encrypted Secure Sockets Layer (SSL) session, each guest session maintains security during logon by forcing the entry of credentials to access different guest sessions. These credentials can be stored so that administrators do not need to enter their credentials to access a guest session. This option allows an administrator to delete (or flush) saved credentials so that anyone at the console who needs to access a guest session must enter credentials to do so.
![]() Reset Checkboxes—This option clears the Don’t Ask Me This Again check box so that if an administrator does not want to be prompted again, select this option.
Reset Checkboxes—This option clears the Don’t Ask Me This Again check box so that if an administrator does not want to be prompted again, select this option.
Stopping the Hyper-V Service
The Stop Service option in the Virtual Network Manager action item menu provides enables you to stop the Windows Hyper-V service on the machine being managed. You might choose to stop the service if you need to perform maintenance or begin the shutdown of an administered system.
A common use of the Stop Service function is to stop the Hyper-V service to flat file (xcopy) Hyper-V guest images. With the Hyper-V service running, all the guest sessions are locked and flagged as “in use” so that Hyper-V can control the state of the images. In this state, however, the image files cannot be easily copied because they show as being in use. If you stop the service, Hyper-V releases control of the images files, and then the files can be copied off and then the Hyper-V service started again.
Managing Virtual Network Segments with the Virtual Switch
The Actions settings in the Hyper-V Manager console contain a Virtual Network Manager option. By selecting the Virtual Network Manager action item, you have access to configure the virtual network switches, as shown in Figure 6.7. You can configure the LAN and WAN connections available for the guest sessions of the virtual server host.
FIGURE 6.7 Virtual network switch management.
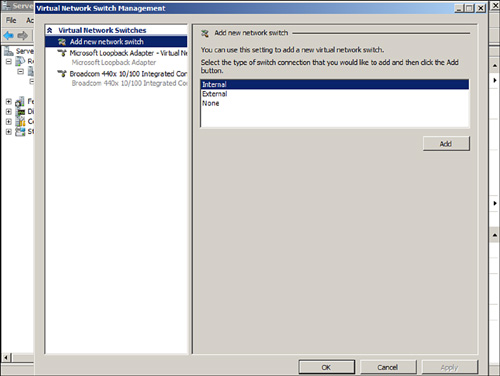
Configuring the Virtual Network Manager is more than just providing a way for guest sessions to connect to a physical network backbone. Doing so also enables administrators to control how virtual guest sessions communicate among themselves or on the network backup. As an example, if an organization has a protected VLAN network segment for key business applications, and then a general network segment for general business email servers and file servers, the Virtual Network Manager can set up a connection between the protected business applications through a dedicated network adapter in the host to a protected network segment. A separate connection can be set from the other virtual guest sessions through a different network adapter to a different network segment.
Because Hyper-V host systems can host 4, 8, 15, 20, or more guest sessions, the guest sessions are frequently applications that should be available to different groups of users. Network segmentation for application access can be achieved by setting up different network switch configurations to different network adapters in a Hyper-V host server.
Specific options include the following:
![]() Add New Virtual Network—This configuration option allows for the addition of a new internal or external network segment available to the guest sessions. An external network segment would be a connection to a LAN adapter in the host server so that a guest session could gain access out of the virtual server. An internal network segment would be a connection that is solely within the virtual server system where you might want to set up a virtual LAN so that the virtual server guests within a system can talk to each other and with the host server. There is also a private session for a virtual network where the guest sessions on a host system can communicate only with themselves and the private network segment does not connect to any external network adapter and not even to the host server itself. Private network segments are commonly used by application developers and IT personnel who want to test (typically for security purposes) an application to ensure the session is not accidentally connected outside of the virtual guest session.
Add New Virtual Network—This configuration option allows for the addition of a new internal or external network segment available to the guest sessions. An external network segment would be a connection to a LAN adapter in the host server so that a guest session could gain access out of the virtual server. An internal network segment would be a connection that is solely within the virtual server system where you might want to set up a virtual LAN so that the virtual server guests within a system can talk to each other and with the host server. There is also a private session for a virtual network where the guest sessions on a host system can communicate only with themselves and the private network segment does not connect to any external network adapter and not even to the host server itself. Private network segments are commonly used by application developers and IT personnel who want to test (typically for security purposes) an application to ensure the session is not accidentally connected outside of the virtual guest session.
![]() Existing virtual network switches—If the system you are managing already has virtual network switches configured, they will be listed individually in the leftmost pane of the Virtual Network Switch Management dialog box. By selecting an existing virtual network switch, you can change the name of the virtual switch, change the internal or external connection that the switch has access to, or remove the network switch altogether.
Existing virtual network switches—If the system you are managing already has virtual network switches configured, they will be listed individually in the leftmost pane of the Virtual Network Switch Management dialog box. By selecting an existing virtual network switch, you can change the name of the virtual switch, change the internal or external connection that the switch has access to, or remove the network switch altogether.
Modifying Disk Settings and Configurations
Another action option on the Hyper-V Manager console is the Edit Disk option. The Edit Disk option enables an administrator to modify an existing VHD image. For instance, an administrator could compress the disk image so that it uses the least amount of disk space possible. Alternatively, the administrator could expand the disk image to make more disk space available for the guest session. For any guest image session you want to make modifications to, the guest image must be shut down and off. The image cannot be in a paused or saved state, and you want to confirm that the last time you shut down the image that it was shut down cleanly.
The Edit Disk option launches a wizard. You are prompted as follows:
1. At the Before You Begin screen, read the description of what the wizard will do, and then click Next.
2. Browse or enter the filename of the virtual guest image you are looking to modify, and then click Next.
3. Choose to compact, convert, or expand the image:
![]() Compact—This option allows you to shrink a VHD to remove portions of the disk image file that is unused. This is commonly used when a disk image will be archived and stored and having the smallest disk image file possible is preferred. You would also use this option if you had a lot of files in your guest image and then deleted the files and are therefore using significantly less of the allocated space than the image file is taking. In this scenario, compression will bring the file back to the size that the image is currently using.
Compact—This option allows you to shrink a VHD to remove portions of the disk image file that is unused. This is commonly used when a disk image will be archived and stored and having the smallest disk image file possible is preferred. You would also use this option if you had a lot of files in your guest image and then deleted the files and are therefore using significantly less of the allocated space than the image file is taking. In this scenario, compression will bring the file back to the size that the image is currently using.
![]() Convert—This option enables you to convert a VHD file from a dynamic virtual disk to a fixed virtual disk. A dynamic virtual disk allows the disk image to grow based on the needs of the guest session. A fixed virtual disk establishes a maximum disk size; when the guest image reaches that limit, the guest session, just like a physical hard drive, runs out of disk space. A dynamic virtual disk provides proves more flexible. The administrator doesn’t have to worry about the guest image running out of space; the image file just keeps growing as it needs the space (or when the host server runs out of disk space). When a dynamic virtual disk expands, however, it slows down the guest image. Therefore, many organizations looking for high performance choose a fixed virtual disk size, and the administrators monitor disk space on the guest image to make sure the system doesn’t run out of space, just as organizations have done for years with physical hard drive disk space availability.
Convert—This option enables you to convert a VHD file from a dynamic virtual disk to a fixed virtual disk. A dynamic virtual disk allows the disk image to grow based on the needs of the guest session. A fixed virtual disk establishes a maximum disk size; when the guest image reaches that limit, the guest session, just like a physical hard drive, runs out of disk space. A dynamic virtual disk provides proves more flexible. The administrator doesn’t have to worry about the guest image running out of space; the image file just keeps growing as it needs the space (or when the host server runs out of disk space). When a dynamic virtual disk expands, however, it slows down the guest image. Therefore, many organizations looking for high performance choose a fixed virtual disk size, and the administrators monitor disk space on the guest image to make sure the system doesn’t run out of space, just as organizations have done for years with physical hard drive disk space availability.
![]() Expand—This option enables you grow the size of a dynamic disk image. For example, you might have initially created the disk image to be only 8GB maximum in size. Now that you’ve added a lot of applications to the guest image, however, you are running out of space in the image file. By expanding the image file, you effectively enable yourself to add more applications and data to the guest session without having to re-create the guest session all over again. Even with a dynamic virtual disk, although it will grow as the guest session requires disk space, you do set a maximum size for the image, and the guest image grows up to that limit. The Expand option enables you to extend the image beyond the maximum size limit set for the image.
Expand—This option enables you grow the size of a dynamic disk image. For example, you might have initially created the disk image to be only 8GB maximum in size. Now that you’ve added a lot of applications to the guest image, however, you are running out of space in the image file. By expanding the image file, you effectively enable yourself to add more applications and data to the guest session without having to re-create the guest session all over again. Even with a dynamic virtual disk, although it will grow as the guest session requires disk space, you do set a maximum size for the image, and the guest image grows up to that limit. The Expand option enables you to extend the image beyond the maximum size limit set for the image.
4. Click Next, and then click Finished to execute the disk maintenance command your requested.
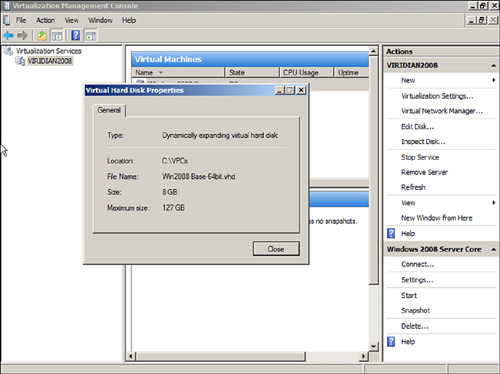
Inspect Disk
The Inspect Disk option in the Virtual Network Manager action item menu enables you to view the settings of an existing virtual image file. For the example shown in Figure 6.8, the disk image is currently 8GB in size, can dynamically grow up to the maximum limit of 2040GB, and is located on the local hard drive in the directory C:VPCs.
Using Common Practices for Securing and Managing a Hyper-V Host Server
There are a handful of practices used to secure and manage a Windows 2008 Hyper-V host server. The first is to identify security risks to determine what the organization needs to be concerned about when applying a security policy. The second is that the organization can implement a tool such as Microsoft Operations Manager to monitor the server and simplify management tasks on a day-to-day basis. And the third is to use maintenance practices to enhance your ability to keep the host server stable and operational.
Identifying Security Risks
A network’s security is only as good as the security mechanisms put into place and the review and identification process. Strong security entails using Windows 2008 security measures, such as authentication, auditing, and authorization controls, but it also means that security information is properly and promptly reviewed. Information that can be reviewed includes Event Viewer logs, service-specific logs, application logs, and performance data.
FIGURE 6.8 Viewing the VHD properties of a guest image.
All the security information for a Windows 2008 Hyper-V host can be logged, but without a formal review and identification process the information is useless. Also, security-related information can be complex and unwieldy, depending on what information is being recorded. For this reason, manually reviewing the security information might be tedious; however, doing so can prevent system or network compromise.
The formal review and identification process should be performed daily. Any identified activity that is suspicious or that could be potentially risky should be reported and dealt with appropriately. For instance, an administrator reviewing a particular security log might run across some data that alerts him to suspicious activity. This incident should be reported to the security administrator to take the appropriate action. Whatever the ultimate course of action might be in the organization, there should be points of escalation and remediation.
Using System Center Operations Manager 2007 to Simplify Management
Many of the recommendations in this chapter focus on reviewing event logs, monitoring the configuration, and monitoring the operations of the Hyper-V system. For an administrator who has several Hyper-V host servers to monitor, with each host server potentially having several virtual guest sessions running on it, such vigilance can prove to be difficult on a day-to-day basis. The challenge is proportional to the number of servers that an administrator is responsible for (and organizations with virtualized servers typically have many virtual servers they are overseeing and managing). Microsoft has developed a product to make these tasks easier and more manageable: System Center Operations Manager 2007.
System Center Operations Manager 2007 is an enterprise-class monitoring and management solution for Windows environments. It is designed to simplify Windows management by consolidating events, performance data, alerts, and more into a centralized repository. Reports on this information can then be tailored depending on the environment and on the level of detail that is needed and extrapolated. This information can assist administrators and decision makers in proactively addressing Windows 2008 operation and any problems that exist or might occur.
Many other intrinsic benefits are gained by using System Center Operation Manager 2007, including the following:
![]() Event log monitoring and consolidation
Event log monitoring and consolidation
![]() Monitoring of various applications, including those provided by third parties
Monitoring of various applications, including those provided by third parties
![]() Enhanced alerting capabilities
Enhanced alerting capabilities
![]() Assistance with capacity-planning efforts
Assistance with capacity-planning efforts
![]() A customizable knowledge base of Microsoft product knowledge and best practices
A customizable knowledge base of Microsoft product knowledge and best practices
![]() Web-based interfaces for reporting and monitoring
Web-based interfaces for reporting and monitoring
Leveraging Windows Server 2008 Maintenance Practices
Administrators face the often-daunting task of maintaining the Windows 2008 environment and specifically Hyper-V host servers in the midst of daily administration and firefighting. Little time is spent identifying and then organizing maintenance processes and procedures.
To decrease the number of administrative inefficiencies and the amount of firefighting an administrator must go through, it’s important to identify those tasks that are important to the system’s overall health and security. After they’ve been identified, routines should be set to ensure that the Windows 2008 environment is stable and reliable. Many of the maintenance processes and procedures described in the following sections are the most opportune areas to target.
Specific Security Practices for Hyper-V Host Servers
In a network environment, specific practices can be implemented to improve the security of a Hyper-V host server. Security practices include protecting image files, establishing network security zones for secured access, and implementing Hyper-V on a Server Core host.
Protecting Hyper-V Guest Image Files
It is important that the image files of a Hyper-V host or any virtualized server environment be protected. Someone who has access to the VHD image file can boot the image file and gain access to the contents of the server, just as if someone were to physically steal a server and start hacking away at the server to gain access to the data on it. However unlike a physical server that would be noticed if it were physically stolen and missing, virtualized guest image files are nothing more than “files.” Administrators have been known to copy the files onto USB hard drives or back up the guest image files to other servers for disaster-recovery purposes. The problem with that is if the files are not protected, someone can copy the files off the disk share and thus effectively obtain the full server.
Maintain good control of the VHD image files. If you do copy the image files as a backup or disaster-recovery procedure, make sure the location where you store the files is secure and properly protected. Just as your physical servers are typically locked up in a rack, digitally lock up the location where you store your virtual server image files to protect their contents.
Hyper-V protects the location where the Hyper-V guest images are stored (for instance, C:VPC or the like) by making the directory accessible only by the local Hyper-V service. Unless you change the file access permissions on a Hyper-V host system, the directory where the images are stored cannot be mounted or shared.
Likewise, if you delete the folder where your Hyper-V images were stored and then create a new folder with the exact same name, when you try to launch your guest images, you will get an error that the guest images cannot start. You need to go into Windows Explorer, go to the folder you just created, and give the LOCALSERVICE account access to the folder. You can read more about this in Chapter 13, “Debugging and Problem Solving the Hyper-V Host and Guest OS.”
Separate Network Adapters for Host and Guests
In the section “Managing Virtual Network Segments with the Virtual Switch,” network segmentation was tied to noting which guest sessions needed to communicate with which network adapter in the host server. With Hyper-V and security in mind, it is best to consider having a separate network adapter just for the management of the Hyper-V host server that none of the guest sessions communicate on.
The advantage of having a separate network adapter for the host server is that internal remote administration and management of the host can be done on one network adapter, and all other communications for guest sessions will occur over a different network adapter or adapters. This setup provides isolated administrative control of the host server from the direct access, communications, and control of the guest sessions. Remember, a person who has access to a Hyper-V host server has access to all the guest sessions running on the system. If there are a dozen virtual guest sessions running on a host, the individual accessing the host has direct access to all 12 virtual guest sessions.
Splitting up the physical network communications and using a monitoring or management tool to monitor communications over the host server network adapter can provide better security for the guest sessions running on the host system.
Running Hyper-V on Windows 2008 Server Core
As noted in Chapter 3, “Planning, Sizing, and Architecting a Hyper-V Environment,” Hyper-V can be installed on either a full version of Windows Server 2008 or on the GUI less version of Windows 2008 called Server Core. Because Server Core does not have the traditional Windows GUI, the attack surface of the host system is greatly diminished. Because guest sessions need to be remotely accessed using either the Hyper-V Manager or using Remote Desktop, there’s no need to have a full host operating system.
Windows 2008 Server Core is one of the better ways of providing security and protection of a host server for virtualization.
Keeping Up with Service Packs and Updates
Another major way to maintain a server for security protection is to make sure the appropriate service packs and updates are regularly applied on the Hyper-V host servers and guest sessions. Service packs (SPs) and updates for both hosts and guests, and for the operating system and applications, are vital parts to maintaining availability, reliability, performance, and security. Microsoft packages these updates into SPs or individually.
An administrator can update a system with the latest SP or update in several ways: Automatic Windows Updates, CD-ROM, manually entered commands, or Microsoft Windows Server Update Services (WSUS).
Thoroughly test and evaluate SPs and updates in a lab environment before installing them on production servers and guest sessions. A good use of the snapshot feature in Hyper-V is to snapshot a guest session, apply a patch or update, and then if the system has problems with the update you can easily roll back to the state of the server from the snapshot. Installing the appropriate SPs and updates on each host server and guest session keeps all systems consistent.
Manual Update or CD-ROM Update
Manual updating is typically done when applying SPs, rather than hotfixes. SPs tend to be significantly larger than updates or hotfixes, so many administrators will download the SP once and then apply it manually to their servers. Or the SP will be obtained on CD-ROM. When an SP CD-ROM is inserted into the drive of the server, it typically launches an interface to install the SP.
In the case of downloaded SPs or of CD-ROM-based SPs, the SP can also be applied manually via a command line. This allows greater control over the install (see Table 6.3), such as by preventing a reboot or by not backing up files to conserve space.
TABLE 6.3 Update.exe Command-Line Parameters

Hotfixes can also be controlled in a similar manner by downloading them and then using the command-line parameters shown in Table 6.4.
TABLE 6.4 Hotfix.exe Command-Line Parameters
Automatic Updates
Windows 2008 can be configured to download and install updates automatically using Automatic Windows Updates. With this option enabled, Windows 2008 checks for updates, downloads them, and applies them automatically on a schedule. The administrator can just have the updates downloaded but not installed (to exercise more control over when they are installed). Windows Update can also download and install recommended updates, which is new for Windows 2008.
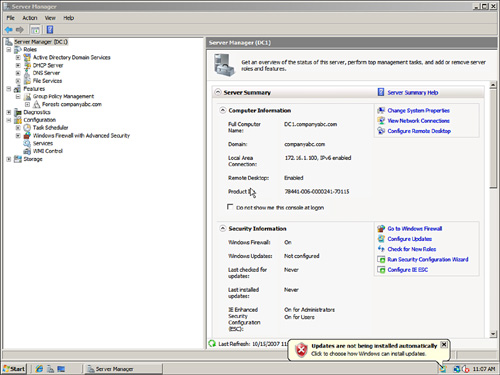
When the Windows 2008 operating system is installed, Windows Update is not configured and a message is displayed on logon, as shown in Figure 6.9. The Server Manager Security Information section shows the Windows Update as Not Configured. This can be an unsecure configuration, because security updates will not be applied.
FIGURE 6.9 Windows Updates “not configured” error.
Windows Updates can be configured as follows:
1. Launch Server Manager.
2. Click the Configure Updates link in the Security Information section.
3. Click the Have Windows Install Updates Automatically to have the updates downloaded and installed.
4. The Windows Updates status will change to Install Updates Automatically Using Windows Updates.
The configuration of Windows Updates can be reviewed by clicking the Configure Updates link again. The Windows Update console appears (shown in Figure 6.10). The figure shows that updates will be installed automatically at 3:00 a.m. every day. The console also shows when updates were checked for last. In the console, the administrator can also complete the following tasks:
![]() Manually check for updates
Manually check for updates
![]() Change the Windows Updates settings
Change the Windows Updates settings
![]() View the update history
View the update history
![]() See installed updates
See installed updates
![]() Get updates for more products
Get updates for more products
The link to get updates for more products enables the administrator to check for updates not just for the Windows 2008 platform, but also for other products such as Microsoft Exchange and Microsoft SQL. Clicking the link launches a web page to authorize the server to check for the broader range of updates.
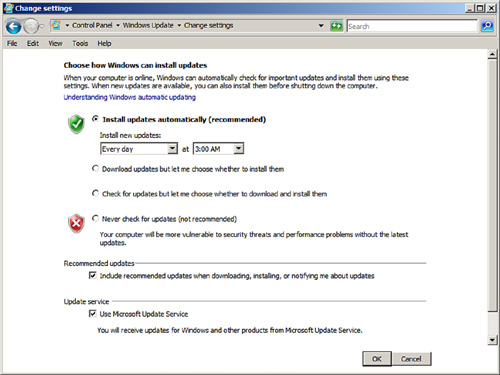
Clicking the Change Settings link allows the Windows Update setting to be changed. The Change Settings window, shown in Figure 6.11, enables the administrator to adjust the time of installs, to install or just download, and to install (or not) recommended updates.
FIGURE 6.10 Windows Update console.
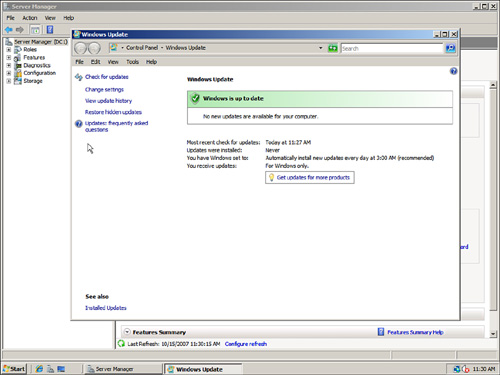
FIGURE 6.11 Windows Update Change Settings window.
The Windows Updates functionality is a great tool for keeping servers updated with very little administrative overhead, albeit with some loss of control.
Windows Server Update Services
Microsoft understands the increased administration and management efforts administrators face when using Windows Update to remain current with SPs and updates in anything other than small environments. Therefore, Microsoft has created the Windows Server Update Services (WSUS) client and server versions to minimize administration, management, and maintenance of mid- to large-sized organizations. WSUS 3.0 SP1 communicates directly and securely with Microsoft to gather the latest SPs and updates.
Microsoft WSUS provides a number of features to support organizations, such as the following:
![]() Support for a broad range of products such as Windows operating system family, Exchange messaging, SQL Server, Office, System Center family, and Windows Defender.
Support for a broad range of products such as Windows operating system family, Exchange messaging, SQL Server, Office, System Center family, and Windows Defender.
![]() Automatic download of updates.
Automatic download of updates.
![]() Administrative control over which updates are approved, removed, or declined. The Remove option permits updates to be rolled back.
Administrative control over which updates are approved, removed, or declined. The Remove option permits updates to be rolled back.
![]() Email notification of updates and deployment status reports.
Email notification of updates and deployment status reports.
![]() Targeting of updates to specific groups of computers for testing and for control of the update process.
Targeting of updates to specific groups of computers for testing and for control of the update process.
![]() Scalability to multiple WSUS servers controlled from a single console.
Scalability to multiple WSUS servers controlled from a single console.
![]() Reporting on all aspects of the WSUS operations and status.
Reporting on all aspects of the WSUS operations and status.
![]() Integration with Automatic Windows Updates.
Integration with Automatic Windows Updates.
The SPs and updates downloaded onto WSUS can then be distributed to either a lab server for testing (recommended) or to a production server for distribution. After these updates are tested, WSUS can automatically update systems inside the network.
The following steps install the Windows Server Update Services role:
1. Open the Server Manager console.
2. Select the Roles folder and click Add Roles.
3. In the Add Roles Wizard, select Windows Server Update Services and follow the instructions onscreen. The wizard will install WSUS 3.0 SP1 and any required components, including Web Server (IIS), if needed.
Unlike other server roles, the binaries for WSUS 3.0 SP1 are downloaded from Microsoft. This ensures that anytime WSUS is installed, you will always be installing the most current version.
Offline Virtual Machine Servicing Tool
As much as patching and update Hyper-V host sessions and running guest sessions is important to the security and ongoing reliability and support of hosts and guest systems, many organizations also have guest sessions that are offline that should be patched and updated. Frequently, these offline guest sessions are template images of base Windows 2003 or Windows 2008 server sessions that have been built and will be used as the base operating system for a future virtual guest server. Other times, offline virtual guest sessions are systems that are available just in case a primary server fails. (A copy of a physical server stored in an offline image can be started and put into production in a form of disaster recovery.)
However, just like physical production servers, the offline guest sessions get out of sync with available patches and updates, so Microsoft came out with an Offline Virtual Machine Service tool that can patch and update nonrunning guest sessions. You can download the Offline Virtual Machine Service tool from www.microsoft.com/downloads. Just search for “Offline Virtual Machine Servicing.”
The tool plugs in to one of the following update applications:
![]() Microsoft System Center Virtual Machine Manager 2008 (VMM)
Microsoft System Center Virtual Machine Manager 2008 (VMM)
![]() Microsoft System Center Configuration Manager 2007 (SCCM)
Microsoft System Center Configuration Manager 2007 (SCCM)
![]() Microsoft Windows Server Update Services (WSUS)
Microsoft Windows Server Update Services (WSUS)
The Installation and Configuration Wizard that comes with the Offline Virtual Machine Servicing tool connects the tool to VMM, SCCM, or WSUS. You can configure your offline guest sessions into machine groups where updates are applied to the offline servers in the machine group.
Jobs can then be scheduled to apply specified updates to the offline guest sessions. The jobs can run immediately or at a scheduled time.
Backing Up the Hyper-V Host and Guests
Another key task in the day-to-day management and operations of any server environment is backing up the server and the data that resides on the system. In the case of Hyper-V virtualization, the backup process involves both the host server and the guest sessions. There are different strategies for backing up virtual hosts and sessions, one of which involves backing up each guest session just like the process of backing up individual physical servers in the past. Another strategy is to back up the host server, which in turn backs up the guest sessions running on the host.
The key to keep in mind on a backup strategy is the state of the server when the information is being backed up. If a host server is being backed up with, for instance, eight guest sessions running on the system, the backup of the guest sessions will be at a state when the guest sessions are running and operational, effectively a snapshot in time. Applications such as Microsoft Exchange, SQL Server, SharePoint Server, and the like prefer that the backup be scheduled at the application level so that the Volume Shadow Copy Service (VSS) writer can properly interrupt the application, set a checkpoint where the database is being backed up; they will then flush the transaction logs on the server to clean up the state of the system after a backup was successfully completed.
When backing up a host server, the VSS writer is not involved in the backup, so the logs on the servers never show the guest server being successfully backed up. Therefore, for applications that have specific log tracking and backup procedures, backing up the guest session as if it were a standalone server is better than backing up the guest sessions simultaneously (at least from the host server perspective).
New backup agents and technologies are continuously being developed to provide better ways to back up virtualized host and guest sessions. These new applications and agents provide for the backing up of Hyper-V host servers that then make VSS calls to guest sessions to properly back up the guest sessions.
For now, organizations are backing up the Hyper-V host server as a Windows server system, and backing up each Hyper-V guest session individually to ensure that the application backup procedures are followed in the current manner that the application expects a backup and flush of logs to occur. Microsoft provides a backup program that allows for the backup of Windows Server systems. The backup program is called Windows Server Backup and is included with Windows Server 2008.
Installing Windows Server Backup
Although the Windows Server Backup console is listed in Administrative Tools, the feature tools need to be installed. The easiest way to install the Windows Backup tools is to use the Add Features function within Server Manager. Of course, for Server Core deployments, the command-line version, ServerManagercmd.exe, must be used.
Installing Windows Server Backup Using Server Manager
On every edition of Windows 2008, except for Server Core installations, the Windows Server Backup feature can be installed using Server Manager. To install the Windows Server Backup feature, follow these steps:
1. Log on to the Windows Server 2008 system with an account with administrator privileges.
2. Click Start, All Programs, Administrative Tools, and select Server Manager.
3. In the tree pane, select the Features node, and click the Add Features link in the Tasks pane.
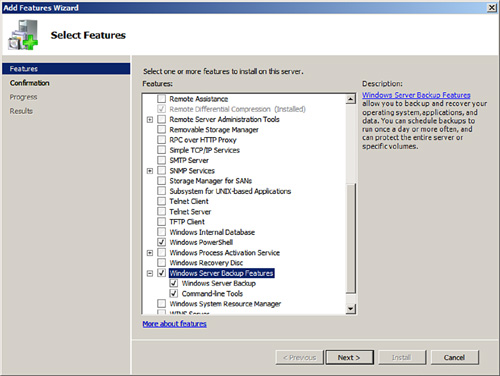
4. When the Add Features Wizard opens, check the boxes next to Windows PowerShell and Windows Server Backup Features, as shown in Figure 6.12. Click Next to continue.
FIGURE 6.12 Selecting the Windows Server Backup features.
5. On the Confirm Installation Selections page, review the summary, and click Install to continue.
6. On the Installation Results page, review the results, and click Close to complete the installation.
Installing Windows Server Backup Using servermanagercmd.exe
In many cases, administrators might choose to use the command prompt environment as a preference when installing roles, role services, or features. When a particular feature or role is installed using the servermanagercmd.exe utility, all feature, role services, and role dependencies are also added. To install the Windows Server Backup command-line tools using servermanagercmd.exe, perform the following steps:
1. Log on to the Windows Server 2008 system with an account with administrator privileges.
2. Click Start, All Programs, All Programs, Accessories, and select Command Prompt.
3. Type cd and press Enter.
4. Type Servermanagercmd.exe –install Backup and press Enter.
5. After the installation completes, the results will be listed in the window, as shown in Figure 6.13.
FIGURE 6.13 Installing Windows Server Backup using servermanagercmd.exe.

6. Type servermanagercmd.exe –query and press Enter to get a list of the installed roles, role services, and features. Review the list to verify that Windows PowerShell and Windows Server Backup command-line tools are now installed.
7. Type exit in the command prompt window and press Enter to exit the command prompt.
Installing Windows Server Backup on Server Core Installations
On a Windows 2008 Server Core deployment, if the Windows Server Backup feature is not installed, you can install it as follows:
1. Log on to the Windows Server 2008 Server Core system with an account with administrator privileges.
2. In the command prompt window, type cd and press Enter.
3. Type in Start /w ocsetup.exe WindowsServerBackup and press Enter. Restart if prompted to do so.
4. Log on to a different Windows Server 2008, Enterprise Edition system with an account with administrator privileges on the local system and on the Server Core system. It is assumed that both systems are part of the same domain and the Server Core system can access other resources on the network from the Server Core system.
5. Click Start, All Programs, Administrative Tools, and select Windows Server Backup.
6. In the Actions pane, click the Connect to Another Computer link.
7. In the Computer Chooser window, select the Another Computer option button, enter the name of the Server Core system, and click OK.
8. If you can connect to the Server Core system, the installation is successful. If the connection fails, either the Server Core firewall is preventing connectivity or Windows Server Backup has not been installed.
9. To determine whether the Server Core firewall is enabled, type Netsh firewall show opmode in the command prompt window on the Server Core system and press Enter.
10. Check to see which profile is active, domain or standard, and check to see whether the operational mode is active or inactive. Figure 6.14 shows that the domain profile is the current profile and that the firewall operational mode is disabled.
FIGURE 6.14 Using Netsh to verify the current firewall settings on Server Core.
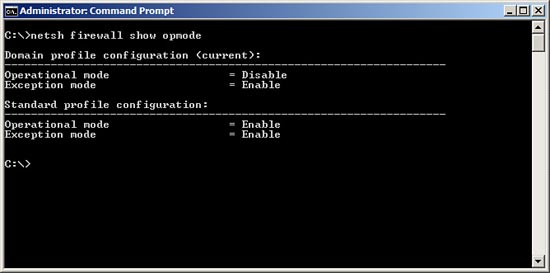
11. If the current profile shows an operational state of enabled, type Netsh firewall set opmode disable and press Enter to disable the firewall.
Disabling a firewall on any system is not recommended. Proper firewall configuration should be performed to only allow the necessary services, applications, and ports through the firewall.
12. After the firewall has been determined to be disabled, try to connect to the Server Core system remotely again.
13. On the Server Core system, the administrator can also verify that Windows Server Backup has been installed by typing wbadmin.exe in the command prompt window and pressing Enter. If the wbadmin options are listed, Windows Server Backup has been installed.
14. Enter logoff to log off of the Server Core system. Log off of any other system as required.
Scheduling a Backup Using Windows Server Backup and Allocating Disks
After Windows Server Backup has been installed, if local disks or scheduled backups will be used, a backup must be run to provision or allocate the disks. This can be done only by running a backup and defining which local disk or disks will be dedicated and managed by Windows Server Backup. If multiple disks will be used to provide offsite backup rotation, all the disks must be available during the creation of the backup.
The external disks that will be used by Windows Server Backup must be managed and completely available to the scheduled backup. Any volumes or data on these disks will be wiped out when the disks are assigned to the backup. This process creates a single NTFS formatted volume that spans the entire disk and sets the disk volume label to include the server name, the date and time, and the disk number for each disk. For example, if disk 1 is assigned to the backup of SERVER1 on September 19, 2008 at 12:00 p.m., the label will be SERVER1 2008_09_19 12:00 DISK_01. To allocate disks for Windows Server Backup, complete these steps:
1. Log on to the Windows Server 2008 system with an account with administrator privileges.
2. Click Start, All Programs, Administrative Tools, and select Server Manager.
3. In the tree pane, double-click the Storage node, and select Windows Server Backup.
4. In the Actions pane, click the Backup Schedule link to start the Backup Schedule Wizard. Clicking the Backup Schedule link is the only way multiple disks can be allocated to Windows Server Backup in one process.
5. Click Next on the Getting Started page.
6. Click the Full Backup (Recommended) option button, and then click Next to continue.
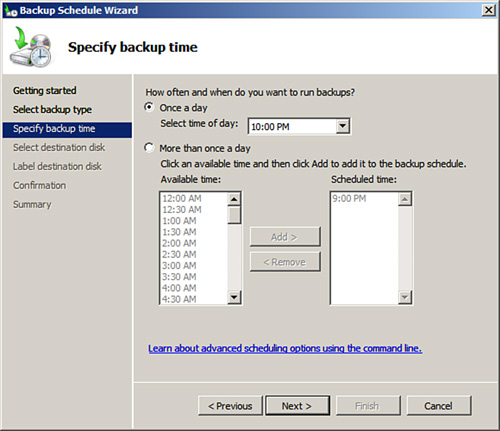
7. Select the time to run the scheduled backup from the Once a Day or the More Than Once a Day selections, and click Next to continue. Figure 6.15 details a backup that will run every day at 10:00 p.m.
8. On the Select Destination Disk page, click the Show All Available Disks button.
9. In the Show All Available Disks window, check each of the disks that will be dedicated to the scheduled backup, and then click OK to save the settings.
FIGURE 6.15 Setting the scheduled backup to run every day at 10:00 p.m.
When multiple disks are assigned to a single scheduled backup, any of the disks may be used, and that is not in the control of the administrator. If a disk is removed for off-site storage, the remaining disks will be used for the next scheduled backup.
10. Back on the Select Destination Disk page, check all the disks that have been added, and then click Next to continue.
11. A Windows Server Backup warning window opens requiring confirmation that the selected disks will be wiped out and used by Windows Server Backup exclusively; click Yes to assign the disks for backup.
12. The Label Destination page details the actual Windows disk and the new label. Click Next to accept the labels and continue with the process.
13. On the Confirmation page, verify the settings, and then click Finish to save the new scheduled backup and backup settings and to reformat and label each of the assigned disks.
14. On the Summary page, review the results, and then click Close to complete the process.
Creating a scheduled backup using Windows Server Backup enables an administrator to automate the backup process, and with the backup and VSS managing the disk, the administrator only needs to verify that backups have been run successfully.
Manually Running a Scheduled Backup
After the scheduled backup is created for a server, an administrator can let the backup run as scheduled or can run the backup manually using the Backup Once link. To manually run a scheduled backup, just click the Backup Once link. Then, on the Backup Options page, select the option The Same Options You Used for Backup Schedule Wizard for Scheduled Backups. Follow the steps on the remaining pages to kick off the backup. Note that if multiple disks are allocated to a scheduled backup, running a manual backup does not allow the administrator to select which disk to use. The only way to control which disk is used for scheduled backup is to either remove all the other allocated disks from the system or mark the disks as offline using Disk Management or Diskpart.exe.
Running a Manual Backup to a Remote Server Share
One advantage running a manual backup has over a scheduled backup is that the backup can be directed to a remote server share. A backup stored on a remote server share enables full backups of Windows 2008 systems that do not have local disk storage suitable for backup. Also, without a locally attached disk or a full backup stored on DVD media, performing a complete PC restore can be accomplished only by using a backup stored on a remote server share. To create a manual backup to a remote server share, perform the following steps:
1. Log on to the Windows Server 2008 system with an account with administrator privileges.
2. Click Start, All Programs, Administrative Tools, and select Server Manager.
3. In the tree pane, double-click the Storage node, and select Windows Server Backup.
4. In the Actions pane, click the Backup Once link to start the Backup Once Wizard.
5. When the Backup Once Wizard opens, select the Different Options option button, and click Next, as shown in Figure 6.16. Running a manual backup and selecting the Different Options option is the only way to store a backup on DVDs or remote server shares.
6. On the Specify Backup Type page, select either the Full Backup to back up all the drives on the Windows 2008 system or select the Custom option button to select specific volumes. For this example, select Full Backup, and then click Next.
7. On the Specify Destination Type page, select Remote Shared Folder, and click Next, as shown in Figure 6.17.
8. On the Specify Remote Folder page, type in the UNC path of the remote server share, and then click the Do Not Inherit option button to set the permissions on the destination folder that will be created and will store the backup.
9. Click Next on the Specify Remote Folder page. A window opens asking for credentials to use when connecting to the share. Enter the appropriate username and password that can create subfolders and write to the share, and then click OK.
FIGURE 6.16 Selecting to run a backup using the Different Options option.

FIGURE 6.17 Selecting to store the manual backup on a remote shared folder.

If a remote folder is specified for the backup destination, ensure that the folder does not already contain a WindowsImageBackup folder (because the permissions might be overwritten by the new backup). If the permissions are not a worry and will remain as they are, clicking the Inherit option button on the Specify Remote Folder page is preferred.
10. On the Specify VSS Backup Type page, select the Copy Backup If a Scheduled Backup Already Exists option, and then click Next to continue. If no other backup product and no scheduled backup will be created, select the VSS Full Backup option, and then click Next to continue.
11. On the Confirmation page, review the settings and click Backup to start the manual backup.
12. On the Backup Progress page, you can view the progress in real time, or you can click the Close button (in which case the progress can be tracked in the Tasks pane back in the Windows Server Backup console). Click Close when the backup completes.
Managing Backups Using the Command-Line Utility Wbadmin.exe
Windows 2008 systems running Server Core installations contain only the Windows Server Backup command-line tools. The command-line backup tool is named wbadmin.exe and can be accessed using a command prompt window. Wbadmin.exe is very functional and can be used to perform most of the functions available in the GUI.
If a Standard or Enterprise Edition of Windows 2008 is deployed on the network, the Windows Server Backup console can be used to manage a Server Core backup.
Understanding and becoming familiar and fluent with the command-line options of wbadmin.exe is required for administrators who need to manage Windows 2008 Server Core systems. The following sections detail a few common tasks that can be performed using wbadmin.exe.
Viewing Backup History
To view the backup history of a system, perform the following steps:
1. Log on to the Windows Server 2008 system with an account with administrator privileges.
2. Open a command prompt.
3. Type in wbadmin.exe Get Versions and press Enter to list the backup history.
Running a Manual Backup to Remote Storage Using Wbadmin.exe
Using wbadmin.exe to run backups can be tedious. To understand each of the options available for a manual backup in a command prompt window, type wbadmin.exe Start Backup /? and press Enter. To run a manual backup and store it on a remote server share, a few options are required. The data will be stored on the remote server share \Server2NetworkBackup, the C: drive will be backed up, and the companyabcadministrator account will be used to connect to the remote share. To run the manual backup using the preceding criteria, perform the following steps:
1. Log on to the Windows Server 2008 system with an account with administrator privileges.
2. Open a command prompt.
3. Type in wbadmin.exe Start Backup –backuptarget:\Server2NetworkBackup –include:c: -user:companyabcadministrator –password:My$3cretPW! and press Enter to start the backup.
4. The backup will process the command and require confirmation to continue. Press Y when prompted and then press Enter to start the backup.
5. The backup progress will be detailed in the command prompt window. After the backup completes, enter exit to close the command prompt window.
Maintaining Windows Server 2008 Hyper-V Systems
Maintaining Windows 2008 Hyper-V host and guest systems isn’t an easy task for administrators. They must find time in their firefighting efforts to focus and plan for maintenance on the server systems. When maintenance tasks are commonplace in an environment, they can alleviate many of the common firefighting tasks.
The processes and procedures for maintaining Hyper-V systems can be separated based on the appropriate time to maintain a particular aspect of a server. Some maintenance procedures require daily attention, whereas others might require only quarterly checkups. The maintenance processes and procedures that an organization follows depend strictly on the organization; however, the categories described in the following sections and their corresponding procedures are best practices for organizations of all sizes and varying IT infrastructures.
Daily Maintenance
Certain maintenance procedures require more attention than others. The procedures that require the most attention are categorized into the daily procedures. Therefore, it is recommended that an administrator take on these procedures each day to ensure system reliability, availability, performance, and security. These procedures are examined in the following three sections.
Checking Overall Server Functionality
Although checking the overall server health and functionality might seem redundant or elementary, this procedure is critical to keeping the system environment and users working productively.
Questions that should be addressed during the checking and verification process include the following:
![]() Can users access data on guest sessions?
Can users access data on guest sessions?
![]() Are guest session applications responding to client requests? Are there long queues for applications such as inbound email message queues, held or paused print queues on guest sessions running print services, and so on?
Are guest session applications responding to client requests? Are there long queues for applications such as inbound email message queues, held or paused print queues on guest sessions running print services, and so on?
![]() Is there an exceptionally long wait to log on (that is, longer than normal)?
Is there an exceptionally long wait to log on (that is, longer than normal)?
![]() Can users access external resources?
Can users access external resources?
Verifying That Backups Are Successful
To provide a secure and fault-tolerant organization, it is imperative that a successful backup be performed each night. In the event of a host or guest server failure, the administrator might be required to perform a restore from tape. Without a backup each night, the IT organization will be forced to rely on rebuilding the server without the data. Therefore, the administrator should always back up servers so that the IT organization can restore them with minimum downtime in the event of a disaster. Because of the importance of the backups, the first priority of the administrator each day needs to be verifying and maintaining the backup sets.
If disaster ever strikes, the administrators want to be confident that a system or entire site can be recovered as quickly as possible. Successful backup mechanisms are imperative to the recovery operation; recoveries are only as good as the most recent backups.
Remember on a Hyper-V server that there’s more than just one server to backup: All the guest sessions running on the host server need to be successfully backed up. At any one time, a server with 4, 8, 10, 15, or more guest sessions will require that all guest sessions are checked to confirm the backup of each guest session was successful.
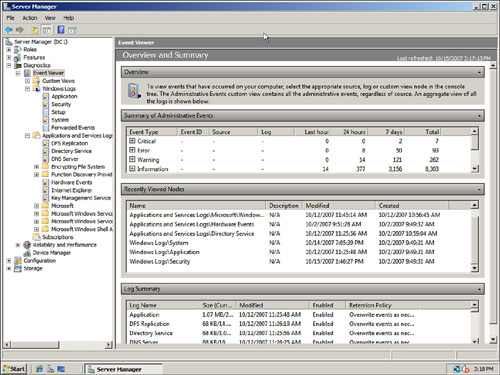
Monitoring Event Viewer
Event Viewer is used to check the system, security, application, and other logs on a local or remote system. These logs are an invaluable source of information regarding the system. The Event Viewer Overview and Summary page in Server Manager is shown in Figure 6.18.
Checking these logs often helps your understanding of them. There are some events that constantly appear but aren’t significant. Events will begin to look familiar, so you will notice when something is new or amiss in your event logs.
All Event Viewer events are categorized either as informational, warning, or error. Some best practices for monitoring event logs include the following:
![]() Understanding the events that are being reported
Understanding the events that are being reported
FIGURE 6.18 The Event Viewer Overview and Summary page.
![]() Setting up a database for archived event logs
Setting up a database for archived event logs
![]() Archiving event logs frequently
Archiving event logs frequently
To simplify monitoring hundreds or thousands of generated events each day, the administrator should use the filtering mechanism provided in Event Viewer. Although warnings and errors should take priority, the informational events should be reviewed to track what was happening before the problem occurred. After the administrator reviews the informational events, she can filter out the informational events and view only the warnings and errors.
To filter events, follow these steps:
1. Expand the Event View folder in Server Manager.
2. Select the log from which you want to filter events.
3. Right-click the log and select Filter Current Log.
4. In the log Properties window, select the types of events to filter. In this case, select the Critical, Error, and Warning check boxes.
5. Click OK when you’ve finished.
Figure 6.19 shows the results of filtering on the system log. You can see in the figure that there are a total of 7,510 events. In the message above the log, the filter is noted and also the 304 resulting number of events. The filter reduced the events by a factor of over 20 to 1. This really helps reduce the volume of data that an administrator needs to review.
FIGURE 6.19 The Event Viewer filter.
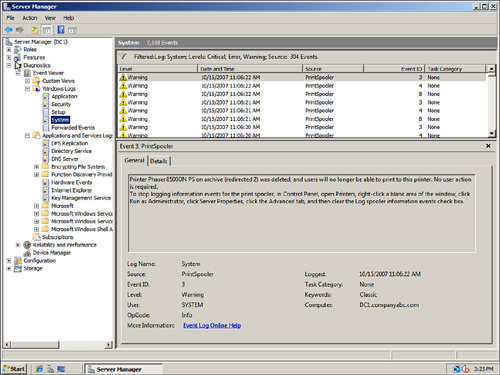
Some warnings and errors are normal because of bandwidth constraints or other environmental issues. The more you monitor the logs, the more familiar you will become with the messages and, therefore, the more likely you will be able to spot a problem before it affects the user community.
You might need to increase the size of the log files in Event Viewer to accommodate an increase in logging activity. The default log sizes are larger in Windows 2008 than in earlier versions of Windows, which were notorious for running out of space.
Weekly Maintenance
Maintenance procedures that require slightly less attention than daily checking are categorized in a weekly routine and are examined in the following sections.
Checking Disk Space
Disk space is a precious commodity. Although the disk capacity of a Windows 2008 system can be nearly endless, the amount of free space on all drives should be checked at least weekly if not more frequently. Whereas a single server may grow disk space demands at a steady pace, with several virtual guest sessions running on a Hyper-V host server the use of disk space can occur exponentially. Serious problems can occur if there isn’t enough disk space, so checking both guest session available disk space and the host server system will ensure an image or server won’t unexpectedly run out of disk space to cache files, queue up messages, or buffer database growth required by the system.
One of the most common disk space problems occurs on data drives where end users save and modify information. Other volumes such as the system drive, and partitions with logging data can also quickly fill up.
As mentioned earlier, lack of free disk space can cause a multitude of problems including the following:
![]() Application failures
Application failures
![]() System crashes
System crashes
![]() Unsuccessful backup jobs
Unsuccessful backup jobs
![]() Service failures
Service failures
![]() The inability to audit
The inability to audit
![]() Performance degradation
Performance degradation
To prevent these problems from occurring, administrators should keep the amount of free space to at least 25%.
If you need to free disk space, you should move or delete files and folders with caution. System files are automatically protected by Windows 2008, but data is not.
Verifying Hardware
These days, hardware systems tend to be pretty reliable unlike a decade or two ago when the quality control on memory chips, hard drives, and the like dictated that a burn-in period was required for all servers to work through faulty components. However, even though reliability is much better today than years past, this doesn’t mean that they’ll always run continuously without failure. Hardware availability is measured in terms of mean time between failures (MTBF) and mean time to repair (MTTR). This includes downtime for both planned and unplanned events. These measurements provided by the manufacturer are good guidelines to follow; however, mechanical parts are bound to fail at one time or another. Therefore, hardware should be monitored weekly to ensure efficient operation.
Hardware can be monitored in many different ways. For example, server systems might have internal checks and logging functionality to warn against possible failure, Windows 2008’s System Monitor might bring light to a hardware failure, and a physical hardware check can help to determine whether the system is about to experience a problem with the hardware.
If a failure has occurred or is about to occur, having an inventory of spare hardware can significantly improve the chances and timing of recoverability. Checking system hardware on a weekly basis provides the opportunity to correct the issue before it becomes a problem.
Monthly Maintenance
It is recommended that you perform the tasks examined in the following sections on a monthly basis.
Testing the UPS
An uninterruptible power supply (UPS) can be used to protect the system or group of systems from power failures (such as spikes and surges) and keep the system running long enough after a power outage so that an administrator can gracefully shut down the system. It is recommended that an administrator follow the UPS guidelines provided by the manufacturer at least once a month. Also, monthly scheduled battery tests should be performed.
Validating Backups
Once a month, an administrator should validate backups by restoring the backups to a server located in a lab environment. This is in addition to verifying that backups were successful from log files or the backup program’s management interface. A restore gives the administrator the opportunity to verify the backups and to practice the restore procedures that would be used when recovering the server during a real disaster. In addition, this procedure tests the state of the backup media to ensure that they are in working order and builds administrator confidence for recovering from a true disaster.
Updating Documentation
An integral part of managing and maintaining any IT environment is to document the network infrastructure and procedures. The following are just a few of the documents you should consider having on hand:
![]() Server build guides
Server build guides
![]() Disaster-recovery guides and procedures
Disaster-recovery guides and procedures
![]() Checklists
Checklists
![]() Configuration settings
Configuration settings
![]() Change configuration logs
Change configuration logs
![]() Historical performance data
Historical performance data
![]() Special user rights assignments
Special user rights assignments
![]() Special application settings
Special application settings
As systems and services are built and procedures are ascertained, document these facts to reduce learning curves, administration, and maintenance.
It is not only important to adequately document the IT environment, but it’s often even more important to keep those documents up-to-date. Otherwise, documents can quickly become outdated as the environment, processes, and procedures change as the business changes.
Quarterly Maintenance
As the name implies, quarterly maintenance is performed four times a year. Areas to maintain and manage on a quarterly basis are typically fairly self-sufficient and self-sustaining. Infrequent maintenance is required to keep the system healthy. This doesn’t mean, however, that the tasks are simple or that they aren’t as critical as those tasks that require more frequent maintenance.
Checking Storage Limits
Storage capacity on all volumes should be checked to ensure that all volumes have ample free space. Keep approximately 25% free space on all volumes.
Running low or completely out of disk space creates unnecessary risk for any system. Services can fail, applications can stop responding, and systems can even crash if there isn’t plenty of disk space.
Changing Administrator Passwords
Administrator passwords should, at a minimum, be changed every quarter (90 days). Changing these passwords strengthens security measures so that systems can’t easily be compromised. In addition to changing passwords, other password requirements such as password age, history, length, and strength should be reviewed.
Performing Management Tasks with Server Manager
Server Manager is a tool that comes with Windows Server 2008 that provides a central location for managing roles and features on a Windows 2008 system. Server Manager has been used several times already in this chapter for the installation of Windows Backup features or to enable Remote Desktop connections. The balance of this chapter covers other tasks within Server Manager specific to Hyper-V and its server components.
Server Manager in general enables the administrator to complete the following steps:
![]() Add and remove roles and features from the server
Add and remove roles and features from the server
![]() Monitor and manage the server
Monitor and manage the server
![]() Administer the roles and features on the server
Administer the roles and features on the server
Server Manager is a one-stop shop for all the administrator management and monitoring needs. The features of Server Manager are available via the Server Manager console.
Selecting the server name in the folder tree will show the Server Manager main window in the Details pane. This consists of several section windows. The Server Summary window (shown in Figure 6.20) shows computer information such as the computer name, networking information, and whether Remote Desktop is enabled. It also shows security information such as whether Windows Firewall is enabled and the Windows Updates status. The window also has active links that enable the administrator to launch wizards to change the configuration or get help.
FIGURE 6.20 Server Manager Server Summary window.
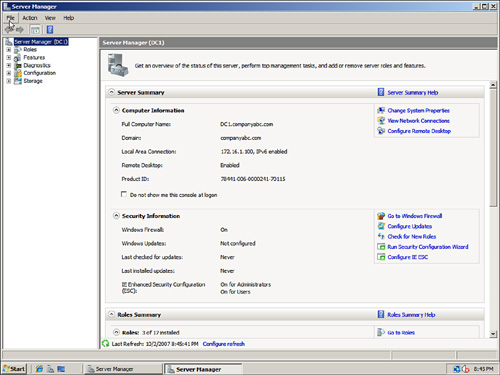
Server Manager launches automatically when the Initial Configuration Wizard is closed and each time a user logs on to the server.
The next sections discuss the components and features of Server Manager.
Server Manager Roles Page
The Server Manager console has a folder tree dedicated to the roles of the server. When the Hyper-V role was installed on the host system as covered in Chapter 3 of this book, the Hyper-V Server role was added to the Roles folder in Server Manager. Selecting the Roles folder in the console tree shows a summary of the roles installed on the server (which Hyper-V will be shown) and a summary page for each of the roles. The summary page for each role shows the role status, such as the status of the system services and the events for the role.
However, selecting the folder for a specific role shows the Server Manager role-specific page for that role. The role-specific pages are dedicated to the role and contain operational information about the role. The following sections discuss the sections included in the role-specific page.
Events Section
There is a problem with going to the full Event Viewer and seeing all the events for all roles, services, and the operating system. There is usually so much information that it ends up overloading the administrator, making it difficult to see real problems. The Events section in the role-specific page addresses this by presenting only the role-specific events.
From the Events section, the administrator can see a summary of the events that pertain to the role, review the details of the events, and filter the events as needed. The default filter shows only events in the past 24 hours, but this can be adjusted via the Filter Events control.
The full Event Viewer can also be launched from this section.
System Services Section
The System Services section lists the services that the role depends on and their status. It also describes each service and includes control links to stop, start, restart, and to configure preferences.
The Preferences control allows the administrator to adjust the dependency services. For example, in Hyper-V, some of the corresponding services used for Hyper-V that may be displayed in the System Services section include the following:
![]() Microsoft Hyper-V Image Management Service
Microsoft Hyper-V Image Management Service
![]() Microsoft Hyper-V Networking Management
Microsoft Hyper-V Networking Management
![]() Virtual Machine Management
Virtual Machine Management
Resources and Support Section
The Resources and Support section is a useful section. It provides a brief recommendation on configurations, best practices, and links to resources. The recommendations are listed in a window; highlighting the recommendation shows a brief explanation of the recommendation with a link to a more detailed explanation. This is great for researching the recommendations. The section also includes links to online resources, such as the appropriate TechCenter and Community Center for the role.
For example, the Resources and Support section for Hyper-V role (shown in Figure 6.21) includes five different recommendations on configuration optimization. One of the recommendations is “Increase the availability of your virtual machines by using clustering to configure failover for the physical computer.” Highlighting this recommendation shows a brief paragraph explaining the recommendation and includes a link to get more detailed information about the recommendation.
FIGURE 6.21 Resources and Support section.
An important note is that these recommendations are static and don’t adjust to changes in the environment.
Server Manager Diagnostics Page
The Diagnostics page in Server Manager consolidates three different consoles into a convenient location. The three consoles are as follows:
![]() Event Viewer
Event Viewer
![]() Reliability and Performance
Reliability and Performance
![]() Device Manager
Device Manager
The next sections review the various features of the three consoles on the Diagnostics page.
Event Viewer
The Windows 2008 Event Viewer functionality has been improved over the previous version of Windows Server. The version in Windows 2008 is the version that released in Windows Vista. The event logs can contain an overwhelming volume of information, which the new Event Viewer summarizes and drills into very effectively.
Selecting the Event Viewer folder under Diagnostics shows the Overview and Summary page. The Summary of Administrative Events section on this page shows a high-level summary of the administrative events, organized by level:
![]() Critical
Critical
![]() Error
Error
![]() Warning
Warning
![]() Information
Information
![]() Audit Success
Audit Success
![]() Audit Failure
Audit Failure
The view shows the total number of events in the past hour, 24 hours, 7 days, and the total. Each of these nodes can be expanded to show the counts of particular event IDs within each level. Double-clicking the event ID count shows a detailed list of the events with the matching event ID. This is useful for drilling on the specific events to see when they are occurring.
The Overview and Summary page also has a Log Summary section, which shows a list of all the various logs on the server. This is important because there are now more than 100 different logs in Windows 2008. In addition to the standard system, security, and application logs, there is a setup log and a forwarded events log. Then there are the numerous application and services logs, which include logs for each application, service, and a huge number of diagnostic and debugging logs. For each of the logs, the Log Summary section shows the log name, current size, maximum size, last modification, if it is enabled, and what the retention policy for the log is. This allows the administrator to quickly see the status of all the logs, which would be a daunting task otherwise.
Of course, the logs can be viewed directly by expanding the Windows Logs folder or the Applications and Services Logs folder. The Windows Logs folder contains all the standard application, security, setup, system, and forwarded events logs. The applications and services logs contain all the other ones.
Custom views can be created to filter events and combine logs into a coherent view. There is a default Administrative Events view, which combines the critical, error, and warning events from all the administrative logs. There is also a custom view created for each role that is installed on the server. New ones can be created by the administrator as needed.
Subscriptions can collect events from remote computers and store them in the forwarded events log. The events to be collected are specified in the subscription. The functionality depends on the Windows Remote Management (WinRM) and the Windows Event Collector (Wecsvc) services and they must be running on both the collecting and forwarding servers.
Server Manager Reliability and Performance Monitor
The Reliability and Performance monitor is incorporated into Server Manager, too. The Reliability and Performance Monitor was introduced with the Windows Vista platform. This diagnostic tool enables the administrator to monitor the performance of the server in real time and to save the performance data to logs for analysis.
The top-level folder of the Reliability and Performance monitor displays the Resource Overview. This gives a comprehensive overview of the CPU, disk, network, and memory utilization during the past 60 seconds (shown in Figure 6.22). The graph shows the server overall usage for each of the four categories. In addition, a Details pane for each of the categories shows the utilization by process.
FIGURE 6.22 Resource Overview graph.

The Monitoring Tools in the Reliability and Performance monitor contain the Performance Monitor and the Reliability Monitor. These tools enable you to monitor the performance and reliability of the server.
The Performance Monitor has not really changed from earlier versions of Windows. It allows you to select performance counters and add them to a graph view for real-time monitoring. The graph can be configured to be a line graph, a bar graph, or even a simple text report of the counters being monitored. The monitor shows the last, average, minimum, maximum, and duration of the windows (1 minute 40 seconds by default).
The Reliability Monitor tracks events that could potentially affect the stability of the server, such as updates, installs, and hardware issues. It uses this information to generate a System Stability Index, which is a number between 1 (least stable) to 10 (most stable). The index tracks the following:
![]() Software Installs/Uninstalls
Software Installs/Uninstalls
![]() Application Failures
Application Failures
![]() Hardware Failures
Hardware Failures
![]() Windows Failures
Windows Failures
![]() Miscellaneous Failures
Miscellaneous Failures
It plots all these events on the chart and uses them to compute the System Stability Index. This is useful for assessing the overall health of the server and for troubleshooting. You can see these events on the chart over time and see how they potentially impact the stability of the server, and then correlate the events to actual stability issues.
Finally, for longer-term tracking, the Data Collector Sets can be used. Data Collector Sets can log data from the following data sources:
![]() Performance counters
Performance counters
![]() Event traces
Event traces
![]() Registry key values
Registry key values
This data can be logged over an extended period of time and then reviewed.
Device Manager
The Device Manager node shows the hardware that is installed on the server. It shows the hardware grouped by type of device, such as disk drives, display adapters, and network adapters. Each instance of the device type is listed in a node underneath the device type.
The Device Manager can be used to update the device drivers of the hardware, to change settings, and to troubleshoot issues with the hardware. Specifically, you can perform the following tasks:
![]() Scan for new hardware
Scan for new hardware
![]() Identify hardware problems
Identify hardware problems
![]() Adjust configurations
Adjust configurations
![]() View device driver versions
View device driver versions
![]() Update the device drivers
Update the device drivers
![]() Roll back device driver upgrades
Roll back device driver upgrades
![]() Enable or disable hardware
Enable or disable hardware
For example, sometimes older video drivers or network card drivers will cause problems with the system. It is easy to check the Microsoft online driver repository using Device Manager. To check for an update to the device driver for the network adapter, follow these steps:
1. Expand the Network Adapters node in Device Manager.
2. Select the network adapter to check.
3. Select Action, Update Driver Software from the menu.
4. Click Search Automatically for Updated Driver Software.
5. Click Yes, Always Search Online (Recommended).
6. Install the update if found.
7. Click Close to exit the wizard.
Many times, the latest version of the driver will already be installed. In these cases, the message “The best driver for your device is already installed” will be shown.
Server Manager Configuration Page
The Configuration page in Server Manager is somewhat misleading. This is not the page from which you would configure the server. The Configuration node in Server Manager is just a container for the following four snap-ins:
![]() Task Scheduler
Task Scheduler
![]() Windows Firewall with Advanced Security
Windows Firewall with Advanced Security
![]() Services
Services
![]() WMI Control
WMI Control
These snap-ins allow the administrator to control some elements of the server configuration and are covered in the next four sections.
Task Scheduler
One of the greatly expanded features of Windows 2008 is the Task Scheduler. In earlier versions of Windows, this was an anemic service with limited options and auditing features. The Task Scheduler features in Windows 2008 have been expanded into a more sophisticated tool. The scheduler can start based on a variety of triggers, can take a number of predefined actions, and can even be mitigated by conditions and the settings.
A creative way of using Task Scheduler in Hyper-V is to set up a task that pauses a virtual guest session, takes a snapshot of the session, copies the session image files off to an external storage system, and then restarts the session. This is a cheap and simple way to take static backups of guest images and copy images off a Hyper-V host system to an external storage system.
There are several elements to the Task Scheduler, as follows:
![]() Triggers—Tasks run when the trigger criteria are met. This could be a scheduled time, logon, startup, idle, log event, user session connect or disconnect, or workstation lock or unlock. These various triggers give the administrator a wide range of options on when to start a task.
Triggers—Tasks run when the trigger criteria are met. This could be a scheduled time, logon, startup, idle, log event, user session connect or disconnect, or workstation lock or unlock. These various triggers give the administrator a wide range of options on when to start a task.
![]() Actions—The actions are the work that the task will perform. This can be executing a program, sending an email via SMTP, or displaying a message on the desktop.
Actions—The actions are the work that the task will perform. This can be executing a program, sending an email via SMTP, or displaying a message on the desktop.
![]() Conditions—Conditions allow the task trigger criteria to be filtered. Conditions include if the computer is idle, on battery power, or connected to a network. This allows administrators to prevent tasks from running if the computer is busy, on battery, or disconnected from the network.
Conditions—Conditions allow the task trigger criteria to be filtered. Conditions include if the computer is idle, on battery power, or connected to a network. This allows administrators to prevent tasks from running if the computer is busy, on battery, or disconnected from the network.
![]() Settings—The settings control how a task can be executed, stopped, or deleted. In the settings of a task, the administrator can control if the task can be launched manually, if it runs after a missed schedule start, if it needs to restart after a failure, if it needs to run multiple tasks in parallel, or to delete it if it is not set to run in the future.
Settings—The settings control how a task can be executed, stopped, or deleted. In the settings of a task, the administrator can control if the task can be launched manually, if it runs after a missed schedule start, if it needs to restart after a failure, if it needs to run multiple tasks in parallel, or to delete it if it is not set to run in the future.
Also included with Windows 2008 Task Scheduler is the Task Scheduler Library, which includes approximately 20 different predefined tasks. These tasks include the following:
![]() ScheduledDefrag—This task runs every week and uses the command defrag.exe –c –i –g to defragment all the volumes on the server. This is a major improvement of earlier versions of Windows, which required this command to be run manually. However, the trigger for this task is disabled by default, so it will not run as shipped.
ScheduledDefrag—This task runs every week and uses the command defrag.exe –c –i –g to defragment all the volumes on the server. This is a major improvement of earlier versions of Windows, which required this command to be run manually. However, the trigger for this task is disabled by default, so it will not run as shipped.
![]() ServerManager—This task runs at user logon and runs the ServerManagerLauncher to launch the Server Manager console whenever a user logs on.
ServerManager—This task runs at user logon and runs the ServerManagerLauncher to launch the Server Manager console whenever a user logs on.
Both these tasks demonstrate the capabilities of the Task Scheduler to automate routine tasks or to ensure that certain tasks run at logon.
The Task Scheduler has a new feature that goes hand in hand with the library, namely the ability to create folders to store the tasks. This helps organize the tasks that are created. The scheduler includes a Microsoft folder for the tasks that ship with the operating system. Administrators can create other folders to organize and store their tasks.
Selecting the Task Scheduler folder in the System Manager configuration shows the Task Scheduler Summary (shown in Figure 6.23). This window has two sections: Task Scheduler and Active Tasks. The Task Scheduler section shows the status of tasks within a time frame, by default the past 24 hours. The time frame can be set to the last hour, last 24 hours, last 7 days, or last 30 days. For each task that has run within the time frame, it shows the Task Name, Run Result, Run Start, and Run End. The section also summarizes the task status; Figure 6.23 shows 51 total tasks have run with 1 running and 50 succeeded. The figure also shows that it is the ScheduledDefrag task that is running.
FIGURE 6.23 Task Scheduler Summary window.
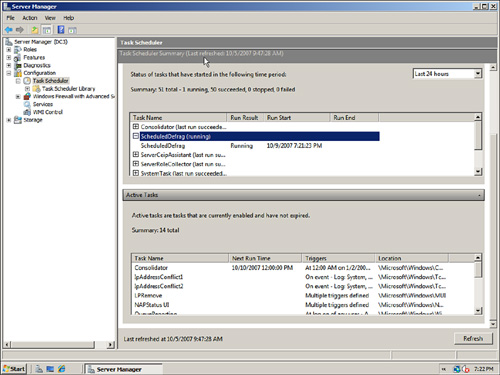
The Active Tasks name is somewhat misleading because it shows tasks that are enabled and their triggers. It does not show tasks that are running. For the scheduled tasks, it shows the Next Run Time. This section is useful for seeing which tasks will run on a given server in response to a trigger, either a schedule or an event. If the task does not appear in this section, it will be run only if executed manually.
A quick review of the Active Tasks shows that the ScheduledDefrag task is not in the list. This is because the trigger for the task is disabled by default, so the task will not run and so does not show in the Active Tasks list.
To enable the ScheduledDefrag task, execute the following steps:
1. Open the Server Manager console.
2. Expand the Configuration folder.
3. Expand the Task Scheduler folder.
4. Expand the Task Scheduler Library folder.
5. Expand the Microsoft, Windows folder and select the Defrag folder.
6. Select the ScheduledDefrag task and select Action, Properties.
7. Select the Triggers tab.
8. Select the Weekly trigger and click the Edit button.
9. At the bottom of the Edit Trigger window, check the Enabled box.
10. Click OK.
11. Click OK to close the Properties of the task.
Going back to the Task Scheduler Summary window, you will now find the ScheduledDefrag task listed with a Next Run Time of the following Wednesday at 1:00 a.m.
Windows Firewall with Advanced Security
The Windows Firewall with Advanced Security feature provides access to the combined Windows Firewall and Connection Security features of Windows 2008. These technologies work in tandem to provide protection from network-based attacks to the server. The firewall rules determine what network traffic is allowed or blocked to the server. The connection security rules determine how the allowed traffic is secured.
The Windows Firewall with Advanced Security folder shows a summary of which profile is active (Domain, Private, or Public), the profile’s high-level configuration, and links to the other components of the snap-in.
The other components of the Windows Firewall with Advanced Security snap-in are for configuration and monitoring the features. These components are as follows:
![]() Inbound rules
Inbound rules
![]() Outbound rules
Outbound rules
![]() Connection Security rules
Connection Security rules
![]() Monitoring
Monitoring
The inbound and outbound rules control what traffic is allowed in to an out of the server. Several hundred rules govern what traffic is allowed. These are organized into profiles for ease of application. Table 6.5 shows these profiles.
TABLE 6.5 Firewall Profiles
Clearly, the vast majority of services will have the Domain Profile active, because they will likely be on a network with Active Directory. Each of the profiles has a set of rules associated with them. In addition, a number of rules apply to all profiles, which are designated as Any. Some of the rules are disabled by default.
Connection Security rules are stored in the likewise named folder. The rules specify how the computers on either side of a permitted connection authenticate and secure the network traffic. This is essentially the IPsec policy from previous versions of Windows, albeit with a much-improved interface. By default, there are no Connection Security rules created in Windows 2008. Rules can be created and reviewed in this portion of the snap-in.
The Monitoring folder is somewhat limited in scope. It has a Firewall folder and a Connection Security Rules folder. These two folders simply show what rules are active, but show no traffic details or whether the rules have blocked or allowed anything. In effect, they show the net result of the profile that is active.
More useful in monitoring is the Security Associations folder. This folder lists the security associations (shown in Figure 6.24) with the local and remote IP addresses, authentication methods, encryption, integrity, and key exchange. In the figure, you can see that the local address of the server is 172.16.1.101 and the other server is 172.16.1.100. The computers are authenticating using Kerberos, and the user is also authenticating at the connection level using Kerberos. Finally, the network traffic confidentiality is protected with the AES-128 encryption algorithm, and the network traffic is protected from modification by the SHA-1 integrity algorithm. Multiple security associations are listed, reflecting various connections that have been established between the two servers.
FIGURE 6.24 Security associations monitoring.

Services
The Services snap-in in the Configuration container in Server Manager is essentially unchanged from the previous version of Windows. All the services are listed, along with their status, startup type, and logon credentials.
From the Services snap-in, administrators can control services on the server, including the following:
![]() Start or stop the services
Start or stop the services
![]() Change the startup type to set the service to start automatically, be started manually, or even prevent the service from starting at all
Change the startup type to set the service to start automatically, be started manually, or even prevent the service from starting at all
![]() Change the account the service runs under
Change the account the service runs under
![]() Set up recovery actions if the service stops, such as restarting the service or even restarting the server
Set up recovery actions if the service stops, such as restarting the service or even restarting the server
![]() View the configuration details of the service, such as what the executable is, what the service name is (which is shown in the Task Manager window), and what dependencies it has
View the configuration details of the service, such as what the executable is, what the service name is (which is shown in the Task Manager window), and what dependencies it has
A new feature is the Automatic (Delayed Start) startup type. This is a setting used to reduce the crunch of services starting all at once during boot of the server. All the services with the Automatic (Delayed Start) setting will be started after the services with the automatic setting. This allows all the services to come up automatically, but allows essential services to start first.
WMI Control
The last snap-in in the Configuration container of the Server Manager is the WMI Control tool. This is a new tool that allows administrators to maintain the Windows Management Instrumentation (WMI) configuration on the server. With this tool, an administrator can accomplish the following tasks:
![]() Back up the WMI repository
Back up the WMI repository
![]() Change the default scripting namespace (rootcimv2)
Change the default scripting namespace (rootcimv2)
![]() Manage access to the WMI via the Security tab
Manage access to the WMI via the Security tab
Before the introduction of the WMI Control tool, these tasks were difficult to accomplish.
To back up the WMI repository, you just need to complete the following steps:
1. Open the Server Manager console.
2. Expand the Configuration folder.
3. Select the WMI Control folder.
4. Select the Action menu and then Properties.
5. Select the Backup/Restore tab.
6. Enter a filename with a full path. The file type will be a WMI Recovery File (REC).
7. Click Save to save the file.
8. Click OK to exit the tool.
Interestingly, the tool is not an integrated snap-in, but rather a separate tool.
Summary
Although administrators can easily get caught up in daily administration and firefighting, it’s important to structure system management and maintenance of the Hyper-V host servers and guest sessions to help prevent unnecessary amounts of effort. Windows 2008 provides many tools that allow administrators to more effectively manage their servers.
The Hyper-V Manager tool provides key components in setting up virtual network switches, managing guest disk images, and configuring host services. The Windows 2008 Server Manager is a one-stop shop for the management and monitoring Hyper-V servers and is the parent operating system of the host system.
Administration of Hyper-V hosts does not need to be done at the console of each Hyper-V host because there are several different ways of connecting to a remote host server and the guest sessions running on the Hyper-V host system.
Security is also extremely important in a Hyper-V environment, being that the compromise of a single Hyper-V host server opens up the door for unauthorized access to many running host servers. Common practices can be applied to minimize the risk footprint of a Hyper-V host system.
Systems management and maintenance is not just about the cool technologies, but also about how those technologies are used. Following a management and maintenance regimen reduces administration, maintenance, and business expenses while at the same time increasing reliability, stability, and security.
The chapter covered a multitude of processes and procedures that help organizations better manage, administer, and maintain their Hyper-V host systems and the guest sessions running on the virtual host server.
Best Practices
The following are best practices from this chapter:
![]() The Hyper-V Administration console is the first tool to use in managing Hyper-V configurations and operations.
The Hyper-V Administration console is the first tool to use in managing Hyper-V configurations and operations.
![]() Use System Manager as a centralized tool for all Windows 2008 and Hyper-V administrative tasks.
Use System Manager as a centralized tool for all Windows 2008 and Hyper-V administrative tasks.
![]() Try to maintain the network environment’s systems periodically to avoid any inefficiency.
Try to maintain the network environment’s systems periodically to avoid any inefficiency.
![]() Remotely manage systems using Remote Server Administration tools, Remote Desktop for Administration, Windows Remote Management, and command-line utilities.
Remotely manage systems using Remote Server Administration tools, Remote Desktop for Administration, Windows Remote Management, and command-line utilities.
![]() Use System Center Operations Manager 2007 to proactively manage Hyper-V hosts and guest sessions.
Use System Center Operations Manager 2007 to proactively manage Hyper-V hosts and guest sessions.
![]() Identify tasks that are important to the system’s overall health and security.
Identify tasks that are important to the system’s overall health and security.
![]() Install the appropriate service packs and updates on each production server and guest sessions to keep all systems consistent.
Install the appropriate service packs and updates on each production server and guest sessions to keep all systems consistent.
![]() Use the Offline Virtual Machine Servicing tool to keep virtual guest templates and offline images up-to-date with the latest patches and updates.
Use the Offline Virtual Machine Servicing tool to keep virtual guest templates and offline images up-to-date with the latest patches and updates.
![]() Test and evaluate service packs and updates in a lab environment before installing them on production servers.
Test and evaluate service packs and updates in a lab environment before installing them on production servers.
![]() Use the snapshot capability in Hyper-V as a rollback strategy to recovery from a service pack or patch installation failure.
Use the snapshot capability in Hyper-V as a rollback strategy to recovery from a service pack or patch installation failure.
![]() Use Windows Software Update Services to minimize administration, management, and maintenance associated with keeping up with the latest service packs and updates.
Use Windows Software Update Services to minimize administration, management, and maintenance associated with keeping up with the latest service packs and updates.
![]() Categorize and document daily maintenance activities such as checking server functionality, verifying that backups were successful, and monitoring Event Viewer events.
Categorize and document daily maintenance activities such as checking server functionality, verifying that backups were successful, and monitoring Event Viewer events.
![]() Categorize and document weekly maintenance processes and procedures such as checking disk space, verifying hardware operation, and archiving event logs.
Categorize and document weekly maintenance processes and procedures such as checking disk space, verifying hardware operation, and archiving event logs.
![]() Categorize and document monthly maintenance processes and procedures such as maintaining system integrity, testing UPS functionality, validating backups, and updating documentation.
Categorize and document monthly maintenance processes and procedures such as maintaining system integrity, testing UPS functionality, validating backups, and updating documentation.
![]() Categorize and document quarterly maintenance processes and procedures such as checking storage limits and changing administrative passwords.
Categorize and document quarterly maintenance processes and procedures such as checking storage limits and changing administrative passwords.
![]() Use Windows Server Backup to back up Hyper-V hosts and guest images, but rely on backing up guest images to take advantage of VSS recovery mechanisms and the proper flushing of application transaction logs.
Use Windows Server Backup to back up Hyper-V hosts and guest images, but rely on backing up guest images to take advantage of VSS recovery mechanisms and the proper flushing of application transaction logs.
![]() Perform management tasks such as reviewing reliability and performance monitor to ensure the Hyper-V host server and guest sessions are running properly.
Perform management tasks such as reviewing reliability and performance monitor to ensure the Hyper-V host server and guest sessions are running properly.