
10 Creating Guest Images from Existing Production and Virtual Systems
IN THIS CHAPTER
This chapter focuses on the process of using System Center Virtual Machine Manager (VMM) 2008 to create a guest image from a production system and from another virtual guest image for the purpose of creating a static lab environment. This process is also used to create real-time replications of images for operational purposes.
Understanding Virtual Machine Conversions
VMM 2008 enables the administrator to convert existing physical computers into virtual machines (VMs). This is known as a production to virtual, or P2V, conversion. VMM simplifies P2V conversions by providing an automated wizard for much of the conversion process.
VMM 2008 can also converting VMs from other virtualization platforms, such as VMware ESX and Microsoft Virtual Server to Windows Hyper-V. This process is known as virtual to virtual, or V2V, conversion and can be performed with different processes, depending on the source virtualization platform.
Physical Computers That Can Be Converted
There are two methods for converting physical computers to VMs. Online P2V conversions are performed using the Volume Shadow Copy Service (VSS) to copy data while the server continues to service user requests. The source computer is not interrupted during a P2V online conversion.
A P2V offline conversion is performed by restarting the source computer in the Windows Preinstallation Environment (Windows PE). VMM then converts the physical disks to Virtual Hard Disks (VHDs).
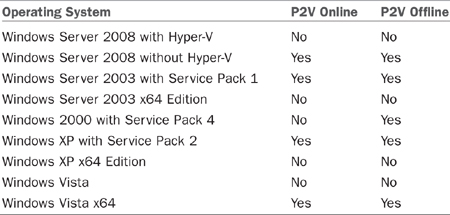
The information in Table 10.1 shows the supported operating systems that VMM can convert using the P2V process.
Table 10.1 Supported Operating Systems for P2V Conversion
In both online and offline P2V conversions, VMM 2008 temporarily installs an agent on the physical source computer to be converted.
VMM 2008 does not support P2V conversion of Windows NT Server 4.0 source computers. These computers can be migrated using the Microsoft Virtual Server 2005 Migration Toolkit (VSMT) or third-party solutions.
Additional Requirements for P2V Conversion
To perform a P2V conversion, the source computer must meet the following additional requirements.
![]() Domain—Source computers must be in the same domain as the VMM server or a member of a domain that has a full two-way trust with the VMM server’s domain.
Domain—Source computers must be in the same domain as the VMM server or a member of a domain that has a full two-way trust with the VMM server’s domain.
![]() RAM—Offline P2V conversions require that the source computer has a minimum of 512MB of RAM.
RAM—Offline P2V conversions require that the source computer has a minimum of 512MB of RAM.
![]() Updates—Most P2V conversions will not be affected by updates. However, certain system files and drivers are replaced during the conversion and may require updates after the conversion completes. If those files are missing, the administrator must add them to the Patch Import directory on the VMM server.
Updates—Most P2V conversions will not be affected by updates. However, certain system files and drivers are replaced during the conversion and may require updates after the conversion completes. If those files are missing, the administrator must add them to the Patch Import directory on the VMM server.
Performing a P2V Conversion
During a P2V conversion, a VM configuration file is created and new VHDs are created and formatted for use by the new VM. Disk images are then created from the source computer.
To perform the conversion, the VMM administrator must provide an account and password with administrator rights on the source computer.
The administrator should perform a disk defragmentation on the source computer’s hard drives to help minimize the time required for the imaging phase. Also, ensure that a fast network connection exists between the source and VMM computers.
Performing a P2V Online Conversion
Ensure that the source computer meets the operating system and additional requirements listed at the beginning of this chapter.
The P2V online conversion process is run from the VMM 2008 Administrator console.
Running the Convert Physical Server Wizard
The process of running the physical server to virtual server configuration process requires launching a conversion wizard. The process is as follows:
1. Open the VMM Administrator console using the shortcut on the Windows desktop or via the Start menu under Microsoft System Center, Virtual Machine Manager 2008, Virtual Machine Manager Administrator Console.
A Connect to Server window may open, prompting for the VMM server to connect to. Enter the server name and connection port (the default is port 8100) using the following format VMMserver:port.
You may choose to always open a connection to this server by selecting the Make This Server My Default check box. Doing so prevents this connection window from displaying when the Administrator console is run.
2. Click Convert Physical Server on the Actions pane in any view in the Virtual Machine Manager Administrator console. The Convert Physical Server Wizard will run, as shown in Figure 10.1.
FIGURE 10.1 The Convert Physical Server Wizard.
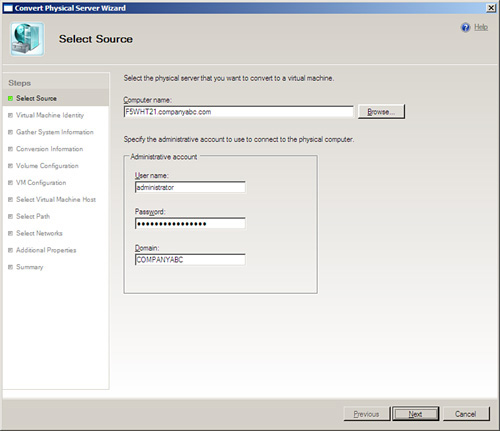
3. Configure the following on the Select Source page:
![]() Computer Name—Enter the name of the physical computer or click the Browse button to locate the computer object to convert in the Active Directory.
Computer Name—Enter the name of the physical computer or click the Browse button to locate the computer object to convert in the Active Directory.
![]() User Name—Enter a username of an account with local administrator rights on the source computer.
User Name—Enter a username of an account with local administrator rights on the source computer.
![]() Password—Enter the password for the local administrator user account.
Password—Enter the password for the local administrator user account.
![]() Domain—Enter the domain of the local administrator user account if it is not already populated. Click Next.
Domain—Enter the domain of the local administrator user account if it is not already populated. Click Next.
4. Configure the following on the Virtual Machine Identity page:
![]() Virtual Machine Name—Enter a new name for the VM or accept the default name, which is the same as the source computer.
Virtual Machine Name—Enter a new name for the VM or accept the default name, which is the same as the source computer.
Renaming the VM name only renames the VM as it appears in the Administrator console. It does not rename the actual computer account in Active Directory.
![]() Owner—Accept the prepopulated domainusername value, enter a new domainusername value or click Browse to choose a new value. The owner account must be a member of Active Directory.
Owner—Accept the prepopulated domainusername value, enter a new domainusername value or click Browse to choose a new value. The owner account must be a member of Active Directory.
![]() Description—This optional field is used to describe the VM. Click Next.
Description—This optional field is used to describe the VM. Click Next.
The owner of a VM is used to identify the owner of the new VM. It does not assign any rights to the VM itself.
5. On the Gather System Information page, click the Gather System Information button. By doing so, you begin a survey of the physical source computer and will display a list of operating system, hardware, and software components installed, as shown in Figure 10.2. It will also identify any missing components that are required for the P2V conversion to run. The wizard installs agent software on the source computer to gather this information and will remove it when the conversion is complete.
FIGURE 10.2 The Gather System Information page.

Ensure that the WMI service is running on the source computer and that a firewall is not blocking HTTP and WMI traffic to the VMM server. A firewall exception will be created for remote administration service (RemoteAdmin) if a firewall is installed on the source computer. The administrator can remove this exception after the conversion operation is complete.
The System Information results window displays the operating system, hard drives, and network adapter information gathered from the survey. Click Next to continue the wizard.
6. The Conversion Information page displays any issues encountered while checking the source computer for suitability for P2V conversion. Do one of the following actions:
![]() Confirm that the message “No issues detected” is displayed.
Confirm that the message “No issues detected” is displayed.
![]() Review any issues that the wizard reports. These issues must be resolved before the P2V conversion can succeed. Each issue listed is accompanied by a solution that explains how to resolve it. After all issues have been resolved, click the Check Again button to rerun the survey.
Review any issues that the wizard reports. These issues must be resolved before the P2V conversion can succeed. Each issue listed is accompanied by a solution that explains how to resolve it. After all issues have been resolved, click the Check Again button to rerun the survey.
![]() When there are no issues detected, click Next.
When there are no issues detected, click Next.
7. On the Volume Configuration page, review the list of disk volumes detected and make changes, if required:
![]() Deselect volumes that should not be included in the new VM.
Deselect volumes that should not be included in the new VM.
The system volume that contains the operating system cannot be deselected.
![]() Increase the size of the VHD for each volume.
Increase the size of the VHD for each volume.
The size of a VHD can be increased, but not reduced. The minimum size is determined by the size of actual data on the volume.
![]() Configure the VHD type to be dynamic (the default) or fixed. Dynamic VHDs automatically grow as more data is saved to the disk. Fixed VHDs are constrained to the size configured by the administrator.
Configure the VHD type to be dynamic (the default) or fixed. Dynamic VHDs automatically grow as more data is saved to the disk. Fixed VHDs are constrained to the size configured by the administrator.
If the VHD is configured as a fixed VHD type, ensure the VHD size is configured to allow for additional data, if necessary.
![]() Configure the channel that the VHD will use. Options include up to 2 IDE channels and up to 62 SCSI channels each on 4 virtual SCSI buses (providing up to 250 separate channels total). Click Next to continue.
Configure the channel that the VHD will use. Options include up to 2 IDE channels and up to 62 SCSI channels each on 4 virtual SCSI buses (providing up to 250 separate channels total). Click Next to continue.
8. On the Virtual Machine Configuration page, select the number of processors and RAM to use on the new VM. The number of processors available for selection is limited by the number of physical processors available in the source computer. The default amount of memory specified by the wizard is equal to the amount of physical RAM in the source computer.
9. On the Select Virtual Machine Host page, select the most suitable host to deploy the new VM on, as shown in Figure 10.3. Each host has a star rating (from zero to five stars) indicating its suitability to host the new VM.
FIGURE 10.3 Selecting the VM host.
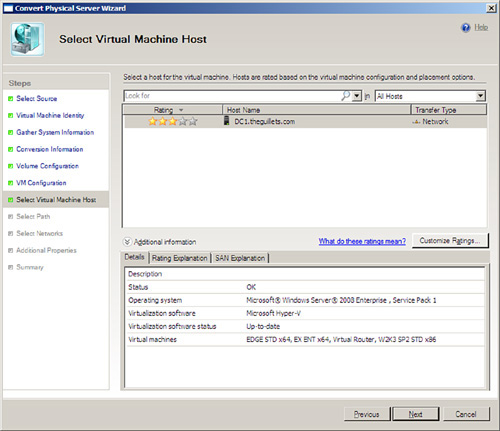
If a large number of hosts are listed, the administrator can use the Host Group, Look For, or Group By fields to display a smaller set of possible hosts.
The Details tab displays the status, operating system, virtualization software platform, virtualization software status, and names of the VMs running on the selected host.
The Rating Explanation tab explains what the star rating means for the selected host and tells what requirements are met for the VM by this host.
The SAN Explanation tab describes the suitability of the host to connect to a SAN for VM storage. Items listed here include Fibre Channel host bus adapters (HBAs) installed and iSCSI initiators installed.
The ratings can be customized using the Customize Ratings button. Here, the administrator can select multiple criteria and assign weights of importance for each component, such as processor load, memory used, network utilization, and so forth.
Select the host on which to deploy the new VM and click Next.
10. On the Select Path page, select the folder where the files associated with the new VM should be placed. The default folder is %SYSTEMDRIVE%Documents and SettingsAll UsersDocumentsShared Virtual Machines. Accept the default or click Browse to select a different path. Click Next.
11. On the Select Networks page, the Virtual Network drop-down list will display all the current networks available on the selected host. Select Not Connected or the appropriate virtual network for the VM to use. Click Next.
12. On the Additional Properties page, configure the following:
![]() Automatic Start Action—Select the action to perform for this VM when the physical host starts. Available actions are as follows:
Automatic Start Action—Select the action to perform for this VM when the physical host starts. Available actions are as follows:
Never automatically turn on the VM.
Always automatically turn on the VM.
Automatically turn on the VM if it was running when the physical server stopped.
![]() Automatic Stop Action—Select the action to perform for this VM when the physical host shuts down. Available actions are as follows:
Automatic Stop Action—Select the action to perform for this VM when the physical host shuts down. Available actions are as follows:
Save state. This action is similar to the Windows Hibernate function.
Turn off VM. This action is equivalent to turning the power off and does not provide a graceful shutdown.
Shut down guest OS. This provides a graceful shutdown of the operating system.
13. The Summary page displays a summary of the settings selected in the Convert Physical Server Wizard. Carefully review these settings and click Create to proceed with the P2V conversion or click Previous to go back and change the configuration.
An optional check box can be selected to start the VM immediately after deploying it to the host.
As with many actions performed from the VMM Administrator console, the Convert Physical Server Wizard offers a View Script button. This option enables the administrator to view, modify, and save the PowerShell commands that the wizard will execute to perform the P2V conversion, as shown in Figure 10.4.
FIGURE 10.4 Convert physical server script.

14. In the Jobs view of the Administrator console, the administrator can monitor the progress of the P2V conversion and confirm that the VM is created successfully. If the job fails, read the error message in the Details pane for information about the cause of the failure and the recommended course of action to resolve the issue.
The P2V process will take several minutes and consists of the following steps:
![]() Collect the machine configuration information.
Collect the machine configuration information.
![]() Add the source machine agent.
Add the source machine agent.
![]() Create the VM.
Create the VM.
![]() Deploy the file (using Background Intelligent Transfer Service, BITS).
Deploy the file (using Background Intelligent Transfer Service, BITS).
![]() Make the operating system virtualizable.
Make the operating system virtualizable.
![]() Install the VM components.
Install the VM components.
![]() Start the VM to install the VM components.
Start the VM to install the VM components.
![]() Stop the VM.
Stop the VM.
![]() Remove the source machine agent.
Remove the source machine agent.
![]() Remove the VMM agent.
Remove the VMM agent.
Finalizing the P2V Online Conversion
After the physical computer has been captured and deployed as a VM, the administrator can turn off the source physical computer and start the new VM.
If the physical computer is using only direct attached storage, take care to copy any data that has changed since the P2V process began, if necessary. How this data is collected depends on the type of data and how it is stored. On local databases, for example, the database may have to be taken offline (quiesced), migrated to temporary storage, and copied to the newly created VM.
Performing a V2V Conversion
During a V2V conversion, an existing VMware ESX VM configuration file and its associated virtual disk files are converted to Hyper-V VM files.
The VMM administrator does not need administrator rights on the VMware VM to perform the conversion because the V2V conversion is just converting files to another type. The VMware VM is turned off, and the files are copied to the VMM library for conversion.
The administrator should perform a disk defragmentation on the source computer’s hard drives to help minimize the time required for the imaging phase. Also, ensure that a fast network connection exists between the source and VMM computers.
Performing a V2V Conversion
The administrator can use VMM to convert VMs that run on VMware ESX into Windows 2008 Hyper-V VMs. This is known as a virtual to virtual, or V2V, conversion.
Ensure that the source VM meets the operating system and additional requirements listed at the beginning of this chapter.
Adding VMware VM Files to the VMM Library
Before the administrator can perform a V2V operation, the VMware server-based VM files (VMX and VMDK) must be added to a VMM library, as follows:
1. Copy the VMX and VMDK files to the library share on the appropriate VMM library server.
2. Open the VMM Administrator console and display Library view.
3. In the Navigation pane, expand Library Server, and then navigate to the library share where the VMware files were copied.
4. Select the library share and in the Actions pane, and under Library Share, click Refresh Library Server.
All files on the share will be immediately indexed by VMM and will be added to the Library view.
Running the V2V Wizard
The V2V online conversion process is run from the VMM 2008 Administrator console as follows:
1. Open the VMM Administrator console using the shortcut on the Windows desktop or via the Start menu under Microsoft System Center, Virtual Machine Manager 2008, Virtual Machine Manager Administrator Console.
A Connect to Server window may open, prompting for the VMM server to connect to. Enter the server name and connection port (the default is port 8100) using the format VMMserver:port.
You may choose to always open a connection to this server by selecting the Make This Server My Default check box. Doing so prevents this connection window from displaying when the Administrator console is run.
2. Go to the Library view by clicking the Library button, and then select the library group where the files are stored.
3. Click Convert Physical Server in the Actions pane in the Library view. The Convert Virtual Machine Wizard will run.
4. On the Select Source page, click Browse to open the Select Library Resource, as shown in Figure 10.5.
FIGURE 10.5 Selecting a resource from the Convert Virtual Machine Wizard.
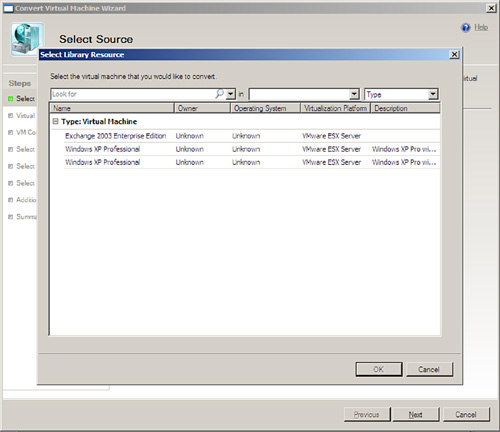
![]() To search for a file, type the complete filename or the first few letters of the filename in the Look For box.
To search for a file, type the complete filename or the first few letters of the filename in the Look For box.
![]() In the Library Group list, select the library group where the VM files are stored.
In the Library Group list, select the library group where the VM files are stored.
![]() To filter the files by group, click a group type in the Group By list.
To filter the files by group, click a group type in the Group By list.
![]() Click the VMX file to convert, and then click OK. Click Next to continue.
Click the VMX file to convert, and then click OK. Click Next to continue.
5. On the Virtual Machine Identity page, configure the following:
![]() Virtual Machine Name—Enter a new name for the VM or accept the default name, which is the same as the source computer.
Virtual Machine Name—Enter a new name for the VM or accept the default name, which is the same as the source computer.
Renaming the virtual machine name only renames the VM as it appears in the Administrator console. It does not rename the actual computer account in Active Directory.
![]() Owner—Accept the prepopulated domainusername value, enter a new domainusername value or click Browse to choose a new value. The owner account must be a member of Active Directory.
Owner—Accept the prepopulated domainusername value, enter a new domainusername value or click Browse to choose a new value. The owner account must be a member of Active Directory.
![]() Description—This optional field is used to describe the VM. Click Next.
Description—This optional field is used to describe the VM. Click Next.
The owner of a VM is used to identify the owner of the new VM. It does not assign any rights to the VM itself.
6. On the Virtual Machine Configuration page, select the number of processors and the amount of RAM to use on the new VM.
7. On the Select Virtual Machine Host page, select the most suitable host to deploy the new VM on, as shown in Figure 10.6. Each host has a star rating (from zero to five stars) indicating its suitability to host the new VM.
FIGURE 10.6 Selecting the VM host.

If a large number of hosts are listed, the administrator can use the Host Group, Look For, or Group By fields to display a smaller set of possible hosts.
The Details tab displays the status, operating system, virtualization software platform, virtualization software status, and names of VMs running on the selected host.
The Rating Explanation tab explains what the star rating means for the selected host and tells what requirements are met for the VM by this host.
The SAN Explanation tab describes the suitability of the host to connect to a SAN for VM storage. Items listed here include Fibre Channel HBAs installed and iSCSI initiators installed.
The ratings can be customized using the Customize Ratings button. Here, the administrator can select multiple criteria and assign weights of importance for each component, such as processor load, memory used, network utilization, and so forth.
Select the host on which to deploy the new VM and click Next.
8. On the Select Path page, select the folder where the files associated with the new VM should be placed. The default folder is %SYSTEMDRIVE%Documents and SettingsAll UsersDocumentsShared Virtual Machines. Accept the default or click Browse to select a different path. Click Next.
9. On the Select Networks page, the Virtual Network drop-down list will display all the current networks available on the selected host. Select Not Connected or the appropriate virtual network for the VM to use. Click Next.
10. On the Additional Properties page, configure the following:
![]() Automatic Start Action—Select the action to perform for this VM when the physical host starts. Available actions are as follows:
Automatic Start Action—Select the action to perform for this VM when the physical host starts. Available actions are as follows:
Never automatically turn on the VM.
Always automatically turn on the VM.
Automatically turn on the VM if it was running when the physical server stopped.
![]() Automatic Stop Action—Select the action to perform for this VM when the physical host shuts down. Available actions are as follows:
Automatic Stop Action—Select the action to perform for this VM when the physical host shuts down. Available actions are as follows:
Save state. This action is similar to the Windows Hibernate function.
Turn off VM. This action is equivalent to turning the power off and does not provide a graceful shutdown.
Shut down guest OS. This provides a graceful shutdown of the operating system.
11. The Summary page displays a summary of the settings selected in the Convert Physical Server Wizard. Carefully review these settings and click Create to proceed with the V2V conversion or click Previous to go back and change the configuration.
An optional check box can be selected to start the VM immediately after deploying it to the host.
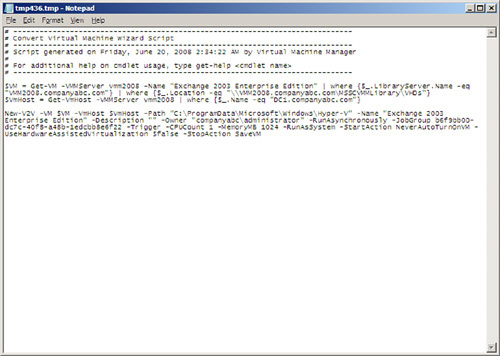
As with many actions performed from the VMM Administrator console, the Convert Physical Server Wizard offers a View Script button. This option enables the administrator to view, modify, and save the PowerShell commands that the wizard will execute to perform the V2V conversion, as shown in Figure 10.7.
FIGURE 10.7 Convert virtual server script.
12. In the Jobs view of the Administrator console, the administrator can monitor the progress of the V2V conversion and confirm that the VM is created successfully, as shown in Figure 10.8. If the job fails, read the error message in the Details pane for information about the cause of the failure and the recommended course of action to resolve the issue.
FIGURE 10.8 Monitoring the V2V conversion job.

The V2V process may take several minutes, but is significantly faster than a P2V conversion. It consists of the following steps:
![]() Collect the machine configuration information from the VMX file.
Collect the machine configuration information from the VMX file.
![]() Create the VM.
Create the VM.
![]() Convert the VMDK file to a VHD file.
Convert the VMDK file to a VHD file.
![]() Deploy the file (using LAN).
Deploy the file (using LAN).
![]() Make the operating system virtualizable.
Make the operating system virtualizable.
![]() Install the VM components.
Install the VM components.
![]() Start the VM to install the VM components.
Start the VM to install the VM components.
![]() Stop the VM.
Stop the VM.
![]() Remove the source VMX machine configuration.
Remove the source VMX machine configuration.
Finalizing the V2V Conversion
After the VMware ESX VM has been deployed as a Hyper-V VM, the administrator can start the new VM.
Further configuration and customization of the VM can be performed from the VMM Administrator console from the Virtual Machines view. Select the VM and click Properties in the Action pane.
Creating a Virtual Lab
The processes listed in this chapter can be used to create a lab environment for testing and application development.
Using P2V to Create a Virtual Copy of Production
The P2V conversion functions of VMM 2008 provide a simple, nonintrusive way to create a virtualized copy of the production environment.
Because VMM uses the VSS to make online copies of production computers, the P2V process will not disrupt the normal operation of these computers. Furthermore, the scripting functions of the VMM command shell enable the administrator to automate the P2V process, simplifying the entire lab-creation process.
Choosing What to Convert
Even complex distributed environments can be virtualized into a lab using the P2V process. For example, a large environment may include many domain controllers, Exchange 2007 servers, file and print servers, and application servers. Depending on the organization’s testing needs, the administrator may be able to create a suitable testing environment with just one of each type of server.
In another scenario, the administrator may want to virtualize only the servers necessary to perform a series of tests, such as a domain controller for authentication and two or three application servers to test replication and fault tolerance.
Care must be taken to ensure that the lab environment is isolated from the production environment to prevent unintended changes to the production environment. This can be achieved by using a separate network, or even better, by physically isolating the lab from the production network.
Automating the Lab-Creation Process Using the Command Shell
Administrators can leverage the View Script button that is available on the Summary page of the P2V and V2V wizards. The entire P2V or V2V process can be configured using the wizards up to the point where the VMs are actually created. At that point, click the View Script button and save the resulting script to a scripts folder.
These scripts can be customized, duplicated, and grouped together to automate the entire lab-creation process. For example, the administrator may have a script called CreateTestDomain.ps1 that will automatically create VMs of a physical domain controller, Exchange 2007 server, and a line-of-business application server, and then deploy it to a Hyper-V host for testing. This script may even be run as a scheduled task for even further automation.
Summary
In this chapter, we have discussed the process of creating Hyper-V VMs that were converted from physical servers (P2V). This process can be performed online without disrupting the physical server by using the VSS. This process can be used to reduce the number of physical servers in the organization’s environment.
VMware ESX VMs can be converted to Hyper-V VMs using the virtual to virtual (V2V) capabilities built in to VMM 2008. This is a quick and easy way to convert from VMware ESX and realize the benefits of Hyper-V.
Both of these processes can be used to create virtual labs for use in testing and application development.
Best Practices
![]() Use VMM’s P2V function to convert physical computers to VMs.
Use VMM’s P2V function to convert physical computers to VMs.
![]() Use the VMM V2V function to convert VMs created on VMware ESX to Hyper-V VMs.
Use the VMM V2V function to convert VMs created on VMware ESX to Hyper-V VMs.
![]() Use the online P2V process to convert physical computers to VMs without disrupting the online server.
Use the online P2V process to convert physical computers to VMs without disrupting the online server.
![]() Use the offline P2V process to convert offline physical computers to Hyper-V VMs.
Use the offline P2V process to convert offline physical computers to Hyper-V VMs.
![]() Know which operating systems can be converted to VMs using the P2V and V2V processes before attempting the conversion.
Know which operating systems can be converted to VMs using the P2V and V2V processes before attempting the conversion.
![]() Use the Microsoft Virtual Server 2005 Migration Toolkit (VSMT) to convert Windows NT Server 4.0 computers to VMs.
Use the Microsoft Virtual Server 2005 Migration Toolkit (VSMT) to convert Windows NT Server 4.0 computers to VMs.
![]() Ensure that source computers are members of the same domain as the VMM server or that there is a full two-way trust with the VMM server’s domain.
Ensure that source computers are members of the same domain as the VMM server or that there is a full two-way trust with the VMM server’s domain.
![]() Perform a disk defragmentation on the source computer before performing the P2V conversion.
Perform a disk defragmentation on the source computer before performing the P2V conversion.
![]() Ensure that a fast network connection exists between the source computer and the VMM server.
Ensure that a fast network connection exists between the source computer and the VMM server.
![]() Renaming the VM name only renames the VM as it appears in the VMM Administrator console. Be sure to also rename the computer within the operating system.
Renaming the VM name only renames the VM as it appears in the VMM Administrator console. Be sure to also rename the computer within the operating system.
![]() Use the owner property of a VM to identify the owner or contact person for the VM.
Use the owner property of a VM to identify the owner or contact person for the VM.
![]() Ensure that the WMI service is running on the source computer and that a firewall is not blocking HTTP and WMI traffic to the VMM server.
Ensure that the WMI service is running on the source computer and that a firewall is not blocking HTTP and WMI traffic to the VMM server.
![]() Remove the RemoteAdmin firewall exception, if necessary, after the conversion is complete to increase server security.
Remove the RemoteAdmin firewall exception, if necessary, after the conversion is complete to increase server security.
![]() Increase the size of a dynamic VHD to allocate more space for the VM if necessary.
Increase the size of a dynamic VHD to allocate more space for the VM if necessary.
![]() Ensure that the size of a fixed-size VHD includes enough additional space for additional data.
Ensure that the size of a fixed-size VHD includes enough additional space for additional data.
![]() When selecting which host to deploy to, use the Host Group, Look For, or Group By fields to display a smaller set of possible hosts.
When selecting which host to deploy to, use the Host Group, Look For, or Group By fields to display a smaller set of possible hosts.
![]() Use the Customize Ratings button to customize the importance of computer and network resources available on hosts.
Use the Customize Ratings button to customize the importance of computer and network resources available on hosts.
![]() Use the Jobs view to monitor the progress of P2V and V2V conversions.
Use the Jobs view to monitor the progress of P2V and V2V conversions.
![]() Review the details in the Jobs view for errors and to determine the cause of failures and the recommended course of action to resolve issues.
Review the details in the Jobs view for errors and to determine the cause of failures and the recommended course of action to resolve issues.
![]() Pay special attention to collect any data that was changed on the source server after the conversion process was begun.
Pay special attention to collect any data that was changed on the source server after the conversion process was begun.
![]() Copy VMware ESX VMX and VMDK files to a VMM library that is closest to the host server to speed VM conversion.
Copy VMware ESX VMX and VMDK files to a VMM library that is closest to the host server to speed VM conversion.
![]() Always refresh the VMM library server after adding files to the library.
Always refresh the VMM library server after adding files to the library.
![]() Use the P2V process to create a virtual copy of the organization’s production environment for testing.
Use the P2V process to create a virtual copy of the organization’s production environment for testing.
![]() Create virtual labs that contain only the servers needed for testing.
Create virtual labs that contain only the servers needed for testing.
![]() Ensure that the lab environment is isolated from the production environment to prevent unintended changes to the production environment.
Ensure that the lab environment is isolated from the production environment to prevent unintended changes to the production environment.
![]() View, save, and customize the scripts that the P2V and V2V conversion wizards produce.
View, save, and customize the scripts that the P2V and V2V conversion wizards produce.
![]() Automate lab creation using the VMM command shell.
Automate lab creation using the VMM command shell.