
Chapter 2: Creating Your Social Media Desktop
In This Chapter
![]() Setting up your social media desktop
Setting up your social media desktop
![]() Adding updates to your tracking center
Adding updates to your tracking center
![]() Deciding which information to track
Deciding which information to track
One of the first problems you encounter in any social media campaign is information overload, or how to keep track of what people are saying on dozens of different sites.
If you create and use a social media desktop, however, you have one central place where you can easily monitor
• The things that people say about you or your organization
• Any stories or themes that you want to track
The best part of having a social media desktop is that you don’t have to type the web address for every site and search result you’re trying to track, because it’s all in one place.
In this chapter, you build your social media desktop. Note: If you haven’t read Chapter 1 of this minibook, hop over there and find out about the sneeze principle. (Gesundheit.) You need a social media desktop so that you can know when other people, um, sneeze (spread along) your content. You also need a social media desktop so that you can find and pass along other people’s great content. That makes you a more valuable member of the community — giving you more authority and making your messages more contagious. Being contagious, so to speak, can boost all your Internet marketing efforts — you’ll get more links (which helps search engine optimization), get more fans (which helps in blogging), and build your brand (which helps with everything).
Setting Up Your Social Media Desktop with RSS
Take a deep breath. Relax. Dry your palms. Setting up your social media desktop is easy — honest!
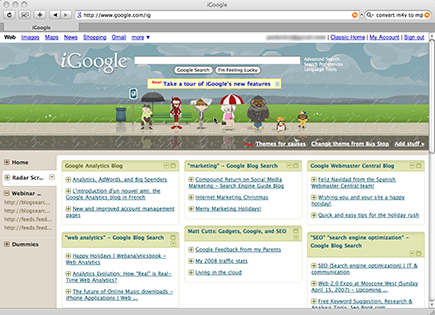
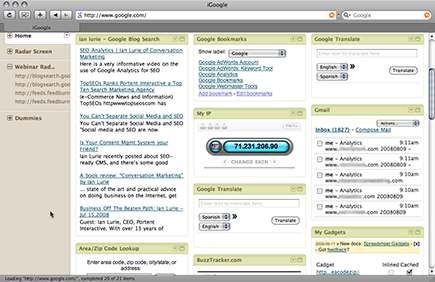
Your social media desktop is just an account that you set up using one of the many services that let you track various search results, blogs, and news stories with a few clicks of the mouse. Check out the iGoogle example shown in Figure 2-1. At a glance, you can see what folks are saying about your company and what your favorite blogs are talking about.
The key to your social media desktop is really simple syndication, or RSS, in which you build your desktop by subscribing to several RSS feeds for websites, blogs, or search results. That way, you can stay up to date without visiting the site, blog, or search result. By putting all those subscriptions in one place, you create your social media desktop: a single place where you can keep an eye on what folks are saying about you, your company, and your competitors.
 RSS is a simple way for websites to deliver a list of the latest headlines, articles, or content. An RSS feed is the actual list of headlines. You don’t need to worry about the technical details.
You can use any RSS feed reader or organizing service you like, but in this chapter, you find out how to use iGoogle and Netvibes. Both of them are free and offer a broad feature set.
Figure 2-1: The iGoogle social media desktop.

Setting Up Your Social Media Desktop in iGoogle
iGoogle is one of the simplest social media desktop tools. If you already have Gmail or use another Google service, you can simply add it to your existing account. Plus, it integrates with Google’s various other services.
The only downside about iGoogle is this: You don’t have much control over how your page looks. If you’re not a fan of the Google aesthetic for pages that have a lot of text on them, iGoogle may not be for you. As you’ll soon see, your social media desktop will have a lot of text on it.
Setting up an iGoogle homepage
You can set up an iGoogle homepage as your social media desktop in just a few simple steps:
1. In your web browser, go to www.google.com/ig.
2. If you already have a Google account:
• But you aren’t logged in: Sign in, and then skip to Step 4.
• And you’re already logged in: Accept the offer on the iGoogle splash page to make it your homepage, and then skip to Step 4.
 If you have a Gmail account, you already have a Google account. Sign in using your Gmail address and password. You’ll see the iGoogle setup page (see Figure 2-2).
Figure 2-2: Creating your iGoogle homepage.
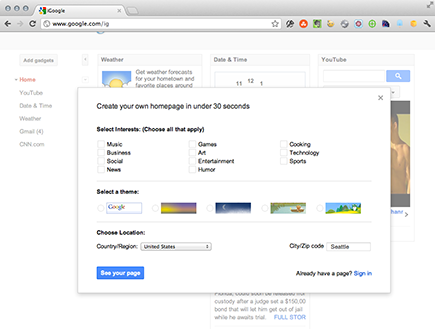
3. Select a theme, but leave your interests blank. Enter your location.
You’ll fill your page with other widgets that bring you news feeds, headlines, and content related to your interests, from blogs, news websites, and search engines.
When your iGoogle homepage appears (see Figure 2-3), with a bunch of preselected items (such as Google News, weather, and the current time), you can remove them, too.
Figure 2-3: Your iGoogle homepage.
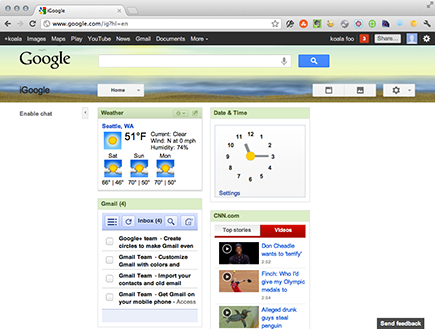
You’re ready to start adding items, such as search results and your favorite blogs.
Adding a website or blog feed to iGoogle
After you create your iGoogle homepage, you can start tracking news feeds and getting up-to-date information. You might already have a few blogs or websites that you read regularly. If you do, you can watch their updates on your iGoogle homepage. Here’s how:
1. Go to the website or blog.
2. Click the RSS subscription button or link, as shown in Figure 2-4.
Figure 2-4: Typical RSS subscription options on a website.

The Add to Google page appears. If your web browser is set up to add RSS feeds to a different program, the Google page may not appear — your browser will open a different web page instead. If that happens, skip to the later section “Adding feeds to iGoogle manually” to work around this issue.
3. Click the Add to Google Homepage button.
You see the latest headlines from that website or blog, as shown in Figure 2-5.
From now on, when the website to which you just subscribed updates, the widget on your iGoogle homepage will immediately update.
Figure 2-5: See updated headlines.
Adding a blog search result to iGoogle
Rather than follow just one specific blog, you can track what most blogs are saying, all at one time, by using Google Blog Search. Running a search for your company name, for example, shows every blog entry mentioning your company. Here’s how to subscribe:
1. Go to www.google.com.
2. Click the More link on the left-hand side of the page and then choose Blogs; see Figure 2-6.
Figure 2-6: The Blogs search option on Google.

3. Search for your organization’s name.
Enclose the name in double quotes. Using quotes narrows your search result to search for a phrase match on the words you entered, whether you have a one-word or a ten-word name.
4. Click the magnifying glass icon.
To see the most recent results first, click the Sort by Date link, in the middle of the left-hand navigation bar. See Figure 2-7.
5. Click the RSS link at the bottom of the page.
Figure 2-7: Subscribe to feeds and sort results here.

6. Go back to your iGoogle homepage.
You see the search result in a nice, neat box. When iGoogle adds a new blog post to this search result, you see it there, as shown in Figure 2-8.
Figure 2-8: The search result added to your iGoogle homepage.
You can add other search results, too. Examples include
• Competitor names
• Names of individuals in your company
• Names of individuals at competitors
• Product names
• Your web address
• Common typographical errors for all elements in this list
Adding feeds to iGoogle manually
If iGoogle isn’t the default RSS feed reader for your browser, you’ll need to add the feed to iGoogle by hand. Only a few steps are added, though, so don’t worry:
1. Click the RSS link on the website you want to follow.
2. Copy the feed URL in the address bar.
3. Go to your iGoogle homepage and click the Add Gadgets link.
4. In the lower-left corner of the Add Gadgets page, click Add Feed or Gadget.
5. In the box that appears right below the Add Feed or Gadget link, paste the feed URL.
6. Click Add.
You’re done — you added a feed by hand.
You can try using a shortcut for adding feeds to iGoogle: Type the web address of the site to which you want to subscribe. If it has a correctly configured feed, Google detects and adds it.
To see more or fewer results in a specific content box on the iGoogle homepage, click the gear menu for that content box, click the Edit Settings, and select the number of items you want to see.
Creating Your Social Media Desktop on Netvibes
If you like a slightly more polished interface, want more customization options, or aren’t comfortable using Google because of privacy concerns (some folks just aren’t), Netvibes is an excellent choice.
Setting up a Netvibes homepage
Setting up a Netvibes homepage takes only five steps:
1. In your web browser, go to www.netvibes.com and sign in or create an account.
The basic option works well for your purposes.
2. Enter a topic you’d like to track.
Now you’ve got a Dashboard, but it isn’t assigned to an account.
3. To set up your account, click the Sign Up in the upper-right corner.
4. Enter your account information, or sign in using Facebook.
5. Follow the activation instructions for e-mail activation or via Facebook.
You’re logged in to your new account; see Figure 2-9.
 In Netvibes, you have two pages: your public page and your private page. When you first sign up, your public page is turned off. If you turn it on, just be careful that you don’t put any widgets you don’t want anyone else to see on your public page.
Figure 2-9: Your new Netvibes homepage.
You’re now ready to start adding widgets that display RSS feeds and other content.
Adding content to a Netvibes homepage
Adding content to Netvibes is similar to adding content to iGoogle manually. Follow these steps:
1. Go to the site, blog search, or other page to which you want to subscribe.
2. Right-click the RSS or Subscribe to RSS link.
3. From the shortcut menu that appears, choose the Copy Link Location command (or a similar one).
4. Go to Netvibes and log in (if you aren’t already logged in).
5. Click the Add Content button; refer to Figure 2-9.
6. In the page that opens, click the Add a Feed button, as shown in Figure 2-10.
7. Paste the feed URL and then click Add Feed.
Figure 2-10: The Add a Feed button and menu on Netvibes.

Netvibes presents options, if necessary. Options are determined by the specific widget. The kind of content you want or don’t want, whether to include photographs, or whether to play video automatically are possible options.
8. Click the Add to My Page button.
The feed is now on your Netvibes homepage.
Here are a couple of shortcuts for adding feeds to Netvibes:
• Simply click Add Feed and then, in the field that appears, type the web address of a site. If the site has a feed, Netvibes finds and adds it automatically.
• Use a Firefox plug-in or a Chrome extension (if you use Firefox or Chrome as your web browser). Be sure to read about those items when you start using Netvibes. Plug-ins are great and easy to install, but do a little research to find the ones that have been around for a while and are proven to work.
Netvibes offers a few additional options with which you can
• Change the number of items shown in the feed box.
• Color-code the content boxes; see Figure 2-11.
Color-coding might seem silly at first, but it can make your social media desktop much easier to review.
• Show more information about each post.
Figure 2-11: Use color-coding on your homepage to help sort content.

Using tabs to stay organized
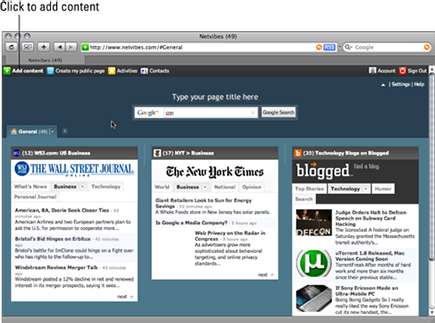
When you start tracking innumerable different searches and sites, you might find that your social media desktop can get a bit out of control, not unlike a cluttered closet; see the figure. (Talk about info overload!)
When that happens, organize your homepage by creating separate tabs and using them to divide your content accordingly. Netvibes and iGoogle both have an Add Tab (or New Tab) link that you can use.
To access these options and others, click the Edit or the Options button at the top of each content box.
Deciding What to Track
You can start adding content to your social media desktop by tracking a few blog search results and websites or blogs of interest. Later, you might want to add
• Twitter feeds or search results
• News search results from Google and Bing
• Stock data
• A Flickr or YouTube channel
The sky’s the limit. As you get comfortable using the tools, you might want to add all manner of feeds and information to the page. Some truly advanced marketers even create tools that generate their own readouts of search rankings and other data.
You need to be judicious — okay, picky — though. Otherwise, your social media desktop will leave you just as buried in information as you were before you created it. As a rule, add a feed only if
• You need to check it daily or more often.
• The information doesn’t show up in another feed.
• You can skim it.
 Your social media desktop should be something you can quickly skim in a matter of minutes. Anything that can’t be digested in a list doesn’t belong there.