You've configured your event, tested it, and publicly promoted the online information page and registration form. Before you know it, event registrations start rolling in. Now what?
As with so many other areas of CiviCRM, these records may be viewed collectively through search tools or on an individual-contact basis. In this section, we'll walk through the event registration as it is viewed through the contact's record and then briefly review importing participant records.
A contact's history of event attendance will appear in their Events tab. From this tab, you can view, edit, or delete an existing registration, or create a new registration for the contact.

Notice that there are two buttons above the event history listing, namely, Add Event Registration and Submit Credit Card Event Registration. The first is used for registrations that do not involve real time credit card processing through the system. This may include free events, payments by check, cash, EFT, or a credit card that was processed outside of the system. The second button should be used if you will be processing a credit card directly through CiviCRM. If you have not configured a payment processor, or your payment processor does not handle integrated payments (for example, PayPal Standard or Google Checkout, which redirect you to an external site to process the payment), then that button will not be visible.
The new registration form allows you to select the event you wish to register the individual for, the fees and fields specific to the event, payment options, and receipting options. The following screenshot shows the top half of the form:
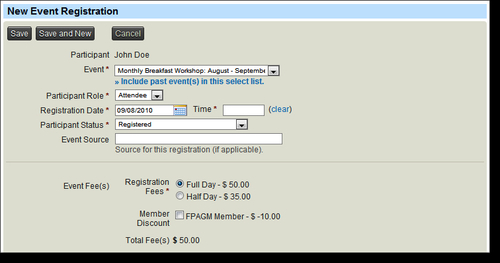
There are several things to note about this form:
- The event drop-down list will only show current and future events. If you wish to register someone for an event in the past, you must click the Include past event(s) in this select list link, which will reload the form with the full list of events. This is done to reduce any confusion and simplify the event selection process.
- If you have created any custom data fields attached to participants, they will appear and be available only when the selections match their "used for" criteria. For example, if you have created custom fields for the participant role Guest, they will only appear when you change the role on this form. If you have custom fields attached to the event type Conference, they will only appear if the event selected is associated with that event type. If you are expecting, but not seeing a certain custom field, make sure your selections match how that field is configured to be used.
Directly below the event fee block is an option to record a payment with this registration. Checking the box reveals a series of contribution-related fields, as shown in the following screenshot:
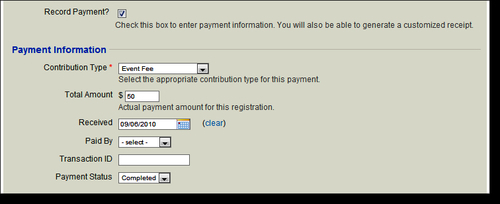
It is important to understand that an event registration in which fees are collected involves both an event participant record and an associated contribution record. While you could process these separately, we strongly advise that you manage them through this single interface. In addition to being easier than entering them separately (since you may handle both records at once), doing so creates a link between the two records. If you return at a later date to view this event registration, you will see the related contribution record summarized below it. Likewise, if you enter the associated contribution record, you will see the event record summarized below it. Revenue totals for the event in reports will also reflect the linked records. Entering them separately will not build that connection.
Inevitably, you will receive event registrations by mail, fax, or phone, in which payment has not been submitted with the event registration. Though you have not actually received the payment, there is an expected payment and consequently, the best practice is to enter the payment as a pending contribution. Use the Record Payment option to log the contribution, but do not complete the Paid By field, and change the Payment Status field to Pending.
Why is this recommended? For two reasons: first, it captures the reality of the data better. You have received a registration that implies a commitment to pay. This is different from a registration for a guest, speaker, or other VIP attendee for whom you do not plan to charge a fee. Secondly, it provides better tools for tracking payments due. If each registrant in the above scenario has a pending contribution payment, you can easily run a search to find out the total due and process invoices or follow-up communication accordingly. In essence, it gives you a better overview of your actual financial position, and a clear data path to those who owe you payment.
Registrations received through your public-facing event registration page will also have both an event and contribution record created. Pay later registrations will have contribution records with a status of Pending, indicating that a payment has not yet been received. When you receive payment, first record the details in the contribution record and change the status to Completed. Doing so will automatically change the status of the associated event registration record to reflect that the payment has been received. Note that the reverse action does not have the same effect: changing the status of a registration to completed does not likewise change the status of its associated contribution record. This supports situations where you want to allow people to attend the event (marked completed) even though they will pay after the event (marked pending).
Before leaving the event record displayed within the contact record, we want to point out one additional feature. From the event tab, click on View to see the registration details. From this screen, you'll notice a button to create a name badge. Clicking on this option will direct you to a form where you select the template to be used and trigger the creation of a PDF file with the name badge.
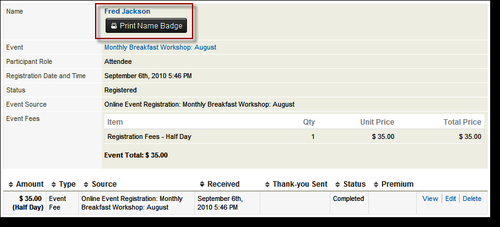
In the following Tracking, searching, and reporting section, we will review how to create name badges for all event participants in bulk. For now, it's useful to see how an individual name badge can be created.
As with other areas of CiviCRM, the event functions include a tool for importing event registrations. This is particularly useful when you are initially migrating data from an external database such as MS Access or MS SQL Server. It may come in handy at times depending on your organization structure and how CiviCRM is being used.
Let's say your organization consists of five chapters geographically oriented to cover the entire state. Each chapter hosts local events and handles all onsite management through volunteers. The registration process is centralized through the state-wide organization using CiviCRM, so the contact participant list is generated and e-mailed to the chapter coordinator the day before the event.
Suppose some of these events allow walk-in registrations and others include continuing education credits that must have verified attendance in order to be earned. In other words, the organization must not only track if people have registered, but must also track whether they actually attended.
You choose to handle this by sending a .csv (comma-separated) export file the evening before the event to the chapter coordinator. The coordinator welcomes people as they arrive at the event and uses spreadsheet software to mark each person who attends in the .csv file. They add new rows for walk-ins. That file is sent back to the main office at the conclusion of the event and is imported into CiviCRM in two steps: existing registrants are imported using the Update option, where the participant status value reflects who attended; and the new registrants are imported using the Insert option, and then are matched with existing records using their name and e-mail.
The import tool is very similar to what we saw in other areas. The four-step wizard consists of loading a file and configuring the import settings, mapping the file's fields to CiviCRM fields, previewing the results, and completing the import. An error file will be generated and will be available for download if any problems are discovered with any records.
To access the import tool, visit Events | Import Participants. There are a few things to note that are specific to importing events:
- Participant import only accepts
.csvfiles. You cannot connect to a MySQL database as with the contact import. - The most significant difference between importing participants and importing contacts is the behavior of the Update option for handling duplicates. The Update option requires the presence of an existing participant record, which must be identified using the unique participant ID value. Consequently, you will only use it in scenarios similar to the one we just discussed, where the participant list is exported from the system, changes are made, and it is then imported back into the system. If the Update option is used, CiviCRM will not process new registration records. In this way, it differs from the contact import that matches and updates existing records and creates new records for those that do not match.
- As one might expect, the field mapping options available for the participant import include a number of registration-related fields. Take note of those in red, as they are required in order to successfully import these records. They include the Event ID and Participant Status. The former can be obtained from the Manage Events page. Several of the fields highlighted in red are used for matching to the contact record. Not all of these are required; only ones sufficient for making a valid match are required. For example, you do not need the internal contact ID and the first/last name. Either of these is sufficient for making a match.