Now that we have set up a group to which we can send a mass e-mail and provided ways for site visitors to subscribe to our newsletter and other bulk e-mail subscriptions, it's time to send a bulk e-mail with CiviMail to all the group members who have subscribed to it.
The construction of a bulk e-mail message involves a five-step wizard in which you select the recipients, mailing options, develop content, preview/test, and then schedule the mailing. Before we work through those steps, let's look at a few additional tools and options you may want to review and configure first.
CiviCRM supports the creation of multiple headers and footers for insertion in your mailing. These can be used in conjunction with or in lieu of message templates. The footer, in particular, can be a very useful element in your mailing.
In order to comply with the US CAN-SPAM Act, and in accordance with generally accepted mailing practices worldwide, every mail sent using CiviCRM must include two special mailing tokens: the domain address and the opt-out URL or e-mail token. We also recommend that you include the group-unsubscribe URL or e-mail token.
It is important to understand the difference between opt-out and unsubscribe: opt-out means that the user has chosen to completely remove themselves from receiving all e-mails from your organization; unsubscribe means they choose to no longer receive a certain newsletter (they are removed from the associated group). If both links are included in your e-mail, be certain to craft the language carefully and accurately. Wherever possible, you will want to encourage people to simply unsubscribe from a certain list rather than completely opting out of all e-mails. If the latter is selected, you may be legally bound to respect the contact's request.
The footer comes into play by providing a useful way to collect these required tokens and make sure they are consistently inserted in your mail. We recommend constructing a single default footer that is generic enough in its layout to be used in conjunction with any template. The footer should generally include the organization's name, domain address token, phone/e-mail/website, and opt-out/unsubscribe tokens.
Optional elements mentioned earlier in the chapter are your organization's tagline/mission, and perhaps a featured call to action that you change regularly. Note that the opt-out/unsubscribe tokens may be included as a URL link (which directs people to your website where they confirm the action) or as an e-mail address which is processed by the CiviMail EmailProcessor.php script (see Chapter 3, Installation, Configuration, and Maintenance for more details). We recommend using the URL form unless there's clear reason to do otherwise. By using the URL, you force people to visit your website before taking action, which provides an opportunity to remind them about who you are, what you do, and perhaps cause them to rethink their removal request.
To construct and edit headers and footers, carry out the following steps:
- Click on either Administer | CiviMail | Headers, Footers and Automated Messages or Mailings | Headers, Footers and Automated Messages.
- Click on the Edit link on the right of the Mailing Header row (you could also click on New Mailing Component button).
- Customize the contents of the Body - TEXT Format and Body - HTML Format fields as appropriate, specifically including visual formatting for the latter.
- If you use a header/footer pair to layout your entire page, in the Body - HTML Format field for the header, include the
<html>, <head>, </head>and<body>tags. Then close those tags (</body>and</html>) in the associated footer. Doing so will frame your e-mail in the appropriate HTML tags and will allow you to use the body region for your content. - Consider defining
<style type="text/css" media="screen">in the body to define inlineCSSfor formatting. - To include an image in the e-mail, use an absolute path to a publicly accessible location, for example:
td.footer { background-image:url( 'http://example.org/sites/example.org/themes/example/images/newsletter-footer-bg.gif'), } - Click on Save.
- Click on the Edit link on the right of the Mailing Footer row (you could also click on the New Mailing Component button).
- Customize the contents of the Body - TEXT Format and Body - HTML Format fields as appropriate, specifically including visual formatting for the latter.
- The footer is the best place to put text and tokens to allow users to unsubscribe from the mailing list and/or from all of your communications.
- For the Body - HTML Format, don't forget the
</body>and</html>tags. - Click on Save.
As introduced earlier, the actual construction of a bulk e-mail consists of walking through a five-step wizard as follows:
- Click on Mailings | New Mailing.
- Enter a value in Name Your Mailing.
- Use the advanced multi-select tool to include/exclude groups and include/exclude recipients of past mailings as appropriate. The tool works by moving selections from the left column to the right by either double-clicking on them, or selecting and clicking on the nearby Add button.
- Click on Next.
- Optionally, change the Tracking and Responding selections. These options cover several important functions. Enabling Track Click-throughs? will rewrite any website links found in the content of your e-mail and route them through CiviCRM. The system can then record when a user visits a link and provide details in the mailing report. This can be an important metric for determining the effectiveness of your mailings. Enabling Track Opens? will record whether the recipient opened the e-mail. Note that this is an imperfect metric, but still helpful in gauging the overall success of your mailing efforts. Enabling the Track Replies?, Forward Replies, and Autorespond to Replies? will similarly track follow-up actions taken by recipients.
Tip
Note that the track replies and forwards functionality requires the proper functioning of CiviCRM's
EmailProcessorscript. See Chapter 3, Installation, Configuration, and Maintenance for a full discussion of cron job scripts that ship with CiviCRM and how to configure them to your needs. Also note that you can turn these two options to default enabled by altering the constant defined in yourcivicrm.settings.phpfile. If you plan to use these options regularly, you will want to do that to avoid manually turning them on for each mailing. - Click Next.
- Select From Email Address. These can be added or updated at Mailings | From Email Addresses or Administer | CiviMail | From Email Addresses.
- If desired, select a template from the pull down list. Doing so will populate the subject and content fields which you can then edit as desired.
- Enter the subject line that will appear in your e-mail in the Mailing Subject field.
- Either compose on-screen by entering content into the HTML Format and Plain-Text Format fields or click on Upload Content and Browse to upload files.
- As noted earlier, ensure that the
{domain.address}and either{action.optOutUrl}or{action.optOut}tokens are included in your content. CiviCRM requires this in order to ensure that CiviMail is not inadvertently used in a way that is sure to get your site blacklisted as a spammer and thus unable to get much of your e-mail delivered. If you've not included them in a standard footer as recommended, they must appear in the body content (generally in both the HTML and Text versions). In your HTML version, you are likely to want to embed the opt-out URL/e-mail token in a hyperlink (a) tag with user-friendly text. - If you plan to use the layout/structure or content of this e-mail for future communications, you may save it as a new template. If the e-mail was based on an existing template, you may update it by clicking the appropriate option. This step in the wizard is also where you select your header/footer and any attachments.
- Click on Next.
- It is highly recommended that you always send a Test Mailing and carefully review it before mass mailing. A test can be sent to a single address or to a predefined group. For example, you may want to create an e-mail test group of people who will regularly review e-mails before they are sent out. It is especially useful to check the message when new or changed bulk e-mail formatting is first used. These checks should include viewing the message in both HTML and text as it comes directly from CiviMail in a variety of e-mail clients and browser-based e-mail services (for example, Outlook, Gmail, Hotmail, and so on), as well as after it has been forwarded.
- Enter your e-mail in the Send to This Address field and/or select an appropriate test group from the Send to this Group list.
- Click on Send a Test Mailing.
- When you are satisfied with the test mailing, click on Next.
- Select to send either immediately or schedule the mailing to go out at a later date/time. In both cases, a cron job must run for the mail to be sent.
- Note that you must unselect Send immediately for the scheduled mailing time to be noticed.
- Click on Submit Mailing.
At this point, the mailing enters the CiviMail queue. It won't actually be sent until the mailing script (civicmail.cronjob.php) is run. Normally, this will be set up as a cron job on your server and scheduled to poll the queue at regular intervals and start mailings. Understand that it will take time for the mailing to be processed. Initially, there will be a delay as the mailing won't begin until the next cron job is run. Thereafter CiviCRM will process the mailings as fast as your hosting environment and resources permit.
After initiating a mailing, you can monitor its status by doing the following:
- Click on Mailings | Scheduled and Sent Mailings.
- Click on the Report link to the right of the row for the mailing of interest.
You can cancel or delete a mailing that is in the process of being delivered by doing the following:
- Click on Mailings | Scheduled and Sent Mailings.
- Click on the -more- link to the right of the row for the mailing of interest, and click on either Cancel or Delete.
- Cancelling will stop further sending. There is no ability to recall e-mails already sent out; it simply halts the mailing process at the time when you cancel it.
- Deleting stops further sending and removes existing data about the mailing from CiviCRM.
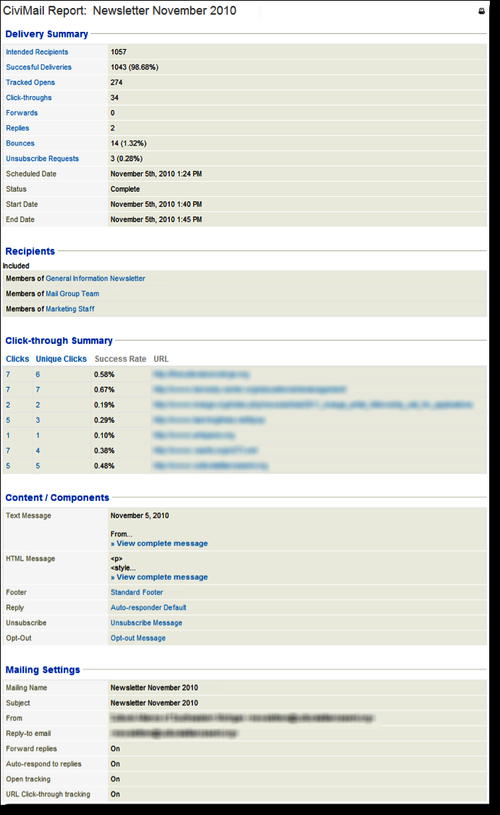
As soon as the actual mailing process initiates, you can begin to review the mailing report. It will periodically get updated with new information as the mailing proceeds. The metrics for click-opens and click-throughs will generally change for several days after a mailing is sent. Constituents may receive the e-mail, take note of it, but may not follow up by clicking on links inside it for a few days after receiving it.
The report itself provides a snapshot of the key metrics and details of the mailing. This includes the number of successful deliveries, bounces, click-opens, click-throughs (including a list of each link and whether it was a unique click), and links to the list of contacts to whom the mailing was sent. It also provides a copy of the message and record of the mailing options you chose.
The following screenshot is from an actual mailing (with some organization-specific details obfuscated). Note that the categorized items in the Delivery Summary section are all hyperlinked. For example, you can click the click-through links to view a list of all contacts in the mailing who clicked on at least one link in your mailing.