3. Imaging and Proofing
Checking your finished files, proofing them locally, and handing them off for production are three key steps in the final production cycle.
A final check prior to handoff ordinarily includes printing a proof copy on your desktop printer. Although inspecting a desktop copy isn’t the same as getting actual proofs from the printer, you can think of it as the first of several stages of proofing. Prior to handoff, it’s equally important to verify that your files are complete before putting them into production.
Turning over your files for imaging involves collecting images, illustrations, fonts, and layout documents and organizing them for production. Adobe InDesign and QuarkXPress both offer software tools for collecting the components of a project, assembling them into folders of associated documents, and making them ready for print production.
Many printing firms also accept print-ready Adobe PDF files created from the page-layout application. PDF documents can be made with full-resolution images and embedded fonts, and they can optionally be converted to the correct color type for printing on a specific press and paper combination using an ICC profile recommended by your printer.
Desktop Proofing Options
Preview your publication throughout its development as a way to check the layout, verify the accuracy of text and graphics, and solve potential printing problems before the files are imaged. You can use a color desktop printer to print a composite proof, giving you an idea what the completed project will look like. You can also use a desktop printer to print color separations to see whether objects print on the correct separations.
Problems identified in a desktop proof can be corrected quickly and easily; the same problems identified on press are dramatically more expensive to fix. Many prepress service providers require a desktop printer proof when you deliver your files for production.
You should make numerous proofs as you develop your publication. Get technical input from your customer as you go to eliminate errors. The services of a professional editor and proofreader are worth the cost.
Virtual proof (onscreen or soft proof)

What it is
An onscreen preview lets you examine the pages of your publication on your computer display.
Appropriate Uses
Use periodic onscreen proofs to refine the appearance of text and to check the overall layout. Enlarge critical areas to get a better look. Check to see that the correct colors have been assigned to each object.
Adobe Creative Suite applications offer a Proof Colors option, which activates a selected output color profile and then shows the document on the computer display with realistic color. Adobe InDesign can also simulate the color of the paper based on the paper white reading made when the profile was created. The default profile is defined in the Suite Color Settings found in Adobe Bridge software. Each application can override the default settings for customized color proofing.
You can also make a color-accurate virtual proof using a properly prepared Adobe PDF document viewed on a calibrated and profiled computer display. Special virtual-proofing software can create proofs of adequate quality to replace the prepress proofs traditionally made before printing.
Desktop laser proof

What it is
Black-and-white composite prints are printed on a PostScript laser printer. This is an inexpensive way to identify problems with layout and design. By printing color separations, you can verify that objects have been assigned the correct colors in your document.
Appropriate Uses
Check registration marks and crop marks. You may need to reduce the size of the printed piece to fit on desktop printer paper, but even a reduced-size proof is a valuable aid in finding and correcting errors prior to a press run.
Desktop color proof

What it is
A composite proof printed on a PostScript color printer can be a good preliminary proof. High-resolution (1440–2880 dpi) inkjet printers can also generate good preliminary proofs.
Appropriate Uses
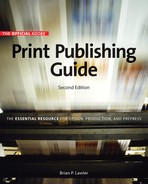
Composite proofs from a desktop color printer are useful for previewing page design, showing color relationships, and verifying image quality. These composites have the disadvantage of not letting you anticipate some press problems, such as moiré patterns and register error. And most color composite proofs can’t show color trapping. In addition, unless you’ve been using a color-managed workflow, the colors in your composite proofs may be unreliable.
What to Send to Production
Your files are in the format specific to that particular application. At handoff, you may choose to transfer your files as they are—in Adobe InDesign or QuarkXPress—or you may choose to convert them to Adobe PDF format. Both approaches offer advantages.
Transferring files in their native form
Handing off a file in the format of your page-layout program allows the service bureau to run its own preflight check on your file, making sure that linked files are present and that all fonts are available. Your service provider will also select the correct printing options for the job: printer’s marks, screen ruling, bleed, and any additional controls needed to print to their platesetter. If service providers encounter problems, they can usually troubleshoot the files and fix them (there is a charge for this service).
Before you hand off any document for production, be sure to communicate with the production specialists about the software you’re using and your computer platform. Although there are few problems relating to applications or computer platforms today, it’s nice to check in advance.
Converting to Adobe PDF
If your service provider uses a PDF workflow for print production, you can provide complete Adobe PDF files, ready to print. Many graphic arts firms use PDF-based workflows for graphic arts–quality productions.
If you use Adobe InDesign, you can choose one of several PDF presets to make your PDF files directly from that application. QuarkXPress also has a method for making PDF files directly from the application. To ensure maximum compatibility, set the preference in QuarkXPress to use an external PDF application—specifically, Distiller, which is part of the Adobe Acrobat software package.

Two graphic arts–specific PDF types are used in the graphic arts industry:
• PDF/X-1a is a PDF specification that ensures compatibility with SWOP-standard printing production systems. It forces a document to CMYK color and forces compliance with resolution standards that are minimal for SWOP printing. PDF/X-1a is a good choice if your work is destined to be run as an advertisement in a publication, or if your work is to be run on a web-fed offset press, on a rotogravure press, or sheet-fed with SWOP standards.
• PDF/X-3 is a more advanced PDF standard. It’s designed for graphic arts–quality production, but it acknowledges more than four colors—thus enabling spot colors, varnishes, and so on. PDF/X3 also allows RGB files to be part of a graphic arts document, with ICC profiles embedded for later processing to CMYK for print by the printing company.
Choosing either one is appropriate for print, but it’s important to ask your commercial printer which type of PDF they prefer before committing to making the documents. You may also find that your commercial printer has its own recommendations for making PDF files ready for printing.
Also remember that PDF creation for print usually leaves photos in the document uncompressed, which can cause these files to be very large. Don’t expect the compact files you get when you compress to PDF for Internet or business document delivery. A 50 MB PDF file for a single-page color document isn’t unreasonable.
Checking Your Files
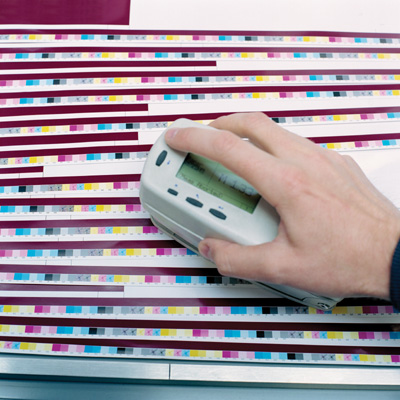
When it’s time to hand off your document to your prepress service provider, a systematic check of your files helps to ensure that your document will print from another computer. This process, analogous to a pilot’s preflight check, is intended to catch missing files, missing fonts, material not intended for print, and any components that may prevent the document from imaging correctly.
Adobe InDesign has a Preflight function that evaluates all the components of your document and produces a report showing real and potential problems. This preflight report is interactive: double-clicking any reported problem leads you to the offending item, allowing for changes if necessary. Some reported problems—like RGB color images in a color-managed workflow—may not be problems at all, so you can skip them if you’re confident that they don’t represent an obstacle to production.
After you’ve checked your files, make a final proof of them on a PostScript laser printer, if available. Printing on a PostScript printer will help to identify any problems that might occur on a PostScript platesetter at the printing firm.
Checking files before going to press
• Check to be sure you have the correct number of pages. Delete any blank or unnecessary pages. If you’re printing an imposed multipage publication, be aware that the total count of pages must be divisible by four (sometimes eight) to fold into efficient signatures.
• Remove artwork that may have been placed in the layout but isn’t used in the final document. Remember that some artwork items marked “do not print” may have important placeholder purposes; these should remain in the document.
• Check linked graphics to ensure that you’re using the latest versions.
• Verify that all colors are defined and named correctly. If you’re using spot colors, make sure that each is defined with just one name.
• Check bleeds and traps. Make sure that bleed allowances are sufficient (usually .125 inch) and that trapping specifications are correct.
Organizing and packaging files
• Using the Package function in InDesign or the Collect for Output function in QuarkXPress, copy all art files and fonts into a new folder on your hard drive. Then, close the document and reopen it from the copy in the folder you just created. Doing so tests the links in your document. After this process is complete, copy the folder to a CD-ROM or DVD-ROM; both are excellent for the transfer of publications.
• If possible, open the document on another computer in your workplace, using the CD-ROM you created. Doing so helps to uncover any font problems and indicates problems with missing or modified images and graphics.
• Many printing companies provide online file-delivery systems or FTP sites for the transfer of your documents. Use an FTP client or a Web browser to make the transfer. If file security is a concern, you should hand-deliver the disc to the printing firm or ask the company to provide access to a secure FTP server that can’t be accessed by others.
Including a Report
Plan to give a printed copy of your document and a printed report of all its requirements and settings to your prepress service provider. The report gives your service provider and commercial printer an understanding of your project. InDesign has an online Instructions form that you fill in as you’re packaging your document for production. This document travels with the job and can be opened and used by the prepress specialists to enter basic information about your job into their production system. The Instructions form is one entry point to a state-of-the-art system called Job Description Format (JDF), where prepress equipment, presses, bindery equipment, and accounting systems all exchange information about your job; this system allows for better production efficiencies and cost accounting.
Packaging your job for production also generates a report in the same folder as the document, outlining the contents of the document—from page size and number of colors, to a complete list of linked graphics and fonts. This report is an orderly listing of the details of your document. Include a printed copy of your document and a pagination sheet. If your document folds, be sure to include a folded laser output mock-up of the project.
In addition to your service report, you should include a specification sheet for your commercial printer. The specification sheet should include this publication specifications information:
Settings for imaging. On the mock-up of your document, be sure to indicate the paper weight, the surface and paper brand you’ve agreed to with your prepress service provider, the halftone screen frequency, any ICC profiles used, and whether you’ve done any trapping in the document.
Font list. List all fonts used in the document and any fonts included in imported artwork. This information is included automatically in the report generated by the page-layout application.
Detailed page listing. Print out all pages of your publication, including both blank and numbered pages. Use the page numbers to keep track of special requirements on each page. Indicate sections, chapters, or other breaks in long publications.
Number of colors. If you’re printing color, indicate the number of colors that need to be printed for each page. This number should also include any spot colors or varnishes on the page.
Notes. Include notes to remind yourself of any special handling on a page. Note the location of bleeds, crossovers, and areas in the publication that need special attention.
Also include the following information on your specification sheet:
• Printing specifications (trim size, quantity, binding process, and so on)
• Packing and shipping instructions
• Due date
• Contact information (how to get in touch with you)

Sample service provider report
Following is the text of an InDesign document, ready for print. It includes most of the specifications for production and printing, a complete listing of linked graphics, fonts, colors used, and contact information:

Color Proofing
Next to proofs made from the printing plates themselves, the most accurate proofs are made on wide-format ink-jet printers. These proofs accurately represent the color that the press will deliver, although sometimes the paper substrate used for proofing is whiter than your chosen printing paper. Such proofs are often used as contract proofs to indicate to the printer the color that you expect to see in the final press run.
As a general rule, the closer the proofing method mimics the conditions of the printing press, the more reliably it indicates the final product’s quality. Most color proofing systems are optimized for process color printing; some proofing systems can also proof high-fidelity colors and spot colors. For spot colors, you can also get a drawdown—a smear of ink produced on the paper to be used—to verify quality and tone. Consult your vendors to see what proofing options are available.
The final stage of proofing is not only for checking your work but also for checking the printer’s work. Without a contract proof, it may be difficult to settle disputes with the printer about color quality. The proof serves as an agreement between the printer and the customer and as a guide for adjusting the press during a press run.
Some people prefer to make a press check, visiting the printer’s facility as the job is ready to print to approve the job as it comes off the press. This step is less common in the era of virtual (onscreen) proofing and highly accurate ink-jet prepress proofs, but it’s always an option. However, changes made during this press check can be very expensive, because they may require making new printing plates and result in press downtime.

Try to keep an “anything is possible” attitude regarding color. Push the limits. Then proof, proof, and proof again.
—Mark Landkamer, Landkamer Partners, San Francisco, CA
Types of proofs
Photomechanical proofs
Photomechanical laminate proofs are created by exposing each color separation on a layer of pigmented material and then laminating the layers together. Examples are Fuji Color-Art, DuPont Waterproof and Cromalin, Matchprint, and Agfa.
Laminate proofs are used for color forecasting and to identify moiré problems. Except in the case of a few printers that still use film imagesetters, laminate proofs generally aren’t made today; they’re costly and time-consuming to make.
Most printers—especially those using computer-to-plate systems—have switched to some form of digitally prepared proof. Many are moving to onscreen virtual proofs.

Digital ink-jet proofs
Digital proofs are usually created using pigments or dyes on wide-format ink-jet printers driven by a PostScript (Raster Image Processor (RIP).
Digital ink-jet proofing can achieve high quality and can sometimes use the actual paper stock you intend to print on rather than special sheets of material. However, most digital proofs don’t show moirés and register error.
Some printers use high-resolution dye-sublimation printers to generate proofs. A number of these devices can mimic the halftone patterns of the platesetter.
Bluelines
Bluelines are diazo contact prints made from film separations produced on an imagesetter. They’re seldom made today, because the industry is nearly 100 percent digital (and film is no longer made in most plants).
Bluelines are made on paper the same dimensions as the press sheet, which can be folded and bound so that you can check crossovers, bleeds, and page sequence. Bluelines are commonly produced for one-color or two-color publications as well as four-color process jobs. They’re exposed and processed in the vacuum frame at the printing plant and require no processing; they also fade quickly.

Press proofs and press checks
For a press proof, plates are exposed, and the printer sets up the press to print a short run of the actual sheet. Changes to the job after press proofing require new plates to be made—a process that is usually prohibitively expensive.
A more common practice is a press check where the printer prepares the press using the final plates and an approved digital color proof. A designer or production person checks the early press sheets and signs off on an approved press sheet. The press sheet is then compared to sheets throughout the press run to ensure consistency.
Checking color proofs
With the availability of high quality low-cost desktop color printers, it’s possible to make excellent proofs periodically during the design phase of a project. As you get close to completion, it’s important to make proofs to check for color quality, content, and technical factors.
What to look for on a desktop color proof
• Check that colors are consistent throughout the pages.
• Check memory colors—that is, colors that are expected to look a certain way: skin tones, sky, grass, and so on. If these colors are off, the whole piece will be perceived to be incorrect.
• Check colors selected from color-matching systems against printed swatches.
• Make sure that bleeds and crossovers extend the required amount beyond the page margins.
What to look for on a prepress proof
When you’re reviewing prepress proofs, which are made on one of a variety of wide-format ink-jet printers, or actual printed sheets at a press check, you must be on the lookout for certain problems. It will help to check your proofs in a viewing booth, with ISO-standard 5,000 Kelvin lighting.
• Digitally prepared prepress proofs usually have no halftone dots. Ink-jet proofs should be evaluated for color quality and overall appearance. The halftone patterns will show up later on the press.
• Look for missing copy elements, overprint characteristics, the quality of the black ink, and the black ink’s relationship to other inks it overprints.
• Check to see that images are positioned correctly and that very small positional errors haven’t crept into your production. Sometimes hair-thin lines appear along the edge of photo frames and aren’t easily detected in the electronic—or even the onscreen—version of the document.
• Look for color casts in images or an overall cast to the document’s illustrations and photos. This could be an indication that something is amiss with your computer display and its ability to show color correctly.
• Scan your copy for hyphenation errors, odd line endings, and dangling widows and orphans (words or parts of words left over after a page or column change). Proofreaders look for details like correct apostrophes and quotation marks. They also like prepositions to fall in-line with the phrases they introduce (don’t leave of at the end of one line with its phrase continuing a line below). Double spaces anywhere in your document are inappropriate in excellent typography; this is a chance to catch these gaps and repair them. Making changes to copy is easy and relatively inexpensive at this stage.
• Check all addresses and phone numbers. Actually call the numbers to be sure they’re working. Test all email addresses and Web addresses.
• Check all pages for correct bleeds, crossovers, and page numbers. Be sure page numbers print in the right place and that they’re easily found when you’re reading the printed product. Consider what happens if your page is folded or trimmed slightly wrong: will the page numbers be cut off?
This image was scaled to a size at which it didn’t quite fit into its picture box. The hair-thin white line will show on the press sheet. Scan prepress proofs with particular attention to details like this.

Many printed projects are flawed by improper punctuation such as typewriter quotes, shown here (top). Proofreaders should check for correct quotation marks and apostrophes (bottom).
What to look for on a press proof
At a press check, plates made from your document are mounted on the press. The press is prepared with the correct inks and paper, and adjustments are made to ensure correct ink density and register. After this process—called makeready—is complete, press sheets of your publication are printed and made available for proofing. You, the press operator, and a customer service representative (CSR) then examine the sheets for quality.
At this point, concentrate on corrections that can be made by adjusting the press, such as ink densities or color consistency. It’s very expensive to make any other changes to your publication beyond these press adjustments, because it means stopping the press and making new plates. Idle press time is typically charged at $400–$800 per hour plus labor costs; time for web-fed presses is considerably more expensive.
• Is the type sharp? Use a magnifier to look for broken or doubled lines that might indicate the press is slurring or stretching the paper as it’s printed.
• Are the colors and type density consistent from one side of the sheet to the other? Remember that ink coverage will vary according to the area of ink printed on the press sheet (number and size of photos and solids).
• Is the color correct? Compare the press sheet to the prepress proof.
• Is the paper or printed surface the one you specified? Bring a sample with you to compare to the press sheet.
• Are page crossovers correct? Fold the press sheet and check the alignment and color match.
• If spot-color inks are used, are they as specified?
• Are there blemishes or mottling of color? Mottling is an indication of an improper balance between moisture (fountain solution) and ink on an offset press. Mottling is often present in correctly printed flexographic work.
• Are all graphic elements present? Compare the press sheet to the prepress proof.
• Are colors in register? Check to make sure all colors line up on the register marks. Under a magnifier, four-color subjects using traditional screening should show a rosette pattern, and no more than a single line of dots of a single color should be visible at the edge of the image.
• Always take a couple of approved press sheets with you for reference.
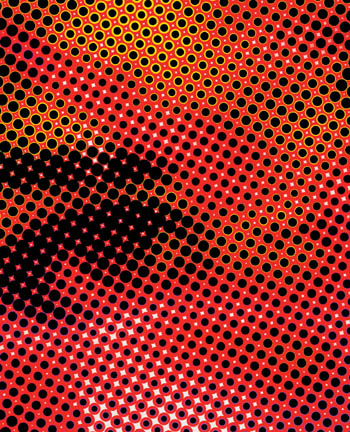
Color bars
Color bars—those rows of color patches you see on your prepress and press proofs—give proofing and press operators a way to measure and control the press. Although most color bar elements require a densitometer to analyze properly, understanding their purpose can help you evaluate the quality of your printing.
Recognizing color bar elements
Color bars are made up of small patches of colors, tints, and patterns that are grouped in rows across the press sheet. Each element currently used by commercial prepress and press houses is designed for a specific purpose. Common color bar elements can be categorized as follows:
Solid-color patch
The most basic element of a test image is the solid-color patch—one for each of the colors being printed. Solid-color patches are used to measure ink densities, according to the printer’s press standards. Printers usually start the press and then run to the numbers— reach standard densities—before considering the appearance of color in a printing job.

Tint patch
A tint patch is a solid-color patch whose color is less than 100 percent. Most color bars include several patches for each process color set at different tint percentages; the de facto standards in the United States are 25 percent, 50 percent, and 75 percent tints. Tint patches permit the measurement of dot gain because they’re created by halftone screens. Dot gain can only be measured in tint areas. Ink lay-down and wet-trapping characteristics (the tack of the ink and its ability to dry correctly on the paper) are also measured with tint patches.
![]()
Solid overprint patch
Solid overprint patches show the effects of combining individual solid-color patches. Most color bars include red (magenta and yellow), blue (cyan and magenta), and green (cyan and yellow) solid overprint patches; many also have three- and four-color patches.

Tint overprint patch
Tint overprint patches combine tint patches of more than one color. These targets are used to monitor the interaction of combinations of standard inks.
![]()
Slur gauges
Twisting or kicking of the press sheet by the numerous units in a printing press as the sheet is printed is a problem that is made evident by changes observed in slur gauges in the color bars. These gauges consist of rows of tiny lines that become solid if the sheet twists on the press. One design displays the word SLUR when the press sheet encounters this problem. It’s usually an indication of trouble with feed and gripper settings on the press.

Standard Lighting
If you expect to get predictable results from your color reproduction system, you must consider the lighting where you work and the lighting you use to check proofs. In a professional working environment, you’ll find workstations in rooms with no windows; walls painted neutral gray; consistent, color-correct (5,000 Kelvin) lighting; monitors that are calibrated and profiled; and viewing booths with color-correct lighting.
Moderately priced color viewing booths are available for graphic design studios. These booths provide correct-color lighting and thus give you an opportunity to view your proofs and printed samples in industry-standard lighting conditions.
Archiving Your Work
To be useful in the future as a source of images and text, your document should be archived in a format that is likely to remain in widespread use for a long time. Be cautious when you’re archiving your document in proprietary formats or in formats specific to an application: the file format, or the application used to create it, may become obsolete.
Adobe is working to develop industry standard file formats that will remain useful for many years. The company’s Digital Negative format, designed for digital photographers, is gaining momentum as a standard for the storage of raw photo files, ensuring that those files will be legible to computers in the decades to come.
Portable Document Format (PDF) provides a way to store publications in a format that can be viewed and printed with 100 percent fidelity. Archived PDF files can be opened, printed, and exchanged in any of the common environments, including Macintosh, Windows, and Unix. Large libraries of PDF files can be indexed and searched. The PDF format should be legible for many generations of computers.
It’s a great idea to make a high-resolution (press quality) PDF of your final document to save as a reference of what went to press in addition to the original document elements. This archive PDF can also be used to make an electronic version of your document.

Print production is an expertise that most designers don’t take seriously. Good production techniques will make or break the design.
—Mary K. Baumann, Hopkins/Baumann, New York, NY
