In this chapter we will we explore game audio implementation. Armed with an understanding of the theory and practice of game audio asset creation from previous chapters, we will explore planning for audio implementation by considering engine capabilities, target platforms, and resources. The core of this chapter will cover topics from asset preparation, implementation, dynamic mixing, and finally onto testing, optimization, and reiteration.
Implementation Basics
In previous chapters we explored the challenges presented in nonlinear media and how the player’s input affects the game state, leaving audio designers unable to determine exactly when a particular audio event will trigger. However, we can plan ahead to answer these challenges during the implementation process. Implementation is essentially the process of assimilating audio into the game engine so that audio can trigger synchronously with other game events. Using a variety of implementation methods we can create dynamic audio systems that adapt seamlessly to gameplay events.
Implementation Methods
There are several foundational methods within the process of audio implementation. As an audio designer you will work with one or more programmers to determine the best tools and techniques for implementation. The budget, schedule, as well as your team’s work capacity and level of knowledge/experience will all be factors in deciding these tools and techniques. Implementation tools include the game engine1 (Unity, Unreal, proprietary engines), a software development environment for building games, and game audio middleware (Wwise, FMOD), which is a third-party audio-focused software environment that sits between the game engine and audio designer. The term middleware in the tech world means software that acts as a bridge or connection between other software or systems. Essentially, audio middleware puts more control into the audio designer’s hands, with less scripting and programming to deal with.
Let’s break down a few typical scenarios in which audio assets are implemented into games. The “asset cannon” approach is the simplest form as it consists of the audio designer delivering assets on spec (concerning file type and compression) to the programmer, who will then implement the audio into the game engine natively. While this approach may seem like a good choice for those who feel a bit uncomfortable with the more technical side of game audio, the downside is a lack of control over assets once delivered. It also places the burden of finalizing audio on the programmer. Not all programmers have a deep understanding of audio concepts and theory, so by working in this way the team’s expertise is not being fully exploited. This approach can also lead to many more iterative reviews and adjustments as the programmer becomes the primary work horse for completing modifications and updates as advised and requested by the sound team.
This method of implementation can also result in the wrong real-time effects being applied, or inconsistencies in compression and volume. With this delivery process you should insist on testing builds once the sounds are in place. Also be sure to build time into the schedule to make changes if necessary. Testing and iteration are the best way to deliver effective game audio using the asset cannon approach.
Implementation of audio natively into an engine is a step above the asset cannon approach. With this approach the audio designer has direct access to the game engine and can import assets and tweak components herself. Compared to the asset cannon approach, direct native implementation saves a lot of the back-and-forth time with the programmer when mixing and making revisions. However, an audio designer not familiar with the engine or uncomfortable with scripting might find it a bit more difficult to achieve all of their audio goals.
Audio implementation natively into the engine is limited to the resources of said engine, and heavily dependent on scripting for audio behaviours beyond play and loop. However, there are plugins like Taz-man, Audio Fabric, and Dark Tonic’s Master Audio which extend the game engine’s native audio functionality, allowing for complex and rich audio behaviours while reducing time spent scripting.
When the programmer agrees to use an audio middleware solution such as Audiokinetic Wwise (Audiokinetic), FMOD (Firelight Technologies), Criware ADX2 (CRI Middleware), or Elias Studio (Elias), it can be the best-case scenario for both the programming team and the audio designer. It’s important to note that these middleware solutions have licensing costs which are indie-dev friendly but should be considered in the process.
Middleware solutions are built to better utilize a game development team’s expertise. With any middleware, whether it is for audio, physics, or anything else, the build allow the experts in each discipline to do what they do best. An audio middleware solution will allow you to control the creation of the sound and music as well as the implementation and mixing of those assets. During development you will spend more time working on audio (as you should) and less time trying to explain to the programmer how the audio should work. The development team will then have more time to spend on other programming tasks and the audio team will have more capacity to make the game sound great!
Later in the chapter we will explore the methods discussed above in greater detail. At times we may generalize the game engine’s audio function and/or audio middleware with the term audio engine.
Integration and Testing
Later in the chapter we will break down the specific functions of implementation and testing, but for now let’s take a macro look at what is involved.
Regardless of the implementation method utilized, the game engine sits at the core of development. A considerable amount of scripting will be required, regardless of who is implementing the audio assets. Audio assets imported into the game engine can be easily attached to game objects – empty containers placed in a game engine that “hold” gameplay instructions (see “Game Engines” later in this chapter for more details). Scripts are then attached as a component onto each game object. A script is basically a set of instructions which tell the engine what to do with the audio assets. At the time of writing this text, game engines are “smart,” but do not operate with much common sense. The future of AI and machine learning might tip that scale, but for now we can assume we need to provide specific instructions to the engine for proper triggering of audio events. Later in the chapter we will break down the key features and functions that make up native engine implementation. We will then take you through a tutorial on the companion site to tie it all together.
As we mentioned previously, audio middleware offers the audio designer control over many functions like randomization of pitch and volume, playlists, beat sync, and more. These features are made easily accessible without scripting in a graphical user interface. Later on we will discuss in detail the various features available in middleware, but for now let’s talk about how it is integrated into the game engine.
Integration is the process of synchronizing a middleware tool with a game engine. Some middleware developers offer integration packages for supported game engines while others use the comprehensive API. Either approach will configure the two pieces of software so they can communicate and share data. A programmer typically completes the integration before sharing the project with the team. After an audio event is created and configured in a middleware program the audio designer can export what is called a sound bank (or bank) to be shared along with the engine. The sound bank provides the audio events and configuration information, which can be used to hook them into the game engine.
During the integration package installation, a specific set of file paths are set up to tell the game engine where to find these sound banks once exported. The sound bank information shares all of the necessary information for the game engine to trigger the audio events as instructed in middleware. The programmer will need to do some light scripting to trigger the events and connect game parameters. Middleware offers users precise control over specific audio event properties such as real-time parameter control (RTPC), which feeds on data values generated by the game engine. RTPC is fundamentally a way to automate multiple audio parameters in real time, and can be used to create fades, volume and effects automation, and mixes that change on the fly.
It’s important to note that native audio implementation into a game engine offers some control of audio based on parameter values, but typically offers limited flexibility and requires additional scripting.
Implementation Cycle
Implementation is a very important step, and (like game audio itself) it is not linear. Your audio assets will be created in a DAW, then imported directly into the game engine or middleware tool for testing. The process is circular in that you will continue to move between these software applications as you create, implement, and test, and then create again. Testing often leaves the audio designer with revisions or re-works, which takes the process back to the audio engine or DAW, and so on.
Visiting Artist: Jeanine Cowen, Composer, Sound Designer
Thoughts on Implementation
Implementation, when it’s done right, opens up new opportunities that the audio designer hadn’t imagined at the outset. Finding a balance between the creativity of sound design and music and the problem solving of implementation is often delicate. Working in game audio implementation is both a technical and a creative job. There is no wrong or right way, there is only, how do we get this audio to sound great and help to enhance the game. Rather than view it as a struggle, the good implementers I know see it as controlled guidance. Like the painter who only had the natural dyes found in the real world, they work with the materials they have rather than trying to force their resources to be something they aren’t. If you find yourself struggling with getting something to work, it might be time to step back and re-ask yourself the question “what is it that I want the player to experience right now?” This question should guide you and allow you to get out of the weeds that can sometimes consume our focus as implementation specialists.
Implementation for Immersion
The level of sonic immersion (or aural cohesion) in a game comes down to the level of detail and planning in the audio implementation. In Chapter 2 as an exercise we asked you to close your eyes and listen. Sound is all around us. Since the days when we heard our very first sounds we understood these details to be cues with valuable information. The same is true of the sonic experience in games. Sounds give players details about the environment, immersing them in the game world.
While sound is clearly used to create affective response in films, in games there is a level of interactivity that also influences the player’s emotional state. In a game scene the player will experience a different level of intensity of music and sound when they are exploring than they will when experiencing an enemy attack. Sound will act as a warning of danger to the player; it prepares them for this transition in gameplay intensity. Sound reacts to the player’s choices and in turn provides the player with information which influence actions. In this way audio creates momentum for the narrative, and reinforces it with aural feedback. This idea is supported by the Gamasutra article, “How Does In-Game Audio Affect Players?”2 Here, Raymond Usher examines the results of a study in which players were monitored while playing games with and without sound. The results proved higher heart rates and slightly higher respiration rates in the audio group. This suggests that audio is a crucial part in our integration and immersion into game scenes.
Playlists and Randomization
Without variation and a certain amount of generative aspects in the sound, games would feel static and lifeless. Gone are the days of the Super Mario Bros. footstep bleeps that repeat over and over again. Variety in even the smallest sonic details can go a long way to making the experience more believable. In film and other linear media we can add variation manually as we build each sequence and it stays synced to the visuals. With interactive media we must create dynamic systems and implement them into the audio engine to vary the soundscape. Sound effects are typically delivered with a few slight audio variations and then grouped into playlists. These playlists can then be randomized in the engine. In addition, the audio engine can also apply randomization to certain properties like pitch and volume. But this is just the tip of the iceberg.
By breaking down a single sound into multiple playlists (sometimes called random containers or multi-instruments) we can add variety and dynamism. For example, an explosion sound could be broken down into attack, sustain, and release tail playlists. The game engine or middleware tool would then randomly choose a sound within each playlist to trigger at the right moment, thus creating unpredictable combinations each time the event is triggered. On top of that, the three containers can be programmed with slight randomizations on pitch and volume as well. This takes our random possibilities and exponentially increases their variability (see Figure 8.1).

Figure 8.1 Screenshot of multi-instruments in FMOD Studio.
Loops
In Chapter 2 on the companion site we discussed creating and preparing looped assets for use in game. Here we will focus on implementing them. By default, implemented audio events will play once from beginning to end. Depending on the method of implementation, it will be necessary to set instructions for the audio engine to loop an asset instead of triggering it just once. This process is usually relatively easy, regardless of the implementation medium, and loops can be set to either loop once or a predetermined number of times.
Audio designers make use of loop functions within the audio engine to get more mileage out of audio assets, which helps keep the memory footprint minimal. Loops also compensate for the differences in timing of each playthrough. Imagine if the soundtrack needed to be as long as the game. Sixty hours of music would certainly take up a large amount of memory and be CPU intensive to stream, not to mention the time it would take to compose. Implementing loops instead of longer linear cues makes the soundtrack more efficient and adaptable. Looping events aren’t just for music either; they can also be used for continuity of background ambience and continuous triggered sound effects.
Looping events is a great solution for keeping memory and CPU usage in check, but the designer must be mindful of avoiding repetition. The length of the loop is something to consider based on how long a player might spend in a specific area where the loop is triggered. We will discuss these benefits and some challenges of looping later in the chapter.
Dynamic Mixing
Mixing for linear media is a process implemented during the post-production stage of film or TV. At this stage designers ensure that signal level, dynamics, frequency content, and positioning of audio are all polished and ready for distribution. However, because games are nonlinear we are essentially working with a moving target when mixing. Dynamic mixing is a multi-faceted process which requires the same attention to signal level, dynamics, frequency content, and positioning, but also requires that the mix be flexible enough to change along with the game state. To do this designers often use snapshots, which allow audio engines to trigger mix changes in synchronization with visual events. Later in this chapter we will discuss in greater detail dynamic mix systems and resource management.
Implementation Preparation
Before we dive into the micro details of audio engines and asset implementation, let’s discuss preparing assets. We will start with the process of mapping out the implementation system, and then we will move into exporting assets ensuring proper volume level, format, and file naming.
Sound Spotting
In the film and television world spotting is the process of determining how the musical score and sound effects will be tied to visuals. During this process the sound designer and/or composer will sit down with the director to review scenes and determine the hit points, or moments that require audio emphasis. In games there is a similar process, but it is often less formal. A game design document (or a GDD) may be provided as a guide for narrative and gameplay. It may contain a synopsis of the story, concept art, and gameplay mechanics. A style of music or a list of musical references may be included to guide the sonic direction. Early gameplay in the form of a build (a pre-release playable version of the game) may be provided to the audio team to prepare concept audio for review. Regardless of how formal or informal the process might be, there is still a need for this pre-production phase.
If audio references from other games are provided, the audio designer should have a good idea of the direction to take. Direction is an important part of the process as visuals can often work well with different sonic styles. Choosing a direction during the spotting process will clarify exactly what style and mood the audio needs to be in to best support the game. For example, a sci-fi shooter as a descriptive can be interpreted in a few ways. Metal Gear Solid and Dead Space are both in the sci-fi genre, but the former is militaristic and technology-driven while the latter is dark and at times horrific. These two games would each require their own particular audio direction to be chosen during the spotting stage.
The spotting session might simply consist of the audio designer playing a build and creating an asset list to review with the developer. Sometimes the game developer will already have a list of assets in mind and present these to the audio designer. Should you receive an asset list as an audio designer it is wise to review the list with the build to ensure sound events have not been overlooked. These asset lists should be kept in a spreadsheet and shared with the rest of the team. A good asset list will allow for new content to be added and the status of assets to be tracked and shared over a cloud-based app like Google Docs for real-time updates. In Chapter 2 we directed you to the Sound Lab (companion site) for a review of a typical asset list.
Building the Sonic Maze
After spotting the game you should have a clearer understanding of the types of assets required. The next step is planning how those assets can be implemented so they sell the scene and support the narrative. We call this building the sonic maze. Essentially you are building the walls of the maze through which the player will move. Your game will consist of a number of assets including sound effects, music, and dialogue. As the audio designer it’s your job to ensure all audio events are implemented with purpose, and are responsive to the player’s input. You must identify the placement of these sound events in the game world by determining where in the scene a player should hear the various sounds as they move about the environment. Taking into account the full player experience and how it impacts the way sounds are triggered is key to effective audio implementation.
To understand how to map out the sounds we must break down the game and its core mechanic(s), just as we did with the animations in Chapter 3. To better understand this, let’s explore a hypothetical sci-fi game. The game will be a third-person shooter, which consists of a player character armed with an automatic weapon and four types of robot as the non-player characters (NPCs). The game is set in a high-tech lab containing five rooms per level with a total of three levels. Inside each room there is various machinery and technology such as LCD monitors (with visual static on the screen) and air vents.
The target platform is mobile and we will be using middleware along with our game engine. Since we know our game is being developed for a mobile platform we will need to be resourceful with memory and CPU usage. Later in the chapter we will discuss ways to manage resources per platform, but for now we just need to understand that there are processing and memory limitations on mobile platforms which are not as much of an issue on desktop or console platforms.
Now that we have an idea of our game, let’s start with mapping out the ambient soundscape of our lab. We can take a macro look at all three game levels and decide what the ambience will be in each of the five rooms. We should first break down room size based on how much technology is in each room. This will help us define our background ambient loop, which will act as the glue to all of our other in-game sounds.
Next, we can take a more micro look at the elements that will emit sound from localized spaces. Let’s imagine one of the rooms contains an air vent, two LCD monitors, and a large mainframe computer system. We would plan to hook sound emitters on those game objects to add some variation to the scene. They will blend with our background ambience, but will work as detailed focal points that bring the ambience to life. Just as sounds in the real world originate from various sources, we need individual sounds in the game world to add depth to the ambience. Once we have a working version of this game (vertical slice pre-alpha build) we can experiment with more complex adaptivity in the environment. We can decide how close or far away a player needs to be to hear certain sounds, and whether or not the acoustics of the location will require reverb or echo effects.
Next we can plan player character sounds, which include weapon fire and footsteps. Starting with footsteps, we would look to the gameplay and visuals to see how to create variation. In our game scene let’s say there are two different floor types, one being solid metal and the other being a thin, wooden platform. With this information we can adapt the footsteps so the sounds change with each floor type. We can continue to think about adding layers of cloth movement and using randomization within our middleware to ensure our footsteps transition and vary smoothly per terrain.
At this point we have taken a very broad look at the sonic maze we would create for this game. From here we would continue with the weapon and robot enemy sounds. These are in a sense simpler because the animation and gameplay will give us specifics in how to create and implement the proper assets. These sounds would be the focal point of the audio because the gameplay is based around combat. We would then employ our numerous techniques from Chapter 3 to create complex and detailed assets for implementation. Although this was a quick overview of the process of implementation, it has served the purpose of introducing a general workflow which we will dive into in the following sections. For now, let’s continue by discussing the preparation of assets for implementation.
Preparing Assets
Delivering quality audio assets begins at the very start of your recording and editing process. A poorly recorded sound that is then trimmed and normalized is not going to sound as polished as a sound that was recorded at a healthy volume to begin with. Working in games is no different than working in a music or post-production studio in this respect. You will want to optimize your workflow and the path the audio takes from beginning to end as much as possible. When preparing assets for implementation there are a few things that should be considered to make the workflow a smooth process. Let’s explore those here.
Mastering Assets
Mastering is a process you may be familiar with in regards to preparing a final soundtrack mix to prepare for distribution. The process ensures consistency across all the music tracks in the album. Typically a mastering engineer will work with a full stereo mix to enhance the sonic character and correct any balance issues with EQ, compression, and limiting. This level of polish is what you are used to hearing when you download an album.
With game audio the assets aren’t in a linear mix that can be processed in a static stereo or surround file. Game audio is dynamic, and assets are cut up and implemented individually into the engine. In this sense, mastering game audio does not produce audio in its final format, the game engine does. Because of this, the mastering process is really meant to prepare the individual assets for interactive mixing. The goal at this stage is then to ensure a cohesive and balanced soundscape once implemented. EQ, compression, and limiting are common tools used to maintain continuity in terms of frequency and volume between all assets. Reverb is sometimes applied to assets to add a sense of “space” to each sound.
During this phase of asset preparation, the audio designer must think about the full mix including music, dialogue, sound effects, Foley, ambiences, UI sounds, etc., and get a sense of the frequency spectrum the assets will occupy. Mid-range, around 1.5 kHz, is the frequency range that our ears are most sensitive to and usually holds the core elements of a soundscape. You may have been introduced to the Fletcher-Munson curve when you first started working in audio. This curve is a good representation of where our ears are most and least sensitive. The midrange is also the part of the frequency spectrum that is most consistent across different speaker types. It’s important to ensure that the assimilation of all assets into the soundscape won’t leave any holes (or buildups) within the 20 Hz to 20 kHz range of human hearing.
The mastering process can also prepare the assets for the lossy compression we mentioned above. This process of encoding attempts to remove frequency content undetectable to the human ear through psychoacoustic modeling. If certain groups of sounds need to be compressed (i.e. low-frequency effects), you can improve the audio quality of the compressed sound by applying high or low pass filters to remove portions of the frequency spectrum preemptively. This then allows the lossy encoding process to dedicate more space and bandwidth to the frequency ranges you, the audio designer, have already identified as important. Different lossy compression encoders, schemes, and formats will provide very different results. It can be helpful to experiment with compression formats beforehand, and evaluate their effect on various categories of sound. A certain amount of trial and error should be expected, and (as always) listen critically to your work to assess whether it suits the needs of the game.
It’s important to note that the mastering stage often carries into the dynamic mixing stage as you test and adjust the audio systems integrated with the game engine. We will cover dynamic mixing in more depth later in this chapter.
Exporting Assets
An important part of bouncing down the assets and preparing them for implementation is ensuring the audio is loud enough so it will not need to have gain applied in the audio engine. Our DAWs are built to provide good gain-staging and signal flow, so doing this work in our specialized audio tool (the DAW) will result in the best-sounding audio in game. Working with a range of reference volumes for each asset type is a helpful way to ensure you have enough audio resolution to work with in the final mix. If you must boost the volume in the audio engine beyond 0 dB, you risk introducing artifacts and system noise. There is only so much gain that can be boosted on an asset that was bounced out of a DAW at a very low volume.
When delivering assets to be integrated by the developer (asset cannon approach), you may want to control the loudness by exporting assets at specific levels for different categories of sound. Here are some rough reference volumes to use as a starting point when you are delivering assets to be integrated by the developer:
- Dialog -6 dBFS
- SFX -6/-9 dBFS
- Music and ambience -20 dBFS
- Foley -18 dBFS
If the audio designer is in charge of implementing natively into the engine or middleware, typically all of the assets can be exported from the DAW around -3 to -5 dBFS. If the project has an audio director, she may offer her preference on the matter. Some might require setting up a limiter with -1 tp (True Peak). The idea here is to ensure you have plenty of audio resolution for fine-tuning volume levels in the audio engine.
Use these signal references as a starting point and adapt them to each project’s unique needs.
Effects Processing
Next we can explore effects processing. The decision to bake in effects processing or to apply real-time effects in the audio engine will influence how the final assets are rendered for implementation. Generally speaking, effects processing in engine can be very CPU intensive. Therefore, baking effects into the audio asset is helpful when you are working with memory- and CPU-limited platforms like mobile. Baking in effects also works for the asset cannon implementation method since you may not have control over defining the effects settings in engine. The negative side of this method is, of course, the effects not adapting to the player’s location. If you apply reverb on footsteps they will sound with the same reverb indoors or outdoors, which doesn’t really make sense. Later in this chapter we will discuss in more detail resource management and optimization, which will allow you as the audio designer to make more educated decisions in regard to planning effects processing.
File Format and Compression
Now that we have a signal level and effects processing covered, let’s talk about file format.
Audio implementation takes into consideration not only what sound events will trigger and when, but also looks at the complete audio storage footprint to ensure that the sounds will fit in their allotted memory. In the past, the limitation might have been the size of the delivery format (CD/DVD/Blu-ray). In today’s world we must also consider the size of the install package, or the DLC download target size. This forces us to use file compression (not to be confused with a compressor, the audio processing tool), which reduces the file size of our audio assets. When the target platform requires us to compress our audio we try to intelligently target different compression approaches for sound categories. For instance it may be acceptable to compress a folder of footstep sounds far more than the background soundtrack.
Most modern game engines can utilize a variety of audio file types and formats. In many instances a decision will need to be made about whether the application itself can handle all audio at its highest resolution. Different hardware platforms (console vs. PC vs. mobile, etc.) may run natively in a particular sample rate and bit depth, or even with an expected audio file format.
Let’s explore the different ways we might handle file formats for two different delivery methods. If you are working within the “asset cannon” scenario, you may want to handle file compression ahead of time. If this is the case, ask that the developer do no further compression of the audio in the game engine. The file format would then be determined ahead of time by the programmer based on the target platform and memory allocated for audio. If you are also in charge of implementation, the files should be exported from your DAW at the highest possible quality as the audio engine will handle conversion settings which can be defined per target platform. We recommend 48 kHz, 24 bit .wav files.
File Naming Standards
File naming is an important part of the asset preparation process. Naming conventions set rules for the expected character sequence of audio file names. This is important for a few reasons, the first of which has to do with being organized when working with team members. The second, and more critically important, has to do with how the assets are embedded into and called from game engine components or scripts. Operating systems, programming languages, and programmers have their own rules and best practices for file naming. If you aren’t well versed in these it’s a good idea to discuss any file-naming specifics with the programmer prior to delivery. This will save you and your development team a lot of back and forth to communicate what is what and where it should be placed when delivering a folder of audio assets.
In the Sound Lab (companion site) we discuss file-naming practices in more detail. Be sure to check it out when you can. For now, we leave you with some of Damian Kastbauer’s thoughts on file-naming standards.
Visiting Artist: Damian Kastbauer, Technical Sound Designer
Thoughts on File-Naming Standards
The opportunity to understand the direct connection of an event-based audio system and game engine begins by leveraging a consistent naming standard. Drawing this line between the input and output is the clearest way to understand their relationship. Building systems with a naming standard in place allows for the flowing of text-based strings from the game to be received by the audio engine. These audio events then arrive loaded with context about what system it came from, what it might represent, and where to find the place it originated from.
This can be as simple as adding a prefix to define the system of origin, for example:
play_vfx_ = the name of the gameplay system originating the audio event (prefix)
explosion_magic_barrel_fire_17* = the name of the object requesting the audio event
Audio event: play_vfx_explosion_barrel_fire_17
This can be further extended to include available actions specific to a system (in this case, as a suffix):
play_vfx_explosion_barrel_fire_17_start
play_vfx_explosion_barrel_fire_17_stop
*Leveraging other disciplines’ naming standards can also help lead you to the asset where an audio event has been authored. If you have the name of the object built into your audio event name, it can easily be used to search within the game engine.
Whether you choose to concatenate (build) different aspects of the event name dynamically or establish the rules up front for use by programmers, the effort of establishing a naming standard is rewarded with a clearer understanding of a sound’s origin during debug. When you find yourself digging through an audio event log trying to understand what, where, and why a sound is playing, the ability to parse the event name and begin your search with a map leading right to the sound is a tremendous way to navigate the project and solve problems.
In the world of abstractions at the core of game development, anything that can be done to build clarity into a pipeline, which can be easily understood, is of value to the process.
Asset Delivery Methods
Delivery for the asset cannon method is often via a secured shared drive on a cloud-based storage site. An asset list in the form of a spreadsheet should be used to keep track of the status of assets, provide notes for integration, and feedback from the developer.
When importing assets natively into the game engine (or when using audio middleware) the process usually involves source control as a delivery method. We will discuss source control in more detail later in this chapter, but for now let’s define it as a server or cloud-based system that hosts source files. In our case the files would consist of game assets and project sessions shared by everyone on the team. It offers control over versioning, like a backup for all of the changes made to the project. It’s important to note that sound banks generated from middleware can be shared across cloud-based storage as an alternative for smaller teams that do not wish to put source control in place. Whether through source control or a drive share, the process allows for sharing sound banks without the programmer needing to have a copy of the middleware.
Source Control
Source control (also known as revision or version control) is an important part of the game development workflow, but is not often discussed. Working with teams means that multiple people need a way to collaborate on a project. This method will need to allow for merging new assets, making updates, and making changes to a shared repository – a central location where data is stored.
Whether you are working on an indie or AAA game, you may be given source control credentials and left wondering what that means. Each development team might have their own preference for source control, so you should familiarize yourself with software like Git, SVN, Mercurial, and Perforce. Git is used quite often among indie teams and there are quite a few “Getting Started” guides and video tutorials on the internet.3
Whenever you have more than one person editing and interacting with assets, you will need a safeguard to avoid changes that might break the game. Source control offers merging of assets and rolling back or reverting to a previous version of an asset, since it keeps a version history. It sounds pretty straightforward, right? Well, it is and it isn’t. For some it can be tricky checking out a repository and creating a local copy of it. The workflow can be a bit daunting as the local repository will consist of trees. The trees are simply objects that create a hierarchy of the files in the repository. You will need to get comfortable working with a directory, checking out files, as well as adding and committing them. We highly recommend starting with exploring Git and the corresponding tutorials.4 Source control is something you have to jump in and use to become comfortable in the workflow.
QA before Asset Implementation/Delivery
Prior to delivering or implementing audio assets, we prefer to audition assets bounced from the DAW in a two-track editor (Adobe Audition, Audacity, etc.). Keep in mind this isn’t a workflow everyone chooses, but we find it useful to ensure our assets are ready for implementation. While introducing another piece of software into the workflow does add an extra step, two-track editors are destructive, which allows any last-minute editing of the file to be easily saved to disk and quickly shared for delivery. The two-track editor outside of the DAW offers a quick look at the head and tail of the assets to ensure the fades are at the zero crossing. Loops can also be checked for seamless playback and levels can be reviewed. Sometimes listening to the asset outside of the DAW environment can reveal issues like tiny pops and clicks, or issues with reverb tails.
This is also a great time to close your eyes and assess the relative levels across similar groups of sounds. By playing all of your swoosh variations for example, you may start to hear the slight volume differences that will make one audio file stand out in game – and not in a good way! Audition lets you rebalance the volume of any sounds that are poking out more than the others. It also allows you to make the final determination of a sound that isn’t quite working with the others, and should not be brought into the game at all. This can also be done visually using loudness meters as part of your mastering process.
Game Engines
Game engines manage numerous tasks to render and run the virtual world of every video game. At any given time while an engine is running it will be handling 2D or 3D graphics, animations, physics, shading, rendering, artificial intelligence, streaming, visual effects, interactive logic, memory management, and audio. The game engine tracks the location of media assets (including music, sound effects, and voice-over assets) as well as when (and when not) to call events. Even in a simple game, this can add up to a large amount of data that needs to be coordinated. In a more complex game the scope can extend into hundreds or even thousands of assets. To render the game the engine might also handle porting of the game to multiple platforms.
There are many game engines available for use and, by extension, there are many plugins and tools to use with them. This means you will find a good amount of variety in the workflow for each project. You might find yourself familiar with some of the more widely mentioned game engines like Unity or Unreal, but there are a variety of other engines like Corona, Game Maker Studio, Cryengine, and Amazon Lumberyard being used by game developers all over the world. Refer to the “List of Game Engines” Wikipedia site5 for a more detailed list. Some developers decide to design and build their own proprietary engines, but third-party software provides programmers with the necessary tools to build games more efficiently.
These engines make use of various scripting languages like C#, C++, Python, Xml, Javascript, and Lua. As you can see it helps to be flexible and open to learning new tech when working in game audio. This doesn’t mean you will need to learn all of these engines and languages, but keeping abreast of the latest trends in the industry and familiarizing yourself with the most utilized tools will help you position yourself as an artisan in the field.
In this chapter we will focus on the Unity engine and its nomenclature as we examine the process of implementing audio natively. At times we will mention similar features in Unreal to demonstrate adaptability between tools. We will also demonstrate the power of audio middleware (specifically Wwise and FMOD) by showing a reduction in the time programmers need to spend on the scripting side, as well as a reflection of the middleware offering much more control over sonic events to the audio designer.
Regardless of the engine used for development, there are common techniques and workflows across the discipline. In Table 8.1 we will break down these common elements, which are an important part of game audio implementation and can be applied to projects of varied configurations.
Table 8.1 Outline of the terminology differences between Unity and Unreal.
| UNITY | UNREAL |
|---|---|
| Project Browser | Content Browser |
| Scene | View Port |
| Hierarchy | World View |
| Inspector | Details Panel |
| GameObject | Actor / Pawn |
The Engine Editor
The game engine is defined as the software application that provides the necessary tools and features to allow users to build games quickly and efficiently. The game engine editor is a creative hub visualized as a graphical interface with customizable layouts of windows and views. These layouts are used by designers and programmers to piece together elements of the game.
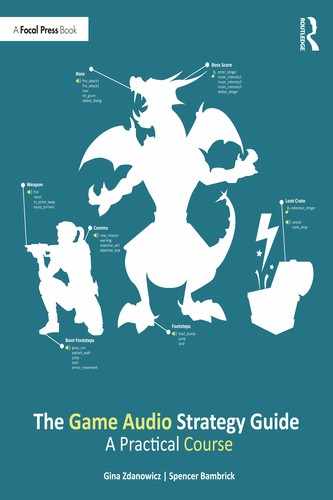
Figure 8.2 Screenshot of the Unity engine editor.
The Sound Lab
 A typical Unity engine layout contains a Hierarchy, Project, Console, Scene, Inspector, Audio Mixer, and a Game window. They all work in conjunction with each other in this creative hub. In the Sound Lab we will break down how they are linked. There are also some important components integrated into the engine to help the user define and provide audio functionality within the game. We also discuss the views and components as well as provide a walkthrough of the Unity engine. When you are finished, come back and move onto 2D versus 3D events. If you skip past this companion site study you may not fully understand the information to come.
2D and 3D Events
In linear media the final mix contains volume attenuations that are “burned” in. This means a sound coming from an object or person far away from the camera will sound softer and more distant, and objects closer to the camera will sound louder and closer. This is typically accomplished during the post-production stage. In interactive media instead of “burning in” those automations, we make use of 2D and 3D events. These events define the attenuation and panning of sound in real time to approximate distance and spatial information relative to the audio listener. The audio listener is essentially a virtual surrogate for our ears in the game environment. It is almost always hooked into the game engine via the camera so that what the player is seeing matches what the player is hearing.
A 2D (or two-dimensional) event is “unaware” of the three-dimensional, 360-degree environment. 2D events don’t have a specific location as a source, so they don’t adapt spatially as the player moves about the game environment. In a sense, 2D events are non-local – the only way they can adapt is to pan left or right, not forward, backward, up, or down. Instead they play through the listener’s headphones or speakers just as if they were playing out of a DAW. This makes them effective for audio that is intended to surround the player at all times. Common uses for 2D events are background music and environmental ambiences.
3D (three-dimensional) events do include spatial information. They set the volume attenuation and pan based on the source distance and direction from the audio listener. In other words, 3D events are localized. 3D events are great for specific sound effects where location is important to the gameplay. However, they can also be implemented with a wide spread so the sound source simulates a stereo image when the player or camera is within a certain radius of the emitter. We will explore uses for hybrid techniques in the “Ambient Zones and Sound Emitters” section later in the chapter.
A simple way to look at 2D and 3D events is by thinking of diegetic and non-diegetic sounds. Underscore is non-diegetic. Players can’t interact with the sound source because there is no source! So 2D events work well for that scenario. However, if a sound is diegetic, then the player will likely be able to interact with its source. In this case we can guide the player to the location of an interactable object (like a radio that can be picked up and added to your inventory) by setting the event to 3D, thereby allowing it to adapt to distance and direction. There are many more ways to use 2D and 3D events, but these examples are the most typical.
Spatial Settings
The audio engine will need a spatial setting in order for the audio to behave as described above. In Unity the Audio Source (as explained in “The Engine Editor” section on the companion site) offers a Spatial Blend function which allows the user to define 2D, 3D, or a blend of the two. The blend would be used in specific situations where the spatialization of the sound needs to change based on the perspective. When a player character (PC) is driving a vehicle in game, music might be a 2D event to fill the space of the vehicle’s interior. When the PC exits the vehicle the sound will behave as a 3D event so it can be spatially located, emanating from the vehicle. When a pure 3D spatial blend is selected there are a few options to control the behavior of the sound’s playback. We will discuss those options a bit later in the chapter.
Doppler level is another important setting within a 2D or 3D event. The Doppler level will raise the pitch of an audio source as the audio listener approaches the object, and then lower the pitch as it moves away from the object. This emulates the way we hear sound coming from moving objects (or as we are moving) in the real world. Keep in mind that when the value is set to zero the effect is disabled. You may want the option to disable the effect when dealing with music as underscore is most often thought of as non-diegetic.
Typically 2D event assets will be imported as stereo or multi-channel files, while 3D event assets are imported as mono files. The mono assets will sound more consistent and localized when positioned in the 3D space. Multi-channel sounds and sounds that need to cover a wide stereo field can be utilized as a 3D asset, but you will have to use Spread Control (as explained in “The Engine Editor” section on the companion site) to separate the channels in virtual 3D space. If done properly, the perceived width of the sound will diminish as the source moves further away from the audio listener, just as it does in the real world. The Spread will allow you to mimic the effect on multi-channel sound.
The Volume Rolloff function controls the attenuation as the listener moves to and from the audio source. The volume curve offers a logarithmic, linear, and user-defined custom slope setting. A minimum and maximum distance setting offers further control over how loud a sound is over a given distance. A lower minimum will play the sound at its loudest volume setting when the listener is very close to the object. The values are in meters, so a value of one means when the audio listener is one meter from the object it will play at the full volume at which the file was imported and consider the volume and mixer level slider settings. A maximum distance value determines the distance at which the sound will stop attenuating. If the slope falls off to zero the sound will become inaudible.
To determine the best settings we need an understanding of how sound behaves in the real world. Lower frequencies travel further because higher frequencies lose their energy faster. In the real world it’s difficult to discern the difference at shorter ranges unless there is high-density matter absorbing the sound waves. This behavior dictates an inverse curve, which is exactly what the logarithmic setting in Unity offers. Most often this will be the most natural sounding option. The linear roll-off attenuates a bit too quickly. Adding a low-pass filter curve to a logarithmic roll-off that attenuates (or reduces) the high-end frequencies as the volume fades out most closely simulates real-world sound. However, there will be times the natural-sounding curve will not work best in game. As always, the definitive answer for which curve to use will come from listening yourself and deciding on the one that best fits the game. If you aren’t happy with the logarithmic results, the curve can be further defined and saved as a custom value.
As you can see, there is much more that goes into implementing a sound than simply choosing the asset and dropping it in the audio engine. Be sure to always test in game to ensure the 3D settings are accurate, and that they add immersion to the environment.
Audio Middleware
The GameSoundCon yearly survey6 polls audio middleware usage between AAA, indie, and pro casual game developers. It’s a great reference for keeping up with the latest implementation trends. It also includes custom and proprietary engines as well as native engine implementation in the poll for a well-rounded snapshot of how audio is being integrated into games. Currently, Wwise and Fmod are the two popular middleware options for both sound and music. Elias is focused on music integration, but can be easily integrated with Wwise or FMOD to combine a sound design and music solution. It isn’t hard to find numerous games developed with these tools.
The Sound Lab
In the Sound Lab Table 8.2 compares middleware implementation tasks broken out into FMOD and Wwise terminology.
The choice of audio engine for a project is usually determined by the game developer or programmer, but a knowledgeable audio designer can help sway this choice. Larger developers with an audio director might rely on their recommendation, or they might decide a custom and proprietary engine is best for the project.
There are many reasons to use audio middleware as opposed to native engine integration. These reasons include the additional licensing costs for using middleware or a programmer’s concern for handling bugs or errors they may be unfamiliar with. As an advocate for working with audio middleware, you should be familiar with licensing costs and the indie budget-friendly options. You should also be well versed in the software and able to assist the programmer with any issues that may arise. Middleware developers do offer support and there are plenty of forums on the internet to provide assistance.
The point of middleware is to offer the sound designer or composer (who may not be familiar with programming) more control over the final in-game mix. It also works to offload the detailed and time-consuming process of audio implementation to the audio designer as opposed to the programmer. Having this control over the implementation process will make your game sound better, period. Middleware allows you to bypass the asset cannon and native engine implementation approaches, and get right into the business of triggering and mixing adaptive audio.
Here are a few other advantages to using audio middleware.
- You have better control over the audio footprint with file compression.
- Dynamic music systems are much easier to configure and implement.
- Debugging and profiling allows for quick ways to uncover issues and resolve them.
- It allows for easier testing for revision and iteration.
- You have control over the final mix.
- You can easily add variety to sound events.
- Flexible licensing makes middleware accessible for smaller teams.
The Sound Lab
In the Sound Lab Table 8.3 looks at some advantages of using middleware over the native audio function in most game engines.
Fmod and Wwise have similar functions, but their graphical user interface looks a bit different, and naming conventions for certain modules and functions vary. We will also have a look at some middleware tasks and how they are referred to in each application.
Integration Packages
As mentioned earlier, by default the game engine and the audio middleware won’t automatically connect and speak to each other. The middleware software developers provide an integration package, which needs to be installed into the game engine. Because the integration process connects two different software packages, the packages are specific to individual software versions. If you update either the game engine software or the middleware version you should reintegrate the package. For this reason, it is best to hold off on upgrades to your tools until you are finished with the game if at all possible. Once the integration package is in place there are several components that can be used in the game engine without any additional scripting. The audio designer will have instant access to add an audio listener, load banks, trigger game state switches, and audio event emitters into a scene.
The integration package also provides a few classes or libraries of pre-programmed functionality, which can be used with minimal code. As you use these integration packages you will appreciate things like calling banks, events, triggers, and real-time control parameters all without needing any support from the programmer. An API (Application Programming Interface) offers the game’s programmer deeper control, while the provided stand-alone app offers the audio designer a graphical hub in which to import sound assets, configure them for playback in game, and test the audio systems.
Middleware Events
The audio functions we discussed in the Sound Lab earlier in this chapter can be applied to middleware functions and modules. Events in middleware are similar to the Audio Source component in the game engine. The Audio Source acts as a container that holds information for the audio to be triggered in game. Middleware events act similarly in that they hold the audio assets and data which determines how and when it is triggered in game. This data is what determines how the event should behave in game. Additionally, middleware events contain more advanced functionality like scatter sounds, RTPC (real-time parameter control), and nested events, which allows the user to organize large and complex events into one or more master event. We will discuss this further on the companion site.
Firelight Technologies’ FMOD allows the user to determine if an event will be 2D or 3D upon creation. When a 3D event is selected a spatializer planner will be available on the master track. In Wwise an audio object can be defined as 2D or 3D in the Position Editor. Once the user has a solid understanding of the functions of audio implementation that knowledge can be applied when acclimating into different tools.
Using middleware, audio designers can easily configure tempo sync transitions, set loop points, create randomization, delays, and and apply real-time effects to events. Programs like Wwise and FMOD accomplish this by taking game data (values that originate from the game code) and synchronizing it to various audio events. The audio events are made up of all kinds of audio assets and automation stored within containers (a broad term used to describe the instruments and modules that can be created with middleware) and triggered in real time. Each middleware program has a different method of synchronizing with game data. FMOD uses parameters, tabs with a pre-set value range that mirrors the game data. Wwise uses game syncs, which function similarly, but without the visual tab that FMOD offers. Native integration into a game engine requires programmer support to create these elements. Additionally, the mixer system allows for grouping events into buses that allow the use of sends and returns. Snapshots can provide pre-configured audio commands which will be applied to specific actions in game. These audio configurations will act as a dynamic mixing board, adapting the mix on the fly. Figure 8.3 demonstrates the flow of data from game engine to middleware.

Figure 8.3 The flow of data from the game engine into middleware and back into the game engine.
Integrated Profiling
A profiler is a tool that provides detailed information about how a game (or in our case a game’s audio) is performing. This tool can uncover various problems or resource management issues and provide some information on how to fix them. Later in the chapter in the “Testing, Debugging and QA” section we discuss profiling as a quality-control and bug-fixing tool. Here, we will explore using profilers for resource management and other tools to audition a project’s events and snapshots in a game-like context prior to connecting to a running instance of the game.
In additional to a profiler, the Wwise Soundcaster and FMOD Sandbox features provide exactly this kind of functionality. These tools provide the audio designer with a way to configure various game state changes without the need to connect to the game. By being certain that the state changes and triggers are working correctly before updating a project into the main development branch, it is far easier for the audio designer to ensure the cohesion of the mix without interrupting workflow for the rest of the team.
Once the designer has created and configured events to her liking, sound banks can be generated based on the target platform. This will create a package from which the game engine can interpret all the necessary audio functions and trigger them appropriately in game.
Software development is never simple. During these tests, issues with implementation often occur. Any small discrepancy such as a mislabellled event can cause an expected sound to improperly trigger. This is where the profiler comes in. A profiler offers a connection to the game through the game engine editor or stand-alone build of the game. A profiler lets the audio designer track the communications between the game and the middleware to verify what data is being sent in between the two programs. This is a crucial step toward optimizing your game’s audio and uncovering bugs or issues with implementation. Later in the chapter we will further explore resource management and optimization.
The Sound Lab
Before moving on, head over to the Sound Lab for tutorials on Wwise and FMOD. When you are finished there come back here to explore individual components and features of middleware that help improve the final in-game mix. If you skip this companion site study, you will not fully understand the information to come.
Achieving Variation within Limits
Since we have limited resources per development platform, it isn’t possible to have 24 hours of streaming music and infinitely varied sound effects for every possible action in the game.7 This means we have to be creative in how we generate audio content. To account for longer play times, we can create continuous loops of music and ambience. We can also string together shorter clips, triggered randomly, that fit together to make a longer more generative loop. This offers a bit more variety. Adding short linear sounds (typically referred to as one-shot sounds) on top of our continuous loops can help further improve the variation. This can be done via random playlists, which we discussed at the beginning of the chapter. For example, a playlist of gunshot sounds may contain four to six one-shot assets. If the same gunshot sound were to be triggered ten times in a row, it would sound synthetic, and the player would lose her sense of immersion. The random playlist instead chooses an arbitrary gunshot sound from the playlist. Every time the player chooses to fire the weapon in game a different sound triggers, adding variety and maintaining a sense of immersion. Designers can also set containers to randomize the pitch, volume, pan, and delay time for the sound to trigger, and multiply the output so that it sounds varied and scattered around 3D space (like simulating a forest of birds chirping). Random settings on pitch and volume should not be overly exaggerated. Similar sounding assets will produce an organic experience, but sound that is too heavily randomized will feel confusing to the player. A small 2 dB fluctuation in volume and a few cents in pitch are enough to provide the subtle randomization necessary to avoid listener fatigue and add generative detail.
Randomization can and should be applied to a variety of sounds in game, but some thought should be put into what kinds of sound need randomization in addition to how much randomization should be applied. Some things will sound consistent with volume and pitch randomizations, others will sound chaotic. For example, UI button presses in game with random pitch or volume applied won’t sound consistent to the player and therefore will not relay the intended effect. It will actually be confusing to the player. Ambient bird chirps however are great candidates for subtle pitch and volume randomization.
In the Sound Lab (companion site) we will provide a video tutorial on randomization. You can visit the site now or come back to it later in the chapter. We will be sure to remind you.
Ambient Zones and Sound Emitters
To create an immersive soundscape in a game scene we start with an ambient zone (see Figure 8.4). Ambient zones are a defined area within a game scene to which designated components such as audio event emitters can be added to trigger background sounds to match the environment. Instantiating this will create a looping background event which triggers over a defined area. To bring the space to life we can then introduce positional sounds by placing sound emitters throughout the scene. These emitters add detail and specificity. When combined with the looping ambience, these events define the sonic setting for a given scene.

Figure 8.4 An ambient zone defined by a spherical game object in a Unity scene set to trigger an audio event when the player enters the area.
Let’s take a look at a scenario in the likes of a FPS (First Person Shooter). We will need to start with an ambient zone. We’ll add a simple ambient loop of a deserted city. However, our battlefield won’t sound very realistic with just a static ambience looping in the background. By adding positional sound emitters scattered around the environment we can provide a heightened sense of realism. For example, our battlefield might need some randomized debris to crumble now and then, or the shouts and cries of unseen NPCs still fleeing the city. By placing emitters on game objects we can add those sonic details to the scene. When the player moves through the environment and into the radius of the emitters she will hear the soundscape change and adapt.
One important function of emitters is to approximate sounds relative to distance. When the source of a sound is far away, as the audio listener (if you can recall, the audio listener is almost always attached to the camera, which we are controlling in a FPS) moves closer to the emitter the mix responds appropriately. As we previously mentioned, as the source moves closer, the volume of the sound event must increase to mimic the way we hear in real life. Additionally, a filter can to be applied to re-introduce the sound’s higher frequencies as the listener approaches the source, which adds more detail and realism. Back in our FPS example, the player will see an NPC shouting in the distance and, as she moves closer, she will hear the shouts louder and the HPF will open up to include higher frequencies. On top of that, the left–right spatialization (and in some cases even up–down) will automatically adapt to the angle of the audio listener. She will perceive all of this as cohesive and realistic details in the soundscape.
It’s important to note that sound emitters don’t necessarily need to be hooked directly to a visual object in the game scene. The audio designer can place sound event emitters in a scene to create positional random sound triggers within an ambient zone. This approach is great when a game object is not visible to the player, but exists as an element regardless (i.e. wind, bird chirps, crickets). These randomized triggers add detail to the soundscape without cluttering the visuals.
The ambient zone/emitter system can be implemented into the game in a few ways. One way is to tie the ambience and emitters to a single event. One middleware event can handle multiple audio objects, so we can set an ambient zone in the game engine that triggers a single event in the middleware program. In the event we might combine one or more looped assets and layer them with multiple one-shot sounds. Spatial settings can then be applied to each asset as well. The static loop would be a 2D event, covering the full area of the ambient zone, while the one-shot sounds would be set to scatter around 3D space. The second method is to place one or more looped assets into one event and create a separate event for the sound emitters. Just like the first method we can define the spatial settings so the static loop is 2D and the emitters trigger 3D events. The difference here is that the ambient zone will trigger the static loop event over a defined region, while the positional emitters will be independently placed and separately triggered around the game scene. This method is a bit more work, but it offers more flexibility with the emitters.
A third option for a responsive soundscape involves a more dynamic ambient system in which multiple loops and emitters trigger sounds according to the game state. This kind of dynamic system can adapt to game context, and can be controlled by real-time parameters (see the section below). A good example of this is Infinity Ward’s Call of Duty (COD4). The team used a dynamic ambient system which streams four-channel ambiences and switches between them based on the amount of action happening in the scene.8 This systems helps to create a detailed soundscape that evolves as the battle intensifies or vice versa.
Some games take advantage of quad ambiences for ambient zones, which make up two or more sets of stereo environments of the same recordings. This can provide a denser sonic background in game. When using quad ambiences it’s best to utilize captured audio that doesn’t have much in the way of easily identified sonic elements (bird chirps, tonal artifacts, etc.). This helps avoid the player picking up on a small detail in the loop as it repeats over and over.
Reverb Zones
Reverb can make a notable difference in how realistic a scene sounds and how well the scene conveys a sense of space. Reverb zones, just like ambient zones, are defined regions for which reverb settings can be applied. This offers the audio designer a way to create specific reverb effects on sounds triggered within this area.
As we mentioned previously, smaller mobile game projects may require the audio designer to bake the reverb into the sound effect before importing into the engine. The problem with this is lack of adaptability to the player’s location. When resources are available the best way to create space in a location is by setting up reverb regions that will trigger different reverb presets in predetermined locations with predefined effect settings.
Reverb utilization in games has evolved and is still evolving as limitations in CPU and memory are improved. Now, more games can benefit from realistic-sounding ambient spaces. Game are already using ray tracing and convolution reverb for simulating truer reflections in a space. As we push forward we can look at more advanced ways to create believable aural spaces. Auralization9 is the process of simulating sound propagation through the use of physics and graphical data. This is another example of more advanced techniques for implementing reverb zones.
To conclude our thoughts on reverb zones, let’s discuss applying reverb to the zones. Presets are a great starting point, but reverb settings should be tweaked to fit the scene. Pre-delay and reverb tail can make a huge difference in how the scene sounds. Pre-delay is the amount of time between the dry sound and the audible early reflections. Adjusting the pre-delay can add more clarity to the mix by opening up space around the initial sound. Adjusting the pre-delay can change the room size without changing the decay time. This will help avoid a washed-out mix from too much reverb versus dry signal.
Looped Events
Middleware offers the audio designer an easy way to define the start and end points of a looped asset. The ability to define a loop region allows the designer to define the start and end points of the container. When the event is triggered, the loop will then continue to play back that region until the event is stopped. The audio designer can specify a particular number times to complete the loop, or set it to infinite for continuous looping.
Loops are an important part of game audio for assets like music and ambiences, but there are a variety of other sounds that benefit from looping. An automatic weapon fire sound would usually consist of a start, a loop, and a stop. These modules (sometimes called sound containers) could be single files, playlists, or separate events entirely. The start sound would contain the initial fire and the stop sound would contain the last bullet fire and tail. The loop would contain a stream of the weapon’s consecutive bursts, and a loop region would wrap around the entire duration. All three modules triggered in synchrony will allow the player to fire the weapon (thus triggering the start module into the loop) and hear a continuous barrage of bullets until the player ceases firing and the stop module is triggered, ending the event.
Variation and contrast in a looped event can help avoid listener fatigue. Avoiding specific tonal elements can also prevent the listener from picking out the loop point. Using a playlist of one shot-sounds in lieu of a static loop can add even more variation. In this case the user can define the random playlist so it doesn’t play the same asset twice in a row. If we move back to our automatic weapon example, the loop module would then be replaced by a playlist of short single-fire sounds. The loop region would remain an essential element of the event.
Looped events can be stopped and started based on ambient zone triggers. This is useful in managing resources because looped sounds will not continue to play in the background if the audio listener is not inside the defined ambient zone. Imagine that our PC is approaching a forest. As the audio listener moves closer to the forest and into the ambient zone, the forest ambience event will trigger and loop. The problem with this scenario is that the event sound starts from the beginning of the loop each time. If the player decides to run to and from the forest six to ten times in a row that loop start might become aggravating. By using a random seek variable, a different point in the loop will randomly be chosen to initiate the playback every time the event is re-triggered. This can also be a great solution for when two positional sound emitters in close proximity are triggering the same looped event. Phasing issues can be avoided if the files start their playback from different points in the loop.
Real-Time Parameter Control
Earlier in this chapter we briefly defined real-time parameter control (RTPC) as the ability to control specific properties of audio events based on real-time game data. Here we will take a microscopic look into some examples of RTPC usage. To put it concisely, RTPC is a method of taking values from the game engine, and using them to automate volume, panning, effects, or really any other sonic properties found within a middleware event. The only difference between automation in a DAW and automation in middleware is that your DAW is locked into a fixed timeline – the SMPTE code. The playhead only moves forward as time passes. In middleware we can use any in-game value that we want to move the playhead forward, and we can have multiple playheads that correspond to multiple parameters, each independent of one another. In the following sections we’ll dig into what these values are and where they come from, and then we’ll share some examples of RTPC usage.
Game engines manage a large amount of information when the game is in run-time. At any time an engine can pass values that define the game state. These could include information on player location, time of day, velocity of an object, player health, vehicle RPM, and more. Pretty much any action or change in the game state can provide data which can be used to adapt the audio around. For example, when 3D events attenuate and position sound, what is actually happening is the game engine is tracking the distance (typically in meters) from the audio listener to all objects in the scene. These distance values are then passed from the engine to the banks generated by your middleware program. These values can then be linked to parameters in FMOD (or game syncs in Wwise) in your middleware program, allowing the volume and panning to adapt in real time, as needed. Game data isn’t limited to distance. Information can include number of enemies in range, time of day, or mission completion.
Another of the many applications of RTPC is to adapt footstep playlists to different types of terrain. The programmer may pass the values for the terrain types to you, or you can do it yourself using the profiler. Either way, these terrain values must be linked to a parameter (let’s call it “terrain,” although you can technically name it whatever you like) via a short scripting process. Usually this part is done by the audio programmer, but it’s important to communicate your ideas first so you can synchronize event and parameter names and ensure appropriate values are being called. Once this is accomplished you can use the parameter values to trigger the corresponding footstep sounds in an event. Random adjustments to the parameters for pitch and volume can also be applied to the footstep playlists. Additionally you can add layers of cloth or armor movement to the event and position the modules with a slight delay. The delay will avoid the footfall and cloth from playing at the same time and sounding too robotic. The delay setting can also be randomized so it plays back with a slightly different delay time for every trigger.
You can also use RTPC to adapt music and sound design based on the player character’s health. Lower health values on a parameter can be used to automate a low pass filter, which can then affect all sounds in game. When the health parameter decreases into a predetermined threshold, the LPF will kick in. This will give the player a feeling of losing control. It will also force the player to focus on the game mechanics as opposed to more superficial sound effects. Alternatively, low health parameters can also be used to add layers. In this case, instead of using a parameter to automate the cutoff of a LPF down, try using it to automate up a layer of music when health falls below a certain value. This can increase the drama of a battle scene or boss fight.
The automations we’ve mentioned are drawn in with curves on the parameter window. Just like volume curves in a DAW, the curve can be defined so it rolls off smoothly. Sometimes the speed at which the parameter value falls in game can sometimes be quick or uneven. This could cause the audio to follow along abruptly causing the transitions to feel rough. In FMOD, a seek speed module will allow you to set the speed at which the value is chased as it moves across the timeline. Small details such as this will help the audio adapt smoothly to game states.
The real fun with RTPCs begins when you begin working with multiple parameters independent of one another. Let’s imagine a hypothetical rainforest scene that adapts to the time of day. Ideally we would have two or three different ambient loops on the parameter tab: one for morning, one for afternoon, and one for night. First, we need to create a parameter – let’s call it “Time of Day” so it corresponds with the time of day values being passed from the engine. In Wwise a blend container can be used to seamlessly crossfade these loops. FMOD similarly allows us to add these loops to a single parameter timeline with a crossfade between them. As the time of day data changes in game, we are left with a single ambient event that evolves over time using real-time parameter control. This will provide a more realistic soundscape since the bird chirps of the morning can slowly fade away into cricket chirps as daylight hours move into evening and night.
But that’s not all! We can also add a second parameter to our event. Let’s call it “Weather.” Using this second parameter we can add a layer of sound to a new audio track. This layer will consist of three looping ambiences: low, medium, and high intensities of rain. To keep it simple these loops will again be added to the parameter tab with crossfades (and a fade in on the low-intensity loop). The only problem here is that rainforests don’t always have rain! Let’s compensate for that by moving the three loops over so that lower parameter values contain no sound at all. Now we have two parameters working independently to adapt to time of day and weather values from the game.
The cherry on top of this wonderful rainforest ambience cake will be the addition of scatterer sounds (FMOD) or random containers (Wwise). These audio objects are sound containers which can be used to sprinkle randomized sounds throughout the 3D space. This allows you to input a playlist of bird chirp sounds and output a pretty convincing army of birds. Let’s add a few scatterers with playlists of birds chirping and some other animal sounds to fill out the sonic space. These scatterers can be placed on the main timeline itself and set with a loop region. At last, we are left with an ambient system that adapts smoothly to two game parameters, and generates a forest full of animals using only a few containers.
It’s important to note that while parameters and RTPC controls can be assigned to all audio objects, busses, effects, and attenuation instances, you should still use them selectively as they can consume a significant amount of the platform’s memory and CPU. We will discuss this in further detail later in this chapter in the section titled “Resource Management and Performance Optimization.”
Nested Events
Just like other forms of software development, the parent/child hierarchy is an important structure which allows for manipulating game objects and events. A nested event is a category of event that is referenced from its parent event. Both Wwise and FMOD offer use of nested events for extending the flexibility of a single event. This opens a variety of possibilities for delaying playback of an event, sequential playback of events, and creating templates across multiple events.
For example, a complex event can be created and nested into a simpler master event. You can then combine other nested events within the master event, and control all the events via parameters/game syncs in the master (like a Russian nesting doll, hence the name). It allows for more cohesion and a level of depth that would otherwise require actually scripting in the game engine. This kind of system is great for complex music systems or vehicle engines that require macro and micro parameter control of individual audio assets. For example, a parent music event will be configured with parameters defined by game states. This macro control could be exploration or combat. The child events that are nested into the parent will have micro control via parameters which could vary the soundtrack in either exploration or combat states.
Game States and Snapshots
In theory a game consists of a sequence of states, which consist of a combination of visual and aural cues. The game states are made up of menu, exploration, combat, boss battle, pause, game over, and scripted logic controls the flow of the game states according to player input. These states are used to trigger the ambient zones we described earlier in the chapter. Each ambient zone can have its own events and mixes applied to increase or create sonic diversity in the game. We do this using snapshots. Snapshots store and recall a range of sound properties, mixer settings, and effects settings. Essentially they are mixer presets for your game that can be triggered as players interact with the game. Snapshots are extremely useful as they can be used to create alternate mix settings and transition between them in real time according to game state changes. They are commonly used to dynamically reduce the volume of music and sound effects to leave room for voice-over. If you’ve ever played a game where the mix changes as your PC dives underwater, that is mostly likely the work of snapshots. In this case the default ambience has been faded out, and a new ambience has been faded in, likely with the addition of an LPF to simulate the physics of sound in water. In effect, what you’re hearing is the game state changing from land to water, which triggers two different snapshots.
For instance, you can duck sound effects and music when the player presses pause using a snapshot. Simply save a snapshot of the mixer with SFX and music up, and store it with the default game state. Then save a second snapshot of the mixer with the music and sounds ducked. When the pause state is triggered snapshot 2 will activate, and the music and SFX will duck out of the way for the player to experience a brief respite from the in-game action.
There are other creative uses of snapshots as well. By creating a snapshot that combines a LPF with volume automation it is possible to dramatically impact the player’s focus. In a battle arena environment, this snapshot can be triggered when a player is firing a powerful weapon (or standing next to it). The snapshot will effectively filter and attenuate the volume of all sounds except for the weapon, which ensures that other sounds don’t mask it. The result is that for a brief moment the player will hear almost nothing but the massive weapon, emphasizing its power and engendering laser-like focus on the act of firing. This can be a very satisfying and fun effect for players if it is not overused. We encourage you to think of your own snapshots that influence player focus on different aspects of gameplay. Try it!
Transitions and Switches
Middlewares provide audio designers with ways to smoothly transition from one audio event to another in real time. This control defines the conditions of tempo/beat synchronization, fades, and the entry and exit points of music cues. We can also delay the transition after it is triggered by the game event, which allows for more control and a smoother change. In both FMOD and Wwise, game data can be used to drive these transition changes. For example, the velocity value of an object in game could define which impact sound is triggered. Below is a comparison of the two transition methods.
In FMOD transitions are triggered by game state values which allow an event playhead to jump horizontally to transition markers. A quantization value can be set to define the delay in either milliseconds or in beats per minute (bpm). This is useful particularly for music, so that transitions can occur in a range of timings, from immediate to any number of beats or bars. FMOD also offers a “transition to” flag, which will allow the transition to happen when the playhead crosses paths with the flag. A transition region is another option; it can span the length of an instrument module, and it continuously checks the parameter conditions. When the predetermined conditions are met, the transition occurs.
Figure 8.5 FMOD transitions.
In Wwise a transition matrix can be set up to define music switches and playlist container transitions. For sound effects, these switches are used to jump from one sound to another. For example, a switch group that defines the terrains available in game will allow switches to be triggered by a game sync. In this case, the game engine sends its data to Wwise, informing the audio engine which material the player character is colliding with in game. A switch group would then transition between footstep playlists corresponding to the terrain. When the player character steps on solid metal the solid metal footstep event will trigger. When the player moves to dirt the dirt footstep event will trigger and so on.

Figure 8.6 Wwise transition matrix.
Obstruction and Occlusion
Humans are good at detecting the location of a sound’s source. Our brains are highly sensitive to the change in panning and frequency spectrum, which tells us not only where the sound sits in relation to our ears, but also whether or not the source is located behind an obstruction. It’s an important part of navigating the real world. It makes sense then to mimic the psychoacoustics of a space in a game scene.
Objects in a game that block sound are called obstructions. These obstructions can be made of any material and come in varying shapes and densities, which change the sound. Sound has the ability to travel around obstructions, but it can still bounce off surrounding surfaces. For this reason, to mimic the physics of sound through an obstruction a low pass filter could be applied to the sound source, but the reverb send should not be affected.
Occlusion occurs when the path between a source and the listener is completely obstructed. A good example of this is a wall between the source and the listener. Sound cannot travel around this wall, so it must travel through it. In this case a volume attenuation and a low pass filter should be applied to the source. The reverb send will also need to be reduced since no reflections from around the wall can occur. In all cases of obstruction and occlusion the programmer is responsible for defining the obstruction and occlusion values in the engine. The audio designer is responsible for defining the volume attenuation and LPF (low pass filter) to reflect how the audio is affected.
A common technique used to emulate real-world sound propagation is ray tracing (or ray casting). Ray tracing is a function utilized by graphics in game to determine the visibility of an object’s surface. It does this by tracing “rays of light” from the player’s line of sight to the object in the scene.10 This technique can be used to define lighting and reflections on objects with which to create realistic visuals. To use this technique for sound we can cast a ray from the audio listener to various objects in the scene to determine how the sound should interact with those objects. For example, in game you might have a loud sound emitting from an object inside a room. The player could leave the room and still hear the sound if there is no door closing off the previous room from the next. The “rays of light” would detect the walls between the rooms, but take into account the “rays of light” that continue into the room via the open doorway. In this way, ray tracing yields game syncs that we can use to trigger obstruction and occlusion automation as detailed above.
Simplicity vs. Complexity
Simplicity vs complexity is both an aesthetic choice and a technical one for some games. Just because you have the ability to craft a complex event does not mean it’s the best choice for the game. The old saying “just because you can, doesn’t mean you should” is something to remind ourselves as game resources like bandwidth and memory are integrally intertwined with the decision on how sound can be leveraged and implemented in a game. The end product is what matters, and if a simple solution works better than a complex one, so be it! A focus on the theory of game audio, experimentation, and reiteration, along with a solid understanding of what the game needs, will lead you on the right path.
Dialogue Systems
Earlier we discussed the use of recorded speech to provide information to the player and support the narrative. Here we will discuss some other ways voice-over can be integrated into the game so it adapts to gameplay. To start off, imagine you are immersed in a role-playing game (RPG), exploring a village. You come upon a blacksmith who tells you a tale of a sword that will help you through your next mission. But wait! You already completed that mission. Without proper logic in place to handle dialogue in game, the intended information could easily become misinformation.
A great example of this kind of dialogue logic is God of War (2018), by Sony Interactive Entertainment. In this game, time spent walking or boating to the next location triggers dialogue. These instances offer players a chance to hear the story progress, and help them prepare for what lies ahead. For example, when boating to a location, Kratos tells stories. These snippets of dialogue set the scene and provide the backstory. Since the game is interactive, and these travel scenes are not pre-rendered, the player can choose to dock and leave the boat at any time. However, the developers ensured that conversation on the boat would naturally end, regardless of timing. In one scene, Mimir is reciting a tale to Atreus while traveling by boat. When the player docks the conversation will naturally end with a line from Kratos saying “Enough. No stories … not while on foot.” Mimir then replies with “Completely understand, I’ll finish later, lad.” The story picks back up when the player heads back to the boat. Atreus says “Mimir, you were in the middle of a story before…” This elegant dialogue system is essential to pushing the narrative of God of War forward without hindering gameplay. The developer’s attention to detail keeps the player tuned in to the story without losing the element of choice and interactivity.
One important method of employing dialogue logic that you can use to make voice-over more interactive is stitching. Stitching is a process in which the dialogue is tied together in game. Some games have full phrases or sentences recorded as individual lines (this is the case in the above God of War example). These lines are then are mapped out to follow along with gameplay. Other games like EA Sports Madden NFL require dialogue to be recorded in smaller bits, and broken down into phrases, numbers, and team names. For example, the voice artists playing the role of the announcers might record the same phrase for every single football team. A more practical and memory-saving approach would be to have both the line and the team names recorded separately. Then they could be strung together by the audio engine. This could be achieved in middleware by creating two sound containers: one would contain a playlist with every possible team, and the other would contain the phrase “… win!” In effect the player would just hear a seamless rendition of “The Giants win!” With this approach it would be crucial for the voice artist to match the inflection correctly with each take.
Typically a programmer will create the logic which triggers voice-overs in game, but you will be responsible for the actual implementation of the assets themselves. Here we will discuss some techniques for implementation of those assets into the game engine.
Native audio in Engine: Regardless of which audio middleware option is being used for the game’s audio integration, voice-overs may be handled directly by the game engine’s native audio system. You would then deliver assets for the programmer to import and control via a script. This operation is simple, but it doesn’t offer much control over the assets in game.
FMOD: Games with a large amount of spoken dialogue content typically trigger assets from a database using a method which FMOD calls a Programmer Sound. This technique requires a script to trigger the Programmer Sound Module and determines which line(s) of dialogue to trigger in game. The audio engine API documentation usually covers how to work with these.
With a small number of assets, each spoken dialogue file may be integrated into its own events. To add variety to the voice-overs a parent event can be set up with several child events referenced within it (this is referred to as a nested event). The parent event would control how often a child event would be triggered, and the child events will hold a playlist of random takes on the same line. Play percentages and probability settings can then be added to the events to avoid the same line of dialogue triggering one after the other in sequence.
Wwise: A specific function called a Dialogue Event in Wwise will allow you to create various conditions and scenarios for triggering voice-over in game. Game state and switch values can then be used to create a matrix of conditions from which dialogue is stitched together seamlessly.
Scripting
If you’ve never had to work with scripting, now might be the time to start. It can seem overwhelming, but with patience and practice it will become a second language. In the long run your audio workflow will be greatly improved with an understanding of the scripted logic behind your games. Not all audio designers will have a need for these technical skills, however. You can probably get by designing sounds and delivering them to the developer for implementation without ever touching the game engine. Just know that sound designers with scripting skills have an edge over those that don’t. While the complexities of scripting are outside the scope of this text, we have dedicated this section to the benefits of diving into this field as a game sound designer, as well introducing some of the basics.
Scripting is a form of programming, and the syntax for integration changes depending on the game engine. Scripts contain game logic, which defines the behavior for all game objects, including audio sources. Scripts are typically written by the programmer but can be edited or updated by non-programmers as well. A “technical sound designer” with coding experience, or an audio programmer, is likely to handle all of the scripting for the game’s audio, but sound designers may need to edit existing scripts.
Developers are often wary of committing to audio middleware solutions due to a fear of licensing costs and possible issues with integration. For this reason it can be useful to be familiar with some basic scripting because it will help you navigate the native audio engine. Being familiar with middleware scripting can also be an asset when arguing in favor of middleware use. Knowing how to script will allow you to effectively demonstrate how much work will be taken off the programmer’s plate by using a tool like FMOD or Wwise. Being able to call sounds and declare events and parameters without the programmer will perhaps be the deciding factor!
Learning scripting is not straightforward and errors are an inevitable part of the process. Internet searches, software documentation, and software developer forums are great places to help with troubleshooting. YouTube can even be a valuable resource. It’s a good idea to read through manuals first to get comfortable with each software package used in your workflow. This is the quickest way to learn all the features the application developers have worked so hard to include.

Figure 8.7 Declaration of parameter in script and Void Update section of script to show how the parameter is attached.
Programming Languages for the Audio Designer
The question of which language to learn comes up often when speaking to those looking to jump into a game audio career. The answer is, “It depends on what you want to accomplish.” It may seem vague but there are many types of programming languages and each can lead you toward a different goal.
C# and C++ are the two most likely languages you’ll need to be familiar with if you are interested in digging into the scripts in your game. If earning a computer science degree does not fit into your schedule, you might consider online scripting courses or dedicated books on game engines. Game Audio Development with Unity 5.X11 and Unreal Engine 4 Scripting with C++12 are helpful starting points. The website asoundeffect.com13 also offers a great introduction to audio scripting in Unity, and there are also many good online courses offered by sites like Udemy14 with an introduction to programming in Unreal and Unity. In Unity most of the programming you do would be C# based while Unreal offers Blueprints (node-based visual scripting specific to the unreal engine), or C++. Blueprints might be a bit easier than C++ if you’re a complete newbie.
There are plenty of other languages to choose from as well. Perhaps you are interested in creating custom actions in Reaper. In this case Python and Lua would good places to start. Python is also a great language to start with if you have an interest in adapting sound through machine learning. Javascript also has some great audio libraries you can build on for web applications while JUCE offers the ability to create your own audio plugins.
XML is another tool to know, but it isn’t a programming language per se. It it a format used by programming languages to represent data. For example, a sound designer might find themselves tasked with editing an XML document to add voice-over file names to a database.
Regardless of your end goal, a great way to get started is checking out some of the tutorials and books we mentioned above. It doesn’t really matter where you start, just pick an engine and read through some of the documentation or check out video tutorials on YouTube. It can seem daunting, but there are varying degrees in which you can learn and use the knowledge in the real world. Just having a basic understanding of what can be done with game audio programming can build a better bridge between you, as the sound designer, and the programmer. At the very least it will give you a better idea of what might be possible in a game engine. You will feel more confident as you map out the audio system for the game. Try it and you may realize you like it!
Programming Languages for the Audio Programmer
Developers creating games with larger budgets will often have an audio programmer role. In “Game Development Roles Defined” in Chapter 1 we touched upon this role. Each studio has different requirements for the technical sound designer and audio programmer roles, but audio programmer roles most often require well-rounded programming knowledge along with DSP (digital signal processing) expertise. Experience with audio middleware like Wwise and FMOD will also be important. A Digital Signal Processing Primer by R. Steiglitz15 and The Audio Programming Book edited by Richard Boulanger and Victor Lazzarini16 are great resources to get you started.
Visiting Artist: Brian Schmidt, Audio Designer, Founder and Executive Director at GameSoundCon
On the Note of Programming
I’m often asked “how technical do I need to be to be a game composer or sound designer? Do I need to learn to program? How important is the tech stuff?” I usually reply as follows: Games run on code and tech; they are a game’s DNA—it’s life-blood. Having a basic understanding of programming concepts will help you understand how the game is put together, and how the different pieces of the puzzle work as well as provide you with an insight into what issues the game programmer may have to address when you request that your sounds be played back in a particular way. Taking a simple “Introduction to Programming” at your local community college can be of great benefit, even if you never write a line of code professionally.
Taking the next step and obtaining a working facility in programming can enable you to directly implement the game’s audio precisely how you, as the composer or sound designer, want it to be implemented and in doing so, make you a more indispensable member of the game team. If all you do as a game composer/sound designer is upload cues to a Dropbox as .wav files for someone else to implement, you become one of the most easily replaceable members of the team.
Dynamic Mix Systems
Great game audio requires an equal blend of asset creation and implementation. Producing a well-balanced and polished dynamic mix is essential to the implementation stage of development.
What Is Mixing?
Mixing as a process consists of bringing all the audio assets that exist in the game together. All sounds must have their place on the frequency spectrum. Additionally, the volume and spatialization from sound to sound should be consistent. Even as the mix changes with gameplay, the mix needs to sound natural and cohesive.
In Chapter 3, we discussed adding clarity to sounds so they fare better in the mix. The technical elements of the full mix should avoid too many sounds sharing the same sonic characteristics because it makes the aural experience cluttered. Creatively, an effective mix should be dynamic and focused. The mix as a whole needs to have elements that set the mood and inform the player of relevant aspects of the game.
Sometimes mixing is left to the final stages of the development cycle, after all content is already implemented. However, it’s good practice to set up the necessary technical elements for the mix and keep house as you go. In film, the final mix is printed and synced to picture. In games, mixing happens at run-time as the player plays the game, so technically the mix is prepared prior to the game shipping. Below we’ll discuss some techniques that result in an effective mix.
Mix Groups
Grouping, a very basic mixing concept adopted from film, is a technique where the audio designer assigns individual assets to a parent group. The idea is to route similar assets into submixes so adjustments to the group are applied to all the sounds within it. Similar to the mixer in a DAW, game audio engines offer a master bus, which can be branched out into the necessary parent/child busses.
In a film mix it might be enough to keep it simple and have only a few groups such as music, Foley, dialogue, and sfx. This can work just fine for a game with a smaller number of assets and a less complex adaptive system, but larger games with more complex interactive requirements need to go deeper. In these cases groups can be further broken down into additional sub-categories such as SFX>Weapons>Pistols. It doesn’t make much sense to add a new bus for each individual sound in the game, but the mixer should be set up in a way that is flexible. These more complex parent/child bus structures offer control over the mix on both large and small scales (see Figure 8.8).

Figure 8.8 Screenshot of Wwise group buses.
Auxiliary Channels
Film and games share the use of auxiliary (aux) channels for routing effects. In run-time the game engine will send values to the audio engine. These can be used to adapt reverb and other effect levels when the player triggers events in game. For example, if the player enters a tunnel from an outside location, a trigger can automate the aux reverb channel up to simulate the reflections one would expect to hear in the closed space.
Side-Chaining (Ducking)
Earlier in the chapter we covered snapshots, which allow designers to change mixer settings based on game states. In addition to snapshots, the audio designer can adapt the mix to singular triggered events using side-chaining (ducking). Side-chaining is a common technique where the level of one signal is used to manipulate another. In music production this is used to reduce the bass level when it receives an input signal from the bass drum, which adds clarity in the low. Build-up in the lower frequencies is avoided here because the bass and kick will automatically alternate instead of playing on top of one another.
In games, side-chaining can be used to control player focus and prioritize events in the mix. The audio designer can set up a priority system which will duck the volume of one group of sounds based on input from another. Wwise has a feature called Auto-Ducking which makes it easy to keep critical dialogue up on top of the mix. It does this by routing the dialogue submix signal to other submixes and assigning a value (in dB) to attenuate the volume of the non-dialogue channels. You can then add a fade in and out to smoothly transition the ducking. It’s important to use your ears to ensure the transition doesn’t stand out too much. The process should be inaudible to the player. Side-chaining can also be set up using parameters or game syncs, which allow the user to set an attenuation curve.
In games like a MOBA (multiplayer online battle arena), shooters can have a lot of sonic action happening during the heat of battle. In such instances the side-chaining is crucial to duck the volume of NPC weapons so the player’s weapon sounds clear in the mix. This technique can also be used to shift the player’s focus. Some games duck in-game audio when UI text or dialogue instructions are guiding the player through a tutorial. This shifts the focus from the gameplay to the UI instructions. This is especially common with important or first-time UI instructions.
Snapshots vs. Side-Chaining
Earlier we discussed snapshots as they apply to ambient zones. Game voice-over is another great example of how a sound designer could make use of snapshots and side-chaining. In-game dialogue can be broken down into high (critical) and low (non-critical) priority. Any dialogue that drives the story or provides necessary information to the player can be considered critical and should always be made audible and intelligible over all other sounds in game via ducking or snapshots. Non-critical dialogue such as barks or walla are typically used to fill the scene with background murmuring, which is not critical to gameplay. It is therefore not necessary to hear it over louder sounds like explosions and weapon fire.
When using a snapshot in the example of a MOBA, we would first set our dialogue to run through Channel “A” and the explosions and weapon fire to route through to Channel “B.” Snapshot 1 might have the two channels equal in volume, but snapshot 2 would attenuate the volume of Channel “B” (the non-dialogue channel), and possibly even use EQ to carve out frequencies around 1.7 kHz–3 kHz to increase the speech intelligibility for the player. We can then choose when to transition to each snapshot, and how smooth (or crossfaded) the transition should sound.
The process of side-chaining is similar to snapshots, but it is a bit more specific. Side-chaining itself is just the process of telling an audio plugin (usually a compressor, or something capable of attenuating volume) what to “listen to” (i.e. what audio signal we want to trigger the mix change). In our example, we want to be listening to the dialogue so that we can duck the explosions and weapon fire. This can be done in various ways depending on the plugin, but it is usually a matter of selecting channels from a dropdown menu. This is a bit simpler than a snapshot because the interaction is automatic once the side-chain is set up. However some combination of these two approaches will likely yield the best results.
We don’t know when important dialogue may trigger, so snapshots and ducking methods are crucial in allowing the engine to control clarity in the mix. These techniques are also discussed in later chapters as part of more advanced techniques for controlling dynamic mixes.
Dynamic Processing
Control over loudness is a key element in a great mix. Dynamic processing such as compression and limiting can be used to add further mix control. Dynamic processors on subgroups can help soften (or thicken up) transients like explosions, weapons, or impacts. These final finesses can make a game sound much more polished. A compressor and/or limiter can also be placed on the master bus to control the dynamic range of the full mix. Doing so can help increase the intelligibility of recorded dialogue in game and add more punch to transients. As always, dynamic processing should be used carefully to avoid squashing all of the dynamics out of the full mix. Use your ears to guide you, and try to always be listening from a player’s perspective.
Mobile puzzle games with simpler mixes work well with dynamics processors on the master bus from the start of the project. This acts as a dynamics “safety net.” More sonically complex games are better off having several mix buses that have compression/limiting suited to each group. Louder levels in a weapons and explosions subgroup would have a different dynamics setting than a footsteps subgroup, or a character sounds subgroup.
The practice of using dynamics on the master bus is a subjective choice and you will find that audio designers have varying opinions on the practice. Some will agree it’s wise to decide on using master bus processing early on as all other mix decisions will be affected. Others will say it’s better working out the mix through attenuations and levels. Once the mix sounds good, bus compression can be applied to glue it all together. In either case it is essential to compare and contrast your dynamic processing by bypassing (or A/B) as you mix. This will ensure that you are aware of all changes you make to the dynamics, and can accurately evaluate whether those changes sound better or worse.
As we have been saying throughout the book, there is no strict set of rules to follow. If a process works for you then by all means use it!
Visiting Artist: Jason Kanter, Audio Director, Sound Designer
Thoughts on Bus Compression
Imagine you have a 10,000-piece jigsaw puzzle and your plan is to preserve it with puzzle glue once it’s assembled. With this goal in mind, would you pour the glue out on the table and assemble the pieces into it?
Of course not! It would be a sticky mess and as the glue spread on the pieces it would blur their detail, making it harder to fit them together. So initially it might seem like the pieces fit and the glue would certainly do its job of holding them together, but in the end you’d just have a jumbled blob that wouldn’t make much sense.
Attempting to balance your mix through the dynamic control of a bus compressor is like assembling your puzzle in a bed of glue. Balancing a mix into a bus compressor may work fine if you only have a few sounds to contend with at any given moment, but if you have a big game world with hundreds of sounds being triggered concurrently, it can lead to a cacophonous mess. The more elements you add, the more dependent on the compressor you’ll be to hold it all together. As the mix takes shape, it will seem to be well balanced but removing the compressor often reveals an unbalanced heap of pieces that don’t truly fit together, making it nearly impossible to make any significant changes without breaking the entire mix down and starting over.
A bus compressor can be an incredibly useful tool to help control the dynamics of your game but only after the mix is balanced. Establishing a well-balanced mix and then applying a compressor will give your mix the control you need while still allowing you to make some adjustments up until the game has shipped.
High Dynamic Range (HDR)
High Dynamic Range (or HDR) is a dynamic mix system that prioritizes the loudest playing sound over all others in the mix. In other words it’s a dynamic system that operates during the run-time system and turns off softer sounds when important louder sounds are triggered. This is another way to add focus and clarity to the mix as well as help reduce the overall voice count, which reduces strain on the CPU. Developers like DICE make use of HDR for many of their games.
HDR action can be complicated in FPS games. Instead of assigning importance based on volume, Blizzard’s Overwatch designers used “threat level.”17 Enemy volume is based on their threat level to the player. Sounds that are more threatening have a higher priority than sounds that are less threatening.
Loudness
There are various development platforms (such as desktop computers, consoles, mobile, and handhelds) that host games from a variety of publishers and developers. Without certain standards for development and delivery, the user experience may be negatively affected. As technology advances and we continue to have access to various media types within a single platform, it’s important to focus on a consistent experience.
There are standards for display area settings and file-size restrictions, but at the time of writing this book the game audio industry has not yet adopted loudness standards for video games. Publishers like Sony are working to define and encourage standardization, and it makes sense to look to the broadcast world for guidance as well.
Mix Considerations
When going through your final mix pass, consider your audience and how it might be listening to your game’s audio. Everyone loves a stellar sound system, but not all development platforms can support one. Mobile games can be heard via the onboard speakers or headphones. These platforms also provide the user with the ability to move about in various locations, so you will want to test your audio in a few different real-world environments. Pay close attention to how the external noise affects the listening experience as you test. The user might be on a noisy train or bus, or at home and connecting via airplay to TV speakers. Test out the game with different consumer equipment. Be sure to check your dynamics. Are the quiet moments too quiet? Are the loud moments too loud? Adjust the mix accordingly. If you deliver your mix with the expectation that the player will have a superb surround system with the ability to handle the heavy low-frequency content, you are missing an opportunity to deliver an appropriate aural experience.
Most of your time will be spent listening in a treated room on studio reference monitors while you design, but you want to be sure to take time to listen on a grot box (industry slang for a small, low-quality studio monitor) as well to verify the integrity of your mix. Your grot box will simulate playback on consumer devices such as mobile phones, televisions, and radios. Speakers like the Avantone MixCube, and plugins such as Audre.io18 are other great tools for preparing your mix for consumer products.
Listening volume when mixing is important. Everyone seems to like mixing loud, but consider listening to your mix at lower volumes so you aren’t missing out on a typical consumer experience. Not everyone has the ability to blast the audio they are listening to. In addition, your own ears will get less fatigued and you won’t suffer from hearing loss.
Reference in Mono
While you will spend most of your time mixing in stereo, you want to be sure to spend time referencing in mono as it can uncover various issues with your mix. It’s especially helpful in revealing any phasing issues you might have. It also works well to determine balance for low-frequency elements in your mix.
Final Thoughts On Dynamic Mixing
With dynamic mixing systems in place, the audio will now change based on player input without losing balance or consistency. It’s important at this point to test for all variations on gameplay. Running through a level without creating any mayhem will be a very different aural experience than running and gunning through a level and interacting with all the objects in the world. Players may want to get away from the action sometimes, and just stand on a beach or in the middle of a forest and take in the ambience. For this reason you should take the time to bring the ambience alive with even the smallest of details.
The techniques we’ve mentioned so far are extremely important for the audio quality in every game, but resource management and optimization are also critical. In the sections below we will discuss managing resources and achieving the best game performance possible.
Resource Management and Performance Optimization
Nonlinear audio uses resources such as CPU, GPU, memory, and bandwidth which need to be shared with other aspects of the game development pipeline. The percentage of these shared resources that are carved out for audio is dependent on the game and development platform. You should work closely with your programmers to determine the audio resource budget for each of your projects. This includes an estimate of shared resources that can be utilized by audio, the amount of audio assets each game requires, the level of interactivity in the audio systems, the required real-time effects needed, and the target platforms. If the audio budget is not looked after, the result could create serious lag in game.
With this information a proper plan for resource management can be mapped out prior to implementing audio. Although we are covering this here in Chapter 8, it doesn’t mean this process should be held off until the last step before implementation. The pre-production stage we discussed in Chapter 2 is an ideal time to lay out the resource management plan. Start by determining the target platform and discussing the estimated audio memory and CPU budget.
To begin, we’ll break down the process of how games make use of their resources. When a game is downloaded from an online asset store or physical disc it is stored on the system hard drive (or flash drive on mobile). When the game is started, assets are loaded into memory (or RAM). How much of the game’s assets are loaded into RAM at any particular time is based on the overall footprint of the game. Larger games, like open-world AAA titles, will have too many assets to load all at once. Asset and bank management are crucial to offset this issue, and we will explore these in a bit.
To continue with our resource pipeline, RAM then works with the CPU, which processes the game logic and player input. At any given point, the CPU might be charged with handling a whole list of tasks such as collision detection, audio events, AI, animations, or scoring systems to name a few. The CPU also works with the GPU to process and render graphical assets, which are stored in VRAM. It’s important to note that some games have made use of additional GPU resources as a co-process for audio DSP (digital signal processing) to help balance the CPU load.
Now let’s take a look at how audio events in particular make use of these resources. When optimizing audio in a game project the focus should be on the processor and memory. All the information from the audio engine will need to be processed, and some of it will be stored either in memory or on the hard disc. Middleware programs back all of the audio engine information into multiple sound banks. Data such as audio sources, events, dynamic mix systems, and asset streaming can be found in these sound banks. Specific sound banks can be generated for each target platform, which allows for resource management across multiple systems. In short, sound banks are extraordinarily powerful tools for organization and resource management.
When a 3D audio event is attached to an object in the scene, pre-planned game logic will determine when and how the event is triggered during run-time. This sound object holds onto its slot in the virtual voice map, whether it is within audible range to the listener or not. The audio event will use up valuable CPU resources despite the fact that the player cannot even hear it! When the game is loaded, sound banks are loaded into the target platform’s RAM so audio will be ready to play. It then falls onto us as audio designers to prioritize these events to minimize the CPU hit.
Hierarchy and Inheritance
Game engines and audio middleware operate under a parent/child hierarchical structure. A child object will have a parent object, which may have its own parent, and so on. The idea is to have a “container” with defined settings that offers organization and group control when applied to multiple audio objects. This structure is also utilized for visuals and logic, but here we will explore the hierarchical relationships as they pertain to audio only.
The parent/child structure in software like Wwise can go deep and become complex quickly. Child audio objects can inherit settings from the parent which may offset or override any child-specific setting. Because of this, it’s important for audio designers to fully understand how the structure is configured for each project, and how to control it to produce a desirable result.
Sharing properties from a parent audio object across a large group of child objects isn’t just for organizational purposes. It’s a CPU and memory saver as well. Imagine that in your DAW you have five tracks, each with a different sound-effect layer. If you apply a reverb plugin as an insert on each of the five tracks with all the same settings, you are using five instances of a plugin, which will be taxing on the CPU. Alternatively, you can apply the plugin on the master bus or a group bus that all five tracks are routed to. This reduces the number of plugins to a single instance, thus drastically reducing the CPU load. Now, getting back to audio engines, each time we override a parent setting on a child it uses more memory and CPU at run-time, just as each instance of a reverb plugin does. By grouping child objects to a parent object with the same settings, we can apply the necessary settings while optimizing our use of resources.
Bank Management
We briefly mentioned banks in the introduction to this chapter. Here we will further discuss their use and how to manage them. Games with smaller amounts of audio assets and more available free memory would be fine using only one sound bank containing all events and assets. In this case, the programmer can load the single bank when the game is initialized. This will keep things simple as it avoids loading and unloading banks and tracking which sounds are available or not. The downside is the inefficient use of system memory as all events, media, and data structures are loaded at once.
Larger game productions with more assets and less available memory benefit from multiple bank solutions. A plan for distributing the assets across the banks is necessary to load and unload banks as the levels, environments, or game states change. Scripting will be required to initialize the sound engine and handle the load and unload process. With enough memory available, multiple banks can be loaded at one time to avoid delayed transitions between scenes.
Games can vary from simple audio event triggers to very complex triggers. In the latter case, banks can be micromanaged with events in one bank and their associated assets/media in another. This allows the banks with events to be loaded into memory while the banks with media files wait to be called. The media banks can then be loaded based on proximity to objects in the game. This is an efficient use of memory as the banks holding instructions are far less of a resource hog than the actual media files. This requires a lot more communication between the audio team and programmers to integrate, but it does offer a cost-effective solution for managing memory.
There are other ways to ensure media and information from banks are ready and available when needed. Events can be analyzed by the engine to check if its associated media is loaded. If it is not, selecting a streaming option allows the media to be pulled directly from the disc. This method will also allow you to decide which banks will be loaded based on specific game data. Streaming can be an essential function on platforms with minimal RAM, but with larger projects for console and desktop the choice between memory savings and potential problems should be weighed. With games that have a boat load of audio assets, streaming approaches can have problems surface at later stages of development once all or most of the assets and logic are in place. While streaming can be great for saving memory and CPU with longer duration sound assets, lack of bandwidth can introduce small delays during loading which isn’t ideal for sound triggers that rely on precise timing. This can impact music and ambiences in particular as the cost of time to load a longer asset results in the game feeling “laggy” and unresponsive.
Due to the benefits, some audio engines default to streaming for imported files that are longer than a set number of seconds. Even though this is the default, it’s best to work with the programmer to define the best solution for handling assets with longer durations as there is a variety of options. Chopping up longer files into shorter bits to play back in a playlist can help avoid having to stream from disc, but it isn’t a good solution for all lengthy audio content. Seek times can also cause delays as storage capacity expansion seems to outpace transfer speed. Audio engines do however offer some setting options for storing part of the file in memory to compensate for the delay during load time. No matter what the approach, you will need to be active in testing and observing how the solution is handling starts and stops of audio, and everything in between.
One exciting recent development in optimization is that Audiokinetic has offered a new solution in Wwise which allows the split of information across multiple banks. For example, if all the music in game has only one event, in the traditional method that event would be in one bank. This new Wwise functionality allows management of memory by splitting the banks so you can control what loads and when it loads. Essentially, you could prioritize bank contents to load less critical information into a separate bank, which will then load only when there is memory available.
Visiting Artist: Alexander Brandon, Composer
The Realities of Bank Management
Banks are a way to manage loading of assets, with the ideal scenario being that assets are only taking memory space when they are needed, and kept in storage when they are not. However, organizing assets is becoming increasingly difficult, as it is uncertain when sounds will be needed at any given time. Most often audio designers become frustrated by assigning many sounds to individual levels or scenes in a game only to discover they’re needed in other locations. The sounds then are needed as global sounds, or permanently loaded. Since early game development, the concept of “on-demand” loading was introduced, and streaming audio became possible in the early to mid-1990s either from hard drives or discs.
Streaming does come at a cost, however, in that a minimum amount of memory must be allocated to “buffer” at least metadata (or information about the audio) to allow the game engine to call the sound at the right time. But this buffer is typically far less in memory than the full sound. The flip side to this is that it does add to the delay of playback.
These challenges are becoming less and less of a concern in modern development. In the game Horizon: Zero Dawn by Guerrilla Games, almost zero load time is experienced by the player, and sounds along with art and everything else are indeed loaded on demand and streamed ahead of player locations and encounters. This makes the necessity of banks less critical; rather memory management is kept to real-time scenarios where an audio implementer is required to ensure that not too many sounds are loaded in situations with the most music, sound, and voice happening simultaneously.
In the end, what matters most is being able to iterate your audio until it works ideally for each situation. Bank management is one of the biggest roadblocks to iteration as sounds and events need to be created and tested, but loading in game is not something that Wwise or FMOD can simulate in their toolsets. As such, a significant amount of time is spent making sure banks and events are loaded, and at the right time during a game. It will not be long before banks are entirely unnecessary, and all that will be needed is simply organizing audio according to design-related needs rather than technical considerations.
Event Management
During development the game is a work in progress, so it can be common to run into performance issues. Controlling the number of sounds playing simultaneously is part of resource management, and is critical to minimizing the load on CPU. When you have several game objects within a small radius emitting sound, event management will be necessary to stay within the allotted audio resource budget. An audio resource budget is concerned not only with how much audio is in the game as measured by storage space, but also how much bandwidth the audio engine is consuming as it plays back multiple sounds concurrently. Added to this is the audio that is sitting resident in memory at any given moment in time. Events and audio sources can have priorities set to control what the player hears based on the context of the game. It will also ensure that players do not hear sounds out of range or sounds that are inaudible.
Limiting playback (or managing polyphony) also helps reduce clutter in the mix and maintain clarity. Let us imagine we are playing a third-person open-world game. There are six gas tanks next to a building and each has an explosion event attached. If we fire at one of the tanks the explosions will chain, and six explosions will simultaneously trigger. This not only gobbles up virtual voices, but it may also cause the overall volume to clip, and possibly introduce phasing issues. At the very least it will sound muddy or distorted. By limiting the number of explosion instances per object, the volume will remain moderate, reducing the load on both CPU and virtual voices. It will also safeguard against one category of sound inadvertently overwhelming the mix. Polyphony management is accomplished in a variety of ways depending on the implementation method, but the simplest way is to set priorities using middleware (see the “Probability and Priorities” section below).
Probability and Priorities
Games with a larger number of audio assets can benefit from the ability to control the probability and priority of sounds in the soundscape. This is another way to optimize our games audio and prioritize our resources. Random sounds triggered in game help add variety, but it could become tiresome if the sounds were to constantly trigger. Control over the probability (or weight) comes in handy to define how often a sound will trigger. By adding weight to sounds so that some trigger more than others will allow for a varied soundscape without overuse. For example, in a forest we might have an event triggering bird chirps. If the same bird sound triggers constantly the sound would stand out to the player. By reducing the probability that the bird chirp plays we are left with a more realistic experience.
When you have limits on the number of channels that can play audio at any given time, a control system is necessary to limit the number of sounds triggering to avoid bottleneck. When the channel limit is reached, a process called stealing can be used to allow new voices to play while stopping older ones. Without defining this system, sounds might feel as if they randomly drop in and out, as if it were a bug in the audio system. Priority systems allows the designer to set a high, medium, or low property to an event. Footsteps triggering in a very busy battle arena will be given lower priority than sounds like weapons and explosions, thus dropping the sounds without the player noticing.
Distance from the listener can also be used to change the priority of an event. Events that trigger further from the listener will automatically be lower in priority, which allows closer events to be heard. “Height” as a game parameter can be used in games with multiple vertical levels to prioritize sounds. It would sound weird if an NPC was positioned directly one level up from the player, but their sound played back as if they were in the same space. Using height to prioritize audio makes sure that only the most relevant audio is heard by the player.
Best Practices for Real-Time Effects
There are a variety of options for real-time effects processing in audio engines. Being aware of the effects of real-time processing on the CPU when implementing can save resources and provide a better mix.
There is no way around the CPU cost of effects processing but some techniques will offer more efficiency. Applying effects on the mix bus as opposed to individual events or objects can save resources. This is equivalent to grouping a reverb effect using an auxiliary track. Determining ahead of time if effects will be more beneficial when used in real time or baked into the sound will also help manage resources. Make use of profiling tools to determine the relative cost of the effect in question. Generally speaking, if the effect is aesthetic, baking it in is a good idea. If the effect needs to be dynamic and adapt to gameplay, it probably needs to be real time. It is often worthwhile to make real-time events reusable. It might take time to set up a particular system, but being able to reuse this logic across other audio events in game will be worth the time and resources.
Remember that codecs (encoding format), number of channels (stereo vs. mono), events, banks, real-time effects processing, and basically all nonlinear audio demand resources from the CPU. These resource limitations are a challenge, but by setting priorities and limiting playback audio designers can save CPU resources and produce a clear and dynamic mix. Keep in mind that these are not steps that need to be taken in the process of sound design for linear media. These methods are only employed when dealing with nonlinear and dynamic sound.
Platforms and Delivery
Understanding target delivery platforms will ensure a smooth delivery process. Most platforms have their own dev kits and requirements for audio (file format, size, etc.). The dev kits are provided to developers after signing an NDA (non-disclosure agreement). These agreements require the teams to keep certain information regarding the kits confidential, so it can be difficult to easily find specs for each platform online. Regardless, platform specifications are a major factor in defining your optimization plan. Consoles and desktop gaming platforms may have up to 80 channels available while handhelds and mobile may only have between 40 and 60 available channels. These figures are estimates, but can be a good starting point for defining the audio budget.
The list below covers major delivery platforms, in no particular order.
- Nintendo Switch, Wii, 3Ds
- Microsoft Xbox One
- Sony Playstation 4/PSVR/PSP/Vita
- Mobile (Apple and Android)
- Apple iWatch
- Web/HTML5
- PC
- VR Head Mount Displays
- Coin-operated games (includes arcade and casino)
While PC users can upgrade their CPU and graphics card, there is only so much room to improve due to motherboard limitations. Console, handheld, and mobile users however don’t have the luxury of updating components. It’s best to plan for the lowest common denominator either way.
Game audio engines have built-in audio compression schemes that allow you to choose between different formats for each platform. Researching the platform will reveal a bit of information about the playback system the player will be listening to during gameplay. To be safe, it’s best to prepare assets to sound good on a variety of listening devices. Since there are many ways to manage the overall audio footprint, it’s important to understand all your options. Developers will appreciate you as a sound designer if you are fluent in the variety of file delivery options.
As we discuss the various format options for the different platforms, keep in mind you will want to record, source, and design your sounds in the highest quality format. Working with 48 kHz/24-bit sessions is standard, but some designers choose to work with 96 kHz/24-bit. Once you bounce the file you can convert it to any file type and compression in the audio engine or prior to implementing the sounds.
Mobile and Handheld
A game developed for mobile or handheld means the player will most likely be listening through a small mono speaker built into the device or a pair of stereo earbuds. Neither will handle extreme ends of the frequency spectrum very well, so use EQ to manage your mix.
Since mobile and handheld devices have memory constraints, you will also need to consider file format and file size. All assets have to share the limited memory available, and audio will have just a small percentage of it allocated. Some mobile projects have an audio footprint limit between 2–5 MB which means you’ll have to pay close attention to file format and compression settings. This will require careful planning regarding the number of assets.
The most common format options for mobile and handheld are Ogg files or raw PCM. While mp3 files are supported on most devices, they are not ideal for looping assets, as we discussed in Chapter 2. You may have played some mobile games and experienced this gap in the music. Some formats are platform specific so it’s a good idea to research the platform you are developing for during the pre-production stage. Since creating immersive audio for games is 50 percent implementation and 50 percent design, it’s important to ensure the assets play back seamlessly in game.
Compressing files reduces the dynamics in the audio and some assets will sound better at lower compression settings than others. Limiting the number of assets you deliver on mobile and handheld devices can help you avoid over-compression while staying within the allotted audio file size. If possible, reuse the same assets in multiple events to maintain efficiency.
Mobile games likely won’t need 20 different footstep variations per terrain for each character for example. You can plan to have between six and eight variations of footsteps per terrain for the player character, and non-player characters (NPCs) can share footsteps based on group type. Similarly, delivering a few smaller ambience loops instead of three- to four-minute files can help add variety while keeping the file size in check.
Considering stereo vs. mono files is another way to reduce file size. If you plan on implementing 3D events into your game you will need to deliver the files in mono regardless. You may have to consider converting 2D events into mono as well to save file space. When designing assets that will eventually be converted to mono, be mindful of overpanning, which will not translate well in the mono file.
During the implementation process you will have to consider which files can be streamed vs. loaded into memory. Typically, looped files and longer assets are set to stream. Don’t stream too many files at once or the quality of playback may suffer.
Console and PC
For game builds deployed on console or PC, the player will typically be listening to playback over TV speakers. However, over-the-ear headphones, surround sound systems, and sound bars are all common as well. The frequency range of these playback systems is wider than for small mobile speakers. This allows for a much fuller sound with rich dynamics and spatialization.
While console and PC have far fewer limitations than mobile and handheld platforms, you still need to consider overall file size and CPU usage. Some platforms use a proprietary audio decoder, which will save processing power. More information on these file types can be found in the dev kit documentation or as part of the engine or middleware audio scheme. For example, viewing the build preferences in FMOD Studio will reveal that Playstation 4’s proprietary decoder is AT9 while Microsoft Xbox One’s is XMA. Console and PC games can range from 20 to 50 GB, and even though audio will only be allotted a portion of this space you’ll have much more to work with than the mobile limitations.
On console and PC the main audio concerns are the number of available virtual channels (managed by setting priorities for sounds) and CPU usage (managed by limiting real-time effects and choosing audio formats judiciously). Earlier in this chapter we covered virtual channel allocation and CPU usage. To review, audio engines and middleware allow you to limit the number of sounds playing at one time. You can also choose when to use real-time effects versus baking them into the sound before implementation.
Web and HTML5
While you may think of the abovementioned platforms as having far more game titles than the web, consider that Facebook has a large games platform with thousands of games. There are also many social casinos popping up online. Plenty of companies host web games for advertising their products or promoting their brand. There are also a number of stand-alone sites that host games, such as Pogo, MiniClip, Kongregate, Addicting Games, and Big Fish Games. These sites host hundreds of games and add new content regularly. To disregard web and HTML5 games is to disregard a large chunk of the market.
Bandwidth and file size are the biggest limitations in web-based games. You need to consider the game’s overall file size. Web-based games often have a limit of 5 GB for all assets, which means audio might be limited to 200–500 MB. A bit of audio trickery is required to achieve this slim file size, namely, music and ambience may have to be baked into one asset to save file space. You may also have to consider using mono files for streaming assets. When you have to use heavy compression it’s best to consider the dynamics in your assets since heavy compression may squash the sound.
Considering the development platform as you design the assets can help you stay in line with the requirements imposed by each device or system. In the Sound Lab you’ll find a practical exercise to get you more familiar with file types and compression. Visit the site now, or come back to it after further reading.
Optimizing for Platforms
The native audio engines will make it manageable to publish assets per platform. Audio middleware goes a step further by allowing designers to work in a single project, and generate separate sound banks for each platform. Selecting the right codec for each platform can be helpful in managing CPU and memory usage. Audio designers take great pride in their work, and often cringe when faced with compressing assets. But high-quality WAV files take up a lot of storage space and can be a hit on CPU during playback. It’s a good idea to come to terms with compressing audio as it will offer you more control over the final product.
A good way to get started understanding different codecs is by getting familiar with the conversion settings in your DAW. Grab a freeware version of Audacity or another audio converter, and test out how each compression type and amount affects a single sound. Try this with a few categories of sounds like underscore music, explosions, and UI. It is easier to hide artifacts that can be introduced during compression in some files than it is in others. It all depends on the type of sound, and its frequency content.
Some platforms (like Playstation and Microsoft consoles) have hardware decoders, which have some advantages as well as disadvantages over software codecs like Ogg Vorbis and mp3 (keep in mind the gap that the mp3 encoding process adds to files – refer to “Looping,” Chapter 2).
Most codecs (whether hardware or software) have a processing cost, so it’s best to read through the information that comes with the dev kits to get more familiar with each system. Hardware codecs may have limits on asset duration and loop points, but may work better natively than a software codec.
Having an understanding of the cost differences between codecs can help define which conversion settings to use in the audio engine. For example, Ogg files require more CPU but less memory than PCM files. Additionally, mobile platforms like Android and Apple have specific preferences for audio codecs. Some developers may ask for Ogg files for Android builds and AAC for iOS. As an audio designer you should be knowledgeable with the process of compressing sounds and file types, just as a graphic artist should have a strong understanding of file formats for various delivery spec.
Testing, Debugging, and QA
Testing the game is an important part of the implementation phase. Although you’ll be testing as you go (as we describe earlier in the chapter, see the “Implementation Cycle”), playtesting often occurs toward the end of the development process. Playtesting is a fancy word for playing the game and looking for glitches, errors, and bugs. As a sound designer you are the expert in how the game should sound. Therefore you are the best person to evaluate whether or not the sound is triggering properly and the mix is clear and effective. However, this is typically a collaborative process and the game’s budget will determine the amount of testing that can be done.
Playtesting
Testing is a process that occurs during all phases of development. For instance, prior to importing assets into the audio engine, some audio designers mock up the audio against video capture of gameplay in their DAW. To take things a step further, middleware offers a space to mock up and audition sound systems for testing, prototyping, and mixing.
In Wwise this feature is called Soundcaster, which allows triggering of events and all of the effects and controls that can affect or evolve them. In FMOD, the Sandbox offers similar control. Both will allow you to apply parameter and game sync control over the sounds to simulate in-game events without having to go into the game engine itself. While these simulation environments allow you to test event triggers, they are also really useful for adjusting distance attenuation and other settings that might need some dialing in. In the Sound Lab (companion site) we have created a video tutorial for using the FMOD Sandbox and the Wwise Soundcaster. Be sure to check it out before moving on to later chapters.
Playtesting is equally important for composers as it is for sound designers. You might have composed the greatest adaptive system in history, but the only way to test if it works for your game is to play it with the music implemented. This will give you valuable insights on whether or not the music hits the mood properly, what transitions are awkward, and whether or not you should even have music in every area. Believe it or not, it is very common to realize you have simply implemented too much music. Wall-to-wall music is not always the best choice, and in many cases you will find yourself either recomposing to make certain cues more ambient, less complex/dense, or taking them out entirely.
Regardless, playtesting is what separates mediocre game scores from great ones.
Debugging
Profiling is both a game engine and middleware feature for examining activity such as memory, streaming, effects, voices, and game syncs for debugging and resource management. Both Wwise and FMOD have profiler features where you can profile locally or while connected remotely to the game engine. In this section we will focus on profiling as it pertains to middleware specifically. It’s important to note that while we have chosen to discuss profiling in the “Testing, Debugging, and QA” section of this book, it can certainly be used earlier on in the implementation process.
Performance profiling allows the user to check for issues in their resource and asset management plan and make quick fixes by accessing the events that are overloading the system. Object profiling focuses on individual audio events triggered by player and non-player characters, ambient objects, weapons, and more. The profiler will generate a preview to monitor which sounds are being triggered in game. Sound-bank memory size, CPU, memory, and bandwidth can also be monitored. A spike in any of those resources can be further investigated in the captured profile session.
Earlier we discussed limiting event sounds based on distance attenuation. If the audio designer sets a voice kill at a max distance variable and you can’t hear the sound in game, it doesn’t mean it isn’t still triggering. With a busy soundscape it is easy for sounds to get masked by other sounds. The profiler lets you look at voices triggered and their volume levels. Additionally, profiling sessions can be saved and recalled at a later time.
Quality Control
The QA, or quality assurance, process is often perceived as “just playing games,” but there is much more to the process than that. A QA specialist needs to define how various players might play the game. Many games can be “broken” if the player’s style falls outside the defined norm. In the context of general game development, QA testers work to push the game to its limits to unveil issues in all areas of the game. Here we will discuss QA as it pertains to audio. There are many organizational aspects related to the job of QA, and an audio designer will be well served to connect with the QA department to build a relationship with it as early as possible. Bug reporting, testing schedules, and protocols are the responsibilities of the QA team. Properly communicating how the team should listen and test audio can be a huge benefit, and an important step toward knowing that your audio is working as expected.
The size of the team and project budget will determine whether or not there is a dedicated QA team. Larger teams will have someone in QA specifically testing audio issues. This person might be someone who is an audio enthusiast, or even someone looking to make the jump to the audio team. Regardless of whether there is a dedicated audio QA tester, the audio designer should be testing, simulating, and profiling as well to ensure audio is behaving as it should. It’s important to test both in the game engine editor and in local builds. Sound issues may not be present in the editor but will present in the build, so check both. Testing on dev kits for the target platform, or various quality computers and mobile devices will offer a view into how the audio might perform across various devices.
In the case of the audio designer tasked with only delivering assets to be implemented by the programmer, testing will be an extremely important part of the process. Perhaps the developer compressed the files too far or a sound isn’t triggering where it was intended. To help resolve issues with incorrect in-game triggering, video mockups from a DAW can be used to demonstrate how sounds should trigger in game. Either way, you will have to insist on leaving room in the development timeline to test and make adjustments.
Contract or freelance audio designers should have a variety of testing devices when working remotely. For mobile games, it’s good to have at the very least an Android device for testing but it can help to have an Apple device as well. Generally speaking, when the game is being developed for both mobile platforms build pushes are usually faster to Android. If you only have an Apple device you may have to wait for the approval process before the build is available. Working with consoles and purchasing dev kits can be expensive so it’s not usual for a remote designer to be given one by the developer. The kits are only available to registered developers so it can be difficult to obtain one on your own. However, VR, AR, and MR head mount displays (HMD) can be purchased by an individual for testing purposes. If you plan on working on these mixed-reality projects it’s a good idea to have a HMD.
Understanding how to test is an important part of the process. Go out of your way to “break” things in game. Thinking outside the box can help with this. Try going against the obvious flow of gameplay as much as possible. Since you are familiar with the audio system you should be prepared to test the game with certain expectations of audio behavior. To be thorough you will have to play through in unexpected ways as well. For example, transitions should be tested for smooth movement between assets, regardless of play style. Material collision sounds might sound good when the player kicks a box once, but if the player decides to continue to kick the box in short sequence it may trigger too many sounds. This kind of play style would then suggest that you may have to set a priority limit on the event. Again, the overall goal is to try to apply various play styles to find rough spots in the audio. Avoiding being cautious and try your hardest to trigger awkward combinations of sounds. It’s better to find the issues during development than for a player to find them in game.
The Sound Lab
Sound and music creation is only half the battle in game audio. Implementation takes technical knowledge, problem-solving abilities, and out-of-the-box ideas to make an immersive sonic experience for the player. Now that you have a better understanding of implementing assets and resource management, stop here and head over to the Sound Lab where we wrap up what you have learned in this chapter.
Notes
1 Wikipedia. “List of Game Engines.”
2 R. Usher, “How Does In-Game Audio Affect Players?”
3 https://guides.github.com/activities/hello-world/
4 R. Dudler, “Git – The Simple Guide.”
5 Wikipedia. “List of Game Engines.”
7 Of course, limitations are less of a concern with next-gen consoles, but a majority of games are being developed for mobile or handheld systems which do have restrictions.
8 M. Henein, “Answering the Call of Duty.”
9 https://acoustics.byu.edu/research/real-time-convolution-auralization
10 J. Peddie, “What’s the Difference between Ray Tracing, Ray Casting, and Ray Charles?”
11 M. Lanham, Game Audio Development with Unity 5.X.
12 J. Doran, Unreal Engine 4 Scripting with C++.
13 A.-S. Mongeau, “An Introduction to Game Audio Scripting in Unity.”
15 R. Steiglitz, A Digital Signal Processing Primer.
16 R. Boulanger, R. and V. Lazzarini, The Audio Programming Book.
17 www.reddit.com/r/Overwatch/comments/50swfk/ama_request_the_overwatch_sound_design_team/
Bibliography
Boulanger, R. and Lazzarini, V. (eds.) (2010). The Audio Programming Book, Har/DVD edn. Cambridge, MA: MIT Press
Doran, J. (2019). Unreal Engine 4 Scripting with C++. Birmingham, UK: Packt Publishing.
Duder, R. (n.d.). “Git – The Simple Guide.” Retrieved from http://rogerdudler.github.io/git-guide/
Henein, M. (2008). “Answering the Call of Duty.” Retrieved from ww.mixonline.com/sfp/answering-call-duty-369344
Lanham, M. (2017). Game Audio Development with Unity 5.X. Birmingham, UK: Packt Publishing.
Mongeau, A.-S. (n.d.). “An Introduction to Game Audio Scripting in Unity.” Retrieved from www.asoundeffect.com/game-audio-scripting/
Peddie, J. (2016). “What’s the Difference between Ray Tracing, Ray Casting, and Ray Charles?” Retrieved from www.electronicdesign.com/displays/what-s-difference-between-ray-tracing-ray-casting-and-ray-charles
Raybould, D. (2016). Game Audio Implementation: A Practical Guide Using the Unreal Engine. Burlington, MA: Focal Press.
Steiglitz, R. (1996). A Digital Signal Processing Primer: With Applications to Digital Audio and Computer Music. Menlo Park, CA: Addison-Wesley.
Usher, R. (2012). “How Does In-Game Audio Affect Players?” Retrieved from www.gamasutra.com/view/feature/168731/how_does_ingame_audio_affect_.php
Wikipedia. “List of Game Engines.” Retrieved from https://en.wikipedia.org/wiki/List_of_game_engines