
Shooting Video
The Basics
Photographers take pictures. Photojournalists tell stories with their cameras. In fact, the best photojournalists use the camera much as the writer uses a computer keyboard—to report observations and tell stories. In essence, the camera is a writing and reporting instrument, an extension not so much of the outer eye as of the inner, mind’s eye. What you see, think, and feel about people and events you often can share with other people through your camera.
Photography is among the most technical of the creative arts. To capture mood, action, and meaning properly and place emphasis where you want it demands that you be not only creatively adept, but technically proficient. Accordingly, it is important not only that you know yourself, your shot, and your story, but your equipment.
THE CAMERA
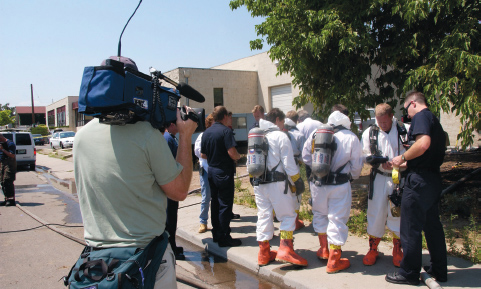
In some respects the electronic camera is similar to a film camera, but with an important difference (Figure A.1). The digital camera features the charge-coupled device (CCD), a solid-state chip, the size of a thumbnail or smaller, that converts reflected light directly to electrical signals. The camera circuitry translates these impulses into strings of 1s and 0s for each frame of video. This digital information is decoded into a broadcast quality video signal that can be fed to a television monitor, recorded onto a hard drive or other recording medium, or routed to live transmission equipment. Because of their reduced size and weight, many solid state cameras are easier to transport and use under difficult field conditions.
The Camera Viewfinder
A black-and-white or color image of the scene also is reproduced in the camera viewfinder, itself a tiny television screen. The scene in the viewfinder is the same image as that recorded, streamed, or beamed live to home viewers. After a story is shot, it can be played back through the camera viewfinder. In this manner, the photographer can “field check” the video and be certain the scenes were properly recorded.
White Balance
Professionals white-balance the camera before they cover a story, and thereafter each time the light source changes. White balance is the adjustment of camera circuitry to reproduce pure whites under the light source at hand. When the camera is properly white-balanced, there is said to be an absence of color “at white.” Many cameras will adjust white balance automatically, although auto settings rarely produce ideal color. Most professionals white balance their own shots manually by showing the camera a white card or other white object in the scene and pressing a button. Most cameras also offer factory-preset white balances for indoor and outdoor light. Presets will work in a pinch, when important shots would otherwise be missed on fast-breaking events.
Video Formats
Over the years, video formats have included the Sony DVCAM, MiniDV Beta, Beta SP, and Digital Betacam; the Panasonic digital video (DVC and DVCPRO) and older to ancient M-II, D-3, and D-4 formats; three-quarter-inch, 4-mm, 8-mm, 19-mm, one-quarter-inch, one-inch, and two-inch video; Super VHS (S-VHS); Hi-Band 8 mm (Hi-8), and yet other digital video formats from manufacturers such as Sony, Canon, and JVC.
Of these options, digital video’s more affordable price and features have made it a clear favorite in today’s newsgathering operations and with cable and corporate producers. Even the smallest, handheld digital video cameras produce broadcast-quality images and offer other features such as high-quality audio and shutter speeds from 1/5 second to 1/15,000 second, a range useful for everything from low-light exposures to slow-motion and stop-action photography. At the mid- to high-end, digital video cameras shoot high-definition images and store still photographs on a hard disk drive or flash memory simultaneously while recording video (capturing still photos for on-screen graphics, for example). Some digital “still” cameras also can record high-def video and audio. As an added bonus, some digital recording media are small enough that a photographer can carry several hours of video in a coat pocket. Briefcase-sized digital laptop editors provide unparalleled ease of editing virtually anywhere. Some smartphones offer basic video and editing capability. The web site at www.digitaljournalist.org provides periodic updates on digital technology, including advances in digital video field acquisition, the process of recording video on cameras equipped with hard disk drives, optical disks, and memory sticks.
THE LENS
The lens gathers and focuses light and controls the amount of light that enters the camera. Professional lenses contain a series of convex and concave elements. They offer both auto and manual focus. If, while a shot is being made, the focus point shifts from one subject to another, the effect is called a rack focus. Gradually, sharp focus is transferred from an object in the foreground to a more distant object, or vice versa. Like most such techniques, the rack focus is least effective when it calls attention to itself.
Macro Lenses
Lenses on video cameras commonly allow macro-focusing, to reproduce larger-than-life images. This feature lets you magnify very small objects, such as printed material from a court document or newspaper, so viewers can see the object clearly. (Figure A.2).
The Zoom Lens
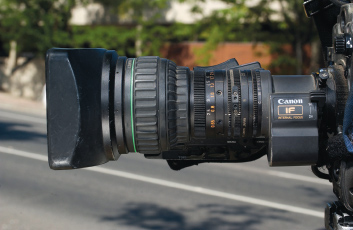
The most common “glass” on video cameras is the variable focal length or zoom lens (Figure A.3). This lens provides continuously variable focal-length settings from wide angle to telephoto. With its ability to provide various focal settings through such representative ranges as 12–120 mm or 25–250 mm, the zoom lens provides the equivalent of several focal length lenses in one. Because focal length is continuously variable, the photographer also can more precisely “crop” or compose scenes to eliminate undesirable elements within the frame.
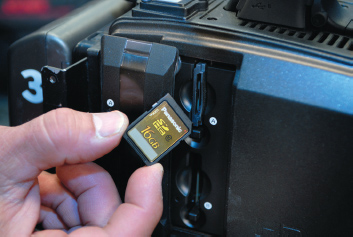
FIGURE A.2
Macro lenses permit the photojournalist to record larger-than-life images, a feature that is especially convenient for magnifying small objects.
Originally, the zoom lens was invented to keep the picture from going to black as camera operators rotated their fixed-lens turrets during live studio broadcasts. The problem was especially acute in broadcasts that originated in single-camera studios. Home audiences saw momentary screen blackouts every time the camera operator rotated the turret to rack up a different lens.
HOW TO FOCUS THE ZOOM LENS To focus the lens, zoom all the way in to a close-up on your subject. Focus the lens. Now zoom back out to the composition you want. Everything within the range of your zoom will be in focus. If you zoom in and are able to obtain a clean focus but then lose focus when you zoom back out, the lens may have a back focus problem that will require service.
Lens Focal Length
Lens focal length (Figure A.4) is determined by measuring the distance from the optical center or node of the lens to the film plane, in the case of film cameras, or the front surface of the target or CCD chip in video cameras. The optical center is the point inside the lens where light rays first bend as they are directed or brought to bear on the film plane or target during the focusing process. Seldom does the physical length of the lens housing accurately represent the lens’s focal length.
FIGURE A.4
Lens focal length is determined by measuring the distance from the optical center, or node, of the lens to the film plane or front surface of the CCD. The physical length of the lens housing is seldom an accurate expression of focal length.
Focal length determines the image size of the subject and the angle of view. Each time the focal length is doubled, the subject’s image size doubles. If the focal length is cut in half, so is the subject’s image size. Whereas a normal lens might provide a 45-degree angle of view, a wide-angle lens might produce more than a 90-degree angle of view.
Lens perspective
“Normal” lens perspective is equivalent to the human eye’s view of the world. The sizes of objects in relation to one another at certain distances are approximately equal to how the human eye sees things.
From one format to another, manufacturers determine normal lens perspective for that format by measuring the diagonal size of the film negative or target. Thus, in some video cameras, “normal focal length” might be 25 mm. Others might require a lens setting of approximately 12 mm in focal length, whereas in the 35-mm still camera, normal perspective results from lenses of 45 mm to approximately 55 mm in focal length.
WIDE-ANGLE LENSES Lenses shorter than the focal length required to yield normal perspective are called wide-angle lenses. These lenses yield smaller subject size and tend to emphasize subject matter in the foreground. Compared to normal and long lenses, wide-angle lenses also yield apparent greater depth of field, defined as the area of the scene that appears to be in sharp focus.
LONG OR TELEPHOTO LENSES Lenses or zoom lens settings greater than the focal length required to yield normal perspective are called long or telephoto lenses. Technically, all telephoto lenses are long lenses, although not all long lenses are telephoto lenses. Telephoto lenses qualify for the title because they are physically shorter than their focal length. Long lenses magnify image size and emphasize subject matter in the background. Most viewers are familiar with the tendency of long lenses to foreshorten distance, so that objects both far and near within the scene appear to be bunched up and shoved together, in an effect called compression. Long lenses also produce more shallow depth of field than normal and wide-angle lenses.
Lens Aperture (F/Stops)
Every camera requires an exact amount of light to produce perfect exposure. The amount of light required varies from one camera to the next depending on which CCD chip the camera uses. But from one application to another with a particular camera, the amount of light required to produce perfect exposure is always the same, regardless of whether the subject is photographed in the dark of night or on the brightest ski slope.
To control the amount of light entering the camera under varying light conditions, the lens is equipped with an adjustable aperture. Similar in function to the iris of the human eye, the aperture can be varied in size according to the prevailing light. The various aperture settings are expressed in f/stops, such as f/1.8, f/8, or f/22.
F/Stops Are Fractions
The f/stop number is a fraction, determined by comparing the effective diameter of the lens against its focal length. Because the f-number is a fraction, the higher the f/stop number, the smaller the aperture size. Thus, f/22 is a smaller aperture opening than f/1.4 (Figure A.5).
Each successive aperture either halves or doubles the amount of light entering the camera. At a setting of f/8, the lens admits only half the amount of light that it does when set to f/5.6. An aperture set to f/16 admits twice as much light as at f/22, whereas f/11 admits four times as much light as f/22. Thus, at the far end of the scale, f/1.2 admits 256 times more light than f/22.

As the aperture is made smaller, the photographer is said to “close down” or “stop down” the aperture. As the aperture size is made larger, the photographer is said to “open up” the aperture.
The most commonly encountered “whole” f/stop numbers are f/1.2, 2, 2.8, 4, 5.6, 8, 11, 16, and 22. For research, military, and related applications, some lenses are available with f/stop numbers that extend to 32, 45, and 64.
T/Stop
The f/stop is a theoretical value that assumes the lens is passing all the light available to it. A more accurate lens aperture setting is the t/stop, which takes into account the number of lens elements, lens coatings, and other light-absorbing properties of the lens elements and housing. If the lens is calibrated in t/stops, the letter t may appear on the lens housing next to the aperture numbers. Typically, the difference between the two values is about one-half f/stop.
Aperture Size Influences Depth of Field
Aperture size also affects depth of field (DOF), defined as the area within a scene that appears to be in focus. The smaller the aperture, the greater the apparent DOF (Figure A.6). The larger the aperture, the more shallow the DOF.
Aperture size affects depth of field because of its effect on light rays entering the lens. Because the camera can focus on only one plane or point in space at a time, only objects at that one distance from the camera can be in true focus. To one degree or another, every object at any other distance is rendered out of focus.
Razor-crisp focus results from pinpoints of light that strike the film plane or target surface. If the light rays are out of focus, they register not as pinpoints of light but as circles of light called circles of confusion. If the circles of confusion are small enough, the subject may appear sharp enough to be in focus. If the circles of confusion are extraordinarily large, however, the object will be reproduced in fuzzy or soft focus. Small apertures produce smaller circles of confusion, and thus greater apparent depth of field.
Other Factors That Affect Depth of Field
In addition to aperture size, depth of field also is determined by lens focal length and distance from subject. Wide-angle lenses produce greater apparent depth of field than long lenses, and depth of field increases as a lens is focused on objects further from the camera. Conversely, depth of field diminishes as the lens focuses on objects closer to the camera.

FIGURE A.6
Depth of field is an expression of the area within a scene that appears to be in focus. The left example illustrates shallow depth of field; the right illustrates great depth of field.
Focal length affects depth of field because of its influence on aperture size. Assuming all other factors remain equal, each time the lens housing doubles in length, only half the original amount of light is passed. To compensate for the light loss, the aperture size must be doubled. Thus, if the effective diameter of a 12-mm lens at f/8 is 2 mm, the effective diameter of a 25-mm lens at f/8 must be approximately 4 mm. Doubling the focal length of the 25-mm lens to 50 mm would result in an effective diameter at f/8 of approximately 8 mm. Because aperture size controls the size of circles of confusion, out-of-focus objects within the scene are more obviously out of focus when photographed with the 50-mm or 25-mm lenses than with the 12-mm lens.
You can see for yourself how the camera’s distance from the subject affects depth of field. Hold an object very close to your eye, then without changing focus become aware of the surroundings behind the object. If you maintain your focus on the object, the background will appear to be out of focus.
Depth of Field
Most commonly, about one-third of the total range of depth of field occurs in front of the subject or focus point, and two-thirds behind the subject. Assume the lens is focused on a subject 45 feet from the camera, and that the total range of depth of field is 60 feet. In this example, the range of acceptable focus or depth of field would begin 20 feet in front of the subject (one-third of 60 feet) and extend to 40 feet behind the subject (two-thirds of 60 feet).
The near plane of acceptable focus would therefore begin at approximately 25 feet in front of the camera and extend to approximately 85 feet from the camera. ■
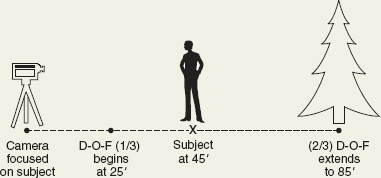
FIGURE A.7
Depth of Field
Now move the object further away from your eye and notice how depth of field increases. If you were to focus on the object several hundred feet away, the entire range of your view would appear to be in focus.
HOW TO OBTAIN MAXIMUM DEPTH OF FIELD Depth of field increases in a scene whenever the following conditions are met, whether separately or in combination. Thus, maximum depth of field results whenever all the conditions are met:
■ small aperture setting (i.e., f/22)
■ short focal-length lens (wide angle)
■ camera focused on objects far from it
HOW TO OBTAIN SHALLOW DEPTH OF FIELD Shallow depth of field is desirable for artistic effect or when the photojournalist wishes to confine the viewer’s attention to foreground subjects by throwing the background out of focus. Depth of field in a scene becomes shallower when the following conditions are met, whether separately or in combination. The minimum depth of field results when all the conditions are met:
■ large aperture setting (i.e., f/2.8 or smaller)
■ long focal-length lens (telephoto)
■ camera focused on objects very near to it
Even in bright light, larger aperture settings are possible if the photographer uses neutral density filters to reduce the amount of light entering the lens (see Chapter 5, “The Magic of Light and Lighting”).
Avoid Automatic Lens Settings
The video camera “sees” the scene in terms of the standard gray scale that is familiar to black-and-white photographers. At one end of the scale, represented by a value of 10, is pure white. At the other end of the scale, represented by a value of 0, is black. In between are the various shades of gray, ranging from light to very dark gray.
Objects within the scene are reproduced as various shades of white, gray, and black. The camera’s color circuitry combines with the black-and-white picture to produce a color image. If you turn down the color on a television set, you can see the underlying black and white image.
If a scene is made up mostly of white and black tones, it is reproduced as a high-contrast image. If the scene is made up mostly of objects that yield medium gray tones, it will be reproduced as a low-contrast image (Figure A.8). In determining exposure, the camera’s automatic exposure circuitry samples all the white, black, and gray areas in the scene, then calculates exposure based on an average of all the values represented. High-contrast scenes most easily fool the camera, such as when you photograph someone against a window, the sky, or a white wall. Images with such high-contrast ratios also typically sacrifice sharpness and subtle detail. The camera normally produces its most accurate exposure and fineness of detail when objects within the scene tend toward the middle of the gray scale.
Because the automatic circuitry adjusts constantly to changing light conditions, it can produce an undesirable “bloom” or surge in exposure whenever moving objects within the scene pass in front of backgrounds with differing shades of contrast. Exposure surge would occur in the following shots if the camera were left on the automatic exposure setting:
■ a child rides a tricycle past a white picket fence interspersed with dark, ornamental bushes
■ a woman doing sit-ups moves into and out of the frame in front of a light-colored wall
■ bright sunlight methodically appears and disappears in the gaps between freight cars as a train roars past a railroad crossing
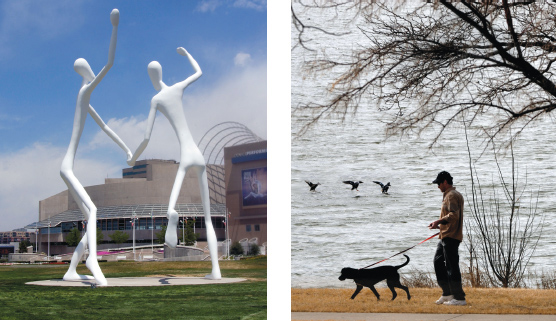
FIGURE A.8
Variations between the brightest and darkest objects dictate the degree of contrast in a scene. Variations between bright and dark objects in low-contrast images (left) are far less pronounced than in high-contrast scenes (right).
In each instance, the automatic circuitry will struggle first to reduce exposure, then to increase exposure to accommodate the changing light intensities. You can avoid problems by keeping the camera on manual exposure while you shoot.
Be Careful with That Camera
Whenever you’re in the field, always remember Peterson’s law: “Murphy was an optimist.” If anything can go wrong in the world of television, it will. Leave your camera on the tripod, walk away for a moment, and be certain that fate will conspire, somehow, to tip it over: a wind gust, a puppy chasing cats, a clumsy passerby, whatever it takes to bring down that camera. Forget to lock down the tripod head, walk over to adjust the mike on your interviewee, and return to discover your $3,000 lens now dangles from a torqued camera body. It happens.
SUMMARY
Today it is possible to photograph technically high-quality images with little or no technical knowledge. Automatic focus, exposure, white balance, and simplified camera operation make this possible. But without an understanding of the basic processes involved in creating visual imagery, the photographer forfeits some supervision over content. Less achievable are the subtle distinctions in imagery that can be used to enhance the viewer’s ability to experience the complex interrelations of nuance, mood, and meaning in stories.
The video camera somewhat duplicates the function of the human eye. The camera converts light rays to electrical signals that can be transmitted to home viewers or recorded on digital media for later broadcast. The camera lens gathers and focuses light, whereas the lens aperture or iris allows for precise exposure control. Lenses are available either in fixed focal lengths or, most commonly, as zoom lenses with continuously variable focal lengths. Changes in focal length allow the photographer to vary emphasis on subject matter by changing perspective and depth of field.
Although entirely adequate stories can be shot with virtually no understanding of the camera, photojournalists who aspire to excellence soon discover that mastery without understanding is unlikely.
KEY TERMS
aperture 290
charge-coupled device (CCD) 286
circles of confusion 291
contrast 294
depth of field (DOF) 291
digital 287
focal length 289
f/stops 290
gray scale 293
great depth of field 292
iris 290
long or telephoto lens 290
macro-focusing 288
maximum depth of field 292
node 289
optical center 289
rack focus 288
shallow depth of field 293
t/stop 291
white balance 287
wide-angle lens 290
zoom lens 288
DISCUSSION
1. Define the term white balance and explain why it is important.
2. In general terms, explain how video signals from the camera are recorded onto video.
3. List and describe the primary functions of the camera lens.
4. List the distinguishing features of the zoom lens and discuss its strengths and weaknesses.
5. Explain how focal length affects lens perspective, image size, and depth of field.
6. Explain the relationship between lens aperture size and f/stop number.
7. Describe steps the photographer can take to achieve shallow depth of field and great depth of field.
8. Explain why duplicate copies of digital recordings show very little loss in quality.
EXERCISES
1. Practice handholding the camera until you can hold it rock steady.
2. Using a television field camera or home video camera, white-balance the camera for sunlight and, without further adjustment, record one scene under fluorescent light, a second scene indoors under artificial quartz lights, and a third scene outdoors under normal sunlight. Now repeat the process, but this time balance the camera for artificial quartz light. Play back the scenes and compare the camera’s response to varying degrees of color temperature.
3. Study the aperture on a camera lens as you change f/stop settings. Notice the relationship between large aperture sizes and small f/stop numbers and vice versa.
4. Position a subject in front of a window or other source of strong illumination. Allow the camera metering system to determine proper exposure. Notice how the subject tends to silhouette unless supplementary light is added to the front of the subject.
5. Allow camera circuitry to determine the proper exposure in a scene, then purposefully underexpose and overexpose the scene by one-half f/stop, next by one full f/stop, and finally by two full f/stops. Identify each stage of over- or underexposure by speaking into the camera microphone as you record the shots on video, or else use a small slate in the scene on which you have written +1/2 stop, +1 stop, etc. Notice the effect of over- and underexposure on colors and contrasts within the scene.
6. Without changing camera position, shoot a wide-angle shot of a subject, then a telephoto shot of the same subject. Notice the effect of focal-length setting on image size, depth of field, and emphasis on subject matter.
7. Shoot a subject in silhouette against a window, the sky, or other bright light source. Record the scene using the camera’s automatic exposure meter. Next, switch the camera to manual exposure setting and record the scene two more times: first, so the subject is correctly exposed; second, so the background is correctly exposed. Play back the video and compare the three shots you have made, paying particular attention to variations in exposure, color reproduction, and fineness of detail between the respective scenes.
8. To become more familiar with the perspective produced at various lens focal settings, first shoot a series of shots with the camera in a fixed position. Make five individual shots, without zooming the lens during any individual shot, at the following or similar focal lengths: 15 mm, 30 mm, 50 mm, 75 mm, and 100 mm. Now, set and keep the focal length at normal perspective for the camera you are using and make five more shots, this time beginning at least 100 feet from a subject and then physically moving the camera ten footsteps closer each time you make a shot. Compare the lack of real change in perspective when the camera is left in one position and the true change in perspective that results when you physically move the camera.
9. Focus the camera on a scene in which a number of highlights are visible. Purposefully but gradually throw the scene out of focus and notice how elements within the scene are reproduced as ever-larger circles of confusion.
10. To become more familiar with the influences that affect depth of field, attach the camera to a tripod in a fixed location and shoot five shots of a subject at the following or similar focal lengths: 15 mm, 30 mm, 50 mm, 75 mm, and 100 mm. Do not move the camera between shots. Next, set the lens on the widest focal-length setting and make five more shots, this time physically moving the camera so that each shot is made approximately equidistant from the previous shot. Repeat the process, this time with the lens set on a long or telephoto length setting. Notice how depth of field decreases the closer the camera is to the subject and the longer the focal-length setting becomes.