Writing with Light
Light has as much substance as words or gale force winds. Light is real stuff, as real as ink and sound, and in television and video, light is the communicators’ primary medium. Until the advent of photography, we could never see or hear the past or present.1 Since photography’s invention, the past has been recalled not simply from memory, or through words, but from a tangible record the original photons created when they glanced off the actual subjects of our stories and were captured on video. Through videotape and digital recordings, the past can be captured, condensed, and reviewed at will. This is the magic embodied in the word photography, which is taken from Greek root words meaning “writing with light.”
As the artist’s palette in this electronic medium, light is thus far more important to the work of the video journalists than merely as a source of illumination to provide an exposure. Light does illuminate, but when properly controlled it also lends texture, emphasis, and emotion. In video journalism, light is form. Light is mood. Light is meaning.
The most “natural” light is natural light (Figure 5.1). The best lighting is invisible. In fact, the strongest and most honest stories often contain little or no lighting. But, when natural light wanes, and your story fades, you’ll profit from understanding the following lighting techniques.
You’ll encounter basic but essential lighting concepts and patterns here. You also can achieve the most important patterns outdoors, under natural sunlight. At first blush, they may appear complex, perhaps unnecessary. Don’t be fooled. Learning to control light, and work smart with available light, is akin not only to learning a native language, but figuring out how to whisper, speak, and shout while using it.
PHOTOGRAPHY IS THE ART OF CONTROLLING LIGHT
In many ways, then, photography is the art of capturing and controlling light. Until the advent of electronic cameras, the photographer was forced to manipulate light, its intensity and color, to suit the whimsy of film stock. With today’s technology, the photographer can adjust electronic circuitry to accommodate a greater range of light conditions and color.
Color Temperature
The color temperature of lighting sources is measured according to a scale of degrees Kelvin (°K), which indicates the proportion of red to blue light the light source radiates. Daylight is a combination of all the light rays in the visible spectrum, but daylight contains a higher proportion of blue than some other sources. Tungsten halogen lights, commonly used in video and television lighting, contain all the light rays of the visible spectrum, but with a higher proportion of red hues than daylight produces.
Some cameras automatically monitor color balance. Other video field cameras are set up to reproduce colors accurately only under light sources with a color temperature of 3200°K. If light entering the lens is anything other than 3200°K, the scenes will be either too green or blue (at color temperatures above 3200°K) or too red or orange (at temperatures below 3200°K). This means that outdoors, without compensating filters or auto monitoring, the camera will “see” sunlight as overly blue.
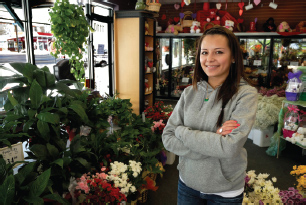
FIGURE 5.1
Natural light is often most natural, even under sunlight, and even indoors. Otherwise, you can achieve natural lighting patterns by understanding how to position artificial lights indoors, and even outdoors under natural sunlight by knowing how to position your camera and your subjects.
An understanding of color temperatures is important for photojournalists because professionals often need to fine tune settings for proper white balance to reproduce pure white and accurate colors under each of the various light sources. White balance is defined as the absence of color at white.
The laws of physics that influence color temperature are different from our psychological and physical reactions to color and temperature. Human experience leads us to associate the color blue with cool or cold objects and the color red with warm or hot objects. In the case of color temperature, just the opposite is true (Figure 5.2). As the color temperature increases, the light becomes progressively more bluish. As color temperature decreases, the light becomes progressively more reddish. Thus, with color temperatures, blue is “hot”; red is “cool.”
Tungsten Halogen Light Sources
The artificial light source frequently used in television news is the tungsten halogen bulb. Many professionals just call them quartz, tungsten, or halogen lights. Small, lightweight, and portable, tungsten halogen lights produce brilliant illumination at a relatively constant color temperature of 3000°K to 3200°K (see Figure 5.2). The color temperature can be held constant because the bulb is filled with an inert gas that prevents the glowing tungsten filament from discoloring the inside of the bulb as it burns. Because of the inert gas tungsten halogen bulbs have the capacity to “renew” themselves. In an atmosphere in which virtually no combustion is possible, particles that evaporate from the filament redeposit onto the filament.
Filters
Videographers and photojournalists rely on three basic filter applications to control light, color temperature, and sometimes depth-of-field. These applications encompass filters used on cameras, artificial lights, and windows.
Color Temperature Scale |
||
| DEGREES KELVIN | TYPE OF LIGHT SOURCE | |
|
Reddish hues |
2000–3000°K |
Sun at sunrise or sunset |
|
2500–2900°K |
Household tungsten bulbs |
|
|
3200–3500°K |
Quartz lights |
|
|
3200–7500°K |
Fluorescent lights |
|
|
3275°K |
Tungsten lamp 2k |
|
| 3380°K | Tungsten lamp 5k, 10k | |
| Bluish hues | 5000–5400°K | Sun: direct at noon |
|
5500–6500°K |
Sun (sun + sky) |
|
|
5500–6500°K |
Sun: through clouds/haze |
|
|
6000–7500°K |
Sky: overcast |
|
|
7000–8000°K |
Outdoor shade areas |
|
|
8000–10,000°K |
Sky: partly cloudy |
|
FIGURE 5.2
The color temperature of various light sources is measured in degrees Kelvin (°K) as an indication of the proportion of red to blue light radiated by the light source. As light sources change, the television camera’s white balance must be adjusted to produce an absence of color at white under these varying hues of color
Source: “Kelvin Color Temperatures,” www.3drender.com/glossary/colortemp.htm (accessed February 13, 2011). Based on information by Jeremy Birn, Digital Lighting & Rendering, (Indianapolis: New Riders Publishing, 2000).
Camera-mounted filters: filters that are mounted on the front of the camera lens or just behind the lens inside the camera.
Light-mounted filters: gel or optical glass filters that are positioned directly on the light head in a mount or clamp-type holder.
Window-mounted filters: filters mounted directly on windows and normally used to change the color temperature of sunlight entering a room to 3200°K.
In each case, the goal is to correct the color temperature, or else to change the quantity of light entering the camera so that a different aperture can be used to control depth of field. No filter is required on the camera when a light source has an intrinsic color temperature of 3200°K. Under all other color temperatures, some form of filter or compensating electronic circuitry is required.
Camera-Mounted Filters
The most traditional camera-mounted filters are the amber (#85), fluorescent (FLB or FLD), and neutral density (ND) filters. On some older video cameras, these filters are built into a filter wheel that can be clicked into proper position behind the lens according to a reference chart printed on the side of the camera body. Commonly, digital cameras provide automatic white balance without filters, with high-end cameras permitting manual white balance for even more precise color control. Understanding how filters work is still important, however.
#85 B FILTER The amber-colored #85 filter converts sunlight in the vicinity of 5400°K to 3200°K. Average daytime sunlight, which otherwise would appear overly blue to the camera, is reduced to the same color temperature as the artificial light from tungsten bulbs so that normal color results. An amber filter must be used anytime the light source, regardless of whether it is natural sunlight or artificial fill light, is 5400°K, or reasonably close to that figure.
Practically speaking, in average daylight conditions, the #85 filter can be used anytime from a couple of hours after sunrise to within a couple of hours before sunset. It is best, however, to use no filter or a clear filter within one hour after sunrise or one hour before sunset. At these times of day, color temperature is already between 3200°K and 3500°K, a range that closely parallels the camera’s preset preference for color temperature.
FLUORESCENT (FL) FILTERS Two designations of camera-mounted fluorescent filters can be used to accommodate fluorescent light that otherwise would be reproduced with an undesirable greenish-blue cast. The first of these is the FLB filter, used under fluorescent bulbs that produce color temperatures in the range of 4500°K. The second is the FLD filter, used under “daylight” fluorescent bulbs that produce color temperatures in the range of fine to cloudy daylight, or 6500°K. Once again, FL filters produce the appearance of a color temperature around 3200°K.
NEUTRAL DENSITY (ND) FILTERS A third type of camera-mounted filter, the ND filter, reduces the amount of light entering the camera but otherwise has no effect on either color temperature or the colors of objects within scenes. The primary function of this dark, smoke-colored filter is to cut exposure—either to help reduce depth of field by permitting a wider lens aperture (resulting in less emphasis on the background and greater emphasis on the subject), or to reduce exposure under very bright light sources to acceptable limits.
LIGHT-MOUNTED FILTERS
The dichroic filter is most commonly used on lights. This filter, made of gel or optical glass, has a pronounced bluish hue. It boosts the color temperature of quartz-halogen lights (3200°K) to the approximate color temperature of sunlight (5400°K). The filter helps achieve balanced color temperatures when sunlight and artificial light are mixed. Artificial fill lights outfitted with dichroic filters are useful outdoors, with the sun used as the key light, and indoors regardless of whether sunlight entering through a window is used as the key or the fill light.
Window-Mounted Filters
Semiflexible panels and flexible sheets of #85 amber filters sometimes are used on exterior windows to convert sunlight to 3200°K. The sheets also can be taped to car windows, thereby allowing the use of 3200°K fill lights inside the car—for example, to photograph an interview with a police officer as she patrols a neighborhood. These filters also can be taped over house and office windows to convert the sunlight entering a room to 3200°K. It is then possible to supplement the sunlight with artificial lights with a color temperature of 3200°K. If sunlight at 5400°K is allowed to enter the interior of a car or room, then artificial fill light must be pumped up to 5400°K by means of a dichroic filter mounted on the light head. This alternative is less desirable because more lights and higher wattage bulbs may be required to overcome the exposure-reducing effects of the dichroic filter.
Filter Factors
All filters, even clear glass, filter out some light. With clear filters, the light loss is virtually unnoticeable, but with other filters the light loss can be significant enough to result in underexposure. The amount of loss for a given filter is expressed as the filter factor.
Each factor of 2 cuts the original amount of light in half, an amount equal to one f/stop decrease in the amount of light entering the lens. Thus, if a scene were being photographed at f/16, a new exposure of f/11 would be necessary if the scene were to be rephotographed using a filter with a filter factor of 2. Cameras with automatic exposure circuitry compensate automatically for this light loss, but an understanding of filter factors is still important to the professional photographer.
The ND filter, for example, allows the photographer to achieve normal exposure in extremely bright light conditions. ND filters also allow the photographer to shoot at wider lens apertures in any given lighting environment than would otherwise be possible. Wider apertures, in turn, result in reduced or shallow depth of field.
Filters Used in Combination
Note that each filter factor of 2 results in the equivalent of one f/stop of light loss. To determine the light loss that occurs when filters are used in combination, it is necessary to multiply the filter factors. Because some picture quality is lost when two filters are used together, manufacturers commonly combine dyes with the characteristics of two filters into the physical properties of one filter.
One of the most common filters of this type is the 85N6 filter, which combines the color conversion characteristics of the #85 amber filter (with a filter factor of 1.5) and the light-reducing properties of the ND 0.6 filter (filter factor of 4). Thus, the combined filter factor of the 85N6 filter is 6:
| 1.5 | = | filter factor of #85 filter |
| × 4 | = | filter factor of ND 0.6 filter |
| 6 | = | combined filter factor |
BOX 5.1 TRY YOUR HAND WITH FILTERS AND LIGHTING
The following situations and discussion are provided to illustrate how you can use various light sources and camera filters in combination. (Assume your camera has no auto color balance.)
Situation 1: Outdoors, under normal sunlight, set up an artificial fill light and balance its color temperature to sunlight.
Situation 2: You’re shooting an indoor scene in front of a window. Across the street, in sunlight, is other important action that can be seen through the window. What combination of lights and filters can be used to achieve balanced color temperatures?
Situation 3: You’re shooting an interview inside a moving car. You’ve placed a #85 gel filter on the driver’s window to convert sunlight to 3200°K and have decided to use a quartz fill light with a color temperature of 3200°K. Which filter do you use on the camera?
Discussion
In situation 1, the sun, with a color temperature of around 5400°K, serves as the key light while the fill light produces a color temperature of 3200°K. A dichroic filter must be mounted on the light head to boost the artificial light to the color temperature of sunlight. In addition, you would want to place a #85 amber filter on the camera lens.
In situation 2, two solutions are possible. If sunlight is the dominant light source inside the room, the camera should be outfitted with a #85 amber filter. To match the color temperature of sunlight, all quartz fill lights should be outfitted with dichroic filters.
If, in situation 2, artificial quartz lights provide the dominant light (3200°K), then no filter should be used on the camera lens. Sunlight entering the room should further be converted to 3200°K by use of #85 filter sheets placed on the window.
In situation 3, you would simply shoot the scene as is, with no filter of any kind on the camera lens. ■
MIXING LIGHT SOURCES
Poor color reproduction can result when light sources are mixed. Indoors, the photographer should avoid mixing fluorescent light (greenish hue) with daylight (bluish hue) or tungsten lights (reddish hue). Outdoors, an inadvertent mix of sunlight and tungsten light also produces undesirable results. Any of the light sources used alone—fluorescent, daylight, or tungsten—are acceptable, but they should never be mixed unless they can be balanced with filters.
Check for the presence of various light sources as one of the first steps after you arrive on location. If daylight in the room is strong enough, you can use it as the only light source. If different light sources are present, perhaps you can turn off all fluorescent lights in the room, close curtains in the room to block unwanted sunlight, and light the scene only with tungsten lights. If the fluorescent lights can’t be turned off, use them if they provide sufficient illumination. Otherwise, you will have to overpower them with artificial lights or perhaps a combination of sunlight and artificial light color-balanced to the temperature of sunlight.
BASIC LIGHTING PATTERNS
Most lighting patterns borrow from nature’s design. The most frequent pattern is one dominant light source (the sun or an artificial light) combined with a secondary light source. The dominant source produces direct light rays that throw strong highlights and distinct shadows in an effect called specular light. The goal is to make the light look as though it originates from one source, even when three lights are being used, and to light in such a way that subjects have dimension, not flatness.
The secondary light source, whether artificial or from the sun’s rays that reflect off objects in the environment, is soft and diffused. Secondary light yields no hard shadows and no distinct highlights because it has been broken up and randomly scattered as it reflects off the multitude of objects and surfaces within an environment.
THE ROLE OF ARTIFICIAL LIGHT
For most photographers, the sun remains a favorite light source. But for all its charm, sunlight is never reliable or under a photographer’s control, and it seldom is available in sufficient quantity when the shooting moves indoors. In such conditions artificial light gives the photographer control over illumination, and when properly controlled, can recreate the natural look of available sunlight. Proper light control also gives the illusion of depth in scenes and makes possible the creation of textures and interesting highlights and shadows.
KEY LIGHT
For natural-looking news scenes that replicate the look and feel of available light, almost all artificial lighting setups have one dominant light source called the key light. This light represents the function of the sun and provides the distinctive highlights and shadows in the scene.
When using the older, more traditional tungsten lights, the key light is usually placed higher than the subject to be photographed and to one side of the camera, somewhere between 30° and 45° over from the camera axis and high enough so that the light can be aimed down 45° or steeper at the subject, in a pattern called high side lighting.
When using a Chimera® (described in this chapter) or Lowel Rifa® soft box, for example, the key light is placed much lower (see Figure 5.3). Irrespective of light source, the key light is placed properly when it throws a triangle of light on the shadow side of the subject’s face.
Outdoors the photographer can achieve the same effect using the sun as the key light. In this approach you can reposition the subject until the triangle appears on the shadow side of the face.
Variations to the high side light pattern include the side light, sometimes called hatchet light because it splits the subject in half, and side-rear lighting, in which the key light is placed to the side and somewhat behind the subject.
Another variation is top lighting, with the key light almost directly above the subject. This technique throws deep shadows beneath the eyes, nose, and chin. A variation of top lighting is called butterfly light (Figure 5.4). The light remains high but is slightly in front of the subject so that no harsh shadows appear in the eyes or under the lips. This lighting pattern takes its name from the butterfly-shaped shadow that appears beneath the subject’s nose and can be an excellent choice of patterns when only one light is used. Butterfly lighting is also called glamour lighting because it is commonly used with models and actors.

FIGURE 5.3
Butterfly or glamour lighting occurs when the light is positioned high but slightly in front of the subject. Note the modeling in the subject’s face created by shadows beneath the eyebrows, nose, lips, and chin. A single light will produce a butterfly pattern if you position it until you see a “butterfly” pattern beneath the subject’s nose.

CONTRAST CONTROL
Analog video is less sensitive to detail than the human eye, and in dark shadow areas it may lose detail altogether. High-definition video is far more sensitive to detail. Irrespective of the primary light source, most photographers use a fill light (the secondary light source) to create depth and dimension in the subject’s face. The fill light often is set to produce illumination about half as intense as the key light (Figure 5.5).
You can achieve the same fill effect outdoors with a reflector or with a battery-powered light equipped with a dichroic filter that raises the color temperature of tungsten lights to that of sunlight. For soft fill outdoors, use a white reflector with a matte surface (Figure 5.6), or for hard fill light, an aluminum foil reflector. White walls and other objects also can be used outdoors if they reflect light of the same approximate color temperature as the key light source.
THE INVERSE-SQUARE LAW OF LIGHT
The fill light is located approximately mirror opposite the key light and adjusted so that it illuminates the subject at about half the intensity of the key light. To arrive at this intensity, the photographer can use the inverse-square law of light. This law states that at twice the distance from a subject, artificial lights provide only one-fourth their original level of illumination (Figure 5.6).

Stated another way, if you have two identical lights, one twice as far from your subject as the other, the farther light will be only 25 percent as bright on the subject as the closer light.
This would provide a key-to-fill contrast ratio of about 4:1. The key light is four times brighter than the fill light. For analog television lighting the normal contrast ratio should be approximately 3:1 for best color and contrast control. To achieve this, the fill light should be placed about one and a half times the distance of the key from the subject.
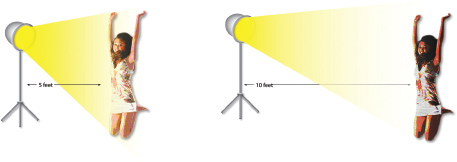
FIGURE 5.6
The inverse-square law of light can be visualized by looking at the diagrams. Doubling the original distance between your light and the subject reduces light intensity to one-fourth its original level.
© 2012 by Laura Schaub Designs
BOX 5.2 LIGHTING RATIOS
Lighting ratios are expressions of the difference between the most brightly illuminated areas of a subject and the areas of least exposure. Calculations are based on the difference in intensities between the key and fill lights. In the following table, a 1:1 ratio indicates that key and fill light intensities are identical: There is no difference in illumination on either side of the subject’s face. A 4:1 ratio indicates that light on the key side of the face is four times brighter than on the fill side. In the case of the 4:1 ratio, the key light determines exposure. If the key light were to be turned off but the fill light left on, the subject would be two stops underexposed. ■
Assume, for example, that the key light is six feet from the subject to be photographed. To maintain proper contrast control for video, the fill light in this case should be placed about nine feet from the subject.
BACKLIGHT
To the key and fill lights, the photographer can add a backlight (also called the accent or separation light). This light is placed opposite the key and shines down on the subject from behind to give the subject’s hair added texture and sheen and to separate the subject more obviously from the background. A fourth light, the background light, illuminates the background to provide even greater separation of the subject from its background.
BROADLIGHTING AND SHORT LIGHTING
When the key light shines on the side of the face closest to the camera, the effect is called broadlighting. Generally, broadlight is the preferred lighting pattern for interviews and news conferences. In short lighting, the fill light shines on the side of the face toward the camera. The technique is used widely in portrait photography, and it can be used as warranted in visual stories to achieve a different mood and feeling.
LIGHTING FOR HIGH DEFINITION
High-definition television brings viewers face to face with people’s physical imperfections. With clarity roughly six times greater than analog television,2 high-def cameras magnify everything from acne scars to wrinkles, bags under the eyes, and poor makeup jobs. High-def studio lighting and adjustments in makeup help hide those imperfections for news anchors, but without similar lighting adjustments in the field an anchor, reporter, or virtually anyone else can suddenly appear 10 years older.3
BOX 5.3 USING THE BACKLIGHT
The backlight separates your subject from the background. When shooting indoors, you might use a window as your key light (light coming from a window is often pleasantly soft), and use one light as a backlight/sidelight. If a lamp is available in the room, you might use that as a sidelight or backlight. ■
HMI Lights
Professionals shooting high def often use HMI lights (Figure 5.7), short for Hydrargyrum Medium Arc-Length Iodide. Aside from their high cost, HMIs offer several advantages. They produce a soft, natural look, and full, rich color, while using only about a fifth the energy of quartz lights. HMI bulbs produce full-spectrum, bluish light much like noon sunlight (5600°K). Photographers and subjects alike also appreciate how much cooler they operate.
FLAT LIGHTING
When the photographer must shoot fast-moving action, there often is not time to properly light the scene. For this reason most digital cameras can power a single battery-operated quartz light that mounts directly to the camera. This approach frees the photographer’s hands to make camera and lens adjustments, but it results in a pattern called flat lighting, which produces uninteresting pictures with little depth or modeling.
A better solution, whenever possible, is to use the single light high and to one side of the camera. In this position the light produces shadows that lend depth and interest to the face.
A common mistake with the single light is letting harsh shadows fall on the background behind the subject. At least three remedies are possible: Hold the light so that shadows fall outside the viewfinder frame, move the light and the subject farther away from the background, or compose a closer shot in such a way that no shadows are visible within the viewfinder.
LIGHT DIFFUSION
In all lighting patterns, some kind of diffusion material over the lights can produce softer, more pleasing natural light. Diffusion materials include spun glass, heat-resistant plastic, metal window screen, and metallic mesh. These materials reduce glare and harshness in the scene by breaking up direct light rays and radiating them in random directions. Diffused light also is less noticeable to persons who otherwise would be uncomfortable and self-conscious under the harsh glare of direct television lights.
Umbrella lighting offers a quick, inexpensive way to convert a single light into a viable soft light source. With an umbrella reflector, the light head is pointed away from the subject. The light is then reflected back to the subject via a metallic-colored, heat-resistant umbrella attached to the light stand or head (Figure 5.8). In a sit-down interview, the light can be placed above the reporter’s head or where the reporter would be if present.
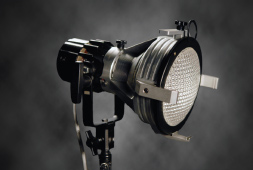
FIGURE 5.7
Short for Hydrargyrum Medium Arc-Length Iodide, HMI lights produce a soft, natural look with the color temperature of sunlight while using only about a fifth the energy of quartz lights.
Light from this single source wraps naturally around the subject. Shadows are soft and smooth, and in close-up shots only a single highlight or catchlight is obvious in each of the subject’s eyes. The light from umbrella reflectors is virtually unnoticeable to home audiences. Interview subjects appear more at ease, and they are more comfortable because of the cooler temperatures that result from indirect light. Umbrella reflectors are available at most camera and photo supply stores for fifty dollars, a relatively small investment considering the improved lighting that results.
BOUNCE LIGHTING
Bounce light is another way to produce soft, natural lighting. Bounce lights can be reflected (bounced) off a ceiling, wall, or some other reflective surface. Bounce light is diffused and less harsh than direct lighting, but take care to avoid unwanted color temperatures when bouncing the light off colored surfaces.
EYE REFLECTIONS
In real life and in natural portraiture, each eye normally contains only one highlight. When lights are improperly placed, however, the subject’s eyes frequently contain two highlights (catchlights), which make it obvious that the subject is being “lit.” The problem is compounded when eyeglass lenses and frames produce still other distracting highlights. Although dual highlights and unwanted reflections cannot always be eliminated, they can often be minimized. The most common solution is to move the camera or to change the projection angle of the lights, or to use some form of indirect lighting that may solve the problem altogether.
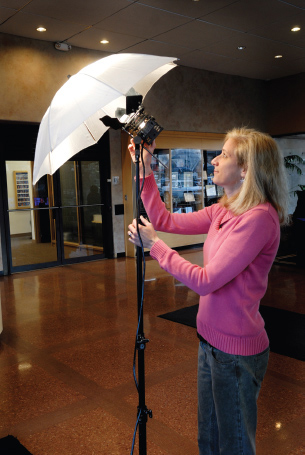
FIGURE 5.8
An umbrella reflector can produce dramatic improvement in lighting quality.
BOX 5.4 LIGHTING FOR HIGH-DEFINITION TV
The key light is most often a soft light, which produces a more flattering and appealing look. Several approaches can help soften the key light. Chimera®, Lowel®, and other companies manufacture a collapsible light box with a reflective silver interior and a front diffusion screen. Such boxes fit on a variety of light heads and produce soft, pleasing light (see Figures 5.9 and 5.10).
Setting the Key Light for Sit-Down Interviews Sunlight is often most pleasant when it’s low. To recreate that same look with the Chimera® Lightbank, bring the key light down low, about a foot above the subject’s eyes. At this angle, the light is perfectly placed (see Figure 5.11). It also illuminates more of the subject’s lower body. If the subject looks into the key light, the camera can see the shadow molding on the other side of the subject’s face, an effect that lends three-dimensional perspective. Try it and experiment. The less moody you want your story to be, the more light you fill into that dark side. ■
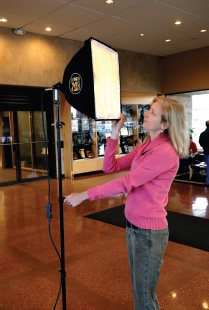
FIGURE 5.9
Light boxes produce soft, natural-looking light, without calling attention to the lighting pattern.
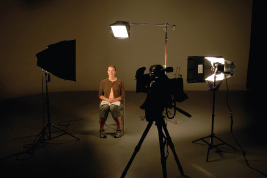
FIGURE 5.10
A typical soft-light setup for a high-definition television interview. The key light in this photo is positioned on the left side of the camera, a fill light on the right, and a backlight behind the subject.
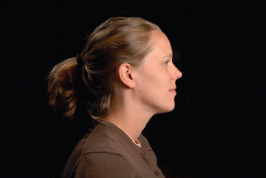
FIGURE 5.11
Figure 5.11A The key light produces full, rich lighting.

Figure 5.11B The fill light side of the face is somewhat underexposed to provide a three-dimensional look. The darker the fill side of the face, the moodier the resulting light.
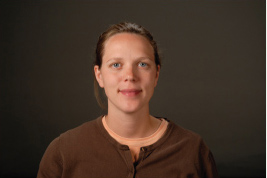
Figure 5.11C The soft box key and fill lights produce a more three-dimensional appearance. Note the triangle of light beneath the subject’s eye on the fill (darker) side of the face.
EXPOSURE
At their most basic, scenes are correctly exposed, too light from overexposure, or too dark from underexposure. Proper exposure results in a rich cross section of pleasing colors and details.
BOX 5.5 STAR QUALITY CLOSE-UPS WITHOUT LIGHTS
Lighting Tips from John DeTarsio Network Freelance Photojournalist
Ready for My Close-Up!
Notice the star’s close-up shot next time you watch a movie. Study how the camera focuses on the actor’s eyes. Whenever we look at someone close to us, we look first at the eyes, or wherever the sharpest focus on the video screen guides our attention. Film and television close-ups thus usually show the person’s face, hair, and shoulders in sharp focus, while retaining soft focus on the background behind the subject. Most people look best in compressed shots like that.
Shallow depth of field emulates how we naturally see others whenever they are close to us. You can confirm it yourself while you read these very words. Remain focused on the text as you transfer your attention (but not your focus) to your peripheral vision. You can see that by focusing on something close, only what you look at directly remains in focus.
How to Shoot Effective Close-Ups
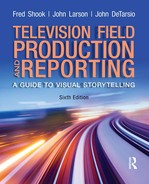
The best close-ups show people (and sometimes animals) as they appear in real life. The goal is to capture your subject so naturally that viewers might recognize that person a few days later at the supermarket. An ideal approach is to position your subject at least 10 feet in front of the background in your shot, and place your camera on a tripod at least 10 feet in front of the subject. Next, zoom into the subject and frame the shot to achieve a “movie star close-up” look (Figure 5.12). Enclosed or difficult shooting environments may sometimes render this general rule of thumb impractical, but honor it as closely as you can. ■
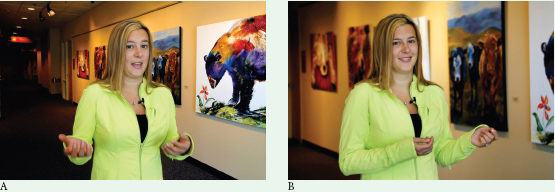
FIGURE 5.12
Depth of field in close-ups affects our impressions of people, and reveals much about the photographer. Figure 5.12A (left) reflects undesirable depth of field that occurs when the subject is positioned too close to the background and the camera. This setup often leads to unnecessary shadows and unwanted background detail. A better approach in close-ups is to set up the shot for shallow depth of field, and focus on subjects’ eyes (Figure 5.12B). Shallow focus portrays people much as you would see them up close in real life. In this setup the subject is about 10 feet from the background, and the camera is on a tripod about 10 feet in front of the subject.
In the case of cameras with automatic exposure control, electronic circuitry behind the lens “sees” only what the lens shows it. If the main subject shows up against a dark background, the scene may be overexposed as the camera struggles to properly expose the predominantly dark area in the background. The same subject in front of a white background might be underexposed because light backgrounds may fool the camera.
The solution in both cases is to move in closer with the camera or zoom lens to eliminate the background and let the camera meter see only the primary subject. Once exposure is properly adjusted, the exposure control can be clicked from automatic to its manual position. The exposure will remain until the control is readjusted or switched back to the automatic mode, so the shot can now be recomposed and recorded.
ESSENTIAL LIGHTING EQUIPMENT
Surprisingly little equipment is necessary to produce professionally lit scenes in the field. Boston photojournalist John Premack recommends the following essentials4:
■ Two focusing quartz lights such as the Lowel Omni (see www.lowel.com/) with stands, barndoors, dichroic filters, 650- and 300-watt lamps, and extrasmall Chimera soft boxes (see www.chimeralighting.com). An alternative to the Chimera is Lowel’s RIFA™ eXchange System™, a small, folding softlight box complete with bulb, socket, and stand-mounting bracket
■ One focusing mini light (such as the Lowel Pro) with stand, 2-leaf barndoor, and diffusion filter
■ One folding fabric reflector to provide fill light from the primary light source, indoors or out
The quartz light heads should include at least one head that can be mounted directly to the camera body for fast-breaking news events. Especially useful are the small reflector lamps that mount on the camera body and can take power from the camera battery. Round out the list with spare lightbulbs, two-inch-wide silver cloth gaffer’s tape to hang lights and to tape cords to the floor to keep people from tripping, and plenty of extension cords. Also desirable is a package of mixed gels, a portable, 12-volt battery-operated light and battery pack for covering big stories at night, as well as scrims and other diffusion materials.
LIGHTING IN SUNLIGHT
Bright sunlight produces distinct highlights and black shadow areas with little or no detail. The problem worsens when subjects are silhouetted against the sky. In these situations, fill light will be required—either from an artificial quartz light outfitted with a dichroic filter or from fill light supplied by a portable reflector or similar source.
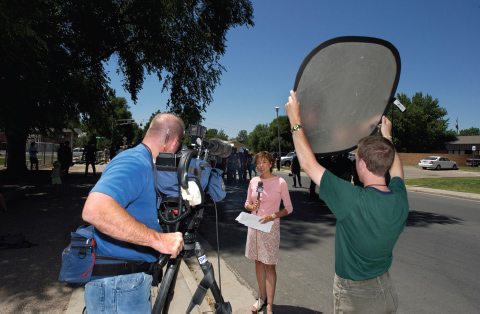
Some of the most pleasing lighting patterns occur when the subject is lit with indirect sunlight. If the sun is behind the subject, the backlight on the person’s hair and shoulders may be used to especially flattering effect, with quartz light or reflector fill light used to enhance illumination on the subject’s face (Figure 5.13). If the sunlight is especially bright and straight overhead, a 1,000-watt quartz light with dichroic filter may be required to balance illumination levels to the same intensity of sunlight. Another pleasing form of indirect sunlight is open shade, in which the subject is photographed in shade, well away from direct sunlight, but with nothing above the subject to obstruct secondary light from the sky itself.
Strong sunlight also can overpower artificial light being used to photograph subjects indoors, converting the subjects to silhouette. The problem is most evident when subjects are photographed in front of open windows. In such situations try to close the curtains behind the person to be interviewed. If there are no curtains or they cannot be closed, try to reposition the subject in front of a more neutral background. Failing that, you may have to boost illumination with artificial lights on the subject’s face to the same intensity as the sunlight behind the subject, a process called balanced lighting.
HOW TO LIGHT A NEWS CONFERENCE
Most news conferences can be nicely lit with a three-light setup. Set up key and fill lights and add a backlight to help separate the subject from the background. If your lights will be more than seven or eight feet from the subject, use at least 650-watt bulbs.
If time or equipment is at a premium, two lights will do an adequate job. Eliminate the fill light and cheat the backlight by setting it on “flood” and opening the barndoor a little more. If you have only one light available, use it to bounce light onto the subject or to create a butterfly lighting pattern. The single light also can be used high and to one side of the camera, ideally with a scrim to help diffuse the light and make it softer, or else move the light back toward the side of the speaker’s face.
If you must work with only one or two lights, shoot at the lowest level of illumination that produces acceptable skin tones. If you find it impossible to achieve light levels of f/8 on the subject and f/8 on the background, consider settling for an illumination level of f/2.8 on the background. If the skin color of the main subject is accurate and if illumination of the main subject is acceptable, little harm will result if exposure levels and color temperature of the background are allowed to stray. Once again, it is important to turn off existing lights or to filter your own lights to match the color temperature of the existing light source.
As you adjust the lights, you can ask your soundperson, your reporter, or a volunteer to serve as a stand-in. If it’s obvious the speaker will throw unwanted shadows against the background, try to move the podium away from the background or reposition the lights and/or camera to eliminate unwanted shadows from the frame.
As you position your lights, set a chair or other object by each light so the stands won’t be inadvertently bumped or knocked down. It also is advisable to tape extension cords securely to the floor so passersby don’t trip and break their legs or send your light stands crashing to the floor.
SETTING UP LIGHTS IN COOPERATION WITH OTHER CREWS
Although news conference lighting is not art, inept lighting calls attention to itself and distracts viewers’ attention from the speaker and what is being said. For that reason, be alert for the damaging influence of other crews who arrive and set up their own lights without regard for the lighting patterns and levels of illumination you’ve already established. Gentle negotiation to establish acceptable lighting patterns will work to everyone’s benefit.
If you must work within the confines of pack journalism, arrive early enough to stake your claim to an ideal camera position and hold your ground. Newspaper and radio reporters may swirl around you and complain that you’re blocking the view, but their requirements are different from yours and they may not understand your needs.
LIGHTING ETIQUETTE
Regardless of the situation you are lighting, remember to practice lighting etiquette. If the room is already set up and lit before the subject walks in, so much the better. Most people will adapt quickly to the lights and soon forget about them. Otherwise, when you first plug in the lights, try to tilt them down to the floor, then swing up the light heads gently so as not to blind your subjects suddenly. Another approach is to use your hand to block the light when it is first switched on, then slowly lower your hand from the light head to permit gradual, full illumination of your subject.
LIGHTING SPOT NEWS AT NIGHT
No matter whether you’re photographing a nighttime political rally outdoors or covering spot news at night, the most logical place for the light is on the camera. Spot-news photography demands that the photojournalist move quickly to keep up with the action, which means that light stands are generally out of the question. Further, the camera-mounted light may be the only illumination available when the camera is diverted from the main action to shoot cutaways.
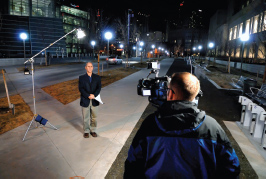
FIGURE 5.14
At night, try to use relatively low levels of illumination. The more intense the light used to illuminate a subject at night, the less visible the background will be.
Especially at night, it’s important to use no more light than you need (Figure 5.14). This means the camera-mounted light is an excellent choice for night photography because of its relatively low level of intensity. If light levels on the main subject are too high, the background at night will be pitch black. “The more light you put on your subject at night, the greater discrepancy there is between your subject and the dark background at night,” says photojournalist John Premack. “You’re trying in effect for balanced light, even at night, so shoot with the aperture wide open if the image looks clean and acceptably exposed.”5
PHOTOGRAPHING SUBJECTS WITH DARK SKIN
Whenever you light subjects with dark skin, look for backgrounds slightly darker than the subject. Another practice is to keep as much light as possible off the background, in order to keep contrast ratios to acceptable levels. If the background is too light or too brightly lit, essential detail may be lost in the subject’s face, or the subject may even be reproduced in silhouette. Keep light levels as low as comfortable, and if possible, err slightly on the side of overexposure rather than underexposure.
LARGE-SCALE LIGHTING
Occasions may occur when you have to photograph uncommonly large areas, such as hotel ballrooms, auditoriums, showrooms, and supermarkets. In such cases, the rule of thumb is to work with the light you have and to supplement existing light rather than bring in an entirely new overall light source. If the predominant light source is fluorescent light, for example, consider adding your own portable fluorescent fixtures to provide additional fill or accent light. Color temperature should remain relatively constant if the lightbulbs are all the same type. Otherwise, you may need to use a correcting gel filter.
If sufficient illumination is unavailable or if extremely deep areas are to be lit, enough lights will be needed to light foreground, middle ground, and background adequately. If the area is very large, high wattage lights of 1,000 watts or more may be necessary. If an examination of the viewfinder shows that certain areas within the scene are too bright, the photographer can use barndoors (Figure 5.15), or flags (opaque panels that block light from certain areas), or cookies (flags with regular or irregular cutouts that form patterns of light and shadow on the background) and nets to enrich or subdue particular areas within the scene, a practice called painting with shadows.

FIGURE 5.15
A portable light with “barndoors” that can be moved to control light falling on the subject and background.
CAUTIONS
Lights are extremely bright and hot, and they pull lots of electricity when plugged into wall outlets. The obvious precautions apply when using artificial lights:
■ Never touch quartz bulbs. Serious burns can result, and bulbs can be damaged from the natural oils on fingers.
■ Allow bulbs to cool before packing them away or setting on objects (including carpeting, camera cases, and vinyl-topped tables).
■ Serious retinal damage can occur if bright lights are used closer than three feet to human or animal subjects.
■ Avoid shining bright lights directly into the lenses of older cameras. Cameras with pickup tubes can be permanently damaged.
■ Avoid plugging more than three lights into an electrical circuit. Excessively highvoltage drains can cause overheated cords or tripped circuits.
■ Avoid 1,000-watt bulbs whenever possible, because they tend to blow fuses.
■ Use only extension cords that are large enough to handle the job. Cords that are too small cause voltage drops and can overheat to the point of causing fires. Voltage drops also alter the color temperature of artificial lights.
■ Never discharge batteries completely or overcharge them.
BOX 5.6 TOO HOT TO HANDLE
Imagine going to someone’s home to cover a story, and burning down their house. It can happen if you overload the home’s electrical circuits. Plug in too many lights, overburden an old fuse box, add one too many extension cords, and you could send an entire family’s way of life up in smoke. Imagine the misery you might cause were you to overload the circuits in an apartment building, or a horse barn, or an airport hangar.
Basic savvy can help you avoid such tragedies. Building codes require 20-amp circuits in most U.S. structures built since the mid-1980s. Before that, the standard was 15 amps. Remember that your equipment rarely is the only electrical appliance on a circuit. If you exceed those loads by plugging in too many lights, stand by to call the fire department. What to do?
Just remember the rough formula for converting watts to amps: divide by 100. If you’re using a 1,000-watt light, divide by 100. This tells you the light draws 10 amps. You are good to go. If you were to use three 1,000-watt bulbs, however, that would be 3,000 divided by 100, or 30 amps. Run for your life.
The consequences might not be life-threatening. You could just blow fuses or trip the circuit breakers. But you could start a fire. Even your extension cords could break into flames. Why risk the danger? Divide the number of watts by 100. It’s the smart way to operate. ■
In the final analysis, lighting creates mood. Mere illumination destroys it. Within every shot, light is the most visually important element—the raw material for every television journalist, the essential substance of every television story. As documentary historian William Bluem observed, “A photographer who cannot light is not a photographer. A reporter who underestimates the importance of light is a fool.”6 Happily, in today’s environment, light is a commodity more easily controlled than ever before in the history of photojournalism.
SUMMARY
One of the photojournalist’s most important writing tools is light. A primary characteristic of light is its color temperature, an expression of the proportion of red to blue light that the light source radiates. Under each varying light source the camera must be white-balanced to produce an absence of color at white. Avoid mixing light from sources with different color temperatures.
When shooting field video, the artificial light source most commonly used is the quartz bulb, which produces a color temperature of 3200°K. Under light of any other temperature, the camera must be white balanced or filters employed. On older cameras, lens-mounted filters are used to correct the color temperature of sunlight, to filter out the excessive greenish-blue hues of fluorescent light, or to reduce the quantity of light entering the camera so a different aperture can be used to control depth of field.
Light-mounted dichroic filters are used to boost the color temperature of quartz light to the approximate color temperature of average daylight. Semiflexible sheets of filter gel also can be mounted on windows to convert sunlight to 3200°K. All filters reduce light to some extent; the amount of loss is expressed by the filter factor. Each factor of 2 cuts the original amount of light by one-half.
Basic lighting patterns involve use of a key or dominant light and a fill or secondary light. The key light normally is positioned 30° to 45° over from the camera axis and high enough so the light can be aimed down 45° or steeper at the subject. Variations include side light, side-rear light, and top light, with further refinements available, such as butterfly or glamour lighting.
The intensity of illumination between key and fill lights helps determine contrast ratios within the scene. Generally, the key light is set one and a half to two stops brighter than the fill light. Often, diffused light is softer and more pleasing to the eye. Sunlight is naturally diffused on overcast or foggy days or when subjects are in open shade. Diffusion of artificial light also can be achieved through bounce light or umbrella lighting or with any of various diffusion materials.
Although most lighting assignments can be accomplished with a key, fill, and backlight, large-scale interiors and night lighting present special challenges. In the final analysis, light creates mood and meaning. Mere illumination destroys it.
KEY TERMS
backlight 91
balanced lighting 97
barndoors 99
bounce light 93
broadlighting 91
butterfly light 88
color temperature 83
cookies 99
fill lights 85
filter 83
filter factor 86
flags 99
flat lighting 92
hatchet light 88
HMI 92
inverse-square law of light 89
key light 88
lighting ratio 91
open shade 96
pack journalism 98
short lighting 91
specular light 87
umbrella lighting 92
white balance 83
DISCUSSION
1. Discuss the extent to which light is the true medium of television, web, and nonbroadcast video.
2. What is color temperature and how does it affect the video image?
3. List the filters most commonly used in television photography (camera-, light-, and window-mounted) and describe their uses.
4. Explain filter factors and how they are used to determine the light-reducing properties of filters.
5. Explain what happens when light sources with different color temperatures are mixed. How can the photographer avoid the problem?
6. Describe the differing roles of the key light and the fill light.
7. Describe the basic lighting patterns commonly used when shooting video.
8. How are key-to-fill lighting ratios (lighting contrast ratios) determined?
9. Explain the difference between broad lighting and short lighting.
10. How can light rays be diffused or otherwise controlled to create softer, more pleasing lighting patterns?
11. What minimum lighting equipment should the photojournalist have available for field assignments?
12. What special considerations are necessary when using supplementary artificial lights outdoors under bright sunlight? Why are artificial lights sometimes necessary under such conditions?
13. Explain how to light a news conference or similar gathering.
14. What considerations should you keep in mind when lighting subjects outdoors at night? When lighting large-scale subjects such as warehouses and supermarkets?
15. What safety precautions should you observe anytime you work with lights?
EXERCISES
1. Color-balance the camera for 3200°K light, then without altering color-balance, photograph scenes illuminated by a normal 60-watt household bulb, under sunlight at noon, and one hour before sunset. Compare the results.
2. With the #85 filter in place and the camera properly white-balanced, shoot a scene under sunlight at noon with and without the #85 filter. Repeat the exercise indoors under artificial quartz light with the camera properly white-balanced for a light source of 3200°K. Slate or otherwise identify each scene.
3. Shoot a scene indoors under artificial quartz light with no #85 filter on the camera. Again shoot the scene, but this time with a dichroic filter on the artificial quartz light.
4. Shoot a daytime scene of a driver from inside a car using a battery-operated, 3200°K artificial fill light and no filter on the camera. Shoot the scene again with the same light and camera setup, but this time with a #85 gel filter taped to the window that is visible behind the driver.
5. Shoot a subject indoors silhouetted against the sunlight or other backlight coming through a window behind the subject. Set up an artificial fill light with dichroic filter to balance exposure on the subject’s face against the light in the background.
6. Set up a key light on a subject. Properly position the key light so that a triangle of light appears on the shadow side of the subject’s face. Now, set up a fill light of equal intensity, but position the fill light approximately twice as far from your subject as the key light. In this configuration, what is the approximate key-to-fill ratio?
7. Reposition the fill light in example 6 so that your key-to-fill light is approximately 3:1. A good way to accomplish this feat is to set the key light first and take an exposure reading with an exposure meter or by letting the camera circuitry determine proper exposure. Jot down the f/stop setting that would be required for proper exposure when using the key light by itself.
At this point, turn off the key light. Adjust the intensity of illumination from the fill light by moving the light stand forward or backward until the exposure reading on your subject’s face is one and a half stops less intense than the key light reading.
In other words, if proper exposure for the key light alone is f/8, position the fill light so that proper exposure for the fill light alone would be halfway between f/4 and f/5.6, or one and a half stops less intense (thus the need to open the aperture to a larger setting). The fill light is always farther from the subject than the key light, if both lights are of equal intensity.
Finally, turn on both lights and shoot the scene. Remember to stop down so that you shoot the scene at the proper exposure value for the brightest light.
8. Using a single light, shoot and record a scene using a flat, front-on lighting pattern, then move the light to create high side lighting, and finally, butterfly or glamour lighting on the subject. Play back the video for review.
9. Outdoors, under bright sunlight, use a reflector fill or artificial quartz light with dichroic filter to provide fill light on the shadow side of the subject’s face.
10. Photograph a subject using broadlighting and short lighting and compare the result.
11. Light a scene to create first a low-contrast image, then a high-contrast image.
12. Practice diffusing artificial light with a diffusion screen or other material, bouncing light from the ceiling, and using a heatproof lighting umbrella.
13. Inspect the shots you have made of people during practice lighting sessions for the presence of single highlights in each eye. If two highlights appear, relight the subjects properly and again photograph them.
14. Light a person outdoors at night, first using brilliant illumination, and then consciously subdue the illumination to the lowest intensity possible. Compare the results.
15. Attend a news conference or other media event and observe lighting techniques and practices. View the scene that night on television.
NOTES
1. Isaac Asimov, “The Third Sense,” American Way (May 28, 1985), 15–16.
2. Diane Holloway, “That’s Harsh: Hi-Def TV Is Changing Our Views of the Stars,” Cox News Services, March 29, 2007.
3. Ibid.
4. John Premack, in correspondence with the author, June 8, 2003.
5. John Premack, “Lighting—Making It Work for You,” a presentation at the NPPA TV News-Video Workshop, Norman, OK, March 19, 1986.
6. A. William Bluem, Documentary in American Television (New York: Hastings House, 1965), 274.