

Apple has built your iMac and Mac OS X to keep running as smoothly as possible, but even so, you will need to perform basic maintenance, such as emptying the Trash, updating your iMac with the latest fixes, and backing up your files. If things go wrong, you will also need to troubleshoot your iMac.
Reclaim Space by Emptying the Trash 326
Keep Your iMac Current with the Latest Updates 328
Back Up Your Files with Time Machine 330
Recover Your Files from a Time Machine Backup 332
Remove Applications You No Longer Need 334
See Which Application Is Causing Your iMac Problems 336
Force a Crashed Application to Quit 338
Recover When Mac OS X Crashes 340
Solve Problems with Corrupt Preference Files 342
Troubleshoot Disk Permission Errors 344
Repair Your iMac's Hard Disk 346
Reinstall Mac OS X to Solve Severe Problems 347
When you throw a file in the Trash, it remains there in case you change your mind and decide to recover it. But when you need to reclaim space on your iMac's hard disk, you can empty the Trash and get rid of all the files and folders in it permanently.

Reclaim Space by Emptying the Trash
Empty the Trash

A Finder window opens showing the contents of the Trash folder.


A dialog opens to confirm the action.

Mac OS X empties the Trash and then closes the Finder window.
Restore a File or Folder to Its Previous Location
Mac OS X restores the file or folder to its previous location.

Is there a quicker way to empty the Trash?
If you are sure that the Trash contains no files or folders you need,
What does the Secure Empty Trash command do, and when should I use it?
When you need to get rid of files and folders and make sure no one can recover them, use the Secure Empty Trash command. Click the desktop, and then choose Finder and Secure Empty Trash. A confirmation dialog opens. Click Secure Empty Trash (

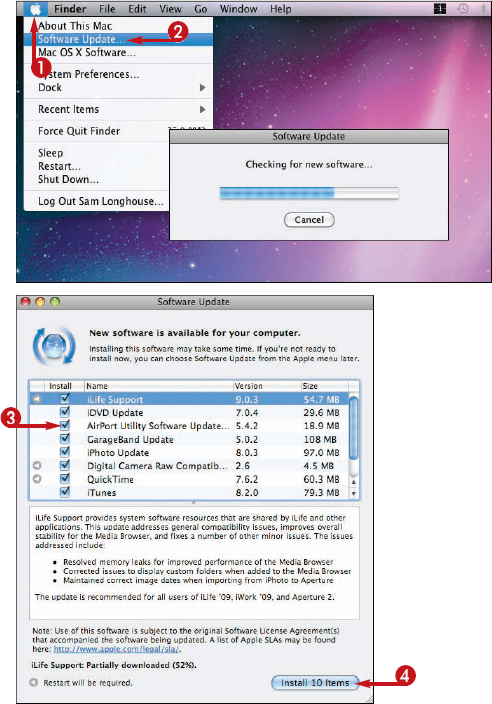
To keep your iMac running smoothly, use the Software Update feature to install the latest updates and fixes that Apple provides for Mac OS X and Apple's applications.
Your iMac must be connected to the Internet in order to check for and download the updates. You can install the updates when your iMac is either online or offline.

Keep Your iMac Current with the Latest Updates
The Apple menu opens.
The Software Update window opens, and Software Update automatically checks for updates.
If updates are available, the New Software Is Available for Your Computer dialog opens.
Note
If Software Update displays the message "Your software is up to date," click Quit. Software Update then quits.
Note
Normally, it is best to install all available updates unless you have heard that a specific update may cause problems with your iMac.
Note
If one or more License Agreement dialogs open, read each license, and then click Install if you accept the agreement.
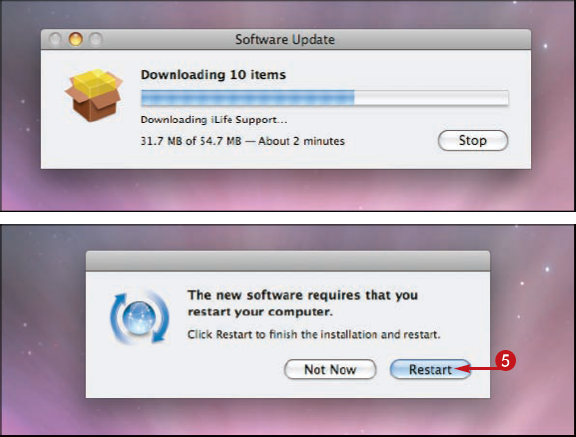
Software Update downloads the updates and then installs those that do not require restarting the iMac.

Mac OS X logs you out, installs the updates that require the restart, and then restarts.
Note
If you are too busy to restart your iMac when Software Update prompts you, click Not Now. You can then restart your iMac whenever it suits you.
Tip
Why does Software Update sometimes prompt me to install updates?
In Mac OS X, Software Update comes set to check for updates automatically; when it finds updates, it prompts you to install them. You can change the frequency of these checks, choose whether to download important updates automatically, or turn off automatic checks. See Chapter 12 for instructions.

Why does Software Update check the boxes for some updates but not for all of them?
Normally, Software Update checks the boxes for all available updates, but sometimes updates do not apply to your iMac – for example, updates built for other Mac models. Software Update does not check the boxes for such updates because your iMac does not need them.

To help keep your valuable files safe, Mac OS X includes an automatic backup application called Time Machine. Time Machine automatically saves copies of your files to an external hard disk connected to your iMac. You can choose which drive to use, how frequently to back up your files, and which folders to include.

Back Up Your Files with Time Machine
Note
When you connect an external hard disk to your iMac for the first time, a dialog may open asking if you want to use the disk for Time Machine. If you do, click Use as Backup Disk; if not, click Cancel.
The Time Machine preference pane opens.
Note
If you have already selected your backup disk, go to step 8.
The Select Backup Disk dialog opens.

The Select Backup Disk dialog closes.

The disk appears in the Time Machine pane, with the Time Machine switch turned on.


The Exclude These Items from Backups dialog opens.

A dialog opens.


The dialog closes, and Time Machine adds the items to the Exclude These Items from Backups dialog.

The Exclude These Items from Backups dialog closes.


Tip
What kind of disk should I use for Time Machine?
You can connect an external hard disk to your iMac by using USB, FireWire 400 on an older iMac that has a FireWire 400 port, or FireWire 800. A FireWire 800 disk gives the best performance. It is best to buy a high-capacity disk – for example, one or two terabytes (TB) so that you have plenty of space for backups.

How often does Time Machine back up my files?
Time Machine backs up all your files two minutes after you set it up. After that, it creates an hourly backup of files that have changed since the last backup. Time Machine also creates a daily backup for each day in the past month, plus weekly backups for the months before that.

When you find that you have deleted, damaged, or lost a vital file, you can recover it from a Time Machine backup. Normally, you will want to recover the most recent undamaged version of the file because this contains the latest changes, but you can also recover older versions if you need to.

Recover Your Files from a Time Machine Backup
A Finder window opens to your default folder.
Time Machine launches and takes over the entire desktop, including the Dock area.


Note
You can also click one of the Finder windows behind the front Finder window to display its contents.

Time Machine brings the backup you chose to the front.
Time Machine disappears, and you see your desktop and the Dock again.
If restoring a file will overwrite a file in the current version of the folder, the Copy dialog opens.


Tip
What are the arrow buttons above the Restore button for?
The two arrow buttons are for navigating among the available backups. Click the upward arrow to move to the previous backup, further in the past. Click the downward arrow to move to the next backup, nearer to the present.
Can I create Time Machine backups manually?
You can create a Time Machine backup any time you want. Click the Time Machine status icon (

If you install applications frequently, you will probably end up with many applications that you no longer need. These useless applications take up disk space and may cause your iMac to run more slowly, so it is a good idea to remove them.
You can remove some applications by placing them in the Trash. Other applications include uninstall utilities.

Remove Applications You No Longer Need
Remove an Application by Moving It to the Trash
The Finder becomes active.
The Go menu opens.
A Finder window opens showing your Applications folder.
The Action pop-up menu opens.
Mac OS X moves the application to the Trash.
The Finder window closes.

Remove an Application by Using an Uninstall Utility
The Finder becomes active.
The Go menu opens.
A Finder window opens showing your Applications folder.
The uninstall utility opens.

Tip
Where do I find the uninstall utility for an application?
If the application has a folder within the Applications folder, look inside that folder for an uninstall utility. If there is no folder, open the CD, DVD, or disk image file from which you installed the application, and look for an uninstall utility there. Some applications use an installer for both installing the application and uninstalling it, so if you do not find an uninstall utility, try running the installer and see if it contains an uninstall option.

Sometimes you may find that your iMac starts to respond slowly to your commands, even though no application has stopped working. When this occurs, you can use the Activity Monitor utility to see which application is consuming more of the processors' cycles than it should. To resolve the problem, you can quit that application, and then restart it.

See Which Application Is Causing Your iMac Problems
A Finder window opens to your default folder.
The Go menu opens.
The Finder window shows the items in the Utilities folder.

The Activity Monitor window opens, listing all running applications and system items.
The details of your iMac's central processing units, or CPUs, appear.
Note
Most iMacs have dual-core processors that appear in Activity Monitor as two separate CPUs. If your iMac has a quad-core processor, you will see four separate CPUs in Activity Monitor.
Activity Monitor sorts the applications and items by CPU activity so that you see which is using most processor cycles.

Tip
What should I do if I cannot quit or force quit the problem application?
If you cannot force quit the application from the Dock or the Force Quit Applications dialog, try force quitting from Activity Monitor. In Activity Monitor, click the application's process name, and then click Quit Process on the toolbar. A confirmation dialog opens. Click Force Quit.
How do I see whether my iMac is running short of memory?
In Activity Monitor, click System Memory (

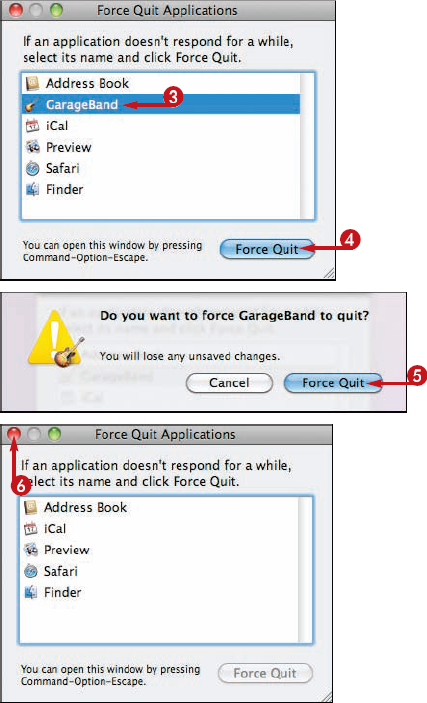
Sometimes an application may stop responding to the keyboard or mouse, so that you cannot quit it as usual. The application may freeze, so that the window does not change, or it may display the spinning beach ball that indicates that the application is busy. When this happens, you usually need to force quit the application — force it to quit — so that you can resume work.
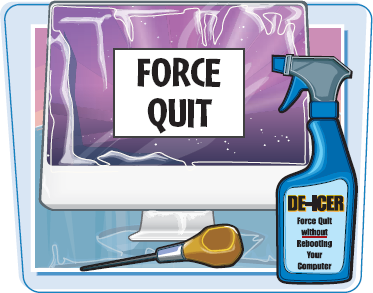
Force a Crashed Application to Quit
Force Quit an Application from the Dock
Mac OS X forces the application to quit.
Force Quit an Application from the Force Quit Applications Dialog
The Apple menu opens.
Note
You can open the Force Quit Applications dialog from the keyboard by pressing


The Force Quit Applications dialog opens.
A dialog opens to confirm that you want to force quit the application.
Mac OS X forces the application to quit.
The Force Quit Applications dialog closes.
Tip
How do I recover the unsaved changes in a document after force quitting the application?
When you force quit an application, you normally lose all unsaved changes in the documents you were using in the application. However, some applications automatically store unsaved changes in special files called recovery files. Such applications then open any recovery files when you relaunch them after force quitting. For other applications, if the unsaved changes are visible on-screen, press

Normally, Mac OS X runs stably and smoothly for days or weeks on end, but sometimes the operating system may suffer a crash.
Your iMac may detect that the crash has occurred and display an informational message, but in other cases the iMac's screen may simply freeze and continue displaying the same information.

Recover When Mac OS X Crashes
Recover from the Screen Freezing
The iMac turns off.

Recover from a Detected Crash
When your iMac detects a Mac OS X crash, it dims the screen and displays a message in the center.
The iMac turns off.

Tip
What causes Mac OS X to crash, and how can I avoid crashes?
Crashes can occur because of power fluctuations or bad memory chips, because your iMac is running too many applications, because an application is corrupted, or because of problems with disk permissions.
Limit the number of applications you run at once. When you have finished using an application, close it.
Make sure your iMac has hard disk space free. Click Finder (

If you notice that running a particular application causes your iMac to crash, uninstall that application, and then reinstall it.
You may also need to repair disk permissions, as discussed later in this chapter.

Each application stores details of its configuration in a special file called a preference file. Sometimes a preference file becomes corrupted, leading to the application not running properly or even crashing.
To fix the problem, you delete the preference file. This forces the application to create a new preference file from scratch.

Solve Problems with Corrupt Preference Files
Note
If you cannot quit the application by using its Quit command, force quit it as described earlier in this chapter.
The Finder becomes active.
The Go menu opens.
A Finder window opens showing the contents of your Home folder.

The contents of the Library folder appear.
The contents of the Preferences folder appear.
Note
If the application has two or more preference files, move them all to the Trash.
The Action menu opens.
Mac OS X moves the file to the Trash.
The application automatically creates a new preference file.

Tip
How do I find the right preference file to delete?
The names of most preference files use the format com. company.application.plist, where company is the manufacturer's name, application is the application's name, and .plist is the file extension for a property list file. For example, com.apple.TextEdit.plist is the TextEdit preference file, and com.microsoft.Excel.plist is the Excel preference file.

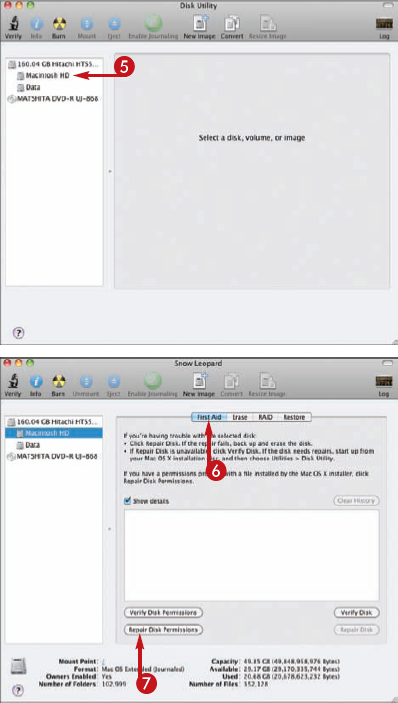
To control what your iMac's users, applications, and different parts of the operating system itself can do, Mac OS X uses a complex system of permissions. Sometimes the permissions on some files become corrupted, which prevents Mac OS X or the applications from running as normal. When this happens, you can often fix the problem by repairing the disk permissions.

Troubleshoot Disk Permission Errors
The Go menu opens.
The Utilities folder opens.

The Finder window closes, and the Disk Utility window opens.
The controls for manipulating the hard disk appear.
Mac OS X repairs the disk permissions. The process may take several minutes.
Tip
What are the symptoms of problems with permissions?
If your iMac has problems with permissions, it may run more slowly than usual. You may also find that applications quit unexpectedly or freeze so that you have to force quit them.

What causes problems with permissions?
The two main causes of problems with permissions are installing software and power outages. A badly written installation script can set permissions incorrectly on not only its own folder but also other folders. Power outages can leave files or folders with permissions temporarily changed to enable certain operations but not changed back as they would normally be.

If your iMac does not start properly or if it crashes frequently, and repairing permissions does not fix the problem, you may need to repair the iMac's hard disk. To do so, you need to start your iMac using the Mac OS X installation DVD, and then run Disk Utility.

Repair Your iMac's Hard Disk
The Disk Utility window opens.
Disk Utility closes, and the Install Mac OS X dialog opens.
Your iMac restarts into Mac OS X from the hard disk.

After a power outage or severe software damage, you may not be able to restart your iMac at all. When this happens, you need to reinstall Mac OS X from the original installation DVD to fix the problem.
You can also reinstall Mac OS X if your iMac crashes frequently and you find that repairing the permissions and the disk does not help.

Reinstall Mac OS X to Solve Severe Problems
The Install Mac OS X dialog opens.
The Software License Agreement dialog opens.
A dialog opens telling you that you must agree to the terms of the software license agreement to proceed.
The Installer then installs Mac OS X.
