
View Your Music and Other Content
Now that you have a substantial music library, you need to choose the right way to view your music so you can find what you want to listen to. In this chapter, I’ll show you various ways to view your music.
Use the Sidebar
The Music sidebar, which displays at the left of the app’s window (Figure 30), helps you navigate your music library. It lets you view your music in different ways.

The sidebar has four or five sections, by default, depending on how you interact with Apple’s commercial offerings:
Search: The search field is at the top of the sidebar, and cannot be hidden. I discuss searching your music library, Apple Music, and the iTunes Store in Search for Music.
Apple Music: If you have an Apple Music subscription, you can use the three elements of the Apple Music section of the sidebar to access For You recommendations, Browse Apple Music content, and listen to Apple Music Radio. If you don’t have an Apple Music subscription, this is still visible; Apple wants to tempt you to sign up. To hide this, choose Music > Preferences, click Restrictions, and disable Apple Music. I discuss Apple Music in Stream Apple Music.
Library: This is your music library, which contains local tracks and those in your Cloud Music Library, if you are using that feature. If you have shared libraries on your network, you can click the Library header to choose those libraries. See Share Your Music and TV Libraries over a Network for more on using Home Sharing.
iTunes Store: If you are signed into an Apple Music account, this is hidden by default; if not, you will see it. You can show or hide it by choosing Music > Preferences, and selecting or deselecting iTunes Store in the Show section. I look at the iTunes Store in Use the iTunes Store.
Playlists: You may have playlists for your local music, or you may have created or saved Apple Music playlists. If so, a Playlists section displays in the sidebar. I explain how to create playlists in On Playlists.
Customize the Sidebar
As mentioned above, you can show and hide two elements of the sidebar in Music’s preferences: Apple Music and the iTunes Store. But you can also choose what to display in the Library section, and you can hide the Playlists section as well.
To edit the Library section of the sidebar, hover your pointer over the header and click Edit, which appears to the right of the word Library. In Figure 31, you can see the Library section of the sidebar in edit mode.

You may not need to see all these views for your music library. For example, if you don’t have any music videos, you can uncheck that; if you don’t listen to classical music, you can uncheck Composers. Note that TV & Movies displays only if you download TV shows or movies from Apple Music (and there aren’t many of these); otherwise you don’t see it, as TV shows and movies are now, for the most part, within the purview of the TV app. Click Done when you’re finished editing this part of the sidebar.
The only other change you can make to the sidebar is to hide the Playlists view, if you don’t use playlists. Hover your pointer over the Playlists header, then click Hide, which appears to the right of that word.
Finally, you can reorder the views in the Library section. Just click and drag a view to a new location. So you could put Recently Added at the bottom of the list, or Songs just before Albums. But you’ll mess up the color scheme.
View Your Music Library
I explained just above that you can remove views you don’t want to use, or don’t need, when accessing your music library. I now discuss the various views, and how you can use them to access and play music.
Recently Added View
Recently Added view shows music you’ve added to your library in reverse chronological order; the newest additions at the top. It has bold headings, such as Today, This Month, and Last 3 Months, so you can scroll down to see your history of adding music, going much further back than “recent.”
Recently Added displays music by album (Figure 32); you cannot change this display.

I like to check my Recently Added view periodically for these reasons:
Listening to new music: No matter how you add music—ripping CDs, buying music from the iTunes Store, or adding it from Apple Music—Recently Added will remind you of what’s new. To listen to recent music, hover your pointer over an album and click the Play
 button that displays.
Noticing the delivery of pre-ordered content: If you purchase music from the iTunes Store, and you’ve set Music to automatically download new content, any albums you have pre-ordered will appear in this view.
Artists View
Artists view adds an artists column to the right of the sidebar and displays a slightly expanded album view.
If you click an artist’s name, you see albums from that artist in the right-hand pane (Figure 33). The header bar of that pane displays the artist’s name, and the number of albums and songs in your library by that artist.

Artists view is a bit limited. You can’t see much in the right-hand section of the Music window, as songs are displayed with a lot of spacing.
You can customize Artists view from the View Options window, accessed by choosing View > Show View Options (⌘-J):
Sort albums by: Choose an option from the pop-up menu to sort the listings in the right-hand pane by title, genre, year, or rating, and chose Ascending or Descending for your sort criterion.
Group compilations: To see all your compilations in the right-hand pane, select the Group Compilations checkbox and then select Compilations from near the top of the artists list.
Albums View
Albums view (Figure 34) displays album art in a grid, with album and artist names below each image.

When you click an album, you see that album on its own (Figure 35).

To tell Music how to sort albums in Albums view, open the View Options window (⌘-J). Music displays albums in order set by two criteria. With the defaults (Sort By: Artist and then: Title), Music first sorts your albums by artist, and then, within each artist, by title. The options available are Title, Artist, Genre, Year, and Rating. (Genre is available only as the first sort criterion.) So you can sort by Year and Artist, or Genre and Title, or any combination of those five criteria, and choose whether the sort is by ascending or descending order.
Genres View
Genres view is similar to Artists view (discussed above), though, like Composers view, discussed below, there are no graphics to illustrate the genre names. Click a genre to see all its albums to the right (Figure 36).

You can sort by Title, Artist, Year, or Rating in the View Options window (⌘-J), but you can’t sort by two criteria, as you can in Albums view.
Composers View
Composers view displays music that has a Composer tag filled in for it. Composers view looks much like Artists view (described above), though it doesn’t display any photos in the left-hand column next to the names of the composers. If you open the View Options window (⌘-J), you can sort albums in the right-hand pane by Title, Artist, Genre, Year, or Rating.
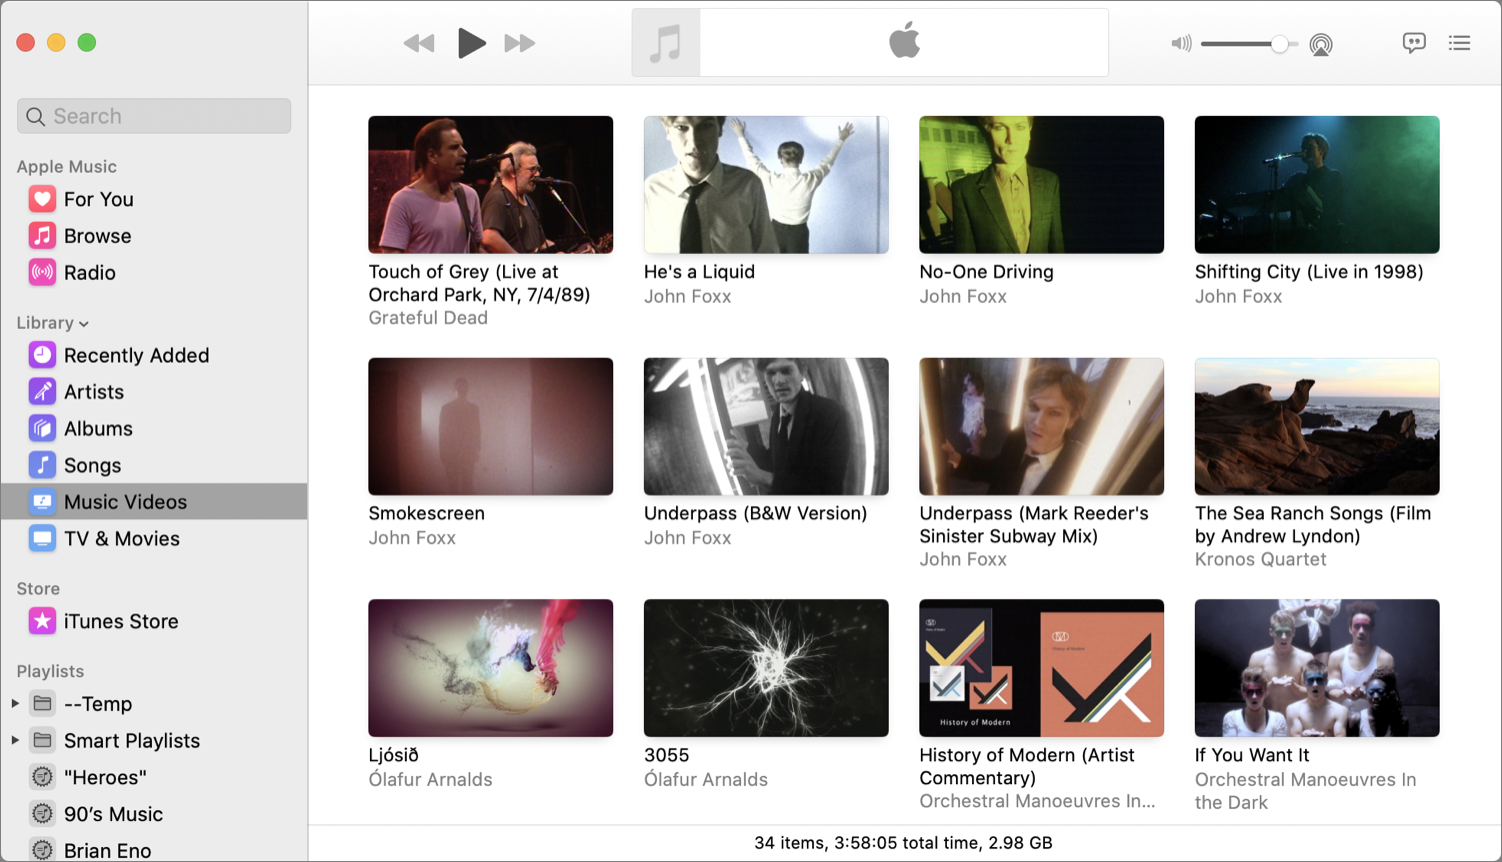
Music Videos
Music Videos displays videos you have added from Apple Music, so if you don’t plan to view music videos, you can hide this section. By default, this view displays music videos in a grid (Figure 37), but you can also choose to display these videos in list form. Press ⌘-J to show the View Options window and choose View As List. If you do this, you’ll have options to display various columns, such is in Songs View, which I discuss below.
TV & Movies
TV & Movies view displays only if you have downloaded TV shows or movies from Apple Music. These include shows like Carpool Karaoke and Planet of the Apps, and are actually quite hard to find if you don’t search for them by title; there’s no TV & Movies section in Apple Music.
Songs View
Songs view is a spartan list of songs, with user-configurable columns showing tags and other metadata (Figure 38).

Songs view is great if you want to sort all your music in specific ways, since it lets you display columns for each kind of metadata about your music; see Show Columns in Songs Views, shortly ahead, for more about controlling which columns appear.
Playlist Views
When you view a playlist, you have a number of options for how you want it to display your music. The default Playlist View is similar to the way individual albums are displayed (Figure 39).

Playlist view is particularly interesting for playlists you save from Apple Music because a description can appear above the list, giving you more information about the artists or songs in it. (To add a description to your playlists, click Add Description and type.) In addition, tracks in Apple Music playlists contain Plus ![]() icons so you can add them to your library, if you wish (shown in Figure 39, above).
icons so you can add them to your library, if you wish (shown in Figure 39, above).
You can view playlists in other ways, however. Press ⌘-J to display the View Options window. In the View As popup menu, you can choose Playlist, Songs, Albums, Artists, Composers, or Genre. All of these views display as described in their respective sections above, and offer the same sorting options.
When you view playlists which contain music from multiple albums—whether in Playlist view, or another view—Music displays a montage of the playlist’s album artwork in the playlist header. You can change this artwork if you wish, so long as the playlist isn’t from Apple Music. Just drag a graphic from the Finder, or from a webpage, to the location where the artwork is in the playlist header, or click the artwork to open a popover, where you can click Other to select a file on your Mac.
Show Columns in Songs Views
If you use Songs view, you can choose which columns display. Each column corresponds to a tag, or a type of metadata. (I discuss tags inShow Columns in Songs Views.)
You can show or hide a column by Control-clicking any column header and choosing a column name; a visible column has a checkmark next to its name in the contextual menu. Because you have to individually choose to show or hide each column by selecting its name, you may find it easier to work with the View Options window.
Open the View Options window by pressing ⌘-J. The lower section of the window lets you show or hide columns (Figure 40); you see different options depending on which view is active.

After adding columns, you may want to reposition them by dragging them left or right in the column header area, and resize them to show all the information they contain or to make them fit in the window.
One way to resize columns is to Control-click a column header, then choose Auto Size Column or Auto Size All Columns. Music fits the size of one or all visible columns to hold the longest text that they contain. Or, drag the divider between any two column headers.
Use Contextual Menus
Quite a few commands in the Music app are available in contextual menus. These menus are worth paying attention to, since it’s often faster to open a contextual menu than to work with a menu bar menu, especially since a contextual menu can appear in the MiniPlayer or in full-screen mode. I often use a contextual menu to rate songs or to add selected songs to the Up Next queue.
A contextual menu appears when you Control-click (right-click) the appropriate location. If you have a trackpad, you may prefer a different method, such as a two-finger tap.
For example, if you Control-click the app header on a track name while playing a tune, a contextual menu opens (Figure 41). When you Control-click that same tune in your Music library, the contextual menu has a few additional items.

Contextual menus also open when you Control-click other items: playlists, artists, genres, etc. Each menu has options appropriate to the selected item. And you see similar menus when you click the More ![]() icon in various locations in the app.
icon in various locations in the app.
The options available from contextual menus are also accessible from the menu bar, on the Song menu.