Maximize Your iPad
Technically, iPads run a completely different operating system than iPhones: iPadOS. In reality, they’re functionally identical… for the most part. However, iPads have some special features that take advantage of the larger screen.
Manage the Dock
The iPad Dock functions more like the Mac Dock than the iPhone Dock. It’s split into two sections. The left-hand section holds the apps you place there—up to 15 of them. The right-hand side presents recently and frequently used apps and Handoff apps, denoted by the Handoff ![]() icon on the app (see Learn About Handoff—Figure 73). You can turn that off with the Show Suggested and Recent Apps setting in Settings > General > Multitasking & Dock.
icon on the app (see Learn About Handoff—Figure 73). You can turn that off with the Show Suggested and Recent Apps setting in Settings > General > Multitasking & Dock.

The icon on the far-right side of the Dock opens App Library (see Clean Up Your Home Screen with App Library).
Reveal the Dock
The Dock is always visible on the Home screen, but is hidden when viewing an app. Swipe up from the bottom of the screen to reveal it. In some apps, you must first swipe up to reveal an arrow ![]() , and then swipe up again to reveal the Dock.
, and then swipe up again to reveal the Dock.
Tapping an app in the Dock switches from the current app to the app you tap.
Adding and Removing Dock Apps
To add an app to the Dock, enter jiggle mode by touching and holding an empty spot on the Home screen, and then drag the app icon to the Dock—see Move Apps. Items added to the Dock are removed from the Home screen. You can also drag in apps from the App Library.
Removing an app from the Dock works the same way: drag the app out of the Dock. Note that you cannot do this in an app—you must be viewing the Home screen.
Type on an iPad
An iPad’s large screen size affords some special keyboard features that wouldn’t make sense on an iPhone.
Flick Down for Special Characters
iPadOS makes typing alternative characters more efficient, by allowing you to “flick” down on a key to type an alternative character instead of having to cycle through keyboard layouts.
Look at each keyboard key. Tapping the key inserts the black character. Most keys also display a light gray character above the primary character. To type these, flick down on the key instead of merely tapping it. Think of it like flicking down a light switch.
If you flick slowly, you’ll notice the light gray character sliding down and becoming the key you’re typing (Figure 74).

Split the iPad Keyboard
The standard iPad keyboard is fine if you’re resting the iPad in your lap, but if you’re holding the iPad in your hands and typing with your thumbs, it can be impossible to reach the middle keys. Thankfully, iPadOS lets you split the onscreen keyboard so you can type with your thumbs:
Touch and hold the Hide Keyboard
 key, and then tap Split (Figure 75).
Figure 75: You can split the iPad’s keyboard, making it easier to type with your thumbs. Or, touch and hold the Hide Keyboard
 key and immediately drag it up.
Either way, the keyboard splits and moves up to the middle of the screen.
To put the keyboard back together, either drag the Hide Keyboard ![]() key down, or touch and hold the Hide Keyboard
key down, or touch and hold the Hide Keyboard ![]() key and tap Merge or Dock and Merge. Merge merely puts the keyboard back together while Dock and Merge puts it together and sets it back at the bottom of the screen.
key and tap Merge or Dock and Merge. Merge merely puts the keyboard back together while Dock and Merge puts it together and sets it back at the bottom of the screen.
Shrink the iPad Keyboard
In iPadOS, you can shrink the keyboard down to a floating keyboard roughly the size of an iPhone keyboard, which is ideal for one-handed typing (Figure 76). Also, the floating keyboard allows the use of QuickPath to type by swiping between keys—see Save Time Typing. You can even swipe between keys with an Apple Pencil.

There are two ways to shrink the keyboard:
Pinch in with two fingers on the big keyboard. This doesn’t work on the split keyboard.
Touch and hold the Hide Keyboard
key, and then tap Floating.
You can move the floating keyboard to anywhere on the screen you want by dragging on the gray bar at the bottom of the keyboard. To expand the floating keyboard, pinch out on it with two fingers.
Use a Mouse or Trackpad
You can use a pointing device with your iPad to make it more like a traditional computer. Pretty much any pointing device—like a mouse or keyboard—will work, but only certain ones officially support multitouch gestures:
Magic Trackpad 2
Magic Mouse 2
Magic Keyboard
Logitech Combo Touch
Any future pointing device approved by Apple should support gestures as well.
First, you need to connect your mouse to your device. For Bluetooth, put the pointing device in pairing mode and pair it in Settings > Bluetooth. If it’s a USB pointing device, you’ll need an adapter. If your device has a Lightning port, I recommend Apple’s Lightning to USB 3 Camera Adapter. For USB-C, there’s a plethora of passable adapters on the market.
Once connected, the pointing device should work automatically. The pointer isn’t the typical arrow but a little circle. There are also a number of gestures you can use with a trackpad. Here are some of the most useful ones:
Secondary click: Click with two fingers or press and hold the Control key on an external keyboard while clicking.
Scroll: Use two fingers to scroll up or down.
Zoom: Pinch to zoom in and out.
Go Home: Swipe up with three fingers.
Open the App Switcher: Swipe up with three fingers and leave them in place.
You can adjust mouse and trackpad settings in Settings > General > Trackpad & Mouse.
Multitask in iPadOS
Every iPad has three multitasking views:
Full screen: The default app view, in which a single app takes up the entire screen.
Split View: A view in which two apps appear side-by-side, with an adjustable border in between you can drag to adjust how much space each app takes.
Slide Over: A view that shrinks an app down to a narrow window that sits on the right or left side of the screen and can be easily moved on and off screen as needed.
Let’s explore how to access them.
Access Multitasking Views
There are a three ways to access your iPad’s multitasking views: buttons, gestures, and the App Switcher.
iPad Multitasking Using Buttons
When viewing a single full-screen app, you should see an ellipsis ![]() icon at the top of the screen, which is known in this context as the Multitasking Controls icon. Tap it to reveal three icons: full screen
icon at the top of the screen, which is known in this context as the Multitasking Controls icon. Tap it to reveal three icons: full screen ![]() , Split View
, Split View ![]() , and Slide Over
, and Slide Over ![]() . When you tap the second or third icon the app you’re viewing slides off to the right edge of the screen, revealing the Home screen and Dock. Tap an app icon on the Home screen, in the Dock, or in the App Library to launch an app in the view you chose.
. When you tap the second or third icon the app you’re viewing slides off to the right edge of the screen, revealing the Home screen and Dock. Tap an app icon on the Home screen, in the Dock, or in the App Library to launch an app in the view you chose.
iPad Multitasking with Gestures
The original method of accessing iPad multitasking was gestures, and while they’re more awkward than the buttons added in iPadOS 15, they’re handy to know:
Enter Slide Over: To add an app to Slide Over, while in an app, bring up the Dock by swiping up from the bottom of the screen, and then dragging an app from the Dock onto the open app (Figure 77).
Figure 77: Slide Over lets you put a second app in a narrow window. Dismiss Slide Over: To get Slide Over out of your way, touch and hold the drag handle at the top of the window and swipe it all the way off the right side of the screen.
Bring back Slide Over: Swipe from outside the right edge of the screen to the left.
Switch between Slide Over apps: You can add multiple apps to Slide Over and switch between them by slowly dragging the bottom of the Slide Over window.
Enter Split View: Drag an app from the Dock to the left or right edge of an open app until the app view “splits” (Figure 78).

Figure 78: Split View puts two apps side by side. Switch between Split View and Slide Over: Touch, hold, and drag the top drag handle down and then move the window to the left or right.
You can also switch multitasking modes with the App Switcher.
iPad Multitasking with the App Switcher
To bring up the App Switcher, swipe up from beneath the bottom of the screen, stop at the center of the screen, and release.
The App Switcher shows not only open full-screen apps, but also any Split View pairings. Here’s what you can do:
Put a full screen app into Split View: Touch, hold, and drag a full screen app thumbnail over another full app thumbnail and release.
Make a Split View app full screen: Touch, hold, and drag the half of the app thumbnail with the app you want and drag it out into the App Switcher between app thumbnails until it becomes a big rectangle, and then release.
Close an app in Split View: Touch and hold the half of the Split View thumbnail you want to close and flick it up, just as if you were force-quitting any other app.
You can also use the App Switcher to manage Slide Over windows. If you go all the way to the right side of the App Switcher, by swiping right to left, you see all your open Slide Over windows.
Manipulate Slide Over windows just as you would other windows: flick them up to close them, drag them into the App Switcher to make them full screen, or drop them on top of another window to put them into Split View.
Also see the TidBITS article iPadOS 15 Finally Makes Multitasking Discoverable.
Use Split View
When using two apps in Split View, there are two controls to pay attention to:
Resize and close Split View panes: A black line divides the two panes. In the center is a gray bar that you can touch and drag to the left or right to adjust the size of the panes. You can drag the divider all the way to the left or right to make one pane full screen and close the other (Figure 79).
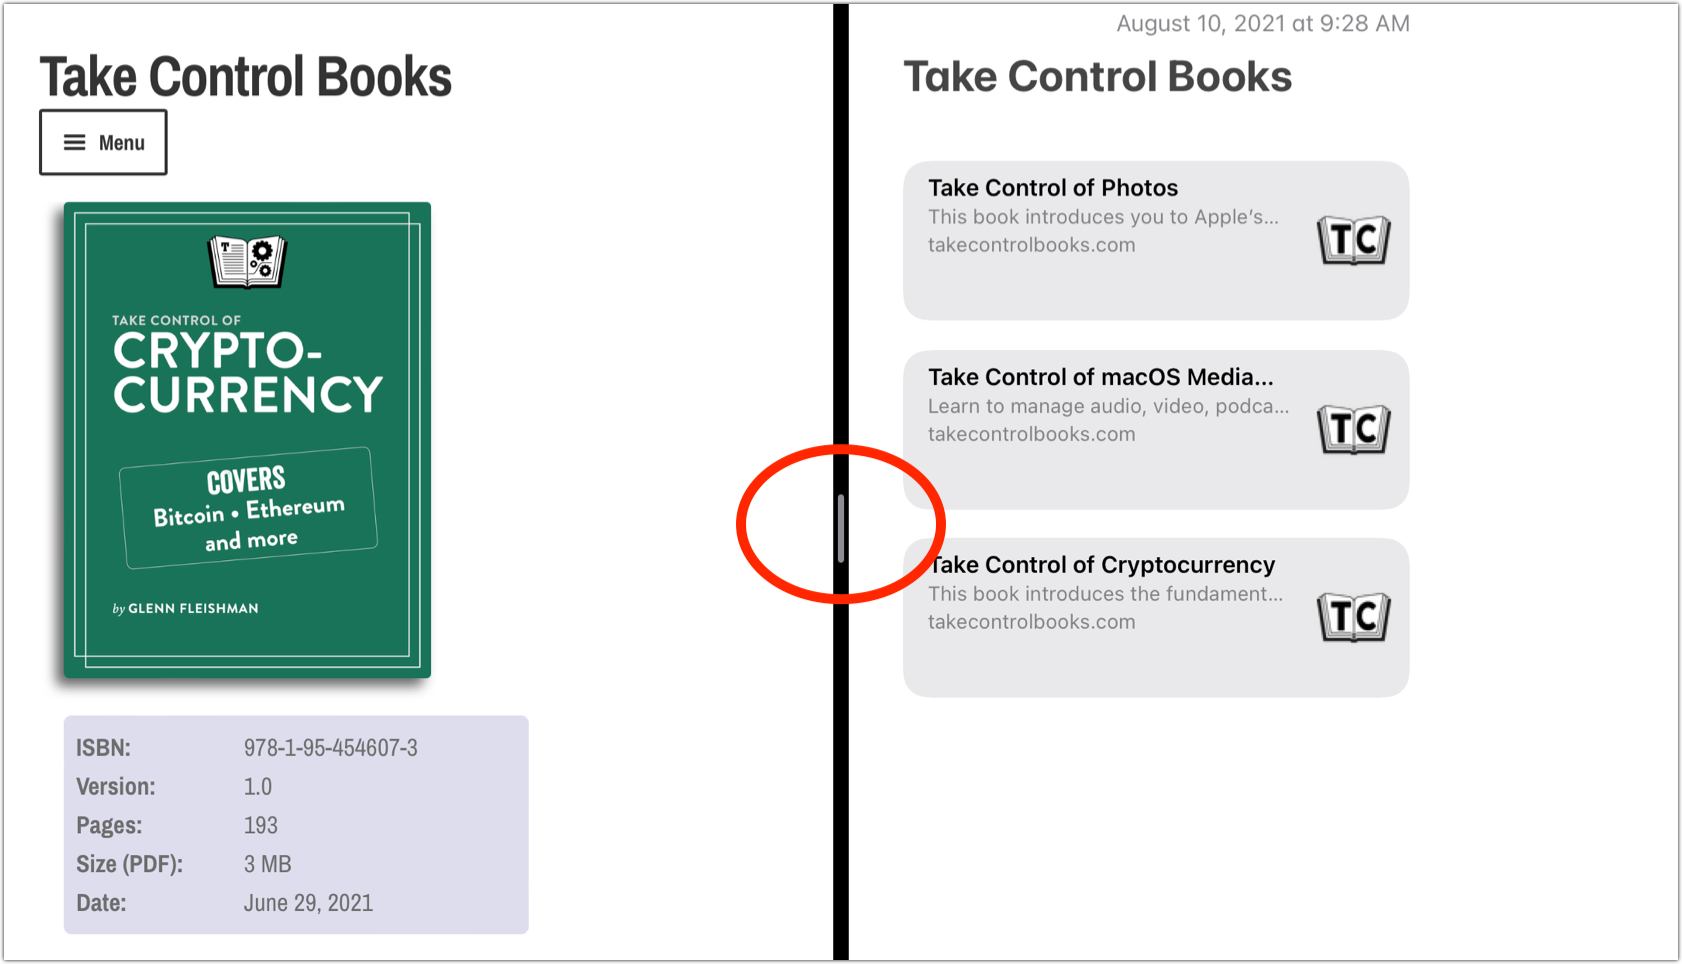
Figure 79: Drag this divider to adjust Split View windows. Alter and rearrange Split View panes: Both panes display a Multitasking Controls
 icon at the top. Tap the button in either pane to make that pane full screen or turn it into a Slide Over window. You can touch, hold, and drag the button to swap the position of the panes, i.e., move the left pane to the right and vice versa. You can also touch, hold, and drag the button down and then move it over to turn it into a Slide Over window.
Use Slide Over
Slide Over shrinks an app down to a narrow window that floats over a fullscreen app, on either the right or left edge of the screen.
One reason you may want to use Slide Over rather than Split View is that you can have multiple Slide Over windows that persist between apps. For example, let’s say Mail is your main app and you open Notes in a Slide Over window. If you switch to Safari, you can pull that Slide Over window back on screen to refer to your note.
Again, there are a few controls to know:
Move and alter Slide Over windows: To move a Slide Over window, touch, hold, and drag the Multitasking Controls
icon. The Slide Over window attaches only to the right or left edge of the screen. If you drag the Slide Over window to the extreme left or right it turns into a Split View pane.Just as in the other views, tap the Multitasking Controls
icon to see options to convert the Slide Over window into a Split View pane or full-screen app.Switch between Slide Over windows: You can open up multiple Slide Over windows, but you can view only one at a time. They stack up on top of each other, and to switch between them, swipe up from the bottom of the Slide Over window and release. If you have multiple Slide Over windows open, they spill across the screen. Tap one to switch to that Slide Over window.
Dismiss and recall Slide Over windows: To get the Slide Over window off your screen, swipe it all the way to the left or right. If it’s on the right edge, touch, hold, and drag the Multitasking Controls
icon and flick the window to the right. If the window is on the left, flick it to the left. An arrow briefly appears on the edge of the screen to indicate which edge is hiding the window. To recall the Slide Over window, swipe in from the outside edge from which it’s hidden. So, if you flicked it off to the right edge of the screen, swipe from outside the right edge of the screen to the left.
Manage Windows with the Shelf
iPad multitasking is messy. It’s easy to lose track of how many windows you have open and it’s hard to figure out how to close them or open new ones. Apple has introduced a feature called the Shelf, which shows thumbnails of all of an app’s open windows so you can easily close them or switch between them (Figure 80).

There are two ways to reveal the Shelf:
Open or switch to an app with multiple open windows.
Tap the Multitasking Controls
icon when multiple windows are open.
While the Shelf is displayed:
Tap a window to switch to it.
Tap New Window to create a new window in that app.
Swipe up on a window in the Shelf to close it (it can’t be the current window).
Manage the Stage
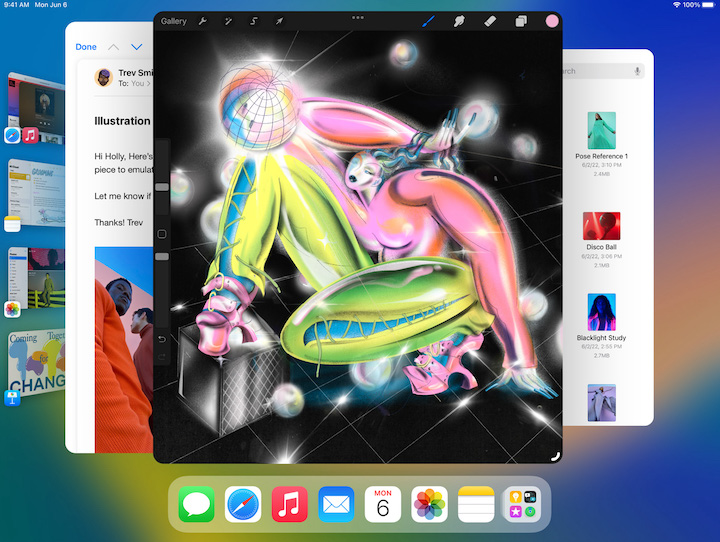
The Stage Manager feature in iPadOS brings limited floating-window multitasking to iPads. Just like on a Mac, you can move and resize the windows (Figure 82). However, Stage Manager windows are a little different than what you’re used to. For instance, there are no red, yellow, and green buttons to control the window.
Another difference is limitations to how many windows can be open at once. You can have up to four on screen at a time in what are called app groups. A bar on the left side of the screen lets you switch among up to five app groups, including the one currently on screen.
Stage Manager also adds proper external monitor support, with app windows on the external monitor independent of the iPad display. Unfortunately, Stage Manager is available only on iPads with M-series processors, and you need an external keyboard and pointing device to use an external monitor.
Using an external monitor effectively doubles how many sets of app groups you can have at one time: five on your iPad and five on your external monitor.
Initiate Stage Manager
Enable Stage Manager by tapping its button ![]() in Control Center. If Stage Manager is not visible in Control Center, enable it in Settings > Control Center.
in Control Center. If Stage Manager is not visible in Control Center, enable it in Settings > Control Center.
What happens next depends on whether you’re currently viewing any apps. If you’re on the Home screen, nothing happens until you open an app. If one app is open, its converted to a Stage Manager window. If you’re viewing two apps in Split View, they’re both converted to Stage Manager windows in an app group.
You can touch and hold the Stage Manager ![]() button in Control Center to see options to show or hide the recent apps area and the Dock. The left checkbox enables and disables the sidebar and the bottom checkbox controls Dock visibility (Figure 83). You probably want to leave both on while you’re learning Stage Manager.
button in Control Center to see options to show or hide the recent apps area and the Dock. The left checkbox enables and disables the sidebar and the bottom checkbox controls Dock visibility (Figure 83). You probably want to leave both on while you’re learning Stage Manager.

Understand Stage Manager Basics
Let’s talk through a scenario to help you understand how Stage Manager works. Let’s assume you trigger Stage Manager while on the Home screen.
With Stage Manager enabled, the next time you open an app, it appears in a new window and the Home screen disappears. You can move the window by touching, holding, and dragging the top-center of the window. You can also use a mouse, trackpad, or Apple Pencil.
To resize a Stage Manager window, drag the curved tick mark on the bottom corner of a window (Figure 84). You can see another example near the bottom of Figure 85.

Also note the Multitasking Controls ![]() icon at the top of the window. Every other function can be found by tapping it.
icon at the top of the window. Every other function can be found by tapping it.
After you open a second app in Stage Manager, the first app is moved to the recent apps area on the left side of the screen. Every time you open a new app in Stage Manager, the current app is moved into that area (Figure 85).
Tip: Don’t forget that the last icon in the Dock ![]() is App Library, which lets you access all of your apps without returning to the Home screen.
is App Library, which lets you access all of your apps without returning to the Home screen.
The recent apps area can contain five apps or app groups at one time, and once you exceed a total of five apps (one open and four recent), the oldest app at the bottom is replaced with the next one up.

Think of it as a secondary Dock that only handles app groups. Tap a thumbnail to return it to the forefront and move the current app group to recent apps area.
Create App Groups
As I mentioned at the start of the chapter, an app group lets you have up to four windows on screen at one time. An app group is treated just like a single app in the recent apps area, so if you switch to another app or group, they are all minimized together into the list of recent apps, displayed as a collection of app icons, and if you tap that entry, all the app windows in the group are returned to the forefront.
There are a couple of ways to add an app to an app group:
Tap the Multitasking Controls
icon and then Add Another Window.Drag an app icon from the Dock onto the existing window.
Use Stage Manager with an External Monitor
If you connect your iPad to an external monitor—via USB-C or Thunderbolt—you can use your iPad much like a traditional desktop with Stage Manager (Figure 86).
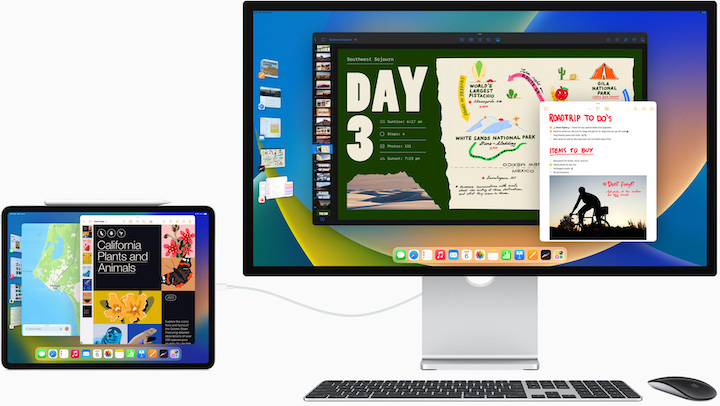
Here are a few notes on using Stage Manager with a monitor:
You must have a keyboard and pointing device connected.
The iPad screen must remain awake. It doesn’t work in “clamshell mode.”
Resizing windows works more like on a Mac. Instead of a black tick in the corner, place the pointer over either of the bottom corners and it turns into resizing arrows.
The windows on the monitor are completely separate from those on the iPad, so you have twice as many total windows.
You can drag apps and files between screens.
To move a window to the other display, click the Multitasking Controls
icon at the top of the window and choose Move to Display.Adjust the display arrangement in Settings > Display & Brightness > Arrangement. Drag the respective displays around to match their relative physical locations.
Also in Settings > Display & Brightness > Arrangement, you can choose to mirror your iPad’s display to the monitor instead.
Take a Quick Note
iPadOS lets you quickly jot down a note without opening the Notes app (Figure 87).

There are three ways to take a Quick Note:
- Finger or Apple Pencil: Place the tip of your finger or Apple Pencil outside the bottom-right corner of the screen and drag toward the upper-left corner.
Tip: if a finger-swipe doesn’t work, enable Allow Finger to Swipe From Corner in Settings > General > Gestures.
Hardware keyboard: Press
 -Q on a connected keyboard.
Control Center: Turn on Quick Note in Control Center by going to Settings > Control Center, scrolling down to Quick Note, and tap the green insert
 button next to Quick Note.
Then reveal Control Center by swiping down from above the upper-right corner of the screen and tapping the Quick Note
 button.
I document Quick Note in more depth in Take Control of Notes.
Meet the iPadOS Menu Bar
Although Apple doesn’t advertise it as such, iPadOS has a macOS-style menu bar. To see it, you need an external keyboard.
Press and hold the ⌘ key while on the Home screen or in any app to reveal keyboard shortcuts. However, the keyboard shortcuts list has been turned into a sort of menu bar, split into tabs along the bottom of the screen (Figure 88).

You can use your finger or a pointing device to cycle through the categories, either by tapping or clicking a tab or swiping through the list. You can tap or click any of the onscreen commands to trigger them.
Write with Scribble
You can use the Apple Pencil to write in pretty much any text field, and your handwriting is converted to text. Try it in Messages, the Safari URL field, and in your favorite apps. For the most part it just works (Figure 89).

Here’s are some special features of Scribble:
Delete text: Scratch over text with the Apple Pencil to delete it, just as if you were scribbling over it with a pen.
Select text: Draw a line through text or draw a circle around it to select it.
Insert text between characters: Tap the tip of your Apple Pencil between two characters to change the insertion point.
Join and separate: Draw a vertical line between two characters to insert or delete a space.