Set Up iCloud
iCloud setup, in and of itself, is easy and largely self-explanatory—you enter your Apple ID and password, and click a few buttons, on each of your devices. There’s no software to install on a Mac or iOS device (assuming you already have a recent version of the operating system) and only a few options you can turn on or off. You have to go through a few more steps, but only a few, under Windows.
However, you may encounter questions about certain settings, wonder how to handle multiple iCloud accounts, or need help disabling iCloud. So in this chapter I walk you through those topics for Macs and iOS devices. (The Apple TV is covered later, in Use iCloud on an Apple TV. And, for help with the iCloud website, see Use the iCloud Website.)
If you’ve already set up iCloud, you can skim most of this chapter, starting with Set Up iCloud on a Mac—just to make sure you’ve enabled all the features you may want to use.
Update Your Software
If you want to access all the latest iCloud features, make sure the Apple software that uses iCloud is up to date on each platform you use. Here’s what you need to do:
iOS: For any iOS device you haven’t already upgraded to iOS 12 or later, tap Settings > General > Software Update and follow the prompts to install the latest update.
Mac: Choose Apple > App Store and click Updates. If newer versions of macOS, Photos, iTunes, or the iWork apps (Pages, Numbers, and Keynote) are found, follow the prompts to install them. In particular, be sure to install 10.14 Mojave—a free upgrade—if you have not already done so and your Mac supports it. (If you are contemplating a major upgrade from an earlier version of macOS, look for steps in my book Take Control of Upgrading to Mojave.)
Windows: Download and install the latest version of iTunes; if you have a previous version installed, you can use Start > Apple Software Update.
Then download iCloud for Windows and run
iCloudSetup.exe; or, if it appears in Apple Software Update (because you had a previous version of the iCloud app installed), install it from there.Apple TV: For information on updating the Apple TV software, see Apple’s article Update the software on your Apple TV.
Set Up iCloud on a Mac
Your Mac may already have prompted you to set up iCloud (in which case, just skim this section to make sure everything is configured to your liking). If not, you can set it up manually. The exact sequence of steps depends on your circumstances.
For the sake of illustration, I’ll show you what to do under Mojave if you ignored any prompts to set up iCloud earlier. What you see under earlier versions of macOS may differ slightly:
Go to System Preferences > iCloud.
The window shows Apple ID and Password fields (Figure 1). Enter the Apple ID you want to use (see About Your Apple ID for more details) and your password and click Sign In. (In the unlikely event that you don’t yet have an Apple ID, click Create New Apple ID and follow the prompts to create one now.)

Figure 1: Before you can use the iCloud preference pane, you must sign in with your Apple ID, or create a new one. The iCloud Terms of Service may appear. If so, agree to them. In some situations, you may also be prompted to enter the password for your Mac’s user account; if so, enter it and click OK.
Your Mac asks (Figure 2) if you want to enable a commonly used set of services (contacts, calendars, reminders, notes, Safari bookmarks, iCloud Keychain, documents—not including your Desktop and Documents folders by default—and mail, even though it’s not explicitly mentioned in the list) and, separately, if you want to use Find My Mac.

Figure 2: You can set up most iCloud services without any further effort by clicking Next here. Most people will want to use all of these, so unless you have a particular reason not to, leave both checkboxes selected and click Next. If you’re prompted to enter your password to set up iCloud Keychain, do so. Then, if you selected Use Find My Mac, click Allow to confirm that it can use your Mac’s location.
You may also be asked to take an additional step to enable iCloud Keychain—entering your password and then either entering your iCloud security code or requesting approval from another device (see Enable and Configure iCloud Keychain).
The full iCloud pane opens (Figure 3). If you left both checkboxes selected earlier in this step, all the corresponding categories will already be enabled.

Figure 3: Here’s where the magic happens—by which I mean, here’s where you select checkboxes to turn on iCloud services. Most should already be checked (which is fine). Your picture may differ slightly depending on which version of macOS you’re using. Select or deselect checkboxes to specify the types of data you want to manage with iCloud. (If you stuck with the default selections to this point, you’ll likely find that only Siri and Back to My Mac are now deselected.) Unless you have some special reason to avoid one of these, I suggest selecting them all.
If you never previously set it up, Keychain requires an additional series of steps to set up, beyond merely selecting its checkbox. If you want to set it up now, flip ahead to Work with iCloud Keychain for instructions. Or leave it deselected for the moment and return to it when you’re ready.
When you’re satisfied with your settings, close System Preferences.
iCloud is now activated on your Mac, although you must take further steps to use the iTunes-specific features (see Use iCloud Music Library). Repeat this iCloud configuration process for any other user accounts on your Mac, as well as for any other Macs you may have, and then move on to set up your other devices.
Set Up iCloud under Windows
After you install iCloud for Windows (see Update Your Software), you can configure it with just a few steps.
The iCloud app may open automatically after you install it. If not, to walk through the whole setup process from the point that the iCloud app is installed, do this:
Locate the iCloud app in the Start menu and open it. Enter your Apple ID and password, and click Sign In. If you turned on two-factor authentication or two-step verification (see Use Enhanced Security Features), follow the prompts to verify your login.
The application should look something like Figure 4 (though the storage indicator may be empty if you haven’t yet migrated any other devices, and other services may be checked or unchecked).
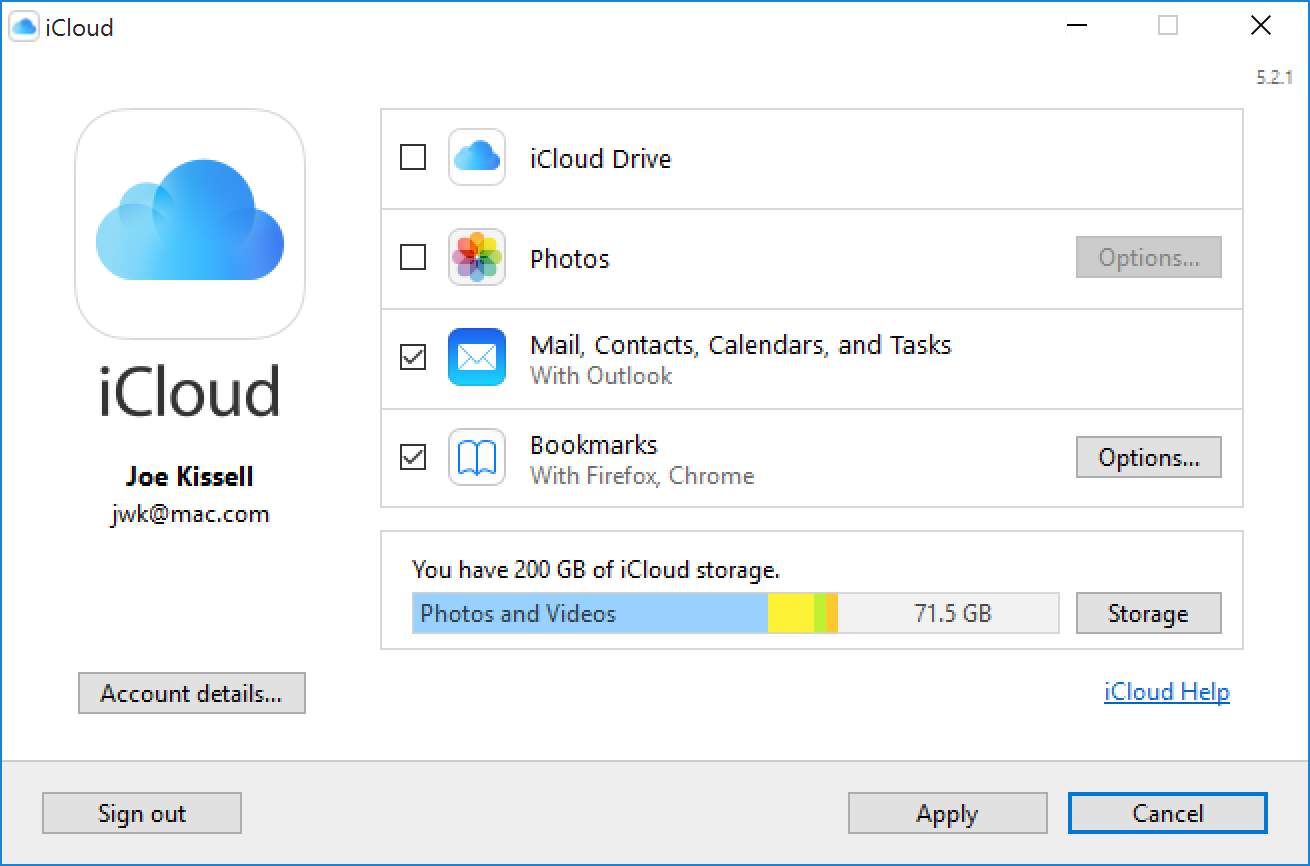
Figure 4: The iCloud app is now ready for your selections. For each service you want to enable—and unless you have a special reason not to, I suggest enabling them all—select the corresponding checkbox. However, note the following:
After turning on Photos, you can click its Options button for several additional settings. First, you can select iCloud Photo Library (to turn on automatic uploads and downloads of photos and videos); if you do so, you can then individually select or deselect Download New Photos and Videos to My PC and Upload New Photos and Videos from My PC (and select default folders for each). You can also select My Photo Stream (upload and download just recent photos) and iCloud Photo Sharing (to share photo streams with others and view photo streams others have shared with you), and you can specify a different iCloud Photo Sharing folder, if you don’t want to use the default folder (
C:Usersyour usernamePicturesiCloud PhotosShared). Click Done when you’re done.Mail, Contacts, Calendars, and Tasks can sync only with Microsoft Outlook 2007 or later. If you don’t have Outlook installed, this item will be disabled (and you’ll see an alert that you need to install Outlook to use them), though you can still access them from a web browser. When you next open Outlook, you may be asked for your iCloud password one or more times.
When you select Bookmarks, an alert appears confirming that you want to merge your local bookmarks with any bookmarks already in iCloud. Click Merge. If the Bookmarks option is set to Internet Explorer and you prefer Firefox or Google Chrome (or any combination of these), then after turning on Bookmarks, click the Options button next to it, select the desired browser(s), and click OK. You’ll be prompted to install iCloud extensions for Firefox or Google Chrome.
Click Apply to activate the selected services. Depending on the options you selected, various other windows and processes may open as iCloud completes its setup process and transfers your data. You may have to click Done to dismiss a progress window or two.
Click Close to close the iCloud app.
iCloud is now running in Windows. You must take more steps to use the iTunes-specific features (read Use iCloud Music Library).
Set Up iCloud on an iOS Device
On an iOS device, proceed with the following tasks:
Tap Settings > Sign in to your Device. (After you sign in, you’ll instead see your name in this spot.)
Enter your Apple ID and password, and tap Sign In. If you have two-factor authentication enabled, follow the prompts to enter your verification code. You may also be prompted to enter your device’s passcode and, in certain situations, respond to other alerts.
Tap iCloud. In the list of services and apps that can sync data with iCloud (Figure 5), most should already be on (shown by a green switch). To toggle any service or app, tap its on/off switch.

Figure 5: Turn each iCloud service on or off here (top shown on left; next portion on right). Options may vary by device and iOS version. Most people will want to have all the apps and services turned on; as the book progresses, I discuss these in more detail, but a few items that you may want to pay attention to now include these:
For the most part, the apps and data types that appear above iCloud Drive in the list are those that use iCloud, but don’t store their data as files visible in iCloud Drive. To prevent any of these items from syncing with iCloud, turn its switch off.
To turn iCloud Drive on or off, tap its on/off switch. You can also enable or disable iCloud Drive syncing for each supported app; apps appear below the iCloud Drive switch.
To turn on or off any iCloud photo syncing service—iCloud Photo Library, Upload to My Photo Stream, or Shared Albums (iOS 12 or later) or iCloud Photo Sharing (iOS 11 or earlier)—tap Photos (see Manage Your Photos for further details).
The Home switch lets iCloud sync settings from the Home app (for smart home products) across your iOS devices. But Home is not otherwise part of iCloud, so I don’t cover it in this book.
The News switch enables data for the News app (such as favorites, history, and saved stories) to sync among your iOS devices. News itself is not an iCloud feature, however, so I have nothing more to say about it in this book.
The Health switch lets you sync data from the Health app (on an iPhone only) with the cloud and with other iPhones you own.
The Wallet switch appears only on the iPhone and iPod touch, and lets you sync wallet items (such as Apple Pay credit cards, loyalty cards, concert tickets, and coupons) among multiple devices. Because Wallet as such isn’t an iCloud feature, I don’t discuss it here.
The Siri switch enables information Siri learns about you on one of your devices to be shared with the others, to improve the quality of its responses.
The Keychain item, which controls iCloud Keychain, may require more than just a tap or two to configure. For full instructions, flip ahead to Work with iCloud Keychain.
If you want to back up your iOS device to iCloud from now on rather than via iTunes, set iCloud Backup to On. (I say more about iCloud Backup later, in Understand How iCloud Backup Works.)
Your current storage statistics for iCloud Drive appear at the top of the screen. To get more detail about what’s backed up using iCloud Backup, or delete the backed-up data for any app, tap Manage Storage. (See Activate and Configure iCloud Backup for details.)
iCloud is now set up on your iOS device, but to use iTunes Match or any of the other iTunes-related features you must take more steps, as I describe in the next chapter. If you have any other iOS devices, repeat these steps with each one now.
Work with Multiple iCloud Accounts
In this book, I generally assume that each person has a single iCloud account. Some people use a separate Apple ID (possibly shared with a family member) for purchases from the iTunes Store (see About Your Apple ID), although Family Sharing largely eliminates the need to do so (see Use iCloud Family Sharing).
However, in some situations a person may have more than one active iCloud account, each with its own data (such as email, contacts, and calendars). For example, you may have a personal account and a work account, or an individual work account and a departmental account that you’re in charge of monitoring. In cases such as these, you can set up your Mac or iOS device to access multiple iCloud accounts at once—with some restrictions. (You can also use this technique to share a set of contacts with a family member or friend; see Share Your Contacts with Someone Else, later.)
Use Multiple iCloud Accounts on a Mac
On a Mac, each user account can be signed in to a different iCloud account and receive the full benefit of that iCloud account, with one important exception: on any given Mac, only one iCloud account at a time can be used for Find My Mac, regardless of how many user accounts you’ve set up. If you want to enable Find My Mac under a different user’s account, first disable it under the user account where it’s active.
Apart from that, each user account on a Mac can have a primary iCloud account—with full access to all available services—as well as secondary iCloud accounts with more limited access. Once a given user has signed in to an iCloud account, that iCloud account becomes the primary account for that user—and the only one that can use Safari data syncing, iCloud Photos, iCloud Drive, iCloud Keychain, and Back to My Mac. If you then add another iCloud account while logged in to the same user account, your Mac treats the new iCloud account as secondary, which means it can be used only for email, contacts, calendars, reminders, and notes. (And yes, you can have more than one secondary iCloud account.)
To add a secondary iCloud account, go to System Preferences > Internet Accounts, click iCloud, and follow the prompts to sign in and enable any desired features.
Use Multiple iCloud Accounts on an iOS Device
On an iOS device, as on a Mac, you can have more than one iCloud account set up, but only the first one you configure—the primary account—can be used for Safari, iCloud Photos, iCloud Drive, Keychain, Find My Device, and Backup. In addition, on an iOS device, push email works only with the primary account. Secondary accounts can be used for email, contacts, calendars, reminders, and notes.
To add a secondary iCloud account, go to Settings > Accounts & Passwords > Add Account, tap iCloud, and follow the prompts.
Switch Primary and Secondary Accounts
If you set up a certain iCloud account as a secondary account on a Mac or iOS device and later decide you want the secondary account to be primary (so it’s the one associated with services like iCloud Photo Library and iCloud Drive), you’ll need to delete the secondary account temporarily (see Remove an iCloud Account), sign out of the primary account, and then sign back in with the (formerly secondary and now primary) account.
Disable iCloud
Once you’ve set up an iCloud account, it exists forever. You can manually delete any or all of the information from the account, if you like, or even stop using it permanently, but Apple provides no way to cancel an iCloud account. However, even if you plan to continue using iCloud indefinitely, you may want to disable individual iCloud features, remove a device from Find My Device, or remove an iCloud account completely from a device.
Disable Individual Features
To disable features you don’t need, go to System Preferences > iCloud (on a Mac), the iCloud app (in Windows), or Settings > Your Name > iCloud (on an iOS device). Uncheck or turn off the features you don’t want to use on that device. In some cases, you are prompted to decide whether you want to keep the associated data on your device or delete it; but even if you delete it from a given device, it will remain in the cloud, meaning it will download again if you later decide to reenable that feature.
Remove a Device from Find My Device
When you turn on Find My Device on a Mac or iOS device, you can then lock or even wipe the contents of that device remotely if it’s lost. If you buy a used Mac or iOS device and the previous owner hasn’t removed the device from Find My Device, that person—and not you—can then erase your new device at any time! Therefore, if you’re selling a device that was signed in to your iCloud account, be sure to remove it from Find My Device first. And before buying a used device, make sure the previous owner has done so (see Check Activation Lock).
You can remove a device from Find My Device by turning off Find My Device in System Preferences > iCloud (on a Mac) or in Settings > Your Name > iCloud (on an iOS device); removing your iCloud account completely (described next); or, on an iOS device, by erasing it (tap Settings > General > Reset > Erase All Content and Settings). For more details, see Apple’s support article iCloud: Remove your device from Find My iPhone.
Remove an iCloud Account
To remove an iCloud account from a device, do one of the following:
Mac: Go to System Preferences > iCloud and click Sign Out.
Windows: Open the iCloud app and click Sign Out.
iOS: Tap Settings > Your Name and then, at the bottom of that screen, tap Sign Out.
Then, follow the prompts to specify whether you want any of your iCloud data to remain on the device.
Removing an iCloud account from a device, like disabling individual features, doesn’t delete data from Apple’s servers. If you later set up the same account on the device, it will re-download data for each iCloud feature you enable.