
Find My Nouns
First there was Find My iPhone, a feature that allowed you to, you know, find your iPhone if it was lost or stolen. Even though Apple later extended the capability to the iPod touch, the iPad, Macs, the Apple Watch, and even AirPods, the “Find My iPhone” name is still used generically to describe this feature. I find that somewhat confusing, so to reduce ambiguity, in this book I use “Find My Device” when talking about the feature as it applies generically to various Apple devices.
What complicates things is that you can find other people, too, using the Find My Friends app. This is limited, of course, to people carrying iOS devices (or cellular-enabled Apple Watches)—so really it’s “Find My Friends’ iOS Devices or Apple Watches.” So, for want of a better term that encompasses people and assorted Apple devices (plus whatever else may be added in the future), I’m calling all these capabilities collectively “Find My Nouns.”
Understand What Find My Device Can and Can’t Do
You can use the iCloud website, Apple’s Find My iPhone app on any iOS device, or (starting in iOS 12 and Mojave) Siri to locate a lost or stolen Mac, iPad, iPhone, iPod touch, Apple Watch, or AirPod.
You can also play a sound, lock a Mac or iOS device (optionally adding or changing its passcode in the process), or erase all its data (to keep it private in case you’re unable to retrieve the device). You can even see your wayward device’s battery level—and you can activate Lost Mode on an iOS device or Apple Watch, which displays the phone number and message of your choice on the missing device’s screen, in the hope that whoever has your device will call you to arrange for its return.
Find My Device works more reliably on devices with cellular capabilities, such as the iPhone, certain iPads, and certain Series 3 or later Apple Watch models. These devices are more likely to have an always-on network connection—cellular access is pretty ubiquitous, whereas Wi-Fi is spotty. (Series 2 and later Apple Watch models, and iOS devices with cellular support, also have GPS chips, so their reported location is more precise than for Macs and for iOS devices that lack GPS.)
In addition, the iPhone and iPad maintain their mobile connections even when “sleeping,” whereas a Mac or iPod touch won’t display any messages or report its location until it’s woken up. (An exception to this rule is any Mac laptop that uses solid-state storage—such Macs support Power Nap, which among other things enables Find My Device to work when they’re sleeping. See Apple’s article How Power Nap works on your Mac for more information.)
Activate Find My Device
Before you can use Find My Device, two prerequisites must be met on the target device (the one you’ll attempt to find, if it goes missing):
A mobile device must be running iOS 5 or later, and a Mac must be running 10.7.2 Lion or later. (On an Apple Watch, Find My Watch is activated automatically as long as Find My iPhone is enabled on the iPhone to which it is paired.)
You must activate Find My Device on the target device. To do this on a Mac, go to System Preferences > iCloud and make sure Find My Mac is checked. On an iOS device, tap Settings > Your Name > iCloud and make sure Find My Device is on; if not, tap Find My Device, tap the switch to turn it on, and optionally turn on Send Last Location, which sends the location automatically when the battery is nearly depleted.
With your device(s) properly configured, you can then find the device using either the iCloud website (as described next) or the Find My iPhone app installed on another iOS device—yours or someone else’s—as I discuss in Find Your Device with an App.
Find Your Device with a Browser
The first way to find your device is to use a web browser. To do so, sign in to theFind Your Device with an AppiCloud website and go to the Find iPhone web app.
Initially, the entire window shows a map on which iCloud tries to locate all your devices. If you have more than one device and want to focus on just one, click All Devices at the top of the screen to display a popover (Figure 27). In the My Devices list, a dot appears beside each device name to indicate its status: gray ![]() means “offline” or “trying to connect,” red
means “offline” or “trying to connect,” red ![]() means “location unknown,” and green
means “location unknown,” and green ![]() means “online.” If you use iCloud Family Sharing, the popover also lists each family member’s devices under that person’s name.
means “online.” If you use iCloud Family Sharing, the popover also lists each family member’s devices under that person’s name.

Select a device from the popover to view location data and a control panel (Figure 28) for just that device.
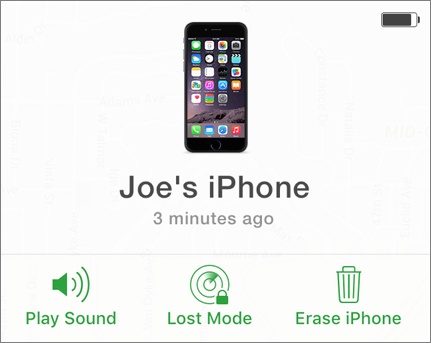
Assuming the selected device is on and online, the map shows its current location (if it’s not on and online, but has been recently, the map should show the last known location, along with how recently its location was determined). The location becomes increasingly specific as Find My iPhone zeroes in on the device’s location using a combination of cell tower triangulation, Wi-Fi network identification, and GPS, depending on which of these are available.
If your device is in motion, you may want to update the display from time to time. To ask a remote device to recalculate its location, first select it in the Devices list, and then click its Update ![]() icon.
icon.
Beyond merely locating the device, you can take any or all of several other steps depending on the device type. To do so, use the control panel shown previously in Figure 28:
Play Sound: If the device is online, clicking this button will play a pinging sound at full volume. This can help you locate it if you misplaced it in your home or office. (The sounds plays even if the device is locked, has its ringer switch turned off, or is in Do Not Disturb mode.)
On the wayward device, you can turn off the sound and/or dismiss the message by unlocking the device (if necessary) and then tapping or clicking a button. If the sound has been played or the message sent, iCloud sends you an email message to confirm this.
Lost Mode: Lost Mode is available for iOS devices and Apple Watches only; it lets you not only lock your device, but also put a telephone number and message on the screen to help a finder return it to you. If your device wasn’t already locked with a passcode when you click Lost Mode, you’ll be prompted to choose one. Then enter a telephone number, click Next, type a message, and click Done. The next time the device becomes available online, it will be locked and the message that you sent will appear on the screen. When this happens, you’ll also get an email confirmation.
Lock: Macs don’t support Lost Mode, so instead you’ll see Lock as the middle choice when a Mac is selected. Click this and click Lock again to confirm. Then enter and repeat a numeric passcode, enter an optional message, and click Lock. Your Mac will shut down and lock itself immediately so that no one else can use it or see its data. Only entering the code you chose will unlock it. Be aware, however, that a locked Mac can’t be erased remotely (per the next item).
Erase Device: If your device has been stolen or is otherwise unrecoverable, you can tell iCloud to securely erase all its data—your email messages, address book, photos, apps, documents, and everything else—so that at least whoever has the device can’t access your personal information.
To do this, click Erase Device, read the warning, and click Erase. If the device you’re erasing is a Mac, you must also enter and confirm a numeric passcode that can be used to unlock the device (although not to recover the erased data) and enter a message that will be displayed on the screen if the Mac is ever found. The data is wiped immediately if the device is online, or as soon as it comes back online if not. (Erasing an iOS device or Apple Watch is immediate, whereas erasing a Mac can take as long as a day.)
Once you’ve done this with an iOS device or Apple Watch, the Find My Device features are no longer available (because the device no longer contains your iCloud data—it’s essentially blank). Somewhat counterintuitively, if you wipe a Mac’s data remotely, you may be able to locate it later with Find My Device. Some components used by Find My Mac are kept on the hidden recovery volume that the macOS installer creates—and that’s not included in the data that’s wiped.
Find Your Device with an App
If you have access to an iOS device, you have another way to find a lost device and perform any or all of the activities described just previously (playing a sound, locking the device or activating Lost Mode, or erasing it). All you need is Apple’s free Find My iPhone app, which, despite its name, lets you find any iCloud-enabled iOS device, Mac, Apple Watch, or AirPod. The app is built in to iOS 9 or later, or available as a free download from the App Store for older versions of iOS.
To use the app, tap the Find iPhone icon. If you are asked, enter the Apple ID and password associated with the device you want to find, and then tap Go.
Once you’re signed in, the app offers approximately the same features as Find iPhone on the iCloud website. After selecting a device, tap Actions to display additional controls. You can also tap a device’s icon on the map and then tap the car icon to get directions to the device from your current location.
If you’re using the app on someone else’s device, be sure to tap Sign Out before quitting so that your credentials aren’t saved.
Find Your Device with Siri
If you’re running Mojave or later, or iOS 12 or later, or a HomePod or an Apple TV with a Siri remote, you can activate Siri in any of the usual ways, and then say something like “Find my Mac” or “Where’s my iPad?” and the device in question plays a sound. If you want to do anything more than play a sound, however, you’ll have to use an app or the iCloud website.
Find Your Friends
Apple’s free Find My Friends app lets you locate iOS devices belonging to anyone who’s given you permission to know their whereabouts.
If someone gives you authorization, then you can find them (well, find their iOS device, assuming it’s with them) whenever you want. Each person can revoke others’ access at any time.
You can locate your friends using the Find My Friends iOS app, The Find Friends Web App on the iCloud website, or in your Notification Center Today view in macOS or iOS if you’ve added the Find My Friends widget. But, you’ll probably use Find My Friends most often while you’re on the go, so my directions here are for the iOS app. The iOS app is part of iOS 9 or later and can be downloaded for free from the App Store to older versions of iOS.
Tap the Find Friends icon on your iOS device, and if prompted to do so, enter your Apple ID and password and tap Sign In. (You won’t be prompted to sign in again if your device is protected with a passcode.) Agree to the alert asking if the app can use your current location, and optionally to the alert asking if the app can send you push notifications—these alerts appear only the first time you use the app.
Tap Add to share your location with other people you specify. Tap a name to see that friend’s location.
You can also set up location-based alerts in Find My Friends. For example, your friends can be alerted when you arrive at or leave a certain location, and you can get the same information about your friends and family members—with their consent, of course!
To send someone else a notification with your location, tap Me > Notify Friends, enter one or more email addresses, and then select Right Now, When I Leave, or When I Arrive; in the latter two cases, you’ll have to choose a location and decide whether you want this to be a one-shot alert (the default) or a recurring alert that is sent whenever you leave or arrive. Then tap Done.
To receive a notification when a friend’s location changes, tap a friend’s name, tap Notify Me, tap Leaves or Arrives (and change the location to be monitored, if necessary), and tap Done.
For detailed instructions on using Find My Friends, tap Me, then Help. You may also find it useful to read Apple’s About Find My Friends.