
Meet LaunchBar
In this chapter, I introduce you to LaunchBar, a powerful tool with a simple interface. You’ll learn how to install and invoke LaunchBar, and you’ll meet the bar, the interface you see in LaunchBar.
Next, you’ll learn the Five Superpowers of LaunchBar: abbreviation searching, browsing, and sub-searching, as well as Send To and Instant Send. You’ll also get advice for how you can Tweak the Interface and Launch at Login.
Even if you’re a long-time LaunchBar user, you should read this chapter, as you will likely discover important features that you’ve overlooked. Really. All my editors have.
Install LaunchBar
If you haven’t already installed LaunchBar, you can get a copy from the Objective Development Web site. Download the .dmg file, then double-click it to mount the disk image’s volume. Drag the LaunchBar application to the alias of the Applications folder in the disk image window. LaunchBar is copied into your Applications folder.
If you’re using the trial version of LaunchBar, you can purchase the application by pressing the LaunchBar keyboard shortcut (to invoke the bar), clicking the gear wheel ![]() icon at the right of the bar, and choosing License. Click Buy Now to be taken to a page on the Objective Development Web site where you can add a license to the cart and buy it.
icon at the right of the bar, and choosing License. Click Buy Now to be taken to a page on the Objective Development Web site where you can add a license to the cart and buy it.
Launch LaunchBar
To launch LaunchBar, go to your Applications folder and double-click the LaunchBar icon. LaunchBar launches, and its icon appears in your Dock. You may be asked one or two important questions:
- Can LaunchBar access your contacts? To open contacts from LaunchBar and carry out certain contact-related actions, such as sending email, click OK. If you mistakenly click Don’t Allow, go to the Security & Privacy system preference pane, click the Privacy button, then Contacts, and then select the box next to LaunchBar. (This dialog pops up in 10.8 Mountain Lion; in 10.9 Mavericks, you’ll also be asked about access to calendars and reminders.)
- Do you want to change the Spotlight keyboard shortcut or the LaunchBar shortcut? I explain how to handle this question in Invoke LaunchBar, next. Whatever you answer here, it is easy to change your mind later.
With these questions answered, you should see LaunchBar’s main interface, which I call the bar, near the top of the screen (Figure 1). (If you don’t see it, skip to the next topic, about invoking LaunchBar.)

Figure 1: When you first launch LaunchBar, you’ll see its bar at the top of your screen, just below the menu bar.
The bar is where you interact with LaunchBar. We’re all used to bloated applications with windows and menus so numerous that we need maps to find our way around. LaunchBar is the opposite of this. Its interface is simple and unobtrusive, and you see it only when you want to work with it.
Invoke LaunchBar
To tell LaunchBar that you want it to do something, you invoke its bar (Figure 2) with a keyboard shortcut. You’ll be pressing this shortcut often, so make sure to choose a shortcut that works for you.

Figure 2: When you first launch LaunchBar and invoke its bar, you’ll see your home folder and its path (it’s in the /Users folder) at the left, and a gear wheel icon at the right.
In the first version of LaunchBar, the default shortcut for invoking the bar was Command-Space. When Apple released Mac OS X 10.4 Tiger in 2005, Apple created a conflict that continues to this day by setting Command-Space as the default shortcut for the new-in-Tiger Spotlight search feature. Many LaunchBar users were already accustomed to Command-Space as a LaunchBar shortcut, and wished to continue using it.
Thus, when you first open LaunchBar, a dialog asks if you want to change the Spotlight keyboard shortcut or the LaunchBar shortcut. If you’re used to opening Spotlight with Command-Space, then you might want to keep Command-Space as its shortcut, and assign something else to LaunchBar, such as Control-Space. You could also assign a function key, such as F5 or F6, which are in the middle of the keyboard, or any shortcut you like. I like to use some modifier key (Command, Option, Control) with the Space bar, as a combination like that is easy to press quickly.
(I still use Command-Space as my LaunchBar keyboard shortcut, because, with the Command key so close to the Space bar, I find it easier to hit. I often make mistakes when pressing Control-Space, which is what I have set for Spotlight.)
If you’re viewing the dialog that appears when you first launch LaunchBar, you can change the Spotlight keyboard shortcut by clicking Open Spotlight Preferences or the LaunchBar shortcut by clicking Open LaunchBar Preferences. (You can change them later by opening their respective preference panes):
- In the Spotlight system preference pane: Edit the keyboard shortcut associated with the “Spotlight menu keyboard shortcut” checkbox. Or, de-select the checkbox and search Spotlight only from LaunchBar; invoke the bar, and press Command-Option-Space. (You can change LaunchBar’s Spotlight shortcut in the LaunchBar’s Keyboard Shortcuts Preferences pane.)
- In the LaunchBar Keyboard Shortcuts Preferences: Make sure that “Search in LaunchBar” is selected. Click the field adjacent that checkbox, then press a new keyboard shortcut for invoking LaunchBar. Or, consider using a modifier tap to invoke LaunchBar, as described next. (You can use either or both methods.)
Note that the Command-Space shortcut may conflict with certain other programs or OS X features, including these:
- If you use multiple input sources (configured in the Language & Text pane of System Preferences), the default keyboard shortcut for switching among them is Command-Space. You can change this shortcut in the Input Sources view of the Language & Text system preference pane.
- Some older versions of Adobe Photoshop and Illustrator also may use the Command-Space shortcut for zooming. However, you can keep this shortcut if, in the Adobe applications, you press the Space bar before pressing the Command key. If this complicates things too much, set another shortcut for the Zoom feature in Photoshop’s or Illustrator’s Keyboard Shortcuts item in the Edit menu.
Two Menus
LaunchBar has two menus, both of which you open from the bar. So, your first step to opening a menu is to invoke the bar. The menus are:
- Action: Click the icon or any text at the left side of the bar to open this menu (Figure 3). If you are new LaunchBar user, just notice that the menu exists for now. I describe its commands later.
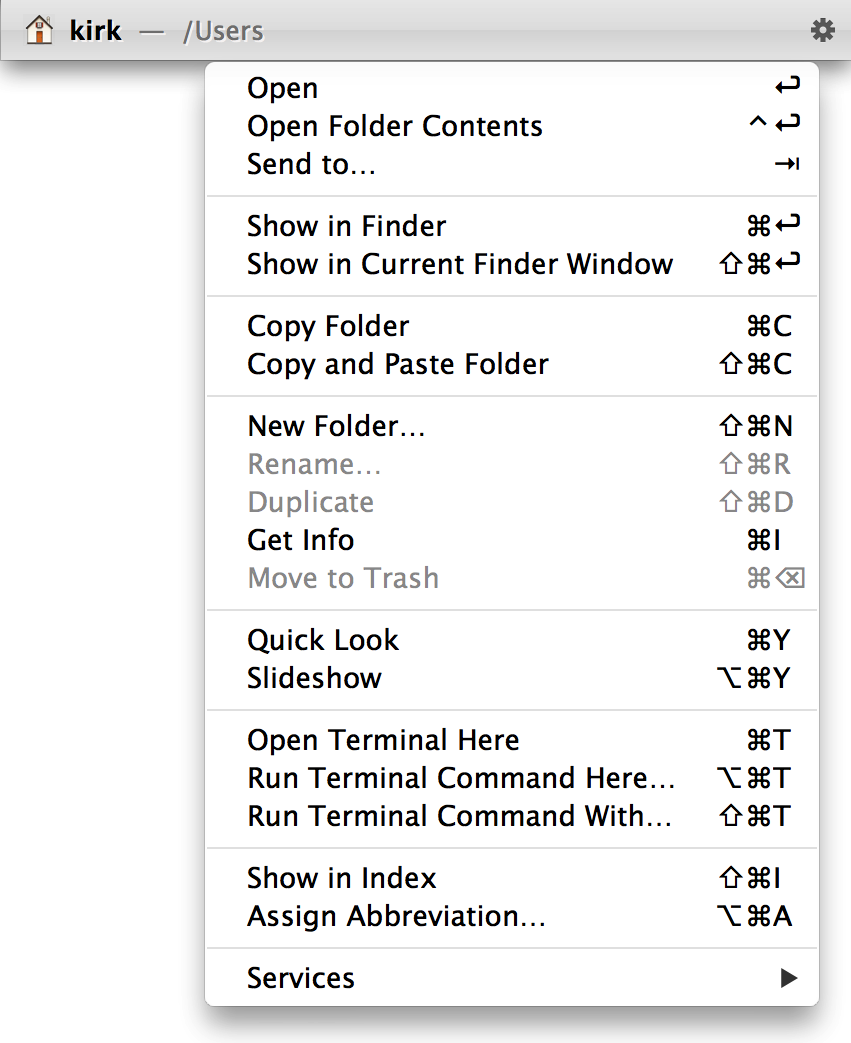
Figure 3: You can do a lot from the Action menu. The keyboard shortcuts shown on the menu, such as Shift-Command-Return for Show in Current Finder Window, remind you that you can issue these commands from the keyboard too. (Depending on what is on the bar, you may see a different menu.)
- LaunchBar: Click the gear wheel
 icon to view the LaunchBar menu (Figure 4). This menu has a few housekeeping-related commands, such Help and Preferences. I mention the Preferences command many times in the pages ahead. Another important item in the LaunchBar menu is Index. LaunchBar’s power is largely based on its own, regularly updated, index of items stored on your Mac. Although beginning LaunchBar users need not immediately concern themselves with the index, LaunchBar power users will enjoy exploring it.

Figure 4: The LaunchBar menu opens when you click the gear wheel icon. This menu lets you interact with LaunchBar itself.
Five Superpowers
LaunchBar has five superpowers that let you perform both common and complex tasks on your Mac from the keyboard. When you’ve learned LaunchBar’s five superpowers, you’ll be a Mac superhero.
Superpower 1 - Abbreviation Search
Much of what you do in LaunchBar is type abbreviations in order to make your Mac do something. With this core LaunchBar superpower, you can access applications, files, and other items by typing short abbreviations. For example, after you invoke the bar, you can type SAF to launch Safari, press IT to find iTunes (Figure 5), or type a few letters of a friend’s name to find his email address. With the item that you want selected in the results, press Return to launch or open it.

Figure 5: The IT near the right of the bar shows that I’m using an abbreviation search with IT. The first found item, shown with a blue highlight below the bar, is iTunes. Your copy of LaunchBar might show a different first item, but you can train it to do what you want.
You don’t need to use the first letters of the item you want: for example, I type FF to launch Firefox, GB to launch GarageBand, and SPR to open System Preferences. Also, although I show abbreviation examples in capitals so you can see them easily as you read, you can type them in lowercase. LaunchBar doesn’t distinguish between cases. I’ll give you the skinny on Abbreviation Search in the next chapter.
Superpower 2 - Browsing
Browsing takes abbreviation searches one step further. Notice how in the figure just earlier both items in the results list have small triangles ![]() at their right. Each triangle indicates that you can access additional content related to that result. This content could be an app’s recently opened files, app-related data such as contact information or iTunes playlists (Figure 6), or even the text contained in a file.
at their right. Each triangle indicates that you can access additional content related to that result. This content could be an app’s recently opened files, app-related data such as contact information or iTunes playlists (Figure 6), or even the text contained in a file.

Figure 6: After selecting iTunes, press the right-arrow key to browse and see the above items.
Generally speaking, you can press the right-arrow key to browse within an item and continue browsing by pressing the arrow keys. If you press Return while an item is selected, that item opens or activates.
An interesting example of browsing is browsing your Mac’s entire file system, or any specific folder. For example, to browse your Documents folder, you can type, say, DOC, select the Documents folder in the results list, and then press the Space bar or right-arrow key to view the folder’s contents.
To open an item that you’ve found with browsing, press Return. I’ll look more deeply at Browsing in the next chapter.
Superpower 3 - Sub-search
When you browse a list in LaunchBar, you can search that list instead of arrowing up and down in it. In other words, after a first search, you can sub-search to perform a second abbreviation search on the items in the current list, instead of in LaunchBar’s full index. So in the figure just previously, I could press the right-arrow key to browse my iTunes playlists and then type GD to select one of my Grateful Dead playlists. To listen to my playlist, I’d press Return. I’ll tell you more about Sub-search in the next chapter.
Superpower 4 - Send To
If you’ve read about LaunchBar’s first three superpowers, you know how to select an item in LaunchBar and then open it by pressing Return. With Send To, you select an item in LaunchBar and then press the Tab key. This tells LaunchBar that you want to do something with that item other than what would happen if you pressed Return, such as attaching it to a new email message or opening it in a non-default application. In short, the Send To superpower lets you use LaunchBar to activate another application or action. Flip ahead to Send To for details.
Superpower 5 - Instant Send
The first four superpowers enable you to invoke LaunchBar and then select something—such as an app or action. But, what if the item you want to act on is already visible in the Finder? Instant Send lets you put that item on the bar quickly. From there, you can browse (press the left-arrow key, or in some cases, the right-arrow key), choose a command from the Action menu (click the item’s name to reveal the menu), or do a “send-to,” using superpower #4. In the case of a send-to, you don’t have to press the Tab key, because LaunchBar is already primed for another action. See Instant Send to be more fully initiated into this superpower.
1,000 Things to Do
LaunchBar’s slogan is “1000+ features, 1 interface,” and there are certainly 1,000 things you can do with this app, even beyond those made possible with LaunchBar’s five superpowers. Here’s a sampling of what LaunchBar can do, with links, in case you want to click ahead to a specific topic right now:
- Visit a Web site, whether by quickly sending a URL to your Web browser or by rapidly picking a Web browser bookmark or history item. See Open Web Sites and Access Bookmarks & History.
- Search the Web. You can use search templates to search specific Web sites, such as Amazon or IMDB. Or, if none of the defaults meet your needs, you can create your own template. See Search the Internet.
- Store a clipboard history, so you can find items you have previously copied and use them again easily. You can even merge two copied items into one, and then paste them! See Save Time with Clipboard History.
- Automagically insert snippets of text that you’ve saved in LaunchBar. See Type Less with Snippets.
- Quickly see contact-related information—and act on it! You can rapidly carry out actions like sending an iMessage, starting an email message, viewing a phone number in huge type, and more. See Work with Contacts.
- Create calendar events and reminders. See Create Calendar Events and Make Reminders.
- Quickly perform simple or complex mathematical calculations, right on the bar. See Calculate Quickly.
- Browse your iTunes library and control iTunes playback. See Control iTunes.
- Let LaunchBar replace the Finder for many common actions. It’s easy to browse your various drives and folders, but you can also copy and move files and folders, rename them, delete them, and much more. Plus, you can use Quick Look to preview files. You can even find and look at hidden files and folders. See Do Amazing Things with Files & Folders.
- Type Terminal commands in the bar; Terminal opens and runs them. See Use Terminal with LaunchBar.
- Take advantage of a variety of handy built-in actions—such as putting your Mac to sleep and switching users—that you can carry out easily with an abbreviation-search keyboard shortcut or by browsing or sub-searching the Actions category. See Use Actions.
- Integrate LaunchBar with Apple’s Automator, using special actions to send the results of workflows to LaunchBar. See Use LaunchBar-Automator Workflows.
Tweak the Interface
Now that you’ve taken a whirlwind tour of LaunchBar, it’s time to look at some of the settings you can use to make LaunchBar work your way. I won’t cover all the preferences—just the ones that are most important at this early stage. (See Set LaunchBar Preferences for more.)
Adjust the Bar
You can move the bar by invoking LaunchBar and then dragging the bar—don’t click on any text showing in the bar; instead, start dragging a blank area. (If you press and hold the Command key, you can click anywhere on the bar to drag it.)
You might prefer to have the bar all the way at the left of your screen, under the active application’s menus; or you might like it on the right, under the systemwide menus (sometimes called menu extras). I find it best to have it in the center, since, with my 27-inch display, it’s easy to see there. You’ll notice that if you move the bar near the top, center of your screen, it will “snap” to the exact center point.
And, you know what? You don’t have to keep the bar attached to your menu bar. You can move it anywhere on your screen. If you move the bar below the center, search results will appear above the bar, not below, and the top hit will be at the top, farthest from the bar.
You can also adjust the width of the bar. To do this, drag the left or right edge of the bar. You can make the bar as wide as your display, or as narrow as the icon on the left plus about thirty characters of text. (From the keyboard, press Command-Shift-Left-Arrow to make it wider and Command-Shift-Right-Arrow to make it narrower.)
Show & Hide the Bar
You may wish to have the bar visible all the time, especially if you like dragging items to it (see Select Files & Folders). By default, the bar “hides” by sliding up under your menu bar when you’ve finished acting on a selected item. But you can force the bar to display all the time, using either of two methods:
- Invoke the bar, then press Command-Shift-H.
- Open the LaunchBar preferences (invoke LaunchBar; then press Command-Comma or choose Preferences from the LaunchBar menu). In the Appearance preference pane, de-select “Automatically Hide LaunchBar.”
You can turn hiding back on by pressing Command-Shift-H or by selecting “Automatically Hide LaunchBar” in the Appearance preference pane.
Hide the Dock Icon
Since LaunchBar is designed to be operated from the keyboard, you may want to hide its Dock icon. If you do this, the only easy way you can access the application is by pressing its keyboard shortcut. (If the Dock icon is visible, you get another way to invoke the bar: clicking that icon.)
To hide the Dock icon, open LaunchBar’s preferences (invoke the bar, click the gear wheel ![]() icon, and choose Preferences), click Advanced, and then at the bottom of the window, click Hide Dock Icon. LaunchBar displays a dialog that explains the (many) implications of hiding the Dock icon; in short, there’s no way you can access the application without the keyboard shortcut (or by “launching” the app again in the Finder). Click OK if you want to do this. LaunchBar prompts you to quit and restart the app.
icon, and choose Preferences), click Advanced, and then at the bottom of the window, click Hide Dock Icon. LaunchBar displays a dialog that explains the (many) implications of hiding the Dock icon; in short, there’s no way you can access the application without the keyboard shortcut (or by “launching” the app again in the Finder). Click OK if you want to do this. LaunchBar prompts you to quit and restart the app.
Launch at Login
When you install LaunchBar, it’s not set to launch each time you log in to or restart your Mac. But, to enjoy LaunchBar fully, you probably want this to be the case. You can ensure that LaunchBar is always running in either of two ways:
- If the LaunchBar icon is visible on the Dock, click and hold that icon. From the menu that opens above the icon, choose Options > Open at Login.
- Open the Users & Groups system preference pane. At the left of the pane, click your user account; then at the right, click Login Items. Click the plus
 icon below the list of items, and find LaunchBar in your Applications folder. Select LaunchBar, and click Add.